TOYOTA SIENNA 2007 Service Repair Manual
Manufacturer: TOYOTA, Model Year: 2007, Model line: SIENNA, Model: TOYOTA SIENNA 2007Pages: 3000, PDF Size: 52.26 MB
Page 171 of 3000
SUSPENSION – REAR SHOCK ABSORBERSP–53
SP
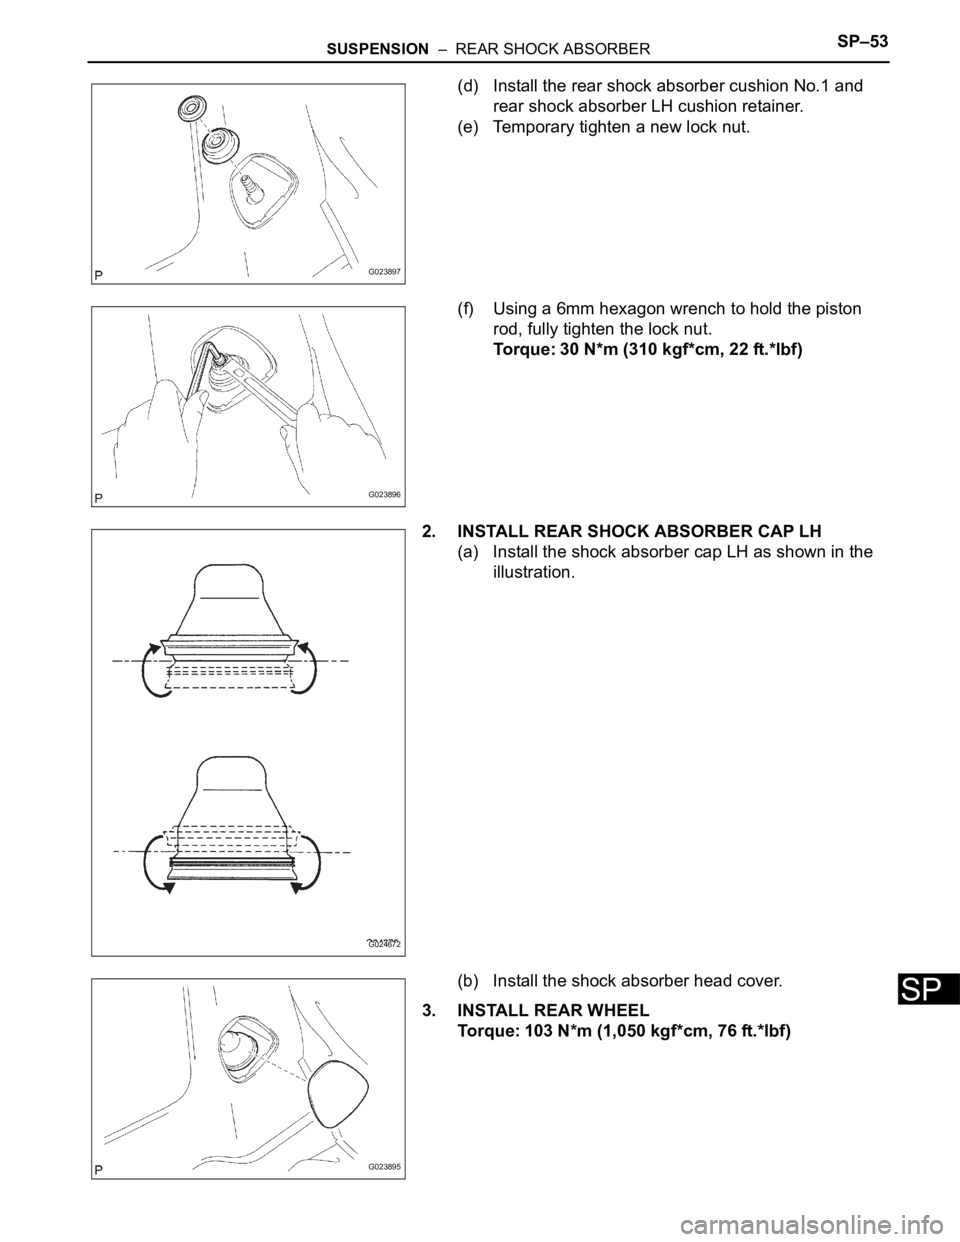
(d) Install the rear shock absorber cushion No.1 and
rear shock absorber LH cushion retainer.
(e) Temporary tighten a new lock nut.
(f) Using a 6mm hexagon wrench to hold the piston
rod, fully tighten the lock nut.
Torque: 30 N*m (310 kgf*cm, 22 ft.*lbf)
2. INSTALL REAR SHOCK ABSORBER CAP LH
(a) Install the shock absorber cap LH as shown in the
illustration.
(b) Install the shock absorber head cover.
3. INSTALL REAR WHEEL
Torque: 103 N*m (1,050 kgf*cm, 76 ft.*lbf)
G023897
G023896
G024672
G023895
Page 172 of 3000
SP–54SUSPENSION – REAR SHOCK ABSORBER
SP
4. FULLY TIGHTEN SHOCK ABSORBER ASSEMBLY
REAR LH
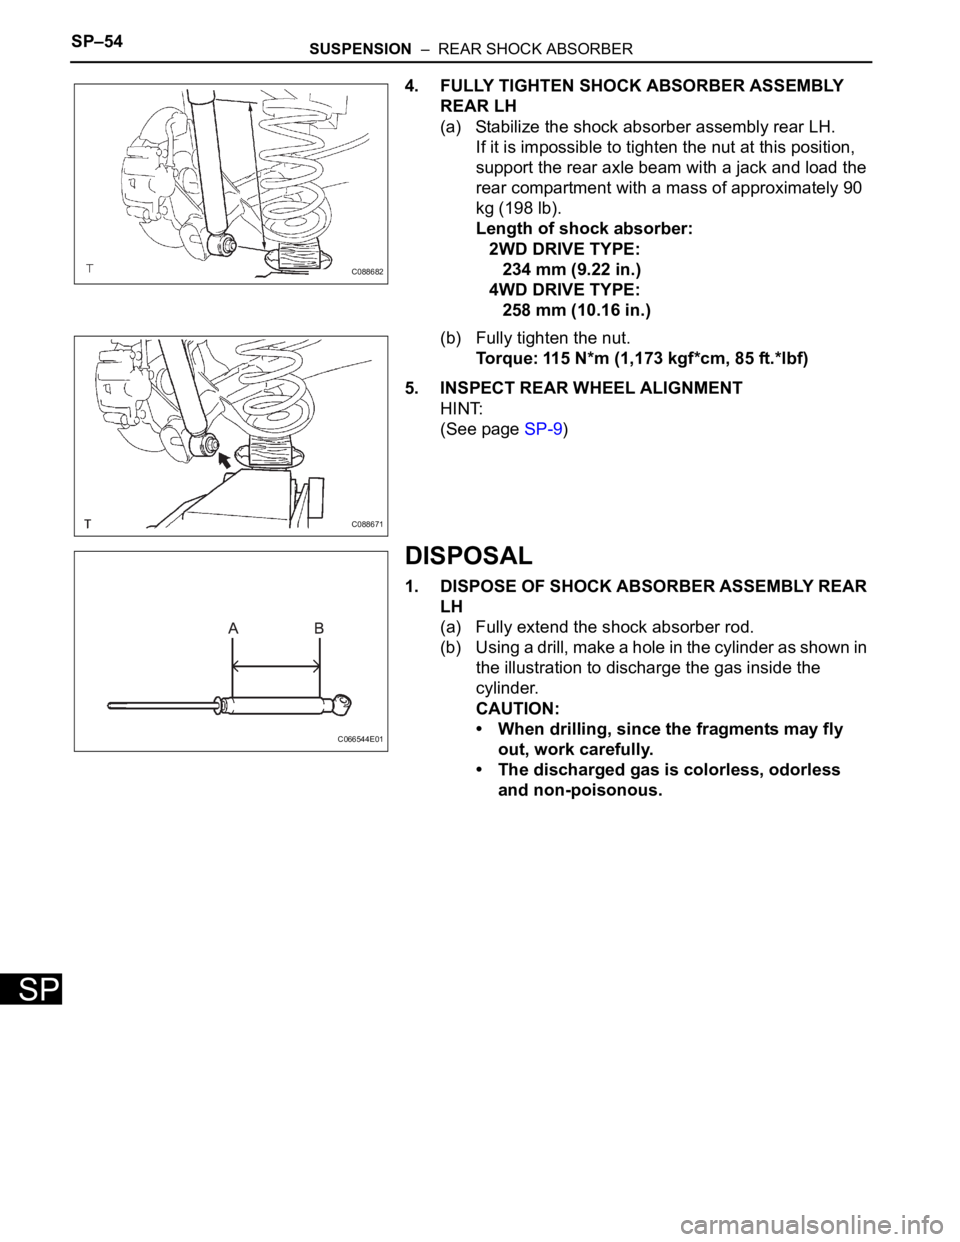
(a) Stabilize the shock absorber assembly rear LH.
If it is impossible to tighten the nut at this position,
support the rear axle beam with a jack and load the
rear compartment with a mass of approximately 90
kg (198 lb).
Length of shock absorber:
2WD DRIVE TYPE:
234 mm (9.22 in.)
4WD DRIVE TYPE:
258 mm (10.16 in.)
(b) Fully tighten the nut.
Torque: 115 N*m (1,173 kgf*cm, 85 ft.*lbf)
5. INSPECT REAR WHEEL ALIGNMENT
HINT:
(See page SP-9)
DISPOSAL
1. DISPOSE OF SHOCK ABSORBER ASSEMBLY REAR
LH
(a) Fully extend the shock absorber rod.
(b) Using a drill, make a hole in the cylinder as shown in
the illustration to discharge the gas inside the
cylinder.
CAUTION:
• When drilling, since the fragments may fly
out, work carefully.
• The discharged gas is colorless, odorless
and non-poisonous.
C088682
C088671
C066544E01
Page 173 of 3000
TIRE AND WHEEL – TIRE AND WHEEL SYSTEMTW–3
TW
INSPECTION
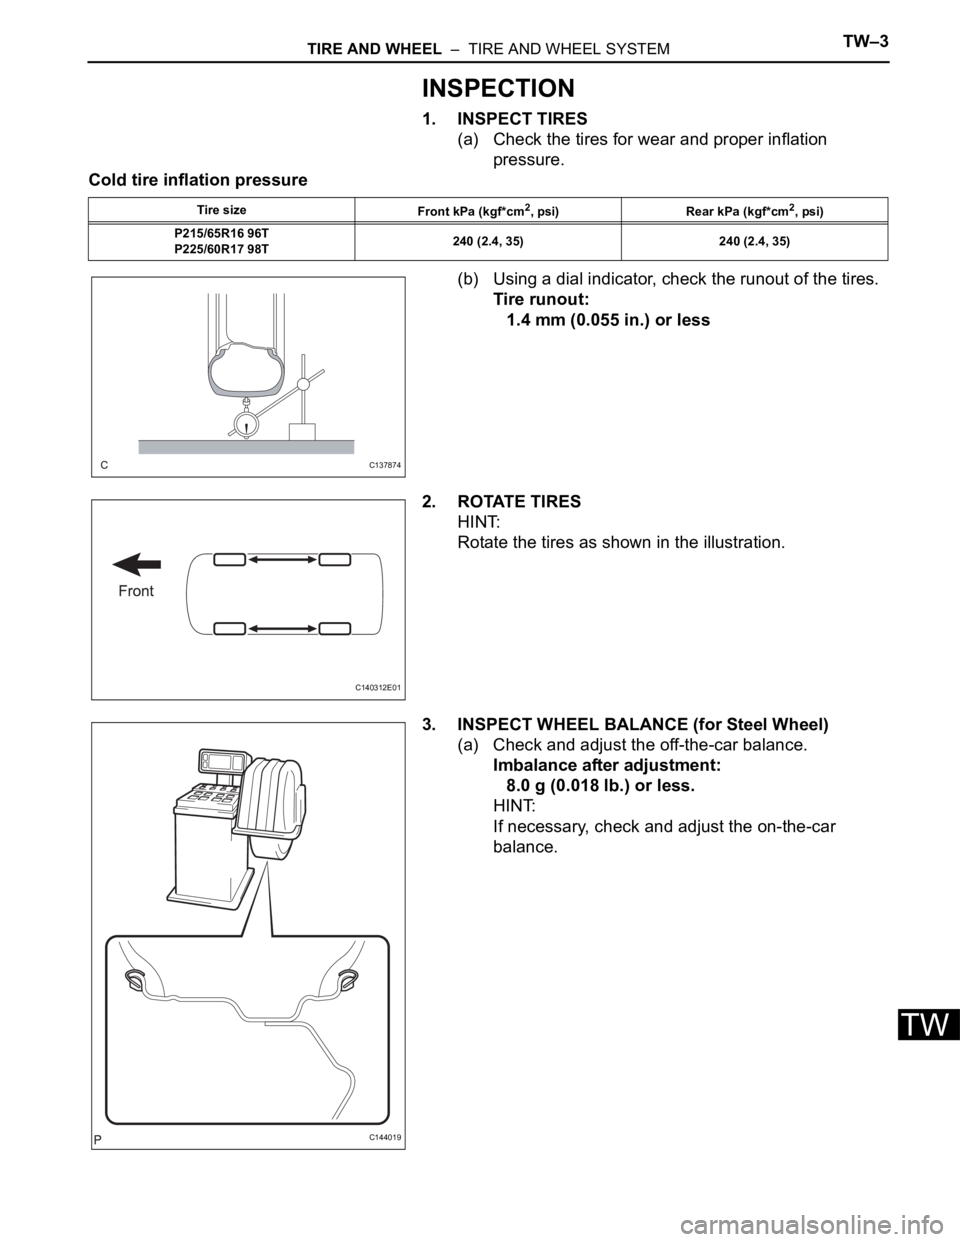
1. INSPECT TIRES
(a) Check the tires for wear and proper inflation
pressure.
Cold tire inflation pressure
(b) Using a dial indicator, check the runout of the tires.
Tire runout:
1.4 mm (0.055 in.) or less
2. ROTATE TIRES
HINT:
Rotate the tires as shown in the illustration.
3. INSPECT WHEEL BALANCE (for Steel Wheel)
(a) Check and adjust the off-the-car balance.
Imbalance after adjustment:
8.0 g (0.018 lb.) or less.
HINT:
If necessary, check and adjust the on-the-car
balance.
Tire size
Front kPa (kgf*cm2, psi) Rear kPa (kgf*cm2, psi)
P215/65R16 96T
P225/60R17 98T240 (2.4, 35) 240 (2.4, 35)
C137874
C140312E01
C144019
Page 174 of 3000
TW–4TIRE AND WHEEL – TIRE AND WHEEL SYSTEM
TW
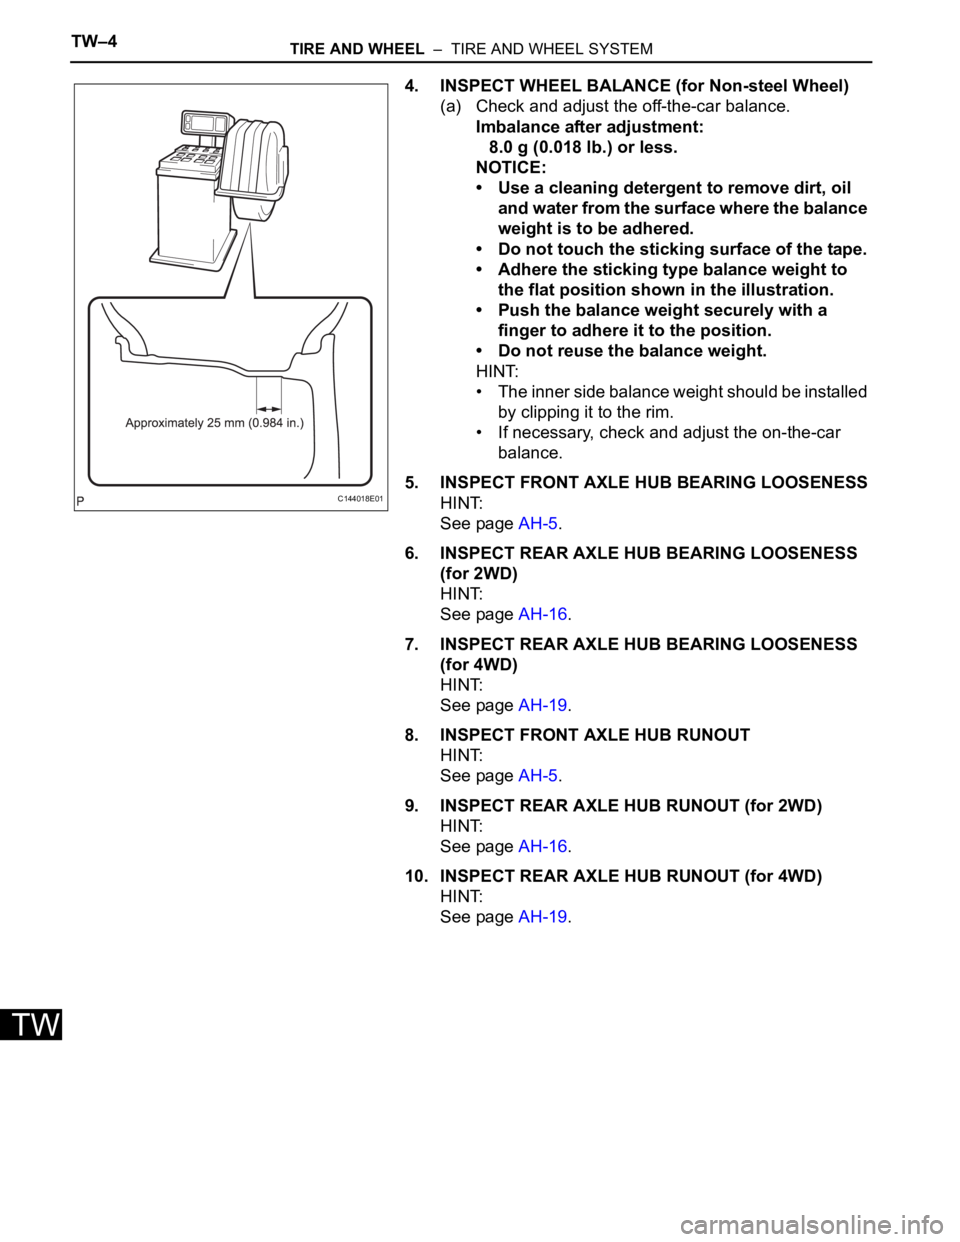
4. INSPECT WHEEL BALANCE (for Non-steel Wheel)
(a) Check and adjust the off-the-car balance.
Imbalance after adjustment:
8.0 g (0.018 lb.) or less.
NOTICE:
• Use a cleaning detergent to remove dirt, oil
and water from the surface where the balance
weight is to be adhered.
• Do not touch the sticking surface of the tape.
• Adhere the sticking type balance weight to
the flat position shown in the illustration.
• Push the balance weight securely with a
finger to adhere it to the position.
• Do not reuse the balance weight.
HINT:
• The inner side balance weight should be installed
by clipping it to the rim.
• If necessary, check and adjust the on-the-car
balance.
5. INSPECT FRONT AXLE HUB BEARING LOOSENESS
HINT:
See page AH-5.
6. INSPECT REAR AXLE HUB BEARING LOOSENESS
(for 2WD)
HINT:
See page AH-16.
7. INSPECT REAR AXLE HUB BEARING LOOSENESS
(for 4WD)
HINT:
See page AH-19.
8. INSPECT FRONT AXLE HUB RUNOUT
HINT:
See page AH-5.
9. INSPECT REAR AXLE HUB RUNOUT (for 2WD)
HINT:
See page AH-16.
10. INSPECT REAR AXLE HUB RUNOUT (for 4WD)
HINT:
See page AH-19.
C144018E01
Page 175 of 3000

TIRE AND WHEEL – TIRE AND WHEEL SYSTEMTW–5
TW
REPAIR
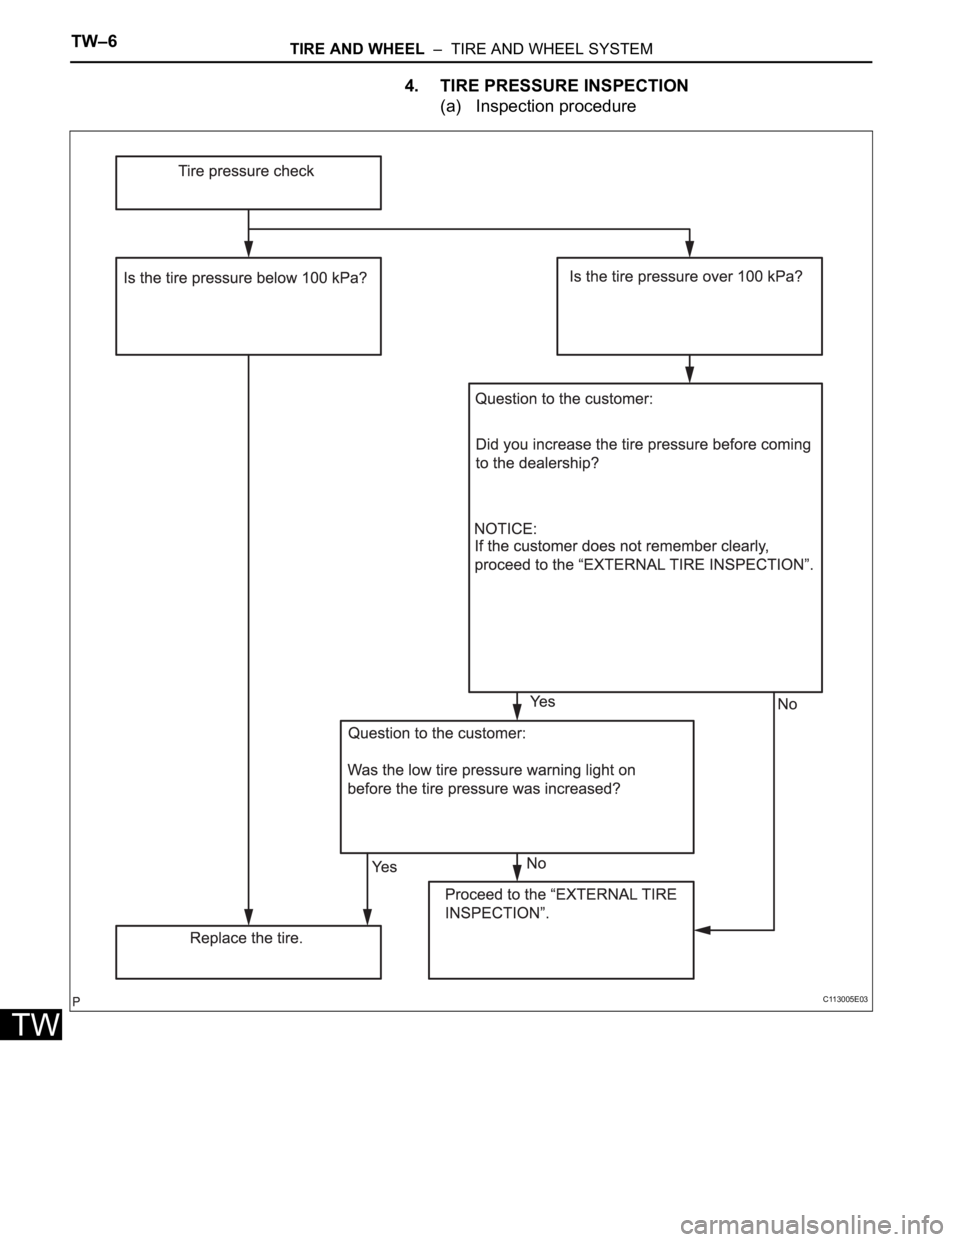
1. INTRODUCTION
(a) This section introduces ways to determine whether
the run-flat tire is repairable or not. Repair must be
performed by following the appropriate procedures.
If a flat tire occurs, it is possible to drive a maximum
of 160 km (100 miles) at a speed below 90 km/h (55
mph) due to the reinforced sidewalls. However, if
the customer continues to drive with low tire
pressure (less than about 100 kPa (1.0 kgf/cm
2,
14.5 psi) and tire pressure warning light is on), the
inside of the sidewall will gradually deteriorate and
the run-flat performance may be reduced.
Therefore, the tires may require replacement.
However, there are some cases where it is possible
to repair a run-flat tire using the same repair method
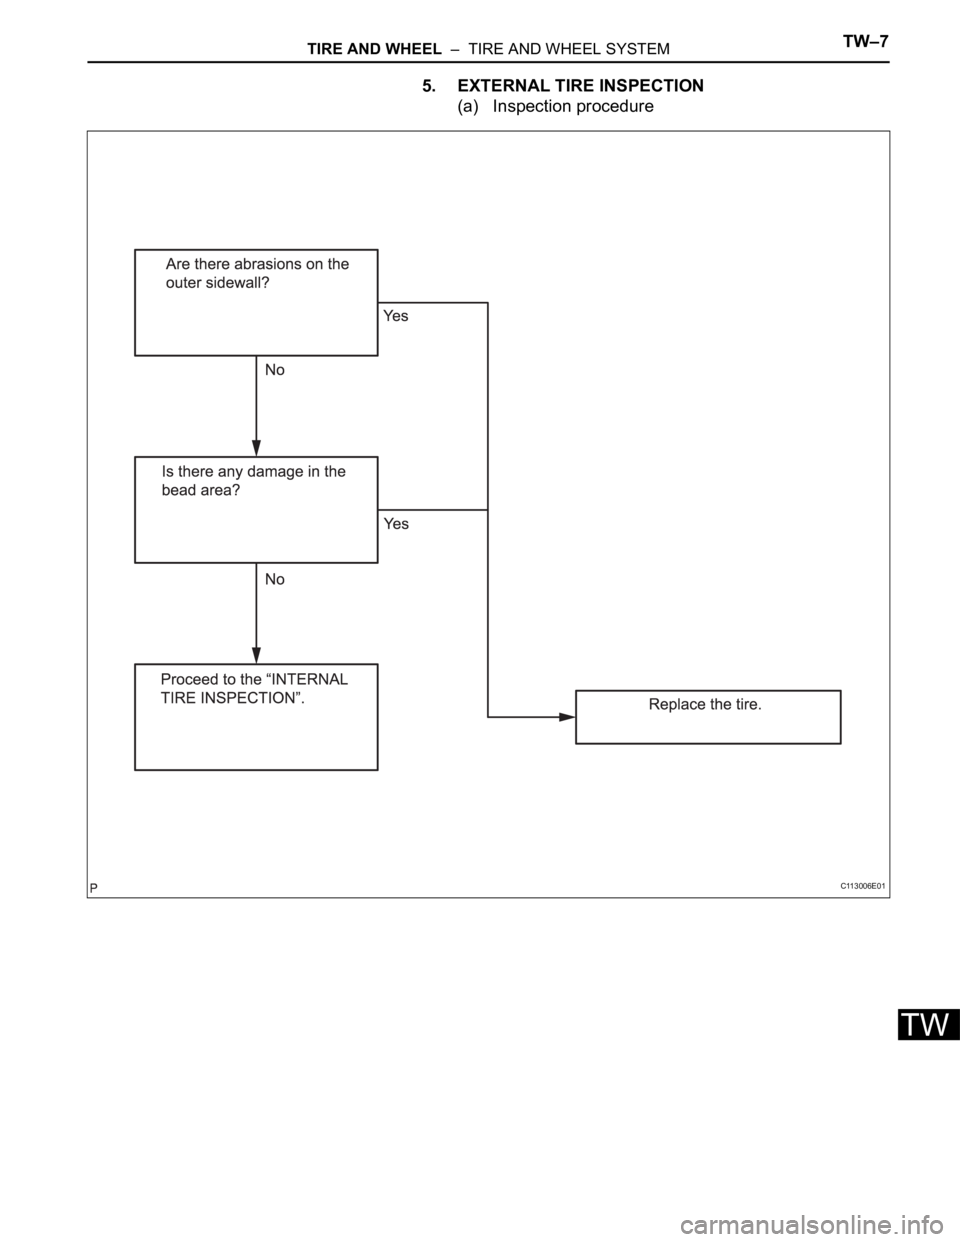
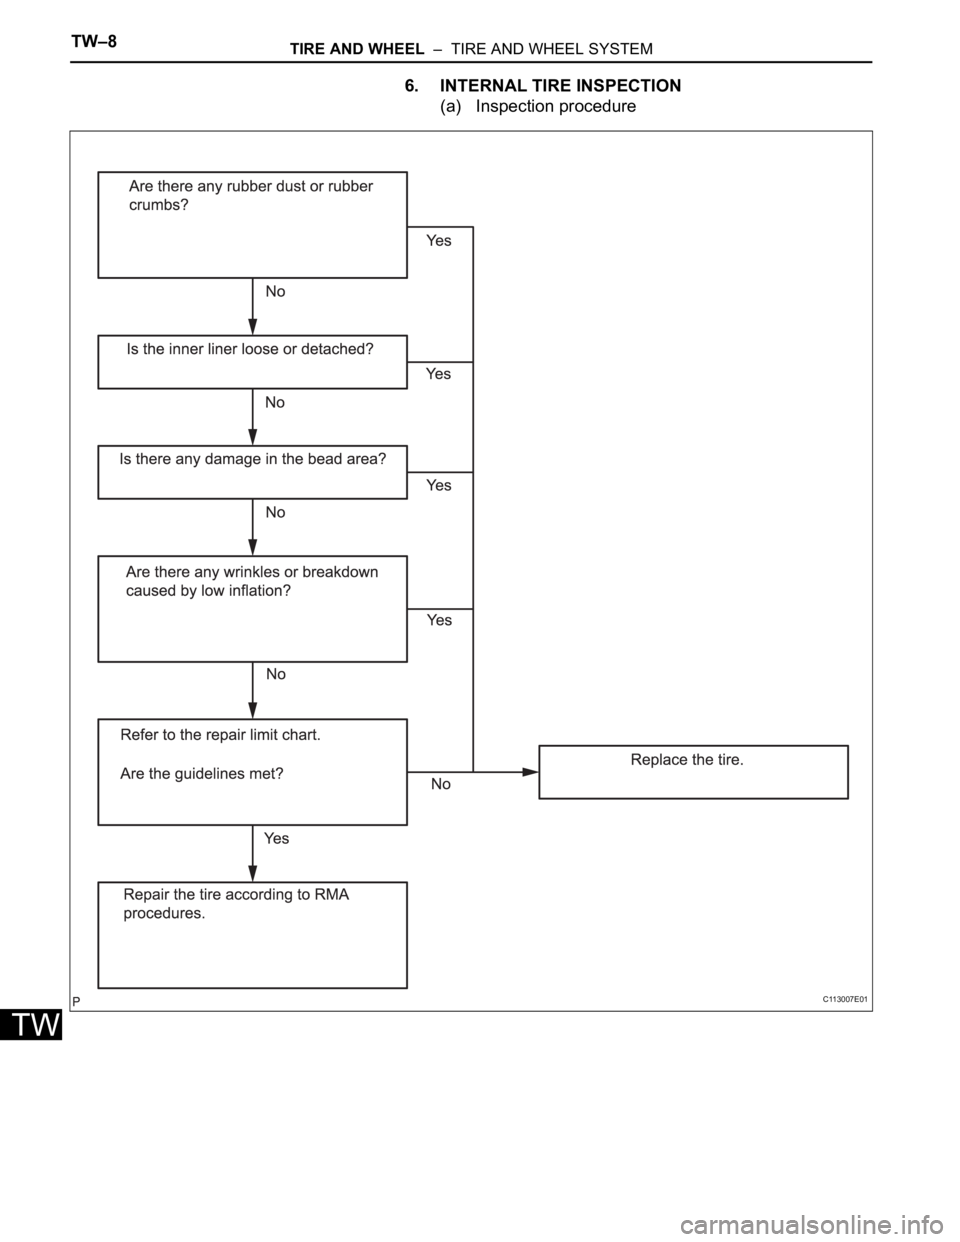
as for normal tires. Use the following flowchart to
determine if a run-flat tire is repairable.
NOTICE:
When performing repairs, follow the Rubber
Manufacturers Association (RMA) repair
procedures.
2. REPAIR PROCEDURE (CUSTOMER INTERVIEW)
(a) The tire pressure warning system can help
determine the history of the tire's use. The driving
conditions the tire was subjected to while the tire
pressure warning light was on should be obtained
from the customer. Also, make sure to ask the
following questions.
(1) Was the vehicle driven at a speed over 90 km/h
(55 mph) with the tire pressure warning light
on?
(2) Was the vehicle driven over 160 km (100 miles)
with the tire pressure warning light on?
A "Yes" response to either of the above will
greatly reduce the chance of tire repairability.
3. TECHNICIAN TIRE INSPECTION
(a) After the customer interview, it is necessary to
conduct a thorough inspection of the tire after it has
been removed from the wheel. As it is difficult to
identify a tire with low pressure visually, check the
pressure of each tire to determine the tire(s) causing
the low-pressure warning. If the tire is found to be
repairable, follow the RMA repair procedures.
NOTICE:
The deflated tire may be extremely hot, which
may cause injury, so allow the tire to cool prior
to handling.
Page 176 of 3000
TW–6TIRE AND WHEEL – TIRE AND WHEEL SYSTEM
TW
4. TIRE PRESSURE INSPECTION
(a) Inspection procedure
C113005E03
Page 177 of 3000
TIRE AND WHEEL – TIRE AND WHEEL SYSTEMTW–7
TW
5. EXTERNAL TIRE INSPECTION
(a) Inspection procedure
C113006E01
Page 178 of 3000
TW–8TIRE AND WHEEL – TIRE AND WHEEL SYSTEM
TW
6. INTERNAL TIRE INSPECTION
(a) Inspection procedure
C113007E01
Page 179 of 3000
TIRE AND WHEEL – TIRE AND WHEEL SYSTEMTW–9
TW
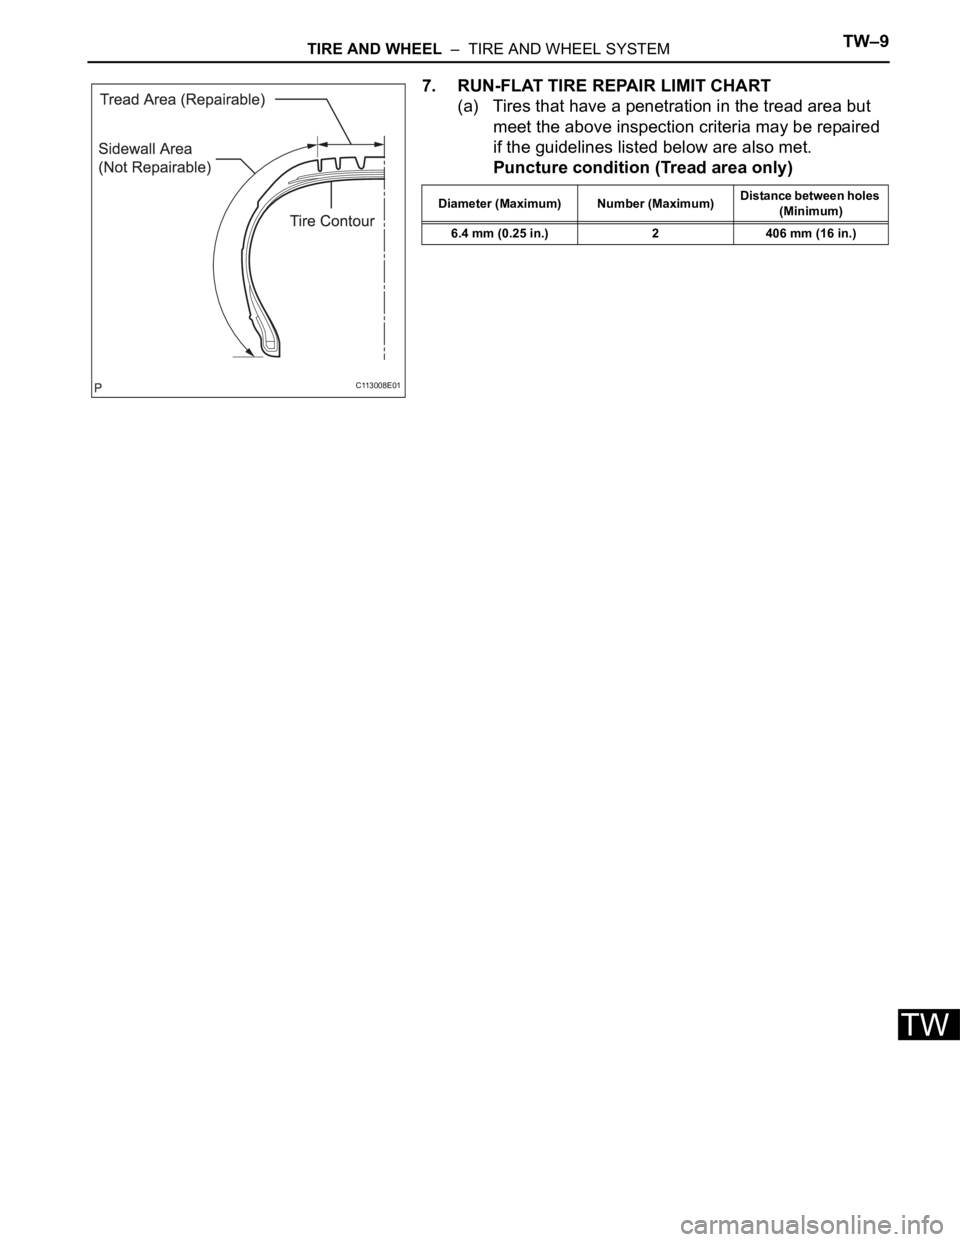
7. RUN-FLAT TIRE REPAIR LIMIT CHART
(a) Tires that have a penetration in the tread area but
meet the above inspection criteria may be repaired
if the guidelines listed below are also met.
Puncture condition (Tread area only)
C113008E01
Diameter (Maximum) Number (Maximum)Distance between holes
(Minimum)
6.4 mm (0.25 in.) 2 406 mm (16 in.)
Page 180 of 3000
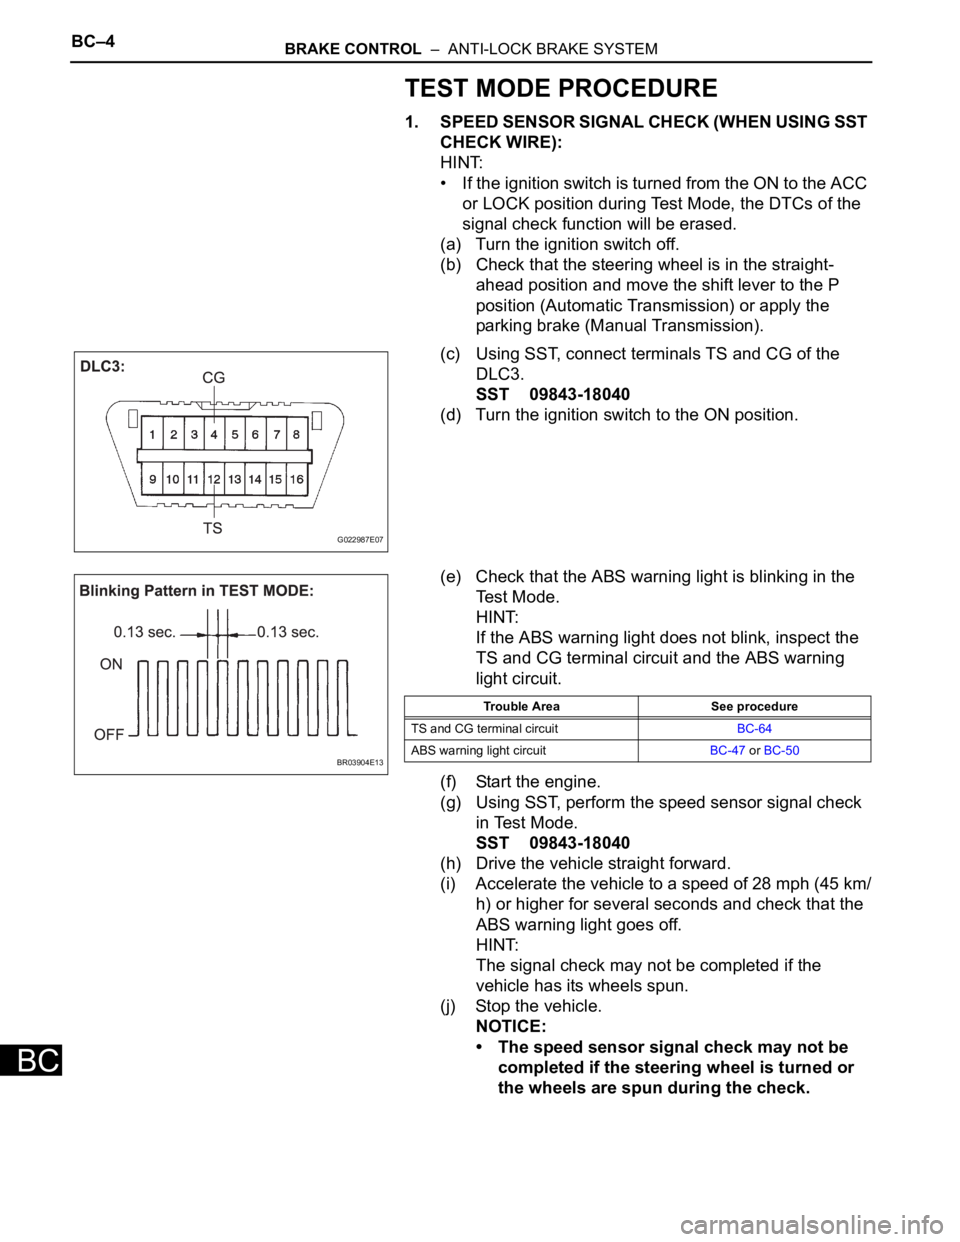
BC–4BRAKE CONTROL – ANTI-LOCK BRAKE SYSTEM
BC
TEST MODE PROCEDURE
1. SPEED SENSOR SIGNAL CHECK (WHEN USING SST
CHECK WIRE):
HINT:
• If the ignition switch is turned from the ON to the ACC
or LOCK position during Test Mode, the DTCs of the
signal check function will be erased.
(a) Turn the ignition switch off.
(b) Check that the steering wheel is in the straight-
ahead position and move the shift lever to the P
position (Automatic Transmission) or apply the
parking brake (Manual Transmission).
(c) Using SST, connect terminals TS and CG of the
DLC3.
SST 09843-18040
(d) Turn the ignition switch to the ON position.
(e) Check that the ABS warning light is blinking in the
Test Mode.
HINT:
If the ABS warning light does not blink, inspect the
TS and CG terminal circuit and the ABS warning
light circuit.
(f) Start the engine.
(g) Using SST, perform the speed sensor signal check
in Test Mode.
SST 09843-18040
(h) Drive the vehicle straight forward.
(i) Accelerate the vehicle to a speed of 28 mph (45 km/
h) or higher for several seconds and check that the
ABS warning light goes off.
HINT:
The signal check may not be completed if the
vehicle has its wheels spun.
(j) Stop the vehicle.
NOTICE:
• The speed sensor signal check may not be
completed if the steering wheel is turned or
the wheels are spun during the check.
G022987E07
BR03904E13
Trouble Area See procedure
TS and CG terminal circuitBC-64
ABS warning light circuitBC-47 or BC-50