VAUXHALL MOVANO_B 2016 Infotainment system
Manufacturer: VAUXHALL, Model Year: 2016, Model line: MOVANO_B, Model: VAUXHALL MOVANO_B 2016Pages: 147
Page 21 of 147

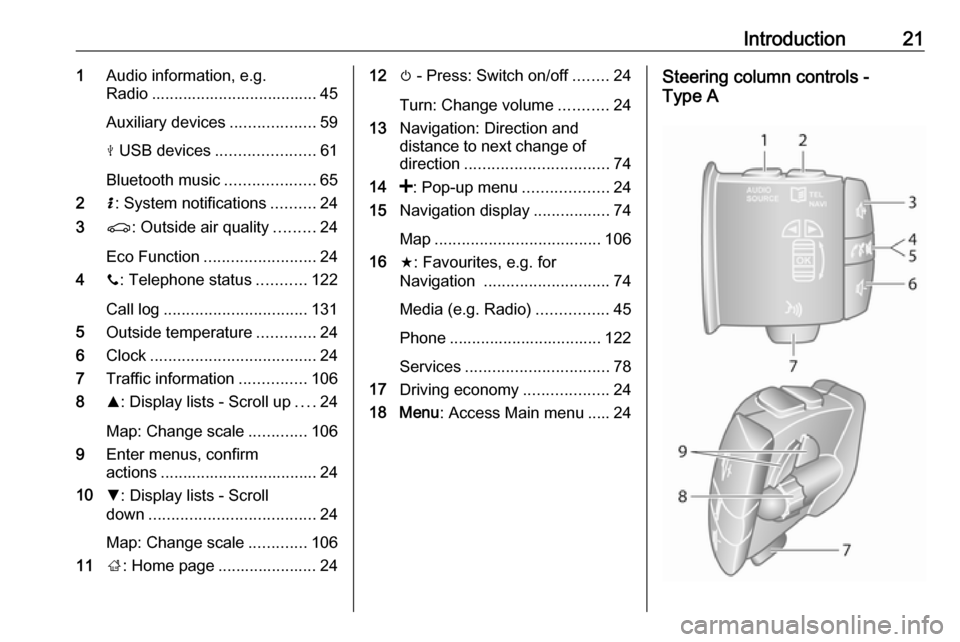
Introduction211Audio information, e.g.
Radio ..................................... 45
Auxiliary devices ...................59
M USB devices ...................... 61
Bluetooth music ....................65
2 H: System notifications ..........24
3 r: Outside air quality .........24
Eco Function ......................... 24
4 y: Telephone status ...........122
Call log ................................ 131
5 Outside temperature .............24
6 Clock ..................................... 24
7 Traffic information ...............106
8 R: Display lists - Scroll up ....24
Map: Change scale .............106
9 Enter menus, confirm
actions ................................... 24
10 S: Display lists - Scroll
down ..................................... 24
Map: Change scale .............106
11 ;: Home page ...................... 2412 m - Press: Switch on/off ........24
Turn: Change volume ...........24
13 Navigation: Direction and
distance to next change of
direction ................................ 74
14 <: Pop-up menu ...................24
15 Navigation display .................74
Map ..................................... 106
16 f: Favourites, e.g. for
Navigation ............................ 74
Media (e.g. Radio) ................45
Phone .................................. 122
Services ................................ 78
17 Driving economy ...................24
18 Menu : Access Main menu ..... 24Steering column controls -
Type A
Page 22 of 147

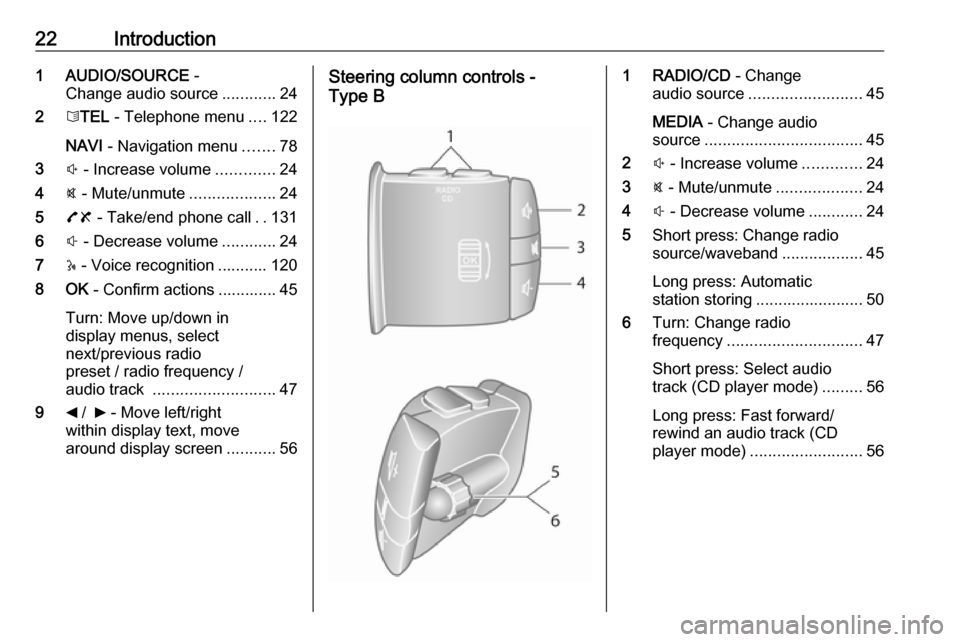
22Introduction1 AUDIO/SOURCE -
Change audio source ............24
2 6TEL - Telephone menu ....122
NAVI - Navigation menu .......78
3 ! - Increase volume .............24
4 @ - Mute/unmute ...................24
5 78 - Take/end phone call ..131
6 # - Decrease volume ............24
7 5 - Voice recognition ........... 120
8 OK - Confirm actions ............. 45
Turn: Move up/down in
display menus, select
next/previous radio
preset / radio frequency /
audio track ........................... 47
9 _ / 6 - Move left/right
within display text, move
around display screen ...........56Steering column controls -
Type B1 RADIO/CD - Change
audio source ......................... 45
MEDIA - Change audio
source ................................... 45
2 ! - Increase volume .............24
3 @ - Mute/unmute ...................24
4 # - Decrease volume ............24
5 Short press: Change radio
source/waveband ..................45
Long press: Automatic
station storing ........................ 50
6 Turn: Change radio
frequency .............................. 47
Short press: Select audio
track (CD player mode) .........56
Long press: Fast forward/
rewind an audio track (CD
player mode) ......................... 56
Page 23 of 147

Introduction23Steering column controls -
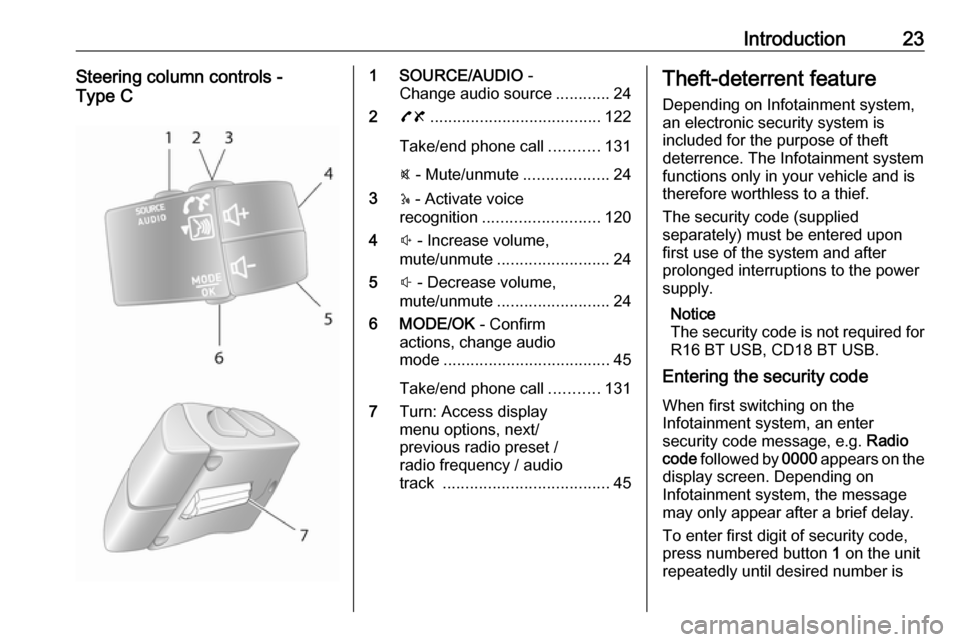
Type C1 SOURCE/AUDIO -
Change audio source ............24
2 78 ...................................... 122
Take/end phone call ...........131
@ - Mute/unmute ...................24
3 5 - Activate voice
recognition .......................... 120
4 ! - Increase volume,
mute/unmute ......................... 24
5 # - Decrease volume,
mute/unmute ......................... 24
6 MODE/OK - Confirm
actions, change audio
mode ..................................... 45
Take/end phone call ...........131
7 Turn: Access display
menu options, next/
previous radio preset /
radio frequency / audio
track ..................................... 45Theft-deterrent feature
Depending on Infotainment system,
an electronic security system is
included for the purpose of theft
deterrence. The Infotainment system functions only in your vehicle and istherefore worthless to a thief.
The security code (supplied
separately) must be entered upon
first use of the system and after
prolonged interruptions to the power
supply.
Notice
The security code is not required for
R16 BT USB, CD18 BT USB.
Entering the security code
When first switching on the
Infotainment system, an enter
security code message, e.g. Radio
code followed by 0000 appears on the
display screen. Depending on
Infotainment system, the message
may only appear after a brief delay.
To enter first digit of security code,
press numbered button 1 on the unit
repeatedly until desired number is
Page 24 of 147

24Introductiondisplayed. Enter second, third and
fourth digits using buttons 2, 3 and 4
in the same way.
When the full code is displayed, press and hold button 6 until an audible
signal sounds. The system is
unlocked when the correct code has
been entered.
NAVI 50 : Enter the security code
using numbered buttons 0 to 9 on the
touchscreen display. The system is
unlocked when the correct code has
been entered.
Incorrect code entered
Depending on Infotainment system,
when the security code has been
entered incorrectly, an incorrect code message, e.g. Error code followed by
a countdown value, e.g. Wait 100 is
displayed.
Wait until the countdown has expired, then enter the correct code. Each
time the code is entered incorrectly,
the countdown time may be doubled,
depending on Infotainment system.Changing the geographical area
When the security code is entered,
depending on Infotainment system
you may be prompted to choose a
geographical area, for example:
● Europe
● Asia
● Arabia
● America
Switch off the Infotainment system,
then simultaneously press button 1
and 5 and m. Then press _ or 6 until
desired area is highlighted on the display screen and set with button 6.
Usage
Infotainment controls The Infotainment system is operated
via buttons, rotary knobs and/or
display menus.
Inputs are made via: ● the central control unit in the instrument panel 3 6, or
● the controls on the steering column 3 6● the voice recognition system (if
available) 3 118
● the touch screen (NAVI 50, NAVI 80) 3 6
Switching the Infotainment
system on or off
Press X to switch the Infotainment
system on.
The previously used audio source is
active.
Press X (or, depending on
Infotainment system, press and hold) to switch the Infotainment system off.
Notice
The clock is displayed when the
Infotainment system is switched off.NAVI 50:
The Infotainment system
automatically switches on/off when
the ignition is switched on/off. Press
X instead, if required.
Notice
The clock and the outside
temperature (depending on version) are displayed when the Infotainment
system is switched off.
Page 25 of 147

Introduction25NAVI 80:
The Infotainment system
automatically switches on when the ignition is switched on. Press X
instead, if required.
The following options are displayed: ● Change settings (to authorise or
reject data sharing)
Notice
When data sharing is switched off,
certain applications may not operate
correctly.
● Language (to change the system
language)
● Done (to continue to the Home
page)
The Infotainment system
automatically switches off when the
ignition is switched off and the driver's
door is opened. Press X instead, if
required.
Notice
The clock and the outside
temperature are displayed when the Infotainment system is switched off.Automatic switch-off
With the ignition off, if the
Infotainment system is switched on
with X, it will switch-off automatically
a short period after the last user input. Depending on Infotainment system,automatic switch-off occurs after
approx. 5 to 20 minutes.
Pressing X again will allow the
Infotainment system to remain on for
a further 5 to 20 minutes.
Setting the volume Turn X/volume rotary knob, or press
< or ].
Alternatively (with the steering
column controls), press ! or #.NAVI 50:
Depending on version, it is possible to
set various volume levels individually
(including audio players, traffic
announcements, navigation
instructions, phone calls and
ringtone).
From the Home page, press
ÿ Settings then Audio followed by
Sound on the display screen.Refer to (NAVI 50) "Volume settings"
3 39.NAVI 80:
To set various volume levels
individually (e.g. navigation
instructions, traffic announcements, phone calls) from the Home page,
press MENU then System followed by
Sound on the display screen.
Refer to (NAVI 80) "System settings"
3 40.
Stored volume
When the Infotainment system is
switched off, the current volume is
stored.
Speed dependent volume
When speed dependent volume
( 3 39) is activated, the volume is
adapted automatically to compensate
for road and wind noise.
Mute
To mute the current audio source
(depending on Infotainment system),
press X briefly or turn knob fully
anticlockwise.
Page 26 of 147

26IntroductionAlternatively (with the steering
column controls), press @ or 8 or
press ! and # simultaneously.
Unmute
To unmute (depending on
Infotainment system), briefly press
X again or turn clockwise.
Alternatively (with the steering
column controls): Press @ again or
press ! and # simultaneously again.
Notice
When a traffic announcement is
broadcast, the system is
automatically unmuted.
For further information, refer to
"Radio data system" 3 51.
Display screen operation
R15 BT USB, R16 BT USB,
CD16 BT USB, CD18 BT USB -
Display screen operation
● To move up/down in the display: Turn OK.
● To confirm actions: Press OK.
● To cancel actions (and return to previous menu): Press /.CD35 BT USB - Display screen
operation
● To move up/down in the display: Turn the central rotary knob.
● To confirm actions: Press the central rotary knob.
● To cancel actions (and return to previous menu): Press /.
NAVI 50 - Display screen operation Use the touchscreen for the following displayed menus as described in
each section:
● è/ñ RADIO
Refer to "Radio" section 3 45.
● t/ü MEDIA
Refer to "USB port" section
3 61.
● yPHONE
Refer to "Phone" section 3 122.
● sMAP
Refer to "Navigation" section
3 74.
● yNAVI / ýNav
Refer to "Navigation" section
3 74.● ðDriving eco2
Refer to "Additional features
(NAVI 50)" in the "Modes of
operation" section below.
● ÿSETTINGS
Refer to (NAVI 50) "Tone
settings" 3 36, "Volume
settings" 3 39 and "System
settings" 3 40.
When the Home page 7 is displayed,
it is possible to hide these menus from
the display (only clock and audio
system information may be shown) by
pressing æDark . Press anywhere on
the screen to display these menus
again.
NAVI 80 - Display screen operation
Use the touchscreen for the following displayed menus as described in
each section.
Page 27 of 147

Introduction27
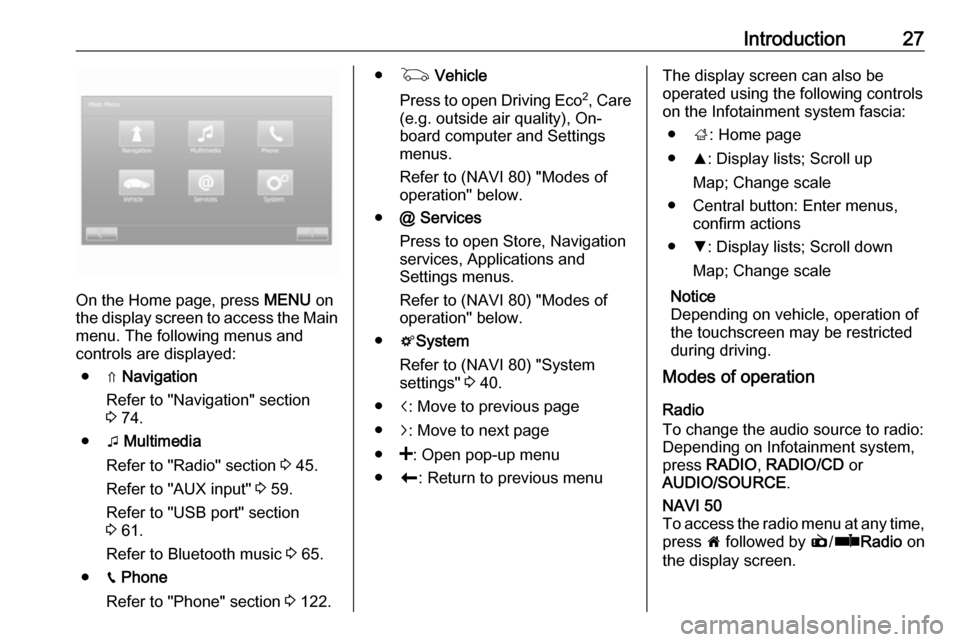
On the Home page, press MENU on
the display screen to access the Main
menu. The following menus and
controls are displayed:
● ⇑ Navigation
Refer to "Navigation" section
3 74.
● t Multimedia
Refer to "Radio" section 3 45.
Refer to "AUX input" 3 59.
Refer to "USB port" section
3 61.
Refer to Bluetooth music 3 65.
● g Phone
Refer to "Phone" section 3 122.
● G Vehicle
Press to open Driving Eco 2
, Care
(e.g. outside air quality), On- board computer and Settings
menus.
Refer to (NAVI 80) "Modes of operation" below.
● @ Services
Press to open Store, Navigation
services, Applications and
Settings menus.
Refer to (NAVI 80) "Modes of
operation" below.
● tSystem
Refer to (NAVI 80) "System
settings" 3 40.
● i: Move to previous page
● j: Move to next page
● <: Open pop-up menu
● r: Return to previous menuThe display screen can also be
operated using the following controls on the Infotainment system fascia:
● ;: Home page
● R: Display lists; Scroll up
Map; Change scale
● Central button: Enter menus, confirm actions
● S: Display lists; Scroll down
Map; Change scale
Notice
Depending on vehicle, operation of
the touchscreen may be restricted
during driving.
Modes of operation
Radio
To change the audio source to radio:
Depending on Infotainment system, press RADIO , RADIO/CD or
AUDIO/SOURCE .NAVI 50
To access the radio menu at any time, press 7 followed by è/ñ Radio on
the display screen.
Page 28 of 147

28IntroductionNAVI 80
To access the radio menu from the Home page, press MENU then
Multimedia followed by Radio on the
display screen
Detailed description of the radio
functions 3 45.
Audio players
To change the audio source to CD,
USB , AUX , Bluetooth or iPod (where
applicable): Depending on
Infotainment system, press MEDIA,
RADIO/CD or AUDIO/SOURCE .
NAVI 50 : To access the menu for
connected auxiliary devices ( USB,
iPod , BT (Bluetooth) or AUX) at any
time, press 7 followed by t/
ü Media on the display screen. Press
S in top left corner and select
auxiliary source.
For Aha Ⓡ application (available
depending on version), refer to
"Additional features (NAVI 50)"
below.
NAVI 80 : To access the menu for
auxiliary devices (USB, SD card, AUX
input, Audio CD, Bluetooth) from the
Home page, press MENU thenMultimedia followed by Media on the
display screen. Select auxiliary
source from the display list.R15 BT USB, R16 BT USB
Detailed descriptions of:
● AUX input functions 3 59
● USB port functions 3 61
● Bluetooth music operation 3 65CD16 BT USB, CD18 BT USB
Detailed descriptions of:
● CD player functions 3 56
● AUX input functions 3 59
● USB port functions 3 61
● Bluetooth music operation 3 65CD35 BT USB
Detailed descriptions of:
● CD player functions 3 56
● AUX input functions 3 59
● USB port functions 3 61
● Bluetooth music operation 3 65NAVI 50
Detailed descriptions of:
● AUX input functions 3 59
● USB port (including iPod) functions 3 61
● Bluetooth music operation 3 65NAVI 80
Detailed descriptions of:
● AUX input functions 3 59
● USB port functions 3 61
● Bluetooth music operation 3 65
Navigation, Map
(CD35 BT USB NAVI, NAVI 50,
NAVI 80)
Detailed description of the Navigation system 3 74, Browse map 3 106.
Phone
Use the display options in the
following menus to connect mobile
phones, make telephone calls, create
contacts lists and adjust various
settings.
Detailed description of the handsfree
phone system functions 3 122.
Page 29 of 147

Introduction29R15 BT USB, R16 BT USB,
CD16 BT USB, CD18 BT USB -
Phone
To access the Phone menu: Press
6 or TEL .
To access the phone settings menu: Press TEL and select Phone settings .CD35 BT USB - Phone
To access the Phone menu: Press
6 or TEL.
To access the phone settings menu:
Press SETUP / TEXT and select
Phone settings .NAVI 50 - Phone
To access the Phone menu at any
time: Press 7 followed by yPhone on
the display screen.NAVI 80 - Phone
To access the Phone menu from the
Home page, press MENU followed by
Phone on the display screen.
Vehicle information (NAVI 80)
To access the Vehicle menu from the
Home page, press MENU followed by
Vehicle on the display screen.
Depending on vehicle, the following
menus are displayed:
● Driving Eco 2
● Care
● On-board computer
● SettingsDriving Eco 2
The following features are available: ● Trip report
Displays the following data from the last journey:
Average fuel consumption,
average speed, total fuel
consumption, recovered energy
or mileage completed, average
environmental driving
performance, braking
anticipation, ability to manage
vehicle speed.
To save journey data: Press
'Save' then select the journey
type from the following list:
Home/work, holiday, weekend,
trip, personal.
To reset journey data: Press 'Reset'. Confirm or cancel with
'Yes' or 'No'.● My preferred trips
Displays changes in your driving style (when journey data has
been saved).
The 'Summary' tab displays the
following: Total route distance,
distance covered, date of
information update, average
rating out of 100.
The 'Details' tab displays journey
record information.
● Eco coaching
Displays advice for reducing fuel consumption
Scroll through the pages and
familiarise yourself with the
advice.Care
The following features are available:
● Ioniser : Select 'Clean' mode to
help reduce bacteria and
allergens in the air, or select
'Relax' mode to improve the
driving environment through the
emission of ions. Operation stops
automatically after 30 minutes.
Switch off if not required.
Page 30 of 147

30IntroductionTo activate automatic operation,press 'Start ioniser at each
vehicle start' (tick box checked).
● Scent diffuser : Change fragrance
type and diffusion intensity in the
passenger compartment.
● Outside air quality : Displays a
chart of outside air quality over a period of time, rated from
ô 'Good' to õ 'Polluted ]' (low
level) to ö 'Polluted <' (high
level).
Press Done to confirm changes.On-board computer
Displays the following information since the last reset:
● start date of calculation
● total distance
● average speed
● average fuel consumption
● total fuel or energy consumption
To reset on-board computer and
instrument panel trip computer
information, press Reset then Yes to
confirm.
For further information, refer to "Trip
computer" in the Owner's Manual.Settings
The following settings can be
changed:
● Park Assist
● Depending on vehicle, press Front park assist or Rear
park assist to switch on/off
(box is checked/unchecked).
Press Confirm to save
changes.
● Volume :
Press < or ] alongside the
volume bar to change volume of the ultrasonic parking
assist system. For further
information, refer to "Parking
assist" in the Owner's
Manual.
● Rear camera view settings :
Select to switch rear view
camera on/off, change
guidelines (static/dynamic)
and adjust image settings
(e.g. brightness, saturation
and contrast).
Press Done to save changes.
For further information, referto "Rear view camera" in the Owner's Manual.
● < (pop-up menu):
Press < in the Park Assist
menu or submenus followed
by Reset to the default
values to restore default
factory settings for all or
current Park Assist options.
● Image settings
To adjust e.g., brightness,
saturation and contrast.
● The following options (depending
on vehicle) can also be adjusted:
● Automatically fold in the exterior mirrors to the parkingposition upon locking thevehicle (switch on/off)
● Lock/unlock doors while driving
● Activate rear window wiper when selecting reverse gear(switch on/off)
● Daytime running lights (switch on/off)