YAMAHA VX110 2005 Service Manual
Manufacturer: YAMAHA, Model Year: 2005, Model line: VX110, Model: YAMAHA VX110 2005Pages: 347, PDF Size: 14.17 MB
Page 101 of 347
5-2
EPOWRENGINE UNIT
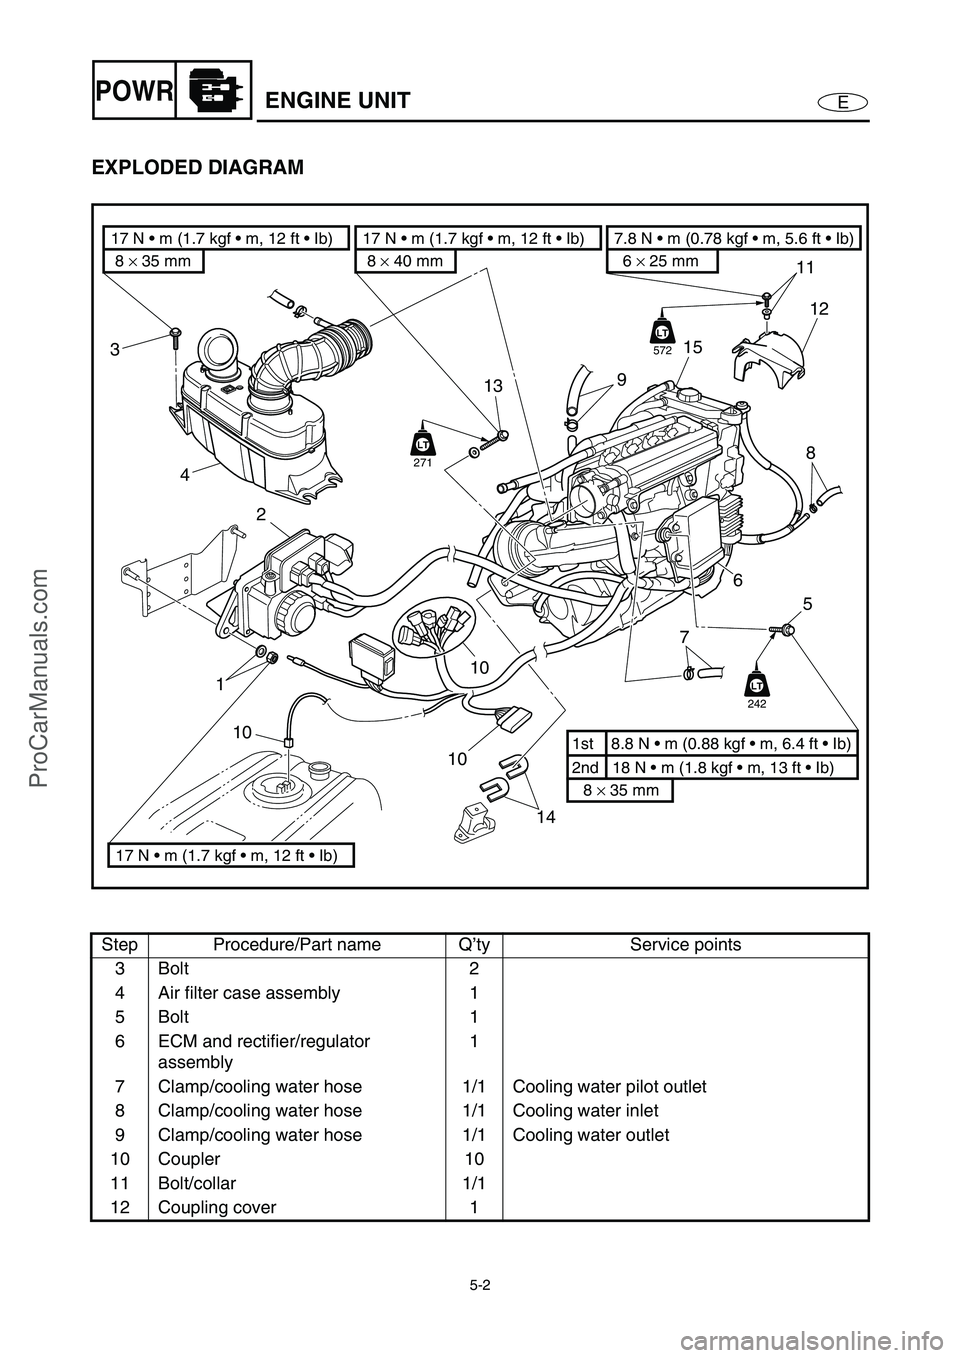
EXPLODED DIAGRAM
Step Procedure/Part name Q’ty Service points
3Bolt 2
4 Air filter case assembly 1
5Bolt 1
6 ECM and rectifier/regulator
assembly1
7 Clamp/cooling water hose 1/1 Cooling water pilot outlet
8 Clamp/cooling water hose 1/1 Cooling water inlet
9 Clamp/cooling water hose 1/1 Cooling water outlet
10 Coupler 10
11 Bolt/collar 1/1
12 Coupling cover 1
14 10
10
2
113
3
4
11
15
12
8
7
9
6
5
2nd 18 N m (1.8 kgf m, 13 ft Ib) 1st 8.8 N m (0.88 kgf m, 6.4 ft Ib)
8 × 35 mm
6 × 25 mm
7.8 N m (0.78 kgf m, 5.6 ft Ib)
8 × 35 mm 17 N m (1.7 kgf m, 12 ft Ib)
17 N m (1.7 kgf m, 12 ft Ib)8 × 40 mm
17 N m (1.7 kgf m, 12 ft Ib)
10LT
242
LT
LT
572
LT
LT
271
ProCarManuals.com
Page 102 of 347
5-3
EPOWRENGINE UNIT
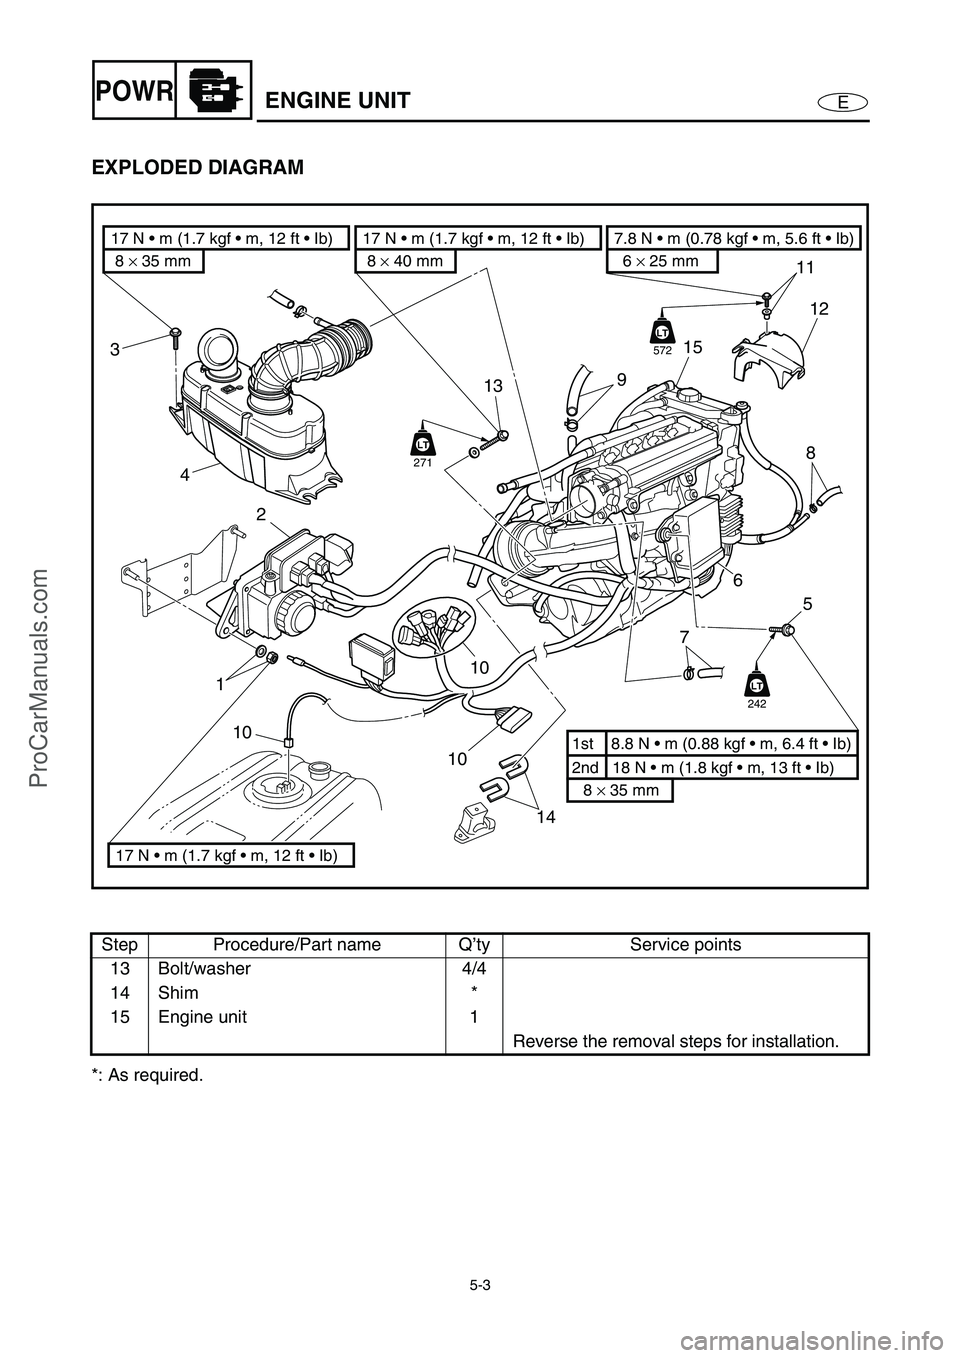
EXPLODED DIAGRAM
*: As required.Step Procedure/Part name Q’ty Service points
13 Bolt/washer 4/4
14 Shim *
15 Engine unit 1
Reverse the removal steps for installation.
14 10
10
2
113
3
4
11
15
12
8
7
9
6
5
2nd 18 N m (1.8 kgf m, 13 ft Ib) 1st 8.8 N m (0.88 kgf m, 6.4 ft Ib)
8 × 35 mm
6 × 25 mm
7.8 N m (0.78 kgf m, 5.6 ft Ib)
8 × 35 mm 17 N m (1.7 kgf m, 12 ft Ib)
17 N m (1.7 kgf m, 12 ft Ib)8 × 40 mm
17 N m (1.7 kgf m, 12 ft Ib)
10LT
242
LT
LT
572
LT
LT
271
ProCarManuals.com
Page 103 of 347
5-4
EPOWRENGINE UNIT
SERVICE POINTS
Compression pressure measurement
The following procedure applies to all of the
cylinders.
NOTE:
Insufficient compression pressure will result in
a loss of performance.
1. Measure:
Valve clearance
Out of specification →
Adjust.
Refer to “POWER UNIT” in Chapter 3.
2. Warm the engine up, and then put the
watercraft in a horizontal position.
3. Remove:
Ignition coils
Spark plugs
CAUTION:
Before removing the spark plugs, use com-
pressed air to blow away any dirt accumu-
lated in the spark plug wells to prevent it
from falling into the cylinders.
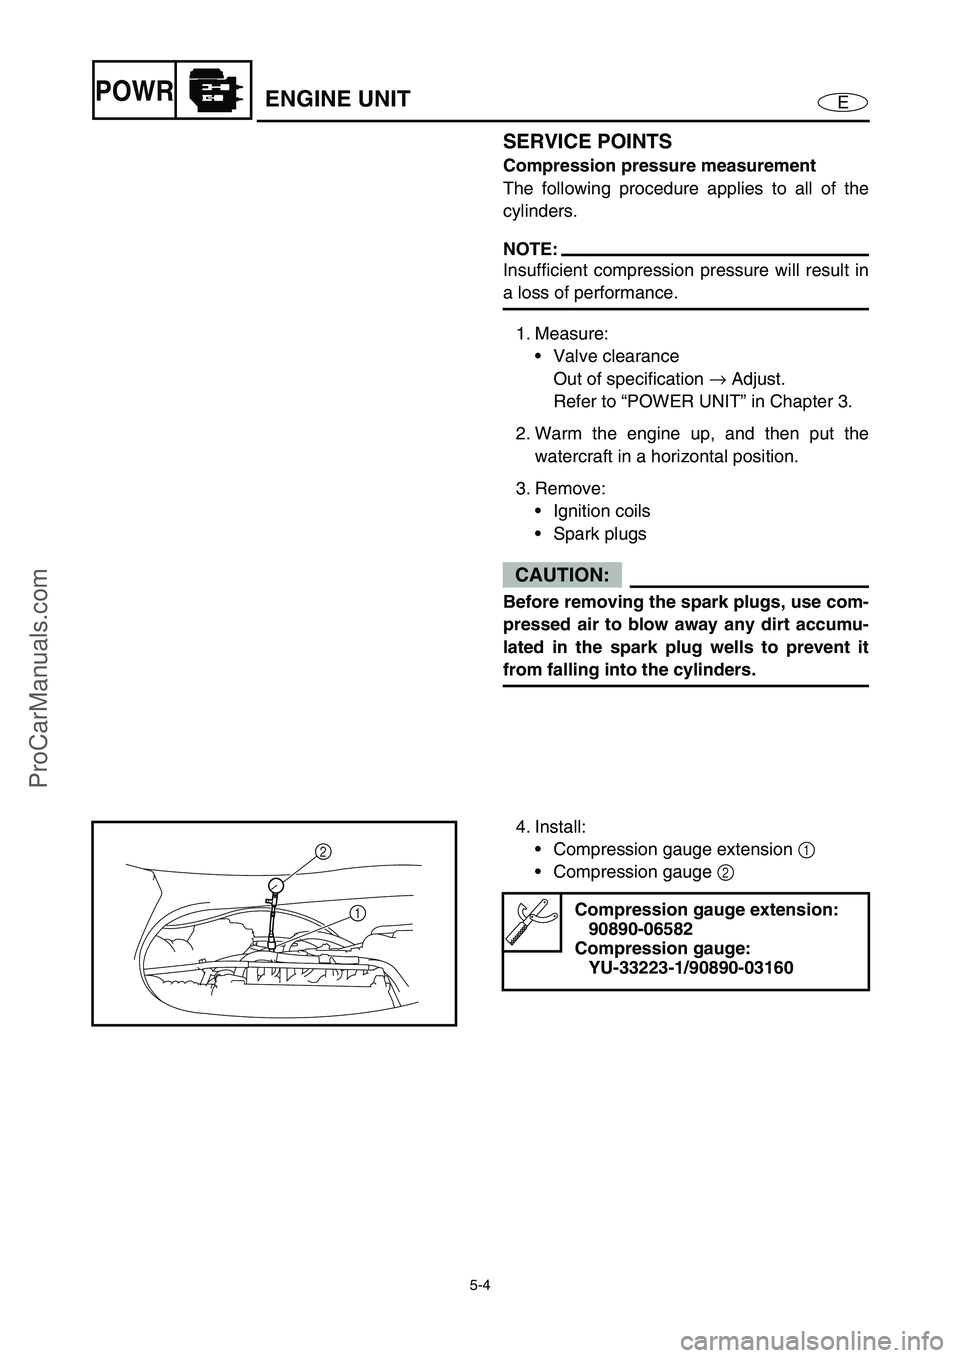
4. Install:
Compression gauge extension 1
Compression gauge 2
Compression gauge extension:
90890-06582
Compression gauge:
YU-33223-1/90890-03160
2
1
ProCarManuals.com
Page 104 of 347
5-5
EPOWRENGINE UNIT
5. Measure:
Compression pressure
Out of specification →
Refer to steps (b)
and (c).
6. Install:
Spark plug
Minimum compression pressure
(reference data):
1,150 kPa
(11.5 kgf/cm
2, 164 psi)
Measurement steps:
a. With the throttle wide open, crank the
engine until the reading on the compres-
sion gauge stabilizes.
NOTE:
The difference in compression pressure
between cylinders should not exceed 100
kPa (1 kgf/cm2, 14 psi).
b. If the compression pressure is extremely
high, check the cylinder head, valve sur-
faces and piston crown for carbon depos-
its.
Carbon deposits →
Eliminate.
c. If the compression pressure is below the
minimum specification, squirt a few drops
of oil into the cylinder and measure
again.
Refer to the following table.
Compression pressure
(with oil applied into the cylinder)
Reading Diagnosis
Higher than
without oilPiston ring wear,
piston wear or
damage
→ Repair.
Same as without
oilValves, cylinder
head gasket or pis-
ton possibly defec-
tive
→ Repair.
T R..
Spark plug:
13 N m (1.3 kgf m, 9.4 ft lb)
ProCarManuals.com
Page 105 of 347
5-6
EPOWRENGINE UNIT
7. Install:
Ignition coils
T R..
Ignition coils bolt:
7.6 N m (0.76 kgf m, 5.5 ft lb)
LOCTITE 572
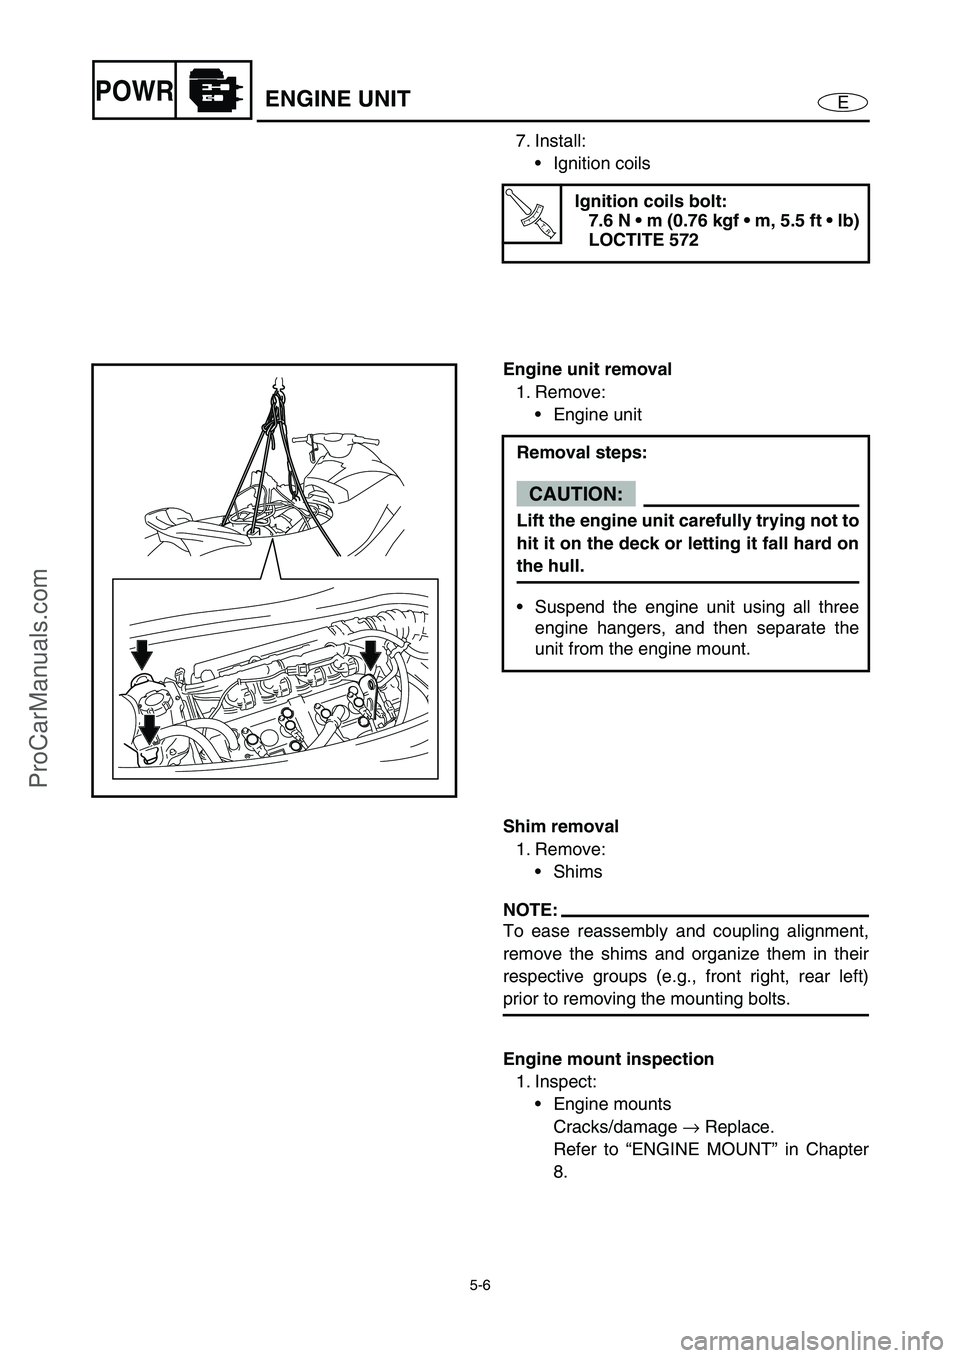
Engine unit removal
1. Remove:
Engine unit
Removal steps:
CAUTION:
Lift the engine unit carefully trying not to
hit it on the deck or letting it fall hard on
the hull.
Suspend the engine unit using all three
engine hangers, and then separate the
unit from the engine mount.
Shim removal
1. Remove:
Shims
NOTE:
To ease reassembly and coupling alignment,
remove the shims and organize them in their
respective groups (e.g., front right, rear left)
prior to removing the mounting bolts.
Engine mount inspection
1. Inspect:
Engine mounts
Cracks/damage →
Replace.
Refer to “ENGINE MOUNT” in Chapter
8.
ProCarManuals.com
Page 106 of 347
5-7
EPOWRENGINE UNIT
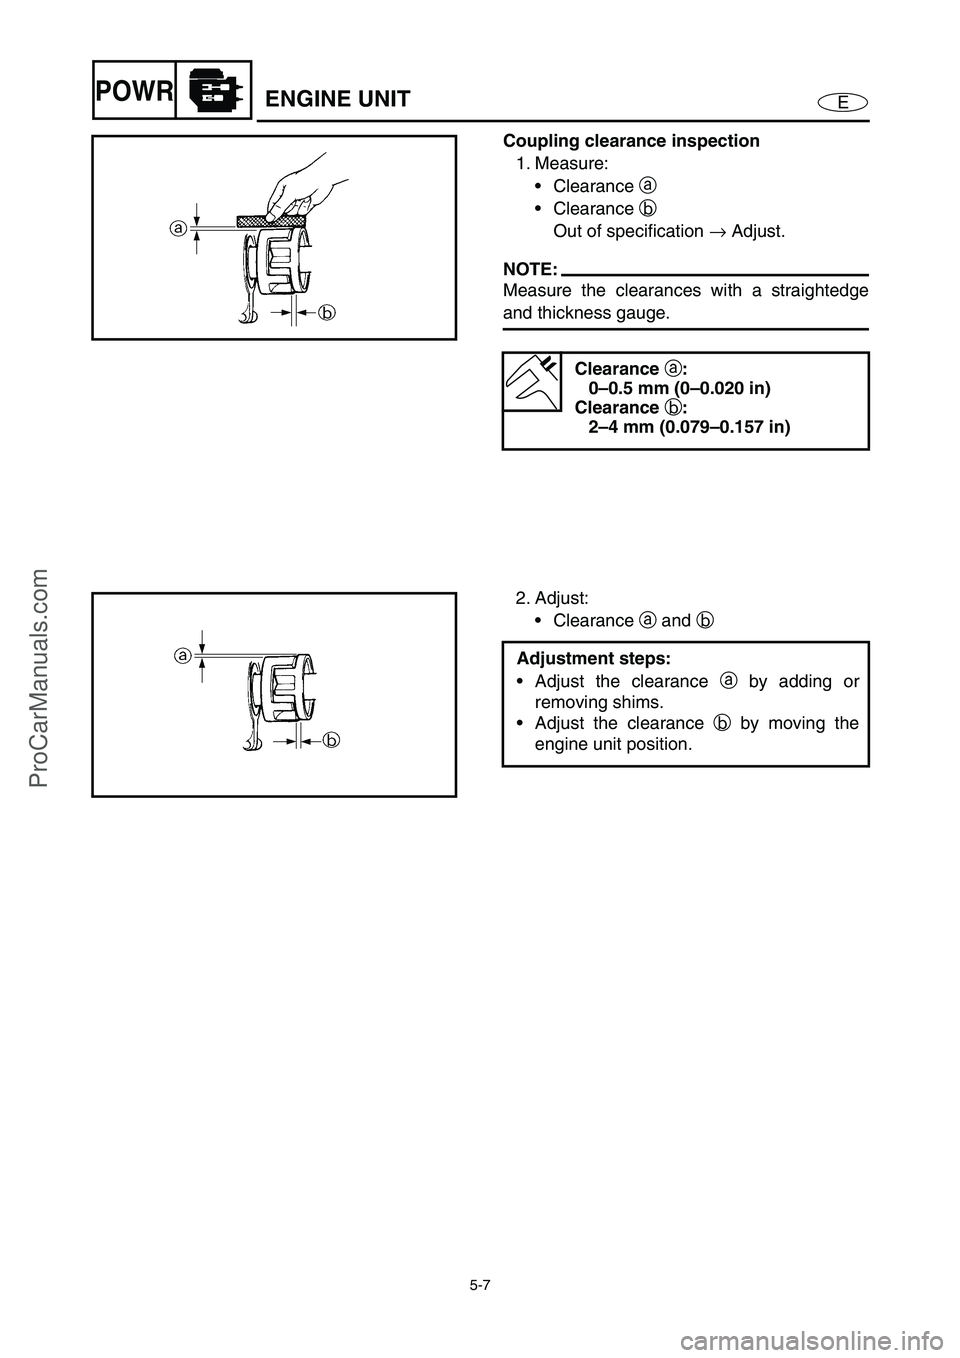
Coupling clearance inspection
1. Measure:
Clearance a
Clearance b
Out of specification →
Adjust.
NOTE:
Measure the clearances with a straightedge
and thickness gauge.
Clearance
a:
0–0.5 mm (0–0.020 in)
Clearance
b:
2–4 mm (0.079–0.157 in)
2. Adjust:
Clearance a
and b
Adjustment steps:
Adjust the clearance a
by adding or
removing shims.
Adjust the clearance b
by moving the
engine unit position.
ProCarManuals.com
Page 107 of 347

5-8
EPOWREXHAUST PIPES 1 AND 2
EXHAUST PIPES 1 AND 2
EXPLODED DIAGRAM
REMOVAL AND INSTALLATION CHART
Step Procedure/Part name Q’ty Service points
EXHAUST PIPES 1 AND 2
REMOVALFollow the left “Step” for removal.
Engine unit Refer to “ENGINE UNIT”.
È
For cooling water pilot outlet on port side
É
From water jacket
1 Clamp/cooling water hose 1/1
2 Clamp/cooling water hose 1/1
3Bolt 2
4 Thermoswitch (exhaust) 1
5 Exhaust joint clamp 2 Slide the outer exhaust joint for exhaust
manifold side
6 Exhaust joint clamp 2
6
64 3
É
5
2
È 6 × 16 mm
7.6 N m (0.76 kgf m, 5.5 ft Ib)
2nd 3.4 N m (0.34 kgf m, 2.5 ft Ib) 1st 3.4 N m (0.34 kgf m, 2.5 ft Ib)LT
242
LT
242
LT
572
LT
LT
572
LT
LT
242
1
LT
242
LT
242
ProCarManuals.com
Page 108 of 347
5-9
EPOWREXHAUST PIPES 1 AND 2
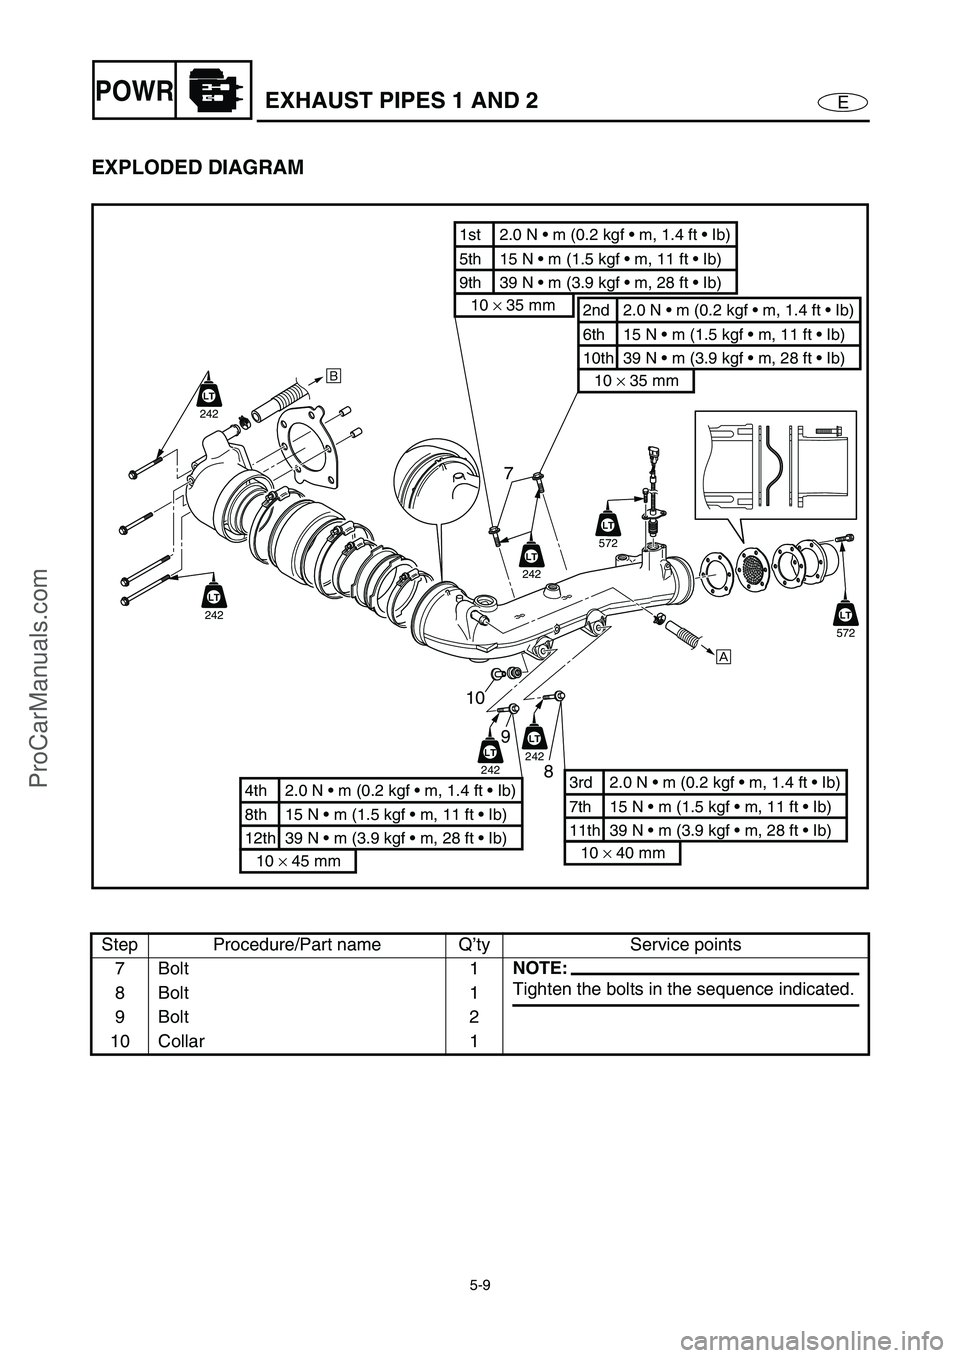
EXPLODED DIAGRAM
Step Procedure/Part name Q’ty Service points
7Bolt 1
NOTE:
Tighten the bolts in the sequence indicated.
8Bolt 1
9Bolt 2
10 Collar 1
7
10
9
8
É
È
6th 15 N m (1.5 kgf m, 11 ft Ib) 2nd 2.0 N m (0.2 kgf m, 1.4 ft Ib)
10th 39 N m (3.9 kgf m, 28 ft Ib)
10 × 35 mm
5th 15 N m (1.5 kgf m, 11 ft Ib) 1st 2.0 N m (0.2 kgf m, 1.4 ft Ib)
9th 39 N m (3.9 kgf m, 28 ft Ib)
10 × 35 mm
8th 15 N m (1.5 kgf m, 11 ft Ib) 4th 2.0 N m (0.2 kgf m, 1.4 ft Ib)
12th 39 N m (3.9 kgf m, 28 ft Ib)
10 × 45 mm
7th 15 N m (1.5 kgf m, 11 ft Ib) 3rd 2.0 N m (0.2 kgf m, 1.4 ft Ib)
11th 39 N m (3.9 kgf m, 28 ft Ib)
10 × 40 mm
LT
242
LT
242
LT
572
LT
LT
572
LT
LT
242
LT
242
LT
242
ProCarManuals.com
Page 109 of 347
5-10
EPOWR
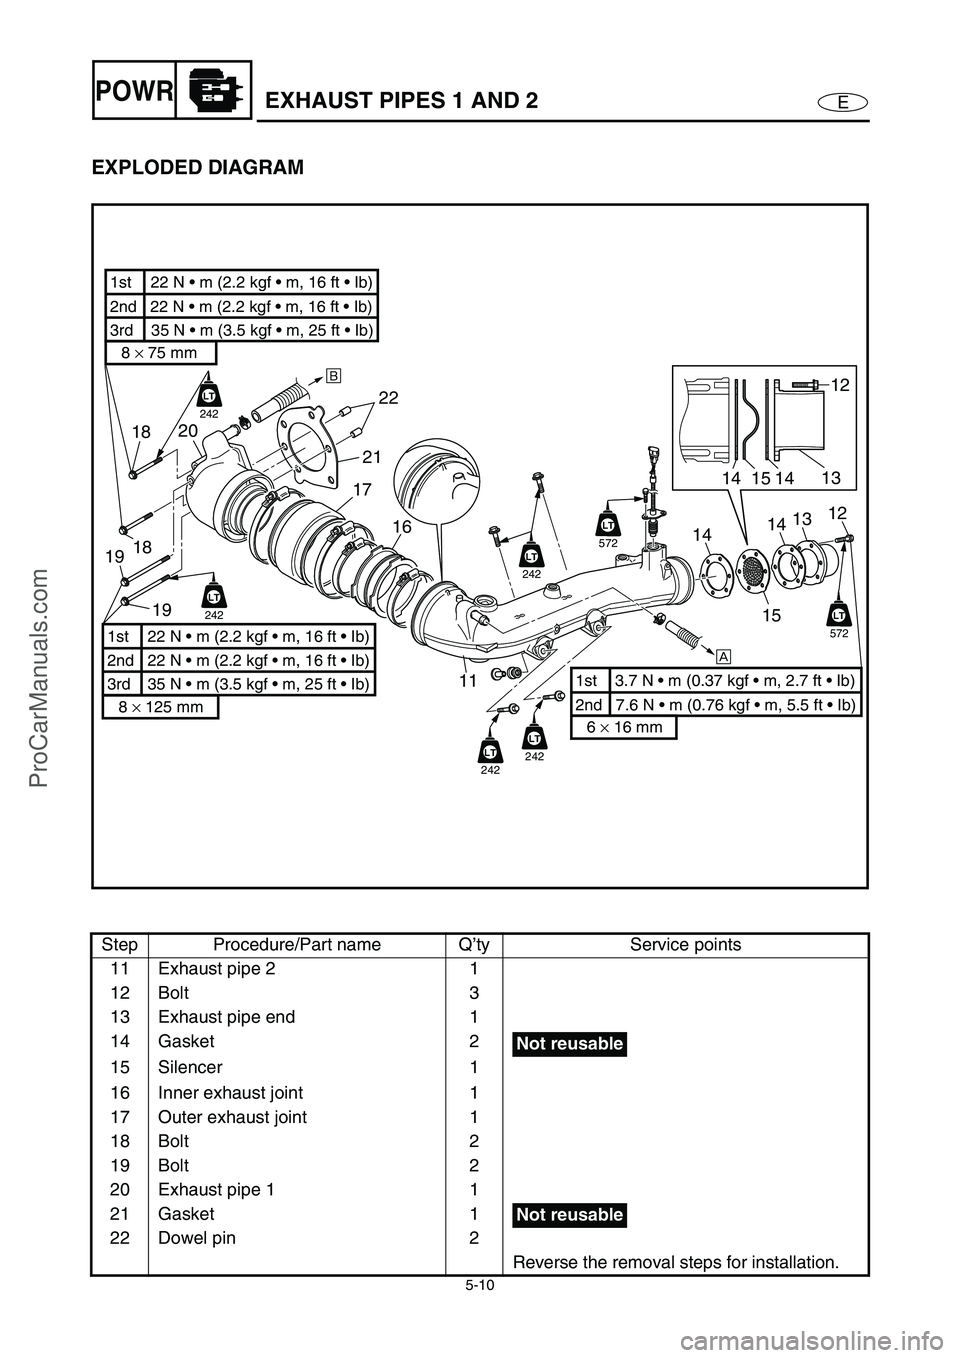
EXPLODED DIAGRAM
Step Procedure/Part name Q’ty Service points
11 Exhaust pipe 2 1
12 Bolt 3
13 Exhaust pipe end 1
14 Gasket 2
15 Silencer 1
16 Inner exhaust joint 1
17 Outer exhaust joint 1
18 Bolt 2
19 Bolt 2
20 Exhaust pipe 1 1
21 Gasket 1
22 Dowel pin 2
Reverse the removal steps for installation.
1417 20
16
1112
13
14
É
18
19
È
22
21
2nd 22 N • m (2.2 kgf m, 16 ft Ib) 1st
22 N m (2.2 kgf m, 16 ft Ib)
3rd 35 N m (3.5 kgf m, 25 ft Ib)
8 × 75 mm
2nd 22 N m (2.2 kgf m, 16 ft Ib) 1st 22 N m (2.2 kgf m, 16 ft Ib)
3rd 35 N m (3.5 kgf m, 25 ft Ib)
8 × 125 mm
2nd 7.6 N m (0.76 kgf m, 5.5 ft Ib)
1st 3.7 N m (0.37 kgf m, 2.7 ft Ib)
6 × 16 mm
LT
242
19
18
LT
242
LT
572
LT
LT
572
LT
LT
242
LT
242
LT
242
12
13
15
14
14
15
Not reusable
Not reusable
EXHAUST PIPES 1 AND 2
ProCarManuals.com
Page 110 of 347
5-11
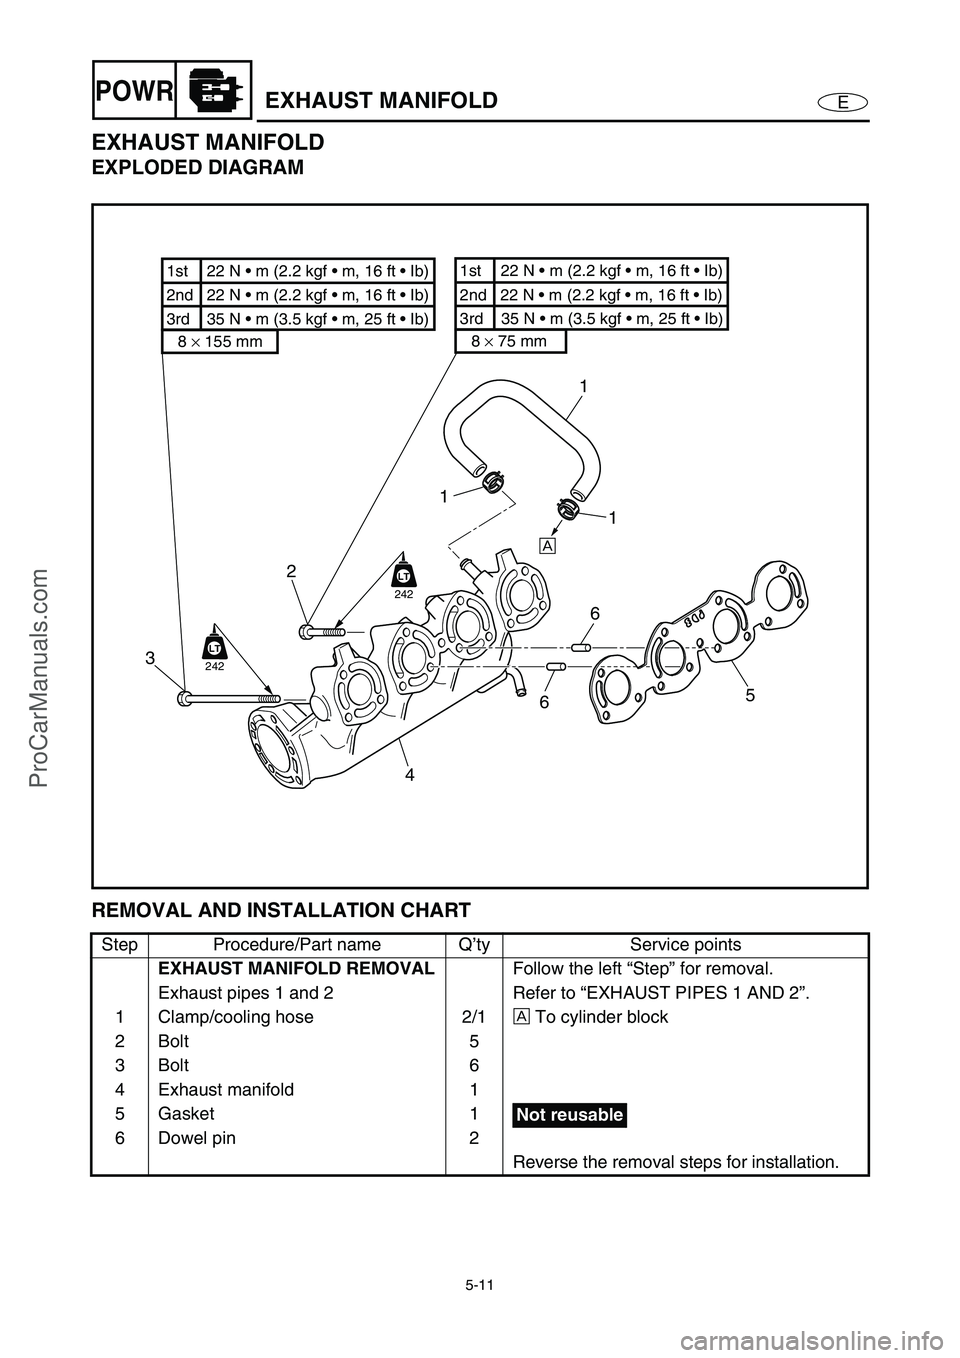
EPOWREXHAUST MANIFOLD
EXHAUST MANIFOLD
EXPLODED DIAGRAM
REMOVAL AND INSTALLATION CHART
Step Procedure/Part name Q’ty Service points
EXHAUST MANIFOLD REMOVAL
Follow the left “Step” for removal.
Exhaust pipes 1 and 2 Refer to “EXHAUST PIPES 1 AND 2”.
1 Clamp/cooling hose 2/1È
To cylinder block
2Bolt 5
3Bolt 6
4 Exhaust manifold 1
5Gasket 1
6 Dowel pin 2
Reverse the removal steps for installation.
6
5 3È
6
2
4
1
1
1
2nd 22 N m (2.2 kgf m, 16 ft Ib) 1st
22 N m (2.2 kgf m, 16 ft Ib)
3rd 35 N m (3.5 kgf m, 25 ft Ib)
8 × 75 mm
2nd 22 N m (2.2 kgf m, 16 ft Ib) 1st 22 N m (2.2 kgf m, 16 ft Ib)
3rd 35 N m (3.5 kgf m, 25 ft Ib)
8 × 155 mm
LT
242
LT
242
Not reusable
ProCarManuals.com