YAMAHA VX110 2005 Service Manual
Manufacturer: YAMAHA, Model Year: 2005, Model line: VX110, Model: YAMAHA VX110 2005Pages: 347, PDF Size: 14.17 MB
Page 161 of 347
5-62
EPOWRVALVES AND VALVE SPRINGS
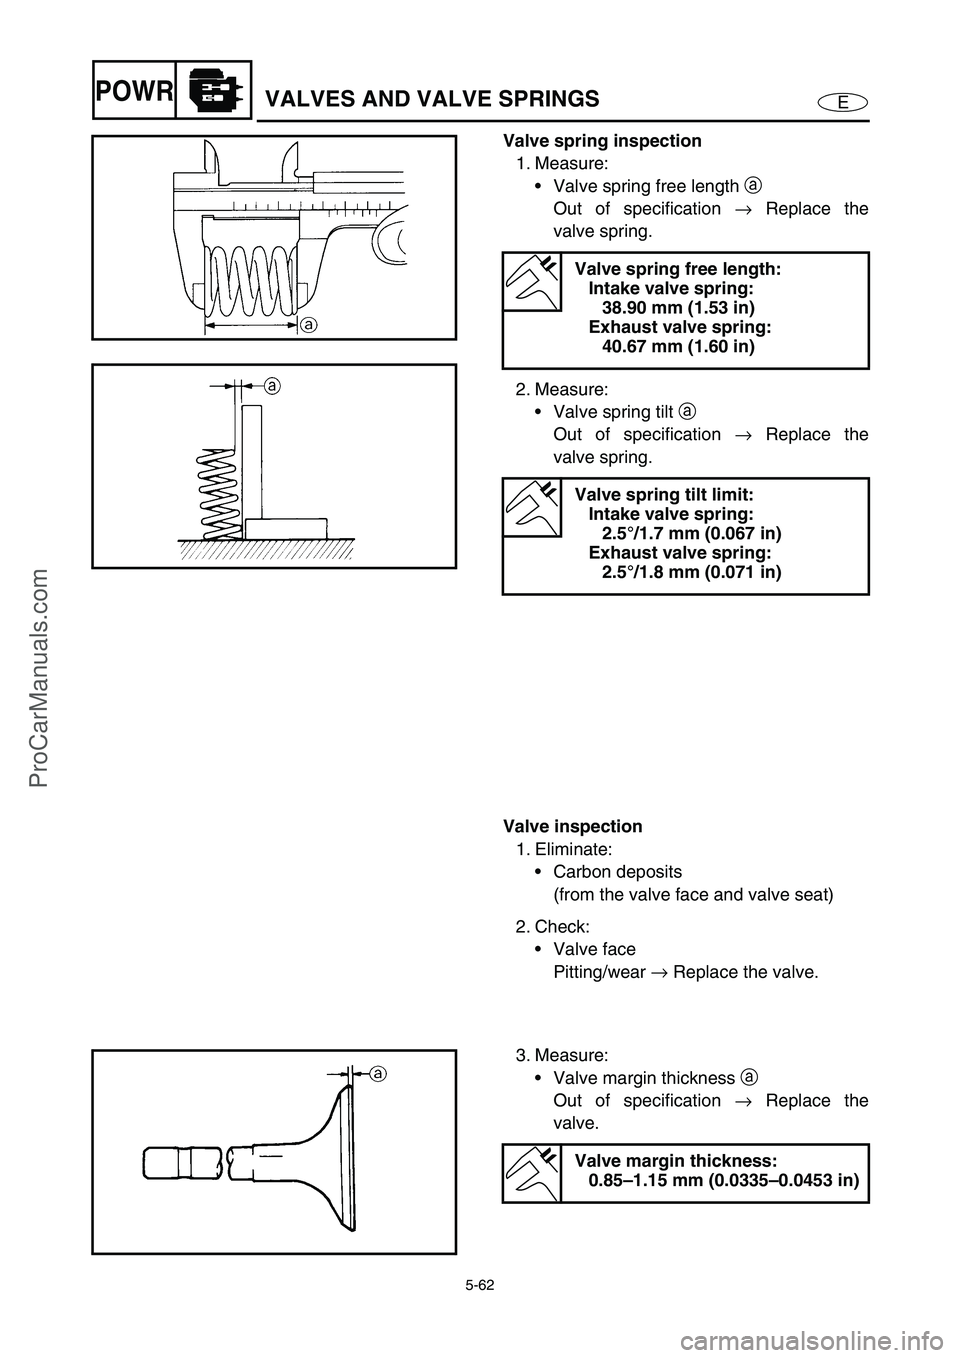
Valve spring inspection
1. Measure:
Valve spring free length a
Out of specification →
Replace the
valve spring.
2. Measure:
Valve spring tilt a
Out of specification →
Replace the
valve spring.
Valve spring free length:
Intake valve spring:
38.90 mm (1.53 in)
Exhaust valve spring:
40.67 mm (1.60 in)
Valve spring tilt limit:
Intake valve spring:
2.5°/1.7 mm (0.067 in)
Exhaust valve spring:
2.5°/1.8 mm (0.071 in)
Valve inspection
1. Eliminate:
Carbon deposits
(from the valve face and valve seat)
2. Check:
Valve face
Pitting/wear →
Replace the valve.
3. Measure:
Valve margin thickness a
Out of specification →
Replace the
valve.
Valve margin thickness:
0.85–1.15 mm (0.0335–0.0453 in)
ProCarManuals.com
Page 162 of 347
5-63
EPOWRVALVES AND VALVE SPRINGS
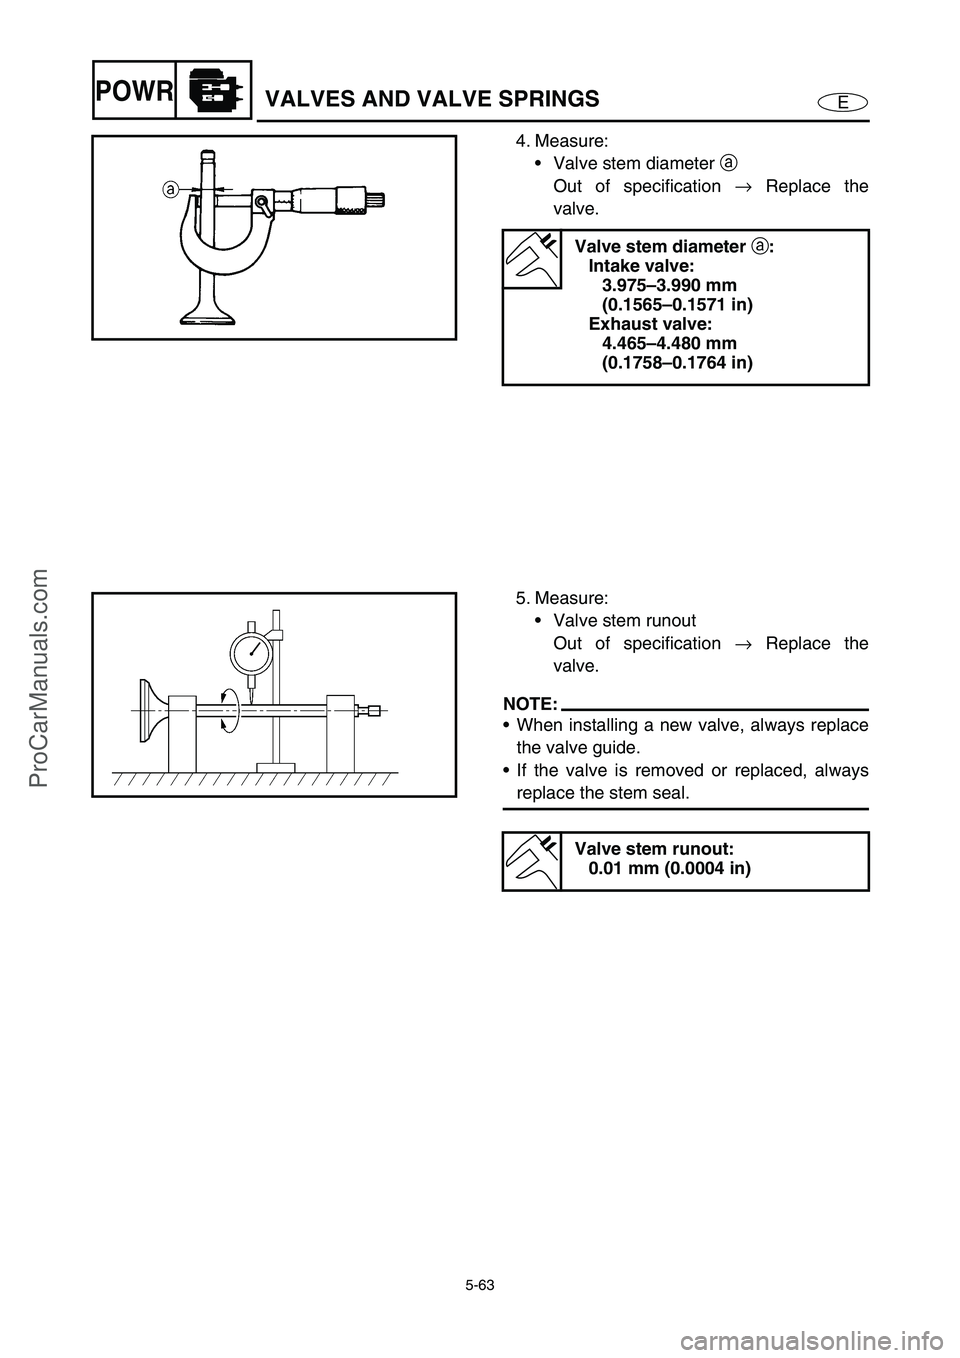
4. Measure:
Valve stem diameter a
Out of specification →
Replace the
valve.
Valve stem diameter
a:
Intake valve:
3.975–3.990 mm
(0.1565–0.1571 in)
Exhaust valve:
4.465–4.480 mm
(0.1758–0.1764 in)
5. Measure:
Valve stem runout
Out of specification →
Replace the
valve.
NOTE:
When installing a new valve, always replace
the valve guide.
If the valve is removed or replaced, always
replace the stem seal.
Valve stem runout:
0.01 mm (0.0004 in)
ProCarManuals.com
Page 163 of 347
5-64
EPOWRVALVES AND VALVE SPRINGS
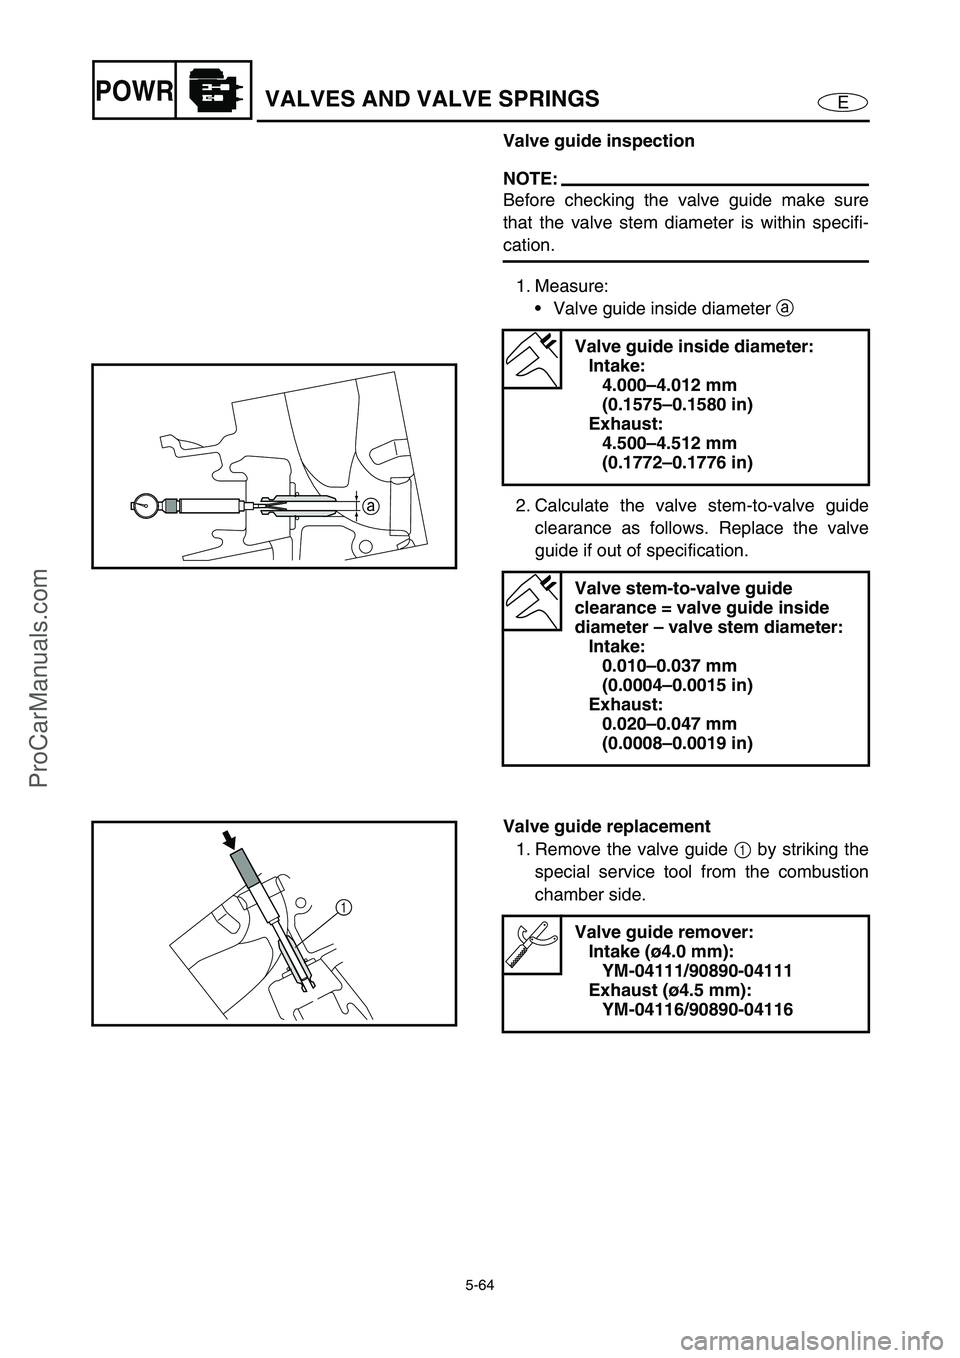
Valve guide inspection
NOTE:
Before checking the valve guide make sure
that the valve stem diameter is within specifi-
cation.
1. Measure:
Valve guide inside diameter a
2. Calculate the valve stem-to-valve guide
clearance as follows. Replace the valve
guide if out of specification.
Valve guide inside diameter:
Intake:
4.000–4.012 mm
(0.1575–0.1580 in)
Exhaust:
4.500–4.512 mm
(0.1772–0.1776 in)
Valve stem-to-valve guide
clearance = valve guide inside
diameter – valve stem diameter:
Intake:
0.010–0.037 mm
(0.0004–0.0015 in)
Exhaust:
0.020–0.047 mm
(0.0008–0.0019 in)
a
Valve guide replacement
1. Remove the valve guide 1
by striking the
special service tool from the combustion
chamber side.
Valve guide remover:
Intake (ø4.0 mm):
YM-04111/90890-04111
Exhaust (ø4.5 mm):
YM-04116/90890-04116
1
ProCarManuals.com
Page 164 of 347

5-65
EPOWRVALVES AND VALVE SPRINGS
2. Install the new valve guide 2
by striking
the special service tool from the camshaft
side until the valve guide clip 3
contacts
the cylinder head.
NOTE:
Apply engine oil to the surface of the new
valve guide.
Valve guide remover:
Intake (ø4.0 mm):
YM-04111/90890-04111
Exhaust (ø4.5 mm):
YM-04116/90890-04116
Valve guide installer:
Intake (ø4.0 mm):
YM-04112/90890-04112
Exhaust (ø4.5 mm):
YM-04117/90890-04117
3
E
2
3. Insert the special service tool into the
valve guide 2
, and then ream the valve
guide.
NOTE:
Turn the valve guide reamer clockwise to
ream the valve guide.
Do not turn the reamer counterclockwise
when removing the reamer.
4. Measure:
Valve guide inside diameter
Valve guide reamer:
Intake (ø4.0 mm):
YM-04113/90890-04113
Exhaust (ø4.5 mm):
YM-04118/90890-04118
Valve guide inside diameter:
Intake:
4.000–4.012 mm
(0.1575–0.1580 in)
Exhaust:
4.500–4.512 mm
(0.1772–0.1776 in)
2
ProCarManuals.com
Page 165 of 347
5-66
EPOWRVALVES AND VALVE SPRINGS
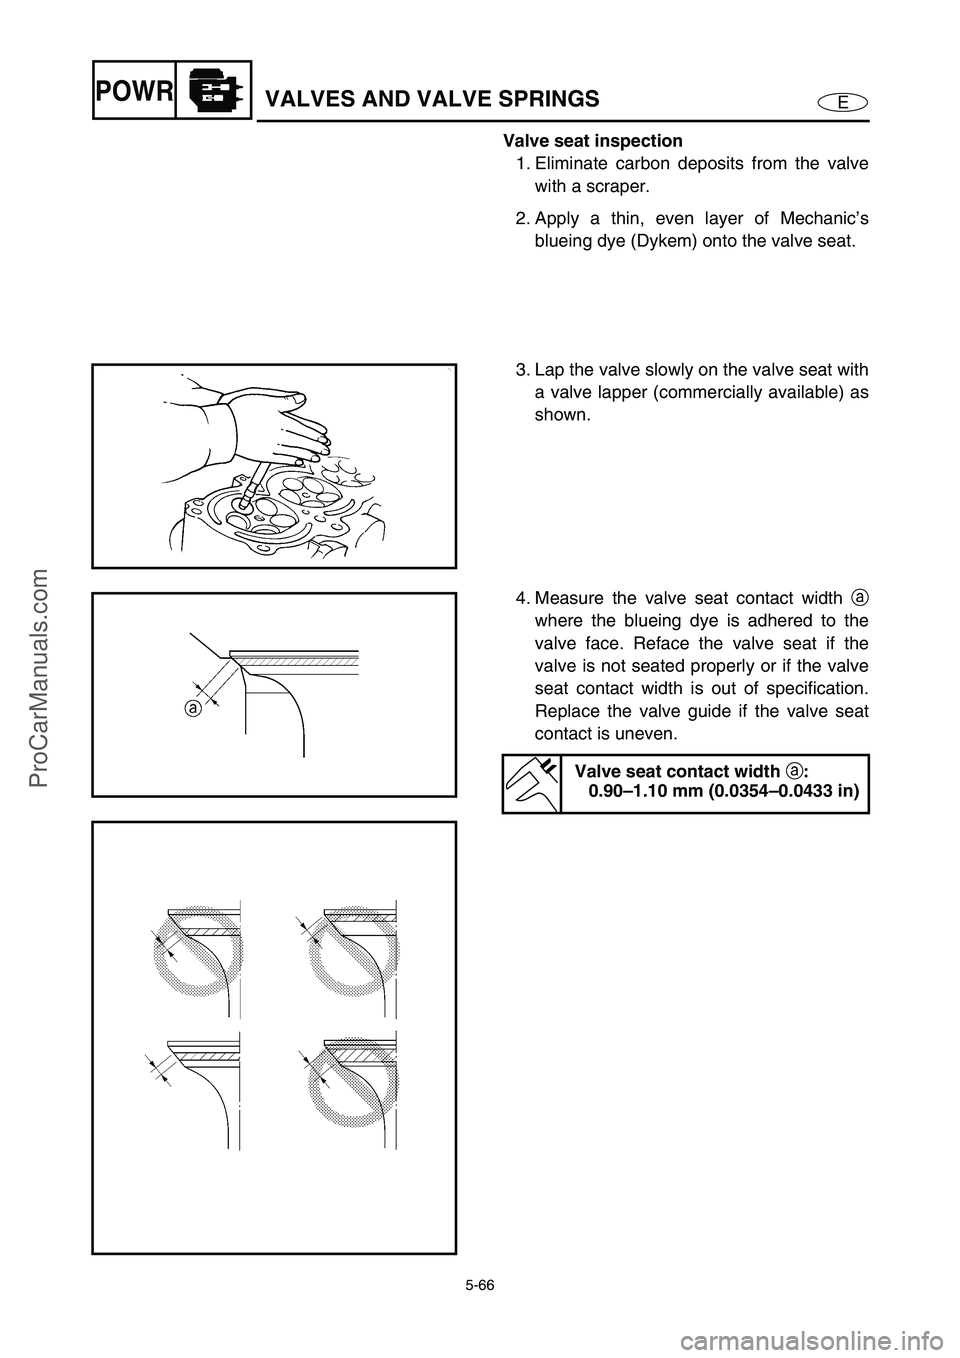
Valve seat inspection
1. Eliminate carbon deposits from the valve
with a scraper.
2. Apply a thin, even layer of Mechanic’s
blueing dye (Dykem) onto the valve seat.
3. Lap the valve slowly on the valve seat with
a valve lapper (commercially available) as
shown.
4. Measure the valve seat contact width a
where the blueing dye is adhered to the
valve face. Reface the valve seat if the
valve is not seated properly or if the valve
seat contact width is out of specification.
Replace the valve guide if the valve seat
contact is uneven.
Valve seat contact width
a:
0.90–1.10 mm (0.0354–0.0433 in)
ProCarManuals.com
Page 166 of 347

5-67
EPOWRVALVES AND VALVE SPRINGS
Valve seat reface
1. Reface the valve seat with the valve seat
cutter.
2. Cut the surface of the valve seat with a 45°
cutter by turning the cutter clockwise until
the valve seat face has become smooth.
aSlag or rough surface
CAUTION:
Do not over cut the valve seat. Be sure to
turn the cutter evenly downward at a pres-
sure of 40–50 N (4–5 kgf, 8.8–11 lbf) to pre-
vent chatter marks.
Valve seat cutter holder:
Intake (ø4.0 mm):
90890-06811
Exhaust (ø4.5 mm):
90890-06812
Valve seat cutter:
30° (intake):
90890-06815
45° (intake):
90890-06814
60° (intake):
90890-06813
30° (exhaust):
90890-06328
45° (exhaust):
90890-06312
60° (exhaust):
90890-06315
Neway valve seat cutter kit:
YM-91044
3. Use a 30° cutter to adjust the contact width
of the top edge of the valve seat.
bPrevious contact width
30˚
b
ProCarManuals.com
Page 167 of 347
5-68
EPOWRVALVES AND VALVE SPRINGS
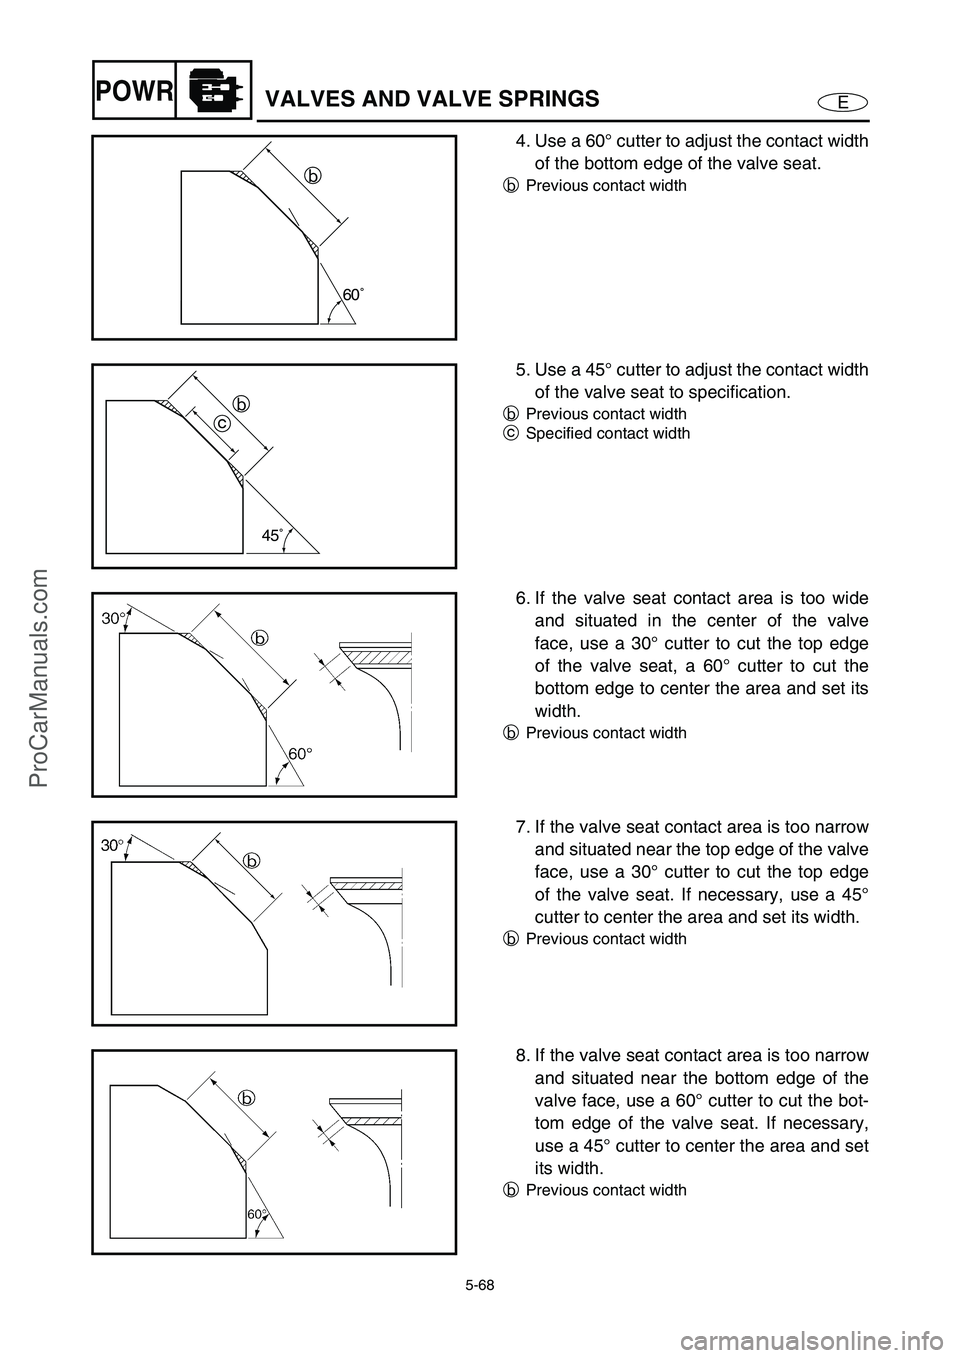
4. Use a 60° cutter to adjust the contact width
of the bottom edge of the valve seat.
bPrevious contact width
60˚
b
5. Use a 45° cutter to adjust the contact width
of the valve seat to specification.
bPrevious contact width
cSpecified contact width
45˚
b
c
6. If the valve seat contact area is too wide
and situated in the center of the valve
face, use a 30° cutter to cut the top edge
of the valve seat, a 60° cutter to cut the
bottom edge to center the area and set its
width.
bPrevious contact width
7. If the valve seat contact area is too narrow
and situated near the top edge of the valve
face, use a 30° cutter to cut the top edge
of the valve seat. If necessary, use a 45°
cutter to center the area and set its width.
bPrevious contact width
8. If the valve seat contact area is too narrow
and situated near the bottom edge of the
valve face, use a 60° cutter to cut the bot-
tom edge of the valve seat. If necessary,
use a 45° cutter to center the area and set
its width.
bPrevious contact width
ProCarManuals.com
Page 168 of 347
5-69
EPOWRVALVES AND VALVE SPRINGS
9. Apply a thin, even layer of lapping com-
pound onto the valve seat, and then lap
the valve using a valve lapper (commer-
cially available).
CAUTION:
Do not get the lapping compound on the
valve stem and valve guide.
10. After every lapping procedure, be sure to
clean off any remaining lapping compound
from the cylinder head and the valve.
11. Check the valve seat contact area of the
valve again.
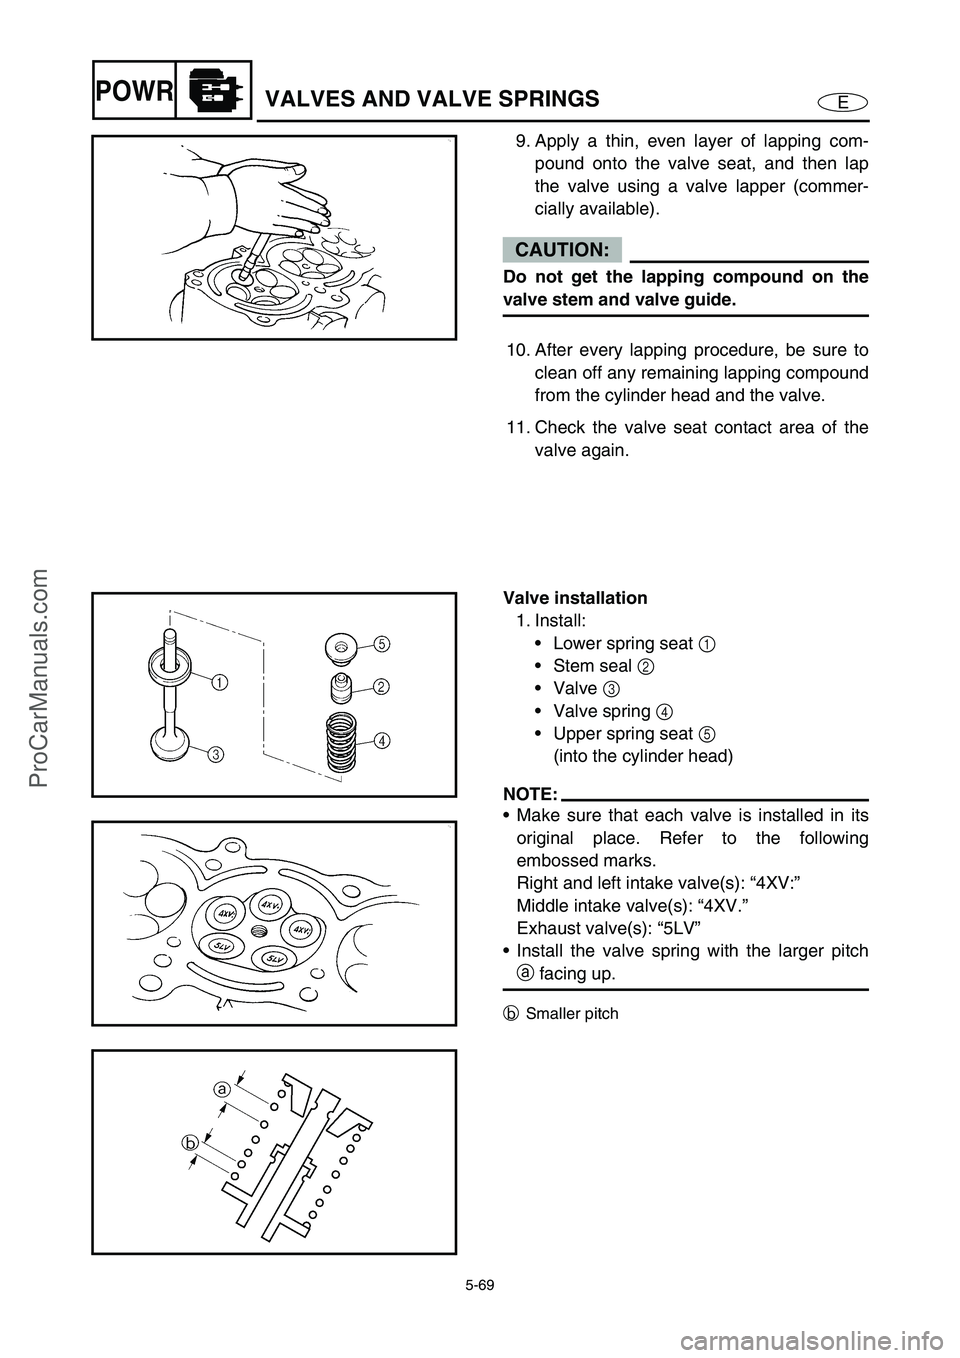
Valve installation
1. Install:
Lower spring seat 1
Stem seal 2
Valve 3
Valve spring 4
Upper spring seat 5
(into the cylinder head)
NOTE:
Make sure that each valve is installed in its
original place. Refer to the following
embossed marks.
Right and left intake valve(s): “4XV:”
Middle intake valve(s): “4XV.”
Exhaust valve(s): “5LV”
Install the valve spring with the larger pitch
a
facing up.
b
Smaller pitch
ProCarManuals.com
Page 169 of 347

5-70
EPOWRVALVES AND VALVE SPRINGS
2. Compress the valve spring, and then
install the valve cotter 1
using a thin
screwdriver with a small amount of grease
applied to it.
Valve spring compressor:
YM-01253/90890-04019
Valve spring compressor
attachment:
(for the intake valve):
YM-04114/90890-04114
(for the exhaust valve):
YM-04108/90890-04108
3. Lightly tap the valve spring retainer with a
plastic hammer to set the valve cotter
securely.
NOTE:
Apply engine oil to the valve pads and valve
lifters before installation.
ProCarManuals.com
Page 170 of 347

5-71
EPOWRCRANKCASE
CRANKCASE
EXPLODED DIAGRAM
REMOVAL AND INSTALLATION CHART
Step Procedure/Part name Q’ty Service points
OIL PAN AND CRANKCASE
REMOVALFollow the left “Step” for removal.
Engine unit Refer to “ENGINE UNIT”.
Intake assembly Refer to “FUEL INJECTION SYSTEM” in
Chapter 4.
Exhaust pipes 1 and 2 Refer to “EXHAUST PIPES 1 AND 2”.
Exhaust manifold Refer to “EXHAUST MANIFOLD”.
Generator cover Refer to “GENERATOR AND STARTER
MOTOR”.
Oil tank Refer to “OIL TANK”.
Oil pump Refer to “OIL PUMP”.
*: Loosen completely
6
21 20
20 11
10 9
87
23
4
5
16
151718
13 14
1219
1
LT
271
LT
LT
572
LT
LT
572
LT
LT
572
LT
LT
572
LT
LT
572
LT
E
E
AA
12 N •
m (1.2 kgf • m, 8.7 ft • Ib)
6 × 70 mm
12 N •
m (1.2 kgf • m, 8.7 ft • Ib)
6 × 20 mm
20 N •
m (2.0 kgf • m, 14 ft • Ib)
8 × 40 mm
2nd *
3rd 15 N • m (1.5 kgf
• m, 11 ft
• Ib) 1st 7.8 N • m (0.78 kgf
• m, 5.6 ft
• Ib)
9 × 105 mm
4th 49 ± 5˚
8.4 N •
m (0.84 kgf • m, 6.1 ft • Ib)
12 N •
m (1.2 kgf • m, 8.7 ft • Ib)
6 × 55 mm
12 N •
m (1.2 kgf • m, 8.7 ft • Ib)
6 × 55 mm
7.6 N •
m (0.76 kgf • m, 5.5 ft • Ib)
6 × 16 mm
15 N •
m (1.5 kgf • m, 11 ft • Ib)
12 N •
m (1.2 kgf • m, 8.7 ft • Ib)
6 × 20 mm
18
AA
1280B
ProCarManuals.com