ACURA NSX 1991 Service Repair Manual
Manufacturer: ACURA, Model Year: 1991, Model line: NSX, Model: ACURA NSX 1991Pages: 1640, PDF Size: 60.48 MB
Page 1031 of 1640
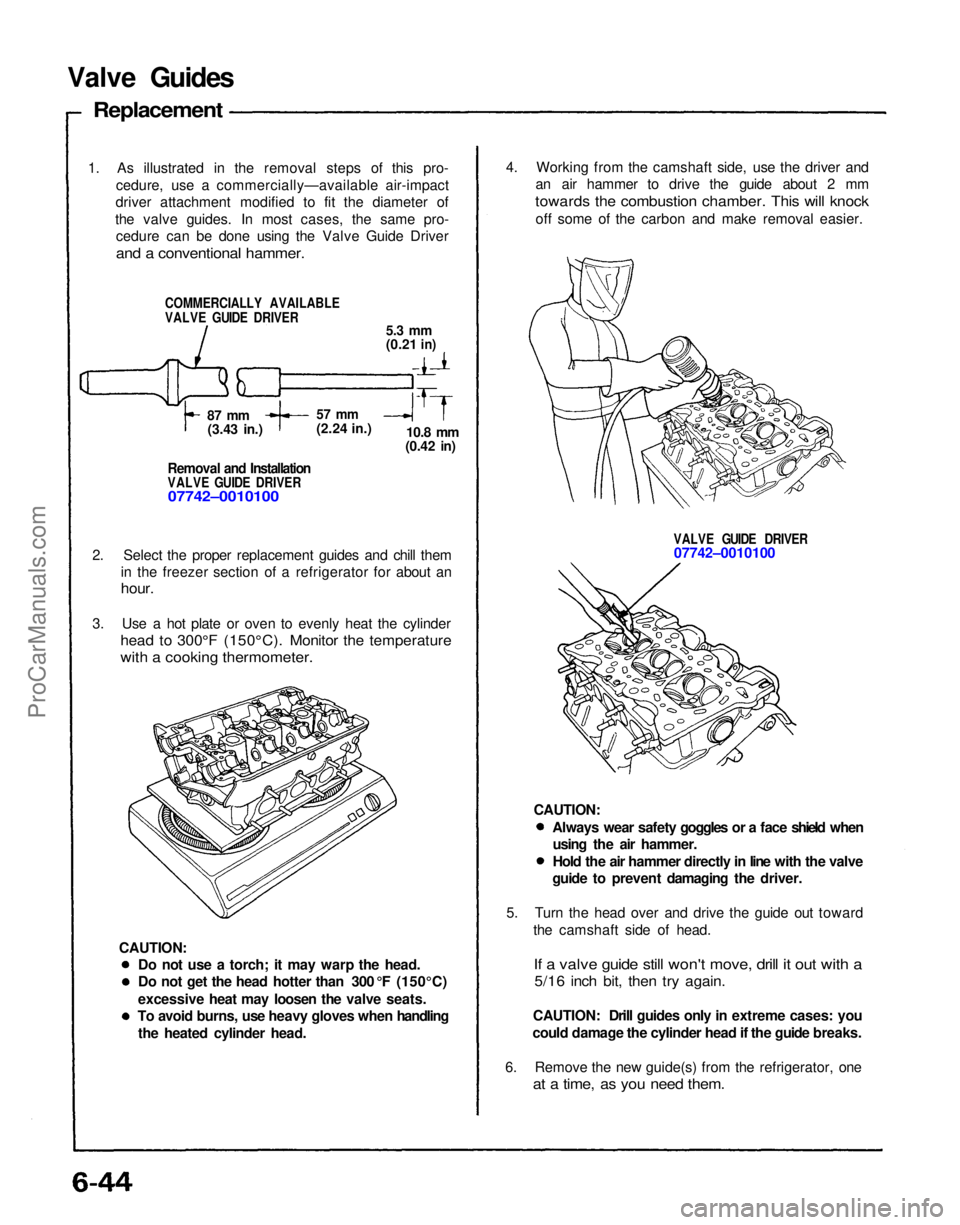
4. Working from the camshaft side, use the driver and
an air hammer to drive the guide about 2 mm
towards the combustion chamber. This will knock
off some of the carbon and make removal easier.
VALVE GUIDE DRIVER
07742–0010100
5. Turn the head over and drive the guide out toward the camshaft side of head.
If a valve guide still won't move, drill it out with a
5/16 inch bit, then try again.
CAUTION: Drill guides only in extreme cases: you
could damage the cylinder head if the guide breaks.
6. Remove the new guide(s) from the refrigerator, one
at a time, as you need them.
Do not use a torch; it may warp the head.
Do not get the head hotter than 300 °F (150°C)
excessive heat may loosen the valve seats.
To avoid burns, use heavy gloves when handling
the heated cylinder head.
Valve Guides
Replacement
1. As illustrated in the removal steps of this pro- cedure, use a commercially—available air-impact
driver attachment modified to fit the diameter of
the valve guides. In most cases, the same pro- cedure can be done using the Valve Guide Driver
and a conventional hammer.
COMMERCIALLY AVAILABLE
VALVE GUIDE DRIVER
5.3 mm
(0.21
in)
87 mm
(3.43 in.)
57 mm
(2.24 in.)
10.8
mm
(0.42
in)
Removal and Installation
VALVE GUIDE DRIVER
07742–0010100
2. Select the proper replacement guides and chill them in the freezer section of a refrigerator for about an
hour.
3. Use a hot plate or oven to evenly heat the cylinder
head to 300°F (150°C). Monitor the temperature
with a cooking thermometer.
CAUTION: Always wear safety goggles or a face shield when
using the air hammer.
Hold the air hammer directly in line with the valve
guide to prevent damaging the driver.
CAUTION:ProCarManuals.com
Page 1032 of 1640
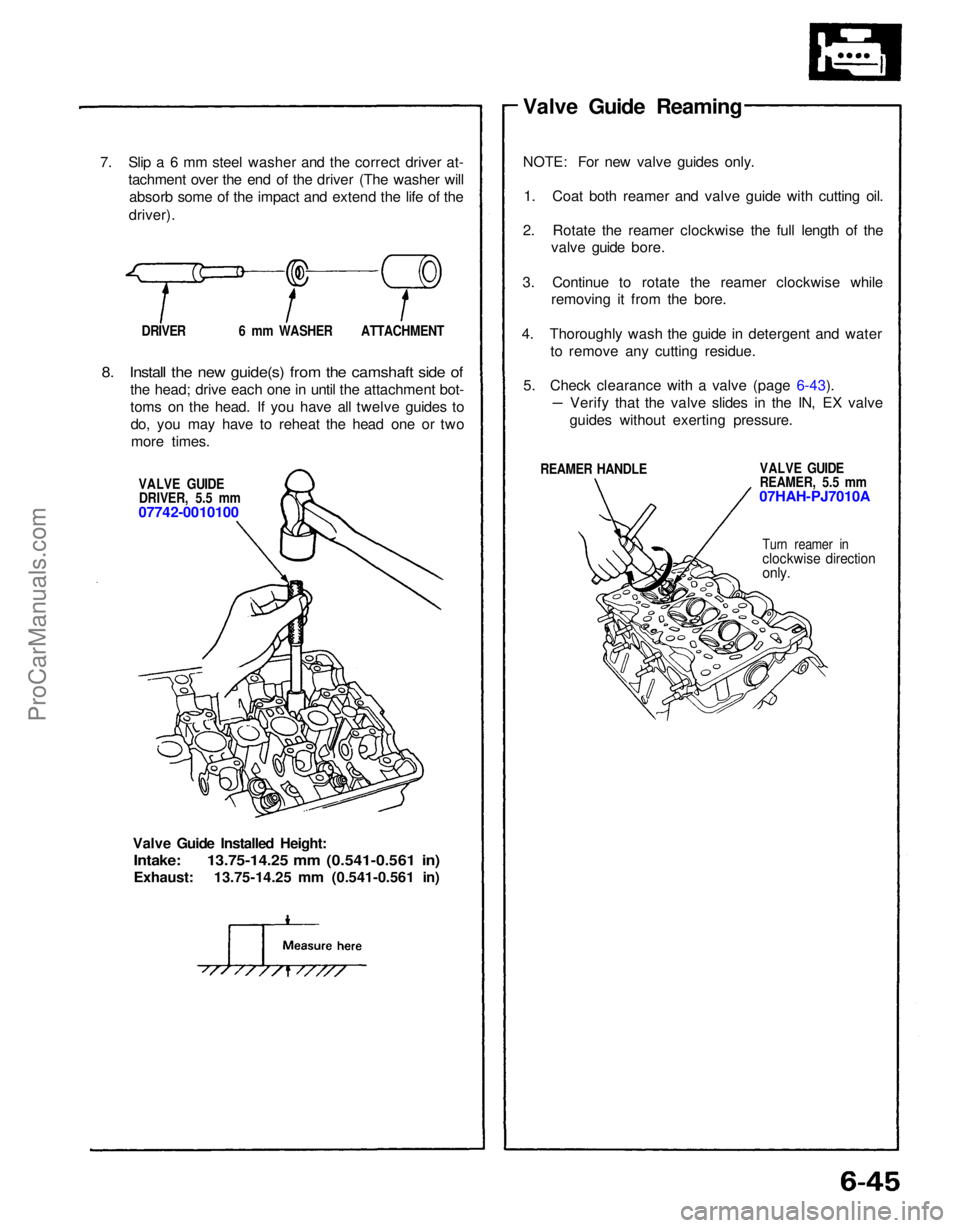
7. Slip a 6 mm steel washer and the correct driver at-
tachment over the end of the driver (The washer willabsorb some of the impact and extend the life of the
driver).
DRIVER 6 mm WASHER ATTACHMENT
8. Install the new guide(s) from the camshaft side of
the head; drive each one in until the attachment bot-
toms on the head. If you have all twelve guides todo, you may have to reheat the head one or twomore times.
VALVE GUIDEDRIVER, 5.5 mm
07742-0010100
Valve Guide Installed Height:
Intake: 13.75-14.25 mm (0.541-0.561 in)
Exhaust: 13.75-14.25 mm (0.541-0.561 in) Valve Guide Reaming
NOTE: For new valve guides only.
1. Coat both reamer and valve guide with cutting oil.
2. Rotate the reamer clockwise the full length of the valve guide bore.
3. Continue to rotate the reamer clockwise while removing it from the bore.
4. Thoroughly wash the guide in detergent and water to remove any cutting residue.
5. Check clearance with a valve (page 6-43).
REAMER HANDLE VALVE GUIDE
REAMER, 5.5 mm
07HAH-PJ7010A
Turn reamer in
clockwise direction
only.
Verify that the valve slides in the IN, EX valve
guides without exerting pressure.ProCarManuals.com
Page 1033 of 1640
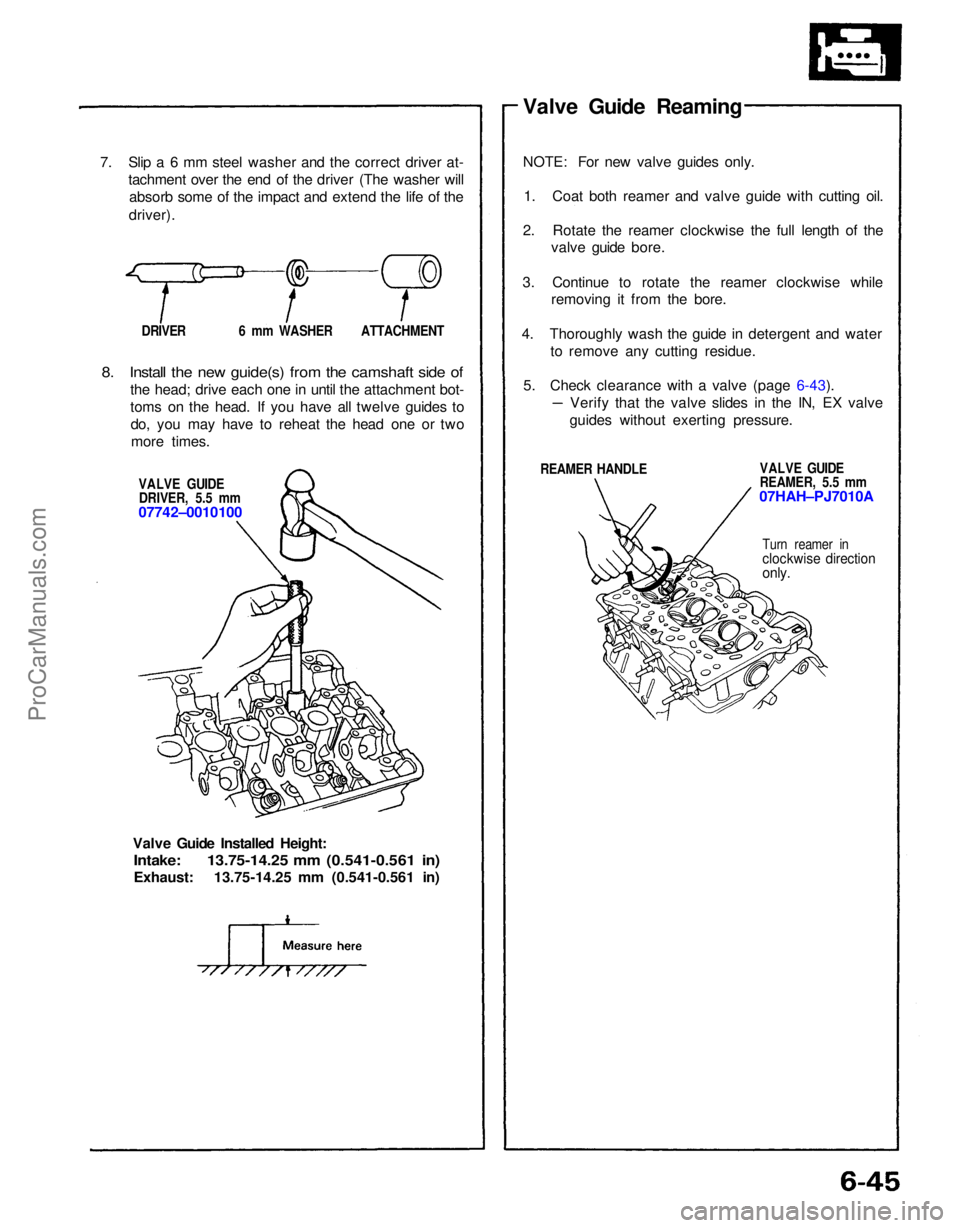
7. Slip a 6 mm steel washer and the correct driver at-
tachment over the end of the driver (The washer willabsorb some of the impact and extend the life of the
driver).
DRIVER 6 mm WASHER ATTACHMENT
8. Install the new guide(s) from the camshaft side of
the head; drive each one in until the attachment bot-
toms on the head. If you have all twelve guides todo, you may have to reheat the head one or twomore times.
VALVE GUIDEDRIVER, 5.5 mm
07742–0010100
Valve Guide Installed Height:
Intake: 13.75-14.25 mm (0.541-0.561 in)
Exhaust: 13.75-14.25 mm (0.541-0.561 in) Valve Guide Reaming
NOTE: For new valve guides only.
1. Coat both reamer and valve guide with cutting oil.
2. Rotate the reamer clockwise the full length of the valve guide bore.
3. Continue to rotate the reamer clockwise while removing it from the bore.
4. Thoroughly wash the guide in detergent and water to remove any cutting residue.
5. Check clearance with a valve (page 6-43).
REAMER HANDLE VALVE GUIDE
REAMER, 5.5 mm
07HAH–PJ7010A
Turn reamer in
clockwise direction
only.
Verify that the valve slides in the IN, EX valve
guides without exerting pressure.ProCarManuals.com
Page 1034 of 1640
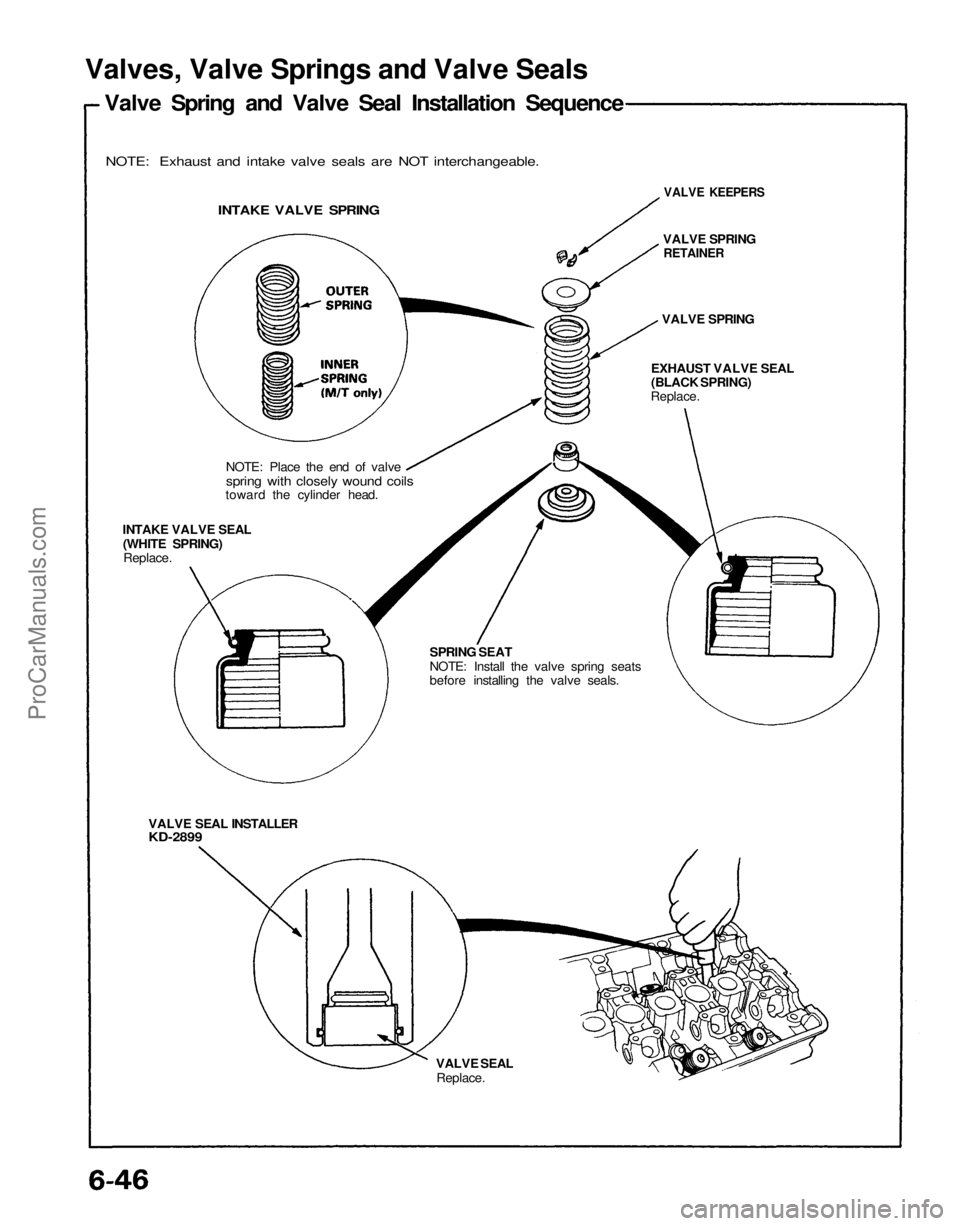
Valves, Valve Springs and Valve Seals
Valve Spring and Valve Seal Installation Sequence
NOTE: Exhaust and intake valve seals are NOT interchangeable.
INTAKE VALVE SPRING
NOTE: Place the end of valve
spring with closely wound coils
toward the cylinder head.
INTAKE VALVE SEAL
(WHITE SPRING)
Replace.
VALVE SEAL INSTALLER
KD-2899
VALVE SEAL
Replace.
VALVE KEEPERS
VALVE SPRING
RETAINER
VALVE SPRING
EXHAUST VALVE SEAL
(BLACK SPRING)
Replace.
SPRING SEAT
NOTE: Install the valve spring seats
before installing the valve seals.ProCarManuals.com
Page 1035 of 1640
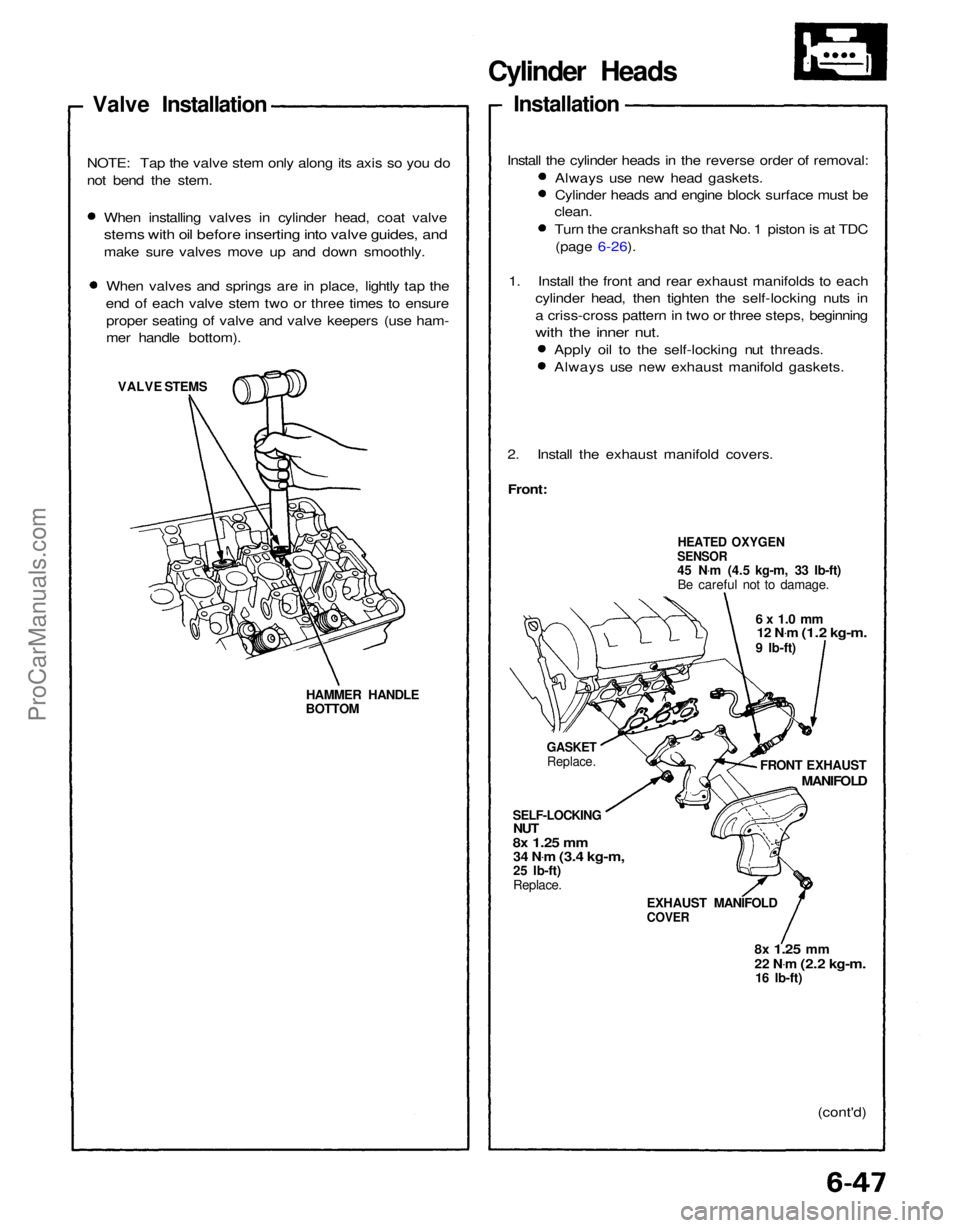
Cylinder Heads
Installation
2. Install the exhaust manifold covers.
Front:
HEATED OXYGEN
SENSOR
45 N .
m (4.5 kg-m, 33 Ib-ft)
Be careful not to damage.
6 x 1.0 mm
12 N .
m
(1.2 kg-m.
9 Ib-ft)
GASKET
Replace.
SELF-LOCKING
NUT
8x
1.25
mm
34 N .
m
(3.4 kg-m,
25 Ib-ft)
Replace.
EXHAUST MANIFOLD
COVER
(cont'd)
8x
1.25
mm
22 N
.
m
(2.2 kg-m.
16 Ib-ft) FRONT EXHAUST
MANIFOLD
Valve Installation
When installing valves in cylinder head, coat valve
stems with oil before inserting into valve guides, and
make sure valves move up and down smoothly.When valves and springs are in place, lightly tap the
end of each valve stem two or three times to ensure proper seating of valve and valve keepers (use ham-
mer handle bottom).
VALVE STEMS
HAMMER HANDLE
BOTTOM
NOTE: Tap the valve stem only along its axis so you do
not bend the stem.
Apply oil to the self-locking nut threads.
Always use new exhaust manifold gaskets.
1. Install the front and rear exhaust manifolds to each
cylinder head, then tighten the self-locking nuts in
a criss-cross pattern in two or three steps, beginning
with the inner nut.
Always use new head gaskets.
Cylinder heads and engine block surface must be
clean.
Turn the crankshaft so that No. 1 piston is at TDC
(page 6-26).
Install the cylinder heads in the reverse order of removal:ProCarManuals.com
Page 1036 of 1640
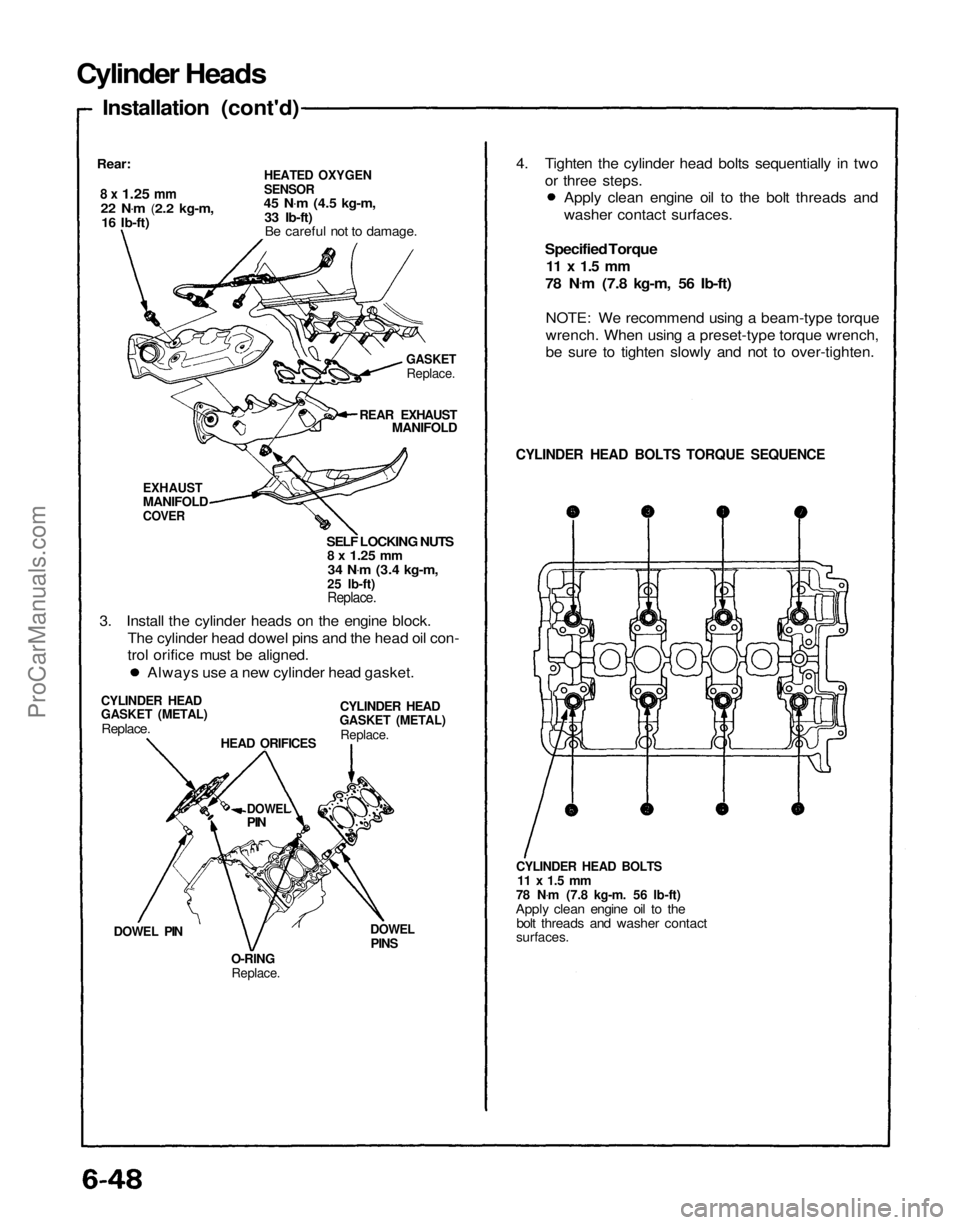
Cylinder Heads
Installation (cont'd)
Rear:
8 x
1.25
mm
22 N .
m
(2.2 kg-m,
16 Ib-ft)
HEATED OXYGEN
SENSOR
45 N .
m
(4.5 kg-m,
33 Ib-ft) Be careful not to damage.
GASKET
Replace.
REAR EXHAUST
MANIFOLD
EXHAUST
MANIFOLD
COVER
SELF LOCKING NUTS
8 x
1.25
mm
34 N .
m
(3.4 kg-m,
25 Ib-ft)
Replace.
3. Install the cylinder heads on the engine block. The cylinder head dowel pins and the head oil con-
trol orifice must be aligned.
CYLINDER HEAD
GASKET (METAL)
Replace.
CYLINDER HEAD
GASKET (METAL)
Replace.
HEAD ORIFICES
DOWEL
PIN
DOWEL PIN
O-RING
Replace.
DOWEL
PINS
CYLINDER HEAD BOLTS
11 x 1.5 mm
78 N .
m (7.8 kg-m. 56 Ib-ft)
Apply clean engine oil to the bolt threads and washer contact
surfaces.
CYLINDER HEAD BOLTS TORQUE SEQUENCE
Specified Torque
11 x 1.5 mm
78 N .
m (7.8 kg-m, 56 Ib-ft)
NOTE: We recommend using a beam-type torque
wrench. When using a preset-type torque wrench,
be sure to tighten slowly and not to over-tighten.
Always use a new cylinder head gasket. Apply clean engine oil to the bolt threads and
washer contact surfaces.
4. Tighten the cylinder head bolts sequentially in two
or three steps.ProCarManuals.com
Page 1037 of 1640
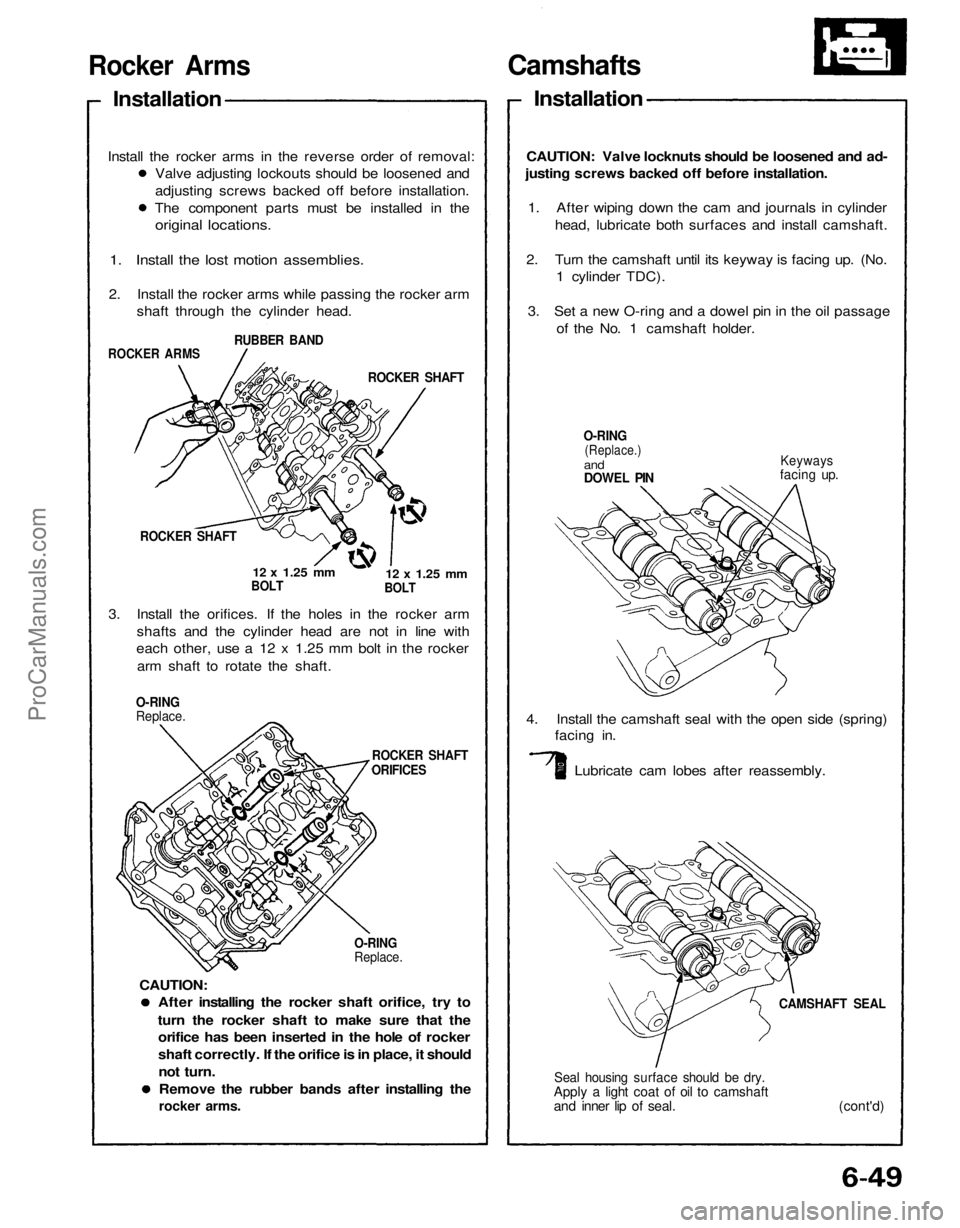
Camshafts
Installation
CAUTION: Valve locknuts should be loosened and ad-
justing screws backed off before installation.
1. After wiping down the cam and journals in cylinder
head, lubricate both surfaces and install camshaft.
2. Turn the camshaft until its keyway is facing up. (No.
1 cylinder TDC).
3. Set a new O-ring and a dowel pin in the oil passage
of the No. 1 camshaft holder.
O-RING
(Replace.)
and
DOWEL PIN
Keyways
facing up.
4. Install the camshaft seal with the open side (spring)
facing in.
Lubricate cam lobes after reassembly.
CAMSHAFT SEAL
Seal housing surface should be dry.
Apply a light coat of oil to camshaft
and inner lip of seal. (cont'd)
After installing the rocker shaft orifice, try to
turn the rocker shaft to make sure that the
orifice has been inserted in the hole of rocker
shaft correctly. If the orifice is in place, it should
not turn.
Remove the rubber bands after installing the
rocker arms.
O-RING
Replace.
ROCKER SHAFT
ORIFICES
O-RING
Replace.
3. Install the orifices. If the holes in the rocker arm
shafts and the cylinder head are not in line with
each other, use a 12 x 1.25 mm bolt in the rocker
arm shaft to rotate the shaft.
ROCKER SHAFT
12 x
1.25
mm
BOLT
12 x
1.25
mm
BOLT
ROCKER SHAFT
ROCKER ARMS
RUBBER BAND
1. Install the lost motion assemblies.
2. Install the rocker arms while passing the rocker arm
shaft through the cylinder head.
Rocker Arms
Installation
Valve adjusting lockouts should be loosened and
adjusting screws backed off before installation.
The component parts must be installed in the
original locations.
Install the rocker arms in the reverse order of removal:
CAUTION:ProCarManuals.com
Page 1038 of 1640
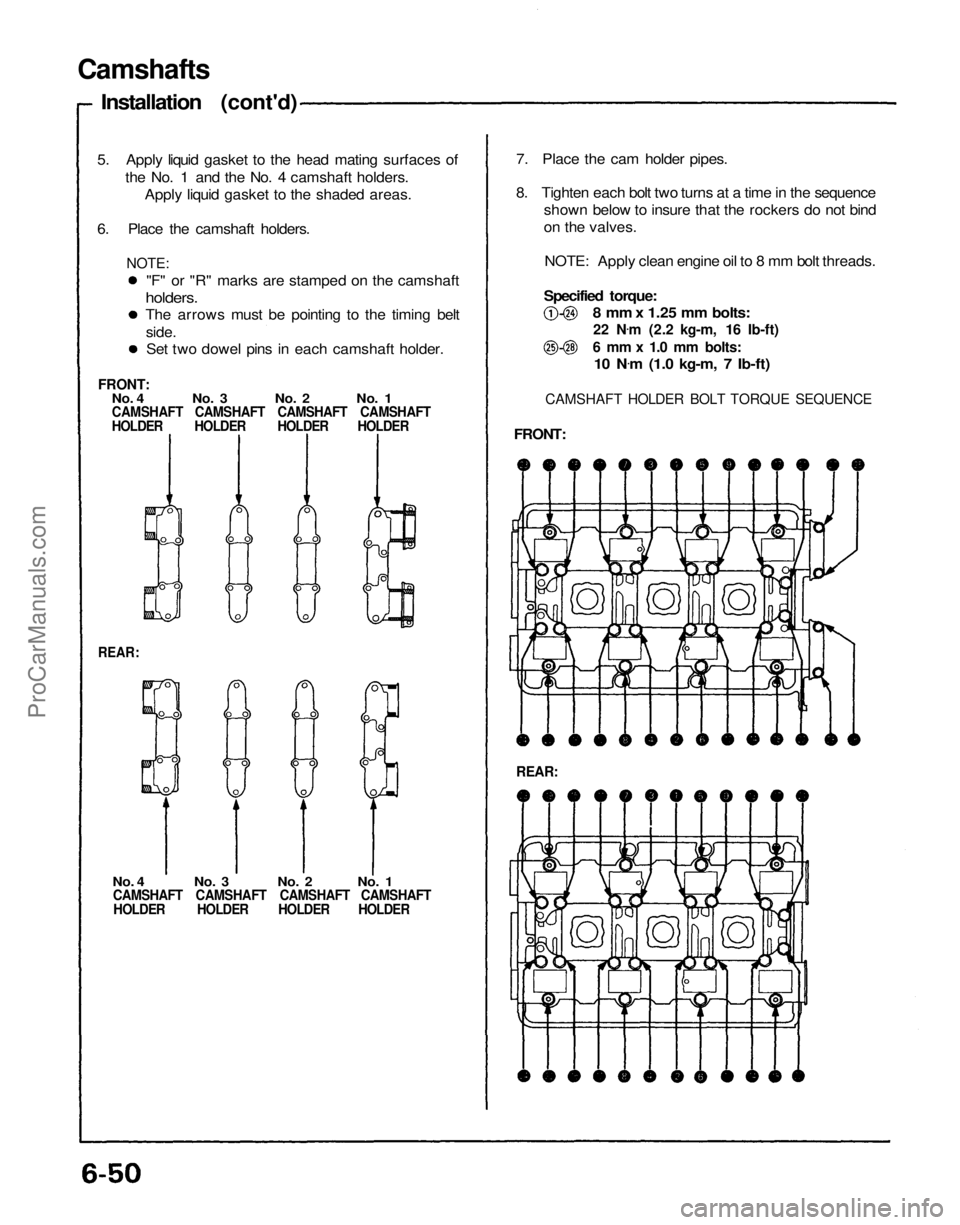
Camshafts
Installation (cont'd)
5. Apply liquid gasket to the head mating surfaces of the No. 1 and the No. 4 camshaft holders.Apply liquid gasket to the shaded areas.
6. Place the camshaft holders.
REAR:
No. 4 No. 3 No. 2 No. 1
CAMSHAFT CAMSHAFT CAMSHAFT CAMSHAFT
HOLDER HOLDER HOLDER HOLDER
REAR:
7. Place the cam holder pipes.
8. Tighten each bolt two turns at a time in the sequence
shown below to insure that the rockers do not bind
on the valves.
NOTE: Apply clean engine oil to 8 mm bolt threads.
Specified torque: 8 mm x 1.25 mm bolts:
22 N .
m (2.2 kg-m, 16 Ib-ft)
6 mm x 1.0 mm bolts:
10 N .
m (1.0 kg-m, 7 Ib-ft)
CAMSHAFT HOLDER BOLT TORQUE SEQUENCE
FRONT:
NOTE:
"F" or "R" marks are stamped on the camshaft
holders.
The arrows must be pointing to the timing belt
side.Set two dowel pins in each camshaft holder.
FRONT:
No. 4 No. 3 No. 2 No. 1
CAMSHAFT CAMSHAFT CAMSHAFT CAMSHAFT
HOLDER HOLDER HOLDER HOLDERProCarManuals.com
Page 1039 of 1640
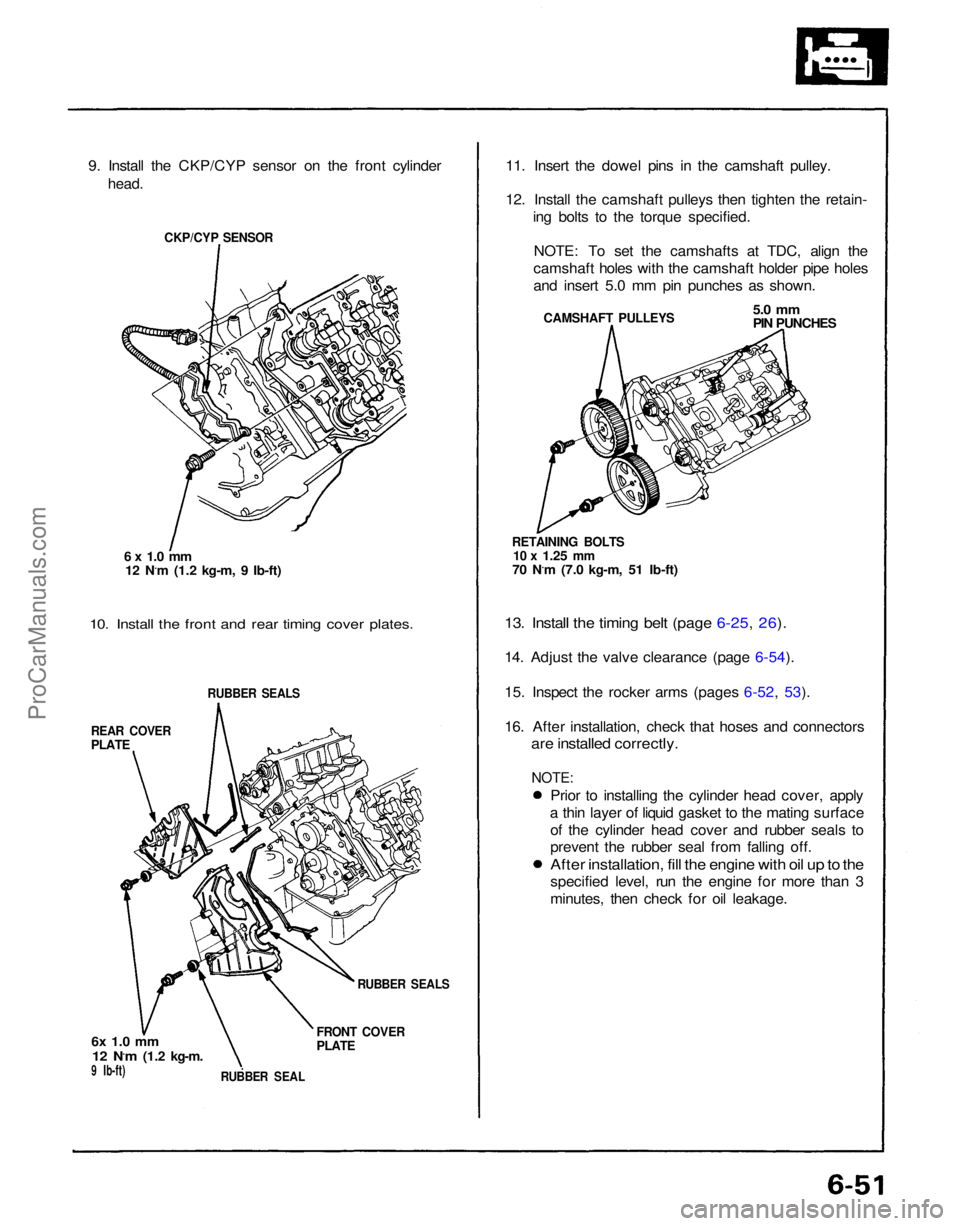
9. Install the CKP/CYP sensor on the front cylinder
head.
CKP/CYP SENSOR
6 x 1.0 mm
12 N.m (1.2 kg-m, 9 Ib-ft)
10. Install the front and rear timing cover plates.
RUBBER SEALS
REAR COVER
PLATE
6x 1.0 mm
12 N.m
(1.2 kg-m.
9 Ib-ft)
RUBBER SEAL
FRONT COVER
PLATE
RUBBER SEALS
11. Insert the dowel pins in the camshaft pulley.
12. Install the camshaft pulleys then tighten the retain-
ing bolts to the torque specified.
NOTE: To set the camshafts at TDC, align the
camshaft holes with the camshaft holder pipe holes
and insert 5.0 mm pin punches as shown.
CAMSHAFT PULLEYS
5.0 mm
PIN PUNCHES
RETAINING BOLTS
10 x
1.25
mm
70 N.m (7.0 kg-m, 51 Ib-ft)
13. Install the timing belt (page 6-25, 26).
14. Adjust the valve clearance (page 6-54).
15. Inspect the rocker arms (pages 6-52, 53).
16. After installation, check that hoses and connectors
are installed correctly.
Prior to installing the cylinder head cover, apply
a thin layer of liquid gasket to the mating surface of the cylinder head cover and rubber seals to
prevent the rubber seal from falling off.
After installation, fill the engine with oil up to the
specified level, run the engine for more than 3
minutes, then check for oil leakage.
NOTE:ProCarManuals.com
Page 1040 of 1640
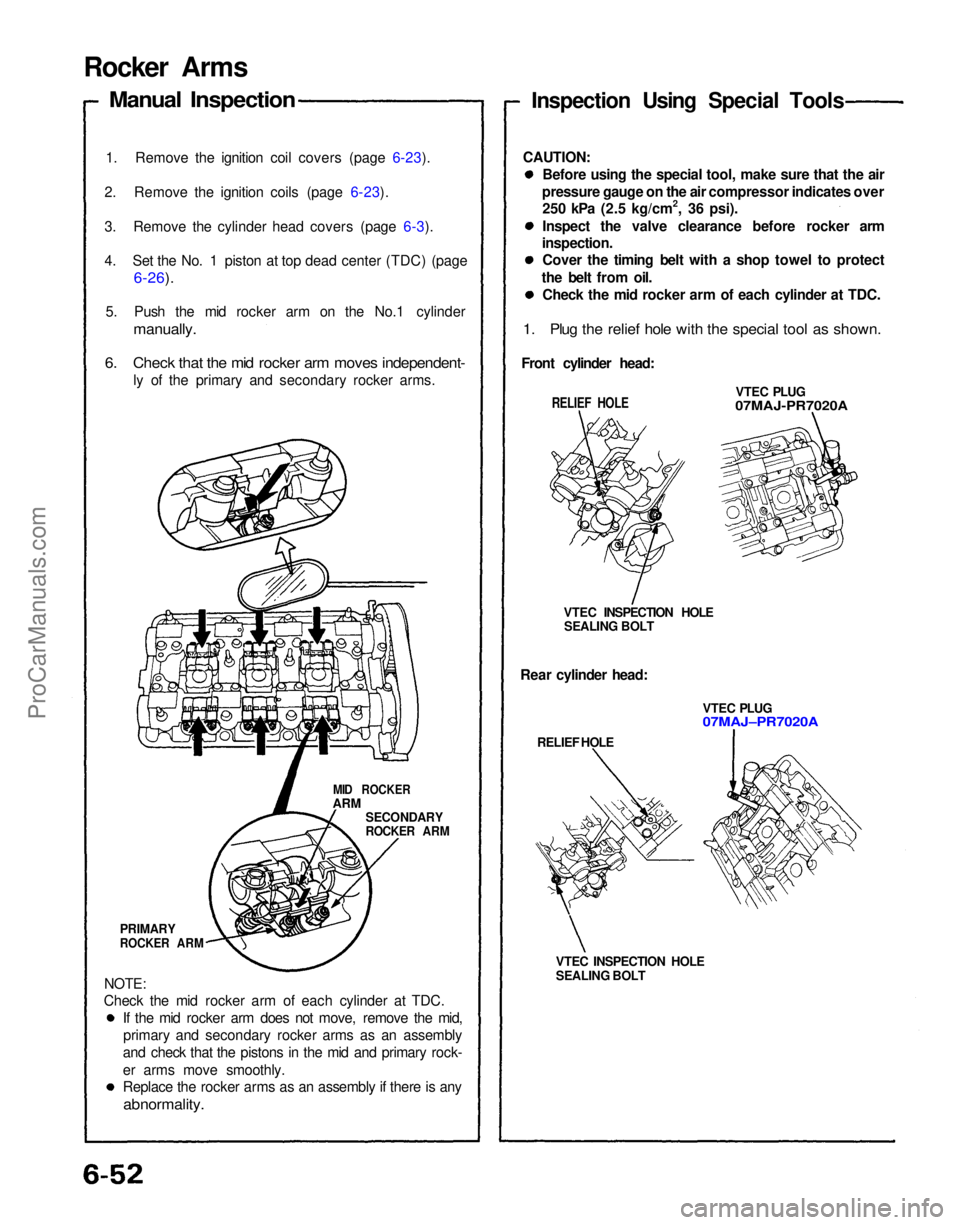
Rocker Arms
Manual Inspection
1. Remove the ignition coil covers (page 6-23).
2. Remove the ignition coils (page 6-23).
3. Remove the cylinder head covers (page 6-3).
4. Set the No. 1 piston at top dead center (TDC) (page
6-26).
5. Push the mid rocker arm on the No.1 cylinder
manually.
6. Check that the mid rocker arm moves independent-
ly of the primary and secondary rocker arms.
MID ROCKER
ARM
SECONDARY
ROCKER ARM
PRIMARY
ROCKER ARM
If the mid rocker arm does not move, remove the mid,primary and secondary rocker arms as an assembly
and check that the pistons in the mid and primary rock-
er arms move smoothly.
Replace the rocker arms as an assembly if there is any
abnormality.
VTEC INSPECTION HOLE
SEALING BOLT
RELIEF HOLE
VTEC PLUG
07MAJ–PR7020A
Rear cylinder head: VTEC INSPECTION HOLE
SEALING BOLT VTEC PLUG
07MAJ-PR7020A
Front cylinder head:
RELIEF HOLE
Before using the special tool, make sure that the air
pressure gauge on the air compressor indicates over 250 kPa (2.5 kg/cm2, 36 psi).
Inspect the valve clearance before rocker arm
inspection. Cover the timing belt with a shop towel to protect
the belt from oil. Check the mid rocker arm of each cylinder at TDC.
Inspection Using Special Tools
NOTE:
Check the mid rocker arm of each cylinder at TDC.
1. Plug the relief hole with the special tool as shown.
CAUTION:ProCarManuals.com