ACURA NSX 1997 Service Repair Manual
Manufacturer: ACURA, Model Year: 1997, Model line: NSX, Model: ACURA NSX 1997Pages: 1503, PDF Size: 57.08 MB
Page 611 of 1503
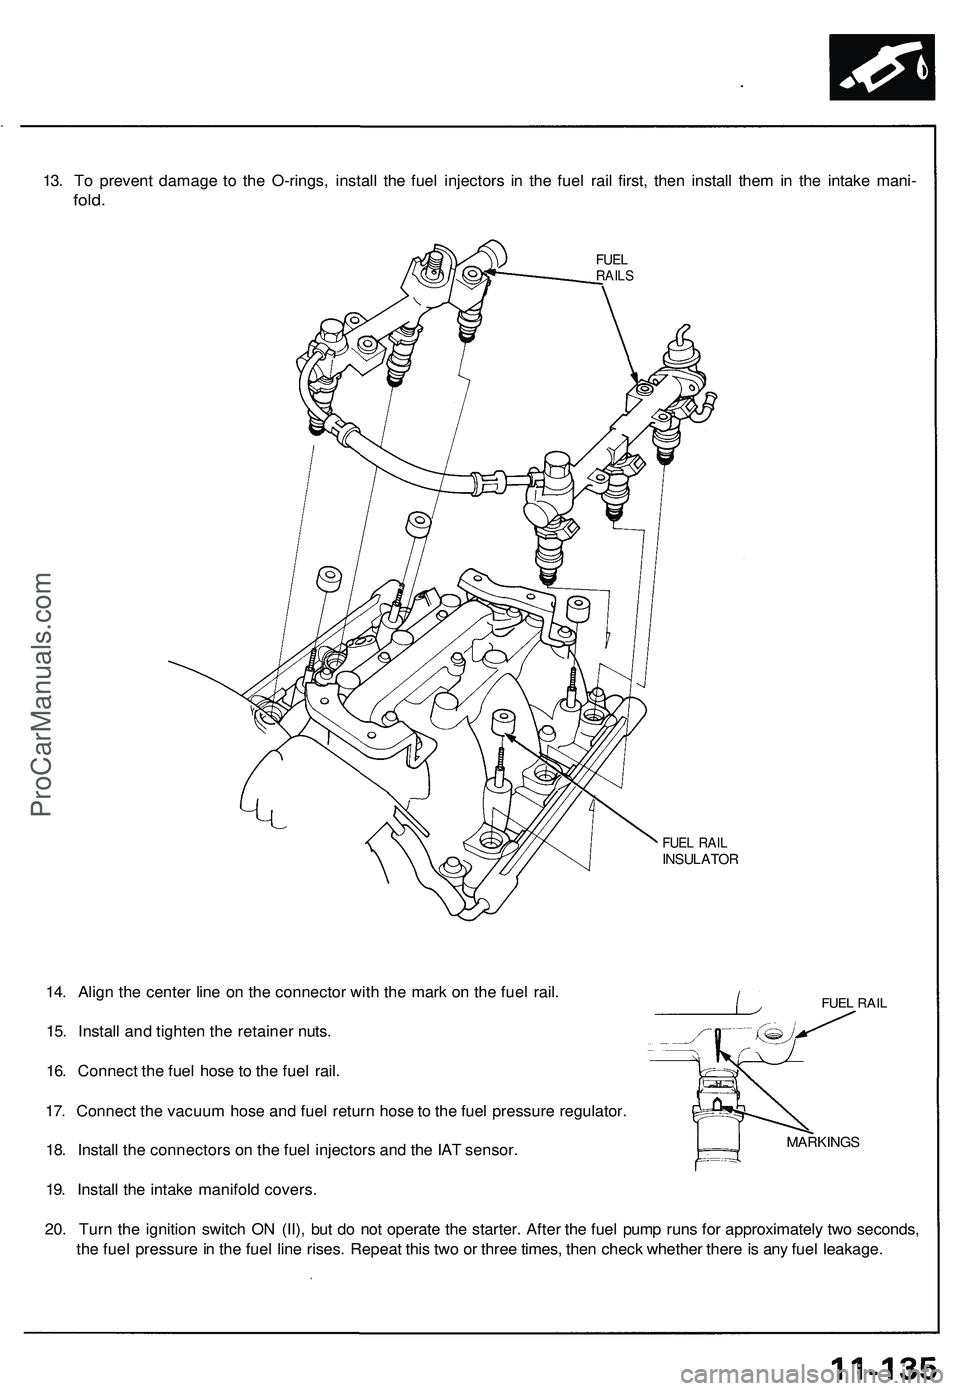
13. To prevent damage to the O-rings, install the fuel injectors in the fuel rail first, then install them in the intake mani-
fold.
FUEL
RAILS
FUEL RAIL
INSULATOR
FUEL RAIL
14. Align the center line on the connector with the mark on the fuel rail.
15. Install and tighten the retainer nuts.
16. Connect the fuel hose to the fuel rail.
17. Connect the vacuum hose and fuel return hose to the fuel pressure regulator.
18. Install the connectors on the fuel injectors and the IAT sensor.
19. Install the intake manifold covers.
20. Turn the ignition switch ON (II), but do not operate the starter. After the fuel pump runs for approximately two seconds,
the fuel pressure in the fuel line rises. Repeat this two or three times, then check whether there is any fuel leakage.
MARKINGSProCarManuals.com
Page 612 of 1503
Fuel Supply System
Fuel Injector Resistor (A/T)
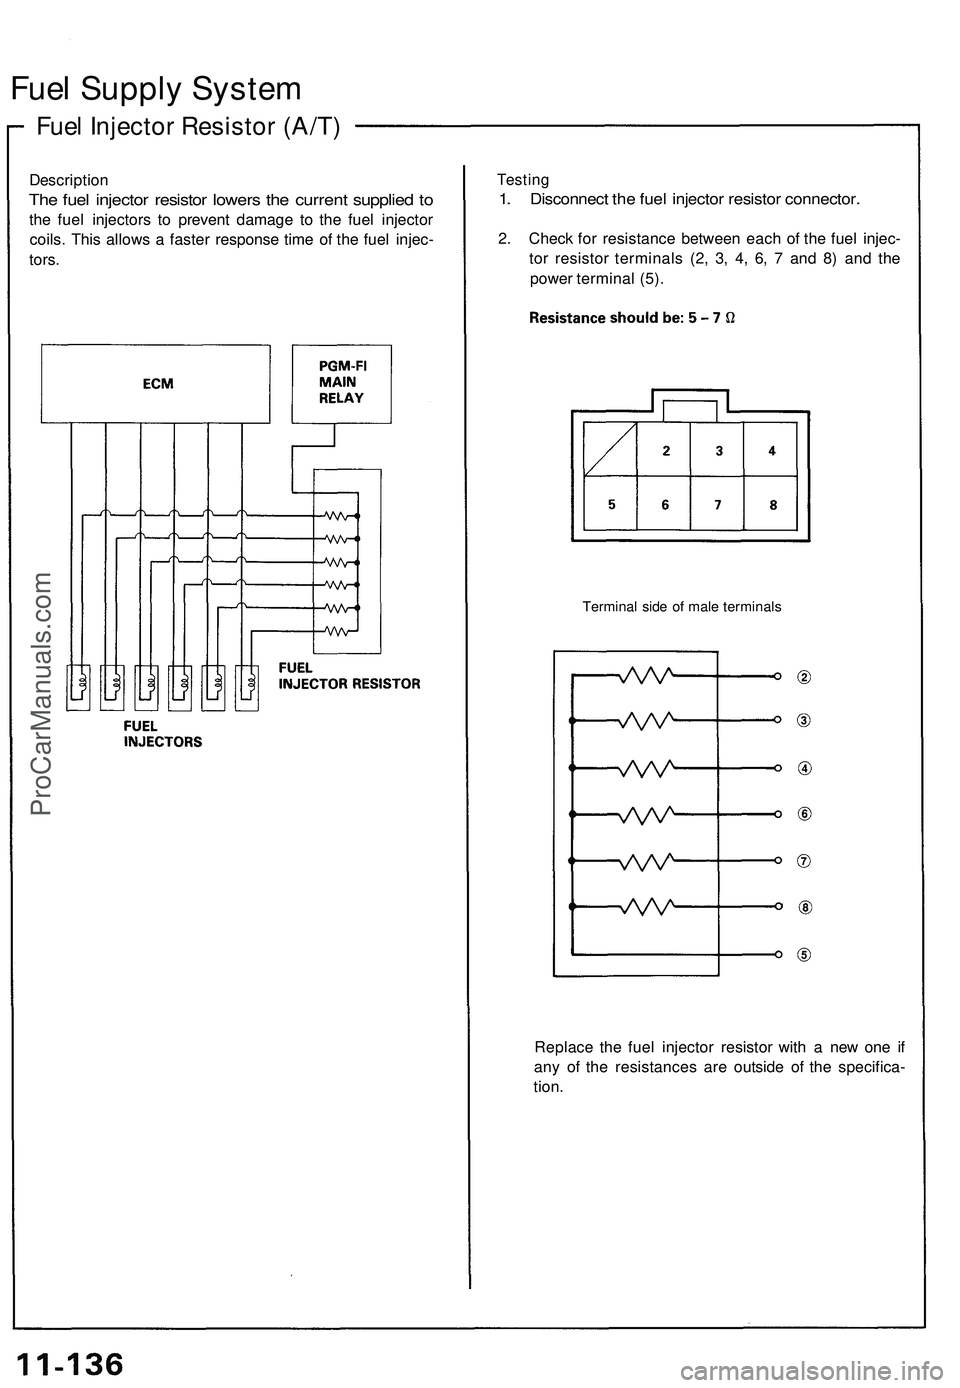
Description
The fuel injector resistor lowers the current supplied to
the fuel injectors to prevent damage to the fuel injector
coils. This allows a faster response time of the fuel injec-
tors.
Testing
1. Disconnect the fuel injector resistor connector.
2. Check for resistance between each of the fuel injec-
tor resistor terminals (2, 3, 4, 6, 7 and 8) and the
power terminal (5).
Terminal side of male terminals
Replace the fuel injector resistor with a new one if
any of the resistances are outside of the specifica-
tion.ProCarManuals.com
Page 613 of 1503
Fuel Pressur e Regulato r
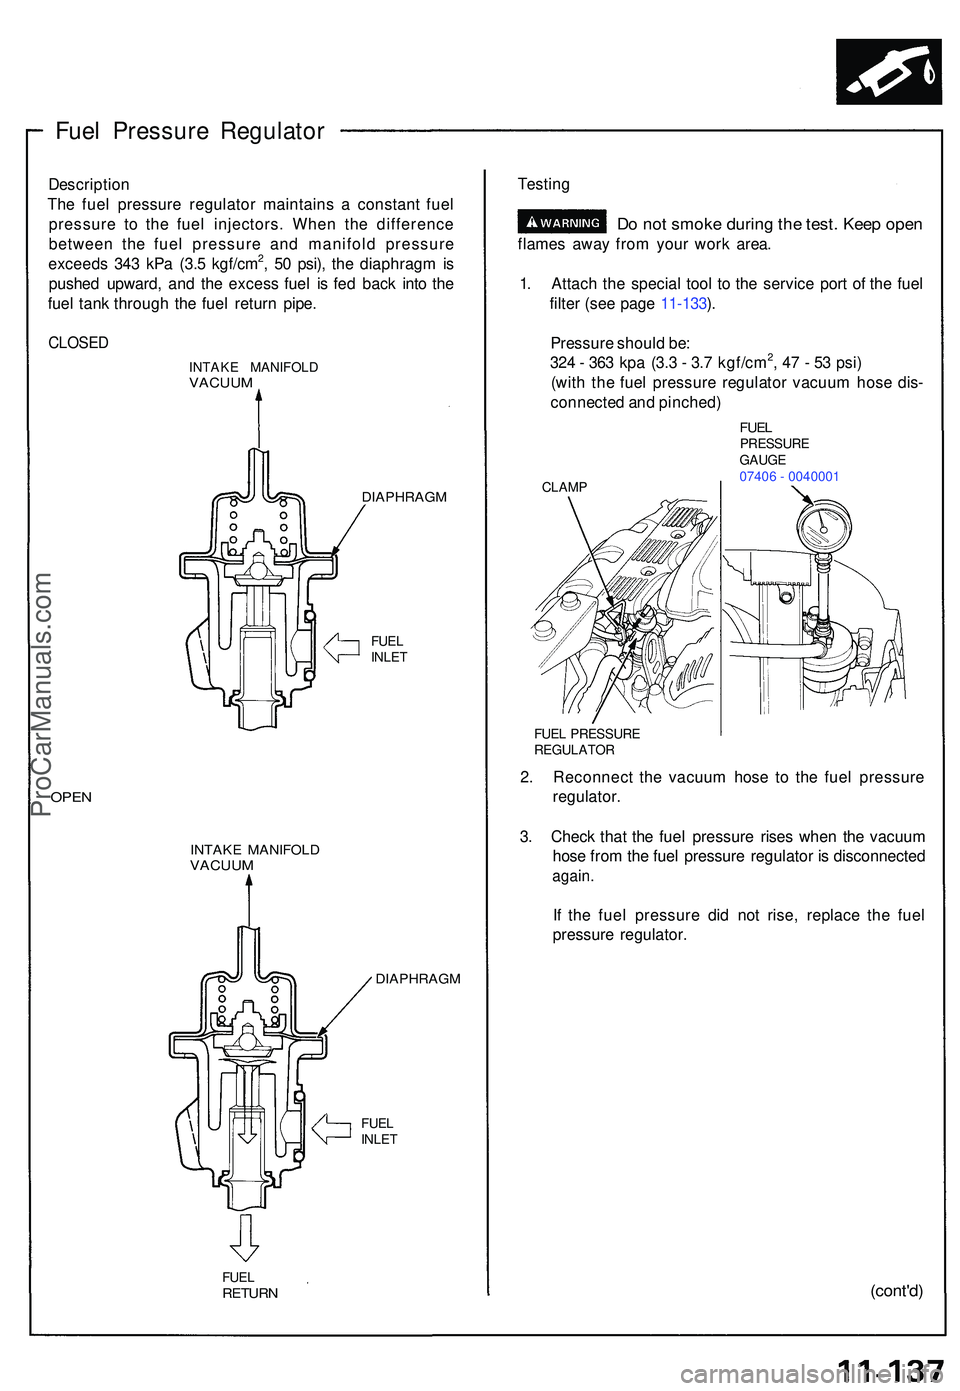
Descriptio n
Th e fue l pressur e regulato r maintain s a constan t fue l
pressur e t o th e fue l injectors . Whe n th e differenc e
betwee n th e fue l pressur e an d manifol d pressur e
exceed s 34 3 kP a (3. 5 kgf/cm
2, 5 0 psi) , th e diaphrag m is
pushe d upward , an d th e exces s fue l i s fe d bac k int o th e
fue l tan k throug h th e fue l retur n pipe .
CLOSE D
INTAKE MANIFOL DVACUUM
DIAPHRAG M
FUEL
INLE T
OPEN
INTAK E MANIFOL DVACUUM
DIAPHRAG M
FUEL
INLE T
FUE L
RETUR N
FUEL PRESSUR EREGULATO R
2. Reconnec t th e vacuu m hos e t o th e fue l pressur e
regulator .
3 . Chec k tha t th e fue l pressur e rise s whe n th e vacuu m
hos e fro m th e fue l pressur e regulato r i s disconnecte d
again.
If th e fue l pressur e di d no t rise , replac e th e fue l
pressur e regulator .
(cont'd)
1. Attac h th e specia l too l t o th e servic e por t o f th e fue l
filte r (se e pag e 11-133 ).
Pressur e shoul d be :
32 4 - 36 3 kp a (3. 3 - 3. 7 kgf/cm
2, 4 7 - 5 3 psi )
(wit h th e fue l pressur e regulato r vacuu m hos e dis -
connecte d an d pinched )
Testin
g
Do no t smok e durin g th e test . Kee p ope n
flame s awa y fro m you r wor k area .
CLAM P
FUELPRESSUR E
GAUG E
07406 - 0040001
ProCarManuals.com
Page 614 of 1503
Fuel Suppl y Syste m
Fuel Pressur e Regulato r (cont'd )
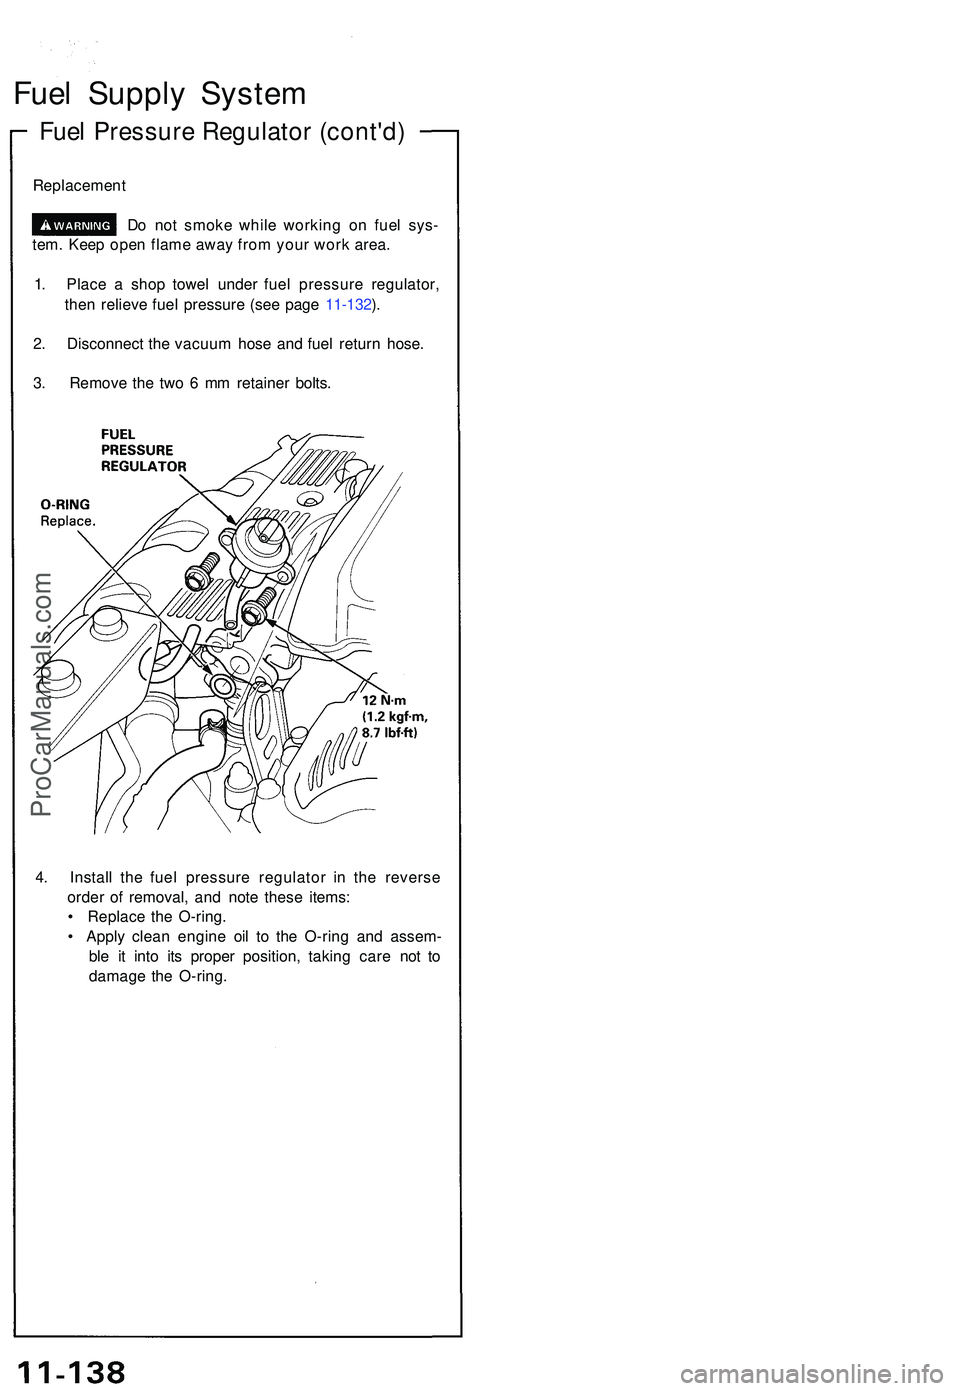
Replacemen t
Do no t smok e whil e workin g o n fue l sys -
tem . Kee p ope n flam e awa y fro m you r wor k area .
1 . Plac e a sho p towe l unde r fue l pressur e regulator ,
the n reliev e fue l pressur e (se e pag e 11-132 ).
2 . Disconnec t th e vacuu m hos e an d fue l retur n hose .
3 . Remov e th e tw o 6 m m retaine r bolts .
4 . Instal l th e fue l pressur e regulato r i n th e revers e
orde r o f removal , an d not e thes e items :
• Replac e th e O-ring .
• Appl y clea n engin e oi l t o th e O-rin g an d assem -
bl e i t int o it s prope r position , takin g car e no t t o
damag e th e O-ring .
ProCarManuals.com
Page 615 of 1503
Fuel Suppl y Syste m
Fuel Filte r
Replacemen t
Do no t smok e whil e workin g o n fue l sys -
tem . Kee p ope n flam e awa y fro m you r wor k area .
Th e fue l filte r shoul d b e replace d ever y 4 year s o r 60,00 0
mile s (96,00 0 km) , whicheve r come s first , o r wheneve r
th e fue l pressur e drop s belo w th e specifie d valu e [32 4 -
36 3 kP a (3. 3 - 3. 7 kgf/cm
2, 4 7 - 5 3 psi ) wit h th e fue l pres -
sur e regulato r vacuu m hos e disconnected ] afte r makin g
sur e tha t th e fue l pum p an d th e fue l pressur e regulato r
are OK .
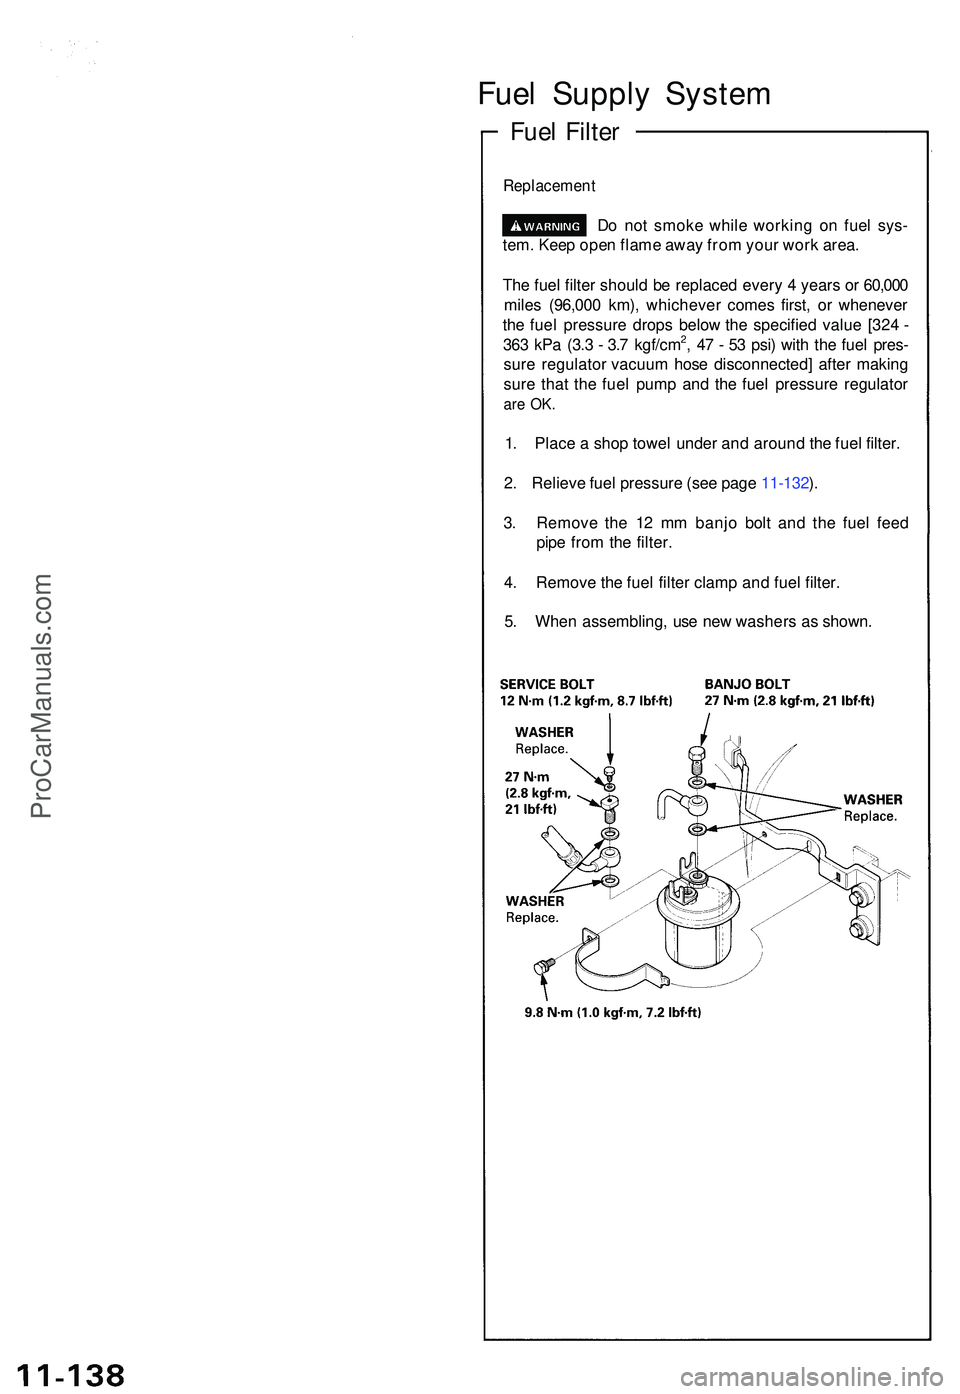
1. Plac e a sho p towe l unde r an d aroun d th e fue l filter .
2 . Reliev e fue l pressur e (se e pag e 11-132 ).
3 . Remov e th e 1 2 m m banj o bol t an d th e fue l fee d
pip e fro m th e filter .
4 . Remov e th e fue l filte r clam p an d fue l filter .
5 . Whe n assembling , us e ne w washer s a s shown .
ProCarManuals.com
Page 616 of 1503
Fuel Suppl y Syste m
Fuel Pum p
Testin g
Do no t smok e durin g th e test . Kee p ope n
flam e awa y fro m you r wor k area .
I f yo u suspec t a proble m wit h th e fue l pump , chec k tha t
th e fue l pum p actuall y runs . Whe n it i s ON , yo u wil l hea r
some nois e if yo u hol d you r ea r t o th e fue l fil l por t wit h
the fue l fil l ca p removed . Th e fue l pum p shoul d ru n fo r
tw o second s whe n th e ignitio n switc h i s firs t turne d on .
I f th e fue l pum p doe s no t mak e noise , chec k a s follows :
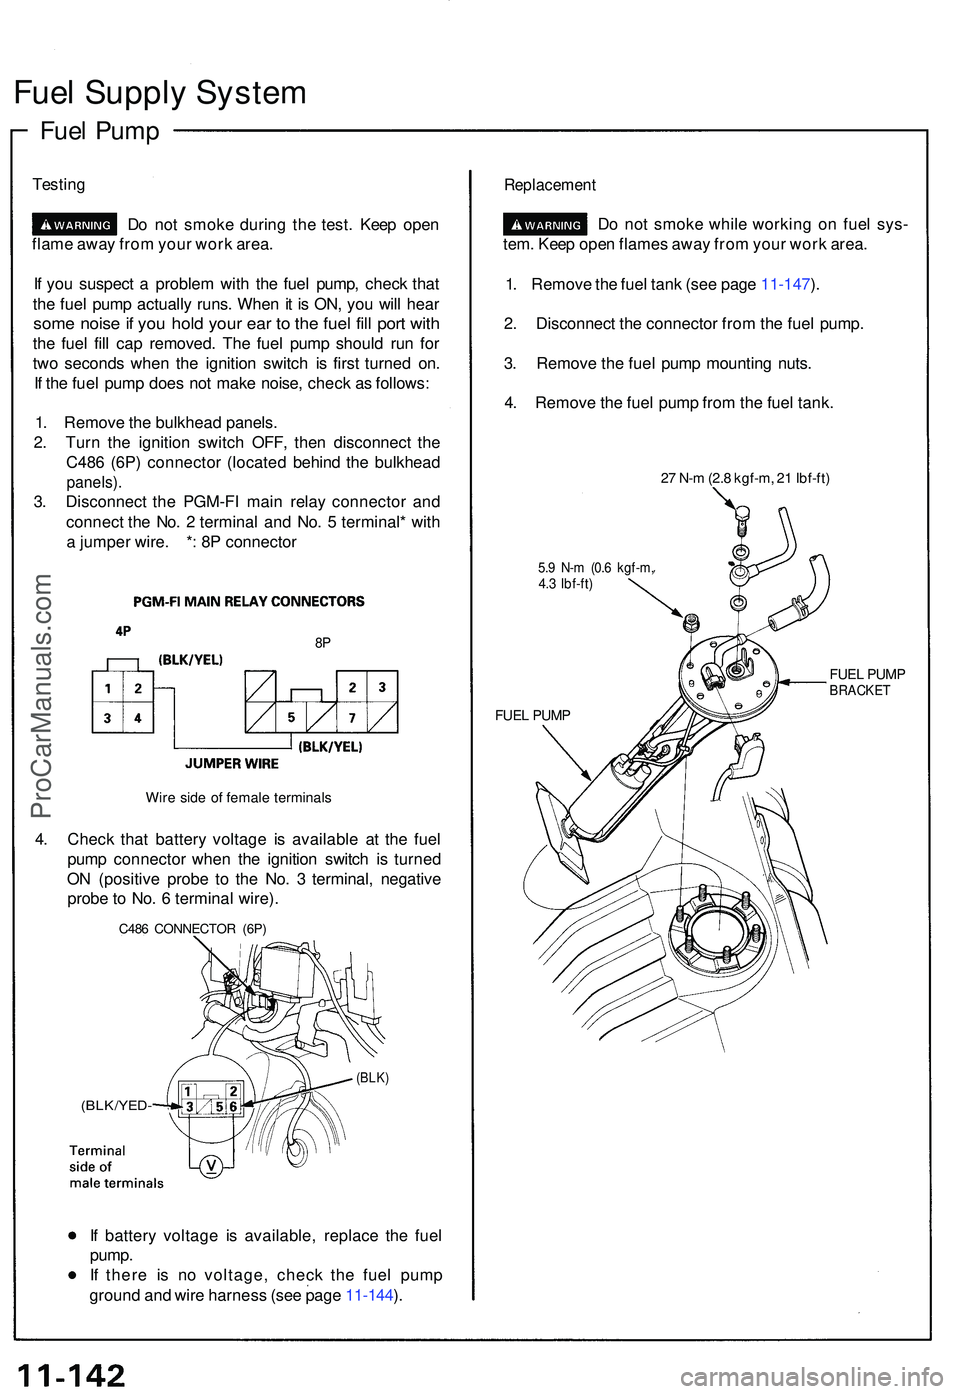
1 . Remov e th e bulkhea d panels .
2 . Tur n th e ignitio n switc h OFF , the n disconnec t th e
C48 6 (6P ) connecto r (locate d behin d th e bulkhea d
panels).
3. Disconnec t th e PGM-F I mai n rela y connecto r an d
connec t th e No . 2 termina l an d No . 5 terminal * wit h
a jumpe r wire . * : 8 P connecto r
8P
Wir e sid e o f femal e terminal s
4. Chec k tha t batter y voltag e i s availabl e a t th e fue l
pum p connecto r whe n th e ignitio n switc h i s turne d
O N (positiv e prob e t o th e No . 3 terminal , negativ e
prob e to No . 6 termina l wire) .
C486 CONNECTO R (6P )
(BLK/YED -
(BLK)
If batter y voltag e i s available , replac e th e fue l
pump .
I f ther e i s n o voltage , chec k th e fue l pum p
groun d an d wir e harnes s (se e pag e 11-144 ).
Replacemen t
Do no t smok e whil e workin g o n fue l sys -
tem . Kee p ope n flame s awa y fro m you r wor k area .
1 . Remov e th e fue l tan k (se e pag e 11-147 ).
2 . Disconnec t th e connecto r fro m th e fue l pump .
3 . Remov e th e fue l pum p mountin g nuts .
4 . Remov e th e fue l pum p fro m th e fue l tank .
27 N- m (2. 8 kgf-m , 2 1 Ibf-ft )
5.9 N- m (0. 6 kgf-m ,4.3 Ibf-ft )
FUEL PUM P FUE
L PUM P
BRACKE T
ProCarManuals.com
Page 617 of 1503
PGM-FI Main Relay
Description
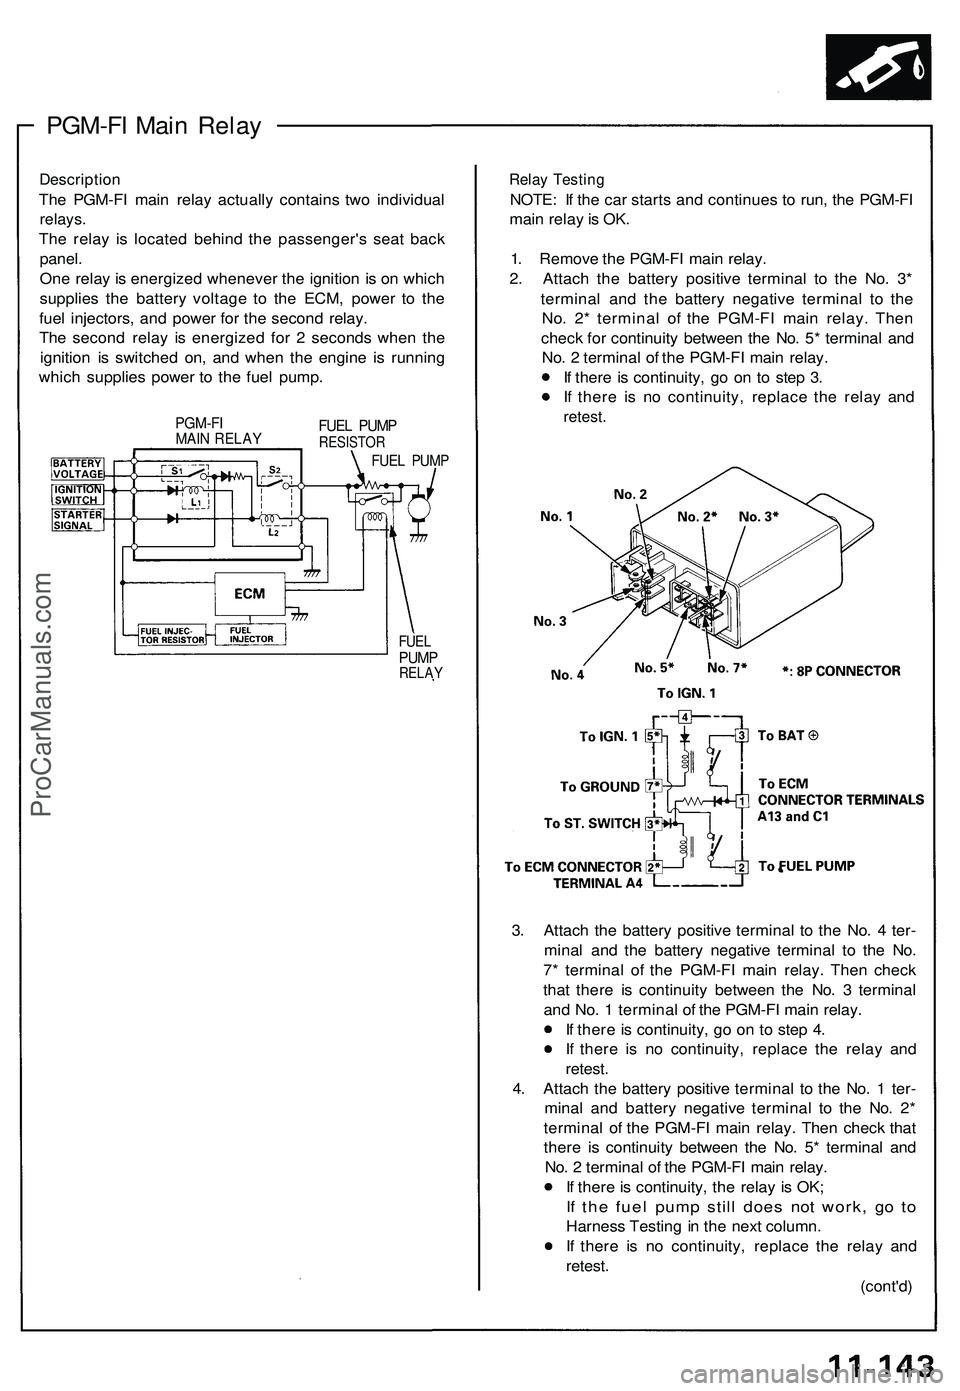
The PGM-FI main relay actually contains two individual
relays.
The relay is located behind the passenger's seat back
panel.
One relay is energized whenever the ignition is on which
supplies the battery voltage to the ECM, power to the
fuel injectors, and power for the second relay.
The second relay is energized for 2 seconds when the
ignition is switched on, and when the engine is running
which supplies power to the fuel pump.
PGM-FI
MAIN RELAY
FUEL PUMP
RESISTOR
FUEL PUMP
FUEL
PUMP
RELAY
Relay Testing
NOTE: If the car starts and continues to run, the PGM-FI
main relay is OK.
1. Remove the PGM-FI main relay.
2. Attach the battery positive terminal to the No. 3*
terminal and the battery negative terminal to the
No. 2* terminal of the PGM-FI main relay. Then
check for continuity between the No. 5* terminal and
No. 2 terminal of the PGM-FI main relay.
If there is continuity, go on to step 3.
If there is no continuity, replace the relay and
retest.
3. Attach the battery positive terminal to the No. 4 ter-
minal and the battery negative terminal to the No.
7* terminal of the PGM-FI main relay. Then check
that there is continuity between the No. 3 terminal
and No. 1 terminal of the PGM-FI main relay.
If there is continuity, go on to step 4.
If there is no continuity, replace the relay and
retest.
4. Attach the battery positive terminal to the No. 1 ter-
minal and battery negative terminal to the No. 2*
terminal of the PGM-FI main relay. Then check that
there is continuity between the No. 5* terminal and
No. 2 terminal of the PGM-FI main relay.
If there is continuity, the relay is OK;
If the fuel pump still does not work, go to
Harness Testing in the next column.
If there is no continuity, replace the relay and
retest.
(cont'd)ProCarManuals.com
Page 618 of 1503
Fuel Suppl y Syste m
PGM-F I Mai n Rela y (cont'd )
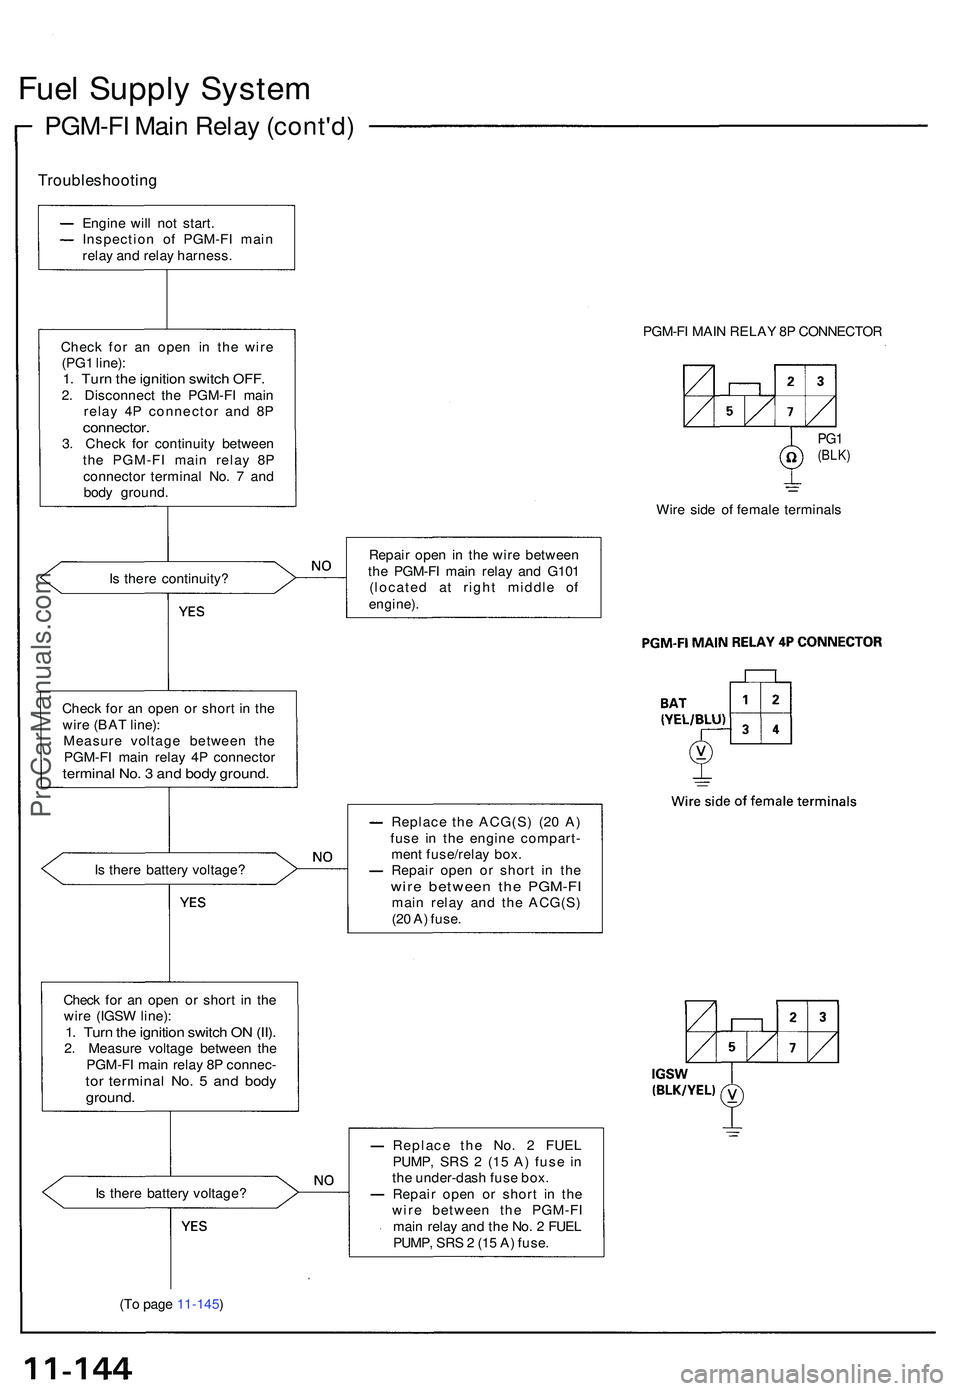
Troubleshootin g
Engine wil l no t start .
Inspectio n o f PGM-F I mai n
rela y an d rela y harness .
Chec k fo r a n ope n i n th e wir e
(PG 1 line) :
1. Tur n th e ignitio n switc h OFF .2. Disconnec t th e PGM-F I mai n
rela y 4 P connecto r an d 8 P
connector .3. Chec k fo r continuit y betwee n
th e PGM-F I mai n rela y 8 P
connecto r termina l No . 7 an d
bod y ground .
I s ther e continuity ?
Chec k fo r a n ope n o r shor t i n th e
wir e (BA T line) :
Measur e voltag e betwee n th e
PGM-F I mai n rela y 4 P connecto r
terminal No . 3 an d bod y ground .
Is ther e batter y voltage ?
Chec k fo r a n ope n o r shor t i n th e
wir e (IGS W line) :
1. Tur n th e ignitio n switc h O N (II) .2. Measur e voltag e betwee n th e
PGM-F I mai n rela y 8 P connec -
tor termina l No . 5 an d bod yground .
PGM-FI MAI N RELA Y 8 P CONNECTO R
PG1(BLK )
Wire sid e o f femal e terminal s
Repai r ope n i n th e wir e betwee n
th e PGM-F I mai n rela y an d G10 1
(locate d a t righ t middl e o f
engine) .
Replac e th e ACG(S ) (2 0 A )
fus e i n th e engin e compart -
men t fuse/rela y box .
Repai r ope n o r shor t i n th e
wir e betwee n th e PGM-F Imain rela y an d th e ACG(S )
(2 0 A ) fuse .
I s ther e batter y voltage ?
(T o pag e 11-145 ) Replac
e th e No . 2 FUE L
PUMP , SR S 2 (1 5 A ) fus e i n
th e under-das h fus e box .
Repai r ope n o r shor t i n th e
wir e betwee n th e PGM-F I
mai n rela y an d th e No . 2 FUE L
PUMP , SR S 2 (1 5 A ) fuse .
ProCarManuals.com
Page 619 of 1503
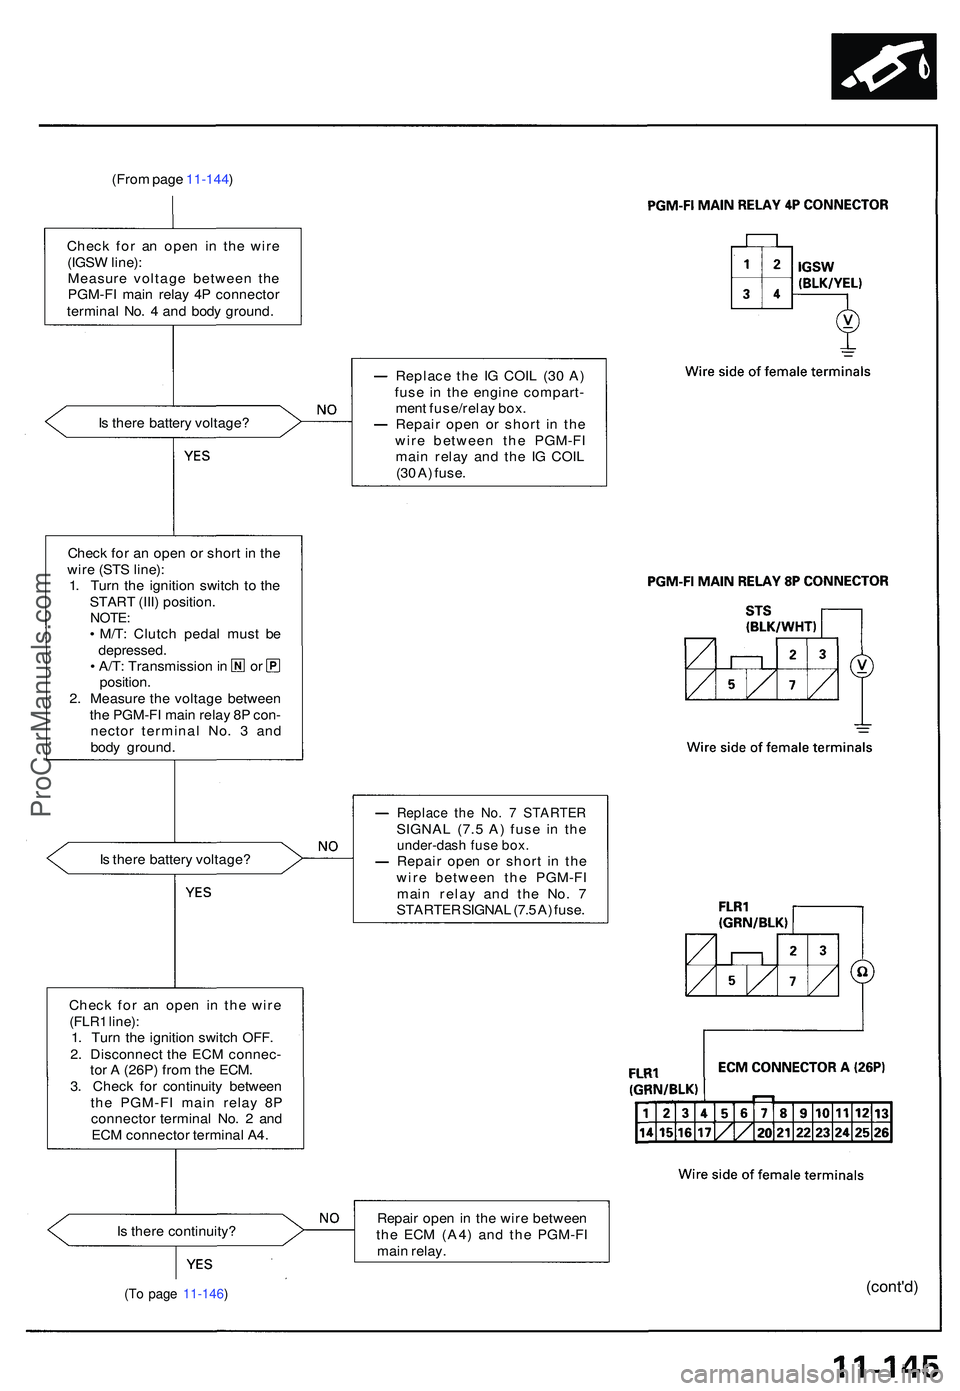
(From pag e 11-144 )
Chec k fo r a n ope n i n th e wir e
(IGS W line) :
Measur e voltag e betwee n th e
PGM-F I mai n rela y 4 P connecto r
termina l No . 4 an d bod y ground .
I s ther e batter y voltage ? Replac
e th e I G COI L (3 0 A )
fus e i n th e engin e compart -
men t fuse/rela y box .
Repai r ope n o r shor t i n th e
wir e betwee n th e PGM-F I
mai n rela y an d th e I G COI L
(3 0 A ) fuse .
Chec k fo r a n ope n o r shor t i n th e
wir e (ST S line) :
1 . Tur n th e ignitio n switc h t o th e
STAR T (III ) position .
NOTE:• M/T : Clutc h peda l mus t b e
depressed .
• A/T : Transmissio n in o r
position .
2 . Measur e th e voltag e betwee n
th e PGM-F I mai n rela y 8 P con -
necto r termina l No . 3 an d
bod y ground .
I s ther e batter y voltage ?
Replace th e No . 7 STARTE RSIGNAL (7. 5 A ) fus e i n th eunder-das h fus e box .Repai r ope n o r shor t i n th e
wir e betwee n th e PGM-F I
mai n rela y an d th e No . 7
STARTE R SIGNA L (7. 5 A ) fuse .
Chec k fo r a n ope n i n th e wir e
(FLR 1 line) :1. Tur n th e ignitio n switc h OFF .
2 . Disconnec t th e EC M connec -
to r A (26P ) fro m th e ECM .
3 . Chec k fo r continuit y betwee n
th e PGM-F I mai n rela y 8 P
connecto r termina l No . 2 an d
EC M connecto r termina l A4 .
I s ther e continuity ? Repai
r ope n in th e wir e betwee n
th e EC M (A4 ) an d th e PGM-F I
mai n relay .
(cont'd )(To pag e 11-146 )
ProCarManuals.com
Page 620 of 1503
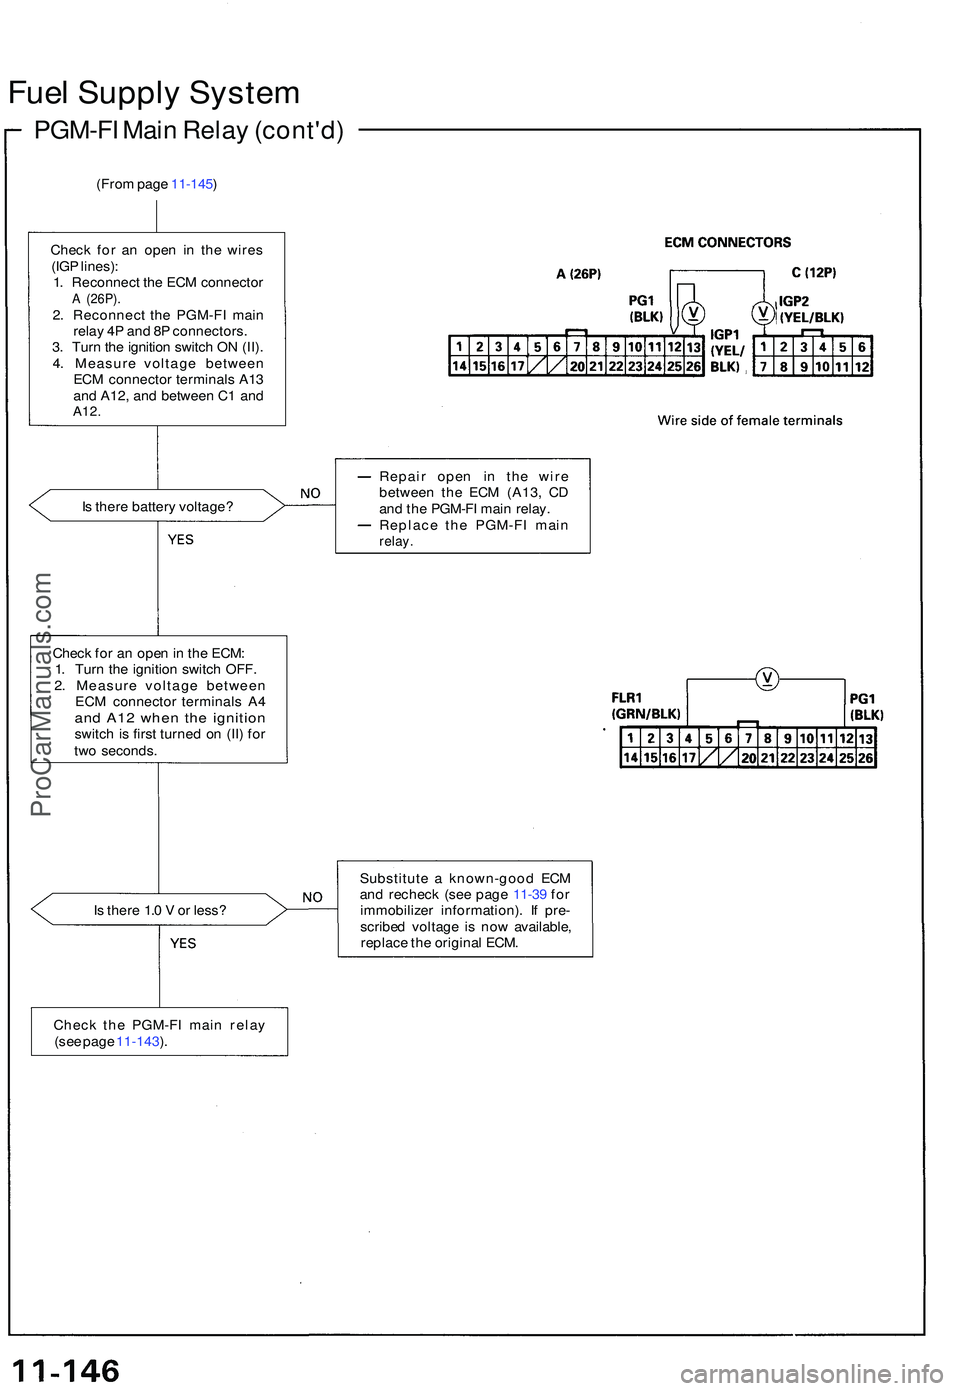
Fuel Suppl y Syste m
PGM-F I Mai n Rela y (cont'd )
(From pag e 11-145 )
Chec k fo r a n ope n i n th e wire s
(IG P lines) :
1 . Reconnec t th e EC M connecto r
A (26P) .2. Reconnec t th e PGM-F I mai n
rela y 4 P an d 8 P connectors .
3 . Tur n th e ignitio n switc h O N (II) .
4 . Measur e voltag e betwee n
EC M connecto r terminal s A1 3
an d A12 , an d betwee n C 1 an d
A12 .
Is ther e batter y voltage ? Repai
r ope n i n th e wir e
betwee n th e EC M (A13 , C D
an d th e PGM-F I mai n relay .
Replac e th e PGM-F I mai n
relay.
Check fo r a n ope n in th e ECM :
1 . Tur n th e ignitio n switc h OFF .
2 . Measur e voltag e betwee n
EC M connecto r terminal s A 4
an d A1 2 whe n th e ignitio nswitch i s firs t turne d o n (II ) fo r
tw o seconds .
I s ther e 1. 0 V or less ? Substitut
e a known-goo d EC M
an d rechec k (se e pag e 11-3 9 fo r
immobilize r information) . I f pre -
scribe d voltag e i s no w available ,
replac e th e origina l ECM .
Chec k th e PGM-F I mai n rela y
(se e pag e 11-143 ).
ProCarManuals.com