ACURA NSX 1997 Service Repair Manual
Manufacturer: ACURA, Model Year: 1997, Model line: NSX, Model: ACURA NSX 1997Pages: 1503, PDF Size: 57.08 MB
Page 861 of 1503
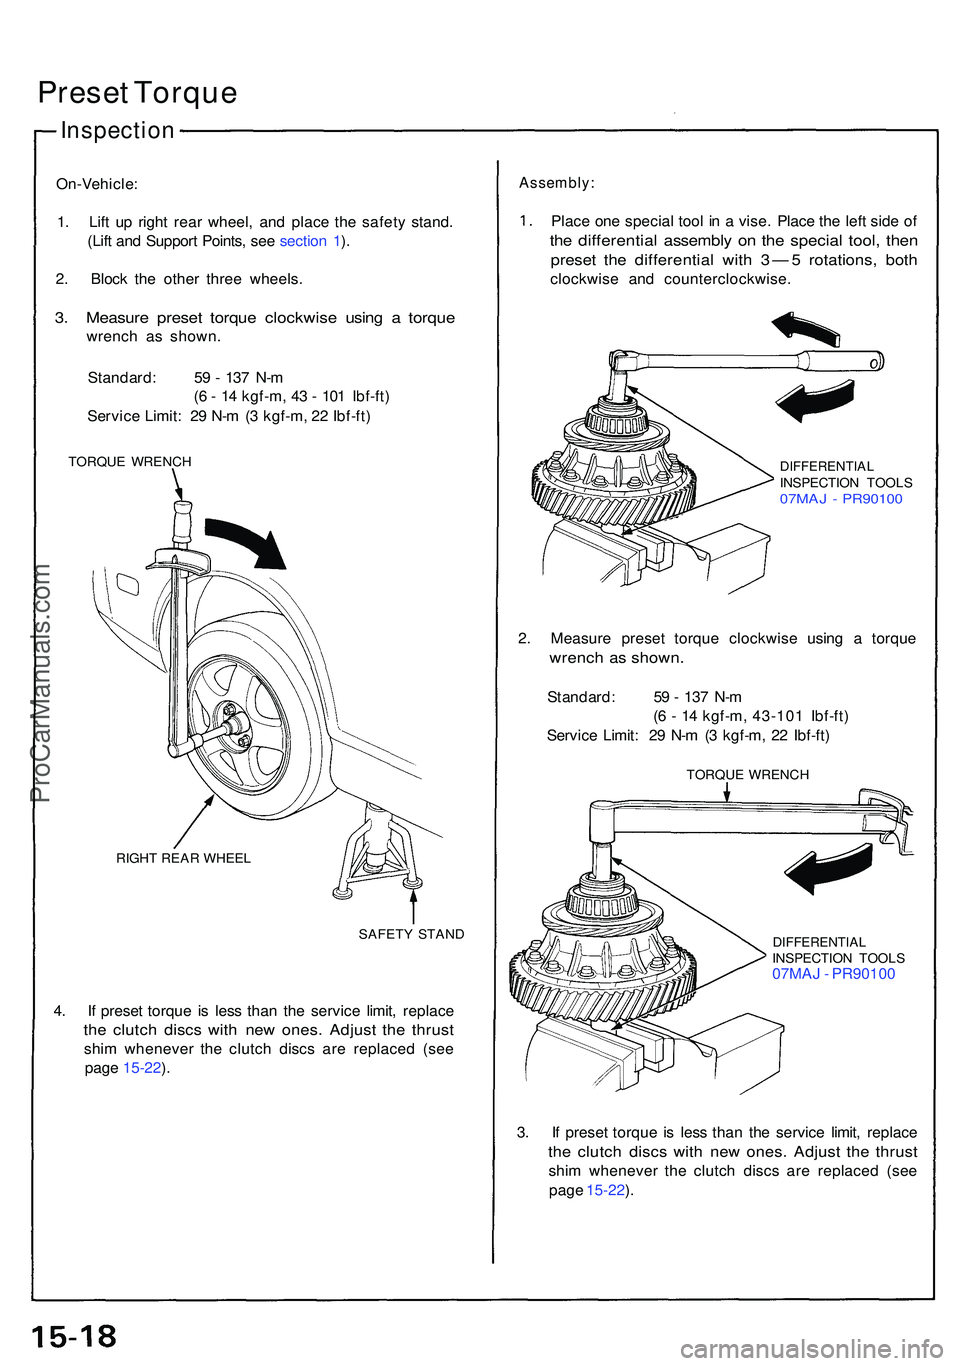
Preset Torqu e
On-Vehicle :
1 . Lif t u p righ t rea r wheel , an d plac e th e safet y stand .
(Lif t an d Suppor t Points , se e sectio n 1 ).
2 . Bloc k th e othe r thre e wheels .
3. Measur e prese t torqu e clockwis e usin g a torqu e
wrenc h a s shown .
Standard : 5 9 - 13 7 N- m
( 6 - 1 4 kgf-m , 4 3 - 10 1 Ibf-ft )
Servic e Limit : 2 9 N- m (3 kgf-m , 2 2 Ibf-ft )
TORQU E WRENC H
RIGH T REA R WHEE L
SAFETY STAN D
4. I f prese t torqu e i s les s tha n th e servic e limit , replac e
the clutc h disc s wit h ne w ones . Adjus t th e thrus t
shim wheneve r th e clutc h disc s ar e replace d (se e
pag e 15-22 ).
Assembly :
Place on e specia l too l i n a vise . Plac e th e lef t sid e o f
the differentia l assembl y o n th e specia l tool , the n
prese t th e differentia l wit h 3 — 5 rotations , bot h
clockwis e an d counterclockwise .
DIFFERENTIALINSPECTION TOOL S07MAJ - PR9010 0
2. Measur e prese t torqu e clockwis e usin g a torqu e
wrench a s shown .
Standard : 5 9 - 13 7 N- m
( 6 - 1 4 kgf-m , 43-10 1 Ibf-ft )
Servic e Limit : 2 9 N- m (3 kgf-m , 2 2 Ibf-ft )
TORQU E WRENC H
DIFFERENTIA LINSPECTION TOOL S07MAJ - PR9010 0
3 . I f prese t torqu e i s les s tha n th e servic e limit , replac e
the clutc h disc s wit h ne w ones . Adjus t th e thrus t
shim wheneve r th e clutc h disc s ar e replace d (se e
pag e 15-22 ).
Inspectio n
ProCarManuals.com
Page 862 of 1503
NOTE:
• Th e bearin g an d oute r rac e shoul d b e replace d a s a
set .
• Inspec t an d adjus t th e bearin g preloa d wheneve r th e
bearin g i s replaced .
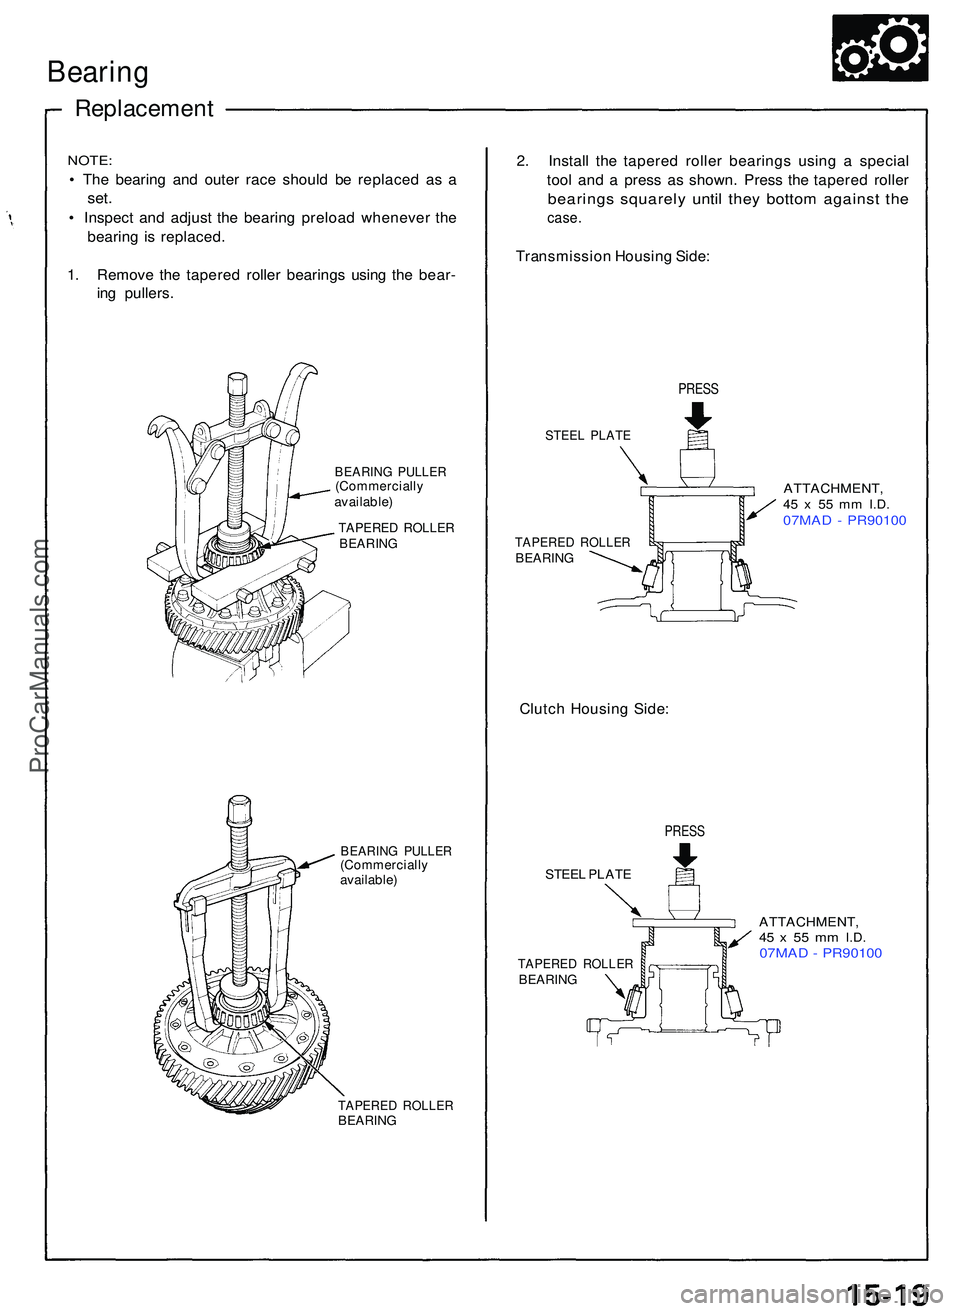
1 . Remov e th e tapere d rolle r bearing s usin g th e bear -
in g pullers .
BEARIN G PULLE R(Commerciall yavailable)
TAPERED ROLLE RBEARIN G
BEARIN G PULLE R(Commerciall yavailable)
TAPERE D ROLLE RBEARING
2. Instal l th e tapere d rolle r bearing s usin g a specia l
too l an d a pres s a s shown . Pres s th e tapere d rolle r
bearing s squarel y unti l the y botto m agains t th e
case .
Transmissio n Housin g Side :
PRES S
STEEL PLAT E
TAPERE D ROLLE RBEARING
ATTACHMENT ,45 x 5 5 m m I.D .07MA D - PR9010 0
Clutch Housin g Side :
PRES S
STEEL PLAT E
ATTACHMENT ,
TAPERED ROLLE RBEARING
45 x 5 5 m m I.D .07MA D - PR9010 0
Bearing
Replacemen t
ProCarManuals.com
Page 863 of 1503
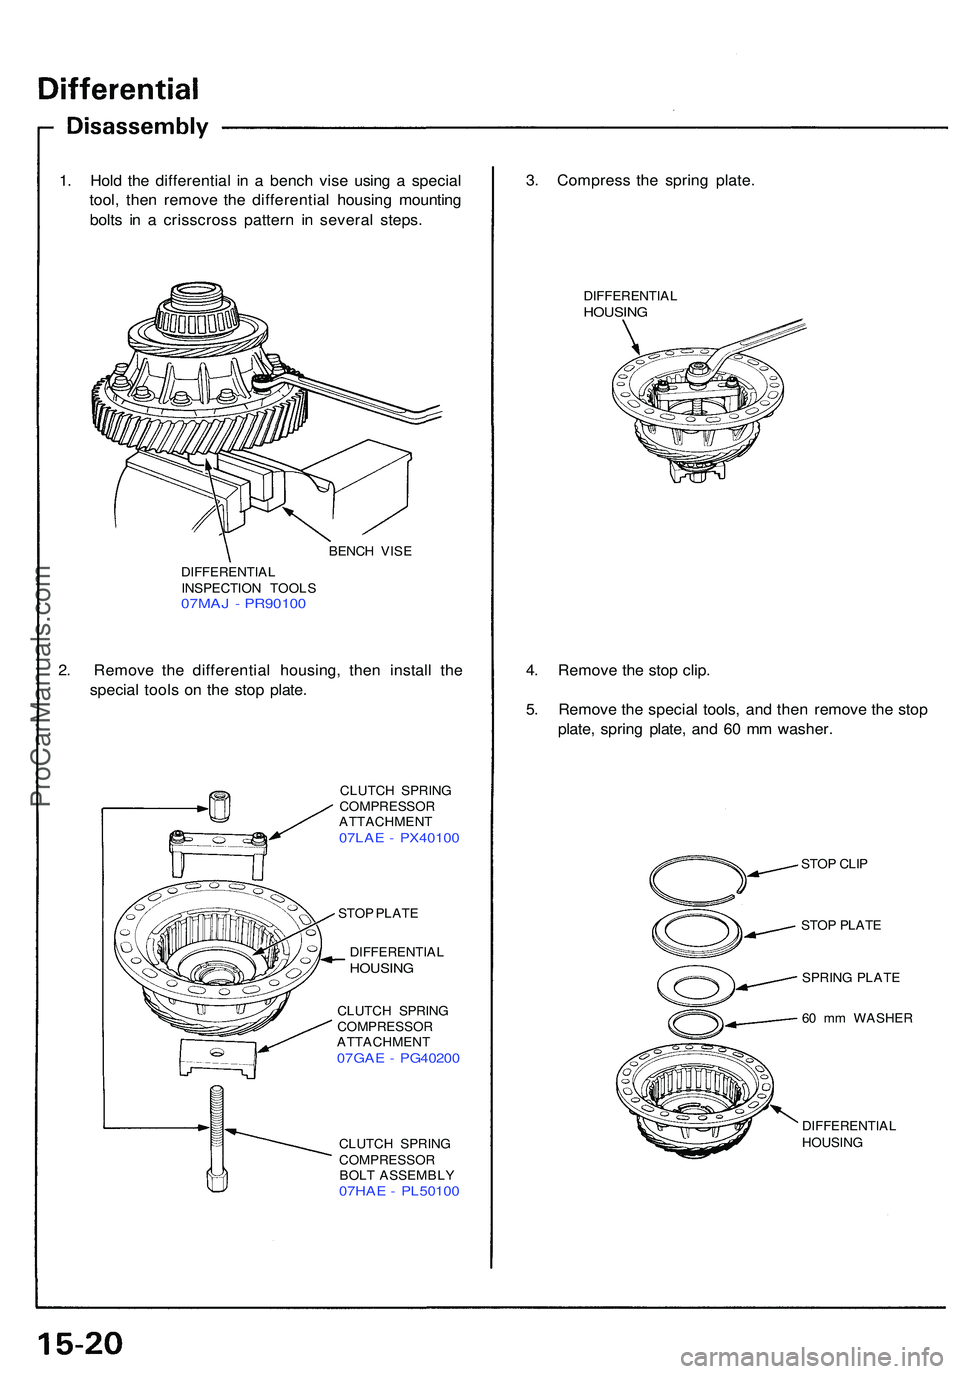
1. Hol d th e differentia l i n a benc h vis e usin g a specia l
tool , the n remov e th e differentia l housin g mountin g
bolt s i n a crisscros s patter n i n severa l steps .
BENCH VIS E
DIFFERENTIA L
INSPECTIO N TOOL S
07MAJ - PR9010 0
2. Remov e th e differentia l housing , the n instal l th e
specia l tool s o n th e sto p plate .
CLUTC H SPRIN G
COMPRESSO R
ATTACHMEN T
07LAE - PX4010 0
STOP PLAT E
DIFFERENTIA L
HOUSING
CLUTCH SPRIN GCOMPRESSO RATTACHMENT07GAE - PG4020 0
CLUTCH SPRIN GCOMPRESSO RBOLT ASSEMBL Y07HAE - PL5010 0
3. Compres s th e sprin g plate .
DIFFERENTIA LHOUSING
4. Remov e th e sto p clip .
5 . Remov e th e specia l tools , an d the n remov e th e sto p
plate , sprin g plate , an d 6 0 m m washer .
STOP CLI P
STO P PLAT E
SPRIN G PLAT E
6 0 m m WASHER
DIFFERENTIA LHOUSING
ProCarManuals.com
Page 864 of 1503
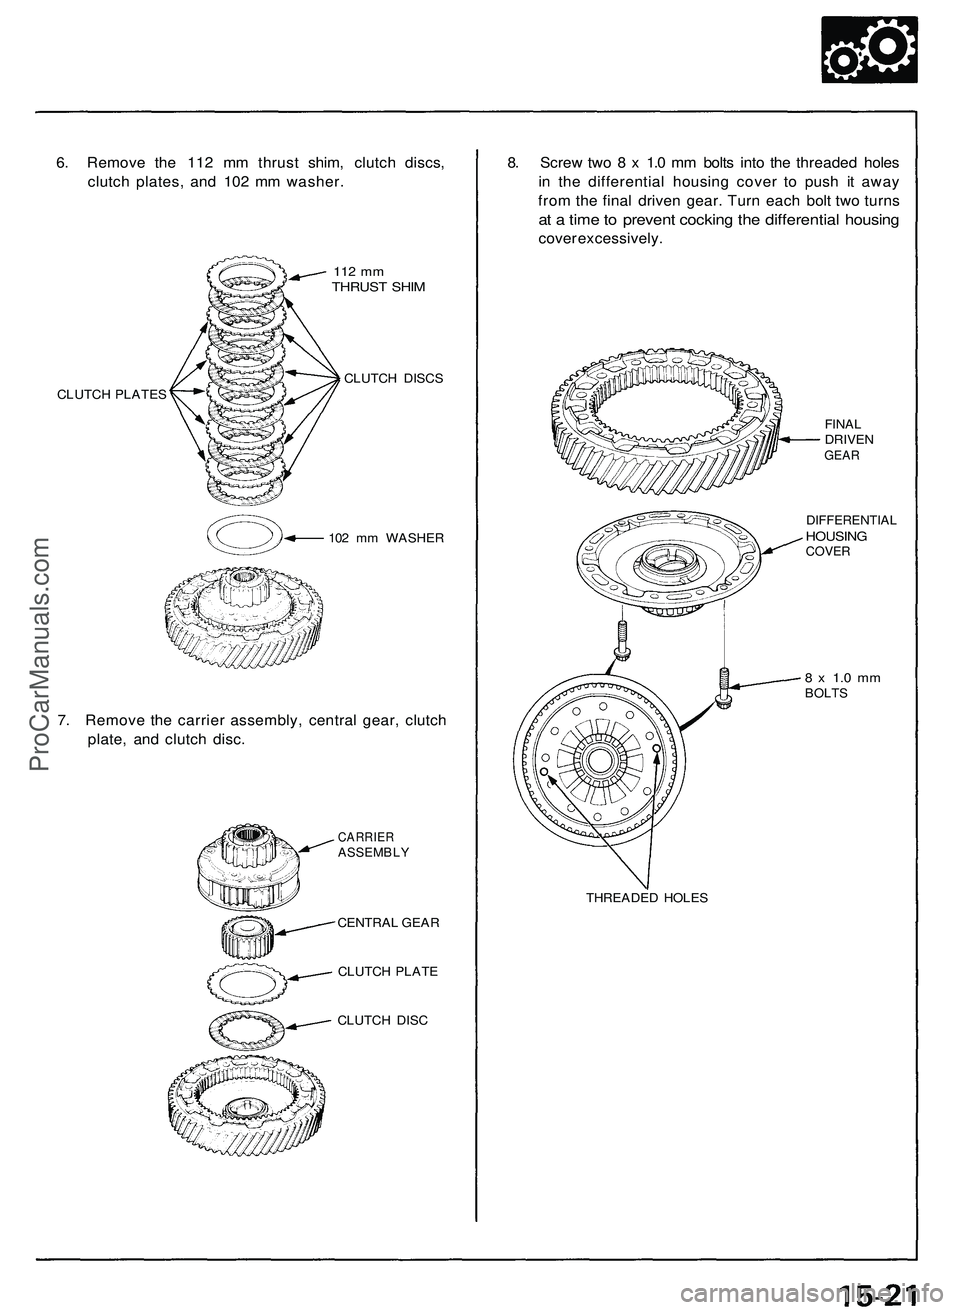
6. Remov e th e 11 2 m m thrus t shim , clutc h discs ,
clutc h plates , an d 10 2 m m washer .
112 m mTHRUS T SHI M
CLUTC H PLATE S CLUTC
H DISC S
10 2 m m WASHE R
7. Remov e th e carrie r assembly , centra l gear , clutc h
plate , an d clutc h disc .
CARRIE RASSEMBL Y
CENTRAL GEA R
CLUTC H PLAT E
CLUTC H DIS C
8. Scre w tw o 8 x 1. 0 m m bolt s int o th e threade d hole s
i n th e differentia l housin g cove r t o pus h i t awa y
fro m th e fina l drive n gear . Tur n eac h bol t tw o turn s
at a tim e to preven t cockin g th e differentia l housin g
cover excessively .
THREADED HOLE S
FINALDRIVE NGEAR
DIFFERENTIA LHOUSINGCOVER
8 x 1. 0 m mBOLT S
ProCarManuals.com
Page 865 of 1503
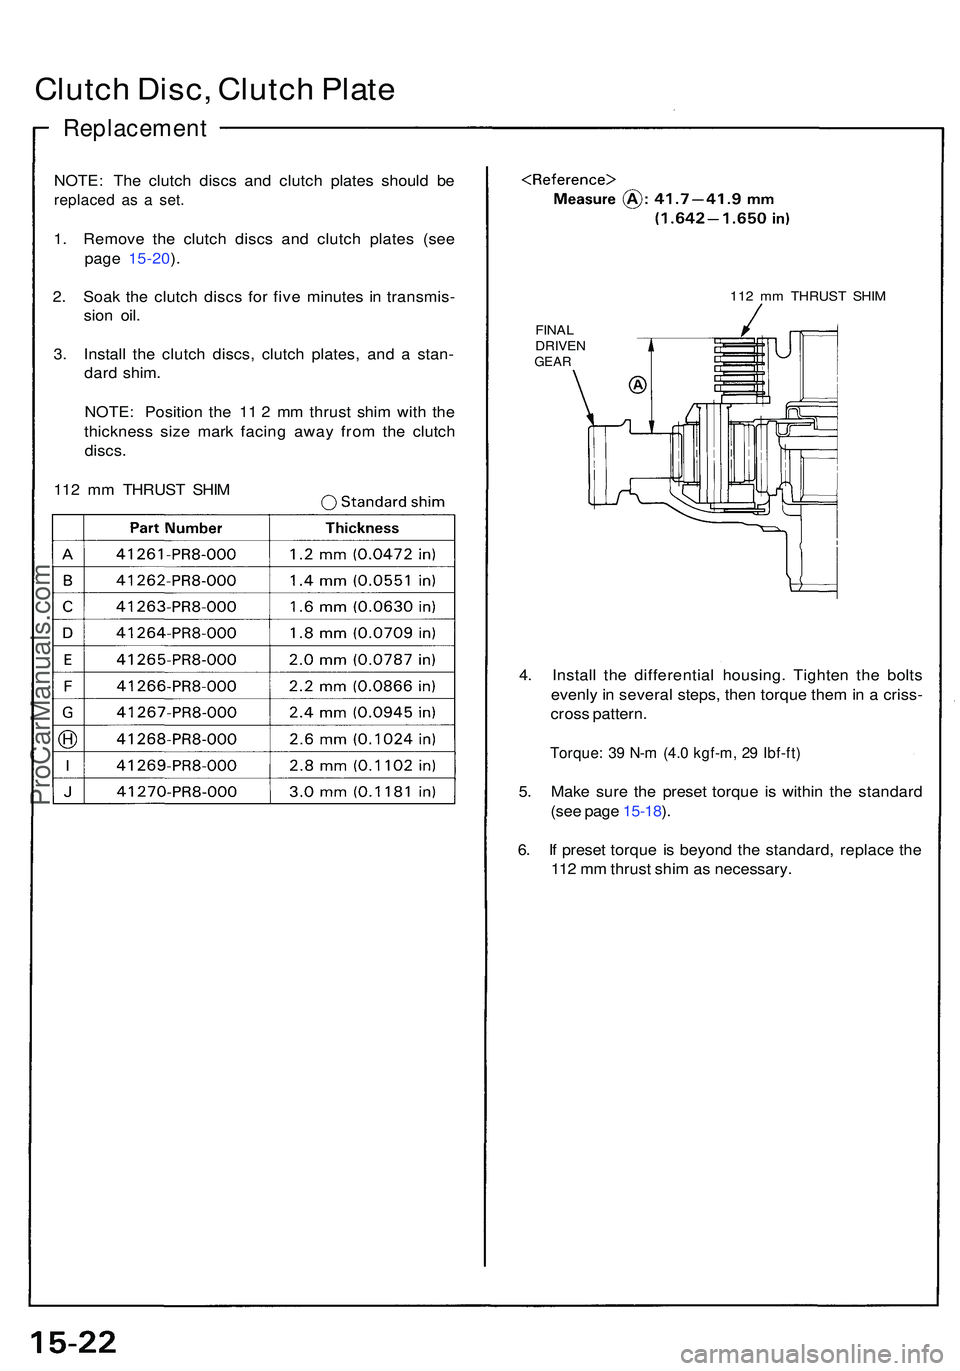
NOTE: Th e clutc h disc s an d clutc h plate s shoul d b e
replace d a s a set .
1. Remov e th e clutc h disc s an d clutc h plate s (se e
pag e 15-20 ).
2 . Soa k th e clutc h disc s fo r fiv e minute s i n transmis -
sio n oil .
3 . Instal l th e clutc h discs , clutc h plates , an d a stan -
dar d shim .
NOTE : Positio n th e 1 1 2 m m thrus t shi m wit h th e
thicknes s siz e mar k facin g awa y fro m th e clutc h
discs.
112 m m THRUS T SHI M
112 m m THRUS T SHI M
FINA L
DRIVE NGEAR
4. Instal l th e differentia l housing . Tighte n th e bolt s
evenl y in severa l steps , the n torqu e the m in a criss -
cros s pattern .
Torque: 3 9 N- m (4. 0 kgf-m , 2 9 Ibf-ft )
5. Mak e sur e th e prese t torqu e i s withi n th e standar d
(se e pag e 15-18 ).
6 . I f prese t torqu e i s beyon d th e standard , replac e th e
11 2 m m thrus t shi m a s necessary .
Clutch Disc , Clutc h Plat e
Replacemen t
ProCarManuals.com
Page 866 of 1503
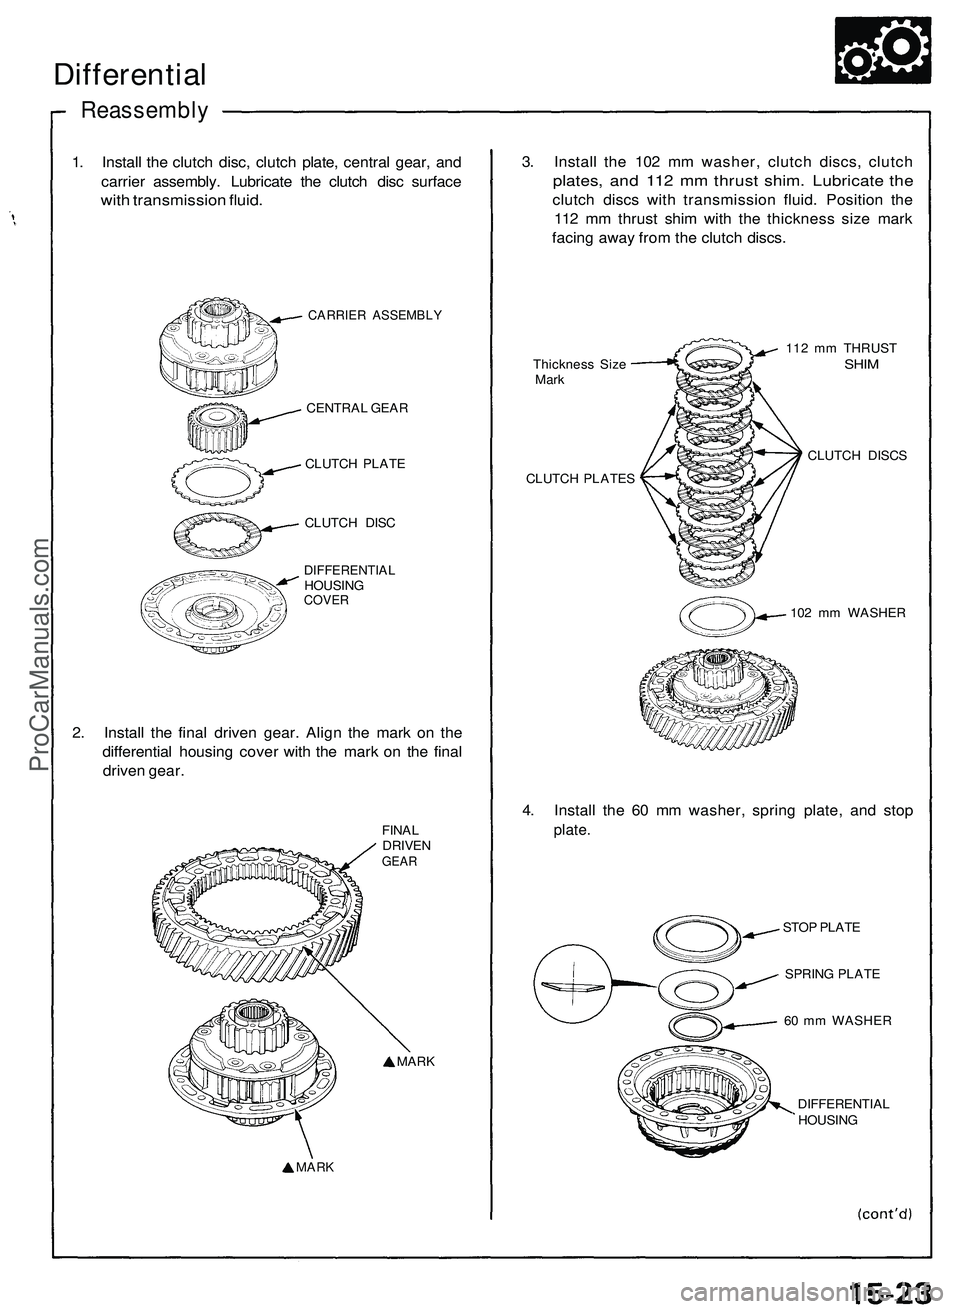
1. Install the clutch disc, clutch plate, central gear, and
carrier assembly. Lubricate the clutch disc surface
with transmission fluid.
CARRIER ASSEMBLY
CENTRAL GEAR
CLUTCH PLATE
CLUTCH DISC
DIFFERENTIAL
HOUSING
COVER
2. Install the final driven gear. Align the mark on the
differential housing cover with the mark on the final
driven gear.
FINAL
DRIVEN
GEAR
MARK
MARK
3. Install the 102 mm washer, clutch discs, clutch
plates, and 112 mm thrust shim. Lubricate the
clutch discs with transmission fluid. Position the
112 mm thrust shim with the thickness size mark
facing away from the clutch discs.
Thickness Size
Mark
CLUTCH PLATES
112 mm THRUST
SHIM
CLUTCH DISCS
102 mm WASHER
4. Install the 60 mm washer, spring plate, and stop
plate.
STOP PLATE
SPRING PLATE
60 mm WASHER
DIFFERENTIAL
HOUSING
Differential
ReassemblyProCarManuals.com
Page 867 of 1503
Differential
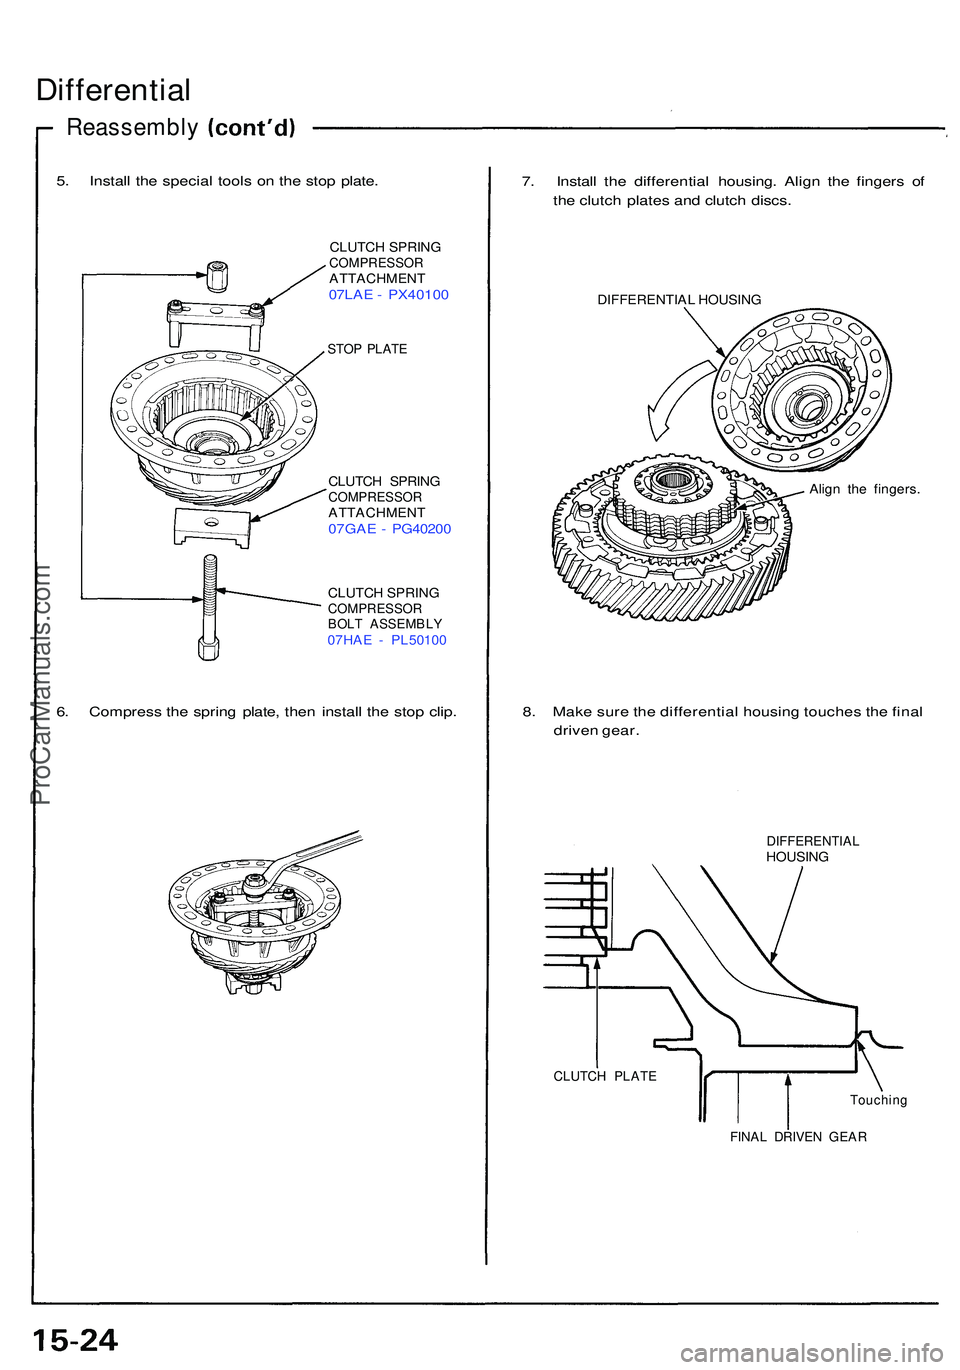
5. Instal l th e specia l tool s o n th e sto p plate .
CLUTC H SPRIN GCOMPRESSO RATTACHMENT07LAE - PX4010 0
STOP PLAT E
CLUTC H SPRIN GCOMPRESSO RATTACHMENT07GAE - PG4020 0
CLUTCH SPRIN GCOMPRESSO R
BOL T ASSEMBLY
07HA E - PL5010 0
6. Compres s th e sprin g plate , the n instal l th e sto p clip . 7
. Instal l th e differentia l housing . Alig n th e finger s o f
th e clutc h plate s an d clutc h discs .
DIFFERENTIA L HOUSIN G
Align th e fingers .
8. Mak e sur e th e differentia l housin g touche s th e fina l
drive n gear .
DIFFERENTIA LHOUSING
CLUTCH PLAT E
Touching
FINA L DRIVE N GEA R
Reassembl y
ProCarManuals.com
Page 868 of 1503
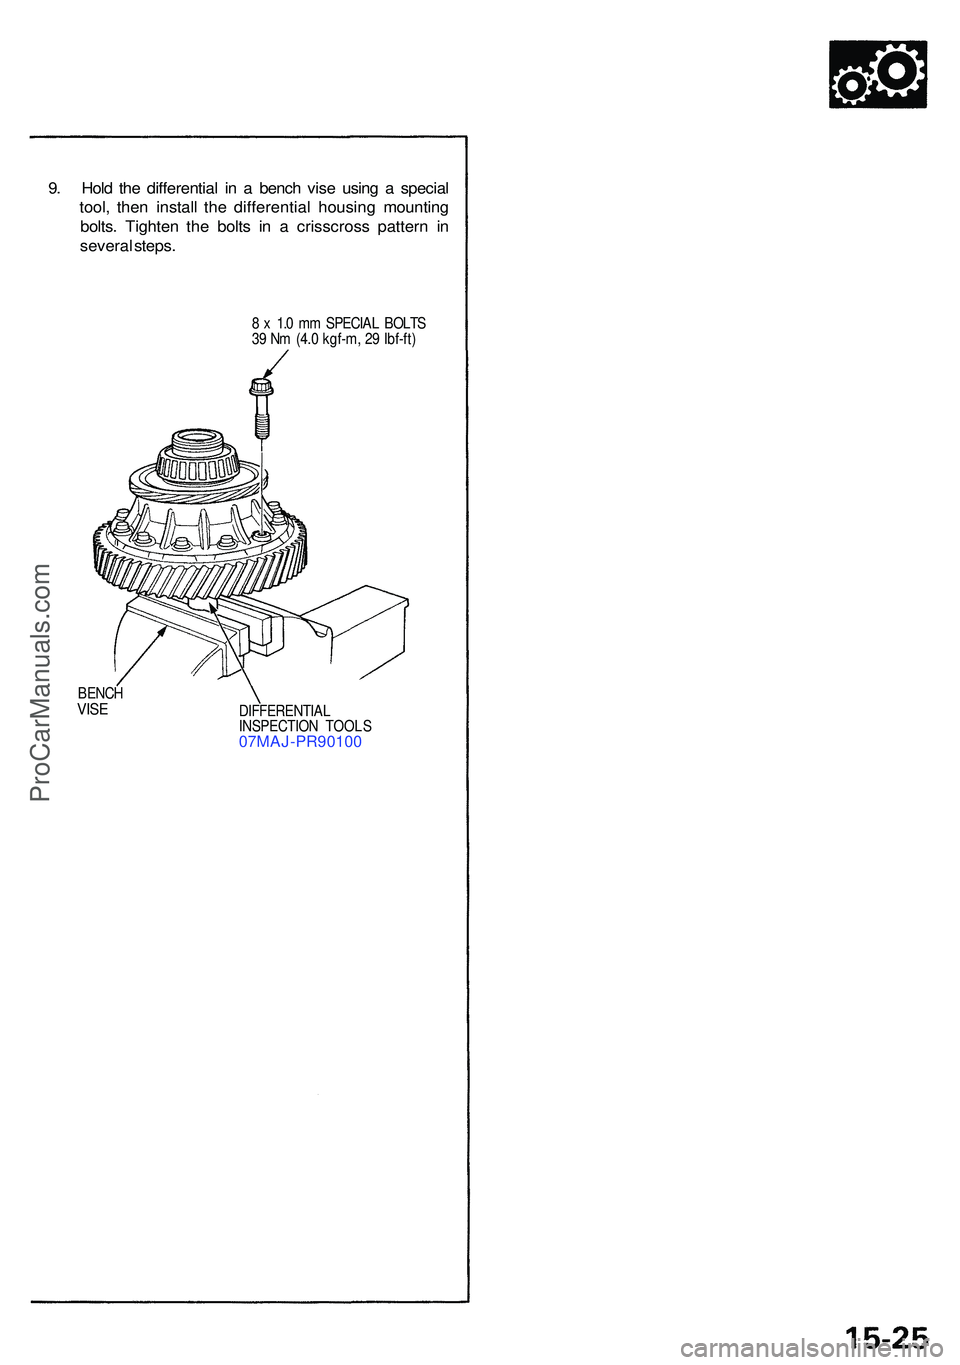
9. Hol d th e differentia l i n a benc h vis e usin g a specia l
tool , the n instal l th e differentia l housin g mountin g
bolts . Tighte n th e bolt s i n a crisscros s patter n i n
severa l steps .
8 x 1. 0 m m SPECIA L BOLT S
3 9 N m (4. 0 kgf-m , 2 9 Ibf-ft )
BENC H
VISEDIFFERENTIA L
INSPECTIO N TOOL S
07MAJ-PR9010 0
ProCarManuals.com
Page 869 of 1503
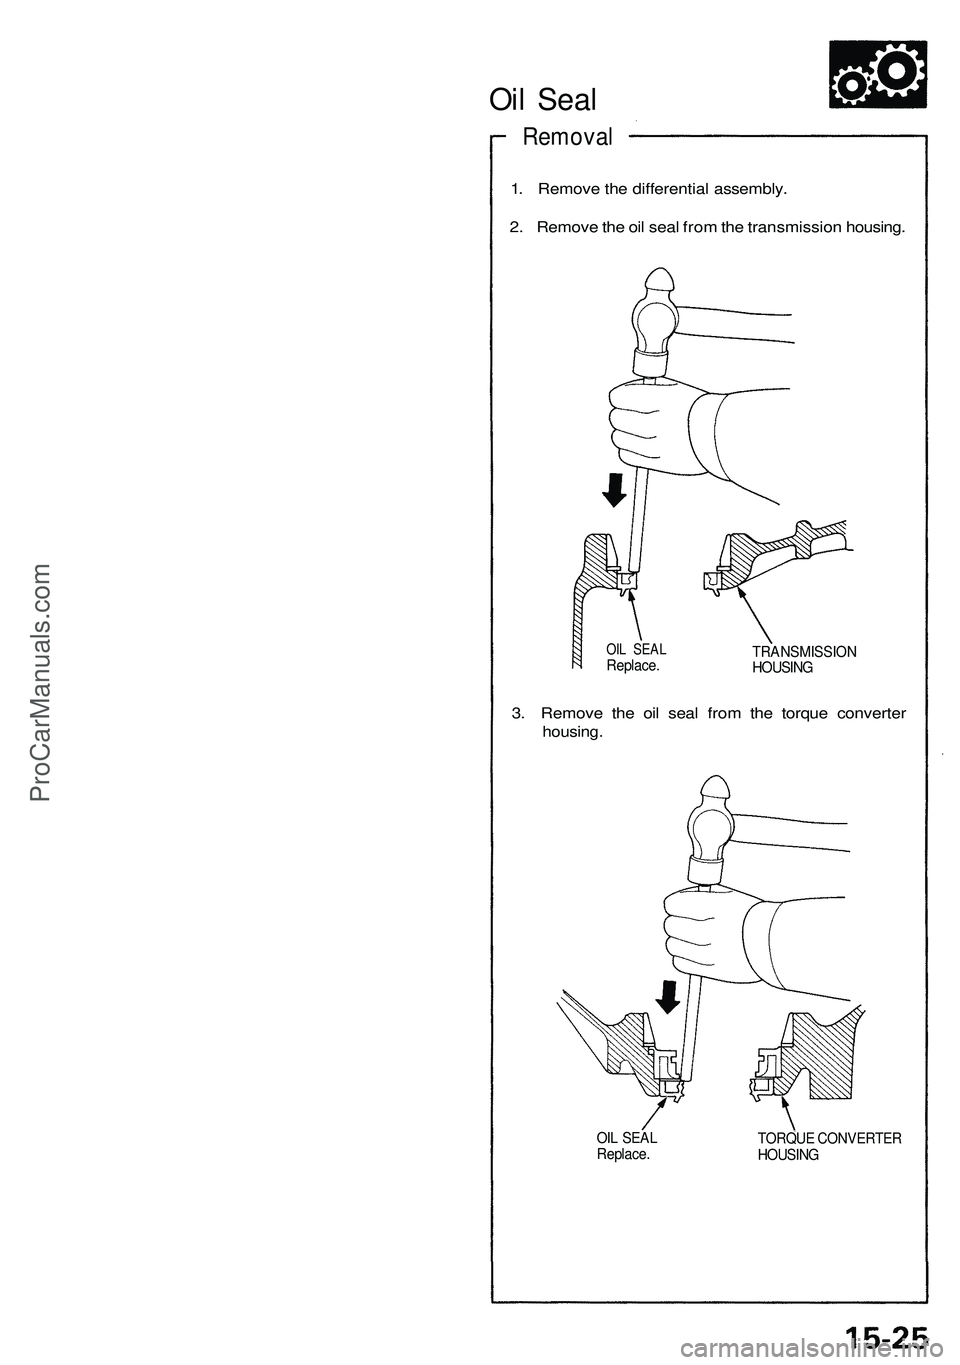
Oil Seal
Removal
1. Remove the differential assembly.
2. Remove the oil seal from the transmission housing.
OIL SEAL
Replace.
TRANSMISSION
HOUSING
3. Remove the oil seal from the torque converter
housing.
OIL SEAL
Replace.
TORQUE CONVERTER
HOUSINGProCarManuals.com
Page 870 of 1503
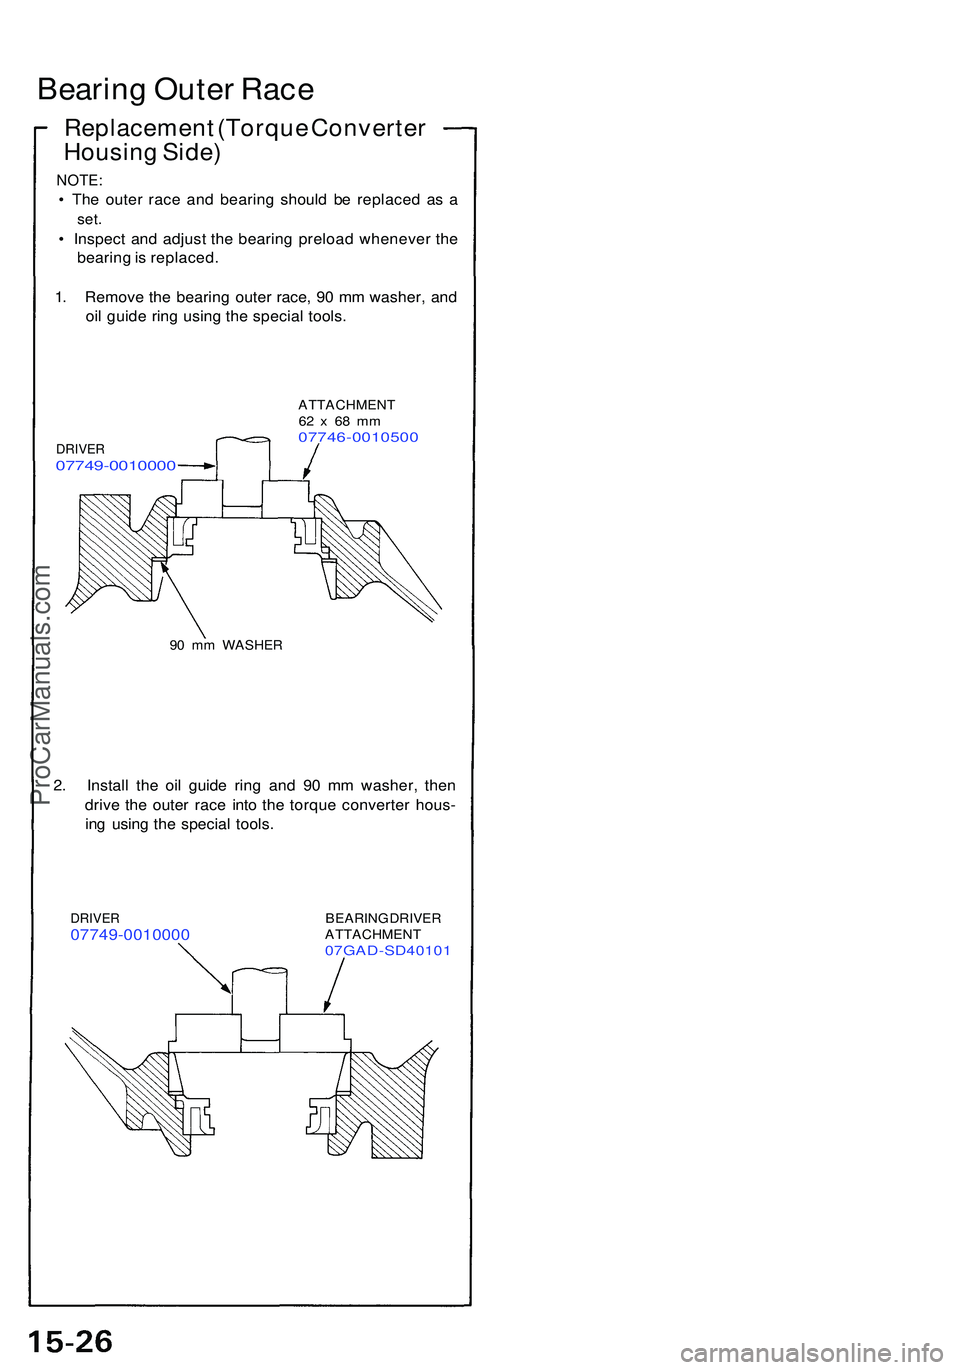
Bearing Oute r Rac e
Replacemen t (Torqu e Converte r
Housin g Side )
NOTE :
• Th e oute r rac e an d bearin g shoul d b e replace d a s a
set .
• Inspec t an d adjus t th e bearin g preloa d wheneve r th e
bearin g is replaced .
1 . Remov e th e bearin g oute r race , 9 0 m m washer , an d
oi l guid e rin g usin g th e specia l tools .
DRIVE R07749-001000 0
ATTACHMEN T62 x 6 8 m m07746-001050 0
90 m m WASHE R
2. Instal l th e oi l guid e rin g an d 9 0 m m washer , the n
driv e th e oute r rac e int o th e torqu e converte r hous -
in g usin g th e specia l tools .
DRIVE R07749-001000 0BEARING DRIVE R
ATTACHMEN T
07GAD-SD4010 1
ProCarManuals.com