ACURA RL KA9 1996 Service Repair Manual
RL KA9 1996
ACURA
ACURA
https://www.carmanualsonline.info/img/32/56992/w960_56992-0.png
ACURA RL KA9 1996 Service Repair Manual
Trending: CD changer, change time, width, glove box, oil change, transmission oil, oil reset
Page 1561 of 1954
Interior Light s
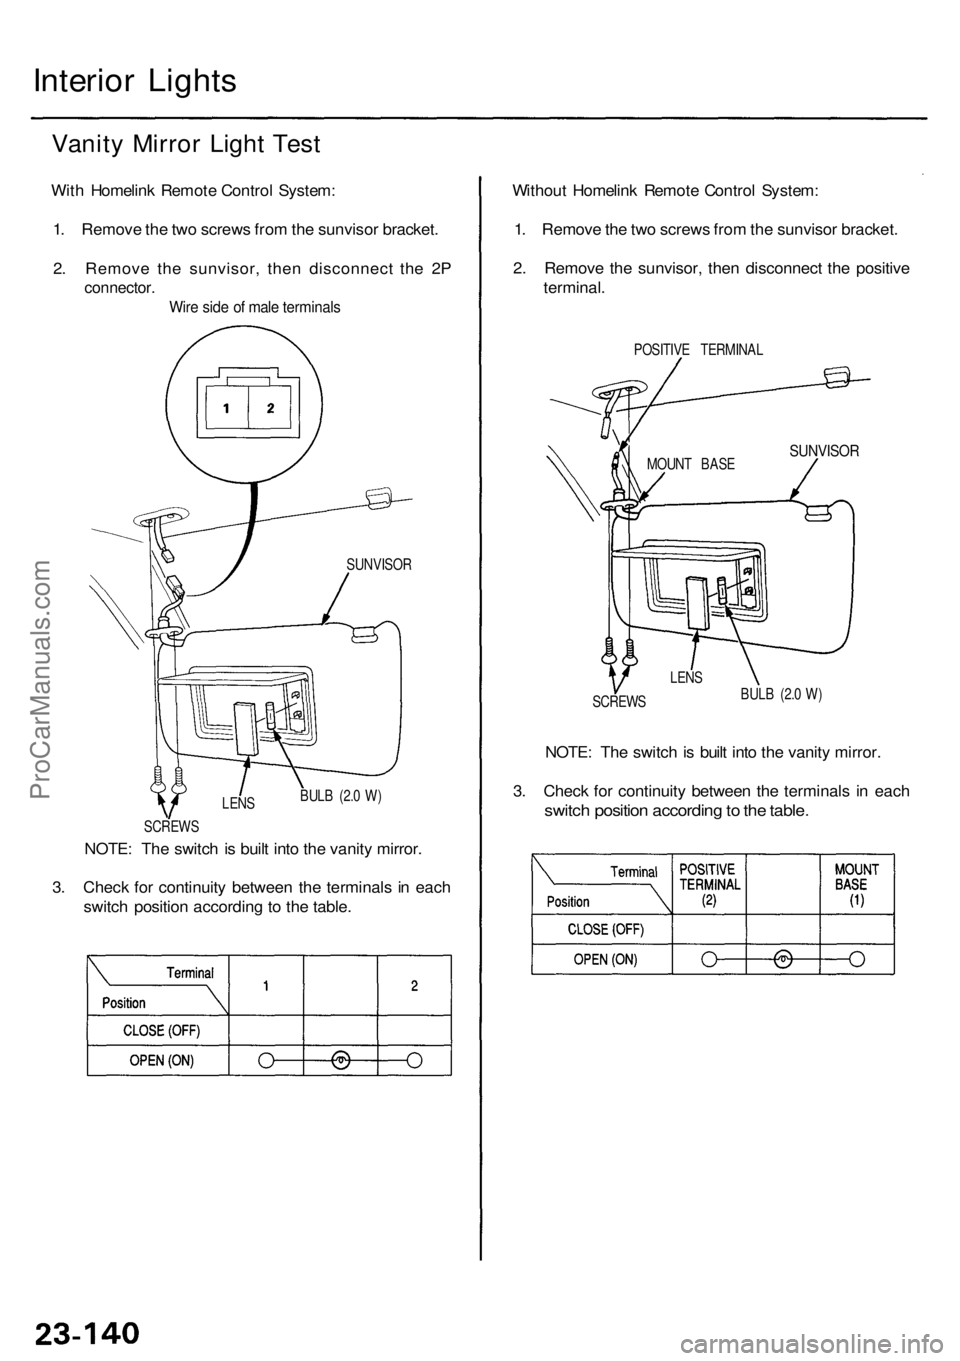
Vanity Mirro r Ligh t Tes t
With Homelin k Remot e Contro l System :
1 . Remov e th e tw o screw s fro m th e sunviso r bracket .
2 . Remov e th e sunvisor , the n disconnec t th e 2 P
connector .
Wire sid e o f mal e terminal s
NOTE: Th e switc h is buil t int o th e vanit y mirror .
3 . Chec k fo r continuit y betwee n th e terminal s i n eac h
switc h positio n accordin g t o th e table . Withou
t Homelin k Remot e Contro l System :
1 . Remov e th e tw o screw s fro m th e sunviso r bracket .
2 . Remov e th e sunvisor , the n disconnec t th e positiv e
terminal .
POSITIV E TERMINA L
SUNVISORMOUNT BAS E
SCREW S
SUNVISO
R
LENS
BULB (2. 0 W )
NOTE : Th e switc h is buil t int o th e vanit y mirror .
3 . Chec k fo r continuit y betwee n th e terminal s i n eac h
switc h positio n accordin g to th e table .BULB (2. 0 W )
LEN S
SCREW S
ProCarManuals.com
Page 1562 of 1954
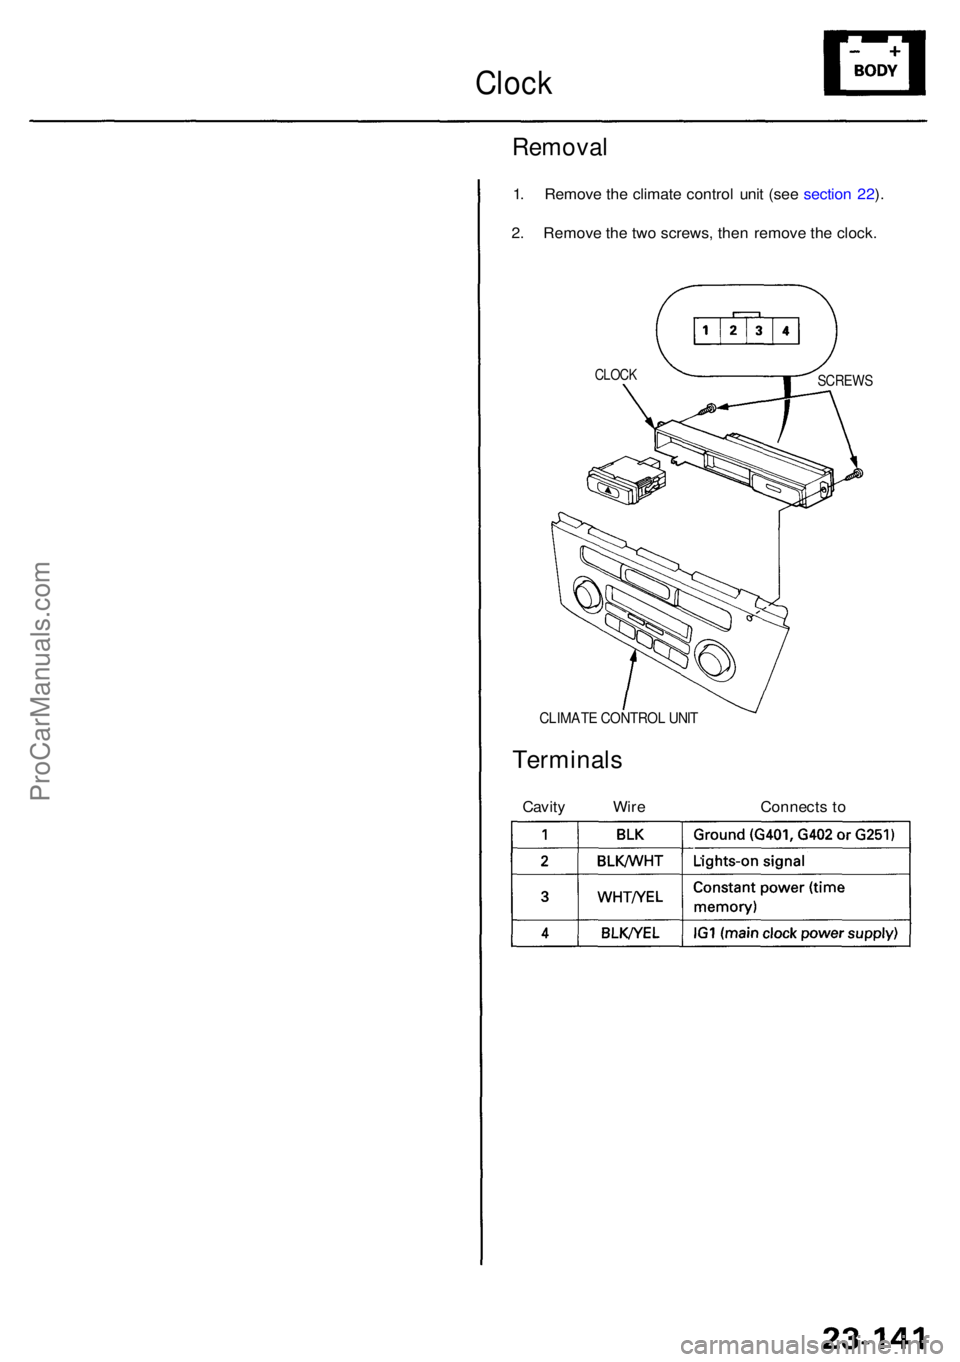
Clock
Remova l
1. Remov e th e climat e contro l uni t (se e sectio n 22 ).
2 . Remov e th e tw o screws , the n remov e th e clock .
CLIMAT E CONTRO L UNI T
Terminal s
Cavity Wir e Connect s t o
CLOC KSCREW S
ProCarManuals.com
Page 1563 of 1954
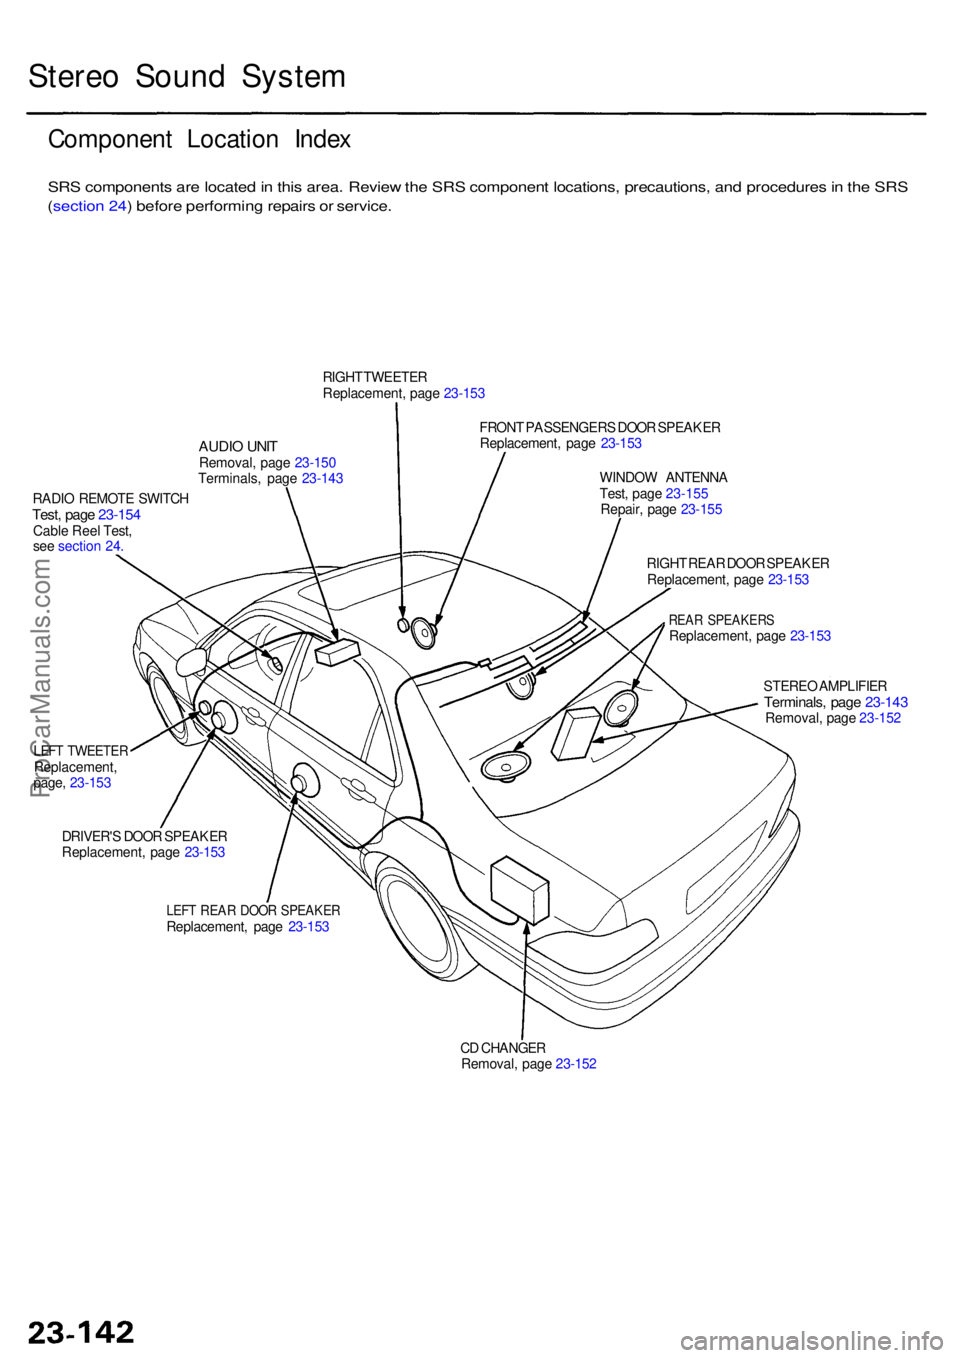
CD CHANGE R
Removal , pag e 23-15 2
LEFT REA R DOO R SPEAKE RReplacement , pag e 23-15 3
DRIVER'
S DOO R SPEAKE R
Replacement , pag e 23-15 3
LEFT TWEETE RReplacement ,
page , 23-15 3
RADI
O REMOT E SWITC H
Test, pag e 23-15 4Cable Ree l Test ,
se e sectio n 24 .
AUDI O UNI TRemoval , pag e 23-15 0
Terminals , pag e 23-14 3
RIGH
T TWEETE R
Replacement , pag e 23-15 3
FRON T PASSENGER S DOO R SPEAKE R
Replacement , pag e 23-15 3
WINDO W ANTENN A
Test , pag e 23-15 5
Repair , pag e 23-15 5
RIGH T REA R DOO R SPEAKE R
Replacement , pag e 23-15 3
REAR SPEAKER SReplacement , pag e 23-15 3
STERE O AMPLIFIE R
Terminals, pag e 23-14 3Removal , pag e 23-15 2
Stereo Soun d Syste m
Componen t Locatio n Inde x
SRS component s ar e locate d in thi s area . Revie w th e SR S componen t locations , precautions , an d procedure s in th e SR S
( sectio n 24 ) befor e performin g repair s o r service .
ProCarManuals.com
Page 1564 of 1954
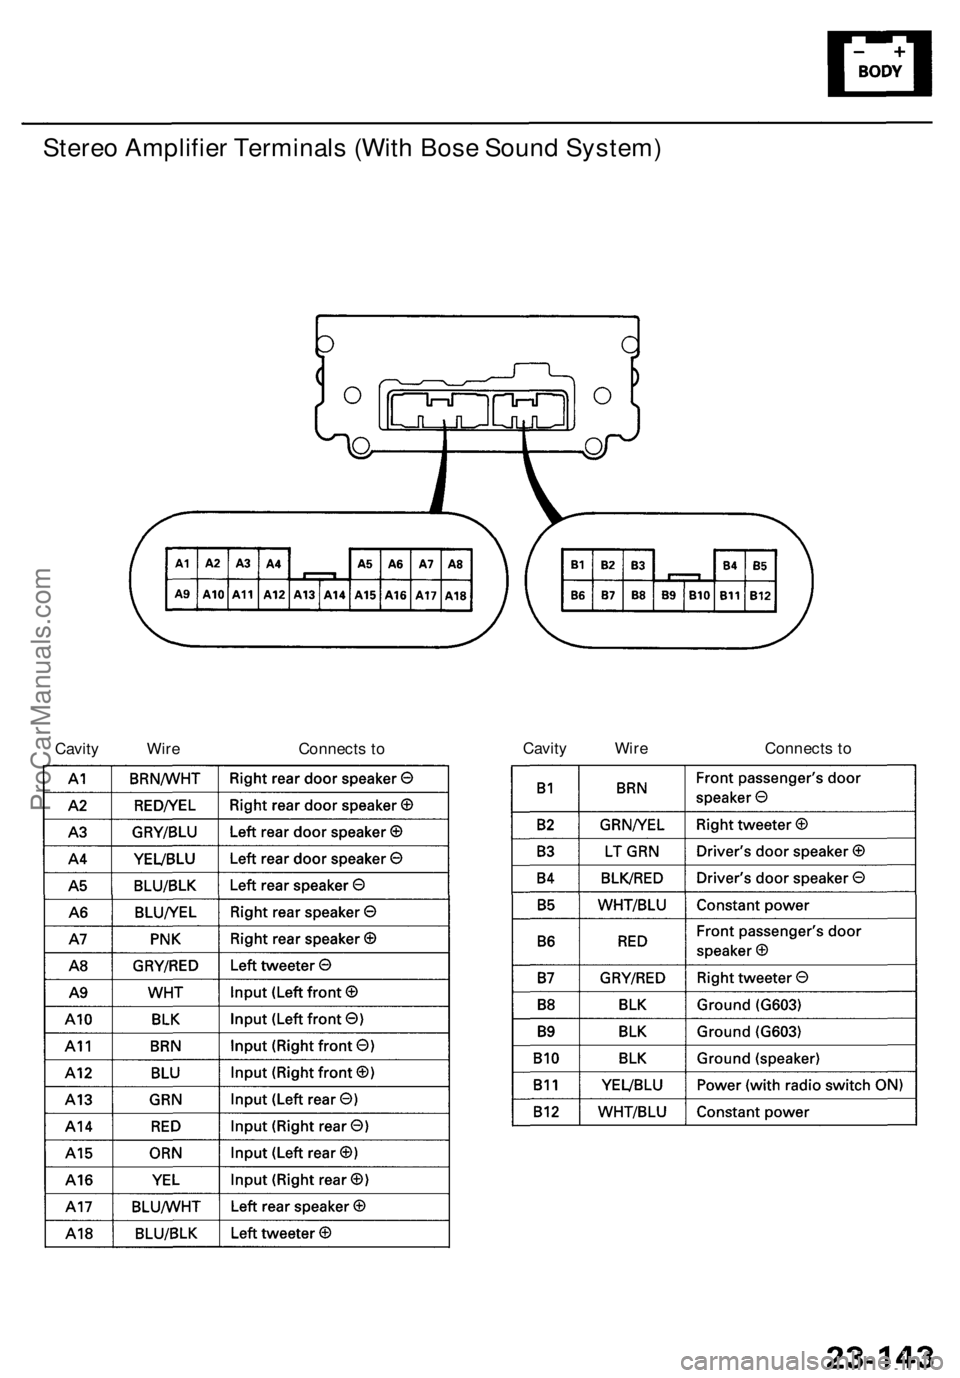
Stereo Amplifie r Terminal s (Wit h Bos e Soun d System )
Cavity Wir e Connect s t o Cavit
y Wir e Connect s t o
ProCarManuals.com
Page 1565 of 1954
Stereo Soun d Syste m
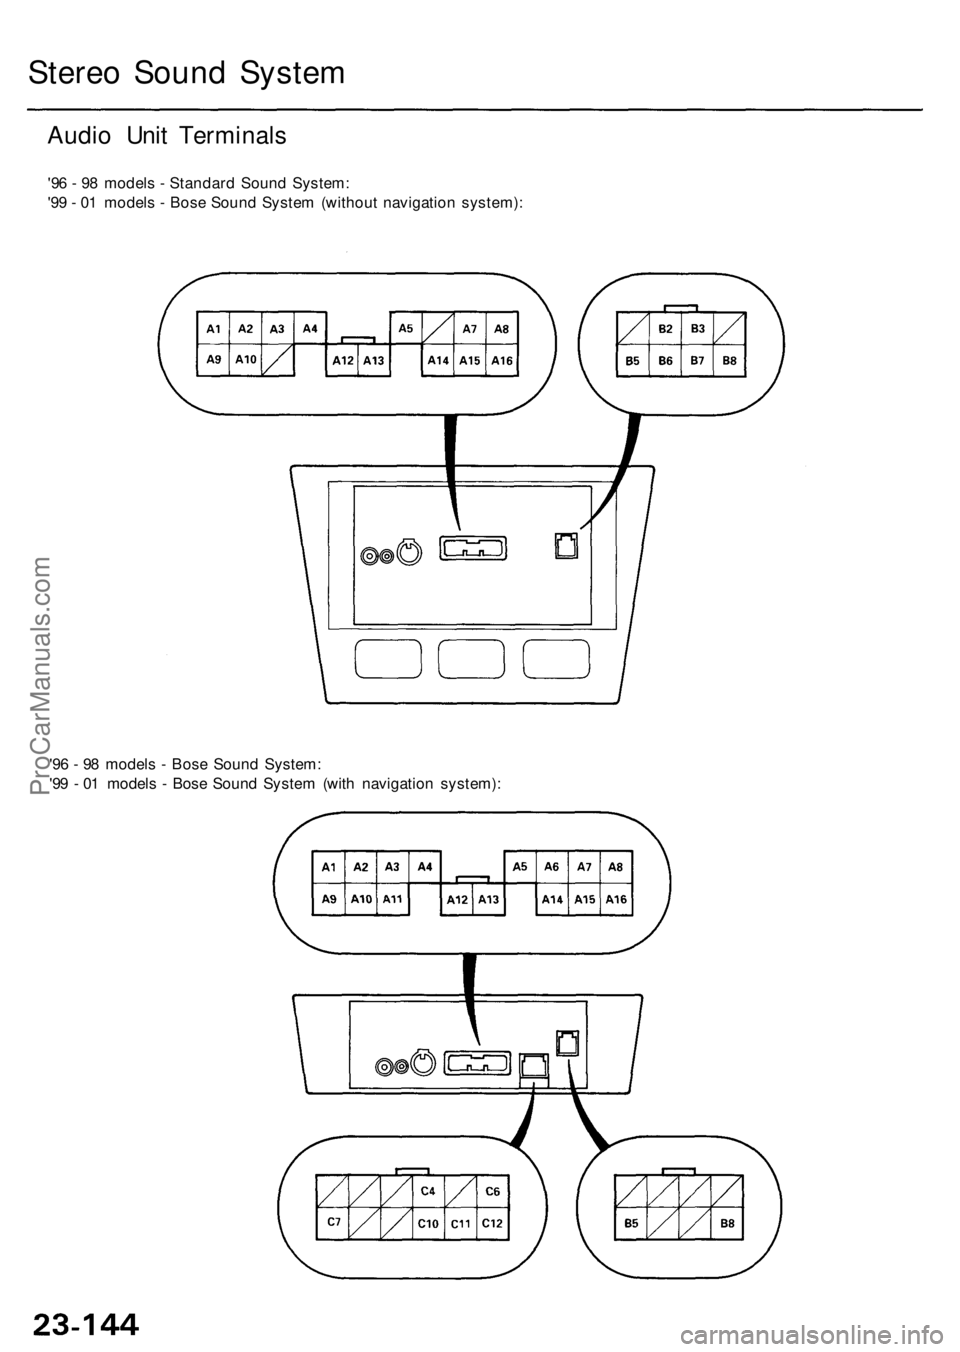
Audio Uni t Terminal s
'96 - 9 8 model s - Standar d Soun d System :
'9 9 - 0 1 model s - Bos e Soun d Syste m (withou t navigatio n system) :
'9 6 - 9 8 model s - Bos e Soun d System :
'9 9 - 0 1 model s - Bos e Soun d Syste m (wit h navigatio n system) :
ProCarManuals.com
Page 1566 of 1954
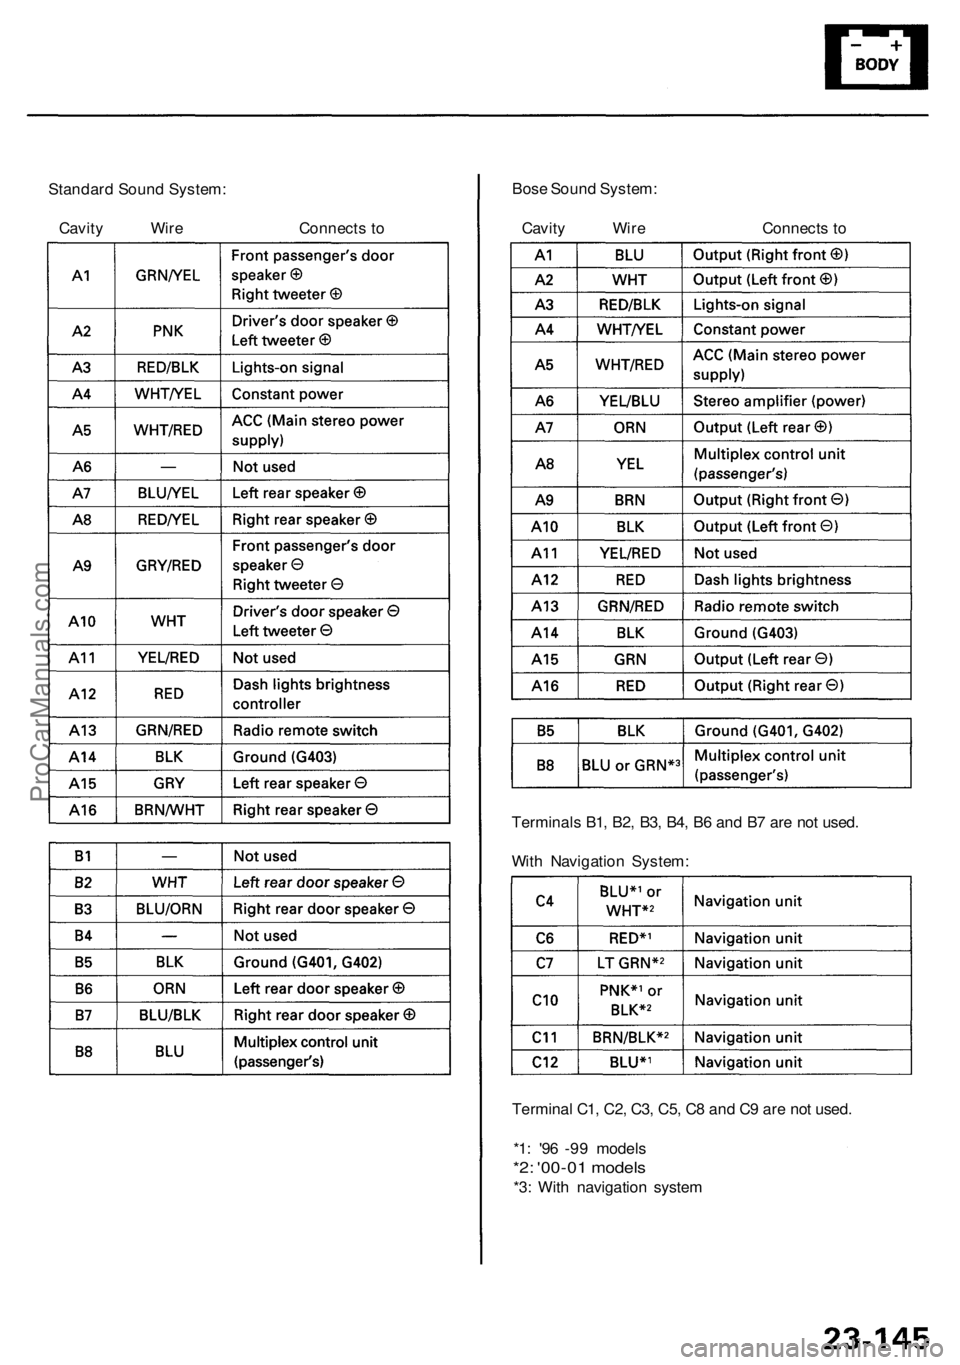
Terminal C1 , C2 , C3 , C5 , C 8 an d C 9 ar e no t used .
*1 : '9 6 -9 9 model s
*2: '00-0 1 model s
*3: Wit h navigatio n syste m
Bos
e Soun d System :
Standar d Soun d System :
Cavit y Wir e Connect s t o Cavity Wir e Connect s to
Terminal s B1 , B2 , B3 , B4 , B 6 an d B 7 ar e no t used .
Wit h Navigatio n System :
ProCarManuals.com
Page 1567 of 1954
Stereo Soun d Syste m
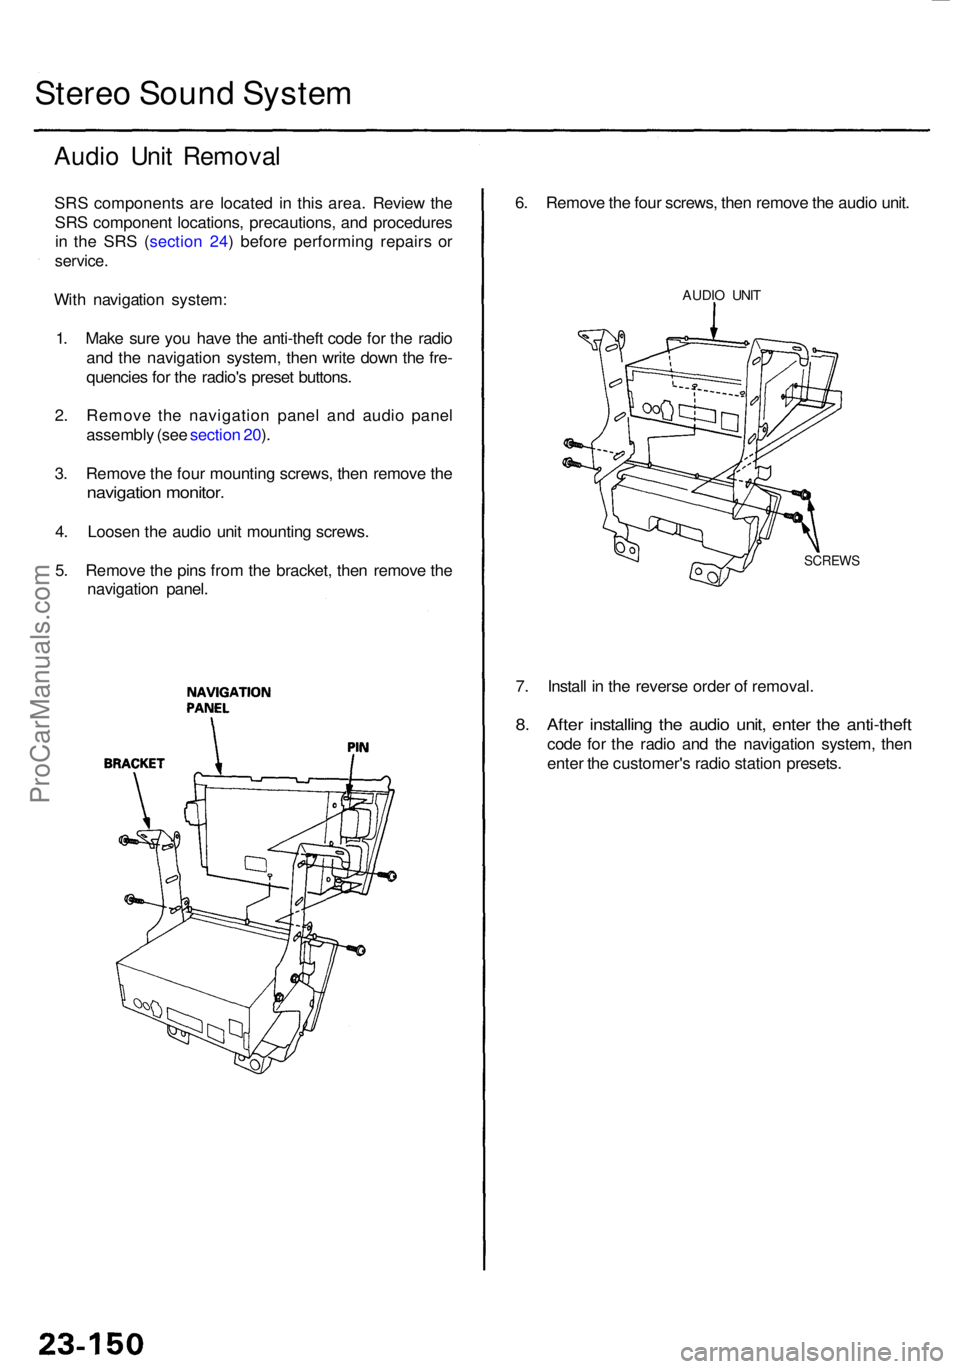
Audio Uni t Remova l
SRS component s ar e locate d i n thi s area . Revie w th e
SR S componen t locations , precautions , an d procedure s
i n th e SR S ( sectio n 24 ) befor e performin g repair s o r
service .
With navigatio n system :
1 . Mak e sur e yo u hav e th e anti-thef t cod e fo r th e radi o
an d th e navigatio n system , the n writ e dow n th e fre -
quencie s fo r th e radio' s prese t buttons .
2 . Remov e th e navigatio n pane l an d audi o pane l
assembl y (se e sectio n 20 ).
3 . Remov e th e fou r mountin g screws , the n remov e th e
navigatio n monitor .
4. Loose n th e audi o uni t mountin g screws .
5 . Remov e th e pin s fro m th e bracket , the n remov e th e
navigatio n panel .
7. Instal l i n th e revers e orde r o f removal .
8. Afte r installin g th e audi o unit , ente r th e anti-thef t
code fo r th e radi o an d th e navigatio n system , the n
ente r th e customer' s radi o statio n presets .
6
. Remov e th e fou r screws , the n remov e th e audi o unit .
AUDI O UNI T
SCREW S
ProCarManuals.com
Page 1568 of 1954
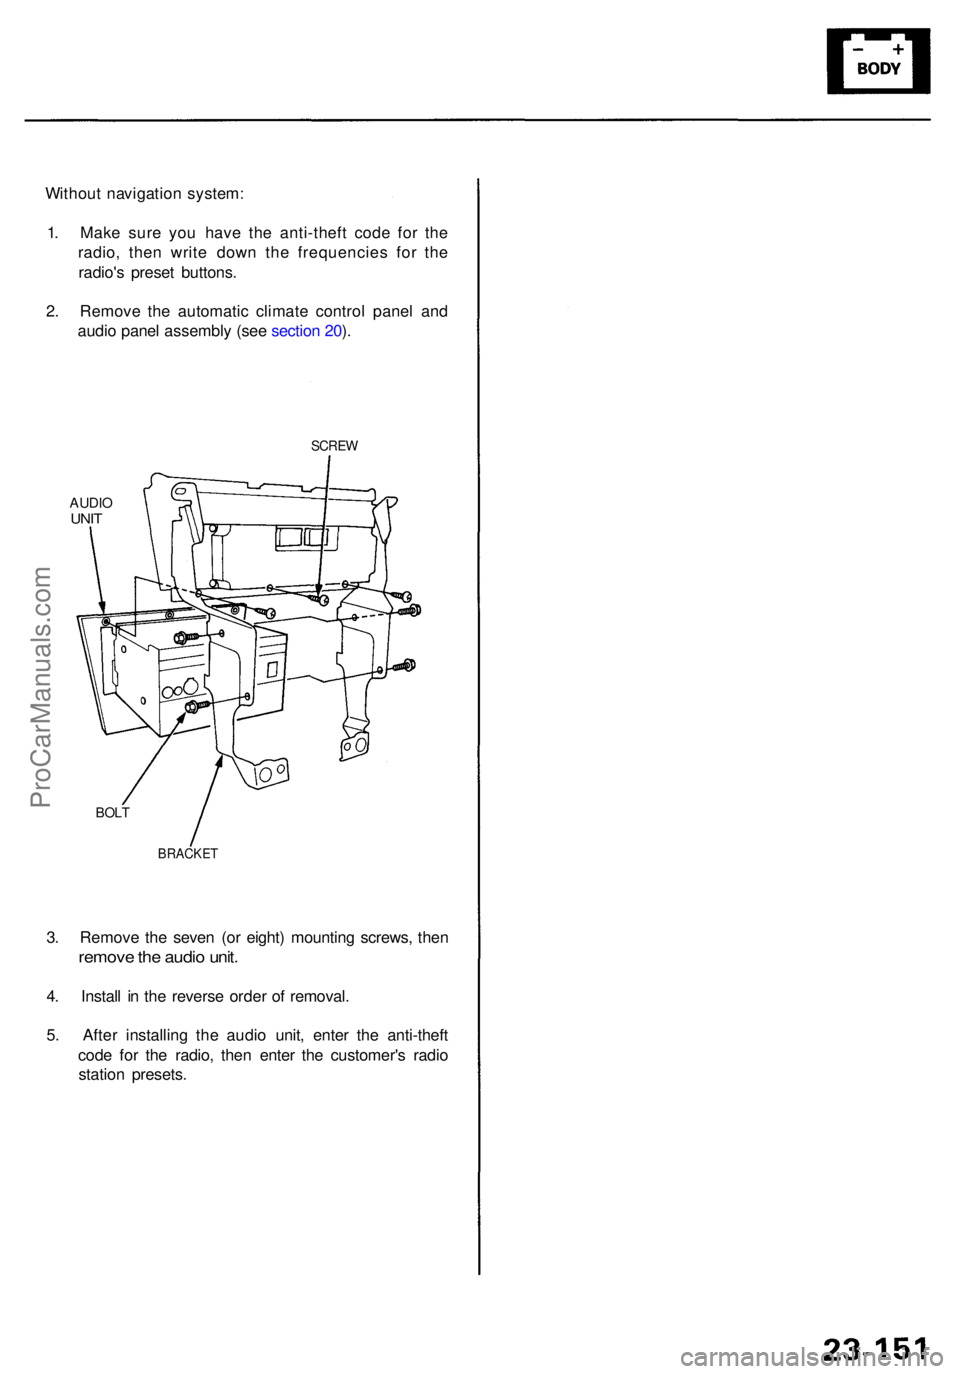
3. Remov e th e seve n (o r eight ) mountin g screws , the n
remov e th e audi o unit .
4. Instal l i n th e revers e orde r o f removal .
5 . Afte r installin g th e audi o unit , ente r th e anti-thef t
cod e fo r th e radio , the n ente r th e customer' s radi o
statio n presets .
Withou
t navigatio n system :
1 . Mak e sur e yo u hav e th e anti-thef t cod e fo r th e
radio , the n writ e dow n th e frequencie s fo r th e
radio' s prese t buttons .
2 . Remov e th e automati c climat e contro l pane l an d
audi o pane l assembl y (se e sectio n 20 ).
SCRE W
AUDIOUNIT
BRACKE T
BOLT
ProCarManuals.com
Page 1569 of 1954
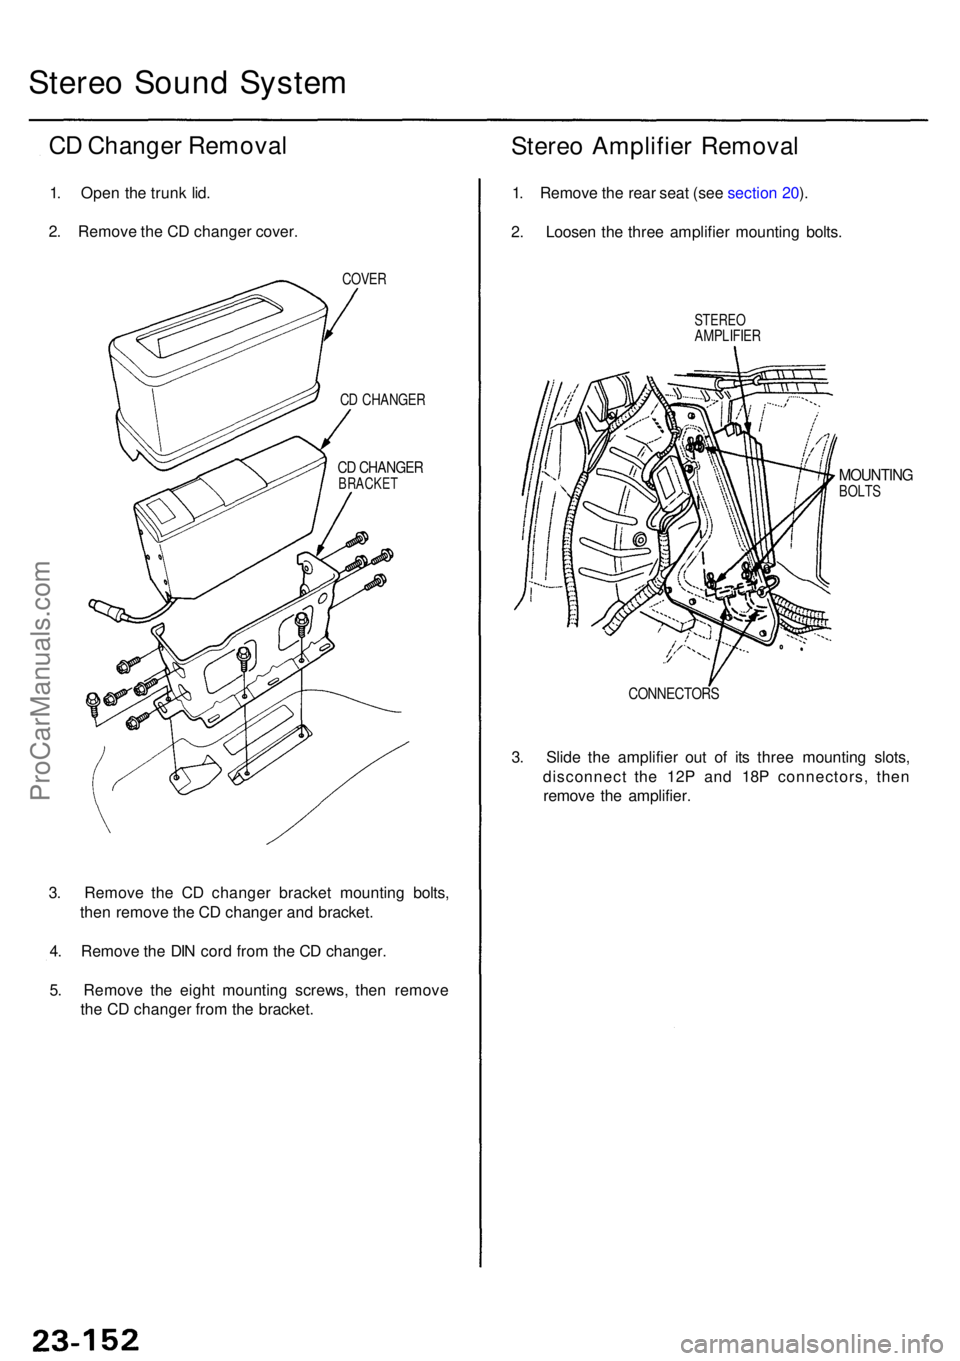
3. Remov e th e C D change r bracke t mountin g bolts ,
the n remov e th e C D change r an d bracket .
4 . Remov e th e DI N cor d fro m th e C D changer .
5 . Remov e th e eigh t mountin g screws , the n remov e
th e C D change r fro m th e bracket .
Stereo Soun d Syste m
CD Change r Remova l
1. Ope n th e trun k lid .
2 . Remov e th e C D change r cover .
Stereo Amplifie r Remova l
1. Remov e th e rea r sea t (se e sectio n 20 ).
2 . Loose n th e thre e amplifie r mountin g bolts .
COVE R
CD CHANGE R
CD CHANGE RBRACKE T
STEREOAMPLIFIE R
MOUNTINGBOLTS
CONNECTOR S
3. Slid e th e amplifie r ou t o f it s thre e mountin g slots ,
disconnec t th e 12 P an d 18 P connectors , the n
remov e th e amplifier .
ProCarManuals.com
Page 1570 of 1954
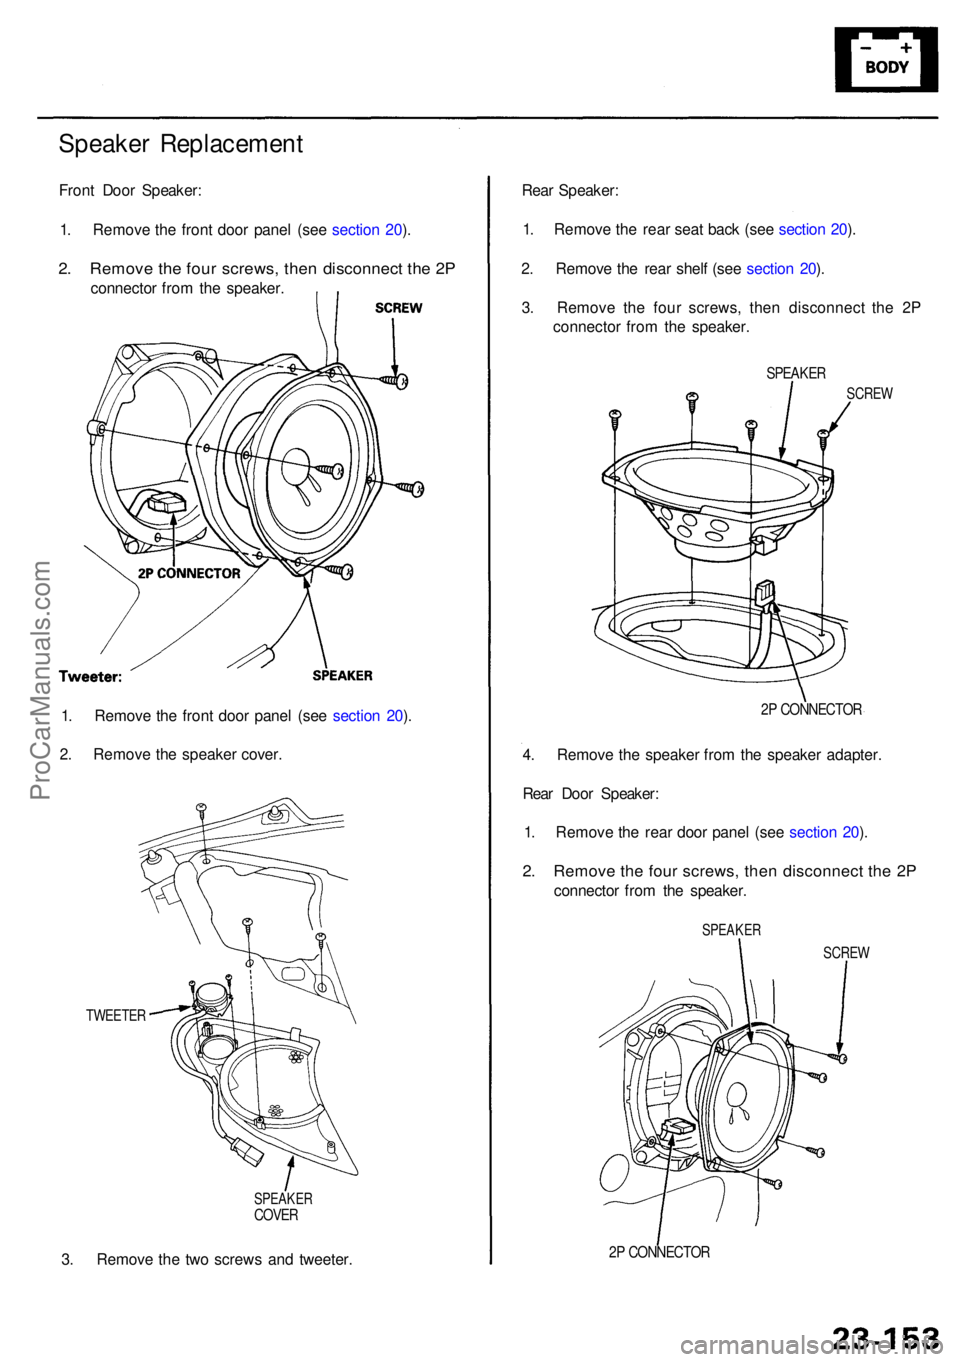
Speaker Replacemen t
Front Doo r Speaker :
1 . Remov e th e fron t doo r pane l (se e sectio n 20 ).
2 . Remov e th e fou r screws , the n disconnec t th e 2 P
connecto r fro m th e speaker .
1 . Remov e th e fron t doo r pane l (se e sectio n 20 ).
2 . Remov e th e speake r cover .
3 . Remov e th e tw o screw s an d tweeter .
TWEETE R
SPEAKERCOVER
2P CONNECTO R
SPEAKER
SCREW
Rear Speaker :
1 . Remov e th e rea r sea t bac k (se e sectio n 20 ).
2 . Remov e th e rea r shel f (se e sectio n 20 ).
3 . Remov e th e fou r screws , the n disconnec t th e 2 P
connecto r fro m th e speaker .
4 . Remov e th e speake r fro m th e speake r adapter .
Rea r Doo r Speaker :
1 . Remov e th e rea r doo r pane l (se e sectio n 20 ).
2 . Remov e th e fou r screws , the n disconnec t th e 2 P
connecto r fro m th e speaker .
2P CONNECTO R
SCREW
SPEAKE R
ProCarManuals.com
Trending: flat tire, roof, roof rack, fog light, torque, radio antenna, key
