ACURA TL 1995 Service Repair Manual
Manufacturer: ACURA, Model Year: 1995, Model line: TL, Model: ACURA TL 1995Pages: 1771, PDF Size: 62.49 MB
Page 1311 of 1771
Removal/Installation
Removal:
Whe n removin g th e modulato r uni t o r afte r removin g
it , b e carefu l no t t o tur n it upside-dow n o r lea n if exces -
sively .
D o no t spil l brak e flui d o n th e car ; i t ma y damag e th e
paint ; i f brak e flui d doe s contac t th e paint , was h i t of f
immediatel y wit h water .
Take car e no t t o damag e o r defor m th e brak e line s
durin g remova l an d installation .
T o preven t th e brak e flui d fro m flowing , plu g an d
cove r th e hos e end s an d joint s wit h a sho p towe l o r
equivalen t material .
D o no t loose n th e relie f plu g o n th e accumulator .
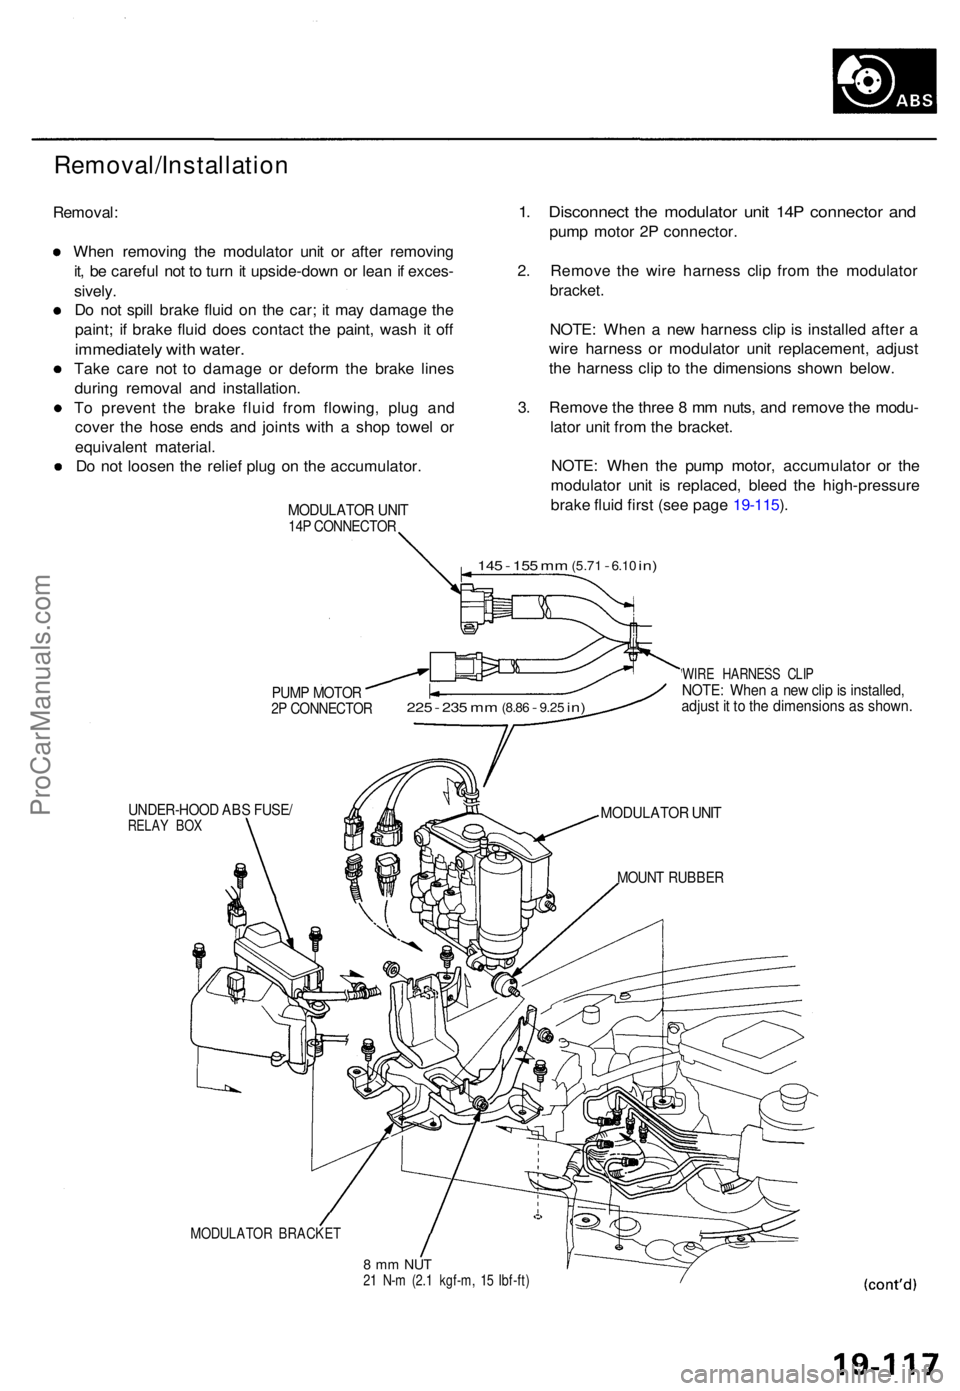
MODULATOR UNI T14P CONNECTO R
1. Disconnec t th e modulato r uni t 14 P connecto r an d
pum p moto r 2 P connector .
2 . Remov e th e wir e harnes s cli p fro m th e modulato r
bracket.
NOTE: Whe n a ne w harnes s cli p is installe d afte r a
wir e harnes s o r modulato r uni t replacement , adjus t
th e harnes s cli p t o th e dimension s show n below .
3 . Remov e th e thre e 8 m m nuts , an d remov e th e modu -
lato r uni t fro m th e bracket .
NOTE : Whe n th e pum p motor , accumulato r o r th e
modulato r uni t i s replaced , blee d th e high-pressur e
brak e flui d firs t (se e pag e 19-115 ).
14 5 - 15 5 mm (5.7 1 - 6.10 in)
PUM P MOTO R2P CONNECTO R
WIRE HARNES S CLI PNOTE : Whe n a ne w cli p is installed ,adjust it t o th e dimension s a s shown .
UNDER-HOO D AB S FUSE /RELAY BO X
MODULATO R BRACKE T
8 m m NU T21 N- m (2. 1 kgf-m , 1 5 Ibf-ft )
MOUN T RUBBE R
MODULATO R UNI T
225 - 23 5 mm (8.8 6 - 9.25 in)
ProCarManuals.com
Page 1312 of 1771
Modulator Uni t
Removal/Installatio n (cont'd )
Installation :
1 . Chec k whethe r th e brak e flui d leve l i n th e reservoi r
i s a t th e MA X (upper ) lever . I f leve l i s low , ad d fres h
brak e flui d t o th e MA X (upper ) level .
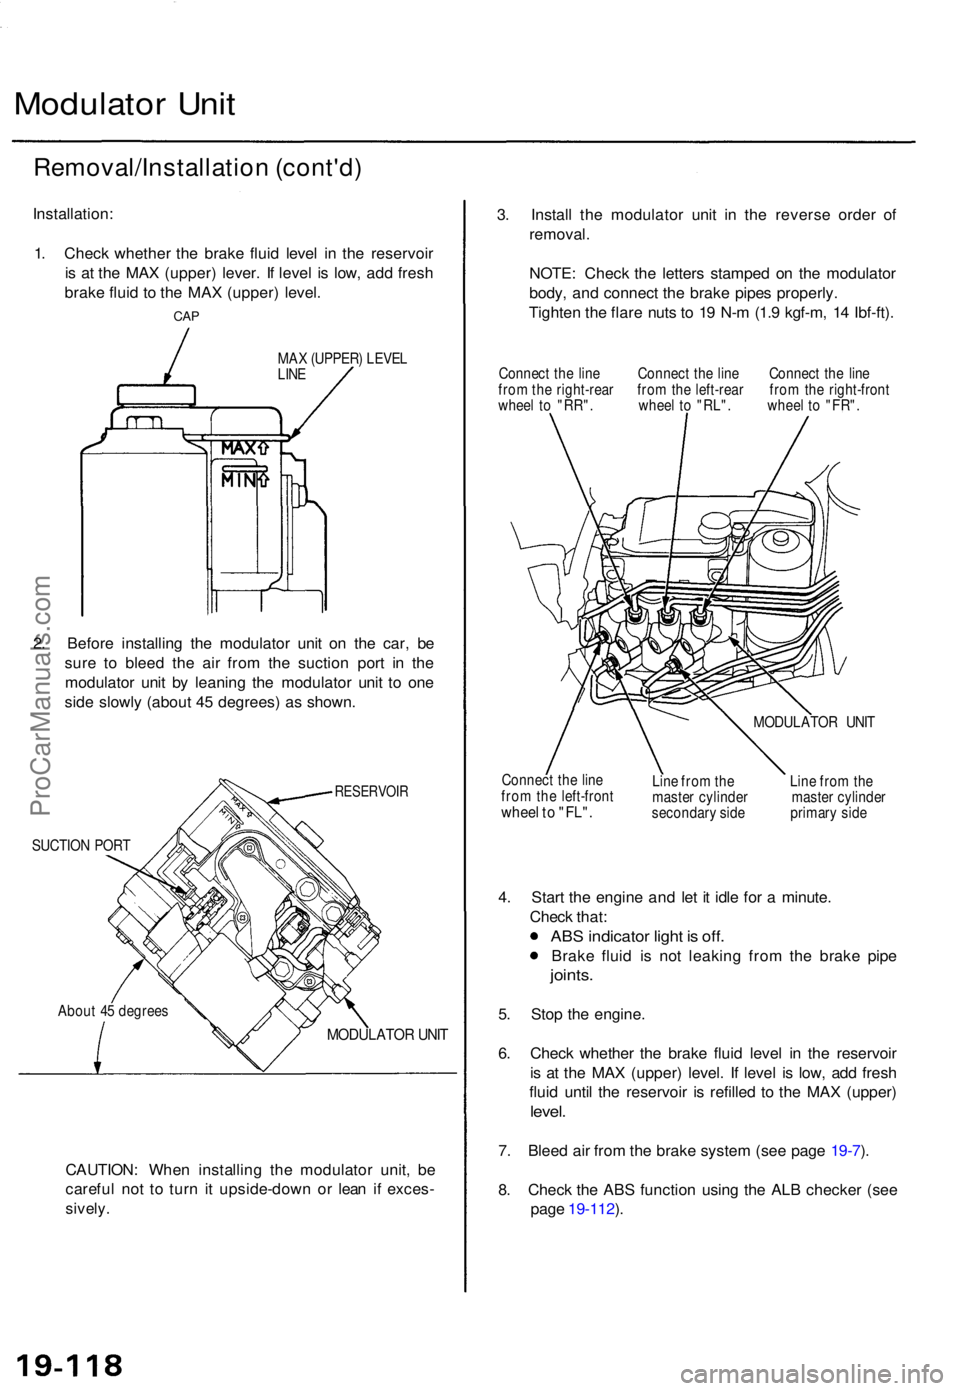
CAP
MA X (UPPER ) LEVE L
LIN E
2. Befor e installin g th e modulato r uni t o n th e car , b e
sur e t o blee d th e ai r fro m th e suctio n por t i n th e
modulato r uni t b y leanin g th e modulato r uni t t o on e
sid e slowl y (abou t 4 5 degrees ) a s shown .
RESERVOI R
SUCTION POR T
Abou t 4 5 degree s
MODULATO R UNI T
CAUTION : Whe n installin g th e modulato r unit , b e
carefu l no t t o tur n i t upside-dow n o r lea n i f exces -
sively.
3. Instal l th e modulato r uni t i n th e revers e orde r o f
removal .
NOTE : Chec k th e letter s stampe d o n th e modulato r
body , an d connec t th e brak e pipe s properly .
Tighte n th e flar e nut s t o 1 9 N- m (1. 9 kgf-m , 1 4 Ibf-ft) .
Connec t th e lin e Connec t th e lin e Connec t th e lin e
fro m th e right-rea r fro m th e left-rea r fro m th e right-fron t
whee l t o "RR" . whee l t o "RL" . whee l t o "FR" .
Connec t th e lin e
fro m th e left-fron t
wheel t o "FL" .
MODULATO R UNI T
Lin e fro m th e Lin e fro m th e
maste r cylinde r maste r cylinde r
secondar y sid e primar y sid e
4. Star t th e engine and le t i t idl e fo r a minute .
Chec k that :
ABS indicato r ligh t i s off .
Brak e flui d i s no t leakin g fro m th e brak e pip e
joints .
5. Sto p th e engine .
6 . Chec k whethe r th e brak e flui d leve l i n th e reservoi r
i s a t th e MA X (upper ) level . I f leve l i s low , ad d fres h
flui d unti l th e reservoi r i s refille d t o th e MA X (upper )
level.
7. Blee d ai r fro m th e brak e syste m (se e pag e 19-7 ).
8 . Chec k th e AB S functio n usin g th e AL B checke r (se e
pag e 19-112 ).
ProCarManuals.com
Page 1313 of 1771
Wire Harnes s Replacemen t
1. Remov e th e modulato r uni t fro m th e ca r (se e pag e
19-117 ).
2 . Remov e th e modulato r uni t cover , an d remov e th e
wir e harness .
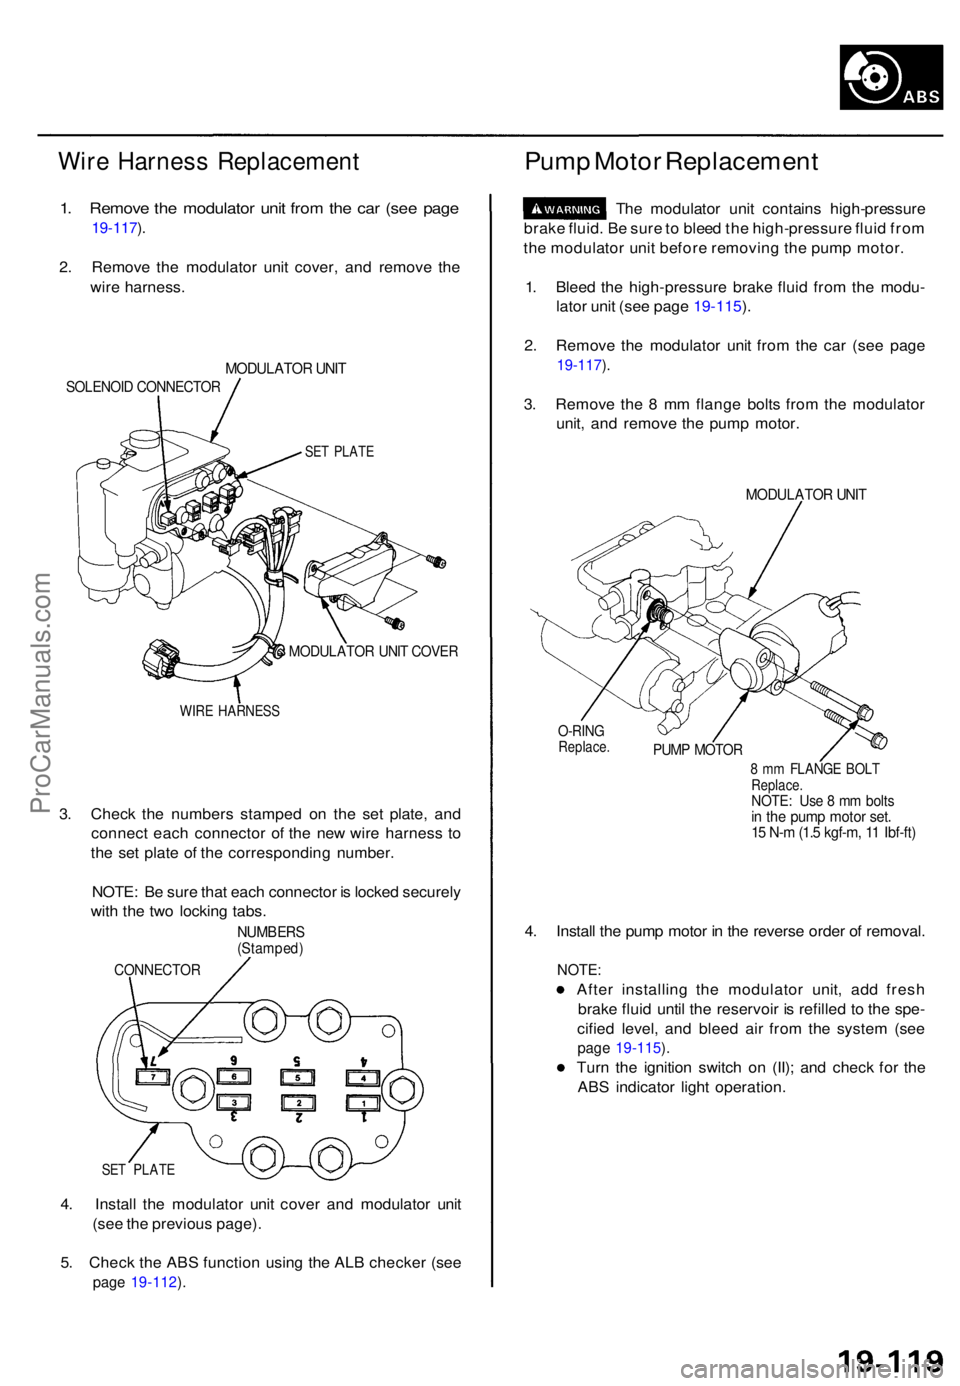
MODULATO R UNI T
SOLENOI D CONNECTO R
SET PLAT E
MODULATO R UNI T COVE R
WIRE HARNES S
3. Chec k th e number s stampe d o n th e se t plate , an d
connec t eac h connecto r o f th e ne w wir e harnes s t o
th e se t plat e o f th e correspondin g number .
NOTE : B e sur e tha t eac h connecto r i s locke d securel y
wit h th e tw o lockin g tabs .
NUMBER S(Stamped )
CONNECTO R
SET PLAT E
4. Instal l th e modulato r uni t cove r an d modulato r uni t
(se e th e previou s page) .
5 . Chec k th e AB S functio n usin g th e AL B checke r (se e
page 19-112 ).
Pum p Moto r Replacemen t
The modulato r uni t contain s high-pressur e
brak e fluid . B e sur e to blee d th e high-pressur e flui d fro m
th e modulato r uni t befor e removin g th e pum p motor .
1 . Blee d th e high-pressur e brak e flui d fro m th e modu -
lato r uni t (se e pag e 19-115 ).
2 . Remov e th e modulato r uni t fro m th e ca r (se e pag e
19-117 ).
3 . Remov e th e 8 m m flang e bolt s fro m th e modulato r
unit , an d remov e th e pum p motor .
MODULATO R UNI T
O-RIN GReplace .PUMP MOTO R
8 m m FLANG E BOL TReplace .NOTE: Us e 8 m m bolt sin th e pum p moto r set .15 N- m (1. 5 kgf-m , 1 1 Ibf-ft )
4. Instal l th e pum p moto r i n th e revers e orde r o f removal .
NOTE:
After installin g th e modulato r unit , ad d fres h
brak e flui d unti l th e reservoi r i s refille d t o th e spe -
cifie d level , an d blee d ai r fro m th e syste m (se e
page 19-115 ).
Tur n th e ignitio n switc h o n (II) ; an d chec k fo r th e
AB S indicato r ligh t operation .
ProCarManuals.com
Page 1314 of 1771
Modulator Uni t
Reservoi r Replacemen t
1. Drai n th e brak e flui d completel y fro m th e reservoi r
(see pag e 19-11 5 fo r th e brak e flui d replacement) .
2 . Remov e th e modulato r uni t fro m th e ca r (se e pag e
19-117 ).
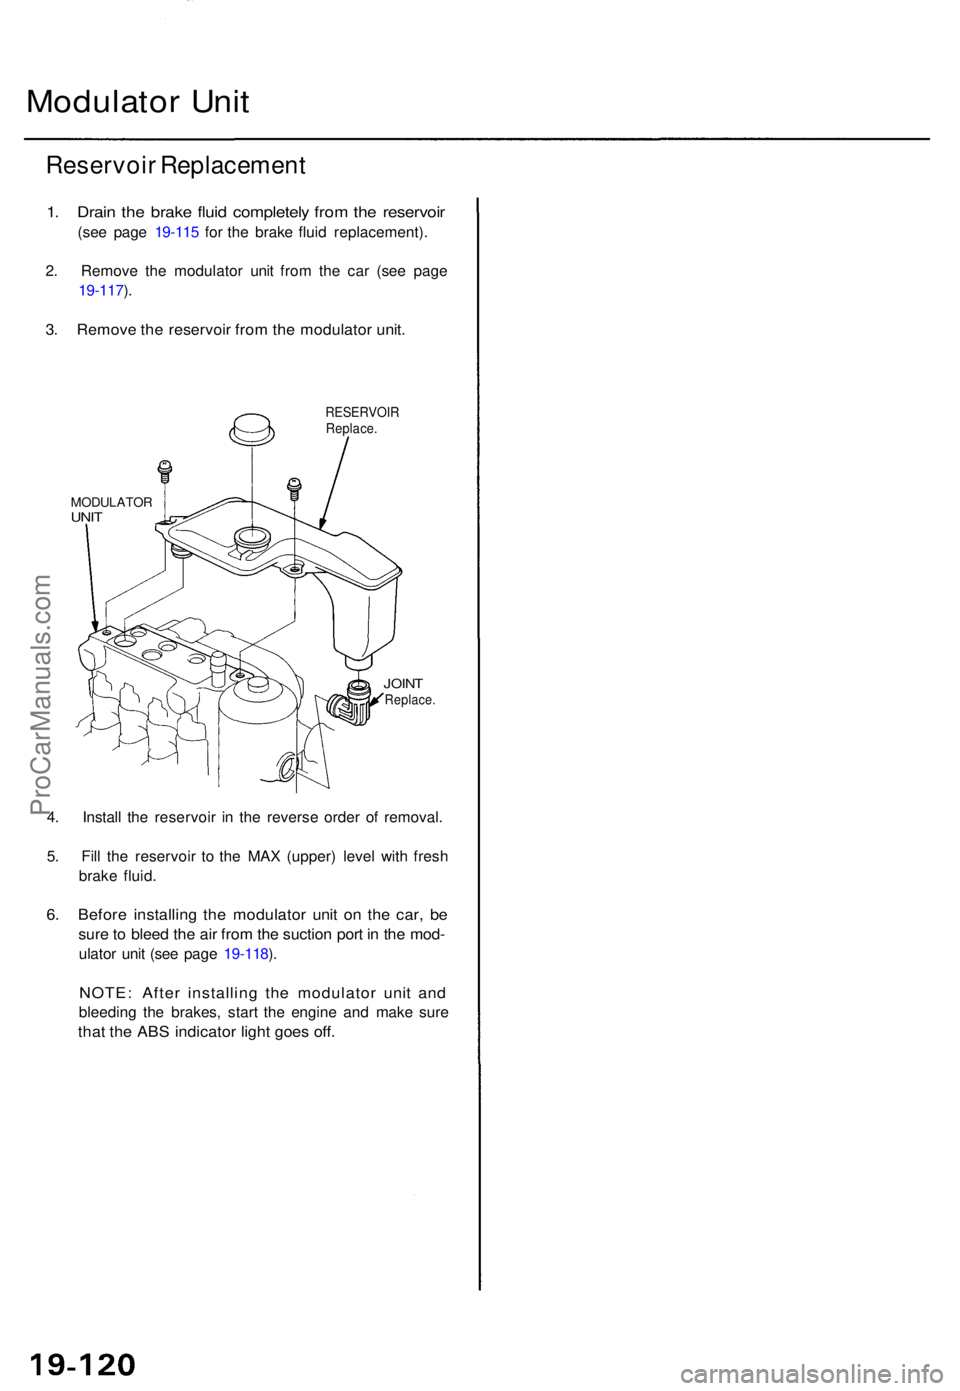
3 . Remov e th e reservoi r fro m th e modulato r unit .
RESERVOI RReplace.
MODULATO RUNIT
JOIN TReplace .
4. Instal l th e reservoi r i n th e revers e orde r o f removal .
5 . Fil l th e reservoi r t o th e MA X (upper ) leve l wit h fres h
brak e fluid .
6. Befor e installin g th e modulato r uni t o n th e car , b e
sur e to blee d th e ai r fro m th e suctio n por t i n th e mod -
ulator uni t (se e pag e 19-118 ).
NOTE : Afte r installin g th e modulato r uni t an d
bleedin g th e brakes , star t th e engin e an d mak e sur e
that th e AB S indicato r ligh t goe s off .
ProCarManuals.com
Page 1315 of 1771
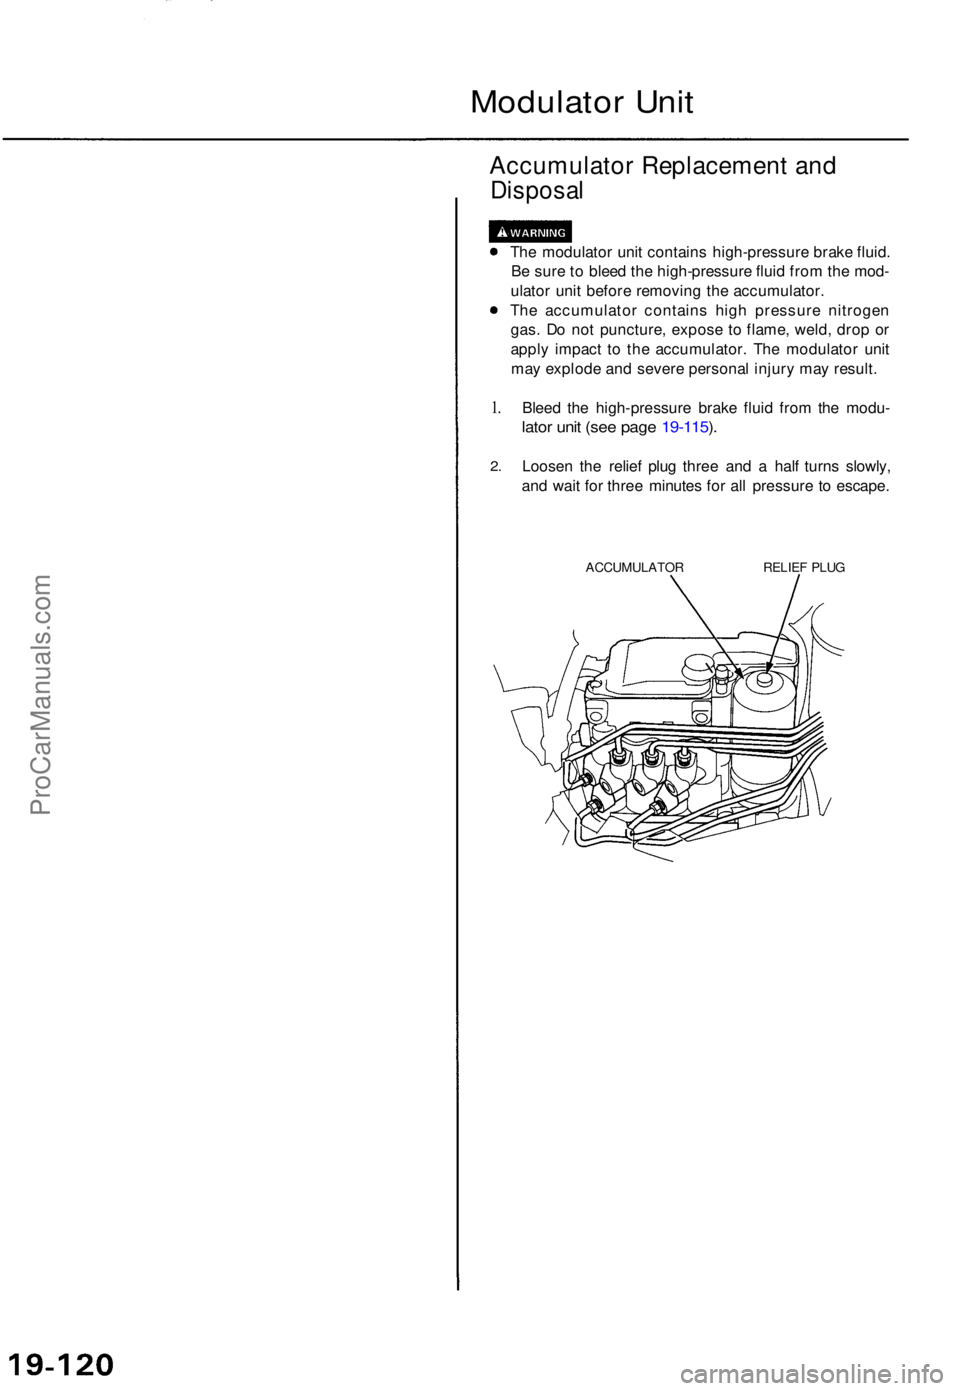
Modulator Uni t
Accumulato r Replacemen t an d
Disposa l
The modulato r uni t contain s high-pressur e brak e fluid .
B e sur e t o blee d th e high-pressur e flui d fro m th e mod -
ulato r uni t befor e removin g th e accumulator .
Th e accumulato r contain s hig h pressur e nitroge n
gas . D o no t puncture , expos e t o flame , weld , dro p o r
appl y impac t t o th e accumulator . Th e modulato r uni t
ma y explod e an d sever e persona l injur y ma y result .
1.
2 .
Blee d th e high-pressur e brak e flui d fro m th e modu -
lator uni t (se e pag e 19-115 ).
Loose n th e relie f plu g thre e an d a hal f turn s slowly ,
an d wai t fo r thre e minute s fo r al l pressur e t o escape .
ACCUMULATO RRELIEF PLU G
ProCarManuals.com
Page 1316 of 1771
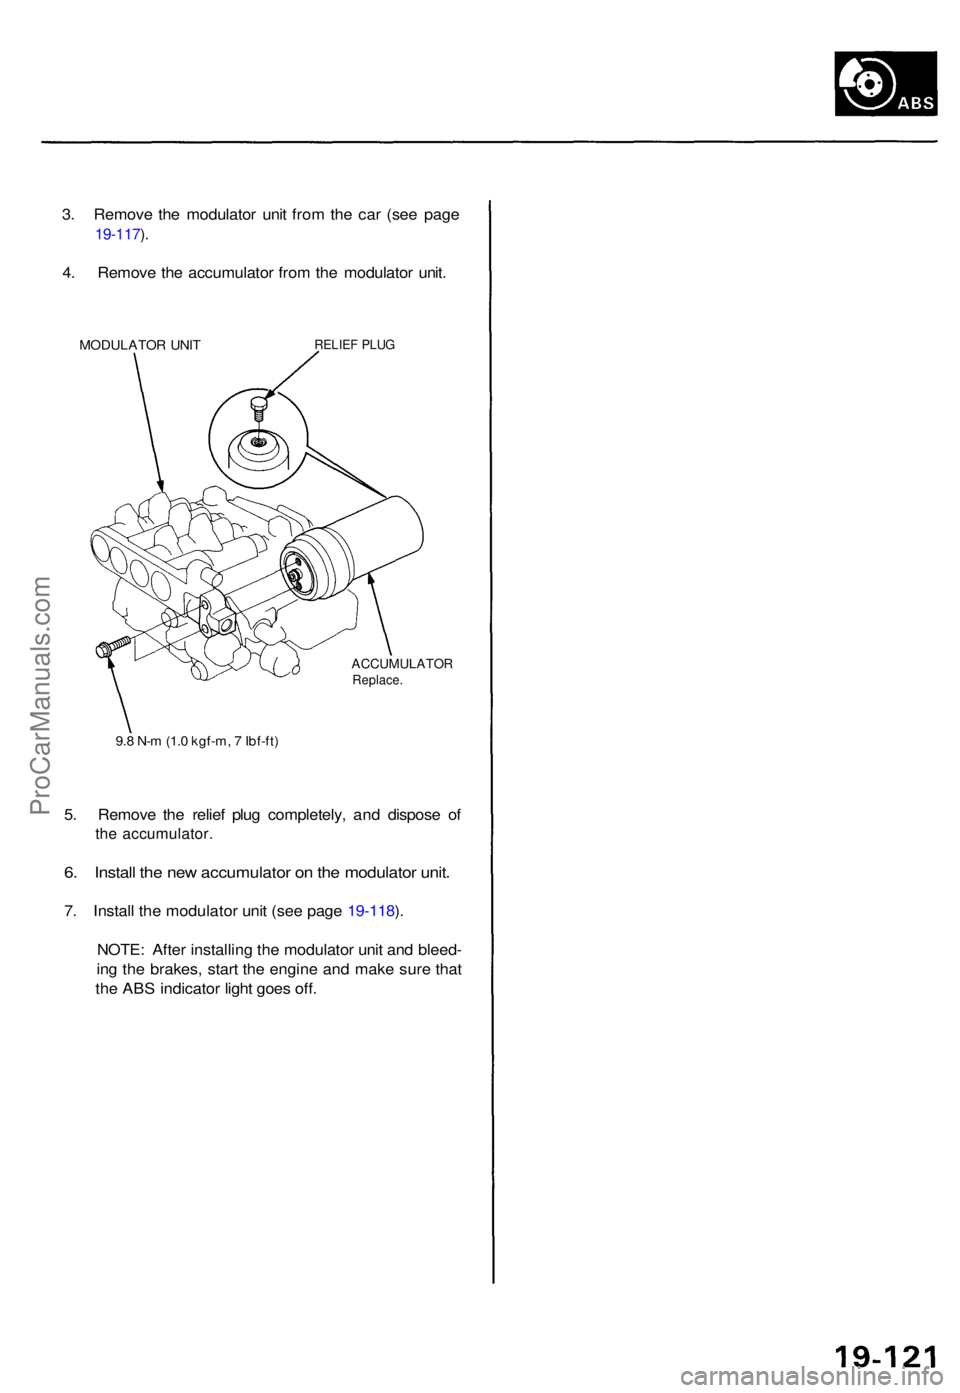
3. Remov e th e modulato r uni t fro m th e ca r (se e pag e
19-117 ).
4 . Remov e th e accumulato r fro m th e modulato r unit .
MODULATO R UNI TRELIE F PLU G
ACCUMULATO RReplace.
9.8 N- m (1. 0 kgf-m , 7 Ibf-ft )
5. Remov e th e relie f plu g completely , an d dispos e o f
the accumulator .
6. Instal l th e ne w accumulato r o n th e modulato r unit .
7. Instal l th e modulato r uni t (se e pag e 19-118 ).
NOTE : Afte r installin g th e modulato r uni t an d bleed -
in g th e brakes , star t th e engine and mak e sur e tha t
th e AB S indicato r ligh t goe s off .
ProCarManuals.com
Page 1317 of 1771
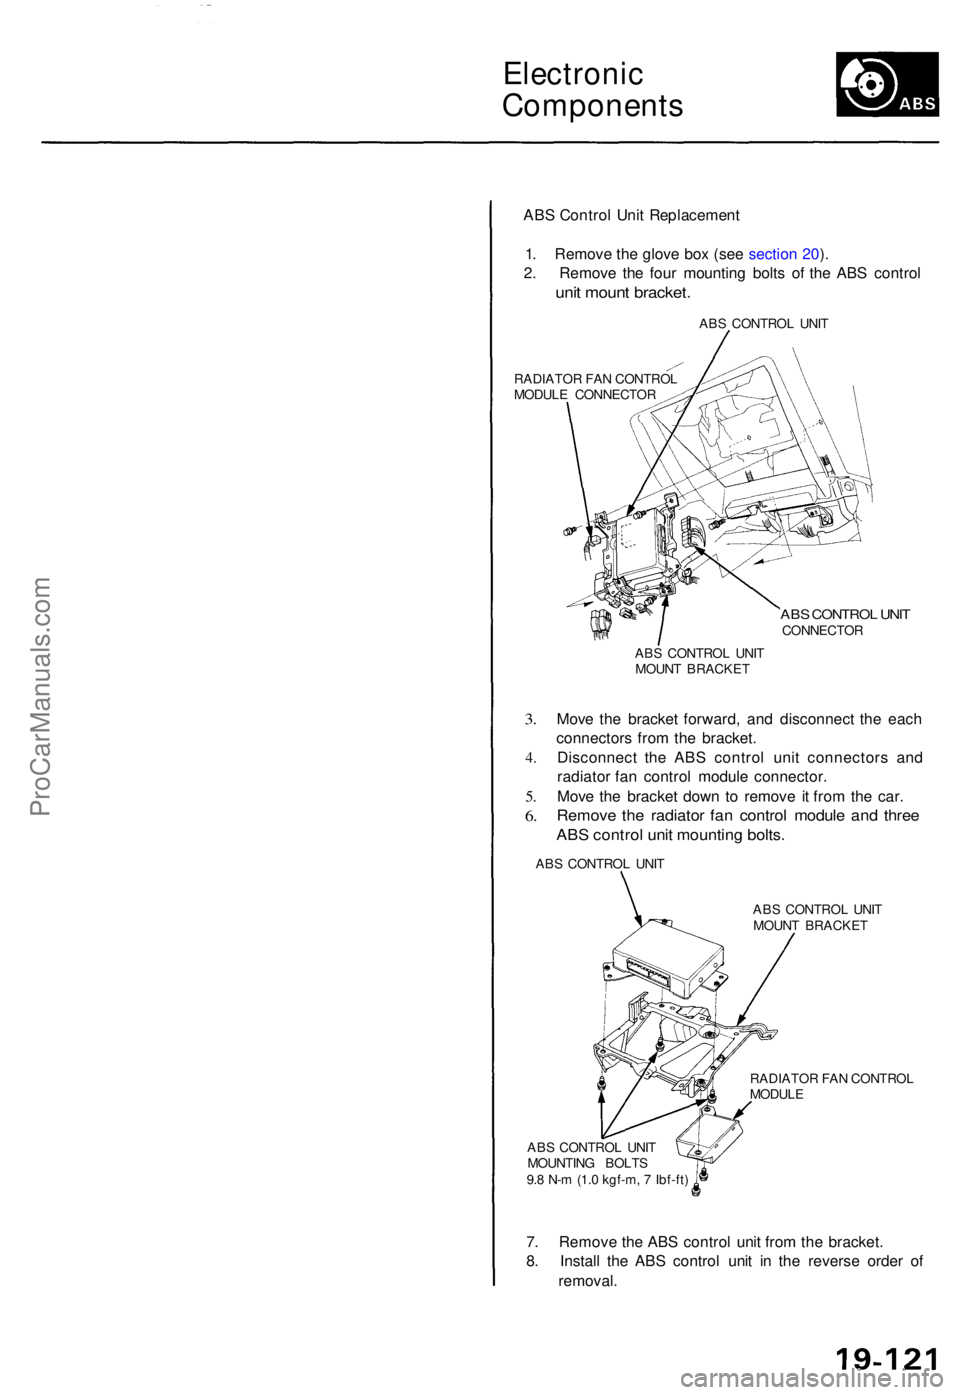
Electronic
Component s
ABS Contro l Uni t Replacemen t
1 . Remov e th e glov e bo x (se e sectio n 20 ).
2 . Remov e th e fou r mountin g bolt s o f th e AB S contro l
unit moun t bracket .
RADIATO R FA N CONTRO L
MODUL E CONNECTO RAB
S CONTRO L UNI T
ABS CONTRO L UNI TCONNECTO R
AB S CONTRO L UNI T
MOUN T BRACKE T
3.
4 .
5.
6 .
Mov e th e bracke t forward , an d disconnec t th e eac h
connector s fro m th e bracket .
Disconnec t th e AB S contro l uni t connector s an d
radiato r fa n contro l modul e connector .
Mov e th e bracke t dow n t o remov e i t fro m th e car .
Remov e th e radiato r fa n contro l modul e an d thre e
ABS contro l uni t mountin g bolts .
ABS CONTRO L UNI T
ABS CONTRO L UNI T
MOUN T BRACKE T
RADIATO R FA N CONTRO L
MODUL E
AB S CONTRO L UNI T
MOUNTIN G BOLT S
9. 8 N- m (1. 0 kgf-m , 7 Ibf-ft )
7. Remov e th e AB S contro l uni t fro m th e bracket .
8 . Instal l th e AB S contro l uni t i n th e revers e orde r o f
removal .
ProCarManuals.com
Page 1318 of 1771
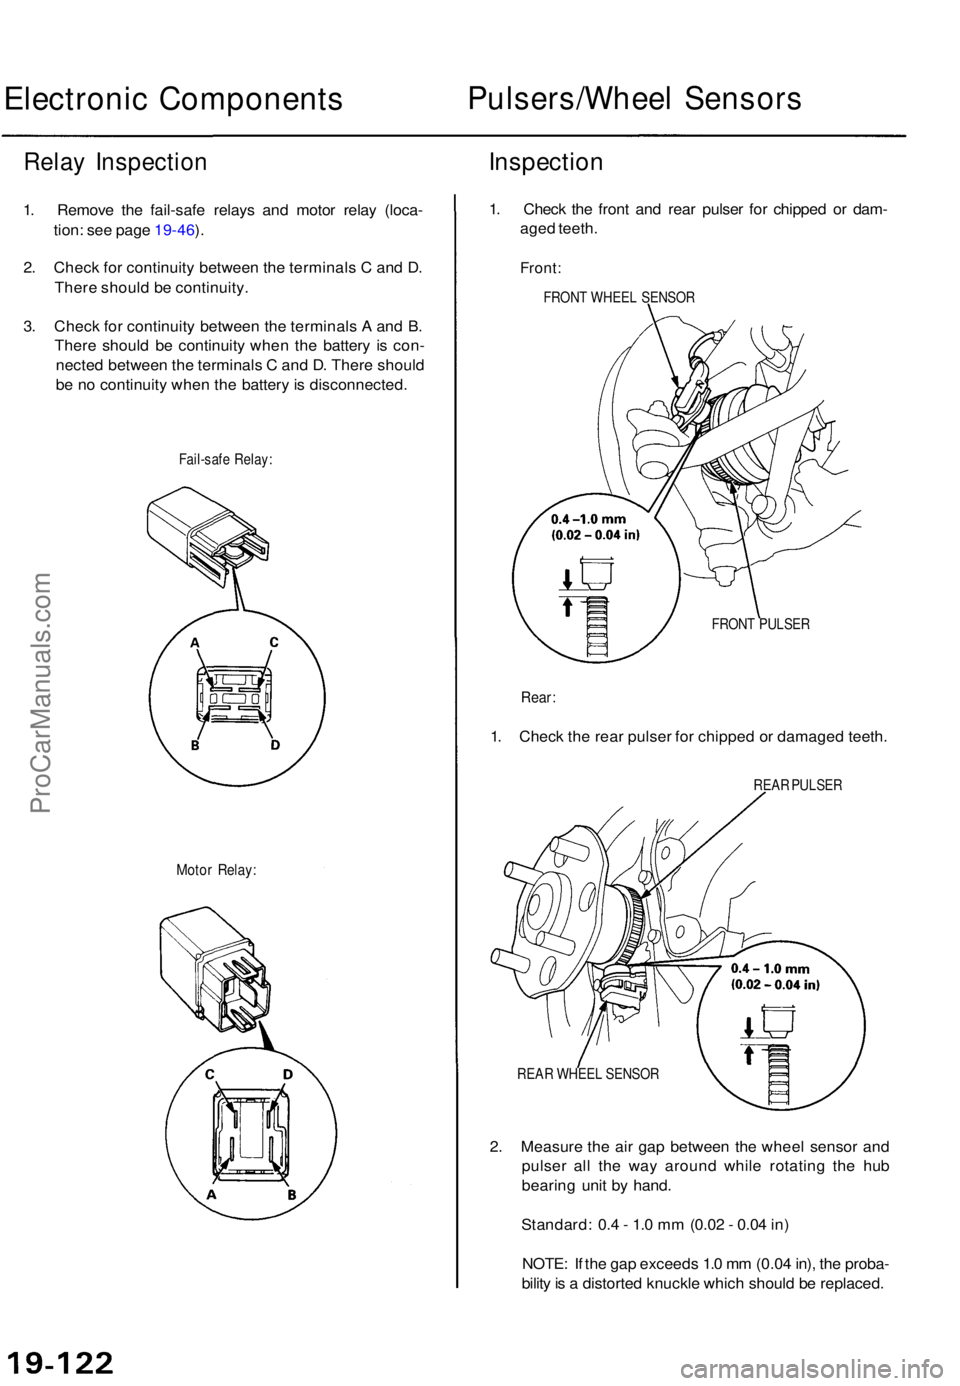
Electronic Component sPulsers/Whee l Sensor s
Relay Inspectio n
1. Remov e th e fail-saf e relay s an d moto r rela y (loca -
tion : se e pag e 19-46 ).
2 . Chec k fo r continuit y betwee n th e terminal s C an d D .
Ther e shoul d b e continuity .
3 . Chec k fo r continuit y betwee n th e terminal s A an d B .
Ther e shoul d b e continuit y whe n th e batter y i s con -
necte d betwee n th e terminal s C an d D . Ther e shoul d
b e n o continuit y whe n th e batter y is disconnected .
Fail-safe Relay :
Inspectio n
Motor Relay :
1. Chec k th e fron t an d rea r pulse r fo r chippe d o r dam -
age d teeth .
Front :
FRON T WHEE L SENSO R
FRON T PULSE R
Rear:
1. Chec k th e rea r pulse r fo r chippe d o r damage d teeth .
REAR PULSE R
REA R WHEE L SENSO R
2. Measur e th e ai r ga p betwee n th e whee l senso r an d
pulse r al l th e wa y aroun d whil e rotatin g th e hu b
bearin g uni t b y hand .
Standard : 0. 4 - 1. 0 m m (0.0 2 - 0.0 4 in )
NOTE : I f th e ga p exceed s 1. 0 m m (0.0 4 in) , th e proba -
bilit y is a distorte d knuckl e whic h shoul d b e replaced .
ProCarManuals.com
Page 1319 of 1771
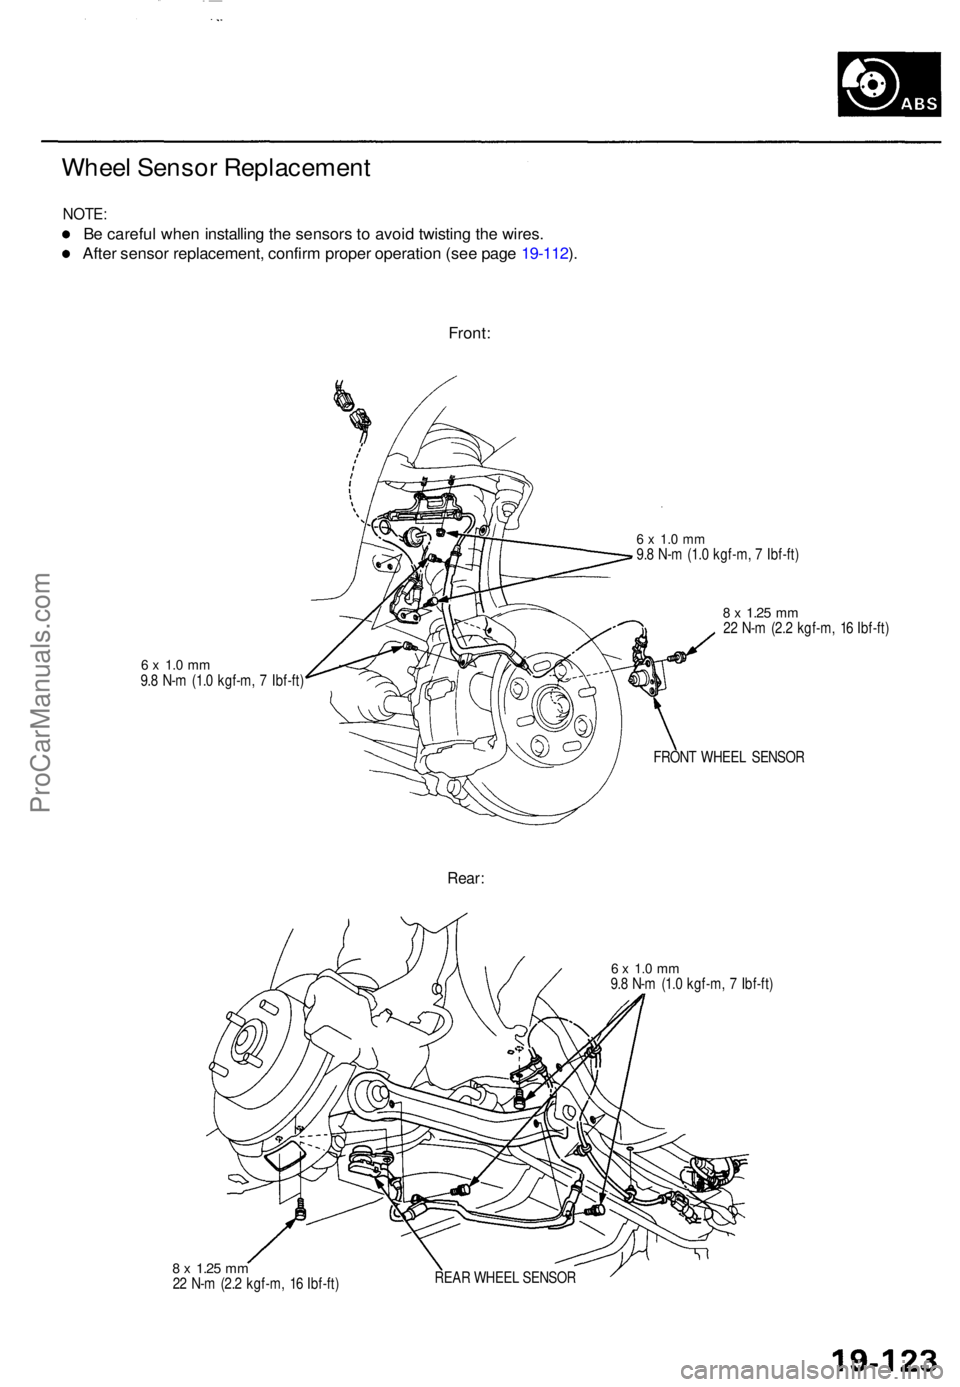
Wheel Senso r Replacemen t
NOTE:
Be carefu l whe n installin g th e sensor s t o avoi d twistin g th e wires .
Afte r senso r replacement , confir m prope r operatio n (se e pag e 19-112 ).
Front :
6 x 1. 0 m m9.8 N- m (1. 0 kgf-m , 7 Ibf-ft )
6 x 1. 0 m m9.8 N- m (1. 0 kgf-m , 7 Ibf-ft )
8 x 1.2 5 mm22 N- m (2. 2 kgf-m , 1 6 Ibf-ft )
FRON T WHEE L SENSO R
Rear:
8 x 1.2 5 mm22 N- m (2. 2 kgf-m , 1 6 Ibf-ft )
6 x 1. 0 m m9.8 N- m (1. 0 kgf-m , 7 Ibf-ft )
REA R WHEE L SENSO R
ProCarManuals.com
Page 1320 of 1771
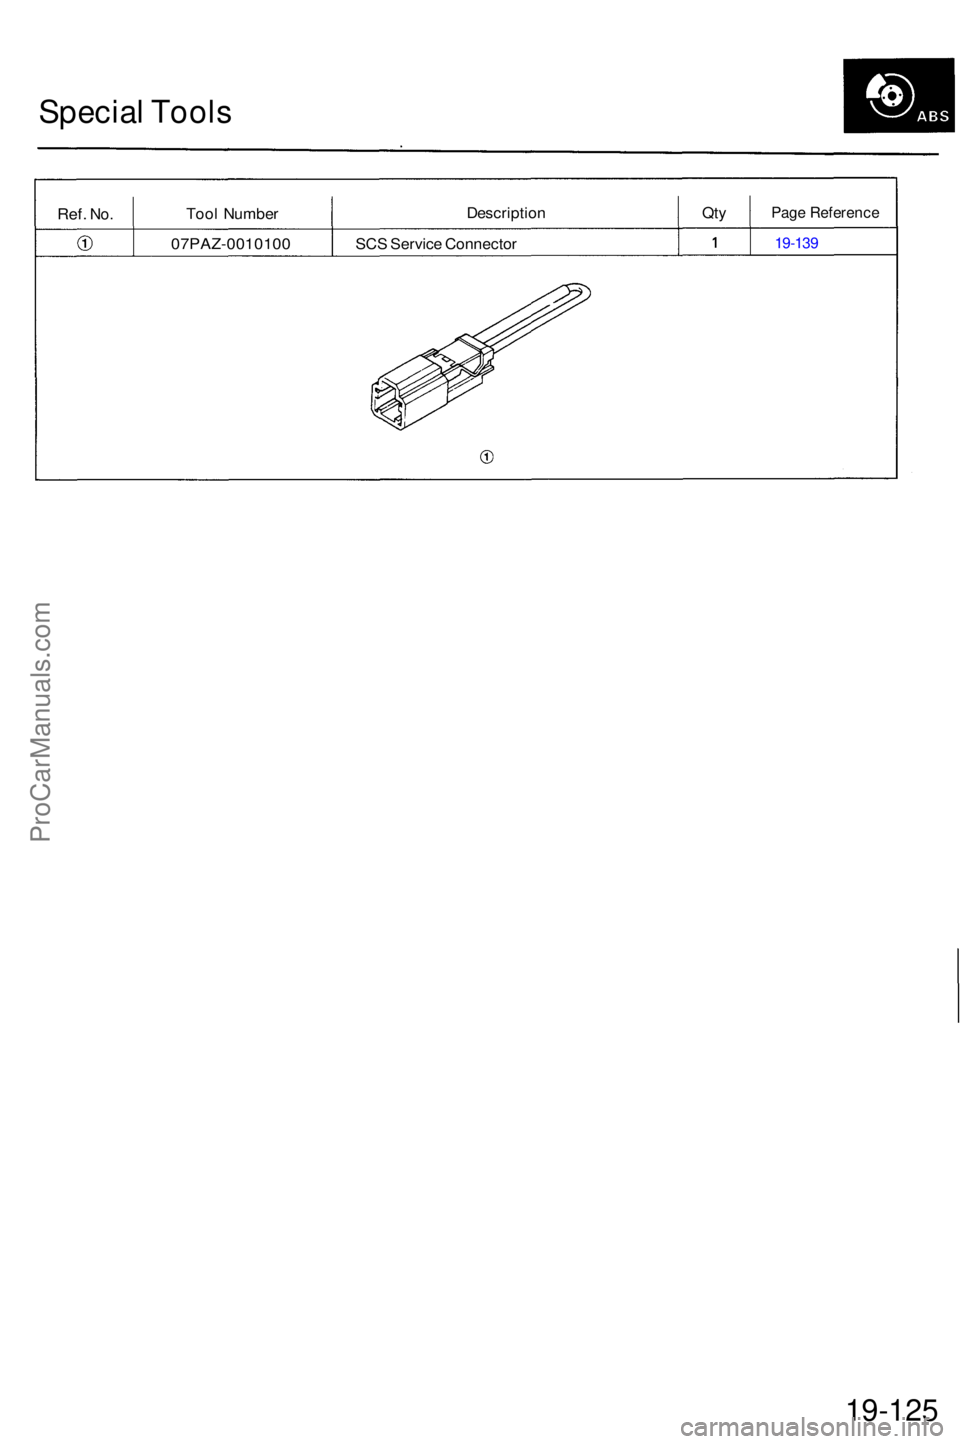
Special Tool s
Ref. No.Too l Numbe r Descriptio
nQtyPag e Referenc e
07PAZ-001010 0 SC S Servic e Connecto r 19-13 9
19-125
ProCarManuals.com