ACURA TL 1995 Service Repair Manual
Manufacturer: ACURA, Model Year: 1995, Model line: TL, Model: ACURA TL 1995Pages: 1771, PDF Size: 62.49 MB
Page 1481 of 1771
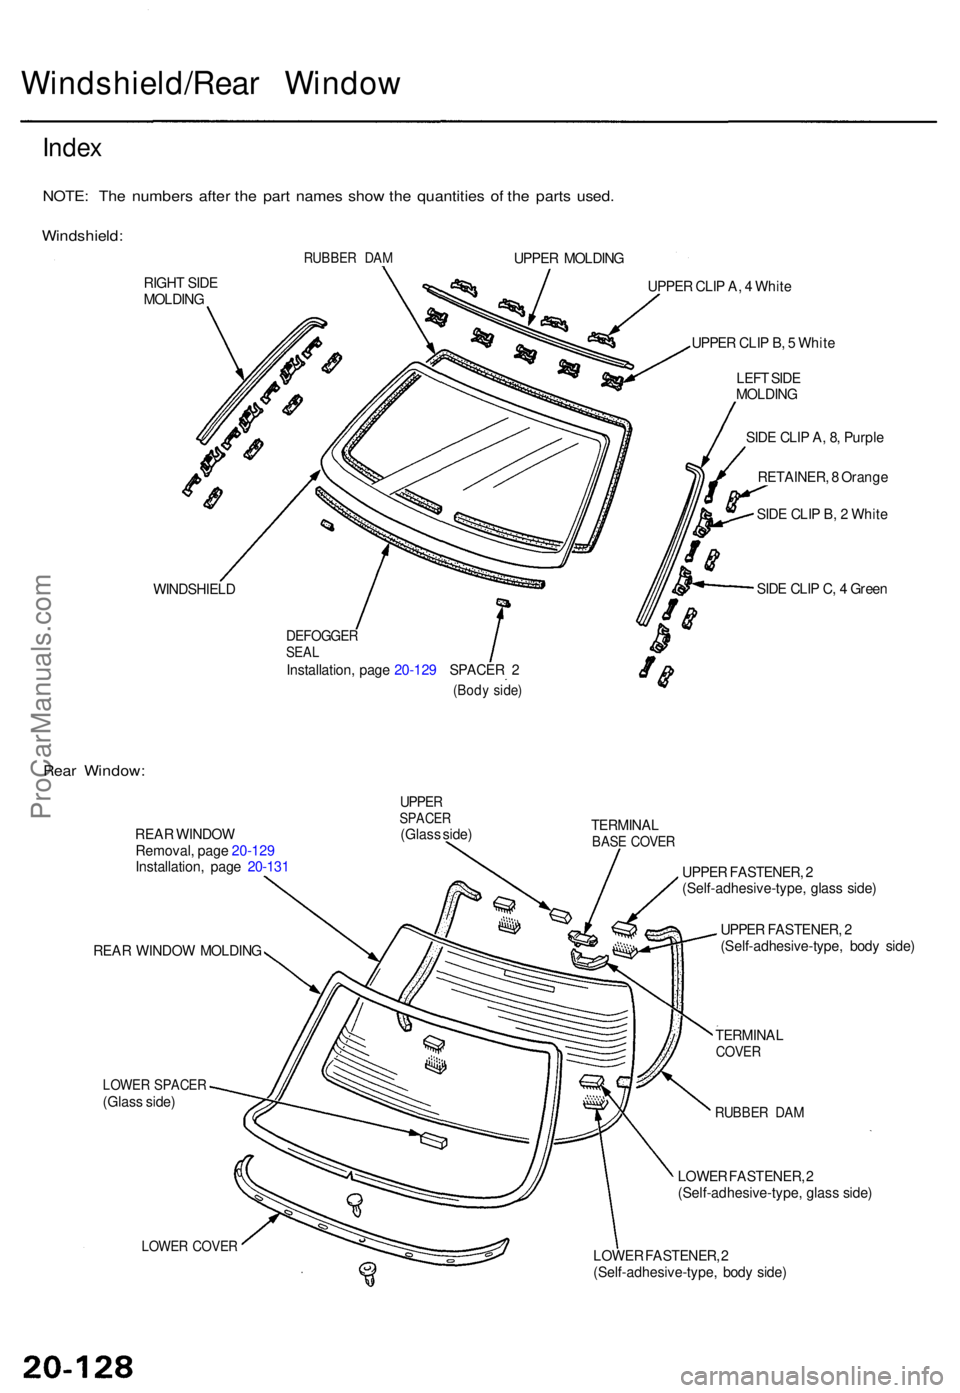
Windshield/Rear Windo w
Index
NOTE : Th e number s afte r th e par t name s sho w th e quantitie s o f th e part s used .
Windshield :
RUBBER DA MUPPE R MOLDIN G
RIGH T SID E
MOLDIN G
WINDSHIEL D
DEFOGGERSEALInstallation , pag e 20-12 9 SPACE R 2
(Bod y side )
UPPE R CLI P A , 4 Whit e
UPPE R CLI P B , 5 Whit e
LEF T SID E
MOLDIN G
SID E CLI P A , 8 , Purpl e
RETAINER , 8 Orang e
SID E CLI P B , 2 Whit e
SID E CLI P C , 4 Gree n
Rear Window :
REAR WINDO W
Removal , pag e 20-12 9
Installation , pag e 20-13 1
REA R WINDO W MOLDIN G
LOWER SPACE R(Glass side )
LOWE R COVE R
UPPERSPACE R(Glass side ) TERMINA
LBASE COVE R
UPPER FASTENER , 2
(Self-adhesive-type , glas s side )
UPPE R FASTENER , 2
(Self-adhesive-type , bod y side )
TERMINA L
COVER
RUBBE R DA M
LOWE R FASTENER , 2
(Self-adhesive-type , glas s side )
LOWE R FASTENER , 2
(Self-adhesive-type , bod y side )
ProCarManuals.com
Page 1482 of 1771
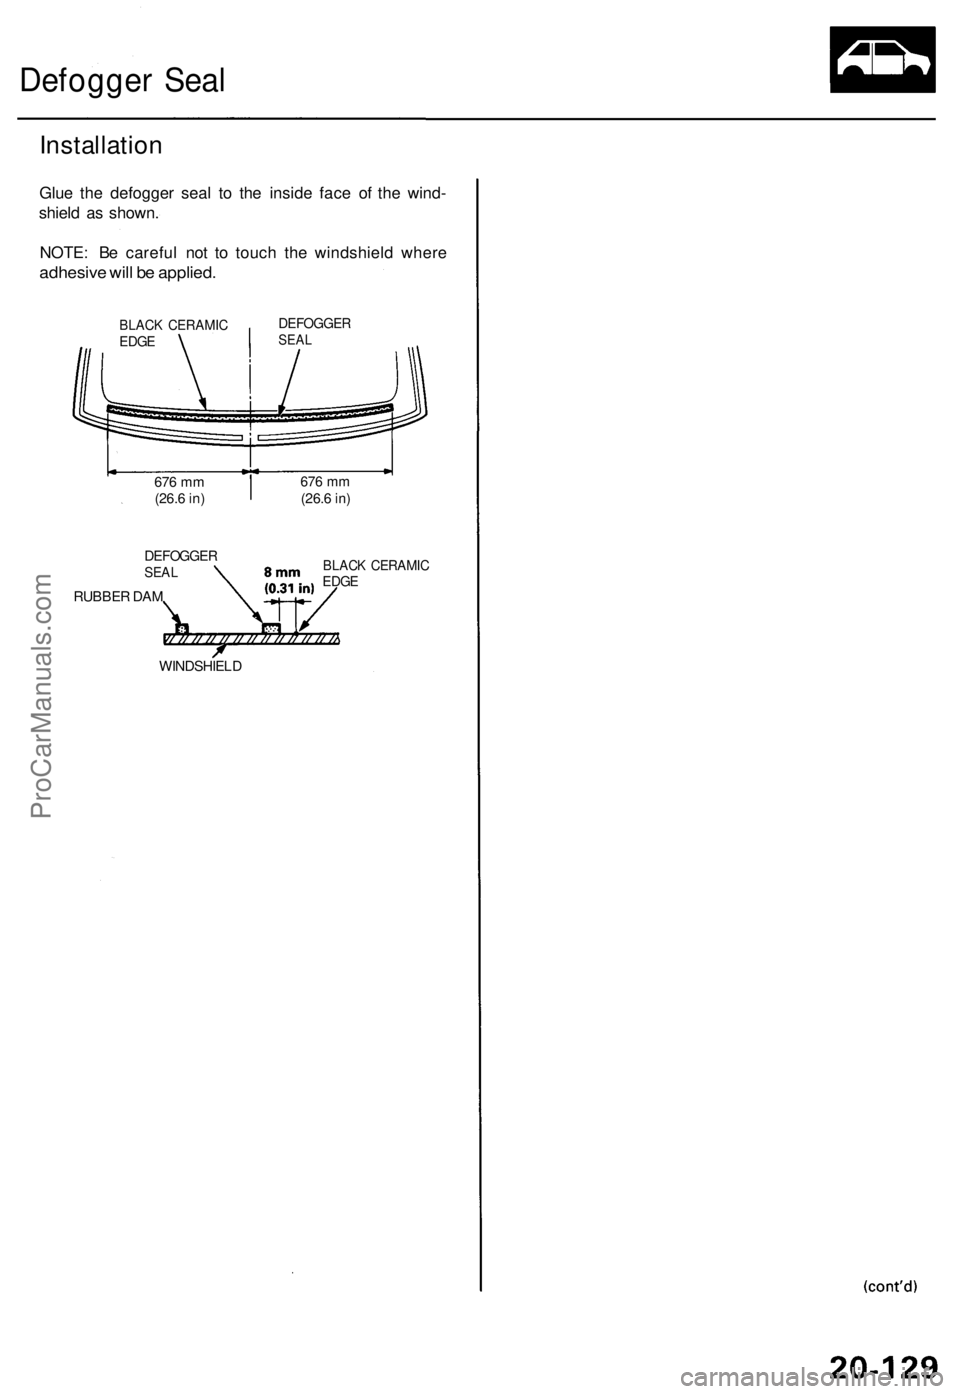
Defogger Sea l
Installatio n
Glue th e defogge r sea l t o th e insid e fac e of the wind -
shiel d a s shown .
NOTE : B e carefu l no t t o touc h th e windshiel d wher e
adhesiv e wil l b e applied .
BLACK CERAMI CEDGE
DEFOGGE RSEAL
676 m m
(26. 6 in)676 m m(26. 6 in)
DEFOGGE RSEAL
RUBBE R DA M
BLAC K CERAMI CEDGE
WINDSHIEL D
ProCarManuals.com
Page 1483 of 1771
Rear Windo w
Remova l
CAUTION :
Wear glove s t o remov e an d instal l th e rea r window .
Us e sea t cover s t o avoi d damagin g an y surfaces .
D o no t damag e th e rea r windo w defogge r gri d lines ,
windo w antenn a gri d lines , an d terminals .
1 . T o remov e th e rea r window , firs t remov e the :
Trun k li d (se e pag e 20-100 )
Rea r sea t cushio n an d seat-bac k (se e pag e 20-85 )
Rea r pilla r tri m (se e pag e 20-59 )
Rea r shel f (se e pag e 20-59 )
2 . Pul l dow n th e rea r o f th e headline r (se e pag e 20-61 ).
CAUTION : Tak e car e no t t o ben d th e headline r exces -
sively.
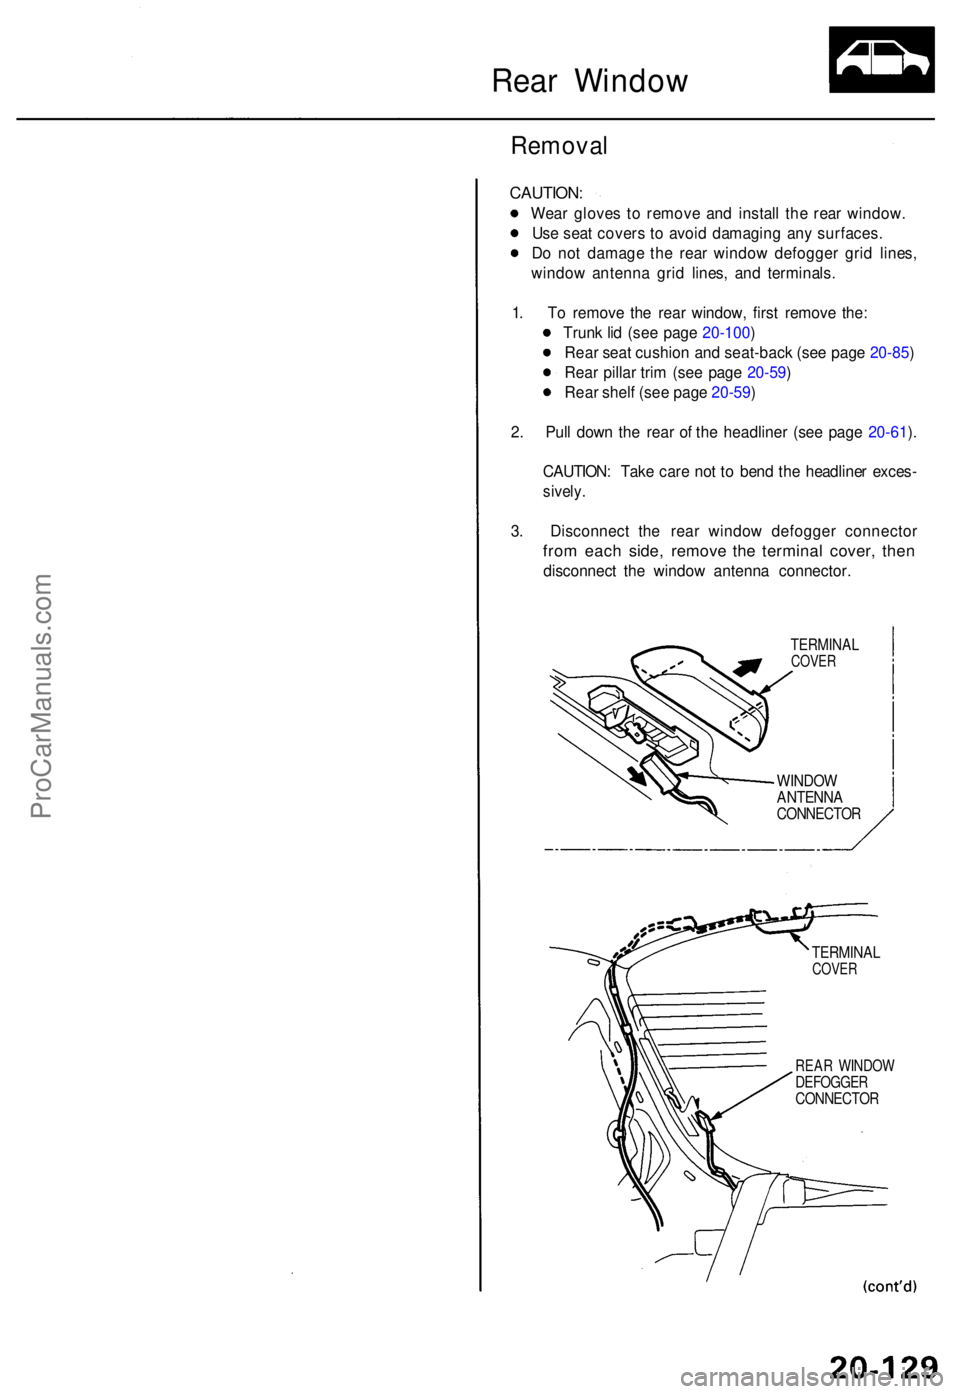
3. Disconnec t th e rea r windo w defogge r connecto r
from eac h side , remov e th e termina l cover , the n
disconnec t th e windo w antenn a connector .
TERMINALCOVER
WINDO WANTENN ACONNECTO R
TERMINALCOVER
REAR WINDO WDEFOGGE RCONNECTO R
ProCarManuals.com
Page 1484 of 1771
Rear Windo w
Remova l (cont'd )
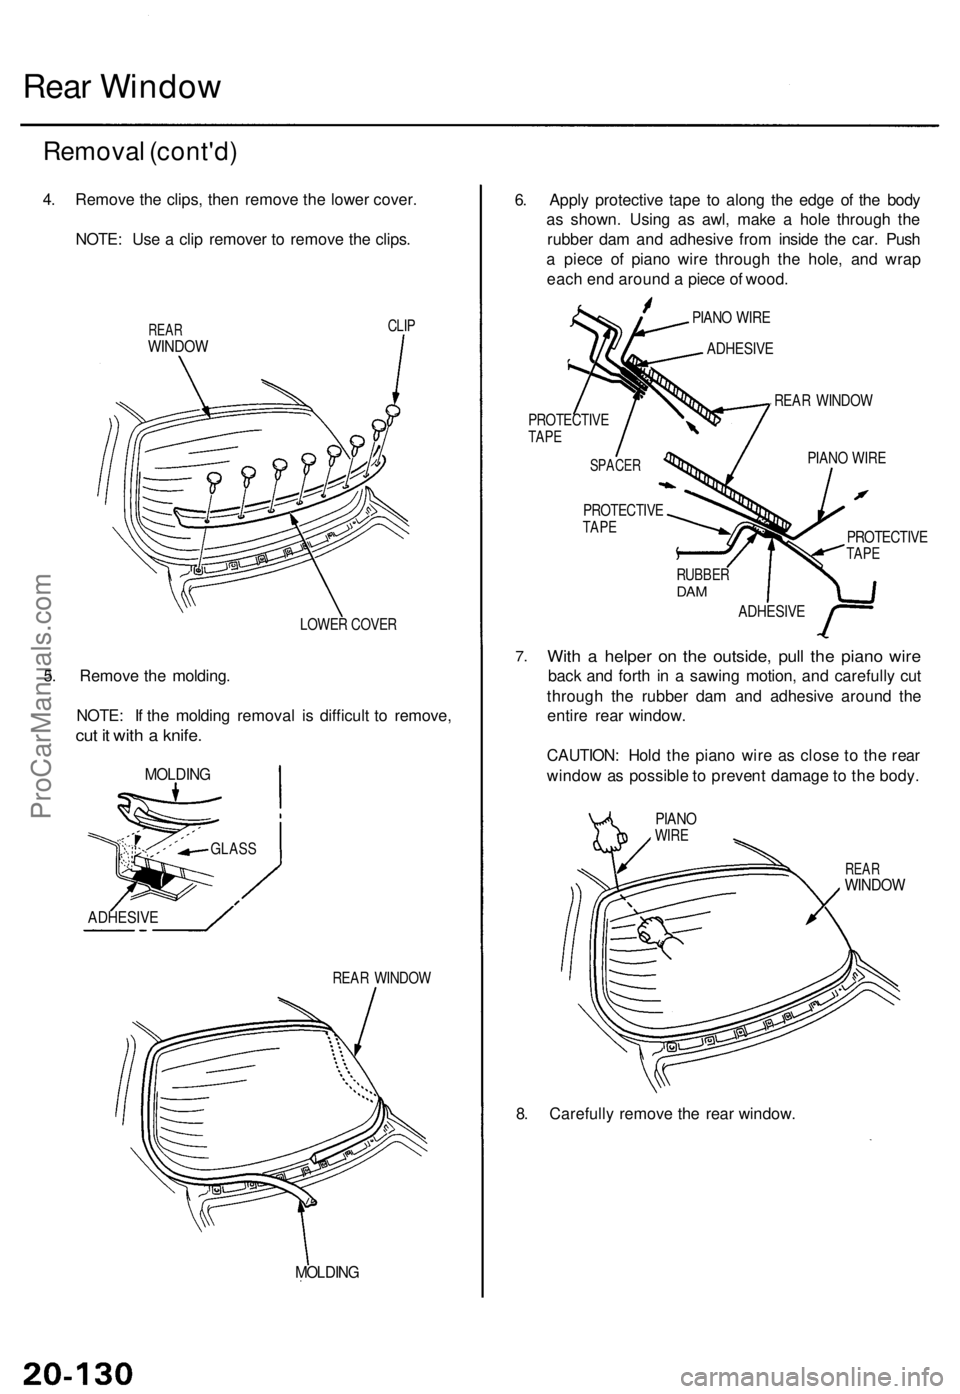
4. Remov e th e clips , the n remov e th e lowe r cover .
NOTE : Us e a cli p remove r t o remov e th e clips .
REARWINDO W
CLIP
LOWE R COVE R
5. Remov e th e molding .
NOTE : I f th e moldin g remova l i s difficul t t o remove ,
cut i t wit h a knife .
MOLDIN G
REAR WINDO W
MOLDING
6. Appl y protectiv e tap e t o alon g th e edg e o f th e bod y
a s shown . Usin g a s awl , mak e a hol e throug h th e
rubbe r da m an d adhesiv e fro m insid e th e car . Pus h
a piec e o f pian o wir e throug h th e hole , an d wra p
eac h en d aroun d a piec e o f wood .
PIANO WIR E
ADHESIV E
REAR WINDO W
PROTECTIV ETAPE
PROTECTIV ETAPEPROTECTIV ETAPE
RUBBE RDAM
ADHESIV E
7.Wit h a helpe r o n th e outside , pul l th e pian o wir e
back an d fort h i n a sawin g motion , an d carefull y cu t
throug h th e rubbe r da m an d adhesiv e aroun d th e
entir e rea r window .
CAUTION : Hol d th e pian o wir e a s clos e t o th e rea r
windo w a s possibl e to preven t damag e to th e body .
REARWINDO W
8. Carefull y remov e th e rea r window .
PIANO WIR ESPACE R
GLASS
ADHESIV E
PIANOWIRE
ProCarManuals.com
Page 1485 of 1771
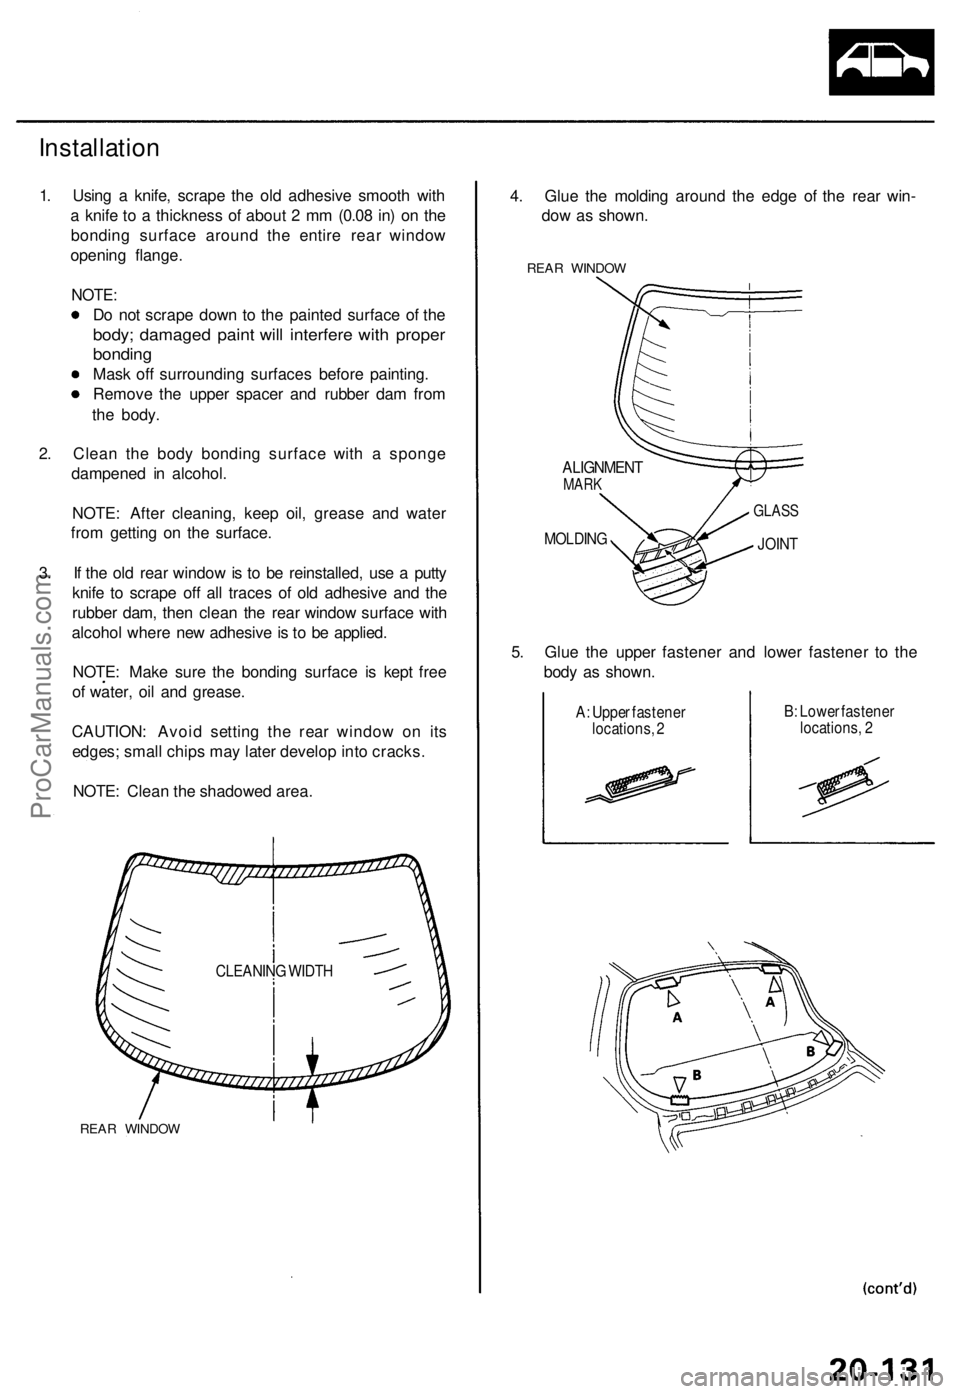
Installation
1. Using a knife, scrape the old adhesive smooth with
a knife to a thickness of about 2 mm (0.08 in) on the
bonding surface around the entire rear window
opening flange.
NOTE:
Do not scrape down to the painted surface of the
body; damaged paint will interfere with proper
bonding
Mask off surrounding surfaces before painting.
Remove the upper spacer and rubber dam from
the body.
2. Clean the body bonding surface with a sponge
dampened in alcohol.
NOTE: After cleaning, keep oil, grease and water
from getting on the surface.
3. If the old rear window is to be reinstalled, use a putty
knife to scrape off all traces of old adhesive and the
rubber dam, then clean the rear window surface with
alcohol where new adhesive is to be applied.
NOTE: Make sure the bonding surface is kept free
of water, oil and grease.
CAUTION: Avoid setting the rear window on its
edges; small chips may later develop into cracks.
NOTE: Clean the shadowed area.
REAR WINDOW
4. Glue the molding around the edge of the rear win-
dow as shown.
REAR WINDOW
ALIGNMENT
MARK
MOLDING
GLASS
JOINT
5. Glue the upper fastener and lower fastener to the
body as shown.
A: Upper fastener
locations, 2
B: Lower fastener
locations, 2
CLEANING WIDTHProCarManuals.com
Page 1486 of 1771
Rear Windo w
Installatio n (cont'd )
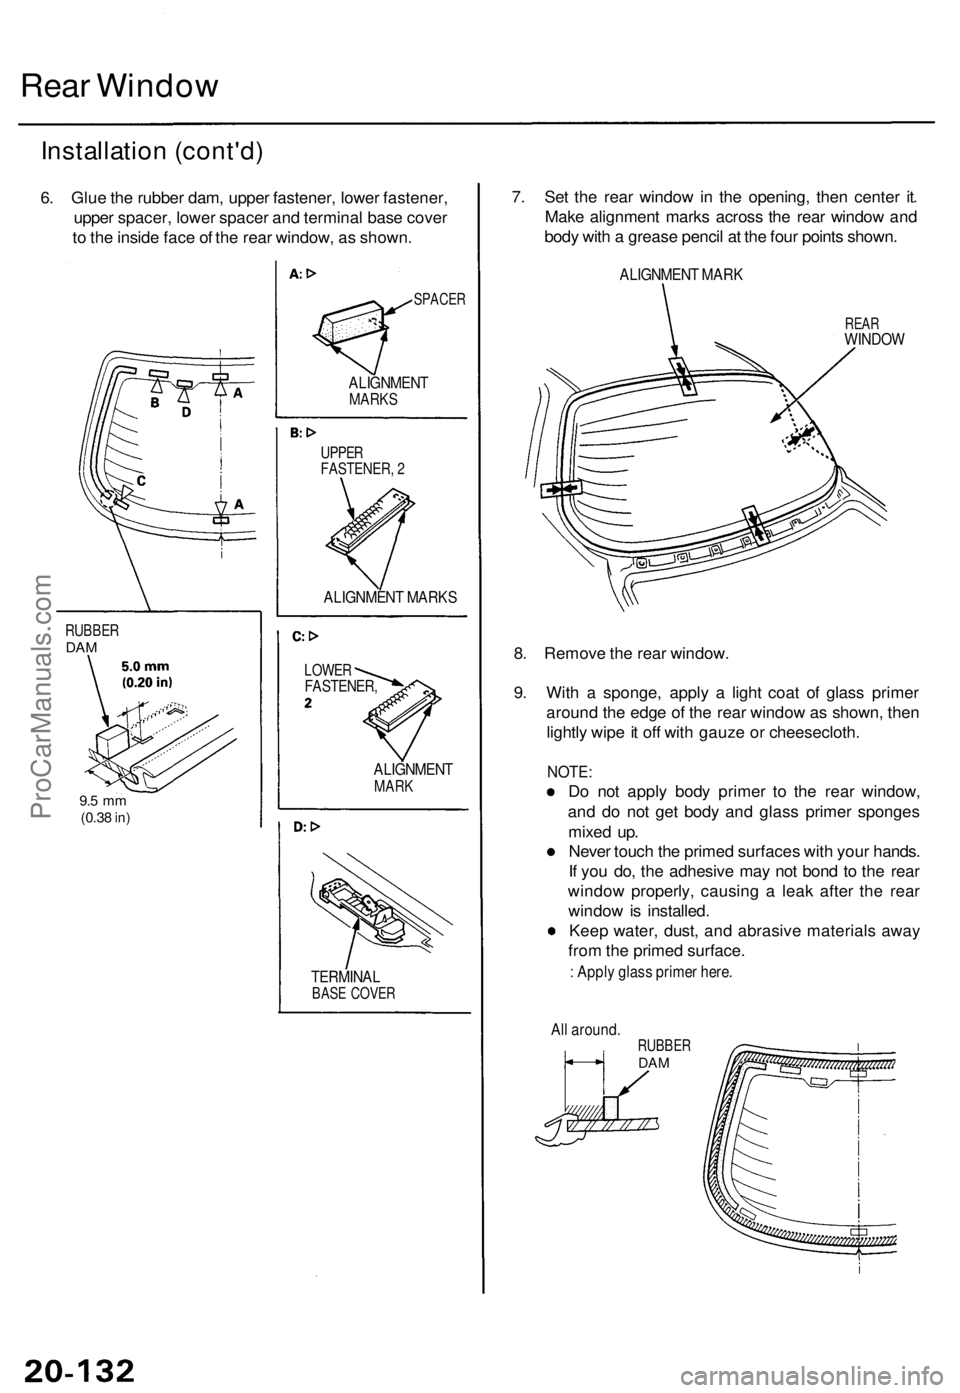
6. Glu e th e rubbe r dam , uppe r fastener , lowe r fastener ,
uppe r spacer , lowe r space r an d termina l bas e cove r
t o th e insid e fac e o f th e rea r window , a s shown .
RUBBE RDAM
9.5 m m(0.3 8 in)
SPACE R
ALIGNMEN TMARKS
UPPERFASTENER , 2
ALIGNMEN T MARK S
LOWERFASTENER ,
ALIGNMENTMARK
TERMINA LBASE COVE R
7. Se t th e rea r windo w in th e opening , the n cente r it .
Mak e alignmen t mark s acros s th e rea r windo w an d
bod y wit h a greas e penci l a t th e fou r point s shown .
ALIGNMEN T MAR K
REARWINDO W
8. Remov e th e rea r window .
9 . Wit h a sponge , appl y a ligh t coa t o f glas s prime r
aroun d th e edg e o f th e rea r windo w a s shown , the n
lightl y wip e it of f wit h gauz e o r cheesecloth .
NOTE:
Do no t appl y bod y prime r t o th e rea r window ,
an d d o no t ge t bod y an d glas s prime r sponge s
mixe d up .
Neve r touc h th e prime d surface s wit h you r hands .
I f yo u do , th e adhesiv e ma y no t bon d t o th e rea r
windo w properly , causin g a lea k afte r th e rea r
windo w is installed .
Kee p water , dust , an d abrasiv e material s awa y
fro m th e prime d surface .
: Appl y glas s prime r here .
Al l around .
RUBBERDAM
ProCarManuals.com
Page 1487 of 1771
10.
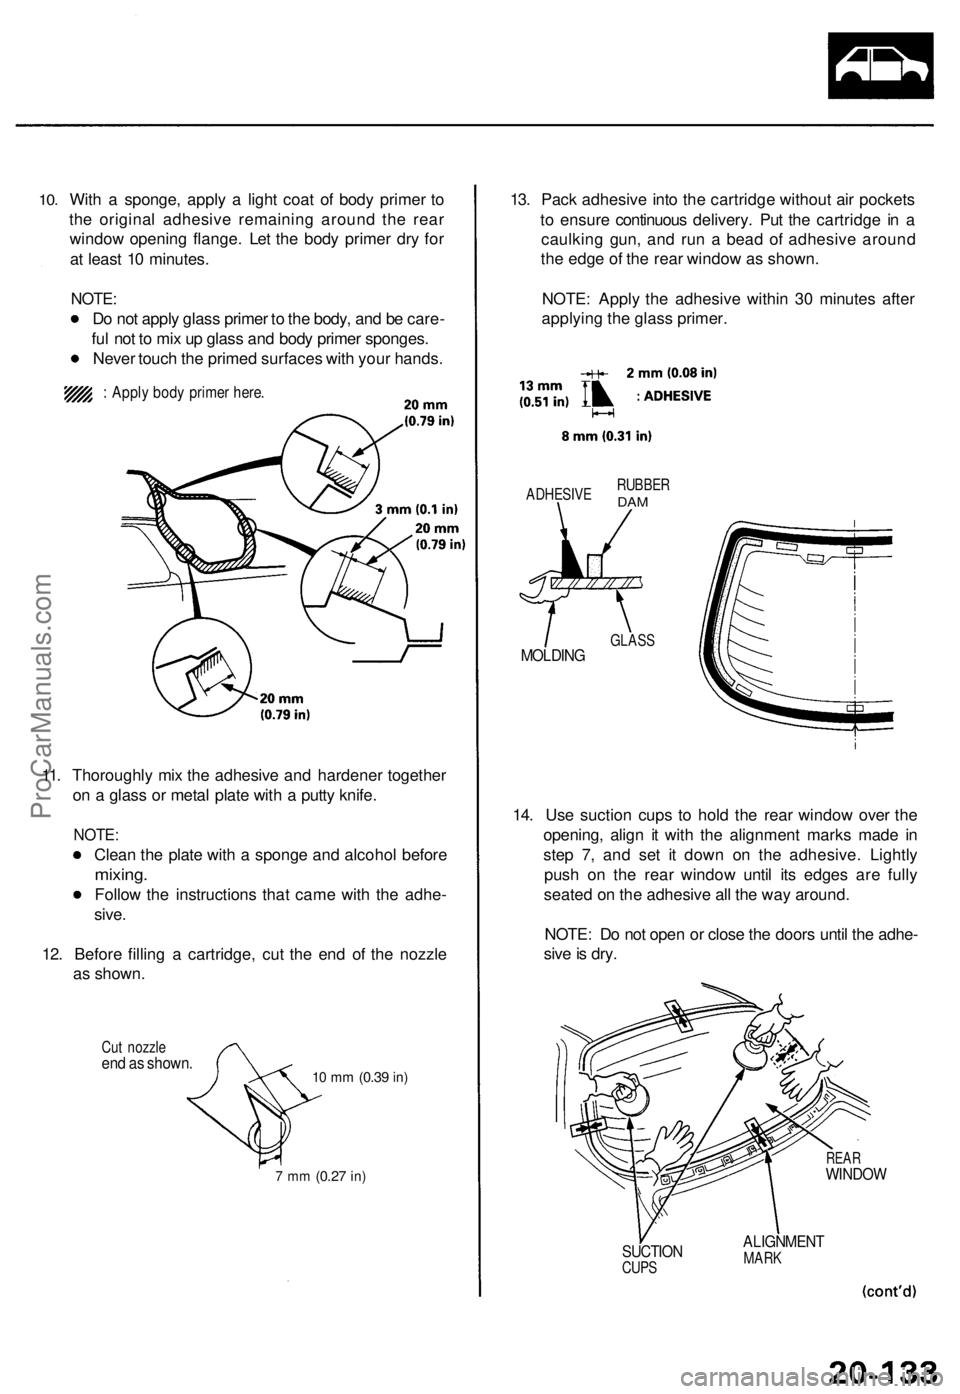
With a sponge, apply a light coat of body primer to
the original adhesive remaining around the rear
window opening flange. Let the body primer dry for
at least 10 minutes.
NOTE:
Do not apply glass primer to the body, and be care-
ful not to mix up glass and body primer sponges.
Never touch the primed surfaces with your hands.
: Apply body primer here.
11. Thoroughly mix the adhesive and hardener together
on a glass or metal plate with a putty knife.
NOTE:
Clean the plate with a sponge and alcohol before
mixing.
Follow the instructions that came with the adhe-
sive.
12. Before filling a cartridge, cut the end of the nozzle
as shown.
Cut nozzle
end as shown.
10 mm
(0.39
in)
7 mm
(0.27
in)
13. Pack adhesive into the cartridge without air pockets
to ensure continuous delivery. Put the cartridge in a
caulking gun, and run a bead of adhesive around
the edge of the rear window as shown.
NOTE: Apply the adhesive within 30 minutes after
applying the glass primer.
ADHESIVE
RUBBER
DAM
MOLDING
GLASS
14. Use suction cups to hold the rear window over the
opening, align it with the alignment marks made in
step 7, and set it down on the adhesive. Lightly
push on the rear window until its edges are fully
seated on the adhesive all the way around.
NOTE: Do not open or close the doors until the adhe-
sive is dry.
REAR
WINDOW
SUCTION
CUPS
ALIGNMENT
MARKProCarManuals.com
Page 1488 of 1771
Rear Windo w
Installatio n (cont'd )
15. Scrap e o r wip e th e exces s adhesiv e of f wit h a putt y
knif e o r towel.
NOTE : T o remov e adhesiv e fro m a painte d surfac e
o r th e rea r window , us e a sof t sho p towe l damp -
ene d wit h alcohol .
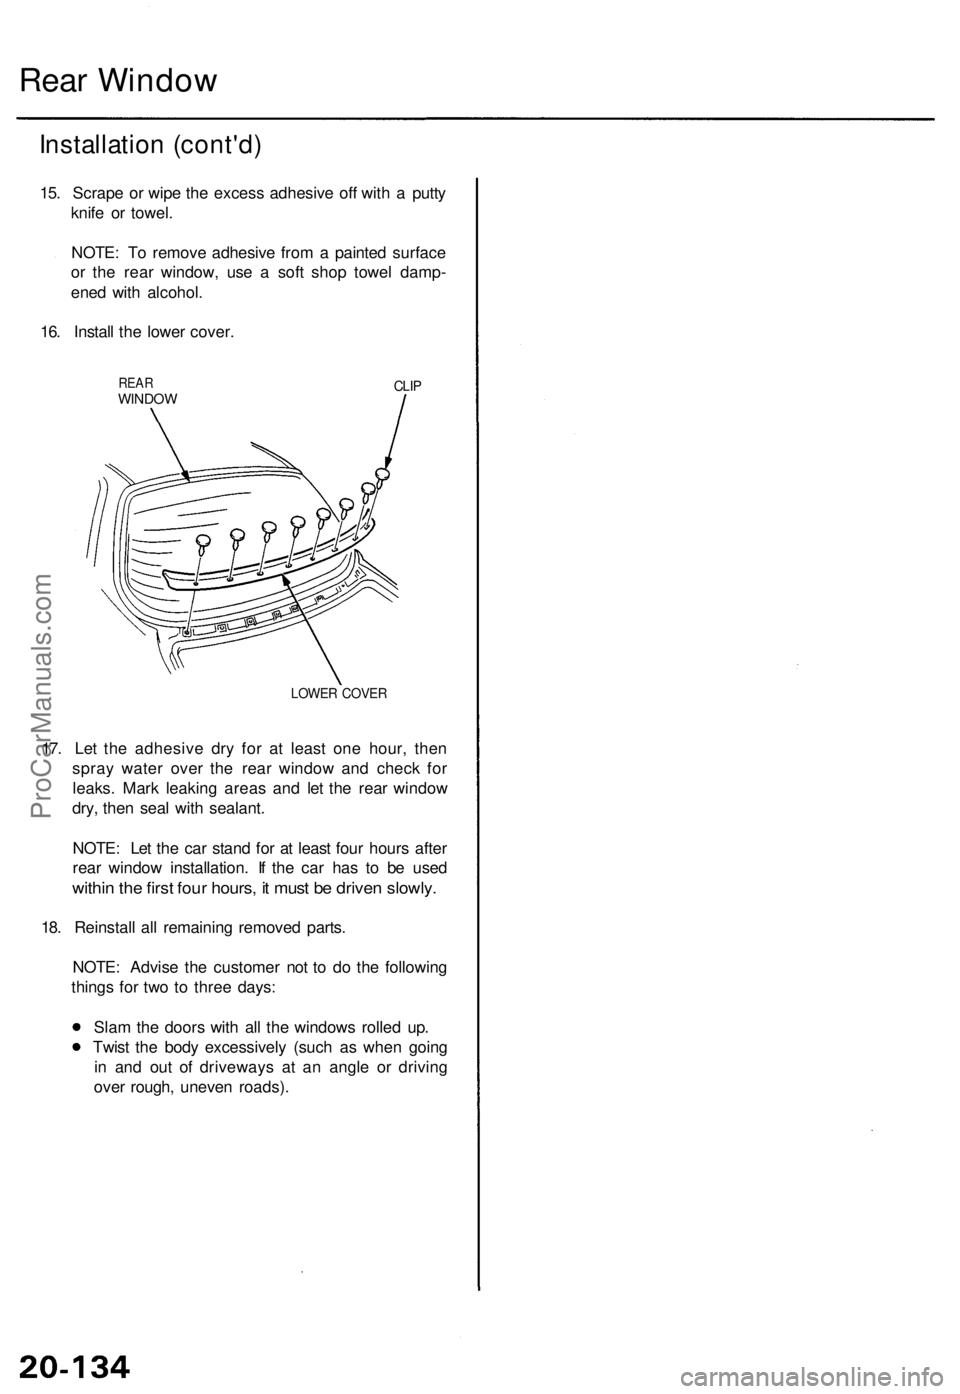
16 . Instal l th e lowe r cover .
REARWINDO WCLIP
LOWE R COVE R
17. Le t th e adhesiv e dr y fo r a t leas t on e hour , the n
spra y wate r ove r th e rea r windo w an d chec k fo r
leaks . Mar k leakin g area s an d le t th e rea r windo w
dry , the n sea l wit h sealant .
NOTE : Le t th e ca r stan d fo r a t leas t fou r hour s afte r
rea r windo w installation . I f th e ca r ha s t o b e use d
within th e firs t fou r hours , i t mus t b e drive n slowly .
18. Reinstal l al l remainin g remove d parts .
NOTE : Advis e th e custome r no t t o d o th e followin g
thing s fo r tw o t o thre e days :
Sla m th e door s wit h al l th e window s rolle d up .
Twis t th e bod y excessivel y (suc h a s whe n goin g
i n an d ou t o f driveway s a t a n angl e o r drivin g
ove r rough , uneve n roads) .
ProCarManuals.com
Page 1489 of 1771
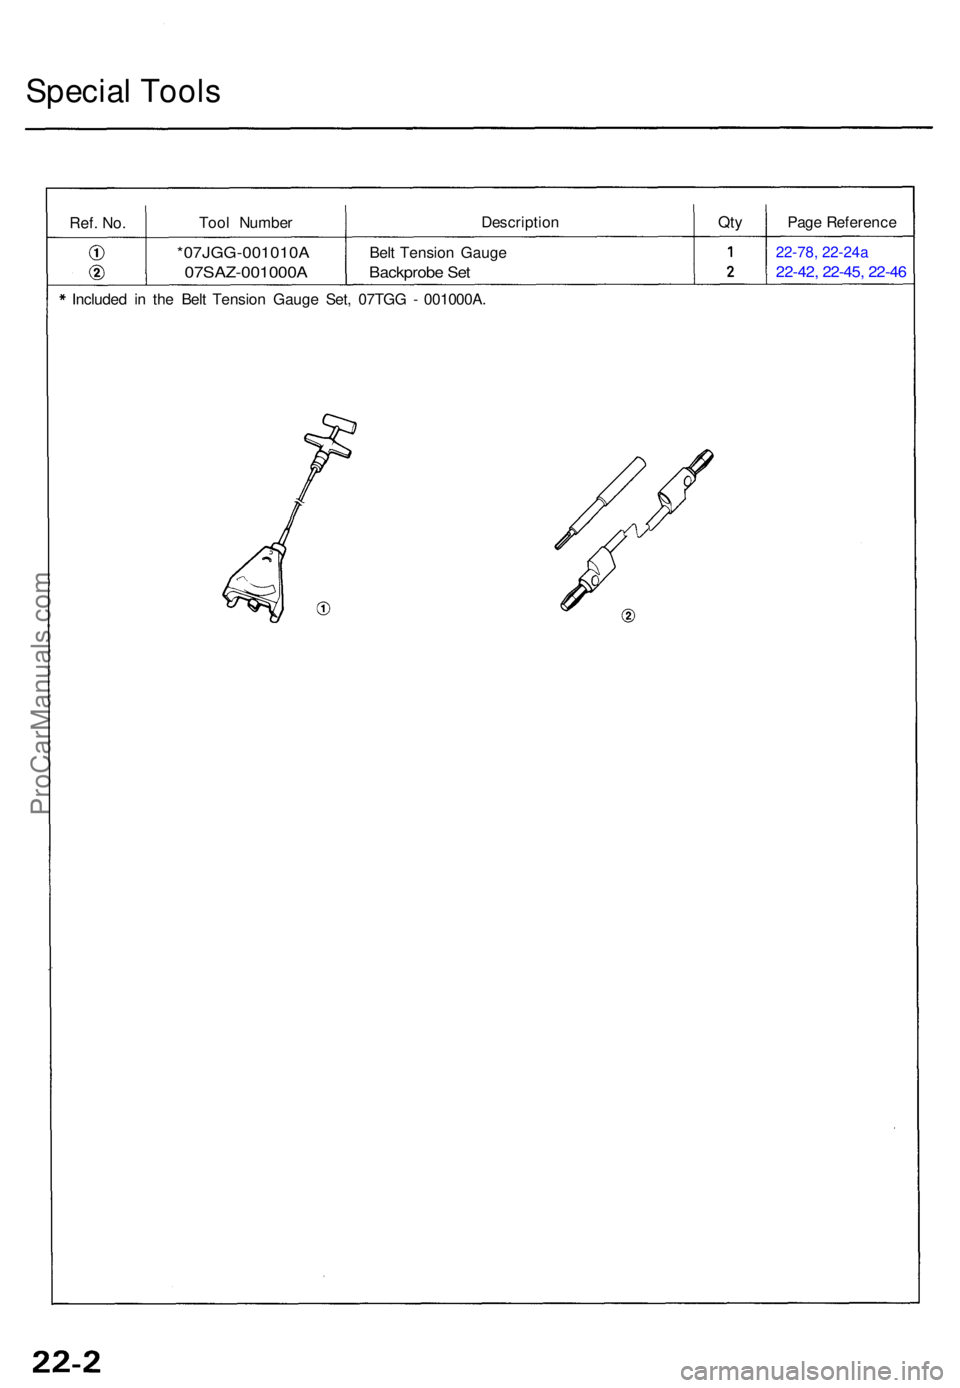
Special Tool s
Ref. No.Too l Numbe r Descriptio
nQtyPag e Referenc e
*07JGG-001010 A
07SAZ-001000A
Belt Tensio n Gaug e
Backprob e Se t
22-7 8, 22-24a
22-42 , 22-45 , 22-4 6
Include d i n th e Bel t Tensio n Gaug e Set , 07TG G - 001000A .
ProCarManuals.com
Page 1490 of 1771
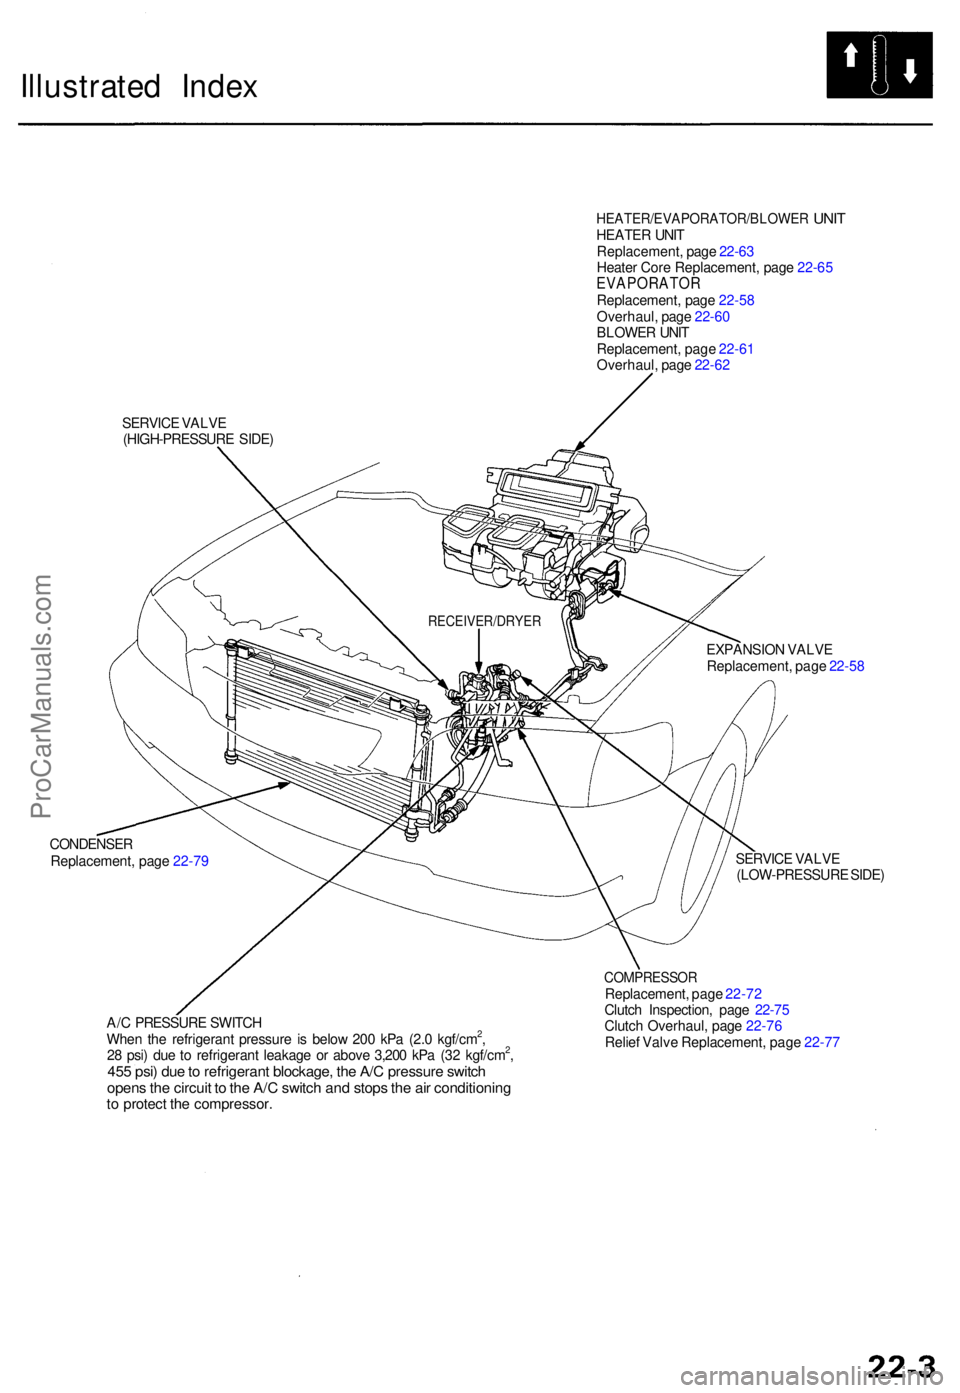
Illustrated Inde x
HEATER/EVAPORATOR/BLOWE R UNITHEATE R UNI T
Replacement , pag e 22-6 3
Heate r Cor e Replacement , pag e 22-6 5
EVAPORATO RReplacement, pag e 22-5 8
Overhaul , pag e 22-6 0
BLOWE R UNI T
Replacement , pag e 22-6 1
Overhaul , pag e 22-6 2
SERVIC E VALV E
(HIGH-PRESSUR E SIDE )
EXPANSION VALV E
Replacement , pag e 22-5 8
CONDENSE R
Replacement , pag e 22-7 9
A/ C PRESSUR E SWITC H
Whe n th e refrigeran t pressur e i s belo w 20 0 kP a (2. 0 kgf/cm
2,
2 8 psi ) du e t o refrigeran t leakag e o r abov e 3,20 0 kP a (3 2 kgf/cm2,45 5 psi ) du e to refrigeran t blockage , th e A/ C pressur e switc hopens th e circui t t o th e A/ C switc h an d stop s th e ai r conditionin gto protec t th e compressor .
SERVICE VALV E
(LOW-PRESSUR E SIDE )
COMPRESSO RReplacement, pag e 22-7 2
Clutc h Inspection , pag e 22-7 5
Clutc h Overhaul , pag e 22-7 6
Relie f Valv e Replacement , pag e 22-7 7
RECEIVER/DRYE R
ProCarManuals.com