CHEVROLET AVEO 2002 Service Repair Manual
AVEO 2002
CHEVROLET
CHEVROLET
https://www.carmanualsonline.info/img/24/56853/w960_56853-0.png
CHEVROLET AVEO 2002 Service Repair Manual
Trending: heating, air condition, timing belt, change time, mirror controls, ad blue, jump start terminals
Page 2681 of 5127
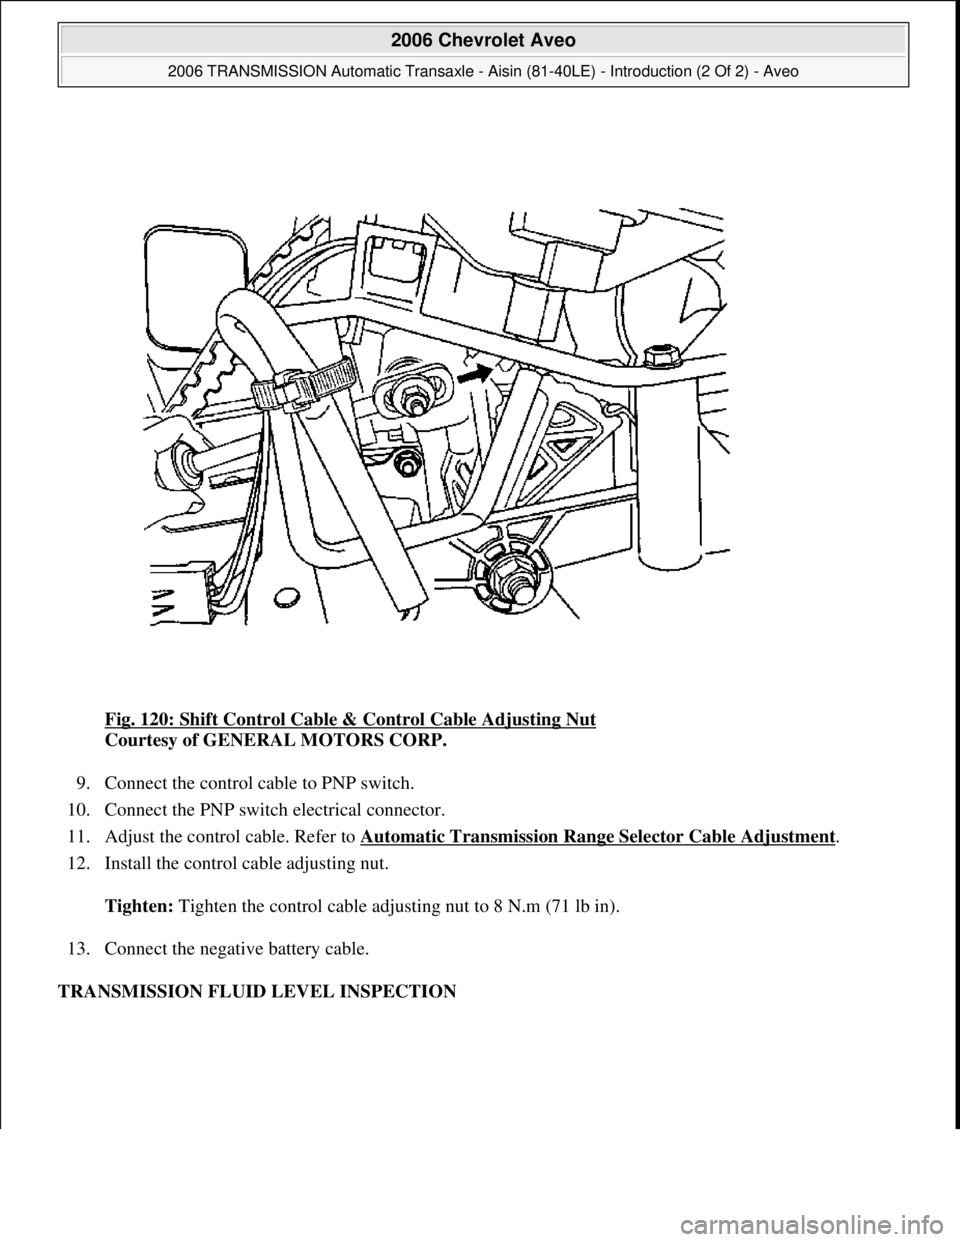
Fig. 120: Shift Control Cable & Control Cable Adjusting Nut
Courtesy of GENERAL MOTORS CORP.
9. Connect the control cable to PNP switch.
10. Connect the PNP switch electrical connector.
11. Adjust the control cable. Refer to Automatic Transmission Range Selector Cable Adjustment
.
12. Install the control cable adjusting nut.
Tighten: Tighten the control cable adjusting nut to 8 N.m (71 lb in).
13. Connect the negative battery cable.
TRANSMISSION FLUID LEVEL INSPECTION
2006 Chevrolet Aveo
2006 TRANSMISSION Automatic Transaxle - Aisin (81-40LE) - Introduction (2 Of 2) - Aveo
Microsoft
Thursday, July 16, 2009 1:17:21 PMPage 132 © 2005 Mitchell Repair Information Company, LLC.
Page 2682 of 5127
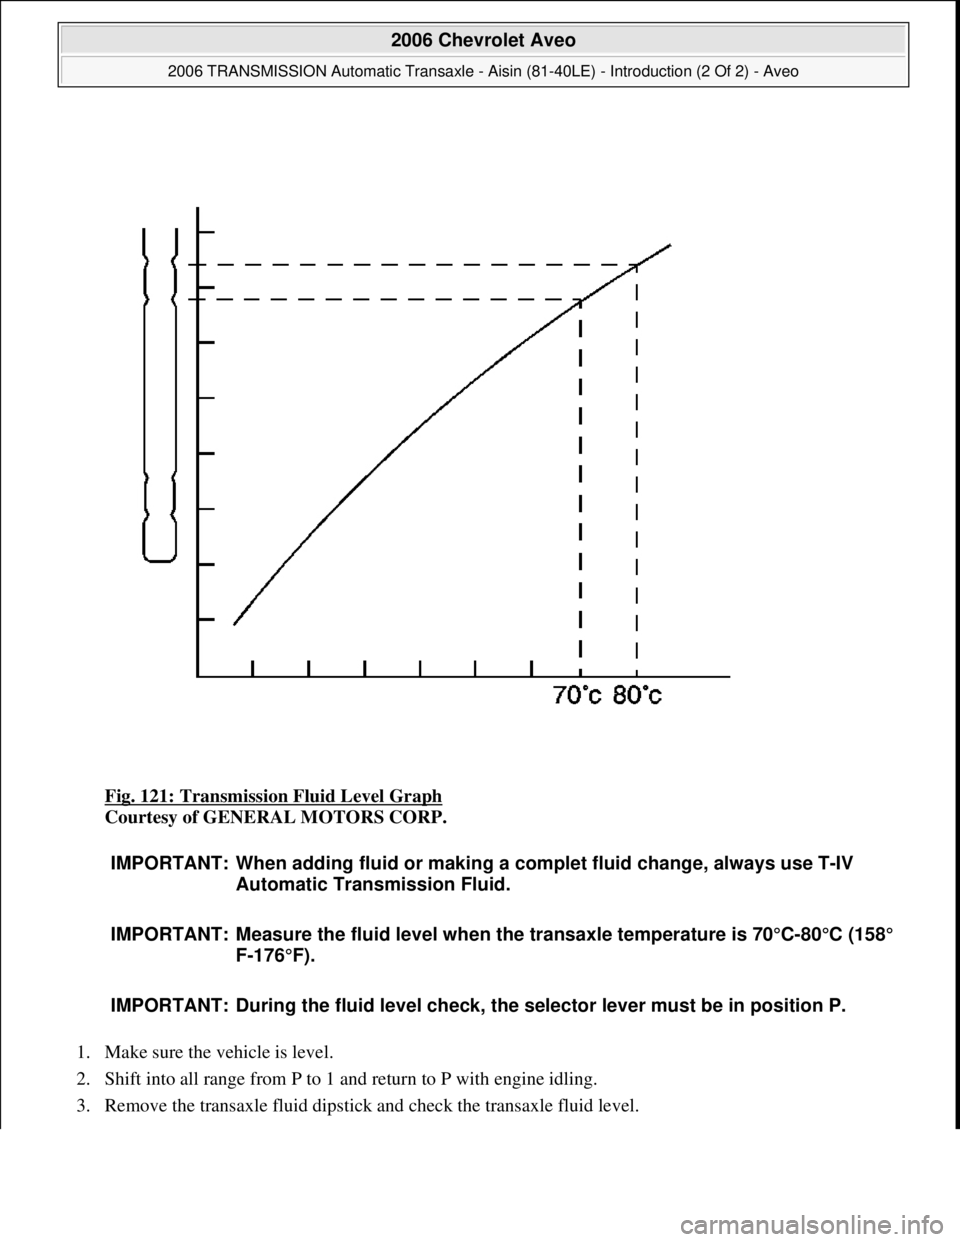
Fig. 121: Transmission Fluid Level Graph
Courtesy of GENERAL MOTORS CORP.
1. Make sure the vehicle is level.
2. Shift into all range from P to 1 and return to P with engine idling.
3. Remove the transaxle fluid dipstick and check the transaxle fluid level.
IMPORTANT: When adding fluid or making a complet fluid change, always use T-IV
Automatic Transmission Fluid.
IMPORTANT: Measure the fluid level when the transaxle temperature is 70°C-80°C (158°
F-176°F).
IMPORTANT: During the fluid level check, the selector lever must be in position P.
2006 Chevrolet Aveo
2006 TRANSMISSION Automatic Transaxle - Aisin (81-40LE) - Introduction (2 Of 2) - Aveo
Microsoft
Thursday, July 16, 2009 1:17:21 PMPage 133 © 2005 Mitchell Repair Information Company, LLC.
Page 2683 of 5127
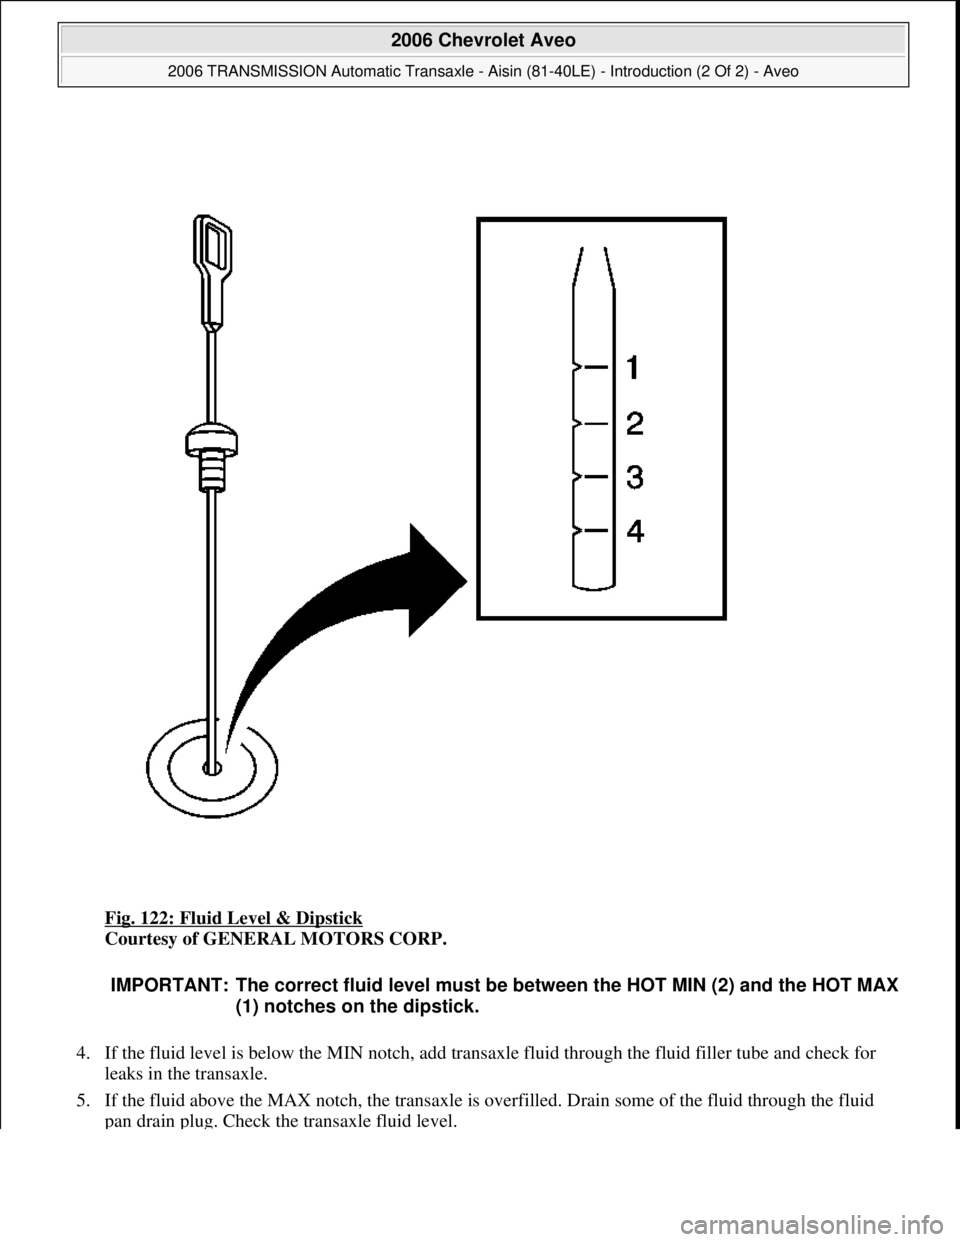
Fig. 122: Fluid Level & Dipstick
Courtesy of GENERAL MOTORS CORP.
4. If the fluid level is below the MIN notch, add transaxle fluid through the fluid filler tube and check for
leaks in the transaxle.
5. If the fluid above the MAX notch, the transaxle is overfilled. Drain some of the fluid through the fluid
pan drain plu
g. Check the transaxle fluid level.
IMPORTANT: The correct fluid level must be between the HOT MIN (2) and the HOT MAX
(1) notches on the dipstick.
2006 Chevrolet Aveo
2006 TRANSMISSION Automatic Transaxle - Aisin (81-40LE) - Introduction (2 Of 2) - Aveo
Microsoft
Thursday, July 16, 2009 1:17:21 PMPage 134 © 2005 Mitchell Repair Information Company, LLC.
Page 2684 of 5127
DRAINING TRANSMISSION FLUID
Draining Procedure
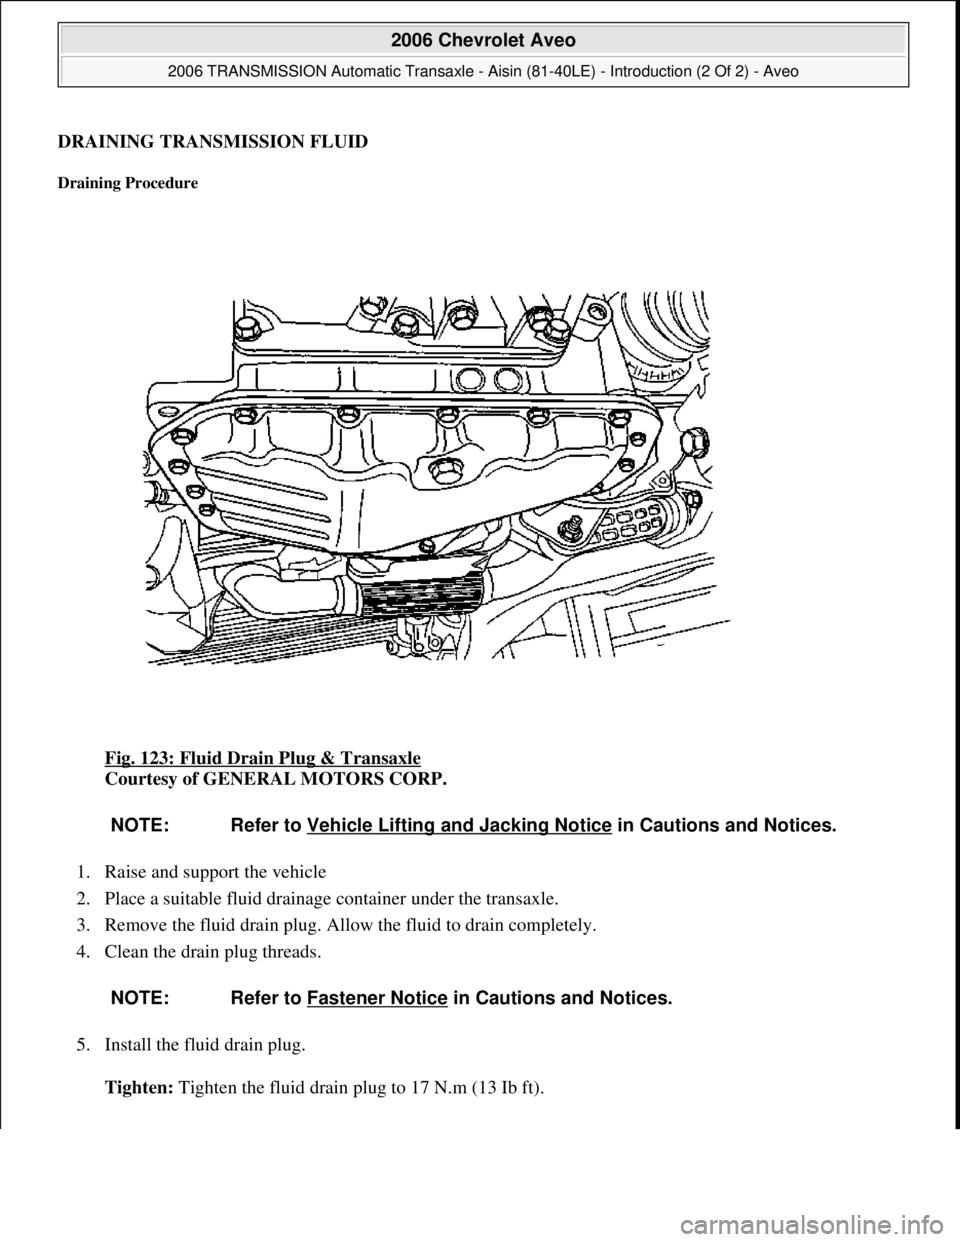
Fig. 123: Fluid Drain Plug & Transaxle
Courtesy of GENERAL MOTORS CORP.
1. Raise and support the vehicle
2. Place a suitable fluid drainage container under the transaxle.
3. Remove the fluid drain plug. Allow the fluid to drain completely.
4. Clean the drain plug threads.
5. Install the fluid drain plug.
Tighten: Tighten the fluid drain plug to 17 N.m (13 Ib ft).
NOTE: Refer to Vehicle Lifting and Jacking Notice in Cautions and Notices.
NOTE: Refer to Fastener Notice
in Cautions and Notices.
2006 Chevrolet Aveo
2006 TRANSMISSION Automatic Transaxle - Aisin (81-40LE) - Introduction (2 Of 2) - Aveo
Microsoft
Thursday, July 16, 2009 1:17:21 PMPage 135 © 2005 Mitchell Repair Information Company, LLC.
Page 2685 of 5127
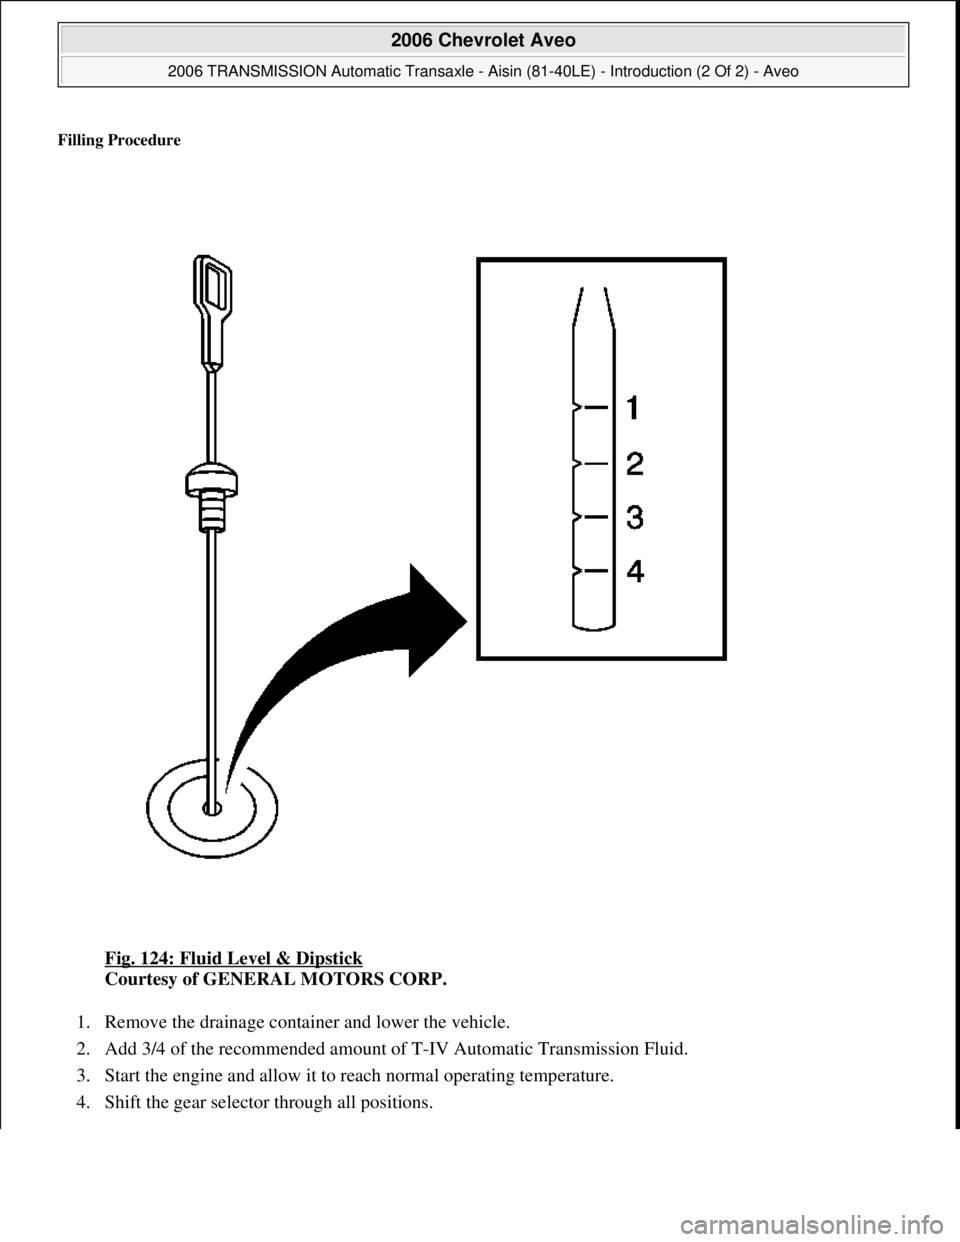
Filling Procedure
Fig. 124: Fluid Level & Dipstick
Courtesy of GENERAL MOTORS CORP.
1. Remove the drainage container and lower the vehicle.
2. Add 3/4 of the recommended amount of T-IV Automatic Transmission Fluid.
3. Start the engine and allow it to reach normal operating temperature.
4. Shift the gear selector through all positions.
2006 Chevrolet Aveo
2006 TRANSMISSION Automatic Transaxle - Aisin (81-40LE) - Introduction (2 Of 2) - Aveo
Microsoft
Thursday, July 16, 2009 1:17:21 PMPage 136 © 2005 Mitchell Repair Information Company, LLC.
Page 2686 of 5127
5. Check the fluid level and add fluid until the dipstick indicates a safe level.
TRANSMISSION DISASSEMBLE
Tools Required
DT 46451 (DW240-020) Brake/Clutch Spring Compressor. See Special Tools.
DT 46454 (DW240-050) Overdrive Brake Adapter. See Special Tools.
DT 46455 (DW240-060-01) Brake Spring Compressor Bolt/Nut. See Special Tools.
DT 46457 (DW240-070) 1st and Reverse Brake Adapter. See Special Tools.
DT 46463 (DW240-150) Transaxle Case Side Bearing Outer Race Adapter. See Special Tools.
DT 46465 (DW240-170) Adapter Handle. See Special Tools.
DT 46453 (DW260-021) Automatic Transaxle Overhaul Fixture. See Special Tools.
DT 46472 (DW260-041) Planetary Ring Gear Nut Removal/Installation Socket. See Special Tools.
Disassembly Procedure
IMPORTANT: The correct fluid level must be between the HOT MIN (2) and the HOT MAX
(1) notches on the dipstick.
2006 Chevrolet Aveo
2006 TRANSMISSION Automatic Transaxle - Aisin (81-40LE) - Introduction (2 Of 2) - Aveo
Microsoft
Thursday, July 16, 2009 1:17:21 PMPage 137 © 2005 Mitchell Repair Information Company, LLC.
Page 2687 of 5127
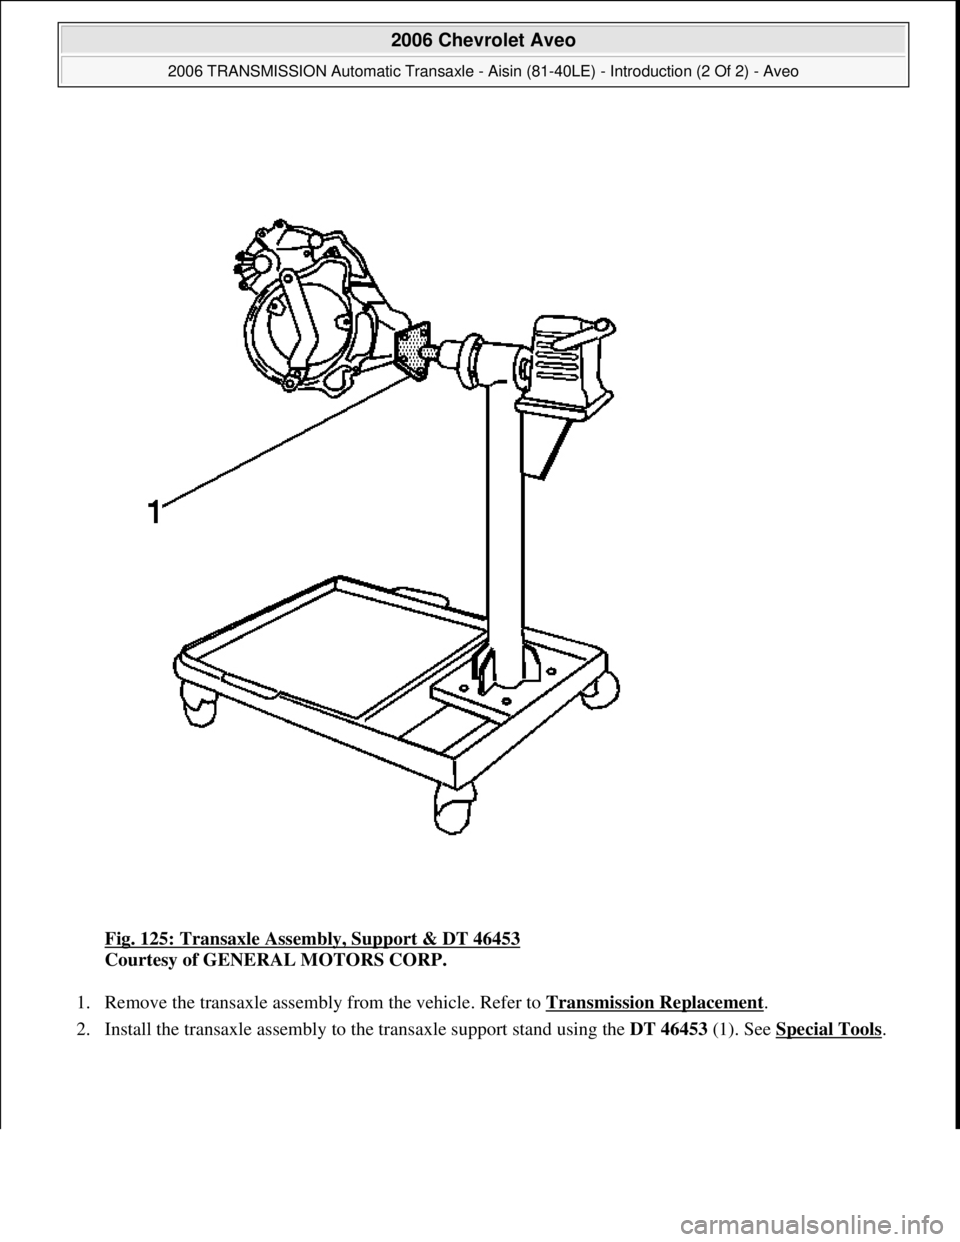
Fig. 125: Transaxle Assembly, Support & DT 46453
Courtesy of GENERAL MOTORS CORP.
1. Remove the transaxle assembly from the vehicle. Refer to Transmission Replacement
.
2. Install the transaxle assembl
y to the transaxle support stand using the DT 46453 (1). See Special Tools.
2006 Chevrolet Aveo
2006 TRANSMISSION Automatic Transaxle - Aisin (81-40LE) - Introduction (2 Of 2) - Aveo
Microsoft
Thursday, July 16, 2009 1:17:21 PMPage 138 © 2005 Mitchell Repair Information Company, LLC.
Page 2688 of 5127
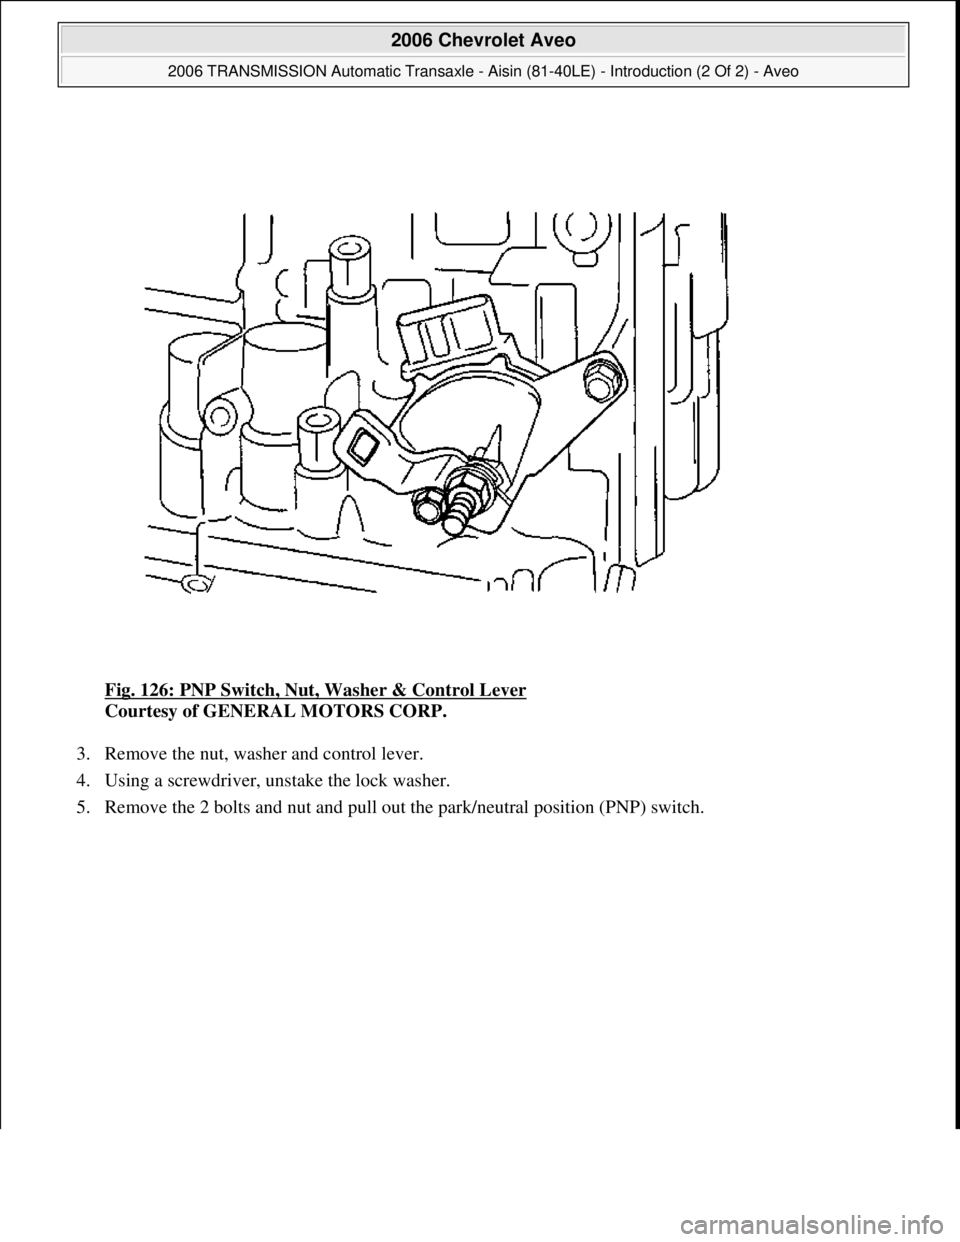
Fig. 126: PNP Switch, Nut, Washer & Control Lever
Courtesy of GENERAL MOTORS CORP.
3. Remove the nut, washer and control lever.
4. Using a screwdriver, unstake the lock washer.
5. Remove the 2 bolts and nut and pull out the park/neutral position (PNP) switch.
2006 Chevrolet Aveo
2006 TRANSMISSION Automatic Transaxle - Aisin (81-40LE) - Introduction (2 Of 2) - Aveo
Microsoft
Thursday, July 16, 2009 1:17:21 PMPage 139 © 2005 Mitchell Repair Information Company, LLC.
Page 2689 of 5127
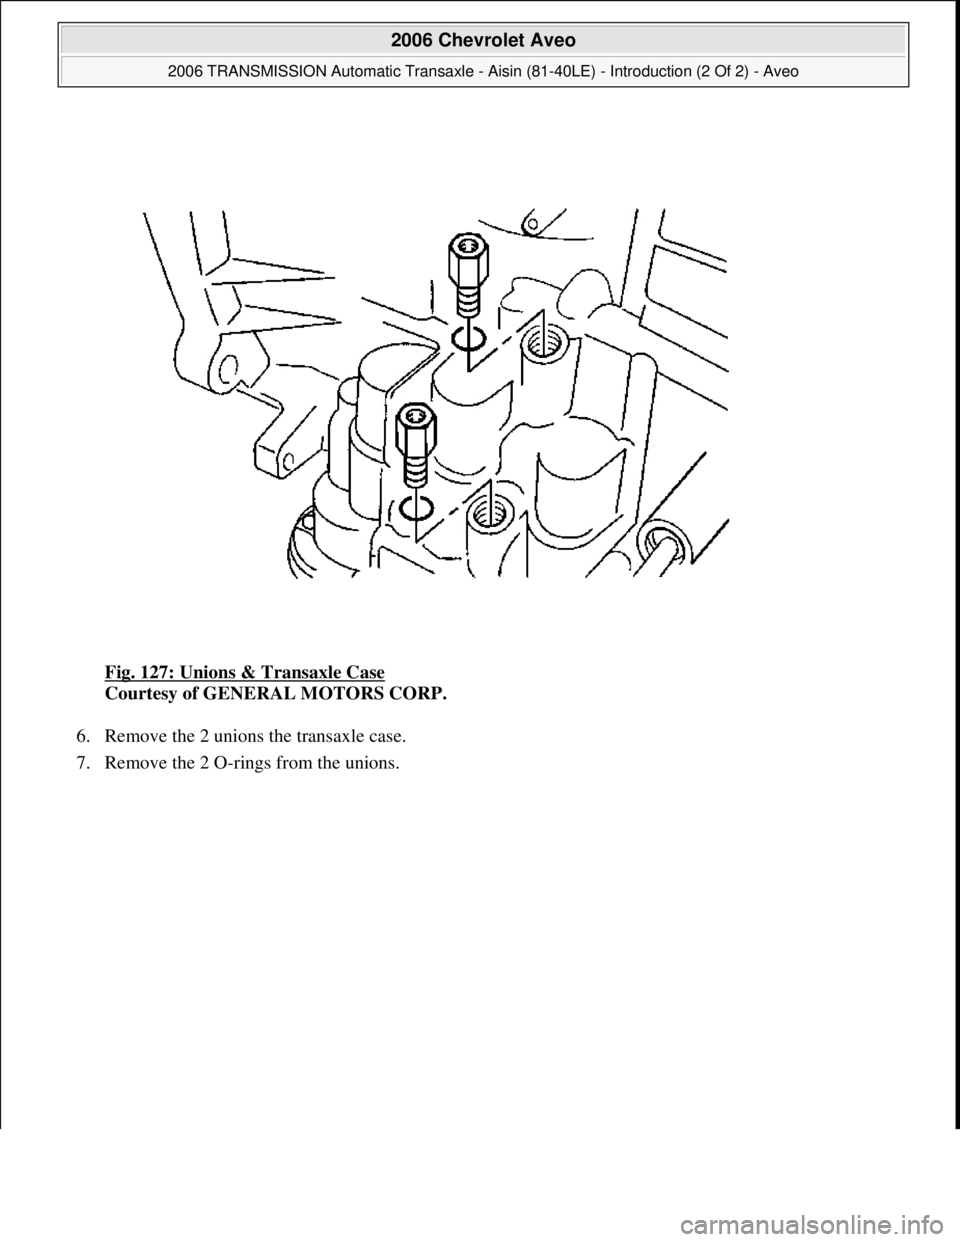
Fig. 127: Unions & Transaxle Case
Courtesy of GENERAL MOTORS CORP.
6. Remove the 2 unions the transaxle case.
7. Remove the 2 O-rings from the unions.
2006 Chevrolet Aveo
2006 TRANSMISSION Automatic Transaxle - Aisin (81-40LE) - Introduction (2 Of 2) - Aveo
Microsoft
Thursday, July 16, 2009 1:17:21 PMPage 140 © 2005 Mitchell Repair Information Company, LLC.
Page 2690 of 5127
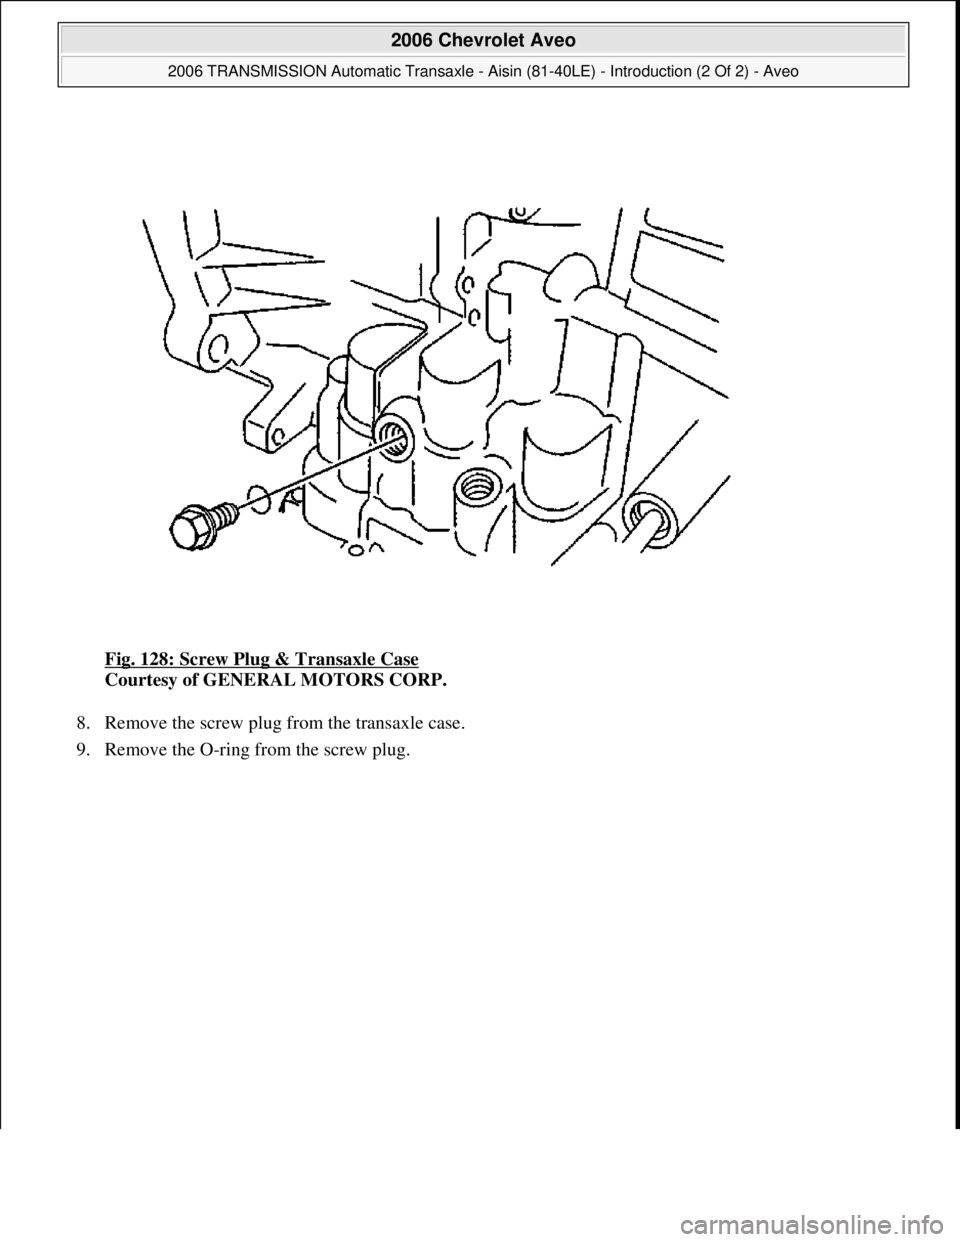
Fig. 128: Screw Plug & Transaxle Case
Courtesy of GENERAL MOTORS CORP.
8. Remove the screw plug from the transaxle case.
9. Remove the O-ring from the screw plug.
2006 Chevrolet Aveo
2006 TRANSMISSION Automatic Transaxle - Aisin (81-40LE) - Introduction (2 Of 2) - Aveo
Microsoft
Thursday, July 16, 2009 1:17:21 PMPage 141 © 2005 Mitchell Repair Information Company, LLC.
Trending: phone, wheel size, maintenance, instrument panel, oil capacities, steering wheel, overheating
