CHEVROLET CAMARO 1982 Repair Guide
Manufacturer: CHEVROLET, Model Year: 1982, Model line: CAMARO, Model: CHEVROLET CAMARO 1982Pages: 875, PDF Size: 88.64 MB
Page 331 of 875
GM – CAMARO 1982-1992 – Repair Guide (Checked by WxMax) 331
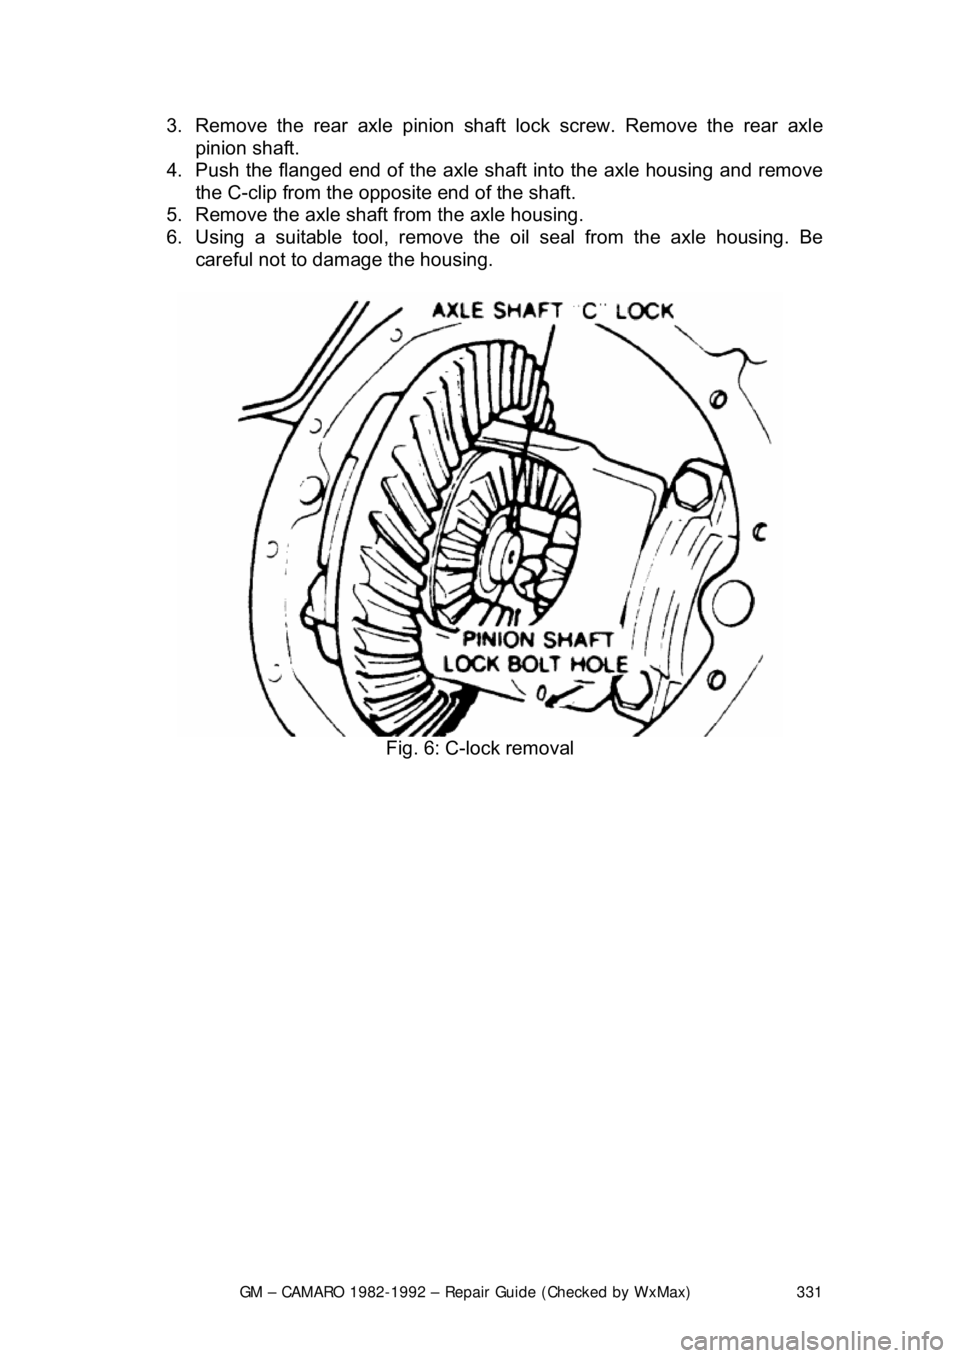
3. Remove the rear axle pinion sha
ft lock screw. Remove the rear axle
pinion shaft.
4. Push the flanged end of t he axle shaft into the axle housing and remove
the C-clip from the oppos ite end of the shaft.
5. Remove the axle shaft from the axle housing.
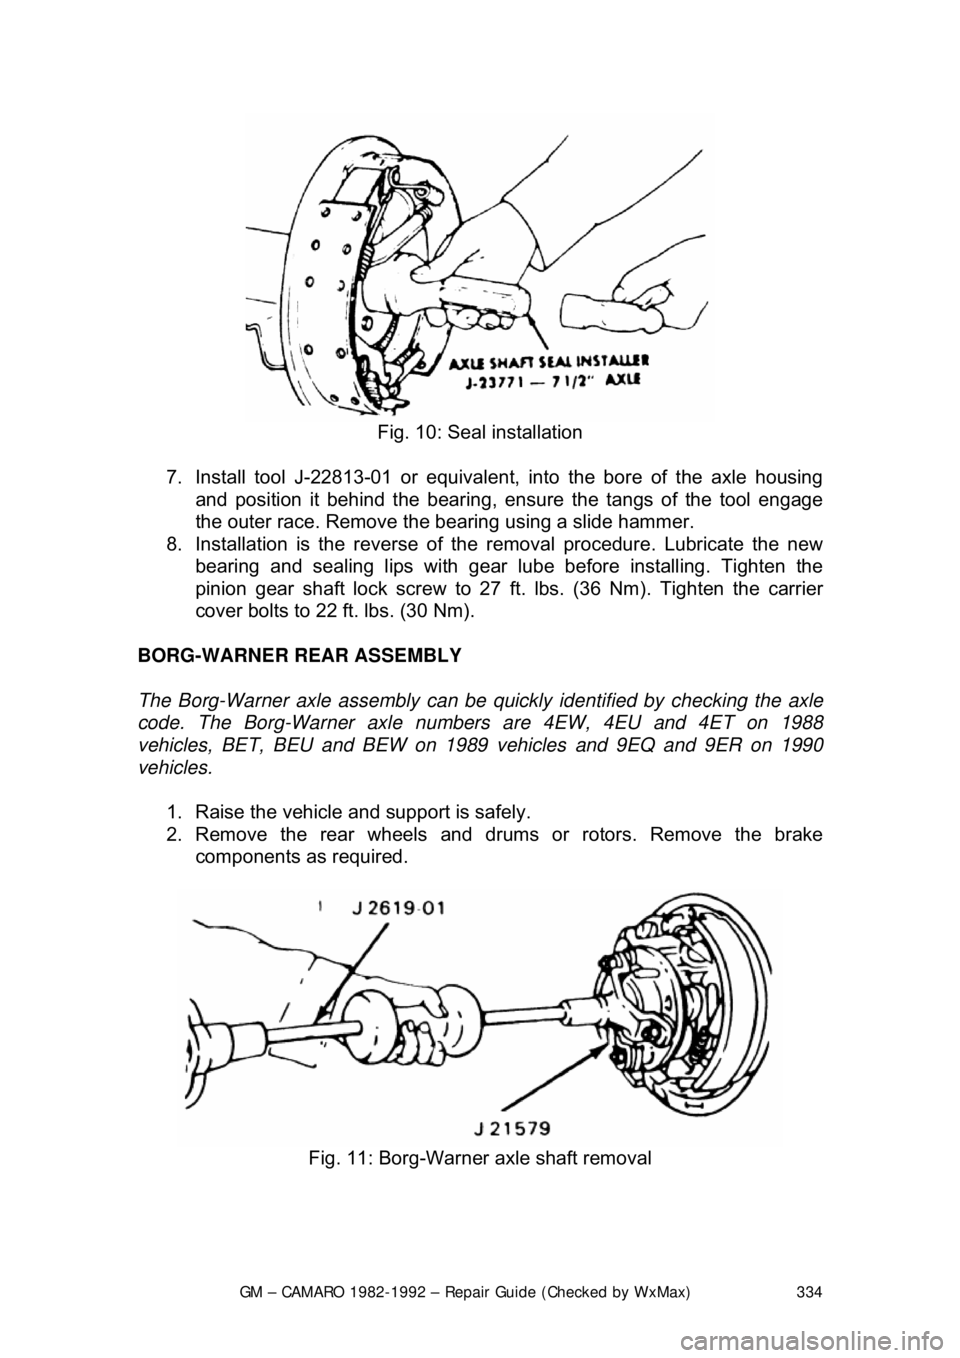
6. Using a suitable tool, remove the oi l seal from the axle housing. Be
careful not to damage the housing.
Fig. 6: C-lock removal
Page 332 of 875
GM – CAMARO 1982-1992 – Repair Guide (Checked by WxMax) 332
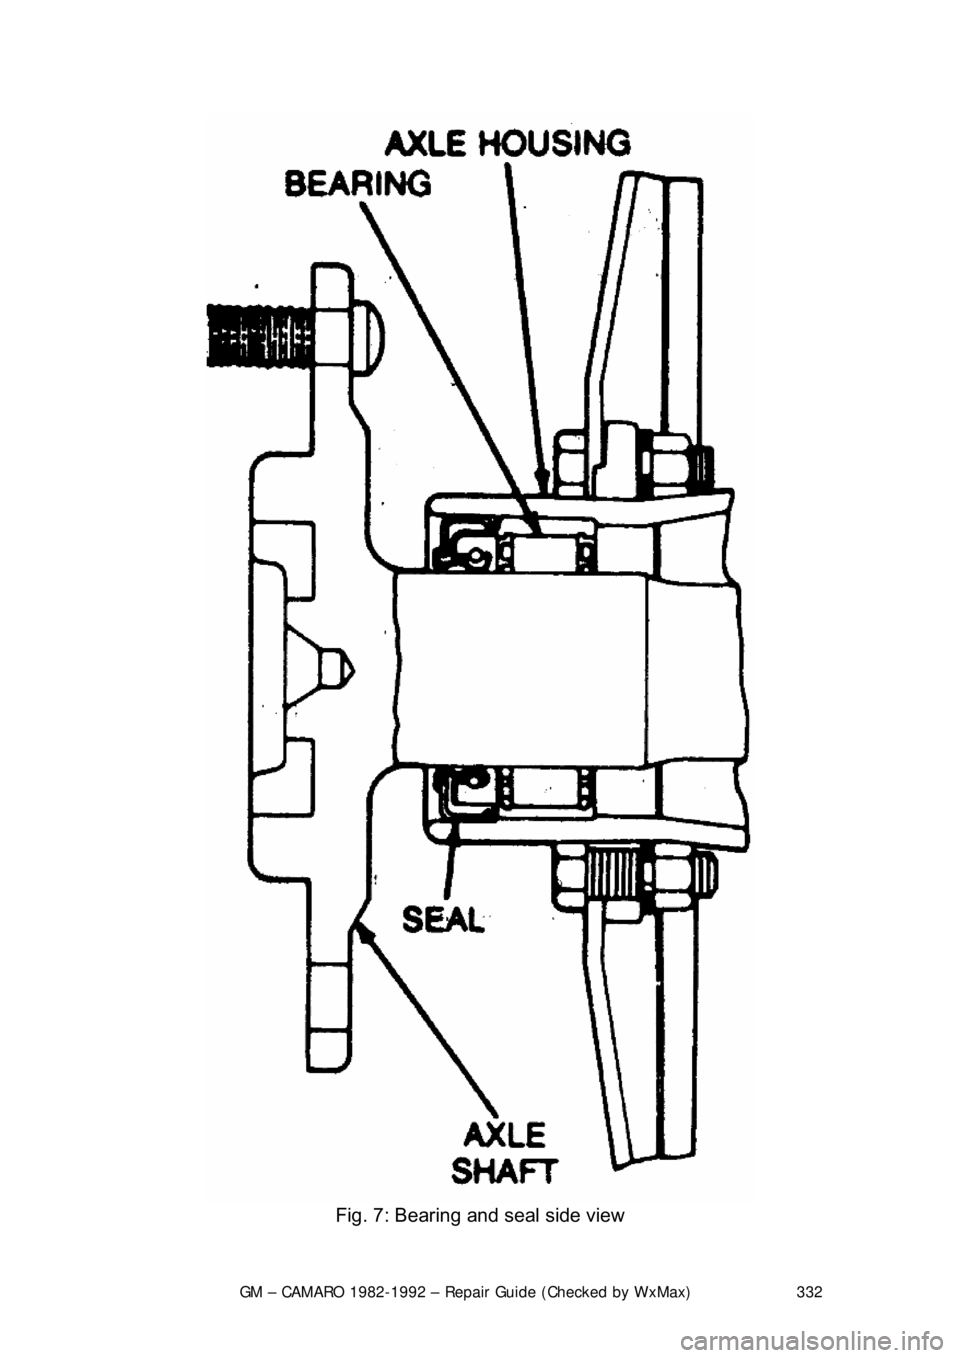
Fig. 7: Bearing and seal side view
Page 333 of 875
GM – CAMARO 1982-1992 – Repair Guide (Checked by WxMax) 333
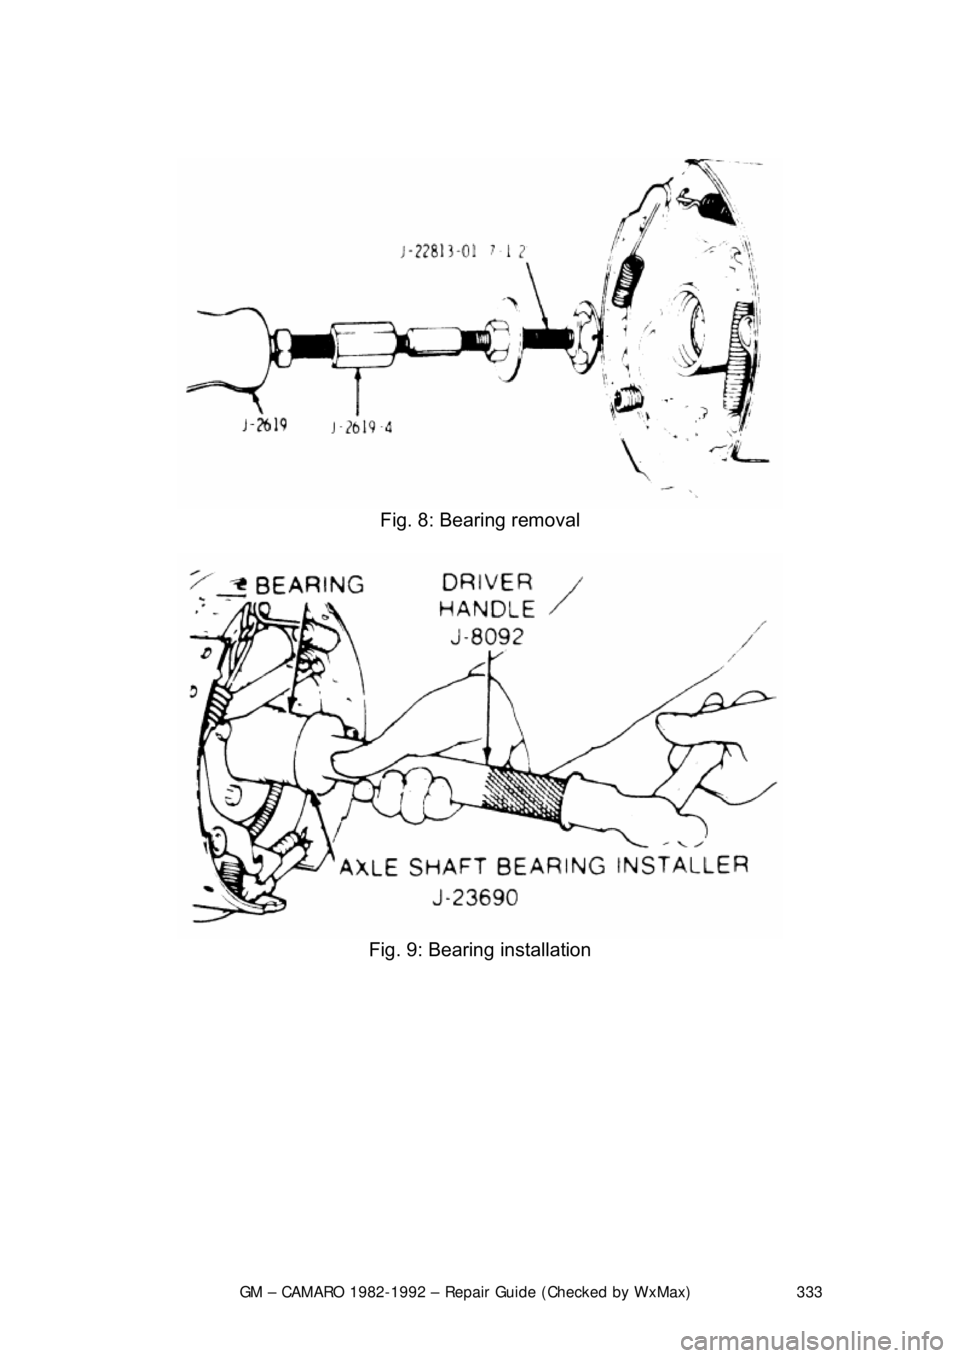
Fig. 8: Bearing removal
Fig. 9: Bearing installation
Page 334 of 875
GM – CAMARO 1982-1992 – Repair Guide (Checked by WxMax) 334
Fig. 10: Seal installation
7. Install tool J-22813-01 or equivalent, into the bore of the axle housing
and position it behind t he bearing, ensure the tangs of the tool engage
the outer race. Remove the bearing using a slide hammer.
8. Installation is the reverse of the removal procedure. Lubricate the new
bearing and sealing lips wi th gear lube before installing. Tighten the
pinion gear shaft lock screw to 27 ft. lbs. (36 Nm). Tighten the carrier
cover bolts to 22 ft. lbs. (30 Nm).
BORG-WARNER REAR ASSEMBLY
The Borg-Warner axle assembly can be quickly identified by checking the axle
code. The Borg-Warner axle num bers are 4EW, 4EU and 4ET on 1988
vehicles, BET, BEU and BEW on 1989 vehicles and 9EQ and 9ER on 1990
vehicles.
1. Raise the vehicle and support is safely.
2. Remove the rear wheels and drums or rotors. Remove the brake components as required.
Fig. 11: Borg-Warner axle shaft removal
Page 335 of 875
GM – CAMARO 1982-1992 – Repair Guide (Checked by WxMax) 335
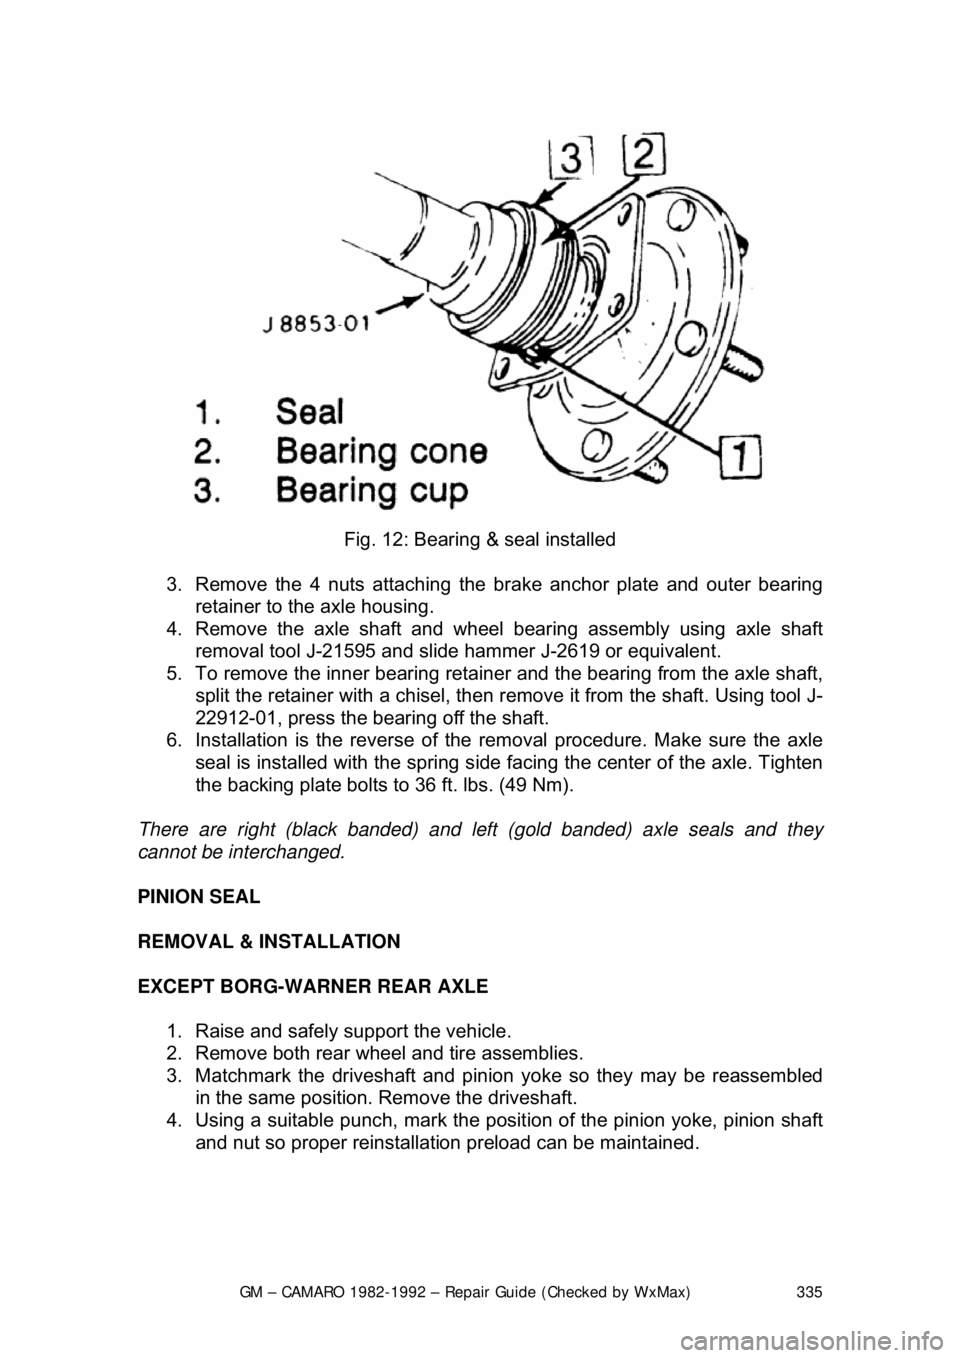
Fig. 12: Bearing & seal installed
3. Remove the 4 nuts attaching the brake anchor plate and outer bearing
retainer to the axle housing.
4. Remove the axle shaft and wheel bearing assembly using axle shaft removal tool J-21595 and slide hammer J-2619 or equivalent.
5. To remove the inner bearing retai ner and the bearing from the axle shaft,
split the retainer with a chisel, then re move it from the shaft. Using tool J-
22912-01, press the bearing off the shaft.
6. Installation is the reverse of the removal procedure. Make sure the axle
seal is installed with the spring side facing the center of the axle. Tighten
the backing plate bolts to 36 ft. lbs. (49 Nm).
There are right (black banded) and left (gold banded) axle seals and they
cannot be interchanged.
PINION SEAL
REMOVAL & INSTALLATION
EXCEPT BORG-WARNER REAR AXLE 1. Raise and safely support the vehicle.
2. Remove both rear wheel and tire assemblies.
3. Matchmark the driveshaft and pinion yoke so they may be reassembled
in the same position. Remove the driveshaft.
4. Using a suitable punch, mark the posit ion of the pinion yoke, pinion shaft
and nut so proper reinstallati on preload can be maintained.
Page 336 of 875
GM – CAMARO 1982-1992 – Repair Guide (Checked by WxMax) 336
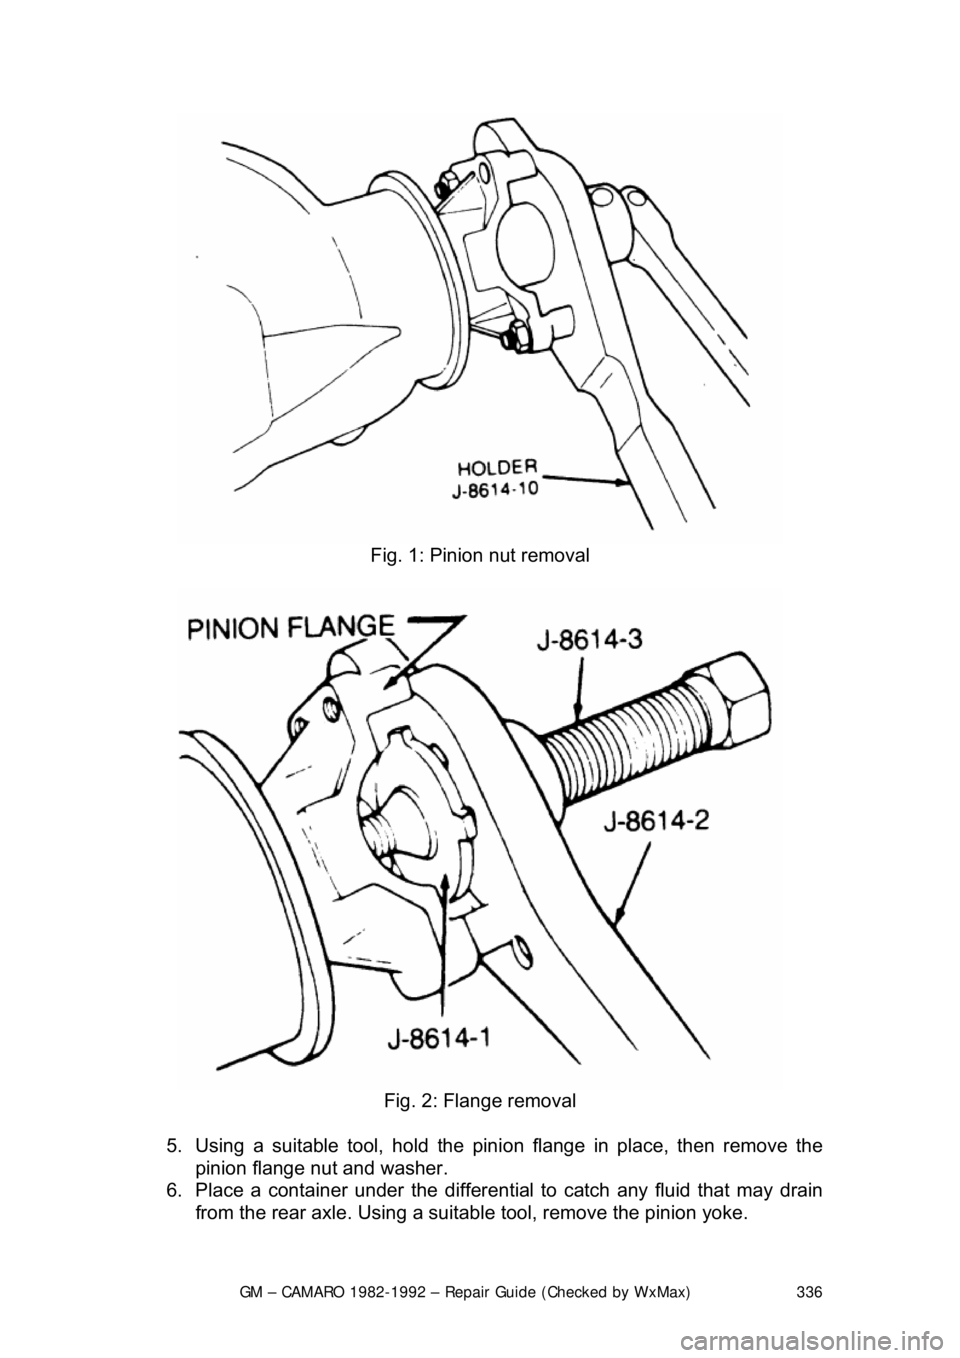
Fig. 1: Pinion nut removal
Fig. 2: Flange removal
5. Using a suitable tool, hold the pini on flange in place, then remove the
pinion flange nut and washer.
6. Place a container under the differential to catch any fluid that may drain
from the rear axle. Us ing a suitable tool, remove the pinion yoke.
Page 337 of 875
GM – CAMARO 1982-1992 – Repair Guide (Checked by WxMax) 337
7. Use a suitable tool to remove the pinion seal.
To install: 8. Inspect the sealing surfaces of the pinion yoke for nicks or damage and
replace, as necessary. Examine the carrier bore and remove any burrs
that may cause leaks around the outside of the seal.
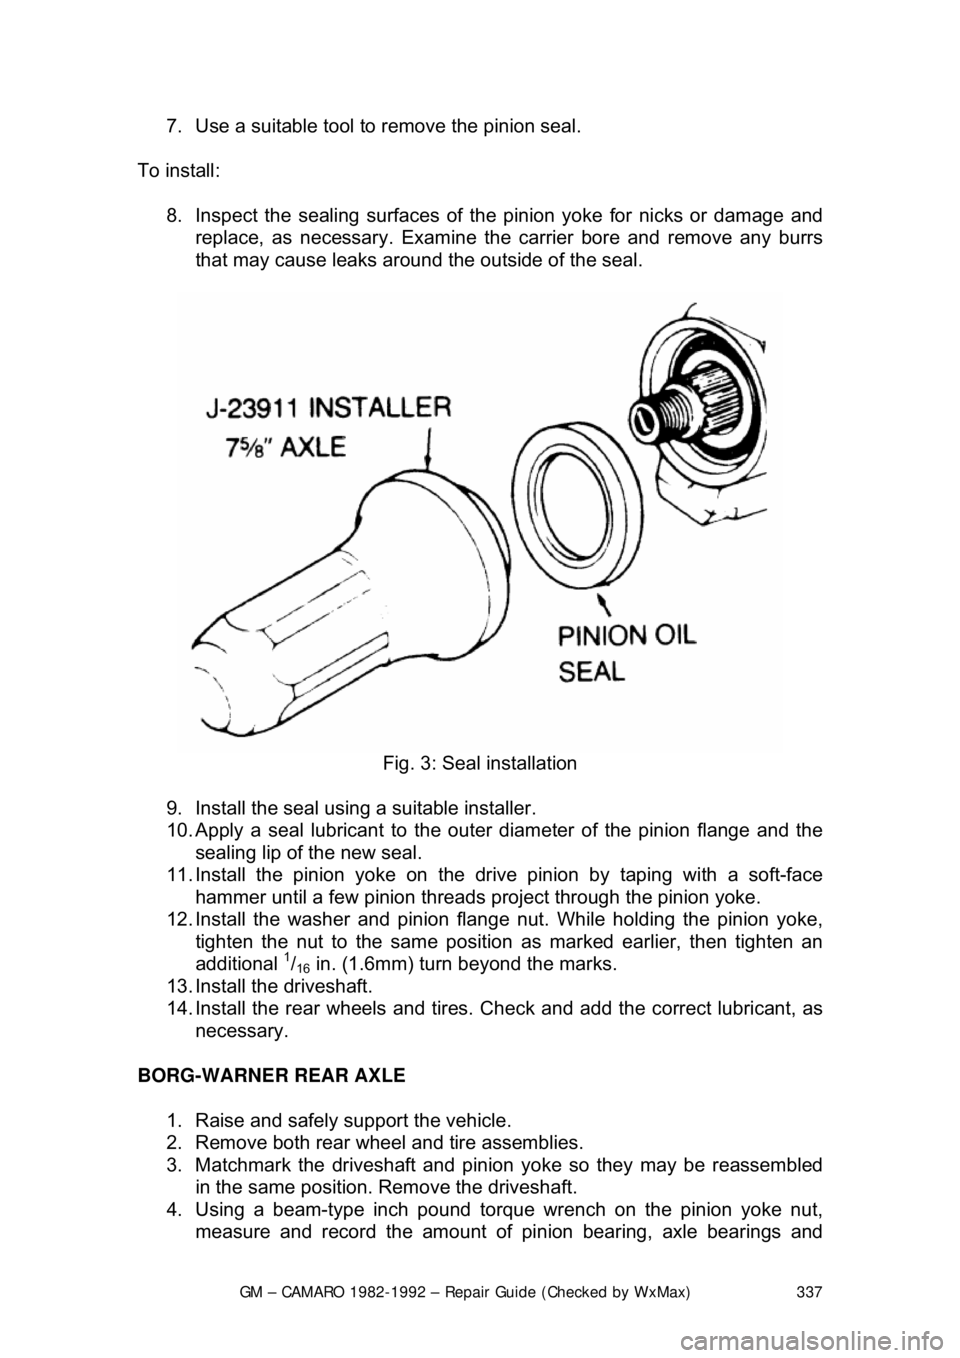
Fig. 3: Seal installation
9. Install the seal using a suitable installer.
10. Apply a seal lubricant to the outer diameter of the pinion flange and the
sealing lip of the new seal.
11. Install the pinion yoke on the drive pinion by taping with a soft-face
hammer until a few pinion threads project through the pinion yoke.
12. Install the washer an d pinion flange nut. While hol ding the pinion yoke,
tighten the nut to the same positi on as marked earlier, then tighten an
additional
1/16 in. (1.6mm) turn beyond the marks.
13. Install the driveshaft.
14. Install the rear wheels and tires. Check and add the correct lubricant, as
necessary.
BORG-WARNER REAR AXLE 1. Raise and safely support the vehicle.
2. Remove both rear wheel and tire assemblies.
3. Matchmark the driveshaft and pinion yoke so they may be reassembled
in the same position. Remove the driveshaft.
4. Using a beam-type inch pound to rque wrench on the pinion yoke nut,
measure and record the amount of pi nion bearing, axle bearings and
Page 338 of 875
GM – CAMARO 1982-1992 – Repair Guide (Checked by WxMax) 338
seal preload. Turn the torque wrenc
h smoothly for several rotations and
record the amount of preload as the a ssembly is turning, not the initial
force required to start the assembly moving.
Preload is measured as the amount of torque required to turn the assembly.
5. Using a suitable tool to hold the pi nion yoke in place, remove the pinion
yoke nut and washer.
6. Place a suitable contai ner under the differential to catch any fluid that
may drain from the rear axle. Using a suitable tool, remove the pinion
flange.
7. Use a suitable tool to remove the pinion seal.
To install: 8. Inspect the seal surface of the pinion flange for tool marks, nicks or
damage and replace, as necessary. Examine the carrier bore and
remove any burrs that might cause leaks around the outside of the seal.
9. Install the seal 0.010 in. (0.2 5mm) below the flange surface using a
suitable seal installer.
10. Apply suitable seal lubricant to t he outer diameter of the pinion flange
and the sealing lip of the new seal.
11. Install the pinion flan ge on the drive pinion by taping with a soft hammer
until a few pinion threads projec t through the pinion flange.
12. Install the washer and pinion fla nge nut. While holding the pinion flange,
tighten the nut a little at a time and turn the drive pinion several
revolutions after each tightening, to set the bearing rollers. Check the
preload each time with a suitable inch pound to rque wrench until the
preload is 5 inch lbs. (0.6 Nm) more then the reading obtained during
disassembly.
13. Install the driveshaft.
14. Install the rear wheels and tires. Check and add the correct lubricant, as
necessary.
AXLE HOUSING
REMOVAL & INSTALLATION 1. Raise the vehicle and support it sa fely. Be sure that the rear axle
assembly is supported safely.
2. Disconnect shock absorbers from ax le. Remove the wheel assemblies.
3. Mark driveshaft and pinion flange, then disconnect driveshaft and support out of the way.
4. Remove brake line junction block bolt at axle housing. If necessary,
disconnect the brake lines at the junction block.
Page 339 of 875
GM – CAMARO 1982-1992 – Repair Guide (Checked by WxMax) 339
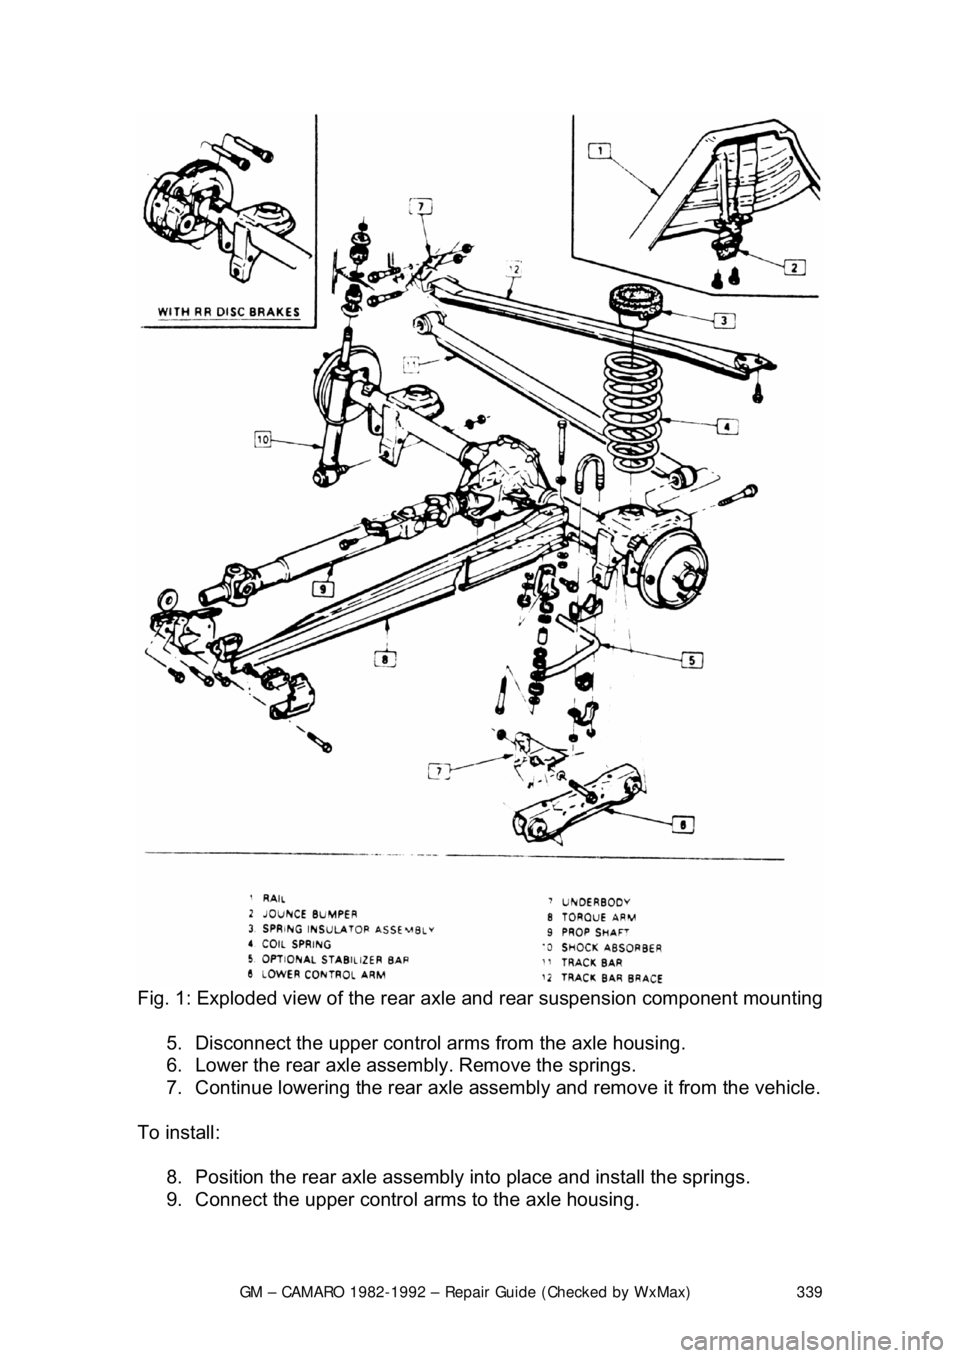
Fig. 1: Exploded view of the rear axle and rear suspension component mounting
5. Disconnect the upper control ar ms from the axle housing.
6. Lower the rear axle assembly. Remove the springs.
7. Continue lowering the rear axle asse mbly and remove it from the vehicle.
To install: 8. Position the rear axle assembly into place and install the springs.
9. Connect the upper control a rms to the axle housing.
Page 340 of 875
GM – CAMARO 1982-1992 – Repair Guide (Checked by WxMax) 340
10. Install the brake line j
unction block bolt at the ax le housing. Connect any
brake lines that were disconnected.
11. Install and secure the driveshaft a ligning the match marks made earlier.
12. Connect the shock absorbers to the axle and install the wheel
assemblies.
13. Lower the vehicle and replace any lost rear axle fluid.
DIFFERENTIAL ASSEMBLY
REMOVAL & INSTALLATION 1. Raise and safely support the vehicle.
2. Place a suitable contai ner under the differential. Remove the carrier
cover and drain the gear oil.
3. Remove the drive axles.
4. Mark the differential bearing caps L and R to make sure they will be
reassembled in their original location.
5. Using a suitable tool, remove the di fferential carrier. Be careful not to
damage the gasket sealing surface wh en removing the unit. Place the
right and left bearing outer races of the side bearing assemblies and
shims in sets with the marked different ial bearings caps so they can be
reinstalled in their original positions.
To install: 6. Inspect the differential carrier housi ng for foreign material. Check the ring
and pinion for chipped teeth, exce ssive wear and scoring. Check the
carrier bearings visually and by feel . Clean the differential housing and
replace components, as necessary.
7. Install the differential carrier. C heck the carrier bearing preload along
with the ring and pinion backlash, then adjust, as necessary. Tighten the
differential bearing cap bolts to 55 ft. lbs. (75 Nm) except on Borg-
Warner rear axles which are ti ghtened to 40 ft. lbs. (54 Nm).
8. Install the axles.
9. Install the carrier cover using a new gasket. Tighten the carrier cover
bolts to 20 ft. lbs. (27 Nm). Add the proper type and quantity of gear oil to
axle assembly.