CHRYSLER VOYAGER 1996 Repair Manual
Manufacturer: CHRYSLER, Model Year: 1996, Model line: VOYAGER, Model: CHRYSLER VOYAGER 1996Pages: 1938, PDF Size: 55.84 MB
Page 61 of 1938
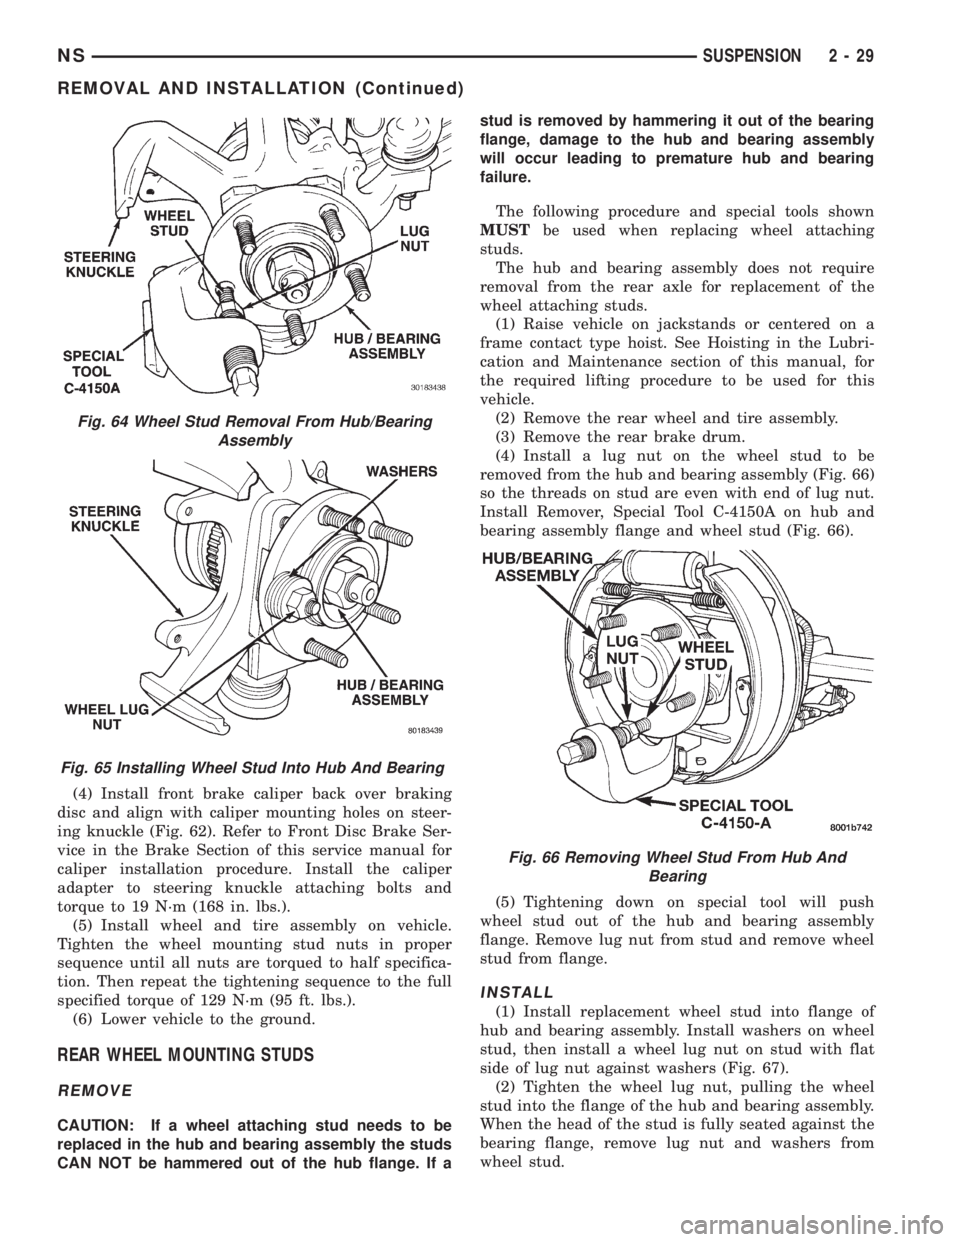
(4) Install front brake caliper back over braking
disc and align with caliper mounting holes on steer-
ing knuckle (Fig. 62). Refer to Front Disc Brake Ser-
vice in the Brake Section of this service manual for
caliper installation procedure. Install the caliper
adapter to steering knuckle attaching bolts and
torque to 19 N´m (168 in. lbs.).
(5) Install wheel and tire assembly on vehicle.
Tighten the wheel mounting stud nuts in proper
sequence until all nuts are torqued to half specifica-
tion. Then repeat the tightening sequence to the full
specified torque of 129 N´m (95 ft. lbs.).
(6) Lower vehicle to the ground.
REAR WHEEL MOUNTING STUDS
REMOVE
CAUTION: If a wheel attaching stud needs to be
replaced in the hub and bearing assembly the studs
CAN NOT be hammered out of the hub flange. If astud is removed by hammering it out of the bearing
flange, damage to the hub and bearing assembly
will occur leading to premature hub and bearing
failure.
The following procedure and special tools shown
MUSTbe used when replacing wheel attaching
studs.
The hub and bearing assembly does not require
removal from the rear axle for replacement of the
wheel attaching studs.
(1) Raise vehicle on jackstands or centered on a
frame contact type hoist. See Hoisting in the Lubri-
cation and Maintenance section of this manual, for
the required lifting procedure to be used for this
vehicle.
(2) Remove the rear wheel and tire assembly.
(3) Remove the rear brake drum.
(4) Install a lug nut on the wheel stud to be
removed from the hub and bearing assembly (Fig. 66)
so the threads on stud are even with end of lug nut.
Install Remover, Special Tool C-4150A on hub and
bearing assembly flange and wheel stud (Fig. 66).
(5) Tightening down on special tool will push
wheel stud out of the hub and bearing assembly
flange. Remove lug nut from stud and remove wheel
stud from flange.
INSTALL
(1) Install replacement wheel stud into flange of
hub and bearing assembly. Install washers on wheel
stud, then install a wheel lug nut on stud with flat
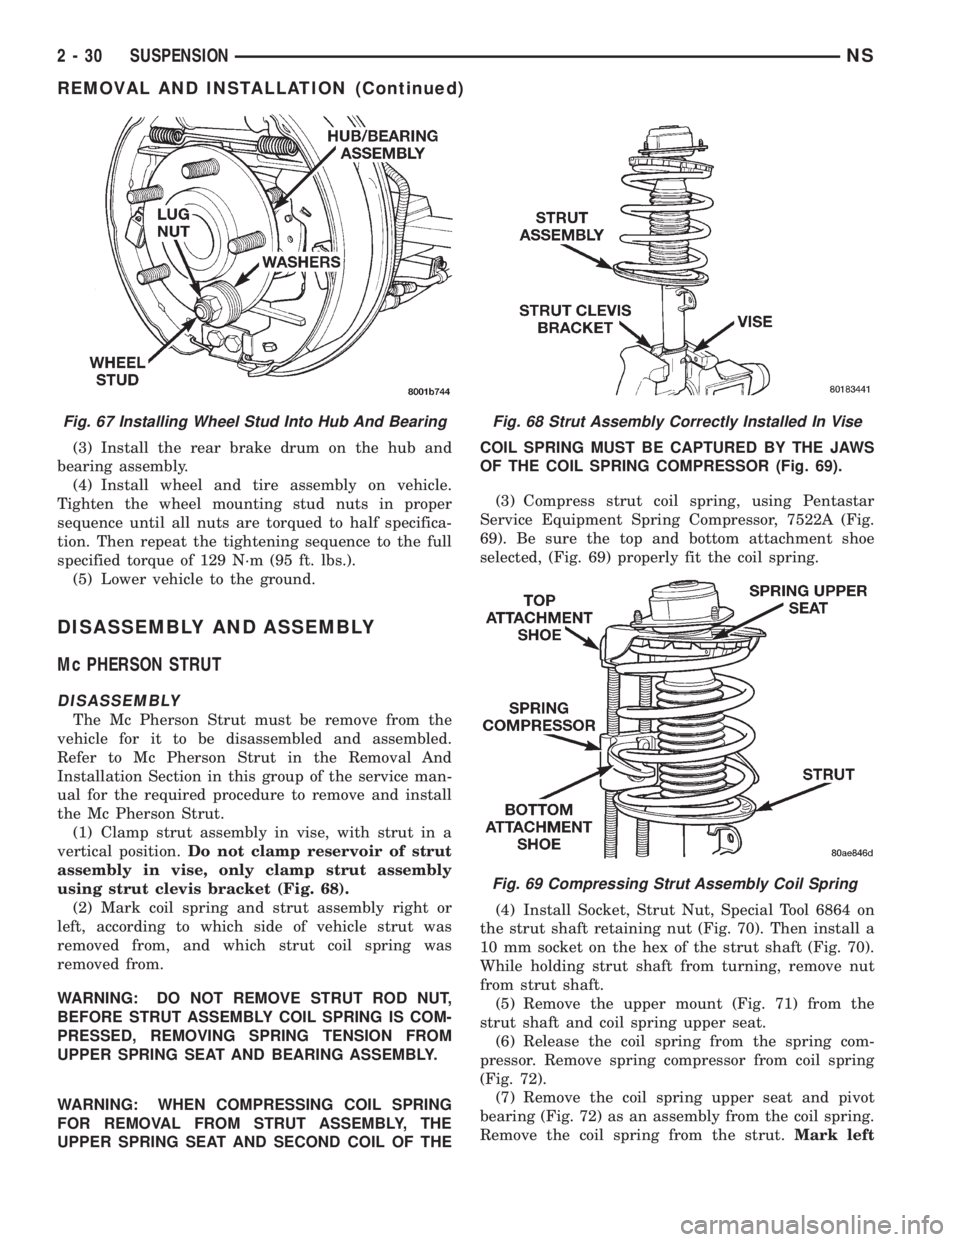
side of lug nut against washers (Fig. 67).
(2) Tighten the wheel lug nut, pulling the wheel
stud into the flange of the hub and bearing assembly.
When the head of the stud is fully seated against the
bearing flange, remove lug nut and washers from
wheel stud.
Fig. 64 Wheel Stud Removal From Hub/Bearing
Assembly
Fig. 65 Installing Wheel Stud Into Hub And Bearing
Fig. 66 Removing Wheel Stud From Hub And
Bearing
NSSUSPENSION 2 - 29
REMOVAL AND INSTALLATION (Continued)
Page 62 of 1938
(3) Install the rear brake drum on the hub and
bearing assembly.
(4) Install wheel and tire assembly on vehicle.
Tighten the wheel mounting stud nuts in proper
sequence until all nuts are torqued to half specifica-
tion. Then repeat the tightening sequence to the full
specified torque of 129 N´m (95 ft. lbs.).
(5) Lower vehicle to the ground.
DISASSEMBLY AND ASSEMBLY
Mc PHERSON STRUT
DISASSEMBLY
The Mc Pherson Strut must be remove from the
vehicle for it to be disassembled and assembled.
Refer to Mc Pherson Strut in the Removal And
Installation Section in this group of the service man-
ual for the required procedure to remove and install
the Mc Pherson Strut.
(1) Clamp strut assembly in vise, with strut in a
vertical position.Do not clamp reservoir of strut
assembly in vise, only clamp strut assembly
using strut clevis bracket (Fig. 68).
(2) Mark coil spring and strut assembly right or
left, according to which side of vehicle strut was
removed from, and which strut coil spring was
removed from.
WARNING: DO NOT REMOVE STRUT ROD NUT,
BEFORE STRUT ASSEMBLY COIL SPRING IS COM-
PRESSED, REMOVING SPRING TENSION FROM
UPPER SPRING SEAT AND BEARING ASSEMBLY.
WARNING: WHEN COMPRESSING COIL SPRING
FOR REMOVAL FROM STRUT ASSEMBLY, THE
UPPER SPRING SEAT AND SECOND COIL OF THECOIL SPRING MUST BE CAPTURED BY THE JAWS
OF THE COIL SPRING COMPRESSOR (Fig. 69).
(3) Compress strut coil spring, using Pentastar
Service Equipment Spring Compressor, 7522A (Fig.
69). Be sure the top and bottom attachment shoe
selected, (Fig. 69) properly fit the coil spring.
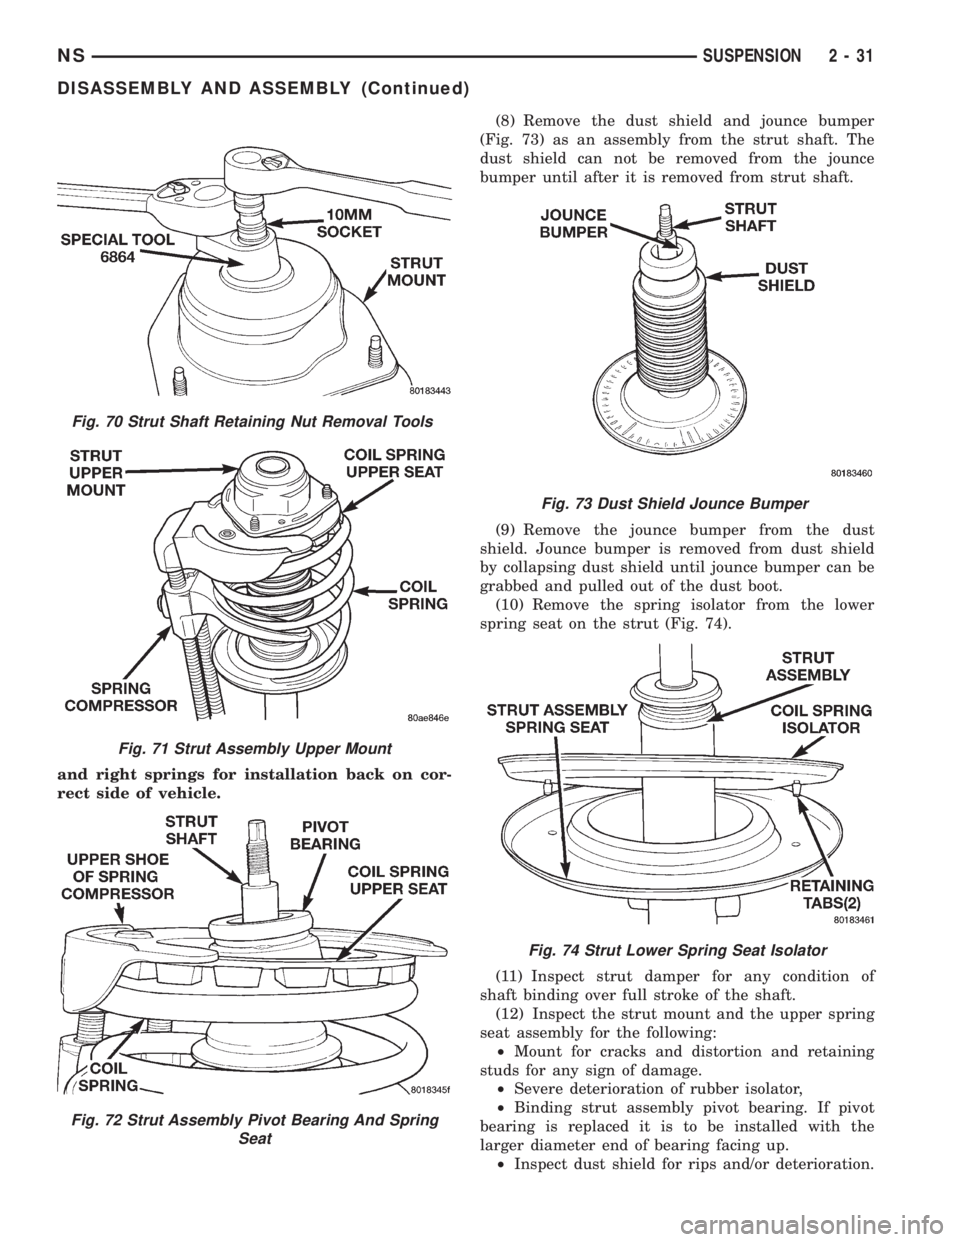
(4) Install Socket, Strut Nut, Special Tool 6864 on
the strut shaft retaining nut (Fig. 70). Then install a
10 mm socket on the hex of the strut shaft (Fig. 70).
While holding strut shaft from turning, remove nut
from strut shaft.
(5) Remove the upper mount (Fig. 71) from the
strut shaft and coil spring upper seat.
(6) Release the coil spring from the spring com-
pressor. Remove spring compressor from coil spring
(Fig. 72).
(7) Remove the coil spring upper seat and pivot
bearing (Fig. 72) as an assembly from the coil spring.
Remove the coil spring from the strut.Mark left
Fig. 67 Installing Wheel Stud Into Hub And BearingFig. 68 Strut Assembly Correctly Installed In Vise
Fig. 69 Compressing Strut Assembly Coil Spring
2 - 30 SUSPENSIONNS
REMOVAL AND INSTALLATION (Continued)
Page 63 of 1938
and right springs for installation back on cor-
rect side of vehicle.(8) Remove the dust shield and jounce bumper
(Fig. 73) as an assembly from the strut shaft. The
dust shield can not be removed from the jounce
bumper until after it is removed from strut shaft.
(9) Remove the jounce bumper from the dust
shield. Jounce bumper is removed from dust shield
by collapsing dust shield until jounce bumper can be
grabbed and pulled out of the dust boot.
(10) Remove the spring isolator from the lower
spring seat on the strut (Fig. 74).
(11) Inspect strut damper for any condition of
shaft binding over full stroke of the shaft.
(12) Inspect the strut mount and the upper spring
seat assembly for the following:
²Mount for cracks and distortion and retaining
studs for any sign of damage.
²Severe deterioration of rubber isolator,
²Binding strut assembly pivot bearing. If pivot
bearing is replaced it is to be installed with the
larger diameter end of bearing facing up.
²Inspect dust shield for rips and/or deterioration.
Fig. 70 Strut Shaft Retaining Nut Removal Tools
Fig. 71 Strut Assembly Upper Mount
Fig. 72 Strut Assembly Pivot Bearing And Spring
Seat
Fig. 73 Dust Shield Jounce Bumper
Fig. 74 Strut Lower Spring Seat Isolator
NSSUSPENSION 2 - 31
DISASSEMBLY AND ASSEMBLY (Continued)
Page 64 of 1938
²Inspect jounce bumper for cracks and signs of
deterioration.
(13) Replace any components of the strut assembly
found to be worn or defective during the inspection,
before re-assembling the strut.
ASSEMBLY
(1) Clamp strut in vise, with strut in vertical posi-
tion.Do not clamp strut in vise by body of strut,
only by the clevis bracket (Fig. 68).
(2) Install the spring isolator on the strut lower
spring seat (Fig. 74). When installing the spring iso-
lator, be sure the 2 retaining tabs on the spring iso-
lator (Fig. 74) are installed in the 2 holes in the
spring seat. When properly installed, the oversize
holes in the spring seat should line up with the holes
in the spring isolator.
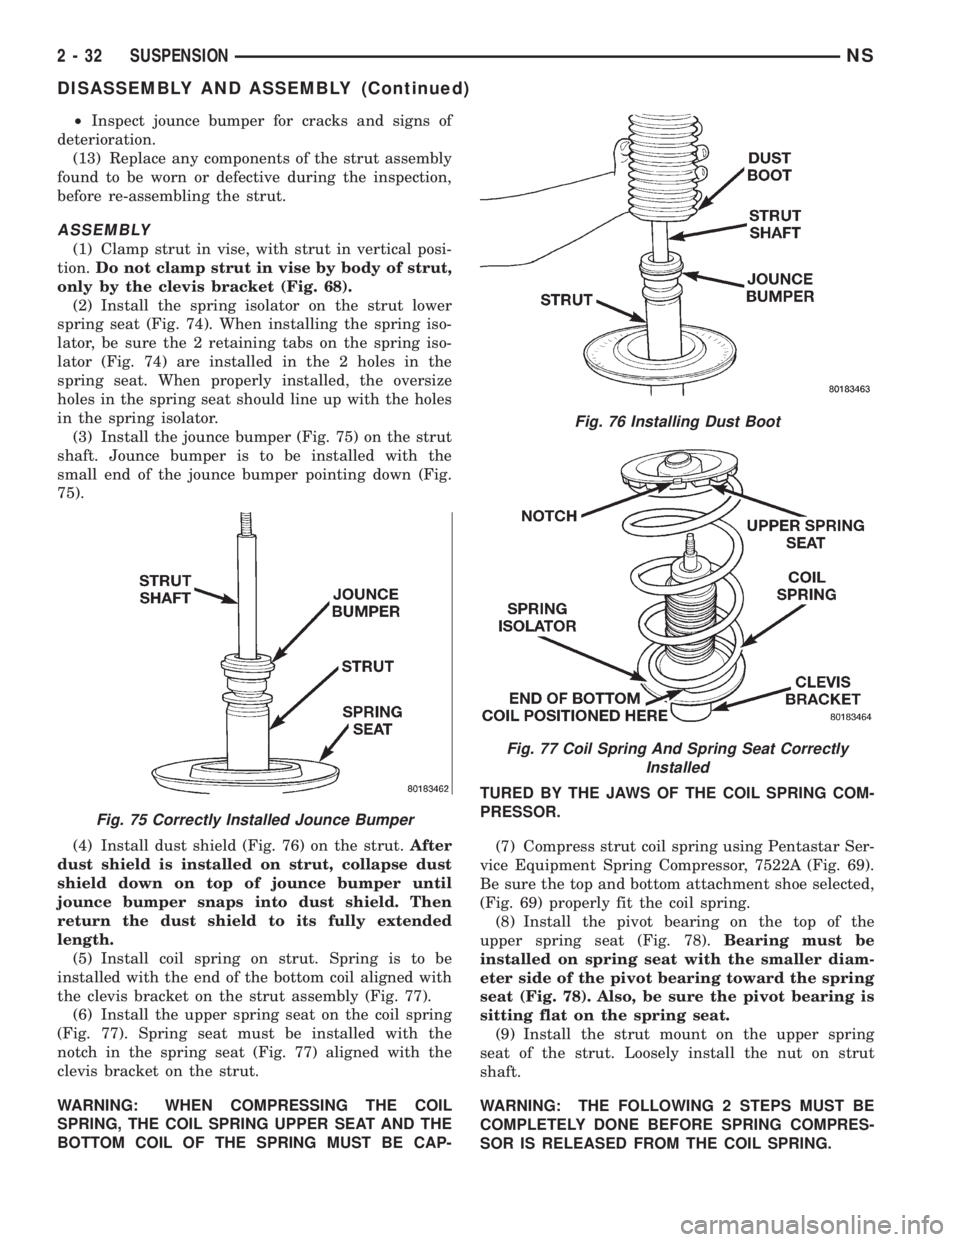
(3) Install the jounce bumper (Fig. 75) on the strut
shaft. Jounce bumper is to be installed with the
small end of the jounce bumper pointing down (Fig.
75).
(4) Install dust shield (Fig. 76) on the strut.After
dust shield is installed on strut, collapse dust
shield down on top of jounce bumper until
jounce bumper snaps into dust shield. Then
return the dust shield to its fully extended
length.
(5) Install coil spring on strut. Spring is to be
installed with the end of the bottom coil aligned with
the clevis bracket on the strut assembly (Fig. 77).
(6) Install the upper spring seat on the coil spring
(Fig. 77). Spring seat must be installed with the
notch in the spring seat (Fig. 77) aligned with the
clevis bracket on the strut.
WARNING: WHEN COMPRESSING THE COIL
SPRING, THE COIL SPRING UPPER SEAT AND THE
BOTTOM COIL OF THE SPRING MUST BE CAP-TURED BY THE JAWS OF THE COIL SPRING COM-
PRESSOR.
(7) Compress strut coil spring using Pentastar Ser-
vice Equipment Spring Compressor, 7522A (Fig. 69).
Be sure the top and bottom attachment shoe selected,
(Fig. 69) properly fit the coil spring.
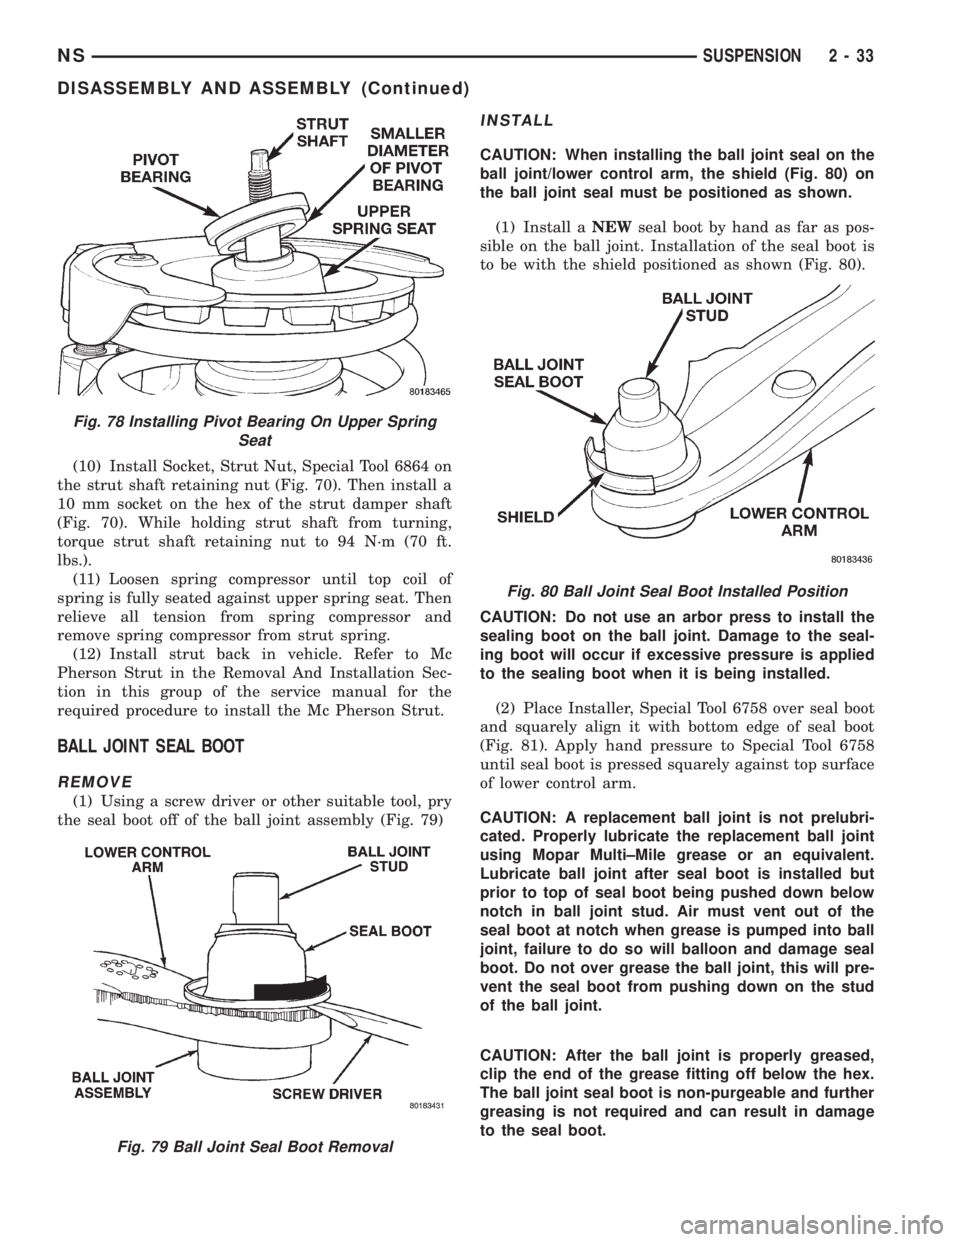
(8) Install the pivot bearing on the top of the
upper spring seat (Fig. 78).Bearing must be
installed on spring seat with the smaller diam-
eter side of the pivot bearing toward the spring
seat (Fig. 78). Also, be sure the pivot bearing is
sitting flat on the spring seat.
(9) Install the strut mount on the upper spring
seat of the strut. Loosely install the nut on strut
shaft.
WARNING: THE FOLLOWING 2 STEPS MUST BE
COMPLETELY DONE BEFORE SPRING COMPRES-
SOR IS RELEASED FROM THE COIL SPRING.
Fig. 75 Correctly Installed Jounce Bumper
Fig. 76 Installing Dust Boot
Fig. 77 Coil Spring And Spring Seat Correctly
Installed
2 - 32 SUSPENSIONNS
DISASSEMBLY AND ASSEMBLY (Continued)
Page 65 of 1938
(10) Install Socket, Strut Nut, Special Tool 6864 on
the strut shaft retaining nut (Fig. 70). Then install a
10 mm socket on the hex of the strut damper shaft
(Fig. 70). While holding strut shaft from turning,
torque strut shaft retaining nut to 94 N´m (70 ft.
lbs.).
(11) Loosen spring compressor until top coil of
spring is fully seated against upper spring seat. Then
relieve all tension from spring compressor and
remove spring compressor from strut spring.
(12) Install strut back in vehicle. Refer to Mc
Pherson Strut in the Removal And Installation Sec-
tion in this group of the service manual for the
required procedure to install the Mc Pherson Strut.
BALL JOINT SEAL BOOT
REMOVE
(1) Using a screw driver or other suitable tool, pry
the seal boot off of the ball joint assembly (Fig. 79)
INSTALL
CAUTION: When installing the ball joint seal on the
ball joint/lower control arm, the shield (Fig. 80) on
the ball joint seal must be positioned as shown.
(1) Install aNEWseal boot by hand as far as pos-
sible on the ball joint. Installation of the seal boot is
to be with the shield positioned as shown (Fig. 80).
CAUTION: Do not use an arbor press to install the
sealing boot on the ball joint. Damage to the seal-
ing boot will occur if excessive pressure is applied
to the sealing boot when it is being installed.
(2) Place Installer, Special Tool 6758 over seal boot
and squarely align it with bottom edge of seal boot
(Fig. 81). Apply hand pressure to Special Tool 6758
until seal boot is pressed squarely against top surface
of lower control arm.
CAUTION: A replacement ball joint is not prelubri-
cated. Properly lubricate the replacement ball joint
using Mopar Multi±Mile grease or an equivalent.
Lubricate ball joint after seal boot is installed but
prior to top of seal boot being pushed down below
notch in ball joint stud. Air must vent out of the
seal boot at notch when grease is pumped into ball
joint, failure to do so will balloon and damage seal
boot. Do not over grease the ball joint, this will pre-
vent the seal boot from pushing down on the stud
of the ball joint.
CAUTION: After the ball joint is properly greased,
clip the end of the grease fitting off below the hex.
The ball joint seal boot is non-purgeable and further
greasing is not required and can result in damage
to the seal boot.
Fig. 78 Installing Pivot Bearing On Upper Spring
Seat
Fig. 79 Ball Joint Seal Boot Removal
Fig. 80 Ball Joint Seal Boot Installed Position
NSSUSPENSION 2 - 33
DISASSEMBLY AND ASSEMBLY (Continued)
Page 66 of 1938
LOWER CONTROL ARM FRONT BUSHING
REMOVE
(1) Remove the lower control arm from the front
suspension cradle. Refer to Lower Control Arm in the
Removal And Installation Section in this section of
the service manual for the required procedure.
(2) Securely mount the lower control arm in a vise.
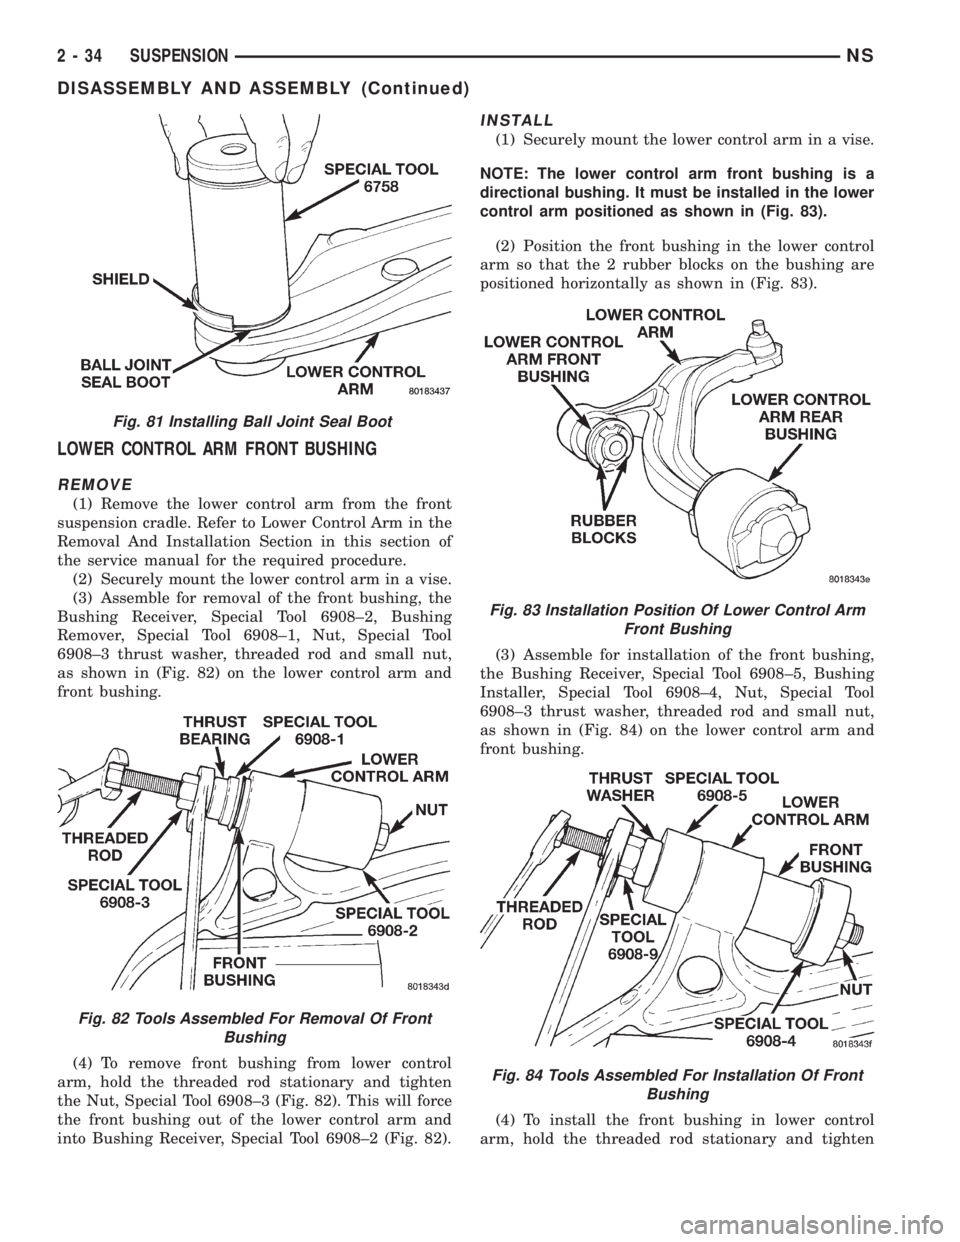
(3) Assemble for removal of the front bushing, the
Bushing Receiver, Special Tool 6908±2, Bushing
Remover, Special Tool 6908±1, Nut, Special Tool
6908±3 thrust washer, threaded rod and small nut,
as shown in (Fig. 82) on the lower control arm and
front bushing.
(4) To remove front bushing from lower control
arm, hold the threaded rod stationary and tighten
the Nut, Special Tool 6908±3 (Fig. 82). This will force
the front bushing out of the lower control arm and
into Bushing Receiver, Special Tool 6908±2 (Fig. 82).
INSTALL
(1) Securely mount the lower control arm in a vise.
NOTE: The lower control arm front bushing is a
directional bushing. It must be installed in the lower
control arm positioned as shown in (Fig. 83).
(2) Position the front bushing in the lower control
arm so that the 2 rubber blocks on the bushing are
positioned horizontally as shown in (Fig. 83).
(3) Assemble for installation of the front bushing,
the Bushing Receiver, Special Tool 6908±5, Bushing
Installer, Special Tool 6908±4, Nut, Special Tool
6908±3 thrust washer, threaded rod and small nut,
as shown in (Fig. 84) on the lower control arm and
front bushing.
(4) To install the front bushing in lower control
arm, hold the threaded rod stationary and tighten
Fig. 81 Installing Ball Joint Seal Boot
Fig. 82 Tools Assembled For Removal Of Front
Bushing
Fig. 83 Installation Position Of Lower Control Arm
Front Bushing
Fig. 84 Tools Assembled For Installation Of Front
Bushing
2 - 34 SUSPENSIONNS
DISASSEMBLY AND ASSEMBLY (Continued)
Page 67 of 1938
the Nut, Special Tool 6908±3 (Fig. 84). This will pull
the front bushing into the lower control arm.
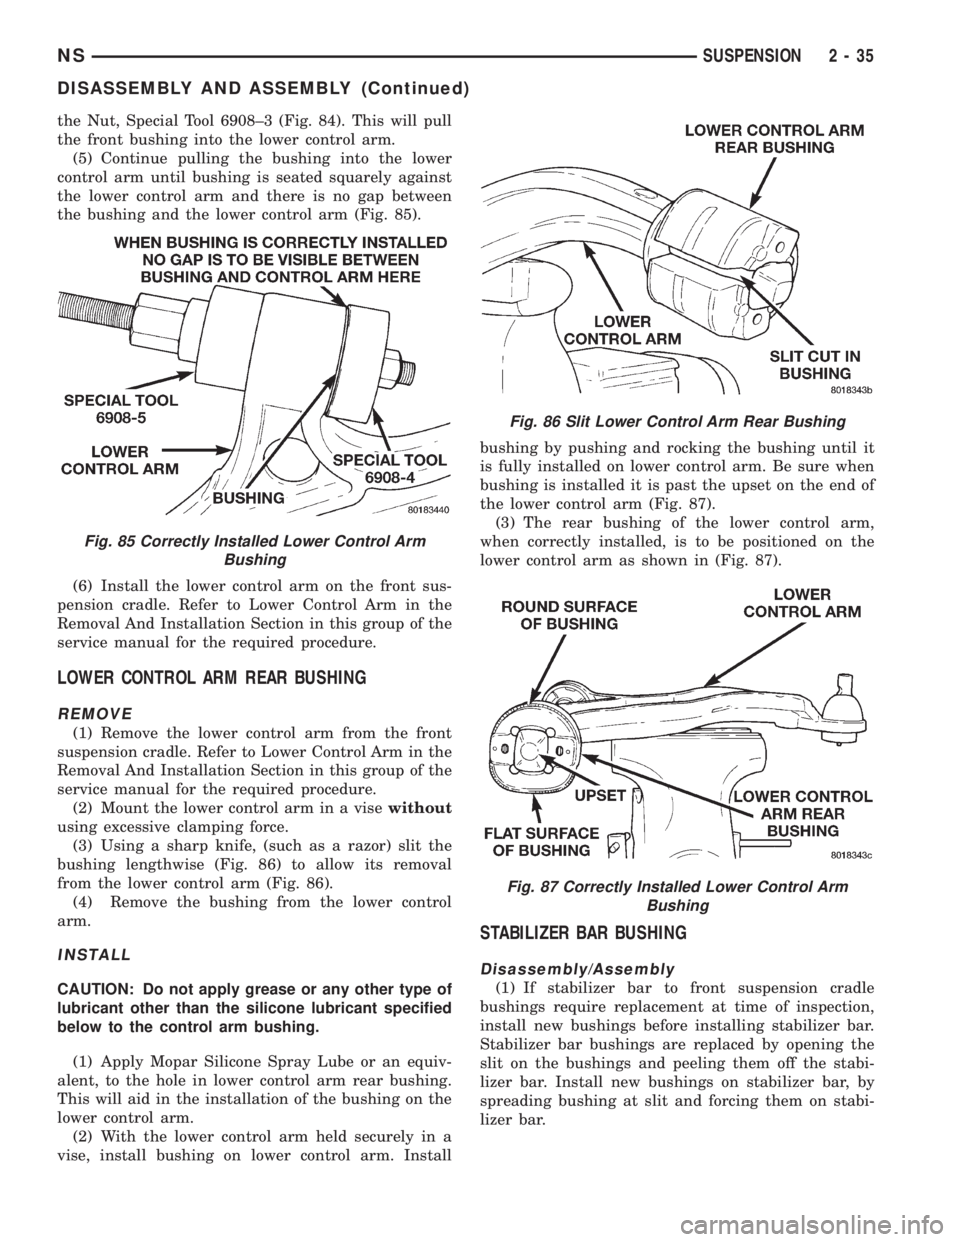
(5) Continue pulling the bushing into the lower
control arm until bushing is seated squarely against
the lower control arm and there is no gap between
the bushing and the lower control arm (Fig. 85).
(6) Install the lower control arm on the front sus-
pension cradle. Refer to Lower Control Arm in the
Removal And Installation Section in this group of the
service manual for the required procedure.
LOWER CONTROL ARM REAR BUSHING
REMOVE
(1) Remove the lower control arm from the front
suspension cradle. Refer to Lower Control Arm in the
Removal And Installation Section in this group of the
service manual for the required procedure.
(2) Mount the lower control arm in a visewithout
using excessive clamping force.
(3) Using a sharp knife, (such as a razor) slit the
bushing lengthwise (Fig. 86) to allow its removal
from the lower control arm (Fig. 86).
(4) Remove the bushing from the lower control
arm.
INSTALL
CAUTION: Do not apply grease or any other type of
lubricant other than the silicone lubricant specified
below to the control arm bushing.
(1) Apply Mopar Silicone Spray Lube or an equiv-
alent, to the hole in lower control arm rear bushing.
This will aid in the installation of the bushing on the
lower control arm.
(2) With the lower control arm held securely in a
vise, install bushing on lower control arm. Installbushing by pushing and rocking the bushing until it
is fully installed on lower control arm. Be sure when
bushing is installed it is past the upset on the end of
the lower control arm (Fig. 87).
(3) The rear bushing of the lower control arm,
when correctly installed, is to be positioned on the
lower control arm as shown in (Fig. 87).
STABILIZER BAR BUSHING
Disassembly/Assembly
(1) If stabilizer bar to front suspension cradle
bushings require replacement at time of inspection,
install new bushings before installing stabilizer bar.
Stabilizer bar bushings are replaced by opening the
slit on the bushings and peeling them off the stabi-
lizer bar. Install new bushings on stabilizer bar, by
spreading bushing at slit and forcing them on stabi-
lizer bar.
Fig. 85 Correctly Installed Lower Control Arm
Bushing
Fig. 86 Slit Lower Control Arm Rear Bushing
Fig. 87 Correctly Installed Lower Control Arm
Bushing
NSSUSPENSION 2 - 35
DISASSEMBLY AND ASSEMBLY (Continued)
Page 68 of 1938
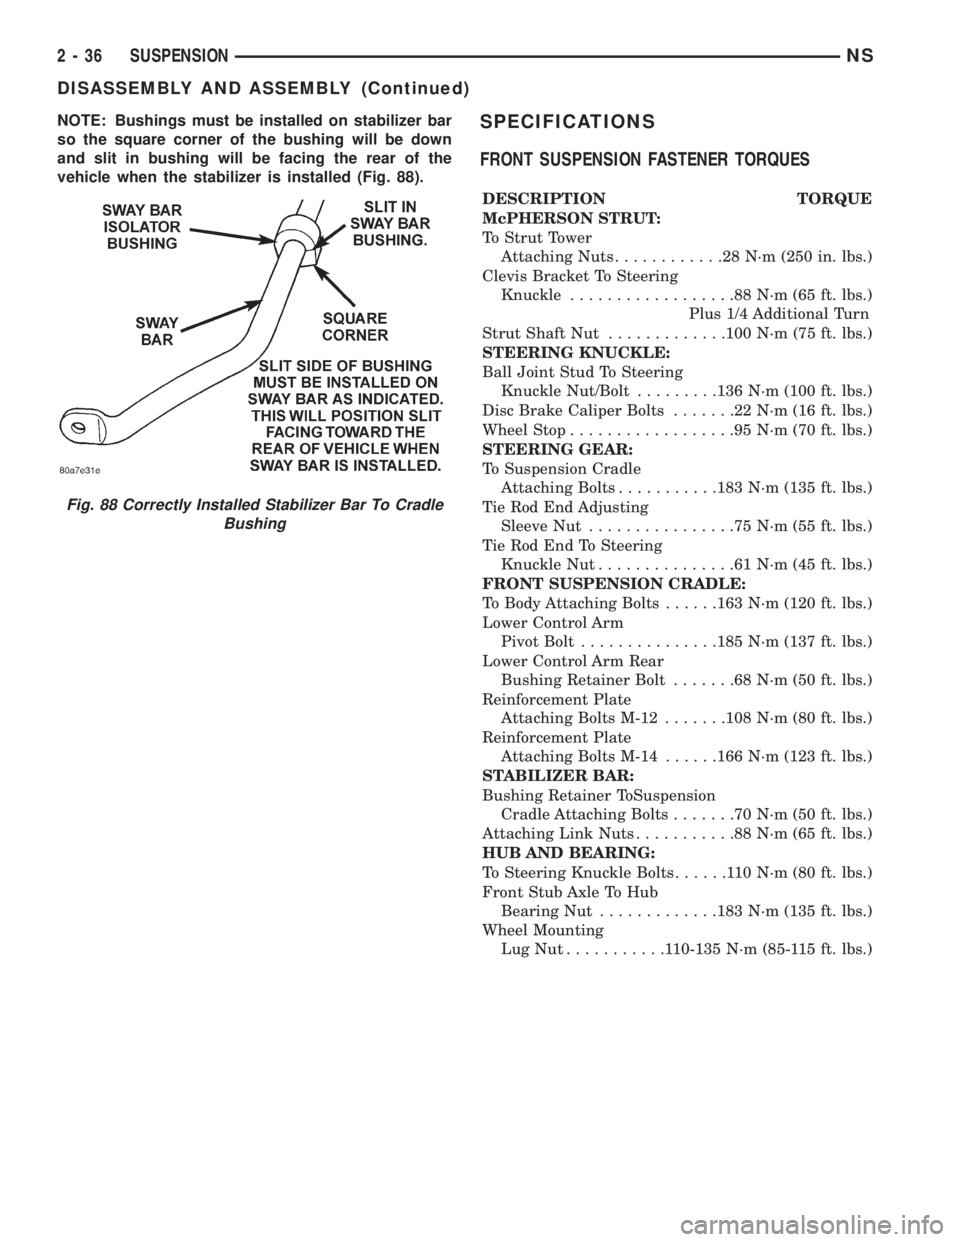
NOTE: Bushings must be installed on stabilizer bar
so the square corner of the bushing will be down
and slit in bushing will be facing the rear of the
vehicle when the stabilizer is installed (Fig. 88).SPECIFICATIONS
FRONT SUSPENSION FASTENER TORQUES
DESCRIPTION TORQUE
McPHERSON STRUT:
To Strut Tower
Attaching Nuts............28N´m(250 in. lbs.)
Clevis Bracket To Steering
Knuckle..................88N´m(65ft.lbs.)
Plus 1/4 Additional Turn
Strut Shaft Nut.............100 N´m (75 ft. lbs.)
STEERING KNUCKLE:
Ball Joint Stud To Steering
Knuckle Nut/Bolt.........136 N´m (100 ft. lbs.)
Disc Brake Caliper Bolts.......22N´m(16ft.lbs.)
Wheel Stop..................95N´m(70ft.lbs.)
STEERING GEAR:
To Suspension Cradle
Attaching Bolts...........183 N´m (135 ft. lbs.)
Tie Rod End Adjusting
Sleeve Nut................75N´m(55ft.lbs.)
Tie Rod End To Steering
Knuckle Nut...............61N´m(45ft.lbs.)
FRONT SUSPENSION CRADLE:
To Body Attaching Bolts......163 N´m (120 ft. lbs.)
Lower Control Arm
Pivot Bolt...............185 N´m (137 ft. lbs.)
Lower Control Arm Rear
Bushing Retainer Bolt.......68N´m(50ft.lbs.)
Reinforcement Plate
Attaching Bolts M-12.......108 N´m (80 ft. lbs.)
Reinforcement Plate
Attaching Bolts M-14......166 N´m (123 ft. lbs.)
STABILIZER BAR:
Bushing Retainer ToSuspension
Cradle Attaching Bolts.......70N´m(50ft.lbs.)
Attaching Link Nuts...........88N´m(65ft.lbs.)
HUB AND BEARING:
To Steering Knuckle Bolts......110N´m(80ft.lbs.)
Front Stub Axle To Hub
Bearing Nut.............183 N´m (135 ft. lbs.)
Wheel Mounting
LugNut...........110-135 N´m (85-115 ft. lbs.)
Fig. 88 Correctly Installed Stabilizer Bar To Cradle
Bushing
2 - 36 SUSPENSIONNS
DISASSEMBLY AND ASSEMBLY (Continued)
Page 69 of 1938
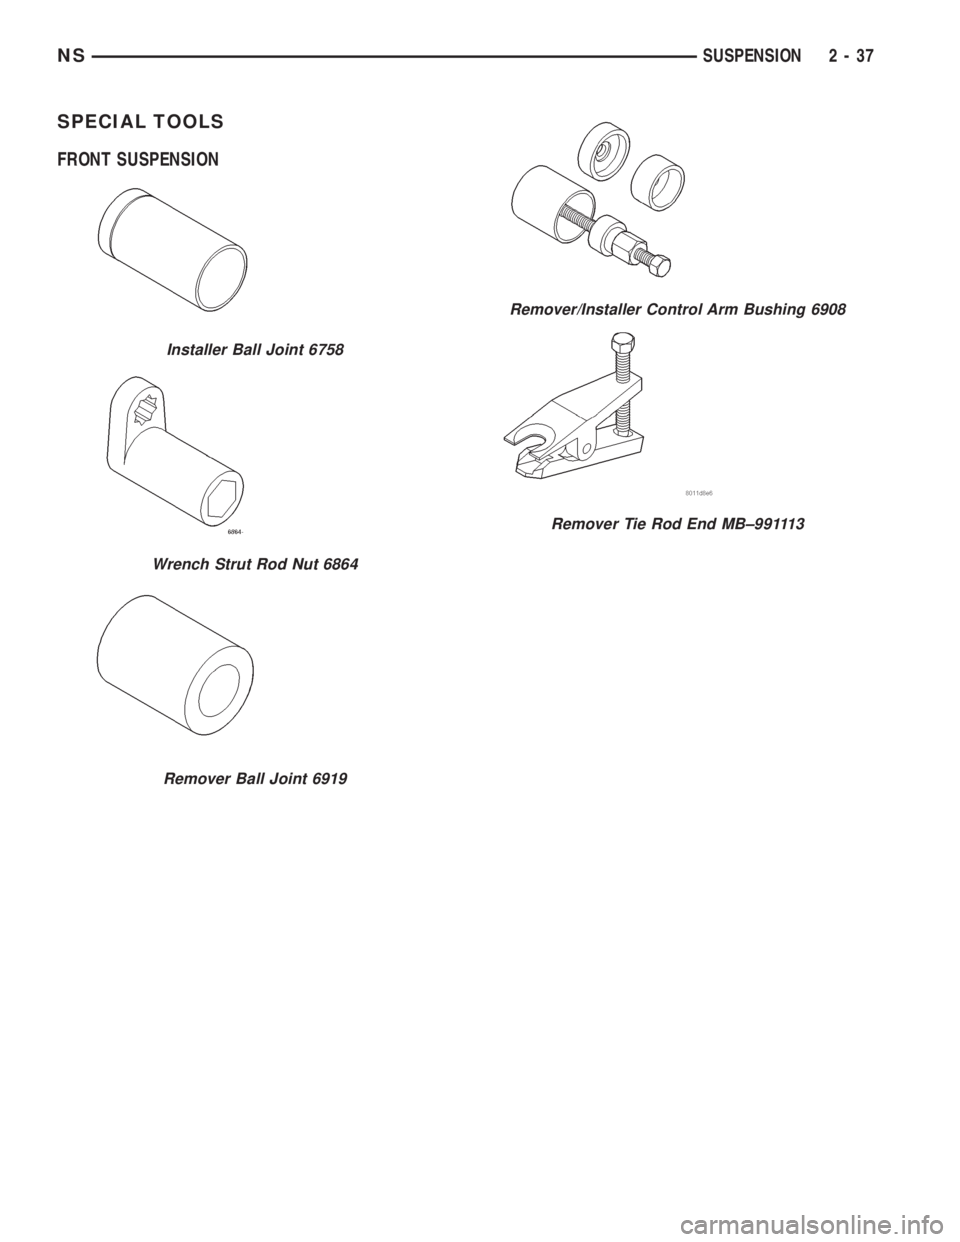
SPECIAL TOOLS
FRONT SUSPENSION
Installer Ball Joint 6758
Wrench Strut Rod Nut 6864
Remover Ball Joint 6919
Remover/Installer Control Arm Bushing 6908
Remover Tie Rod End MB±991113
NSSUSPENSION 2 - 37
Page 70 of 1938
REAR SUSPENSION
INDEX
page page
GENERAL INFORMATION
REAR SUSPENSION..................... 38
DESCRIPTION AND OPERATION
REAR TRACK BAR....................... 39
REAR WHEEL ALIGNMENT................ 39
SHOCK ABSORBERS (REAR LOAD LEVELING) . 40
STABILIZER BAR........................ 39
REMOVAL AND INSTALLATION
JOUNCE BUMPER....................... 46
LEAF SPRING FRONT MOUNT............. 47LEAF SPRING REAR MOUNT.............. 47
REAR SPRINGS (AWD)................... 43
REAR SPRINGS (FWD)................... 40
REAR TRACK BAR....................... 45
SHOCK ABSORBER...................... 45
STABILIZER BAR........................ 46
TRACK BAR MOUNT..................... 45
SPECIFICATIONS
REAR SUSPENSION FASTENER TORQUES . . . 48
GENERAL INFORMATION
REAR SUSPENSION
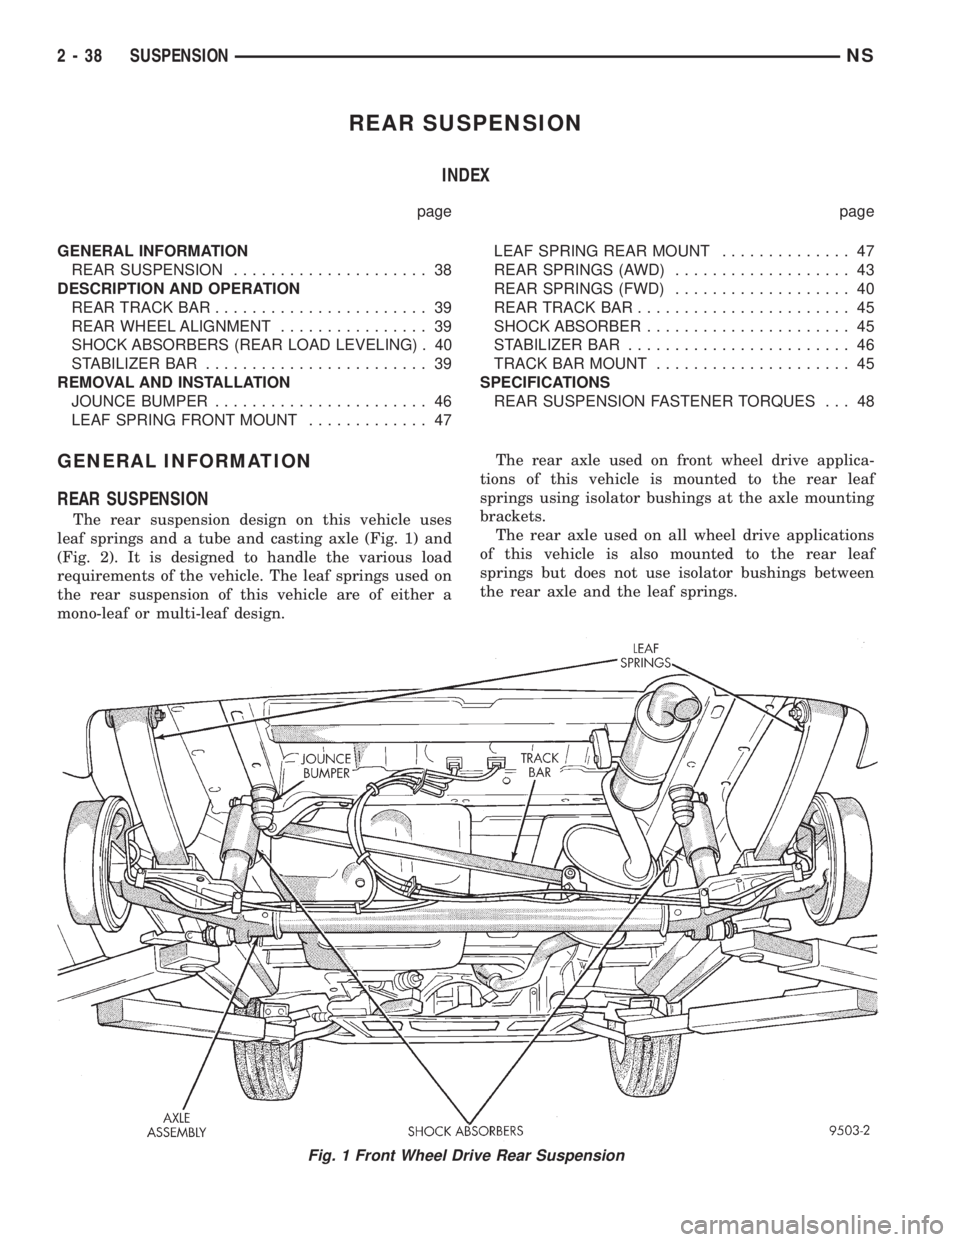
The rear suspension design on this vehicle uses
leaf springs and a tube and casting axle (Fig. 1) and
(Fig. 2). It is designed to handle the various load
requirements of the vehicle. The leaf springs used on
the rear suspension of this vehicle are of either a
mono-leaf or multi-leaf design.The rear axle used on front wheel drive applica-
tions of this vehicle is mounted to the rear leaf
springs using isolator bushings at the axle mounting
brackets.
The rear axle used on all wheel drive applications
of this vehicle is also mounted to the rear leaf
springs but does not use isolator bushings between
the rear axle and the leaf springs.
Fig. 1 Front Wheel Drive Rear Suspension
2 - 38 SUSPENSIONNS