DODGE NEON 1999 Service Repair Manual
Manufacturer: DODGE, Model Year: 1999, Model line: NEON, Model: DODGE NEON 1999Pages: 1200, PDF Size: 35.29 MB
Page 1041 of 1200
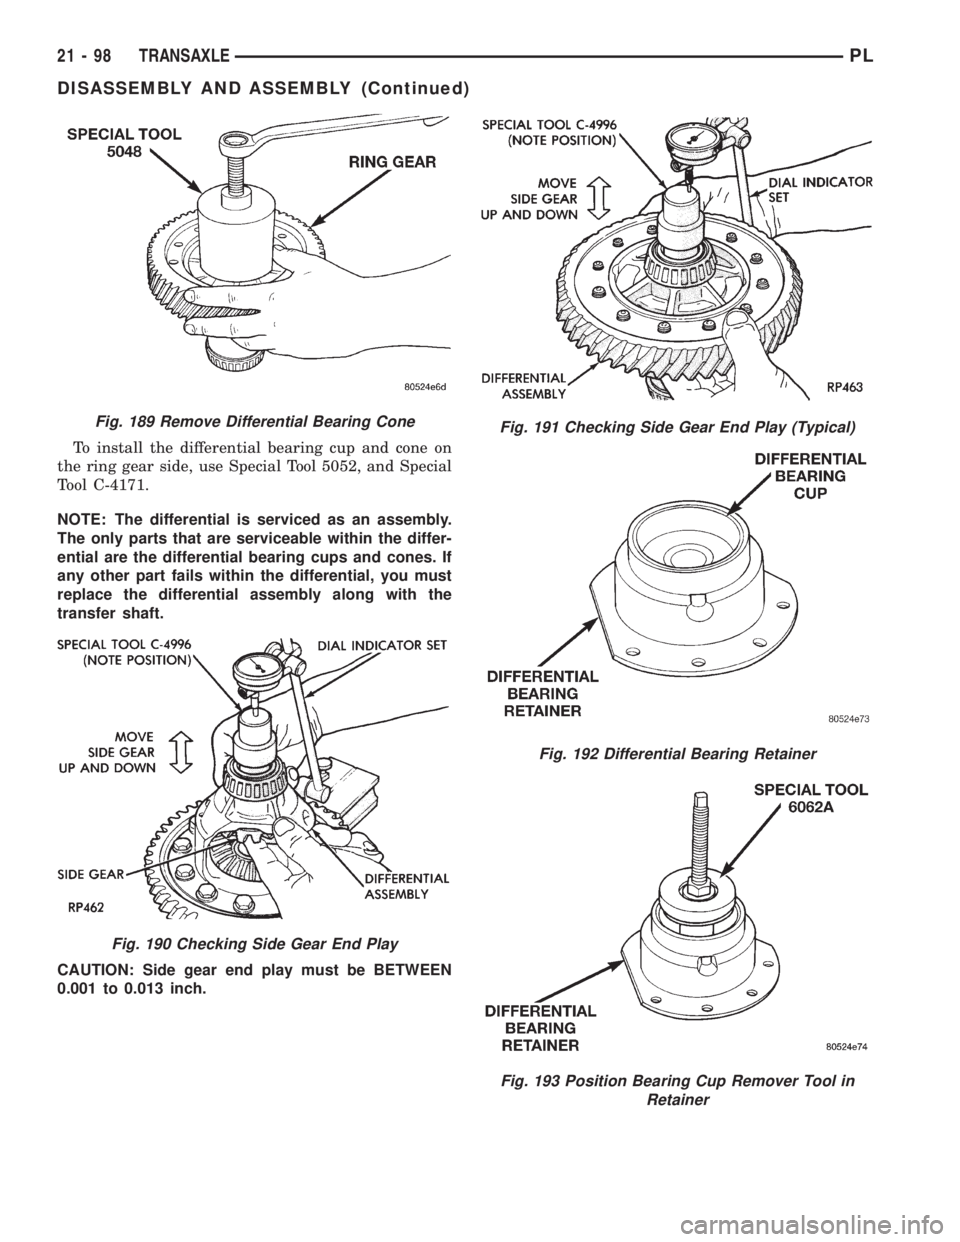
To install the differential bearing cup and cone on
the ring gear side, use Special Tool 5052, and Special
Tool C-4171.
NOTE: The differential is serviced as an assembly.
The only parts that are serviceable within the differ-
ential are the differential bearing cups and cones. If
any other part fails within the differential, you must
replace the differential assembly along with the
transfer shaft.
CAUTION: Side gear end play must be BETWEEN
0.001 to 0.013 inch.
Fig. 189 Remove Differential Bearing Cone
Fig. 190 Checking Side Gear End Play
Fig. 191 Checking Side Gear End Play (Typical)
Fig. 192 Differential Bearing Retainer
Fig. 193 Position Bearing Cup Remover Tool in
Retainer
21 - 98 TRANSAXLEPL
DISASSEMBLY AND ASSEMBLY (Continued)
Page 1042 of 1200
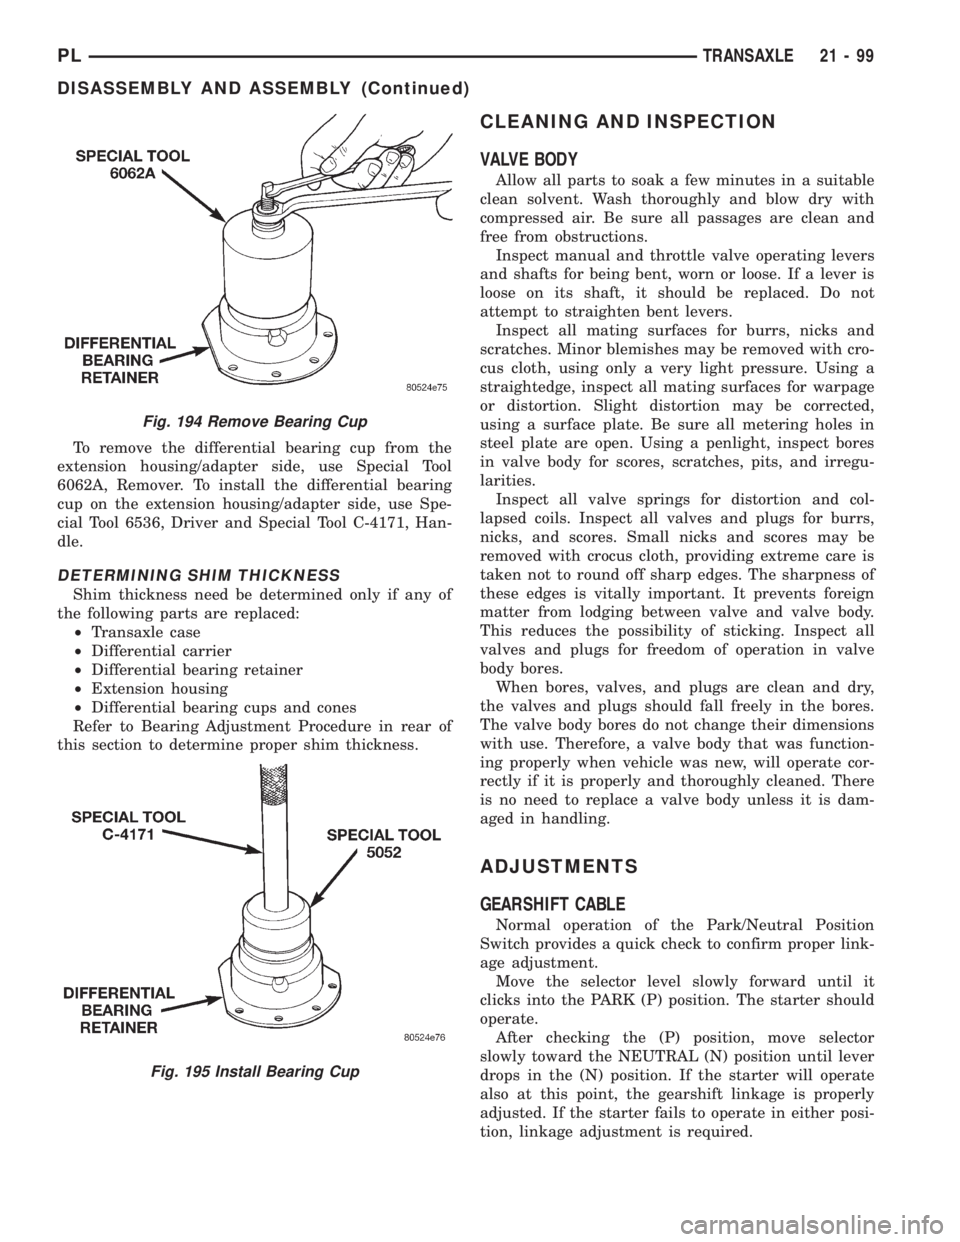
To remove the differential bearing cup from the
extension housing/adapter side, use Special Tool
6062A, Remover. To install the differential bearing
cup on the extension housing/adapter side, use Spe-
cial Tool 6536, Driver and Special Tool C-4171, Han-
dle.
DETERMINING SHIM THICKNESS
Shim thickness need be determined only if any of
the following parts are replaced:
²Transaxle case
²Differential carrier
²Differential bearing retainer
²Extension housing
²Differential bearing cups and cones
Refer to Bearing Adjustment Procedure in rear of
this section to determine proper shim thickness.
CLEANING AND INSPECTION
VALVE BODY
Allow all parts to soak a few minutes in a suitable
clean solvent. Wash thoroughly and blow dry with
compressed air. Be sure all passages are clean and
free from obstructions.
Inspect manual and throttle valve operating levers
and shafts for being bent, worn or loose. If a lever is
loose on its shaft, it should be replaced. Do not
attempt to straighten bent levers.
Inspect all mating surfaces for burrs, nicks and
scratches. Minor blemishes may be removed with cro-
cus cloth, using only a very light pressure. Using a
straightedge, inspect all mating surfaces for warpage
or distortion. Slight distortion may be corrected,
using a surface plate. Be sure all metering holes in
steel plate are open. Using a penlight, inspect bores
in valve body for scores, scratches, pits, and irregu-
larities.
Inspect all valve springs for distortion and col-
lapsed coils. Inspect all valves and plugs for burrs,
nicks, and scores. Small nicks and scores may be
removed with crocus cloth, providing extreme care is
taken not to round off sharp edges. The sharpness of
these edges is vitally important. It prevents foreign
matter from lodging between valve and valve body.
This reduces the possibility of sticking. Inspect all
valves and plugs for freedom of operation in valve
body bores.
When bores, valves, and plugs are clean and dry,
the valves and plugs should fall freely in the bores.
The valve body bores do not change their dimensions
with use. Therefore, a valve body that was function-
ing properly when vehicle was new, will operate cor-
rectly if it is properly and thoroughly cleaned. There
is no need to replace a valve body unless it is dam-
aged in handling.
ADJUSTMENTS
GEARSHIFT CABLE
Normal operation of the Park/Neutral Position
Switch provides a quick check to confirm proper link-
age adjustment.
Move the selector level slowly forward until it
clicks into the PARK (P) position. The starter should
operate.
After checking the (P) position, move selector
slowly toward the NEUTRAL (N) position until lever
drops in the (N) position. If the starter will operate
also at this point, the gearshift linkage is properly
adjusted. If the starter fails to operate in either posi-
tion, linkage adjustment is required.
Fig. 194 Remove Bearing Cup
Fig. 195 Install Bearing Cup
PLTRANSAXLE 21 - 99
DISASSEMBLY AND ASSEMBLY (Continued)
Page 1043 of 1200
ADJUSTMENT
(1) Set parking brake.
(2) Remove floor console. Refer to Group 23, Body.
(3) Place gearshift lever in the (PARK) (P) posi-
tion.
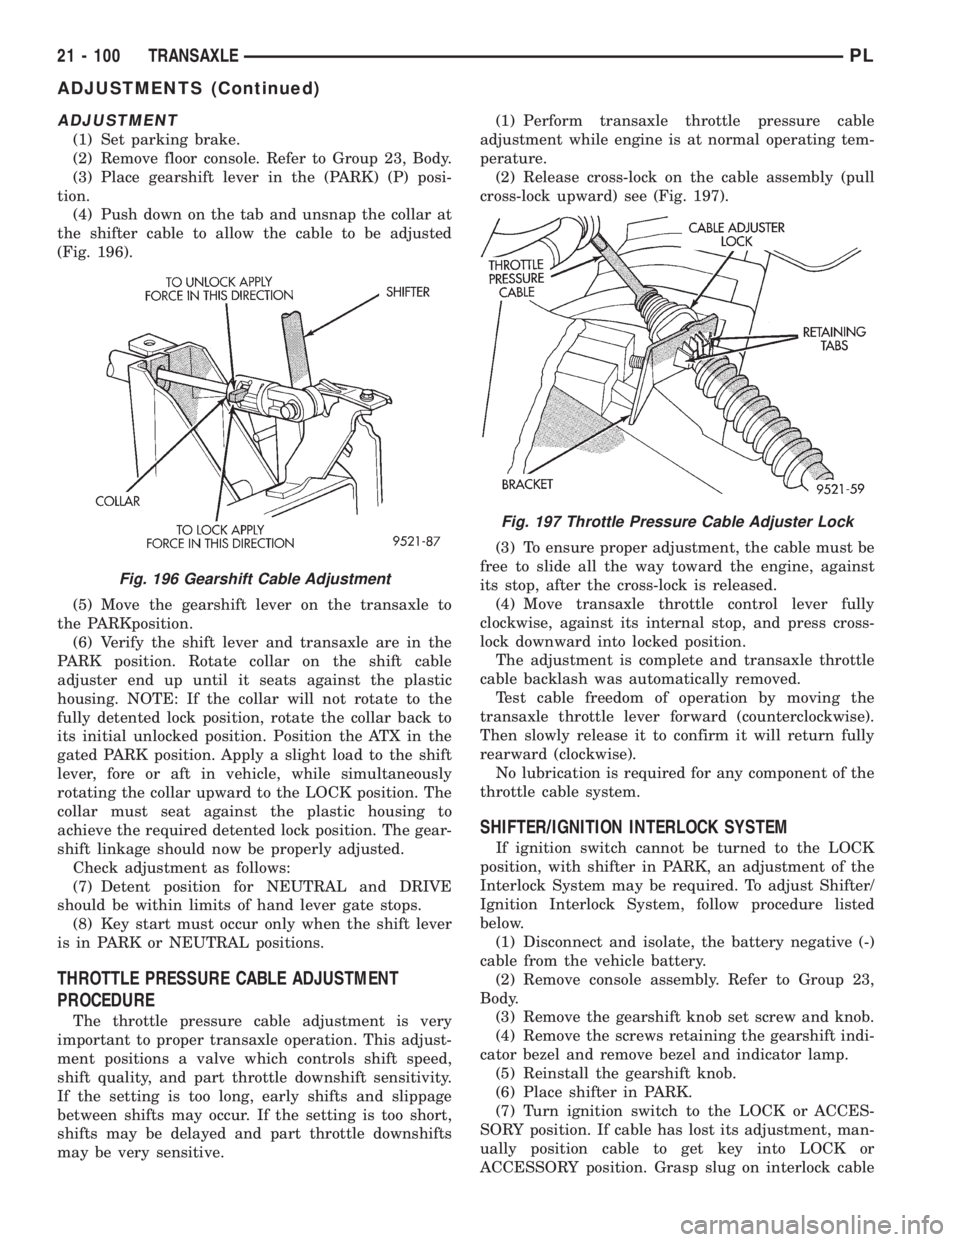
(4) Push down on the tab and unsnap the collar at
the shifter cable to allow the cable to be adjusted
(Fig. 196).
(5) Move the gearshift lever on the transaxle to
the PARKposition.
(6) Verify the shift lever and transaxle are in the
PARK position. Rotate collar on the shift cable
adjuster end up until it seats against the plastic
housing. NOTE: If the collar will not rotate to the
fully detented lock position, rotate the collar back to
its initial unlocked position. Position the ATX in the
gated PARK position. Apply a slight load to the shift
lever, fore or aft in vehicle, while simultaneously
rotating the collar upward to the LOCK position. The
collar must seat against the plastic housing to
achieve the required detented lock position. The gear-
shift linkage should now be properly adjusted.
Check adjustment as follows:
(7) Detent position for NEUTRAL and DRIVE
should be within limits of hand lever gate stops.
(8) Key start must occur only when the shift lever
is in PARK or NEUTRAL positions.
THROTTLE PRESSURE CABLE ADJUSTMENT
PROCEDURE
The throttle pressure cable adjustment is very
important to proper transaxle operation. This adjust-
ment positions a valve which controls shift speed,
shift quality, and part throttle downshift sensitivity.
If the setting is too long, early shifts and slippage
between shifts may occur. If the setting is too short,
shifts may be delayed and part throttle downshifts
may be very sensitive.(1) Perform transaxle throttle pressure cable
adjustment while engine is at normal operating tem-
perature.
(2) Release cross-lock on the cable assembly (pull
cross-lock upward) see (Fig. 197).
(3) To ensure proper adjustment, the cable must be
free to slide all the way toward the engine, against
its stop, after the cross-lock is released.
(4) Move transaxle throttle control lever fully
clockwise, against its internal stop, and press cross-
lock downward into locked position.
The adjustment is complete and transaxle throttle
cable backlash was automatically removed.
Test cable freedom of operation by moving the
transaxle throttle lever forward (counterclockwise).
Then slowly release it to confirm it will return fully
rearward (clockwise).
No lubrication is required for any component of the
throttle cable system.
SHIFTER/IGNITION INTERLOCK SYSTEM
If ignition switch cannot be turned to the LOCK
position, with shifter in PARK, an adjustment of the
Interlock System may be required. To adjust Shifter/
Ignition Interlock System, follow procedure listed
below.
(1) Disconnect and isolate, the battery negative (-)
cable from the vehicle battery.
(2) Remove console assembly. Refer to Group 23,
Body.
(3) Remove the gearshift knob set screw and knob.
(4) Remove the screws retaining the gearshift indi-
cator bezel and remove bezel and indicator lamp.
(5) Reinstall the gearshift knob.
(6) Place shifter in PARK.
(7) Turn ignition switch to the LOCK or ACCES-
SORY position. If cable has lost its adjustment, man-
ually position cable to get key into LOCK or
ACCESSORY position. Grasp slug on interlock cable
Fig. 196 Gearshift Cable Adjustment
Fig. 197 Throttle Pressure Cable Adjuster Lock
21 - 100 TRANSAXLEPL
ADJUSTMENTS (Continued)
Page 1044 of 1200
with needle±nose pliers and pull back on cable. This
will allow the ignition switch to be turned to the
LOCK or ACCESSORY position.
(8) Check that the interlock cable slug is com-
pletely seated into the shifter interlock lever.
(9) Check that the ignition switch is still in the
LOCK or ACCESSORY position.
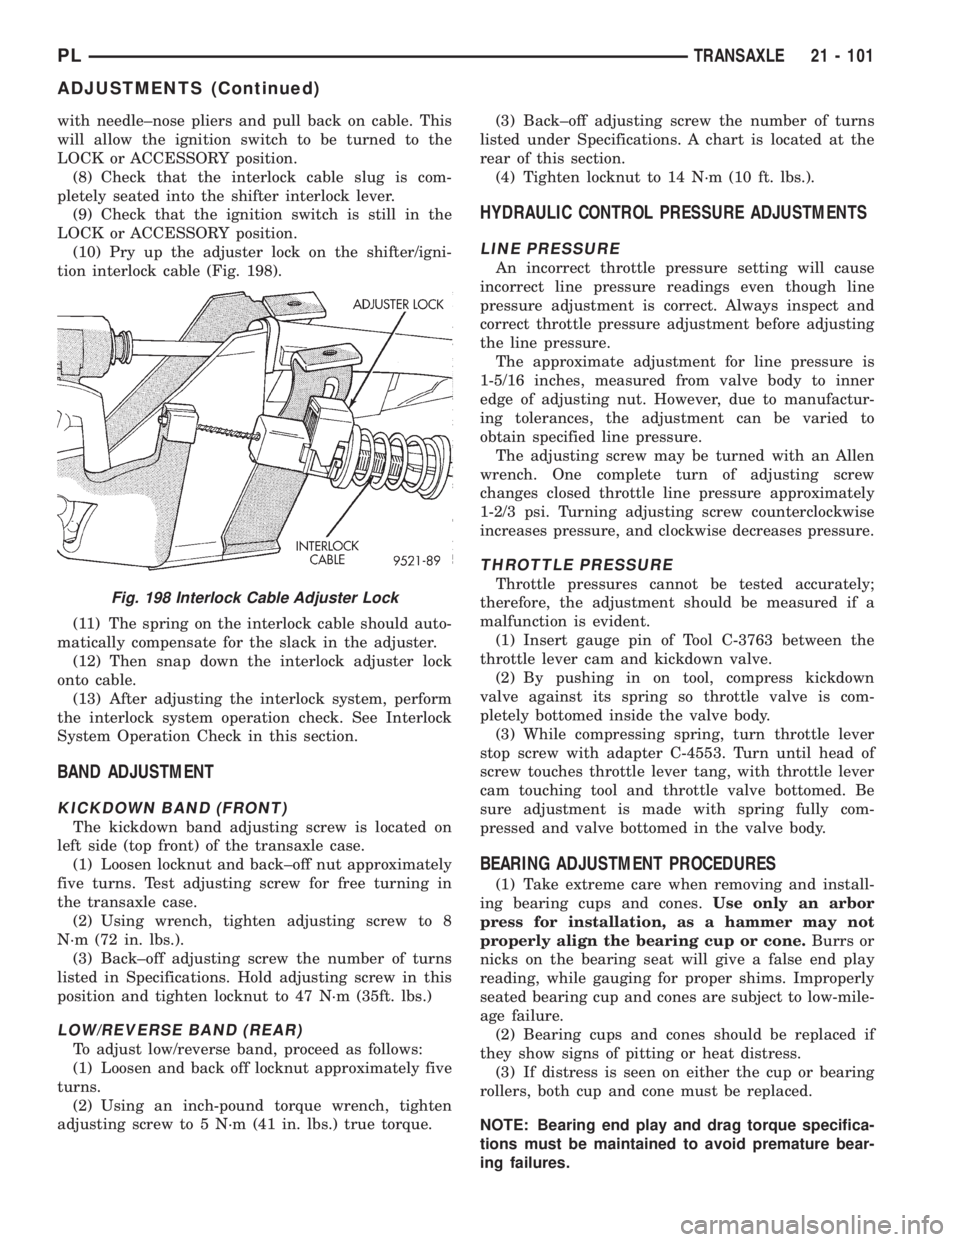
(10) Pry up the adjuster lock on the shifter/igni-
tion interlock cable (Fig. 198).
(11) The spring on the interlock cable should auto-
matically compensate for the slack in the adjuster.
(12) Then snap down the interlock adjuster lock
onto cable.
(13) After adjusting the interlock system, perform
the interlock system operation check. See Interlock
System Operation Check in this section.
BAND ADJUSTMENT
KICKDOWN BAND (FRONT)
The kickdown band adjusting screw is located on
left side (top front) of the transaxle case.
(1) Loosen locknut and back±off nut approximately
five turns. Test adjusting screw for free turning in
the transaxle case.
(2) Using wrench, tighten adjusting screw to 8
N´m (72 in. lbs.).
(3) Back±off adjusting screw the number of turns
listed in Specifications. Hold adjusting screw in this
position and tighten locknut to 47 N´m (35ft. lbs.)
LOW/REVERSE BAND (REAR)
To adjust low/reverse band, proceed as follows:
(1) Loosen and back off locknut approximately five
turns.
(2) Using an inch-pound torque wrench, tighten
adjusting screw to 5 N´m (41 in. lbs.) true torque.(3) Back±off adjusting screw the number of turns
listed under Specifications. A chart is located at the
rear of this section.
(4) Tighten locknut to 14 N´m (10 ft. lbs.).
HYDRAULIC CONTROL PRESSURE ADJUSTMENTS
LINE PRESSURE
An incorrect throttle pressure setting will cause
incorrect line pressure readings even though line
pressure adjustment is correct. Always inspect and
correct throttle pressure adjustment before adjusting
the line pressure.
The approximate adjustment for line pressure is
1-5/16 inches, measured from valve body to inner
edge of adjusting nut. However, due to manufactur-
ing tolerances, the adjustment can be varied to
obtain specified line pressure.
The adjusting screw may be turned with an Allen
wrench. One complete turn of adjusting screw
changes closed throttle line pressure approximately
1-2/3 psi. Turning adjusting screw counterclockwise
increases pressure, and clockwise decreases pressure.
THROTTLE PRESSURE
Throttle pressures cannot be tested accurately;
therefore, the adjustment should be measured if a
malfunction is evident.
(1) Insert gauge pin of Tool C-3763 between the
throttle lever cam and kickdown valve.
(2) By pushing in on tool, compress kickdown
valve against its spring so throttle valve is com-
pletely bottomed inside the valve body.
(3) While compressing spring, turn throttle lever
stop screw with adapter C-4553. Turn until head of
screw touches throttle lever tang, with throttle lever
cam touching tool and throttle valve bottomed. Be
sure adjustment is made with spring fully com-
pressed and valve bottomed in the valve body.
BEARING ADJUSTMENT PROCEDURES
(1) Take extreme care when removing and install-
ing bearing cups and cones.Use only an arbor
press for installation, as a hammer may not
properly align the bearing cup or cone.Burrs or
nicks on the bearing seat will give a false end play
reading, while gauging for proper shims. Improperly
seated bearing cup and cones are subject to low-mile-
age failure.
(2) Bearing cups and cones should be replaced if
they show signs of pitting or heat distress.
(3) If distress is seen on either the cup or bearing
rollers, both cup and cone must be replaced.
NOTE: Bearing end play and drag torque specifica-
tions must be maintained to avoid premature bear-
ing failures.
Fig. 198 Interlock Cable Adjuster Lock
PLTRANSAXLE 21 - 101
ADJUSTMENTS (Continued)
Page 1045 of 1200
(4) Used (original) bearing may lose up to 50 per-
cent of the original drag torque after break-in.
NOTE: All bearing adjustments must be made with
no other component interference or gear inter-
mesh, except the transfer gear bearing.
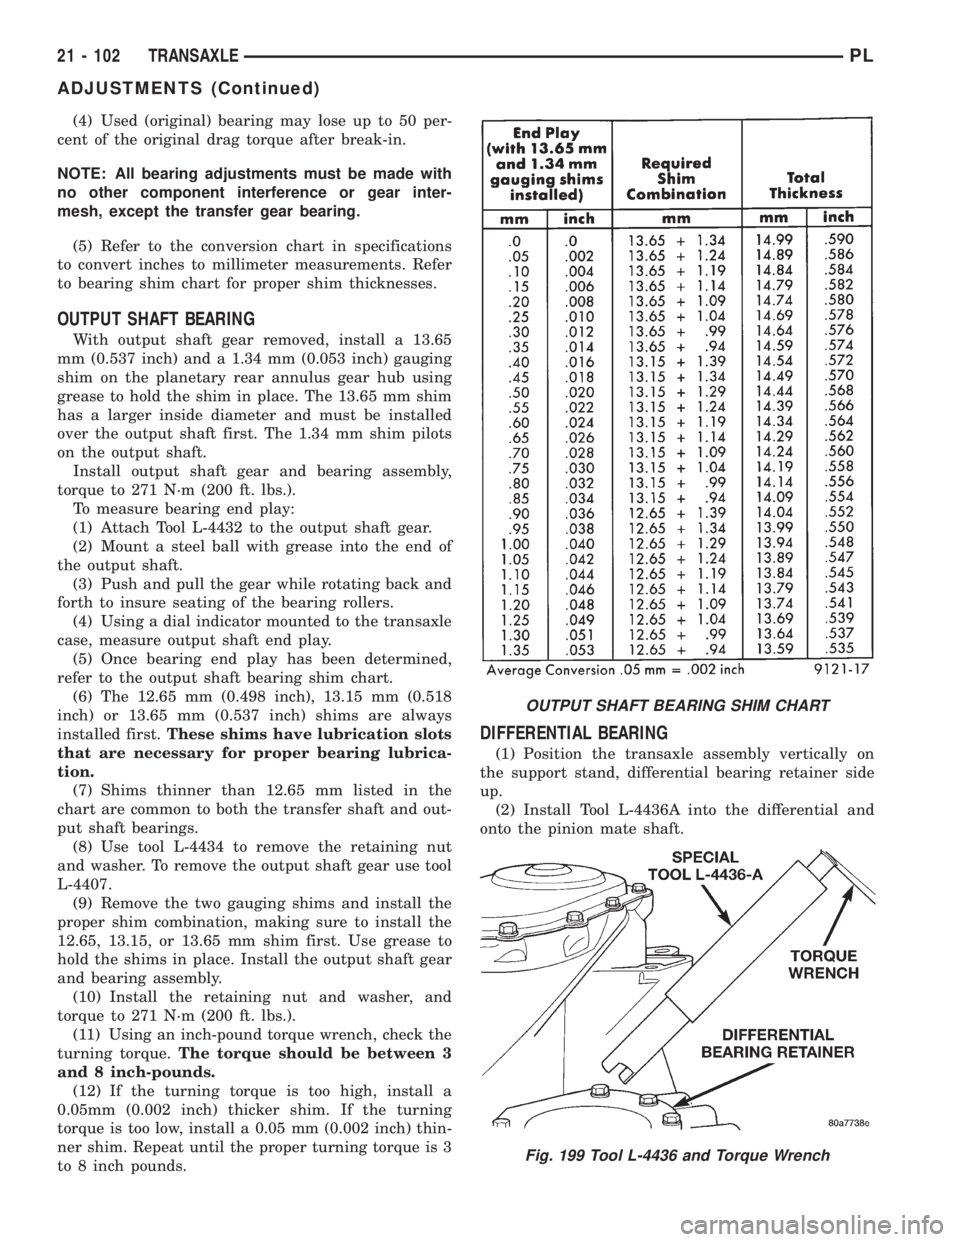
(5) Refer to the conversion chart in specifications
to convert inches to millimeter measurements. Refer
to bearing shim chart for proper shim thicknesses.
OUTPUT SHAFT BEARING
With output shaft gear removed, install a 13.65
mm (0.537 inch) and a 1.34 mm (0.053 inch) gauging
shim on the planetary rear annulus gear hub using
grease to hold the shim in place. The 13.65 mm shim
has a larger inside diameter and must be installed
over the output shaft first. The 1.34 mm shim pilots
on the output shaft.
Install output shaft gear and bearing assembly,
torque to 271 N´m (200 ft. lbs.).
To measure bearing end play:
(1) Attach Tool L-4432 to the output shaft gear.
(2) Mount a steel ball with grease into the end of
the output shaft.
(3) Push and pull the gear while rotating back and
forth to insure seating of the bearing rollers.
(4) Using a dial indicator mounted to the transaxle
case, measure output shaft end play.
(5) Once bearing end play has been determined,
refer to the output shaft bearing shim chart.
(6) The 12.65 mm (0.498 inch), 13.15 mm (0.518
inch) or 13.65 mm (0.537 inch) shims are always
installed first.These shims have lubrication slots
that are necessary for proper bearing lubrica-
tion.
(7) Shims thinner than 12.65 mm listed in the
chart are common to both the transfer shaft and out-
put shaft bearings.
(8) Use tool L-4434 to remove the retaining nut
and washer. To remove the output shaft gear use tool
L-4407.
(9) Remove the two gauging shims and install the
proper shim combination, making sure to install the
12.65, 13.15, or 13.65 mm shim first. Use grease to
hold the shims in place. Install the output shaft gear
and bearing assembly.
(10) Install the retaining nut and washer, and
torque to 271 N´m (200 ft. lbs.).
(11) Using an inch-pound torque wrench, check the
turning torque.The torque should be between 3
and 8 inch-pounds.
(12) If the turning torque is too high, install a
0.05mm (0.002 inch) thicker shim. If the turning
torque is too low, install a 0.05 mm (0.002 inch) thin-
ner shim. Repeat until the proper turning torque is 3
to 8 inch pounds.
DIFFERENTIAL BEARING
(1) Position the transaxle assembly vertically on
the support stand, differential bearing retainer side
up.
(2) Install Tool L-4436A into the differential and
onto the pinion mate shaft.
OUTPUT SHAFT BEARING SHIM CHART
Fig. 199 Tool L-4436 and Torque Wrench
21 - 102 TRANSAXLEPL
ADJUSTMENTS (Continued)
Page 1046 of 1200
(3) Rotate the differential at least one full revolu-
tion to ensure the tapered roller bearings are fully
seated.
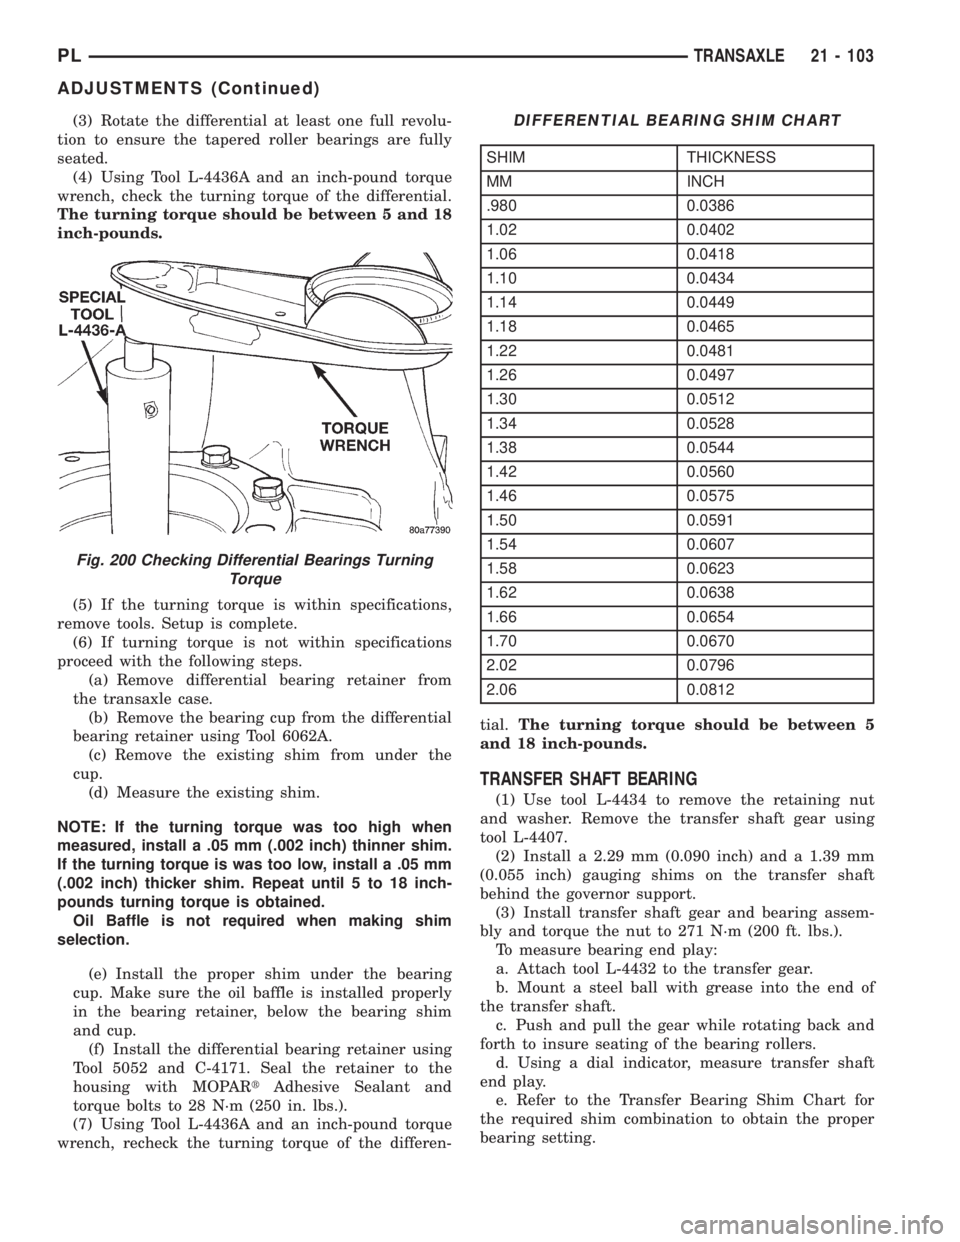
(4) Using Tool L-4436A and an inch-pound torque
wrench, check the turning torque of the differential.
The turning torque should be between 5 and 18
inch-pounds.
(5) If the turning torque is within specifications,
remove tools. Setup is complete.
(6) If turning torque is not within specifications
proceed with the following steps.
(a) Remove differential bearing retainer from
the transaxle case.
(b) Remove the bearing cup from the differential
bearing retainer using Tool 6062A.
(c) Remove the existing shim from under the
cup.
(d) Measure the existing shim.
NOTE: If the turning torque was too high when
measured, install a .05 mm (.002 inch) thinner shim.
If the turning torque is was too low, install a .05 mm
(.002 inch) thicker shim. Repeat until 5 to 18 inch-
pounds turning torque is obtained.
Oil Baffle is not required when making shim
selection.
(e) Install the proper shim under the bearing
cup. Make sure the oil baffle is installed properly
in the bearing retainer, below the bearing shim
and cup.
(f) Install the differential bearing retainer using
Tool 5052 and C-4171. Seal the retainer to the
housing with MOPARtAdhesive Sealant and
torque bolts to 28 N´m (250 in. lbs.).
(7) Using Tool L-4436A and an inch-pound torque
wrench, recheck the turning torque of the differen-tial.The turning torque should be between 5
and 18 inch-pounds.
TRANSFER SHAFT BEARING
(1) Use tool L-4434 to remove the retaining nut
and washer. Remove the transfer shaft gear using
tool L-4407.
(2) Install a 2.29 mm (0.090 inch) and a 1.39 mm
(0.055 inch) gauging shims on the transfer shaft
behind the governor support.
(3) Install transfer shaft gear and bearing assem-
bly and torque the nut to 271 N´m (200 ft. lbs.).
To measure bearing end play:
a. Attach tool L-4432 to the transfer gear.
b. Mount a steel ball with grease into the end of
the transfer shaft.
c. Push and pull the gear while rotating back and
forth to insure seating of the bearing rollers.
d. Using a dial indicator, measure transfer shaft
end play.
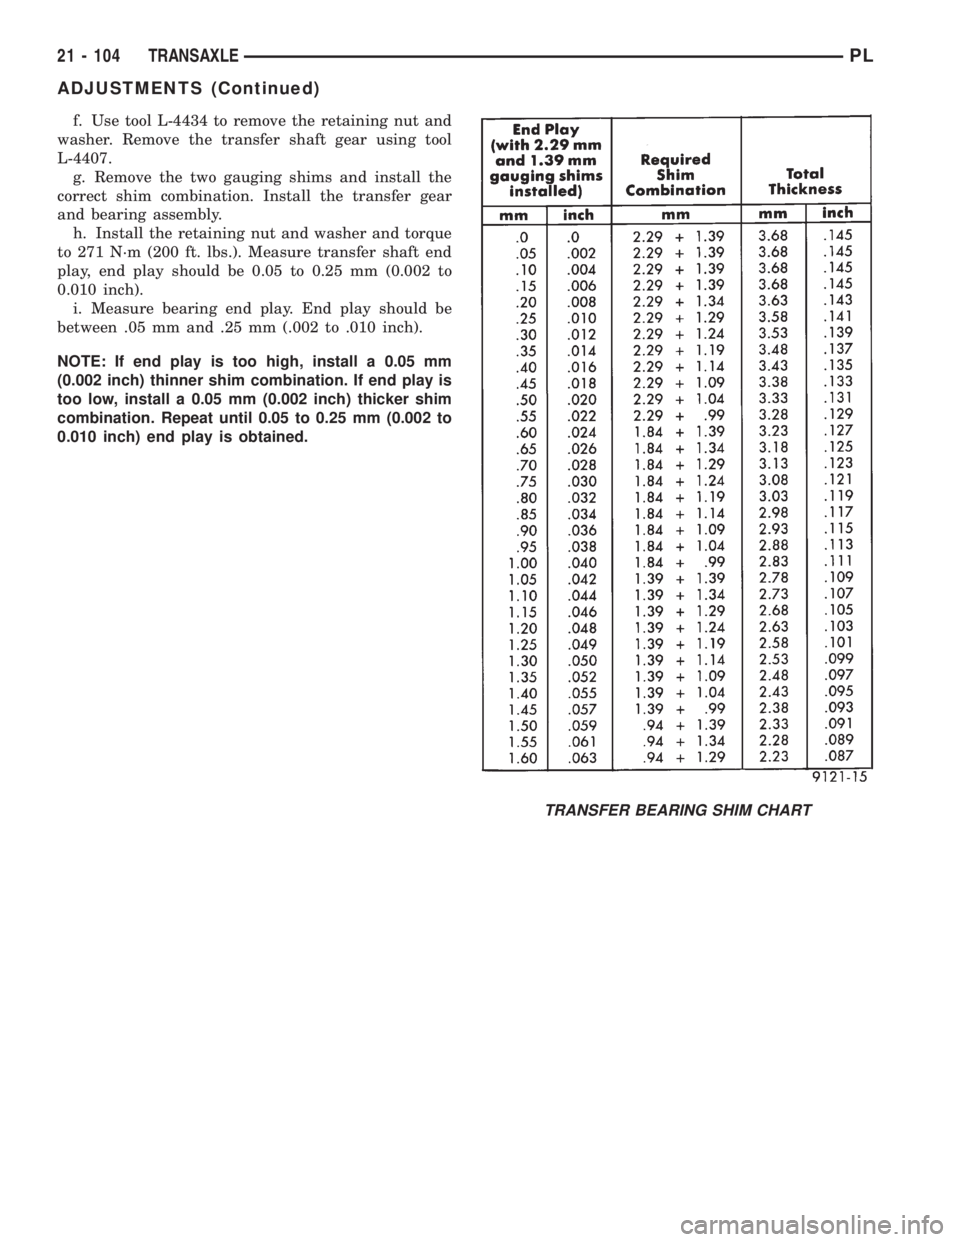
e. Refer to the Transfer Bearing Shim Chart for
the required shim combination to obtain the proper
bearing setting.
Fig. 200 Checking Differential Bearings Turning
Torque
DIFFERENTIAL BEARING SHIM CHART
SHIM THICKNESS
MM INCH
.980 0.0386
1.02 0.0402
1.06 0.0418
1.10 0.0434
1.14 0.0449
1.18 0.0465
1.22 0.0481
1.26 0.0497
1.30 0.0512
1.34 0.0528
1.38 0.0544
1.42 0.0560
1.46 0.0575
1.50 0.0591
1.54 0.0607
1.58 0.0623
1.62 0.0638
1.66 0.0654
1.70 0.0670
2.02 0.0796
2.06 0.0812
PLTRANSAXLE 21 - 103
ADJUSTMENTS (Continued)
Page 1047 of 1200
f. Use tool L-4434 to remove the retaining nut and
washer. Remove the transfer shaft gear using tool
L-4407.
g. Remove the two gauging shims and install the
correct shim combination. Install the transfer gear
and bearing assembly.
h. Install the retaining nut and washer and torque
to 271 N´m (200 ft. lbs.). Measure transfer shaft end
play, end play should be 0.05 to 0.25 mm (0.002 to
0.010 inch).
i. Measure bearing end play. End play should be
between .05 mm and .25 mm (.002 to .010 inch).
NOTE: If end play is too high, install a 0.05 mm
(0.002 inch) thinner shim combination. If end play is
too low, install a 0.05 mm (0.002 inch) thicker shim
combination. Repeat until 0.05 to 0.25 mm (0.002 to
0.010 inch) end play is obtained.
TRANSFER BEARING SHIM CHART
21 - 104 TRANSAXLEPL
ADJUSTMENTS (Continued)
Page 1048 of 1200
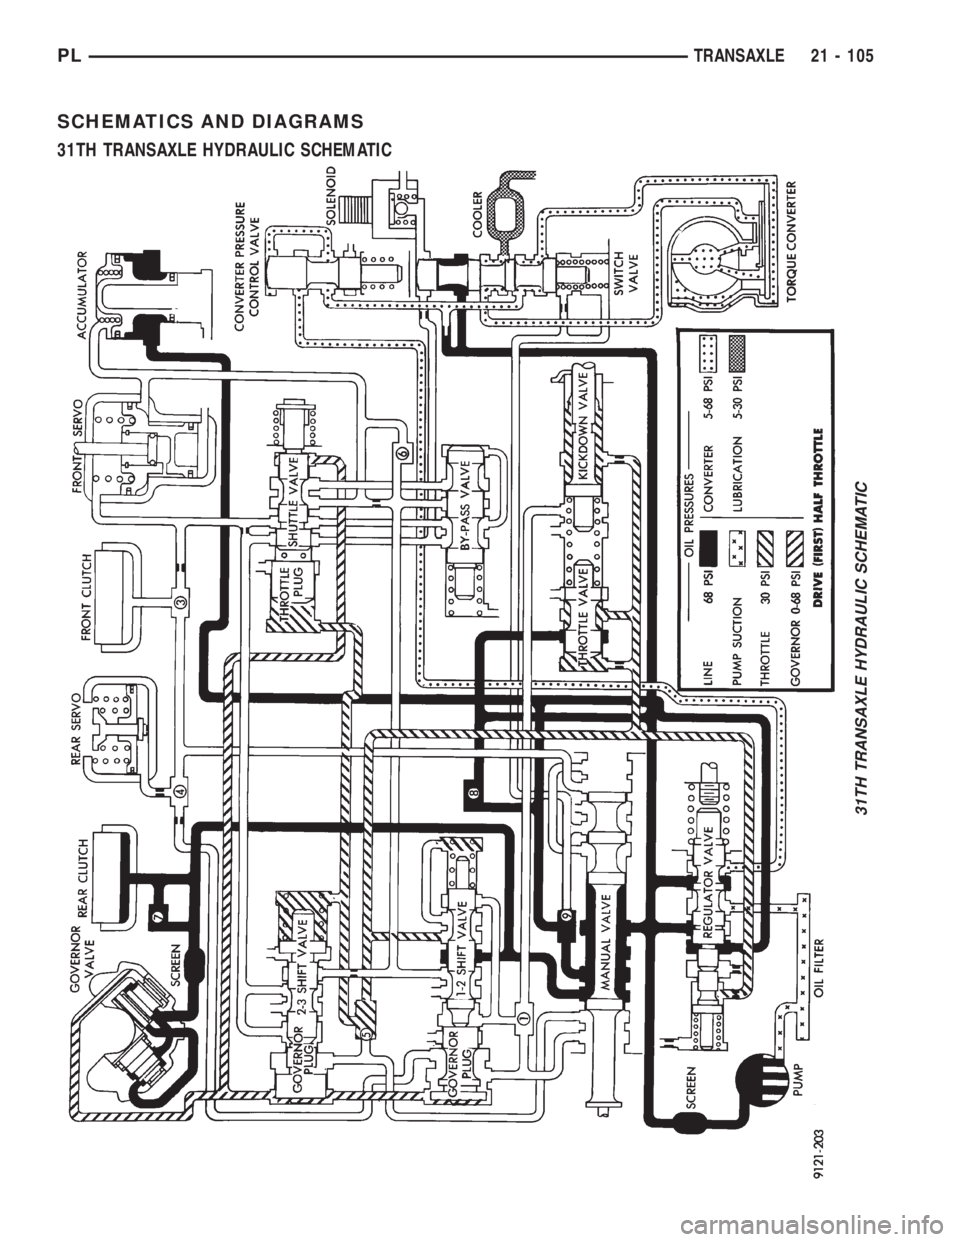
SCHEMATICS AND DIAGRAMS
31TH TRANSAXLE HYDRAULIC SCHEMATIC
31TH TRANSAXLE HYDRAULIC SCHEMATIC
PLTRANSAXLE 21 - 105
Page 1049 of 1200
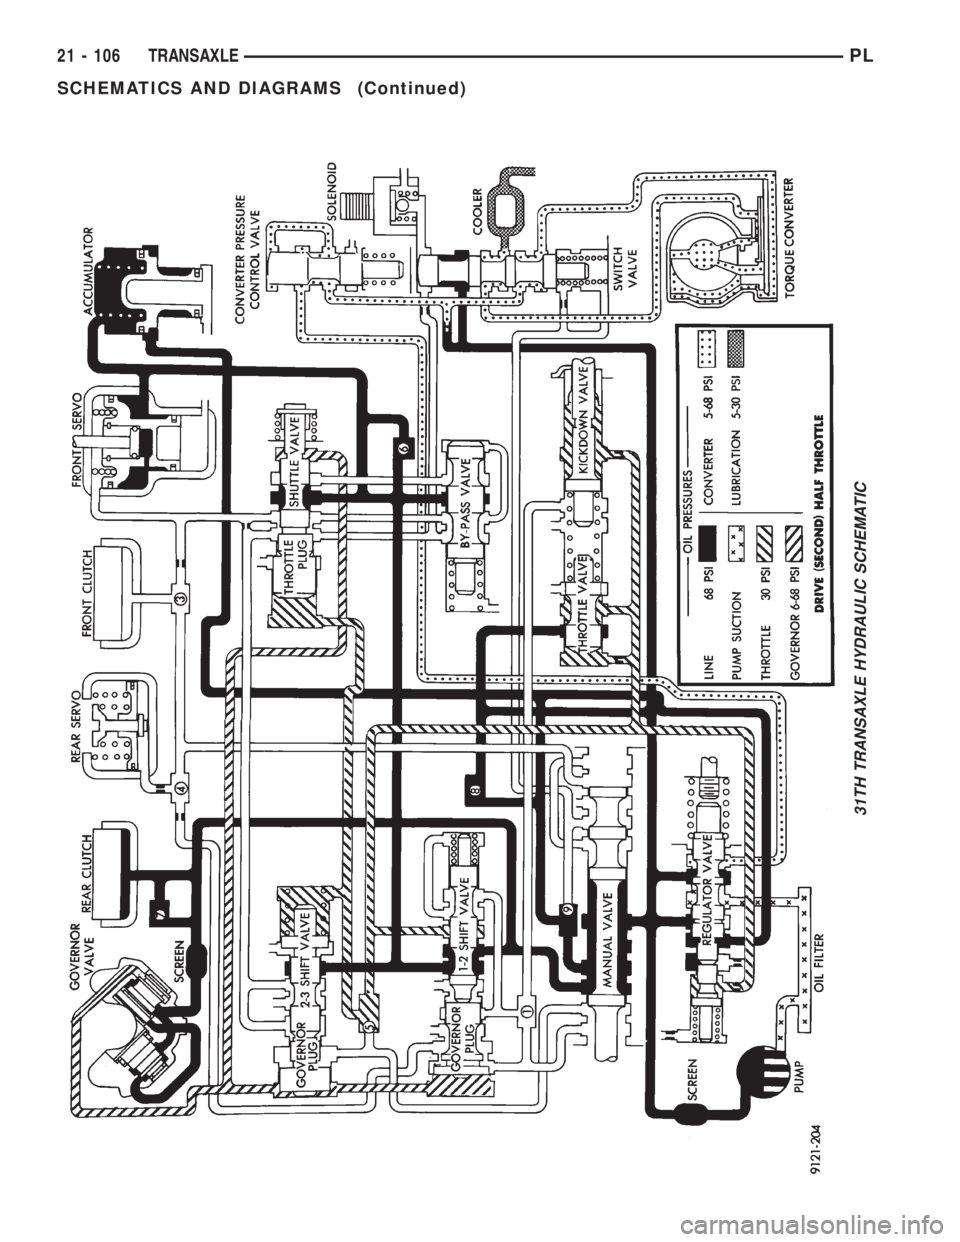
31TH TRANSAXLE HYDRAULIC SCHEMATIC
21 - 106 TRANSAXLEPL
SCHEMATICS AND DIAGRAMS (Continued)
Page 1050 of 1200
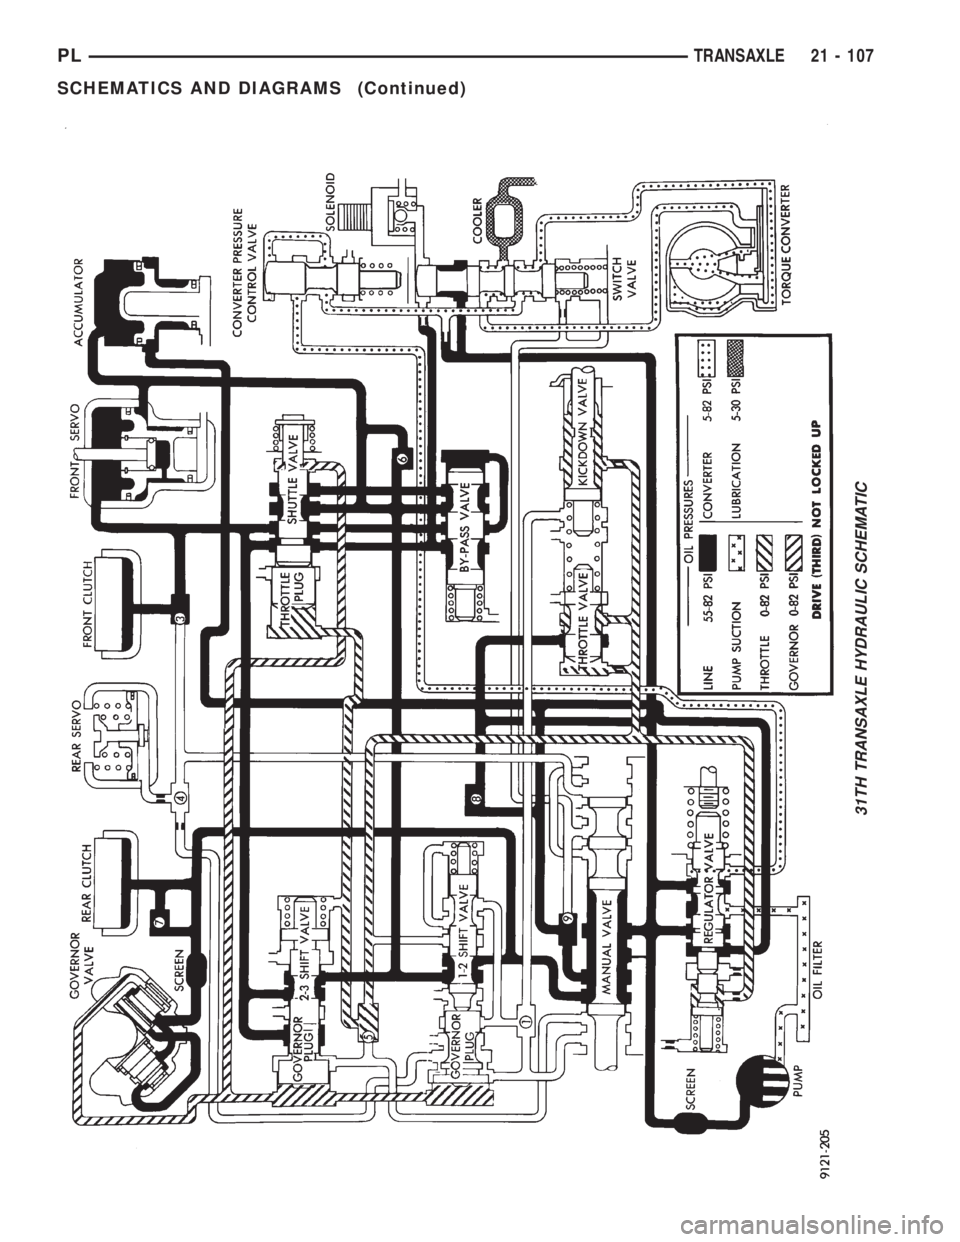
31TH TRANSAXLE HYDRAULIC SCHEMATIC
PLTRANSAXLE 21 - 107
SCHEMATICS AND DIAGRAMS (Continued)