DODGE NEON 1999 Service Repair Manual
Manufacturer: DODGE, Model Year: 1999,
Model line: NEON,
Model: DODGE NEON 1999
Pages: 1200, PDF Size: 35.29 MB
DODGE NEON 1999 Service Repair Manual
NEON 1999
DODGE
DODGE
https://www.carmanualsonline.info/img/12/56911/w960_56911-0.png
DODGE NEON 1999 Service Repair Manual
Trending: boot, change wheel, fuse diagram, Timing, trunk, fuel pressure, key fob battery
Page 1011 of 1200
DISASSEMBLY
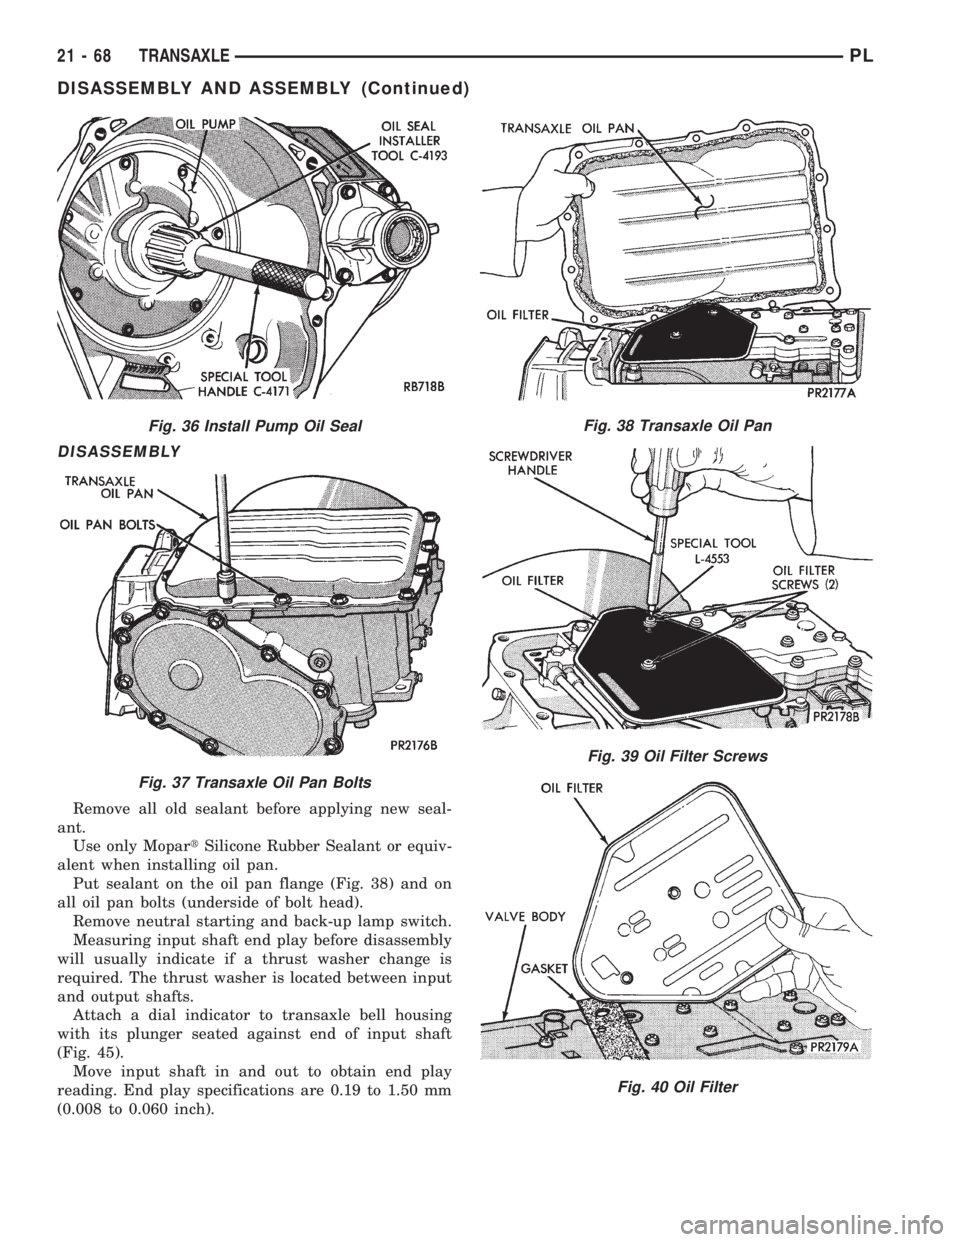
Remove all old sealant before applying new seal-
ant.
Use only MopartSilicone Rubber Sealant or equiv-
alent when installing oil pan.
Put sealant on the oil pan flange (Fig. 38) and on
all oil pan bolts (underside of bolt head).
Remove neutral starting and back-up lamp switch.
Measuring input shaft end play before disassembly
will usually indicate if a thrust washer change is
required. The thrust washer is located between input
and output shafts.
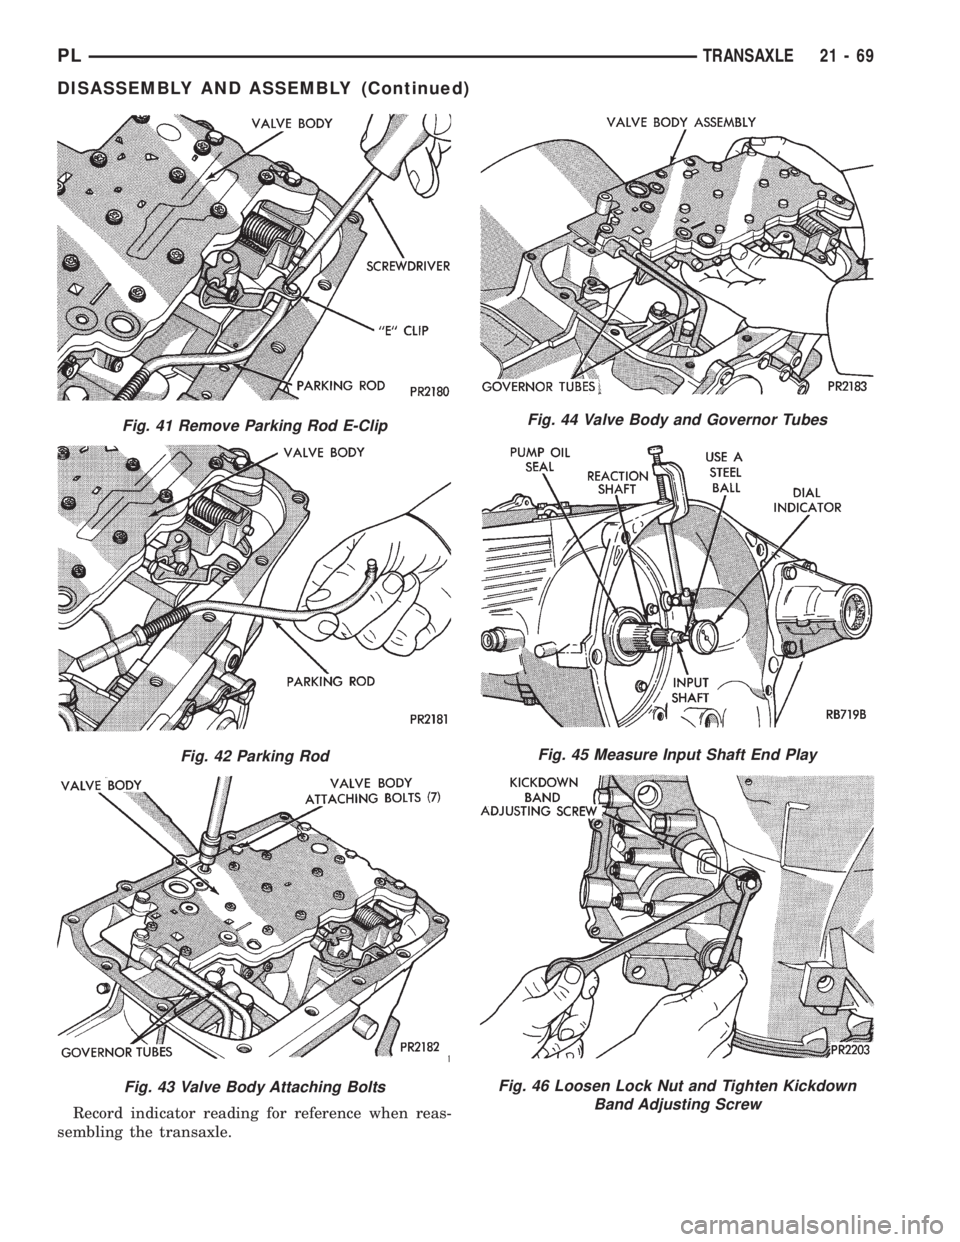
Attach a dial indicator to transaxle bell housing
with its plunger seated against end of input shaft
(Fig. 45).
Move input shaft in and out to obtain end play
reading. End play specifications are 0.19 to 1.50 mm
(0.008 to 0.060 inch).
Fig. 36 Install Pump Oil Seal
Fig. 37 Transaxle Oil Pan Bolts
Fig. 38 Transaxle Oil Pan
Fig. 39 Oil Filter Screws
Fig. 40 Oil Filter
21 - 68 TRANSAXLEPL
DISASSEMBLY AND ASSEMBLY (Continued)
Page 1012 of 1200
Record indicator reading for reference when reas-
sembling the transaxle.
Fig. 41 Remove Parking Rod E-Clip
Fig. 42 Parking Rod
Fig. 43 Valve Body Attaching Bolts
Fig. 44 Valve Body and Governor Tubes
Fig. 45 Measure Input Shaft End Play
Fig. 46 Loosen Lock Nut and Tighten Kickdown
Band Adjusting Screw
PLTRANSAXLE 21 - 69
DISASSEMBLY AND ASSEMBLY (Continued)
Page 1013 of 1200
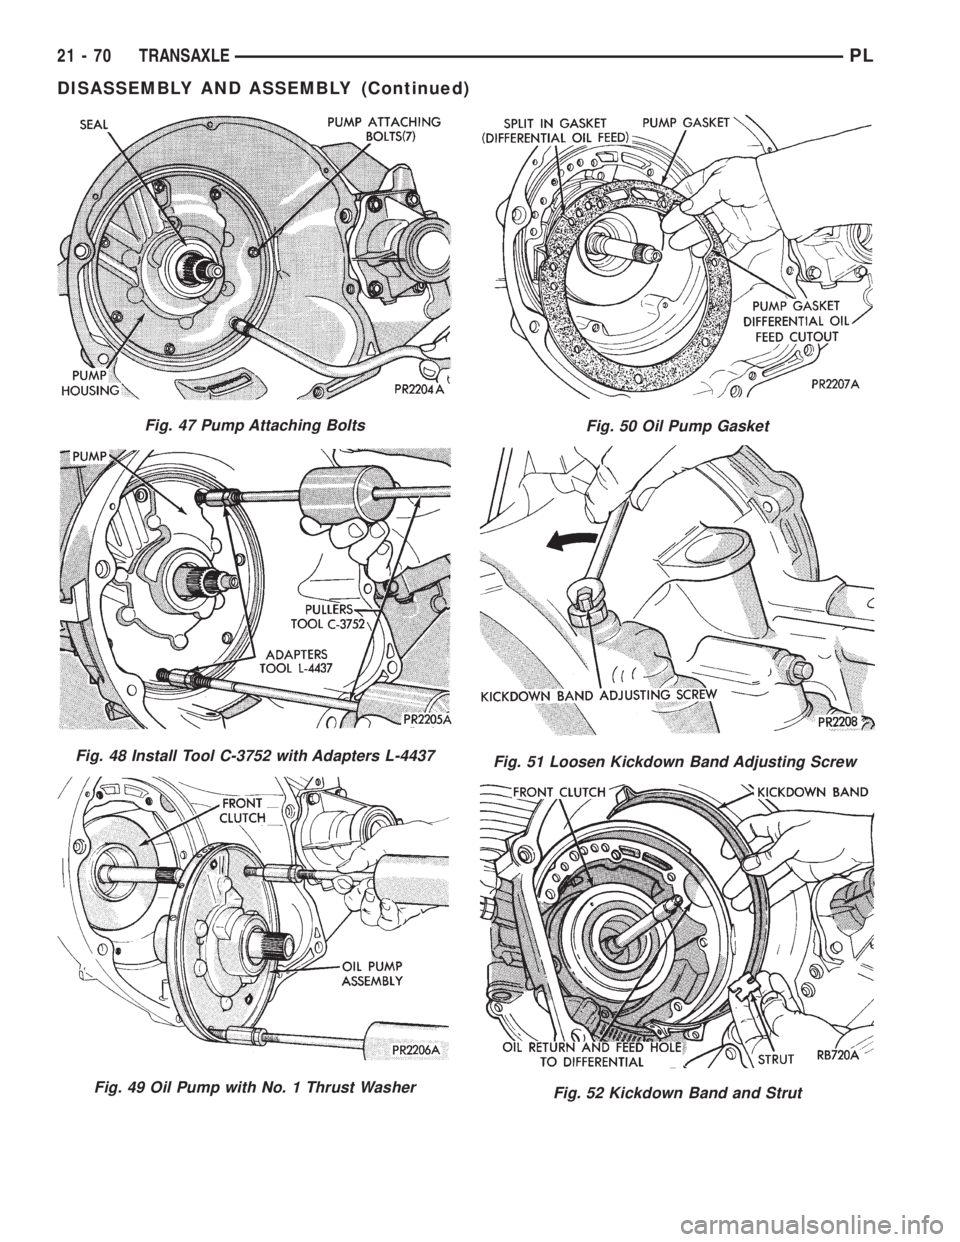
Fig. 47 Pump Attaching Bolts
Fig. 48 Install Tool C-3752 with Adapters L-4437
Fig. 49 Oil Pump with No. 1 Thrust Washer
Fig. 50 Oil Pump Gasket
Fig. 51 Loosen Kickdown Band Adjusting Screw
Fig. 52 Kickdown Band and Strut
21 - 70 TRANSAXLEPL
DISASSEMBLY AND ASSEMBLY (Continued)
Page 1014 of 1200
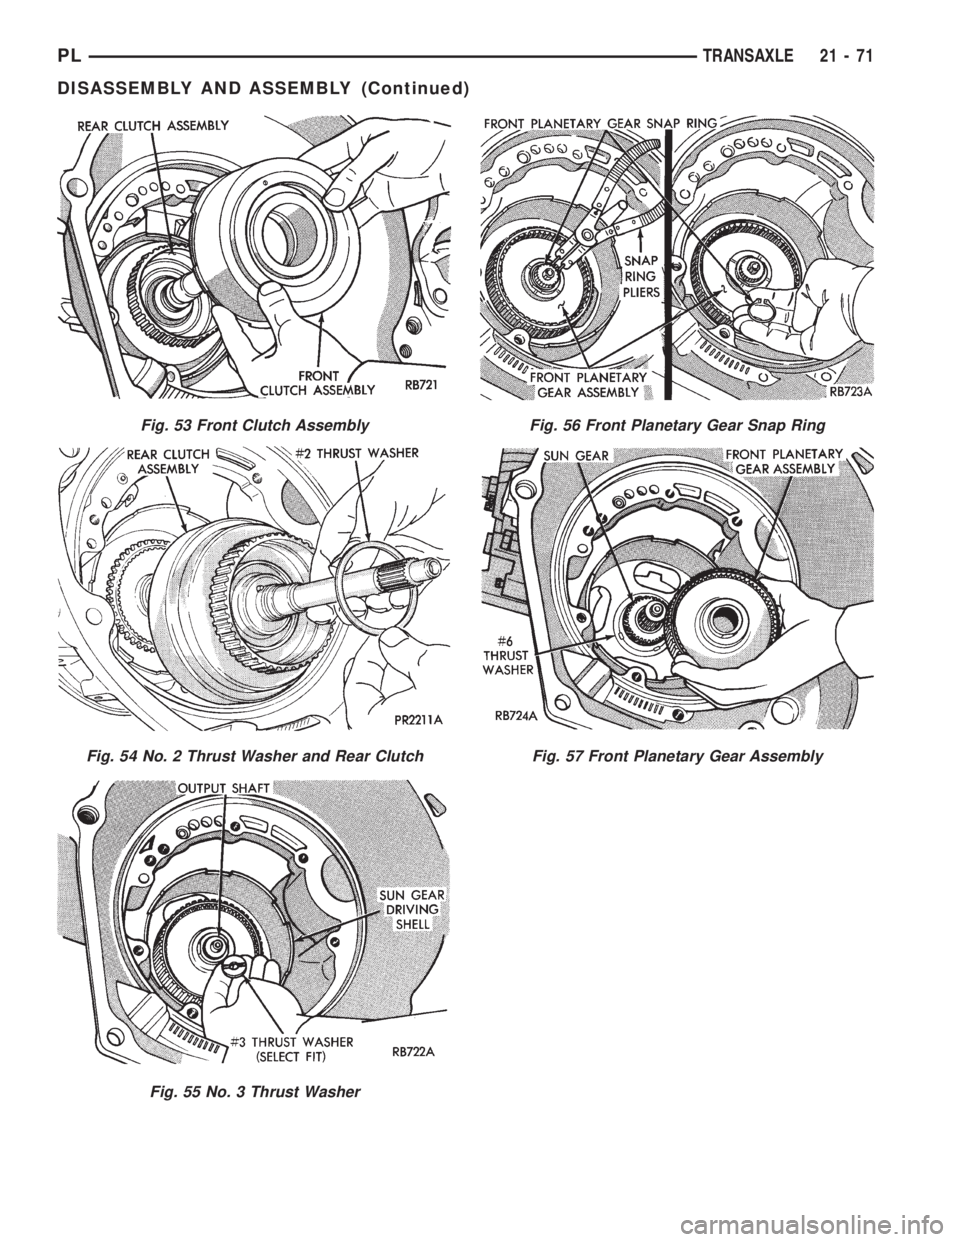
Fig. 53 Front Clutch Assembly
Fig. 54 No. 2 Thrust Washer and Rear Clutch
Fig. 55 No. 3 Thrust Washer
Fig. 56 Front Planetary Gear Snap Ring
Fig. 57 Front Planetary Gear Assembly
PLTRANSAXLE 21 - 71
DISASSEMBLY AND ASSEMBLY (Continued)
Page 1015 of 1200
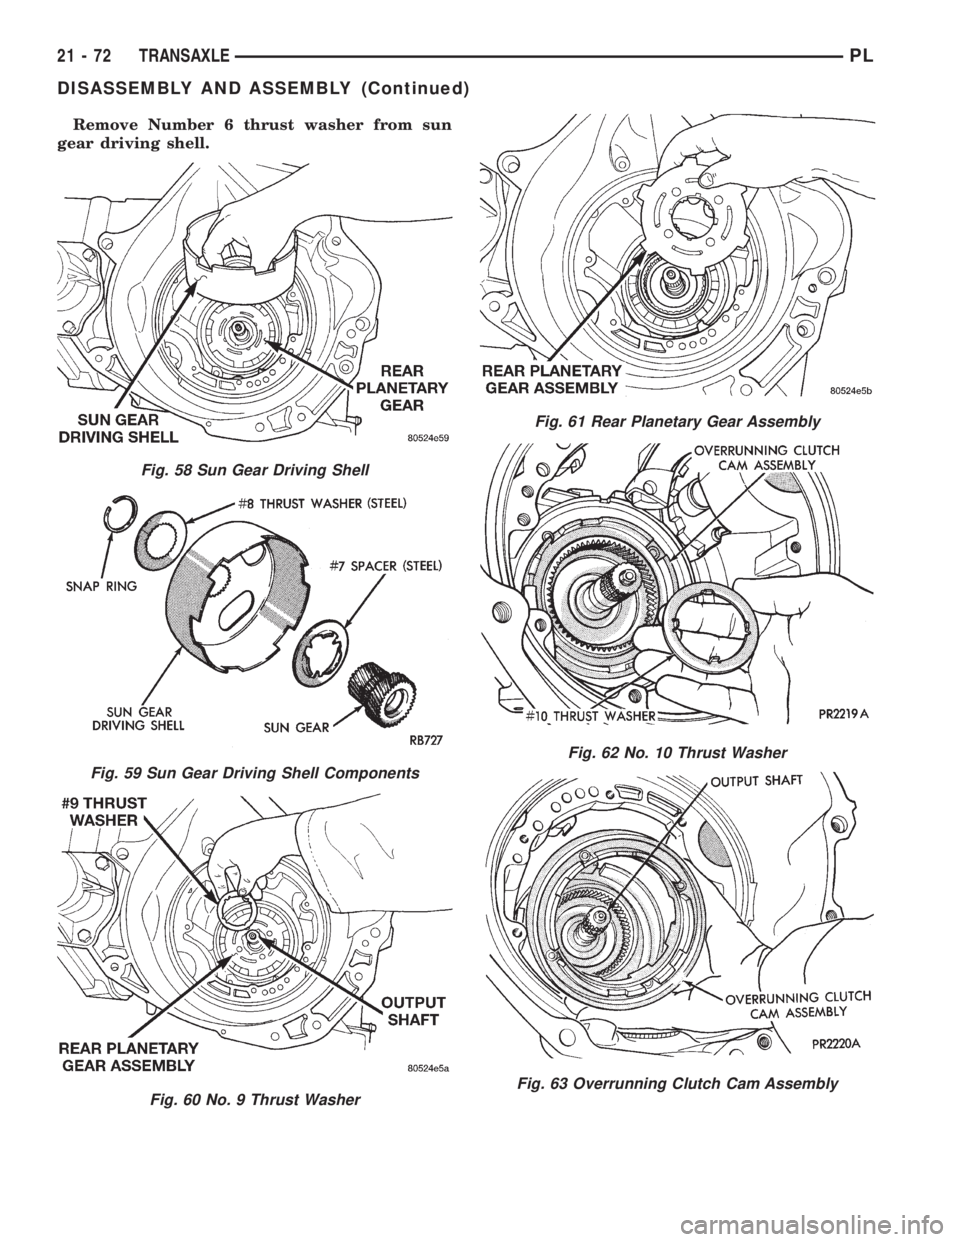
Remove Number 6 thrust washer from sun
gear driving shell.
Fig. 58 Sun Gear Driving Shell
Fig. 59 Sun Gear Driving Shell Components
Fig. 60 No. 9 Thrust Washer
Fig. 61 Rear Planetary Gear Assembly
Fig. 62 No. 10 Thrust Washer
Fig. 63 Overrunning Clutch Cam Assembly
21 - 72 TRANSAXLEPL
DISASSEMBLY AND ASSEMBLY (Continued)
Page 1016 of 1200
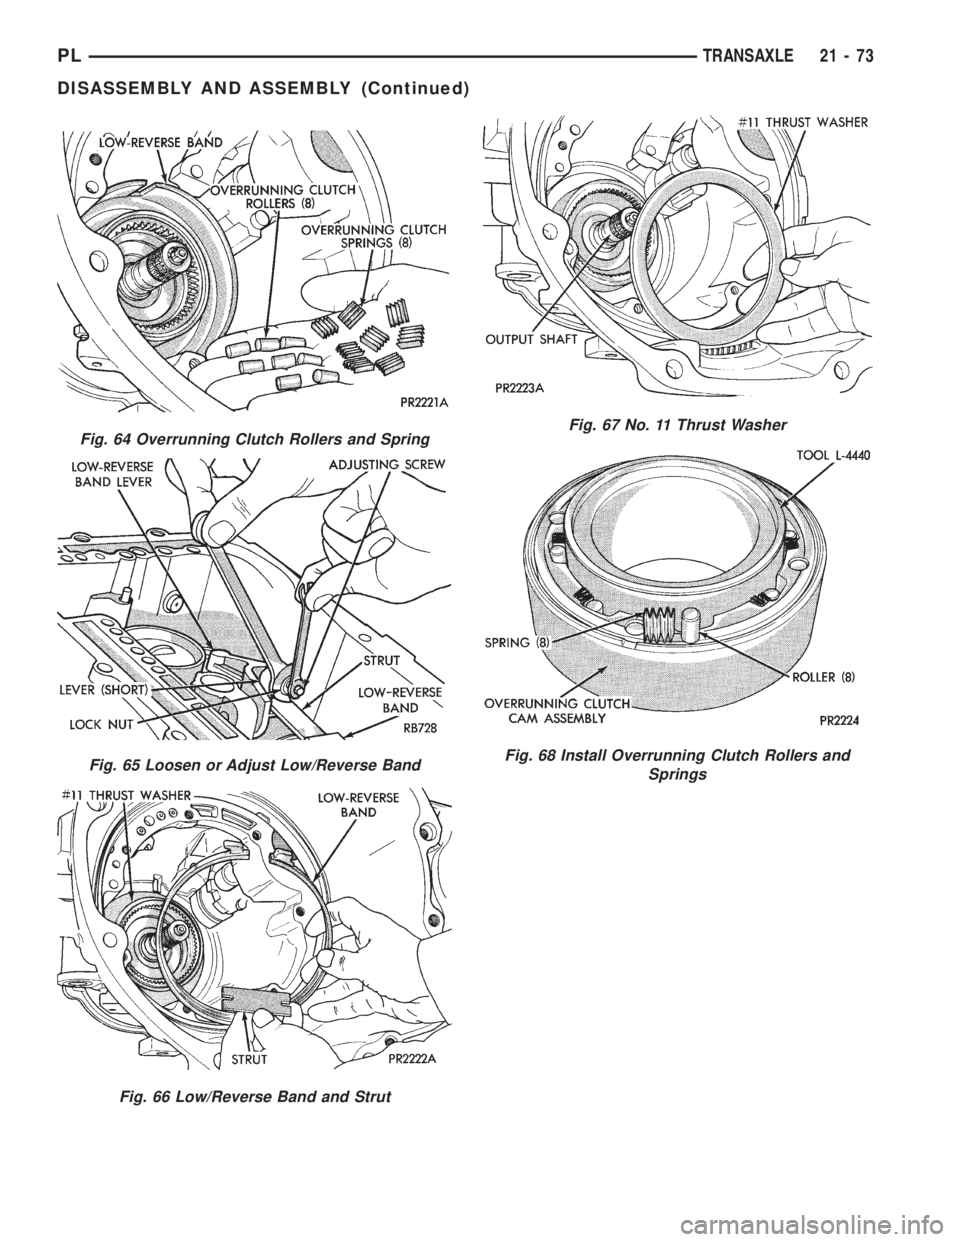
Fig. 64 Overrunning Clutch Rollers and Spring
Fig. 65 Loosen or Adjust Low/Reverse Band
Fig. 66 Low/Reverse Band and Strut
Fig. 67 No. 11 Thrust Washer
Fig. 68 Install Overrunning Clutch Rollers and
Springs
PLTRANSAXLE 21 - 73
DISASSEMBLY AND ASSEMBLY (Continued)
Page 1017 of 1200
ASSEMBLY
When rebuilding, reverse the above procedure.
VALVE BODY RECONDITION
NOTE: Tighten all valve body screws to 5 N´m (40
in. lbs.)
Do not clamp any portion of valve body or transfer
plate in a vise. Any slight distortion of the aluminum
body or transfer plate will result in sticking valves,
excessive leakage, or both.When removing or
installing valves or plugs, slide them in or out
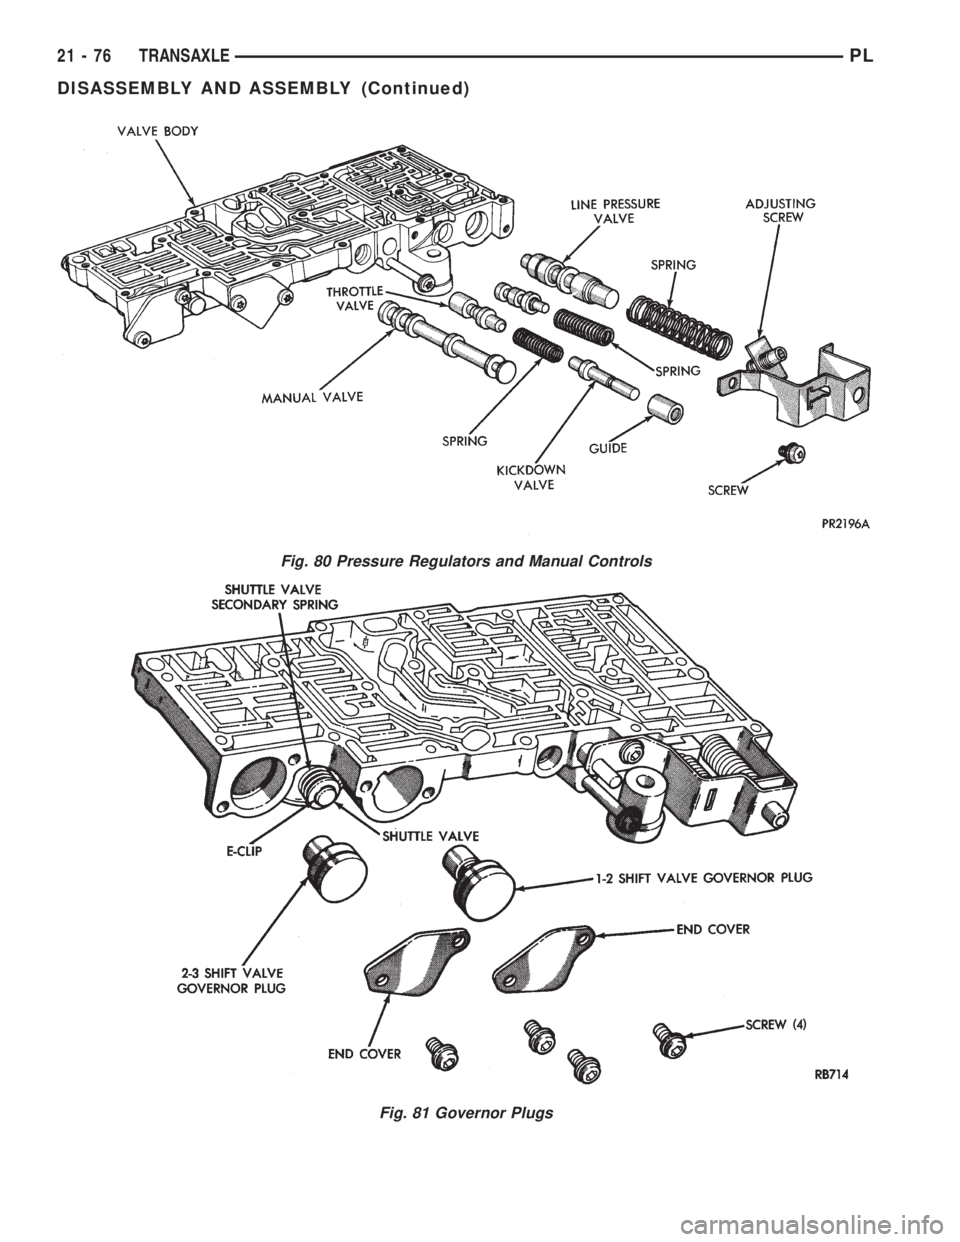
carefully. Do not use force.
NOTE: TAG ALL SPRINGS AS THEY ARE
REMOVED FOR REASSEMBLY IDENTIFICATION.
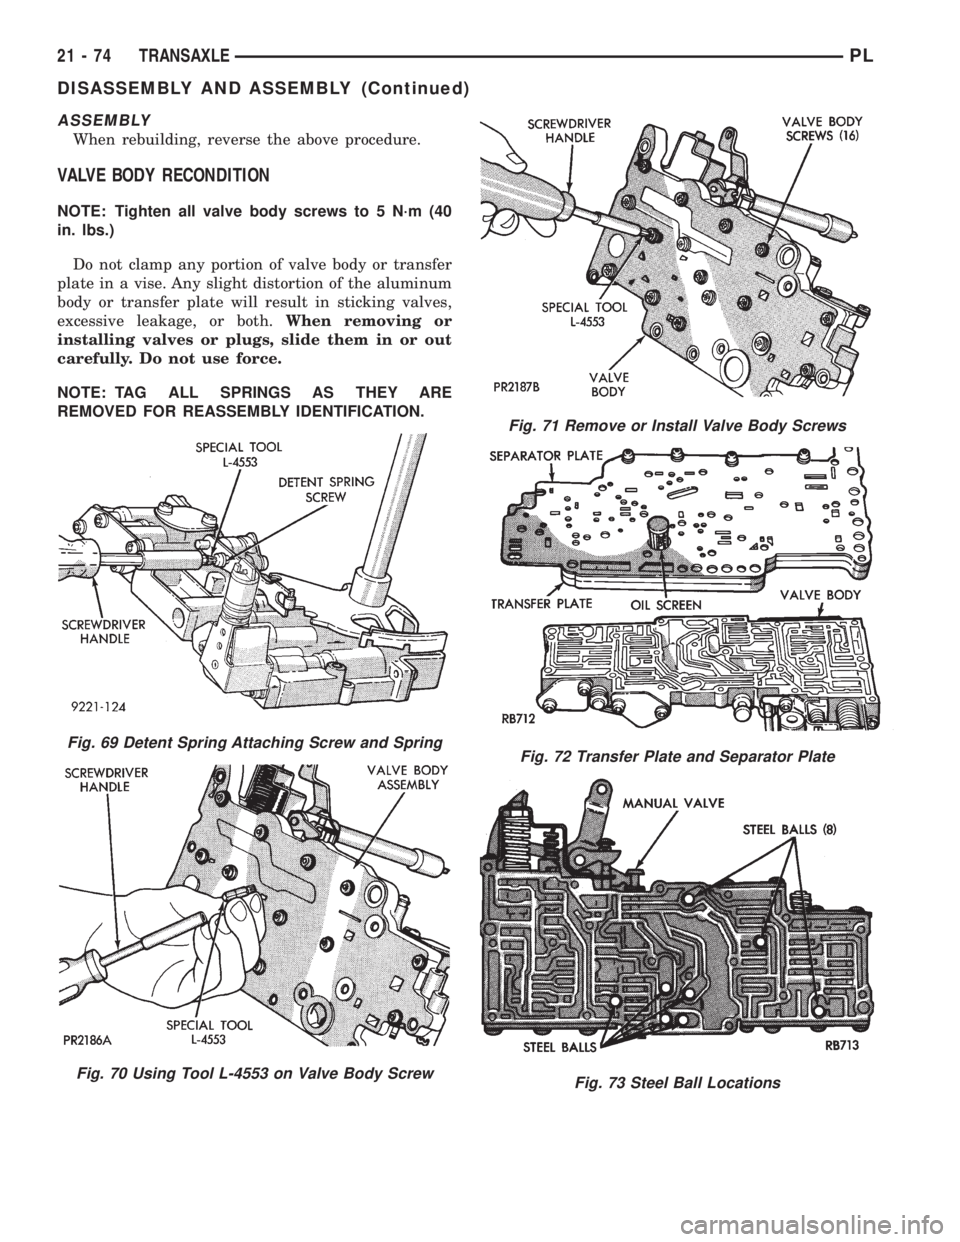
Fig. 69 Detent Spring Attaching Screw and Spring
Fig. 70 Using Tool L-4553 on Valve Body Screw
Fig. 71 Remove or Install Valve Body Screws
Fig. 72 Transfer Plate and Separator Plate
Fig. 73 Steel Ball Locations
21 - 74 TRANSAXLEPL
DISASSEMBLY AND ASSEMBLY (Continued)
Page 1018 of 1200
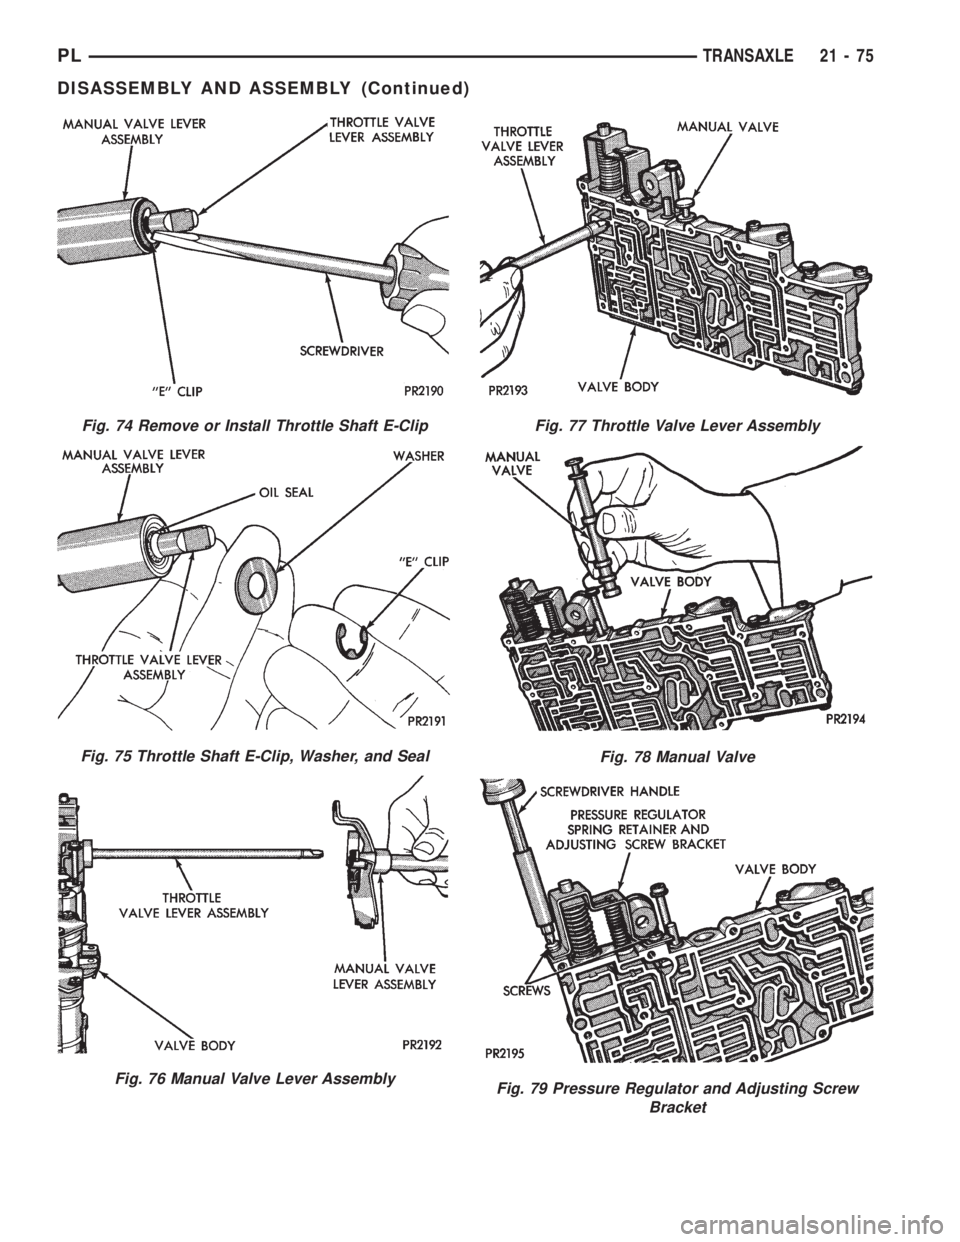
Fig. 74 Remove or Install Throttle Shaft E-Clip
Fig. 75 Throttle Shaft E-Clip, Washer, and Seal
Fig. 76 Manual Valve Lever Assembly
Fig. 77 Throttle Valve Lever Assembly
Fig. 78 Manual Valve
Fig. 79 Pressure Regulator and Adjusting Screw
Bracket
PLTRANSAXLE 21 - 75
DISASSEMBLY AND ASSEMBLY (Continued)
Page 1019 of 1200
Fig. 80 Pressure Regulators and Manual Controls
Fig. 81 Governor Plugs
21 - 76 TRANSAXLEPL
DISASSEMBLY AND ASSEMBLY (Continued)
Page 1020 of 1200
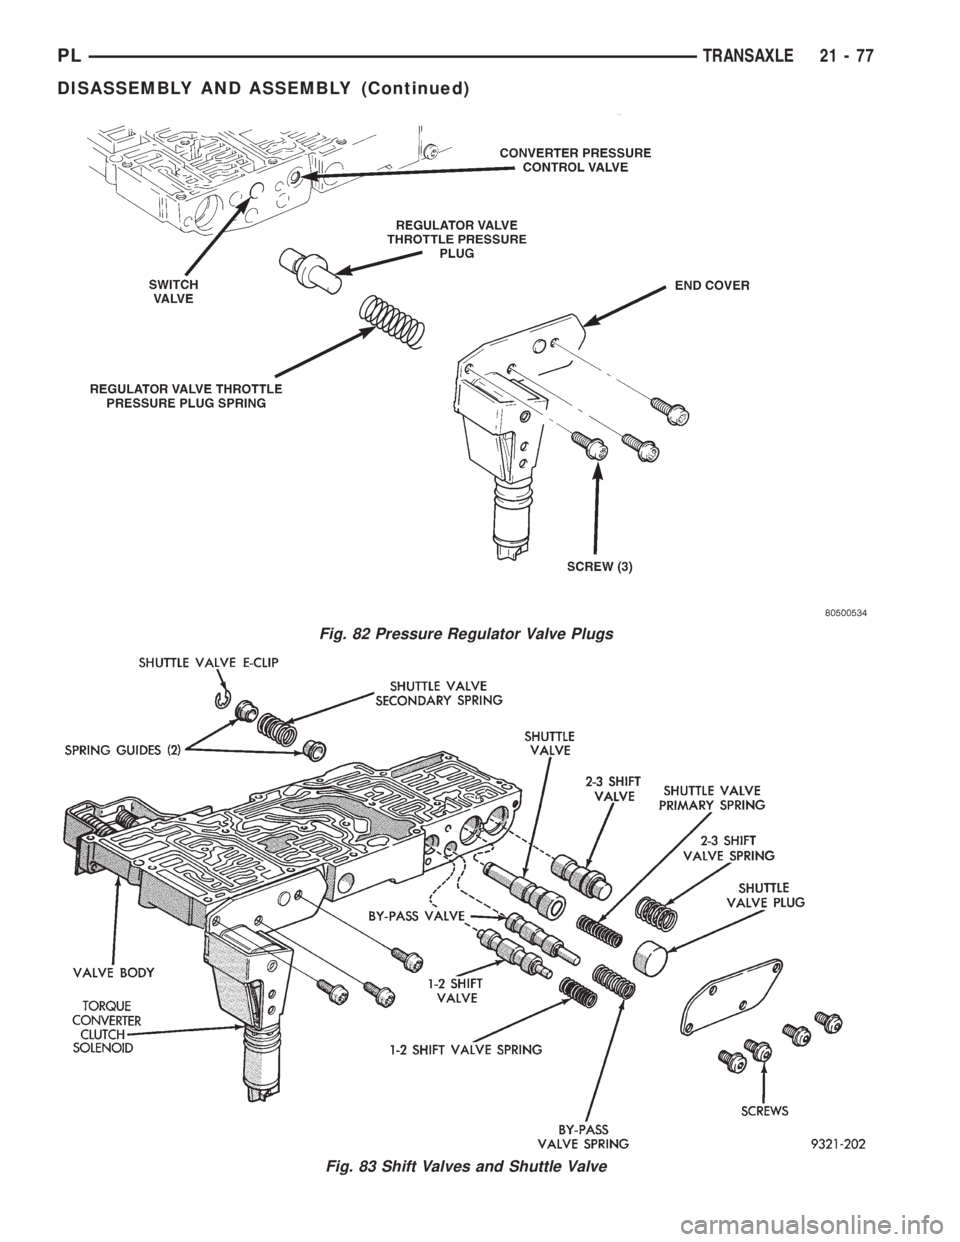
Fig. 82 Pressure Regulator Valve Plugs
Fig. 83 Shift Valves and Shuttle Valve
PLTRANSAXLE 21 - 77
DISASSEMBLY AND ASSEMBLY (Continued)
Trending: oil dipstick, key fob, key fob battery, crankshaft sensor, run flat, remote control, adding oil
