FORD FESTIVA 1991 Service Manual
Manufacturer: FORD, Model Year: 1991, Model line: FESTIVA, Model: FORD FESTIVA 1991Pages: 454, PDF Size: 9.53 MB
Page 351 of 454
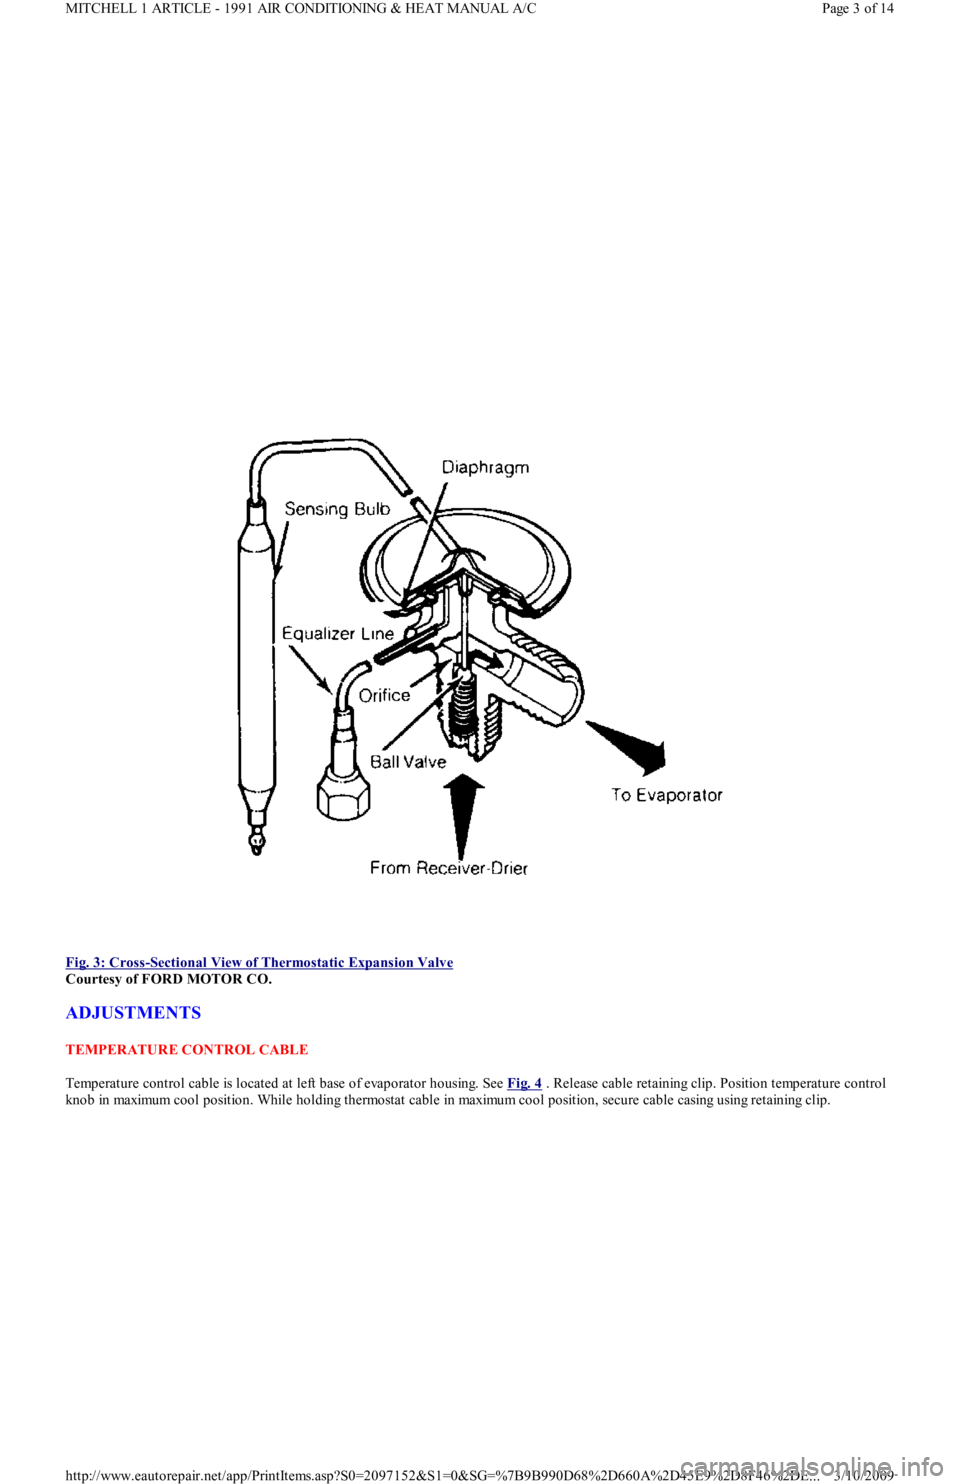
Fig. 3: Cross
-Sectional View of Thermostatic Expansion Valve
Courtesy of FORD MOTOR CO.
ADJUSTMENTS
TEMPERATURE CONTROL CABLE
Temperature control cable is located at left base of evaporator housing. See Fig. 4
. Release cable retaining clip. Position temperature control
knob in maximum cool position. While holding thermostat cable in maximum cool position, secure cable casing using retaining clip.
Page 3 of 14 MITCHELL 1 ARTICLE - 1991 AIR CONDITIONING & HEAT MANUAL A/C
3/10/2009 http://www.eautorepair.net/app/PrintItems.asp?S0=2097152&S1=0&SG=%7B9B990D68%2D660A%2D45E9%2D8F46%2DE
...
Page 352 of 454
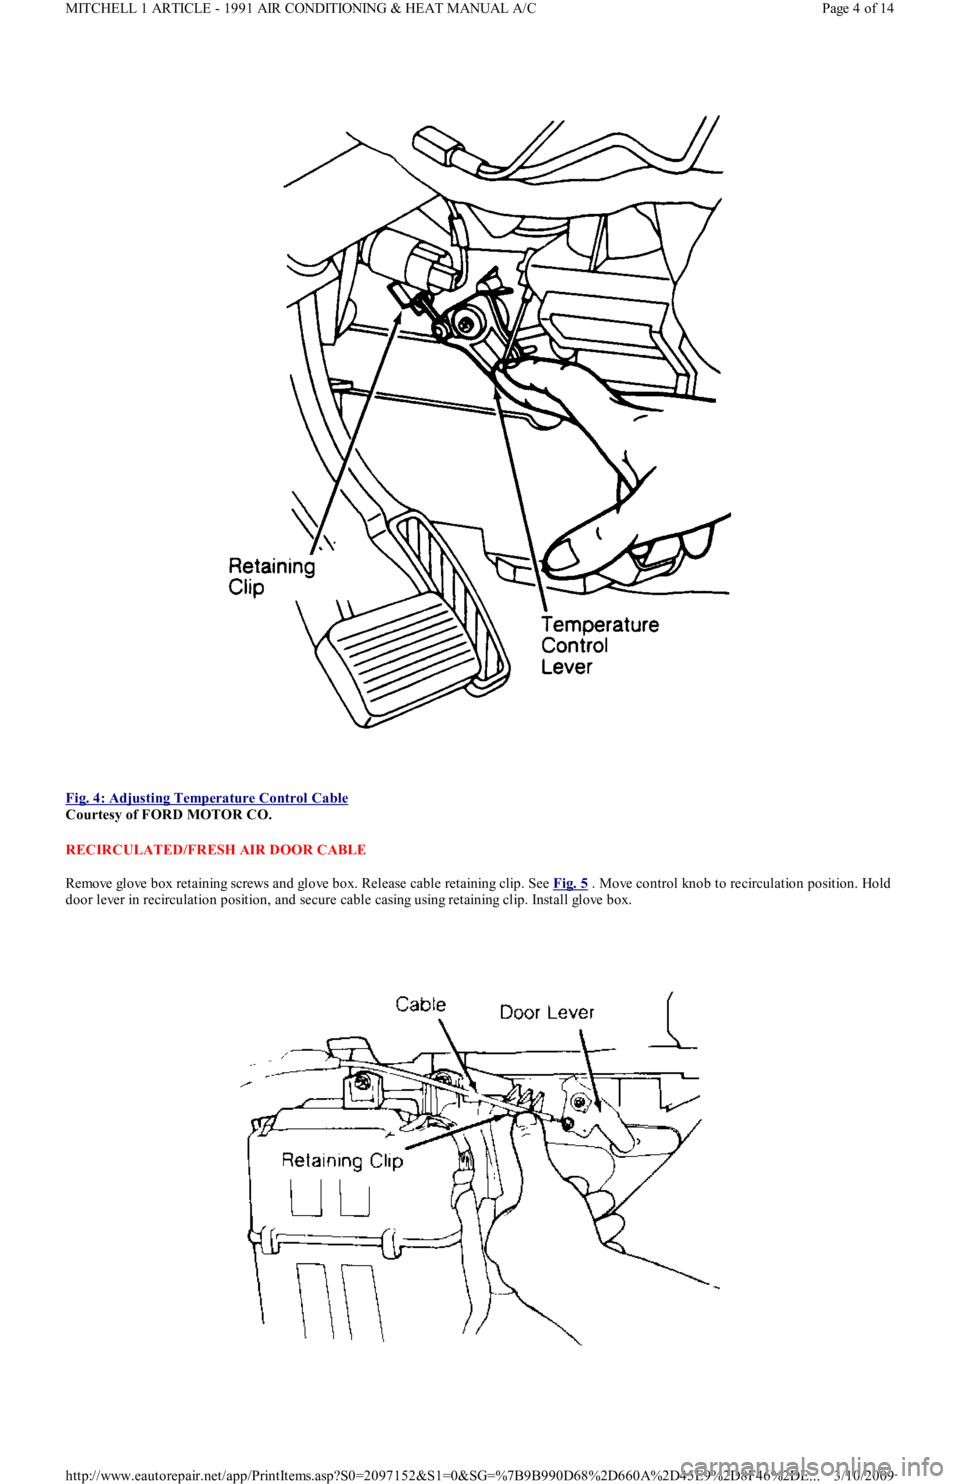
Fig. 4: Adjusting Temperature Control Cable
Courtesy of FORD MOTOR CO.
RECIRCULATED/FRESH AIR DOOR CABLE
Remove glove box retaining screws and glove box. Release cable retaining clip. See Fig. 5
. Move control knob to recirculation position. Hold
door lever in recirculation position, and secure cable casing using retaining clip. Install glove box.
Page 4 of 14 MITCHELL 1 ARTICLE - 1991 AIR CONDITIONING & HEAT MANUAL A/C
3/10/2009 http://www.eautorepair.net/app/PrintItems.asp?S0=2097152&S1=0&SG=%7B9B990D68%2D660A%2D45E9%2D8F46%2DE
...
Page 353 of 454
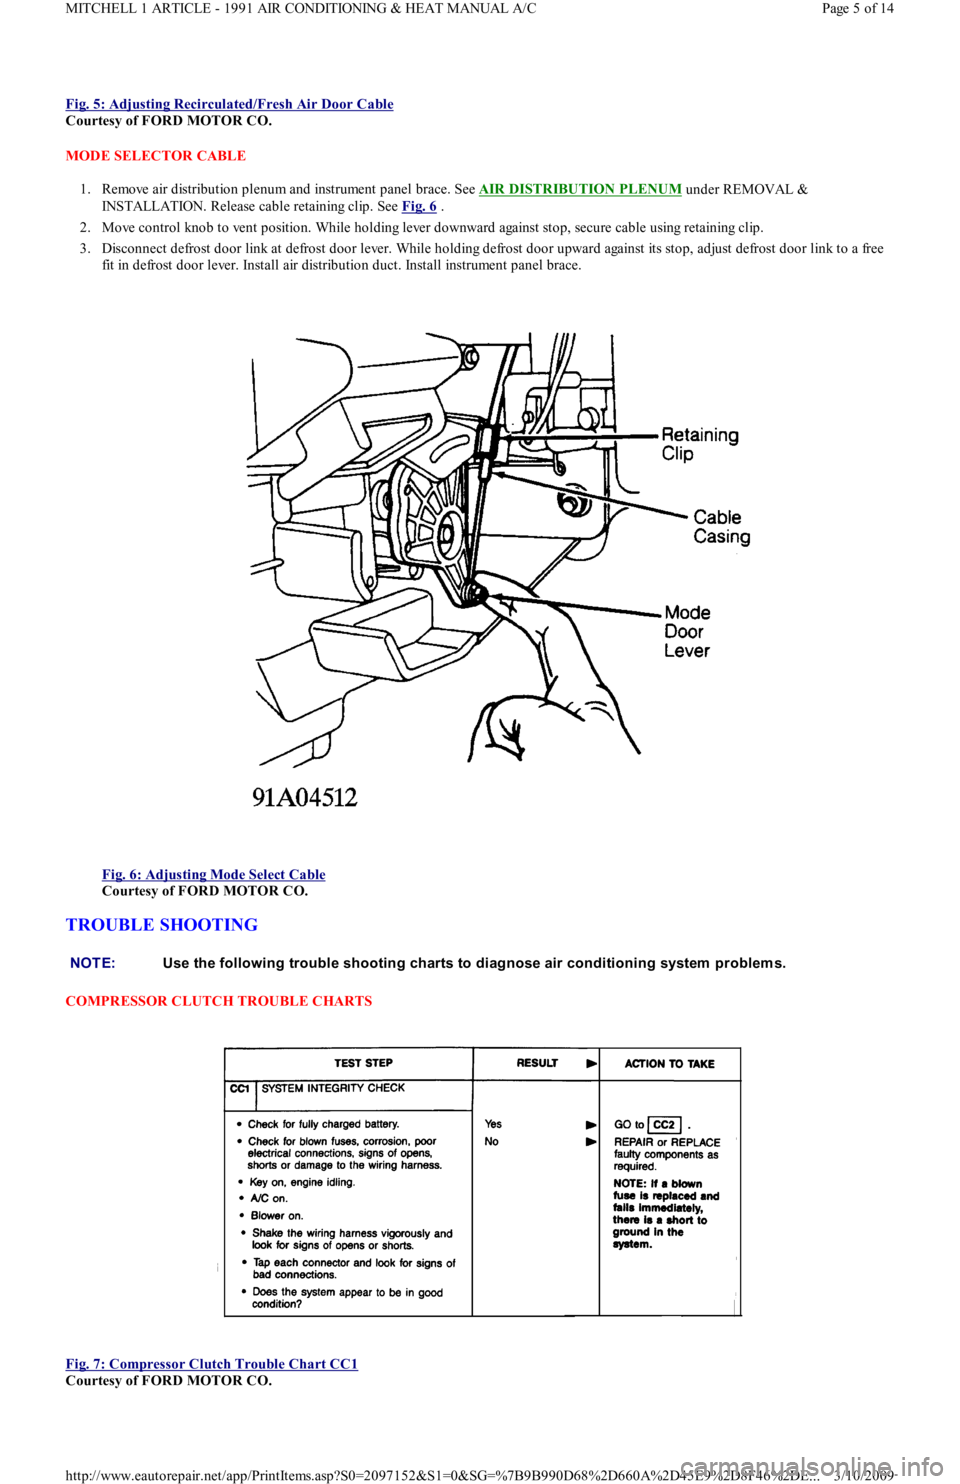
Fig. 5: Adjusting Recirculated/Fresh Air Door Cable
Courtesy of FORD MOTOR CO.
MODE SELECTOR CABLE
1. Remove air distribution plenum and instrument panel brace. See AIR DISTRIBUTION PLENUM
under REMOVAL &
INSTALLATION. Release cable retaining clip. See Fig. 6
.
2. Move control knob to vent position. While holding lever downward against stop, secure cable using retaining clip.
3. Disconnect defrost door link at defrost door lever. While holding defrost door upward against its stop, adjust defrost door link to a free
fit in defrost door lever. Install air distribution duct. Install instrument panel brace.
Fig. 6: Adjusting Mode Select Cable
Courtesy of FORD MOTOR CO.
TROUBLE SHOOTING
COMPRESSOR CLUTCH TROUBLE CHARTS
Fig. 7: Compressor Clutch Trouble Chart CC1
Courtesy of FORD MOTOR CO.
NOTE:Use the following trouble shooting charts to diagnose air conditioning system problem s.
Page 5 of 14 MITCHELL 1 ARTICLE - 1991 AIR CONDITIONING & HEAT MANUAL A/C
3/10/2009 http://www.eautorepair.net/app/PrintItems.asp?S0=2097152&S1=0&SG=%7B9B990D68%2D660A%2D45E9%2D8F46%2DE
...
Page 354 of 454
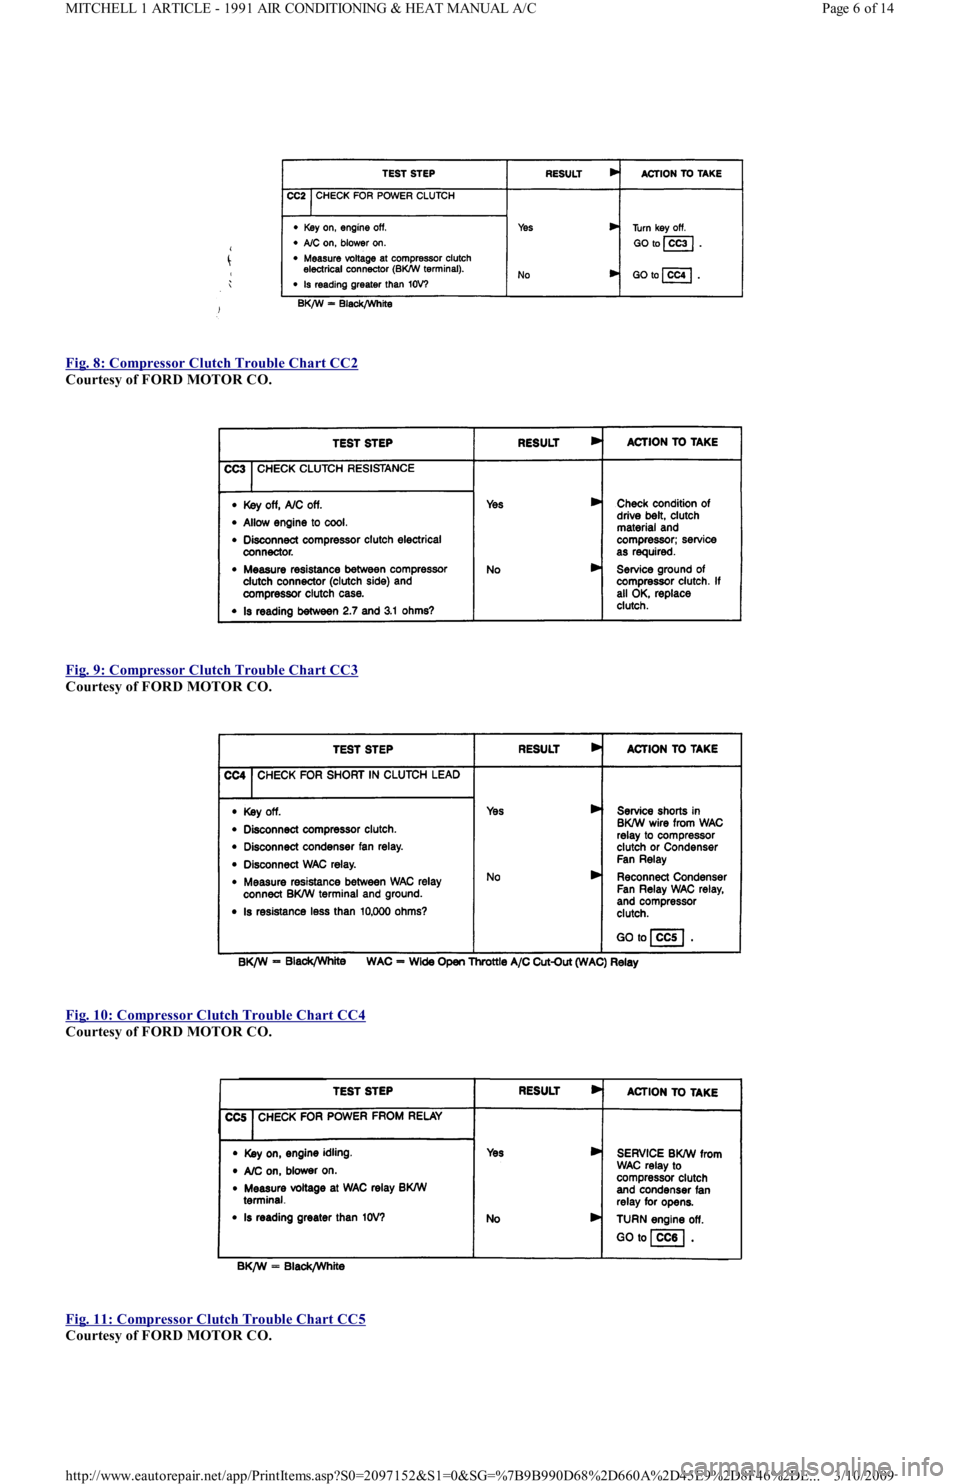
Fig. 8: Compressor Clutch Trouble Chart CC2
Courtesy of FORD MOTOR CO.
Fig. 9: Compressor Clutch Trouble Chart CC3
Courtesy of FORD MOTOR CO.
Fig. 10: Compressor Clutch Trouble Chart CC4
Courtesy of FORD MOTOR CO.
Fig. 11: Compressor Clutch Trouble Chart CC5
Courtesy of FORD MOTOR CO.
Page 6 of 14 MITCHELL 1 ARTICLE - 1991 AIR CONDITIONING & HEAT MANUAL A/C
3/10/2009 http://www.eautorepair.net/app/PrintItems.asp?S0=2097152&S1=0&SG=%7B9B990D68%2D660A%2D45E9%2D8F46%2DE
...
Page 355 of 454
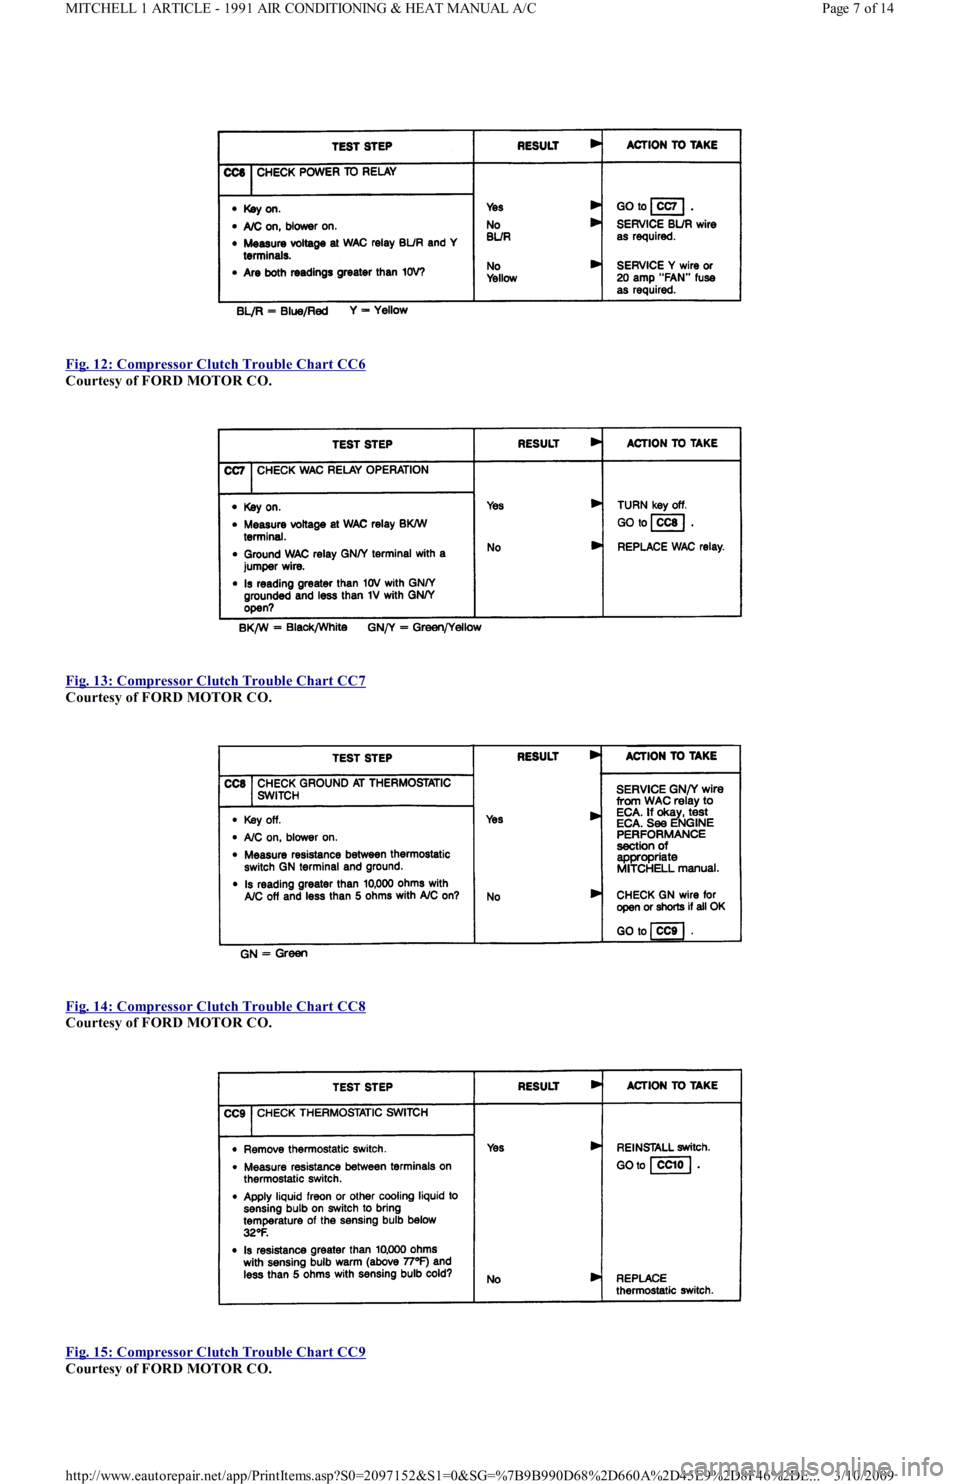
Fig. 12: Compressor Clutch Trouble Chart CC6
Courtesy of FORD MOTOR CO.
Fig. 13: Compressor Clutch Trouble Chart CC7
Courtesy of FORD MOTOR CO.
Fig. 14: Compressor Clutch Trouble Chart CC8
Courtesy of FORD MOTOR CO.
Fig. 15: Compressor Clutch Trouble Chart CC9
Courtesy of FORD MOTOR CO.
Page 7 of 14 MITCHELL 1 ARTICLE - 1991 AIR CONDITIONING & HEAT MANUAL A/C
3/10/2009 http://www.eautorepair.net/app/PrintItems.asp?S0=2097152&S1=0&SG=%7B9B990D68%2D660A%2D45E9%2D8F46%2DE
...
Page 356 of 454
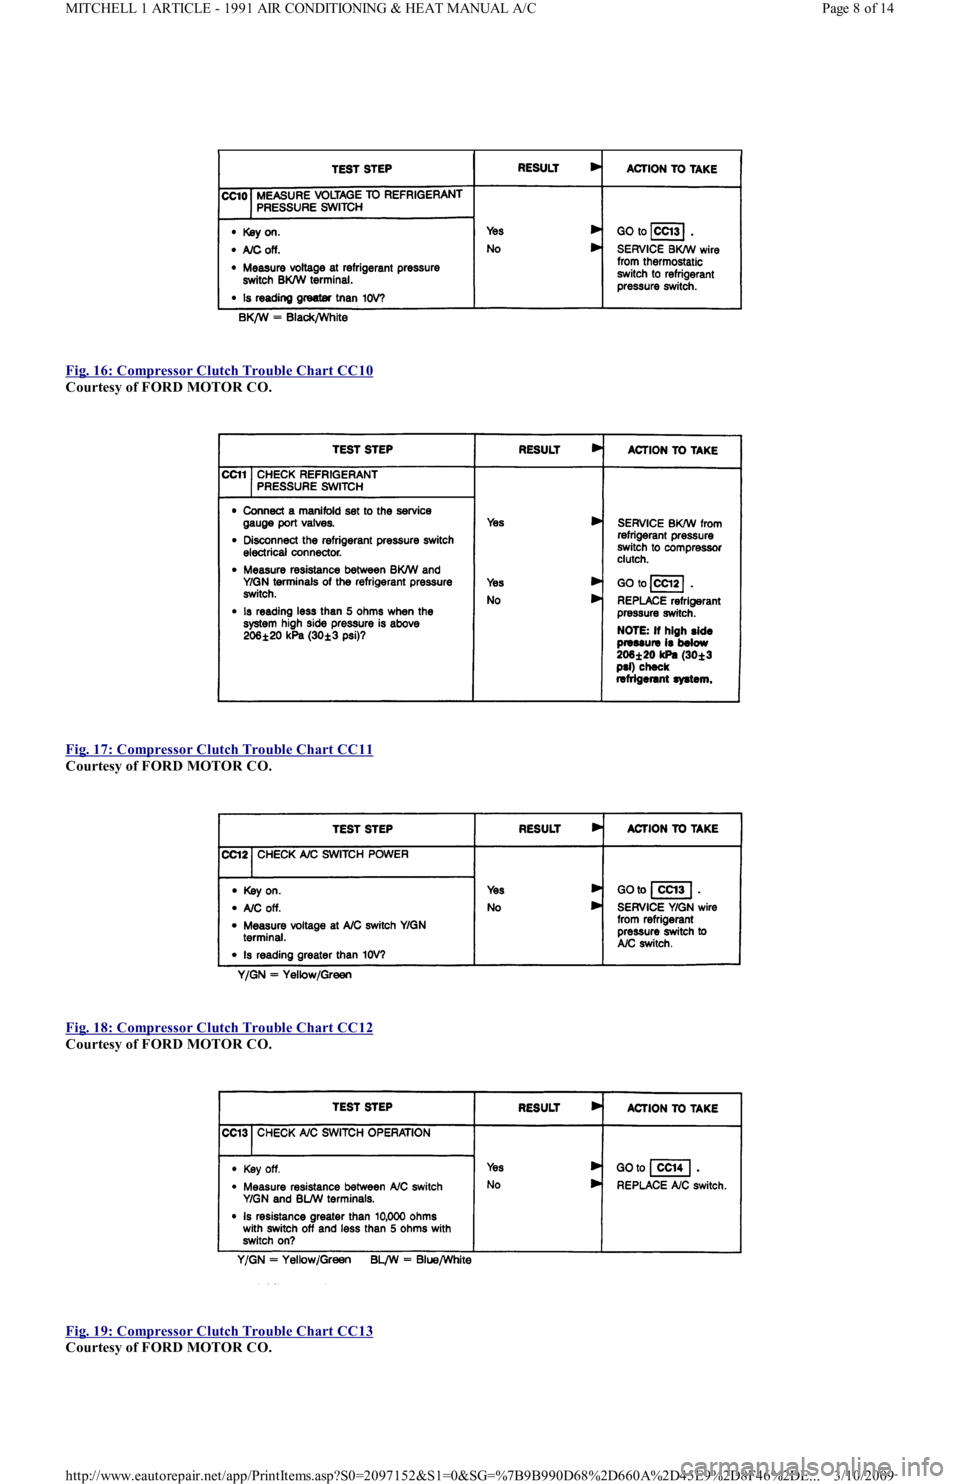
Fig. 16: Compressor Clutch Trouble Chart CC10
Courtesy of FORD MOTOR CO.
Fig. 17: Compressor Clutch Trouble Chart CC11
Courtesy of FORD MOTOR CO.
Fig. 18: Compressor Clutch Trouble Chart CC12
Courtesy of FORD MOTOR CO.
Fig. 19: Compressor Clutch Trouble Chart CC13
Courtesy of FORD MOTOR CO.
Page 8 of 14 MITCHELL 1 ARTICLE - 1991 AIR CONDITIONING & HEAT MANUAL A/C
3/10/2009 http://www.eautorepair.net/app/PrintItems.asp?S0=2097152&S1=0&SG=%7B9B990D68%2D660A%2D45E9%2D8F46%2DE
...
Page 357 of 454
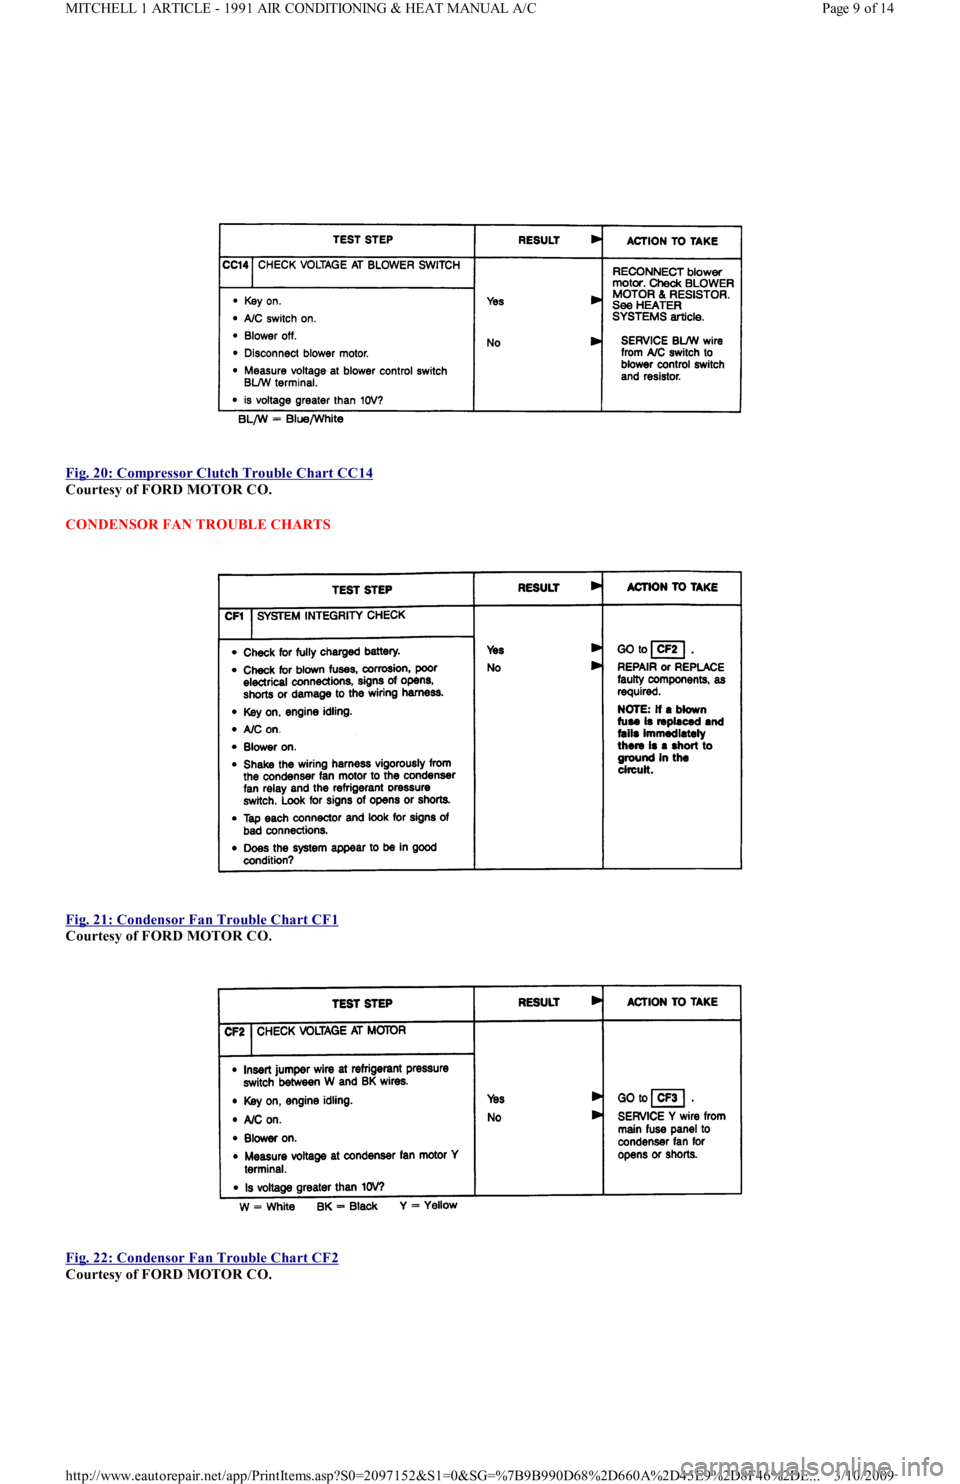
Fig. 20: Compressor Clutch Trouble Chart CC14
Courtesy of FORD MOTOR CO.
CONDENSOR FAN TROUBLE CHARTS
Fig. 21: Condensor Fan Trouble Chart CF1
Courtesy of FORD MOTOR CO.
Fig. 22: Condensor Fan Trouble Chart CF2
Courtesy of FORD MOTOR CO.
Page 9 of 14 MITCHELL 1 ARTICLE - 1991 AIR CONDITIONING & HEAT MANUAL A/C
3/10/2009 http://www.eautorepair.net/app/PrintItems.asp?S0=2097152&S1=0&SG=%7B9B990D68%2D660A%2D45E9%2D8F46%2DE
...
Page 358 of 454
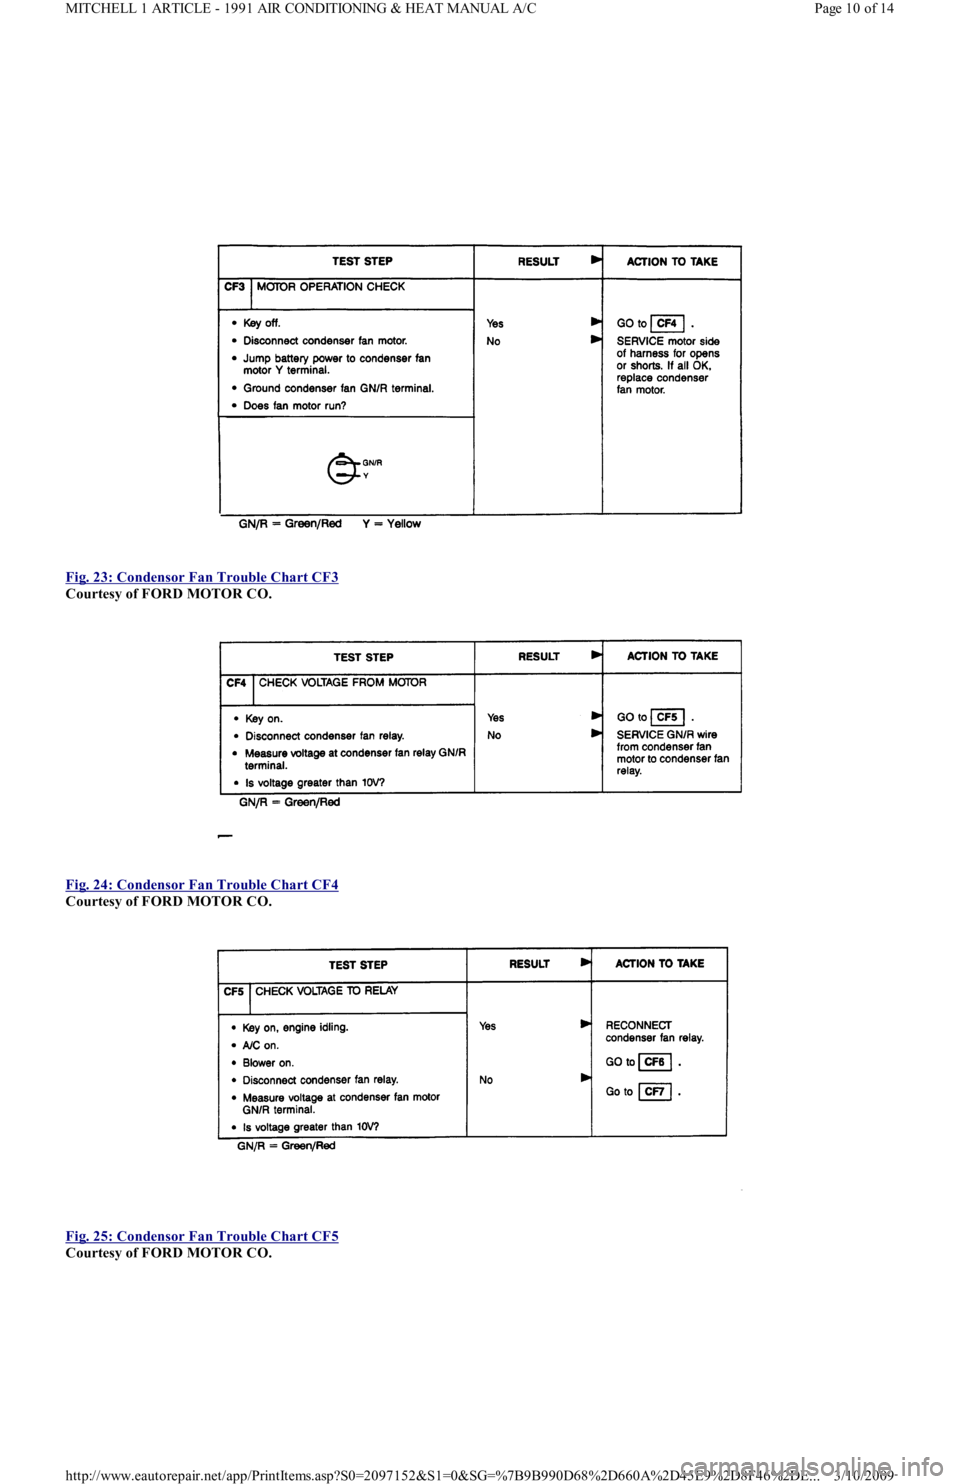
Fig. 23: Condensor Fan Trouble Chart CF3
Courtesy of FORD MOTOR CO.
Fig. 24: Condensor Fan Trouble Chart CF4
Courtesy of FORD MOTOR CO.
Fig. 25: Condensor Fan Trouble Chart CF5
Courtesy of FORD MOTOR CO.
Page 10 of 14 MITCHELL 1 ARTICLE - 1991 AIR CONDITIONING & HEAT MANUAL A/C
3/10/2009 http://www.eautorepair.net/app/PrintItems.asp?S0=2097152&S1=0&SG=%7B9B990D68%2D660A%2D45E9%2D8F46%2DE
...
Page 359 of 454
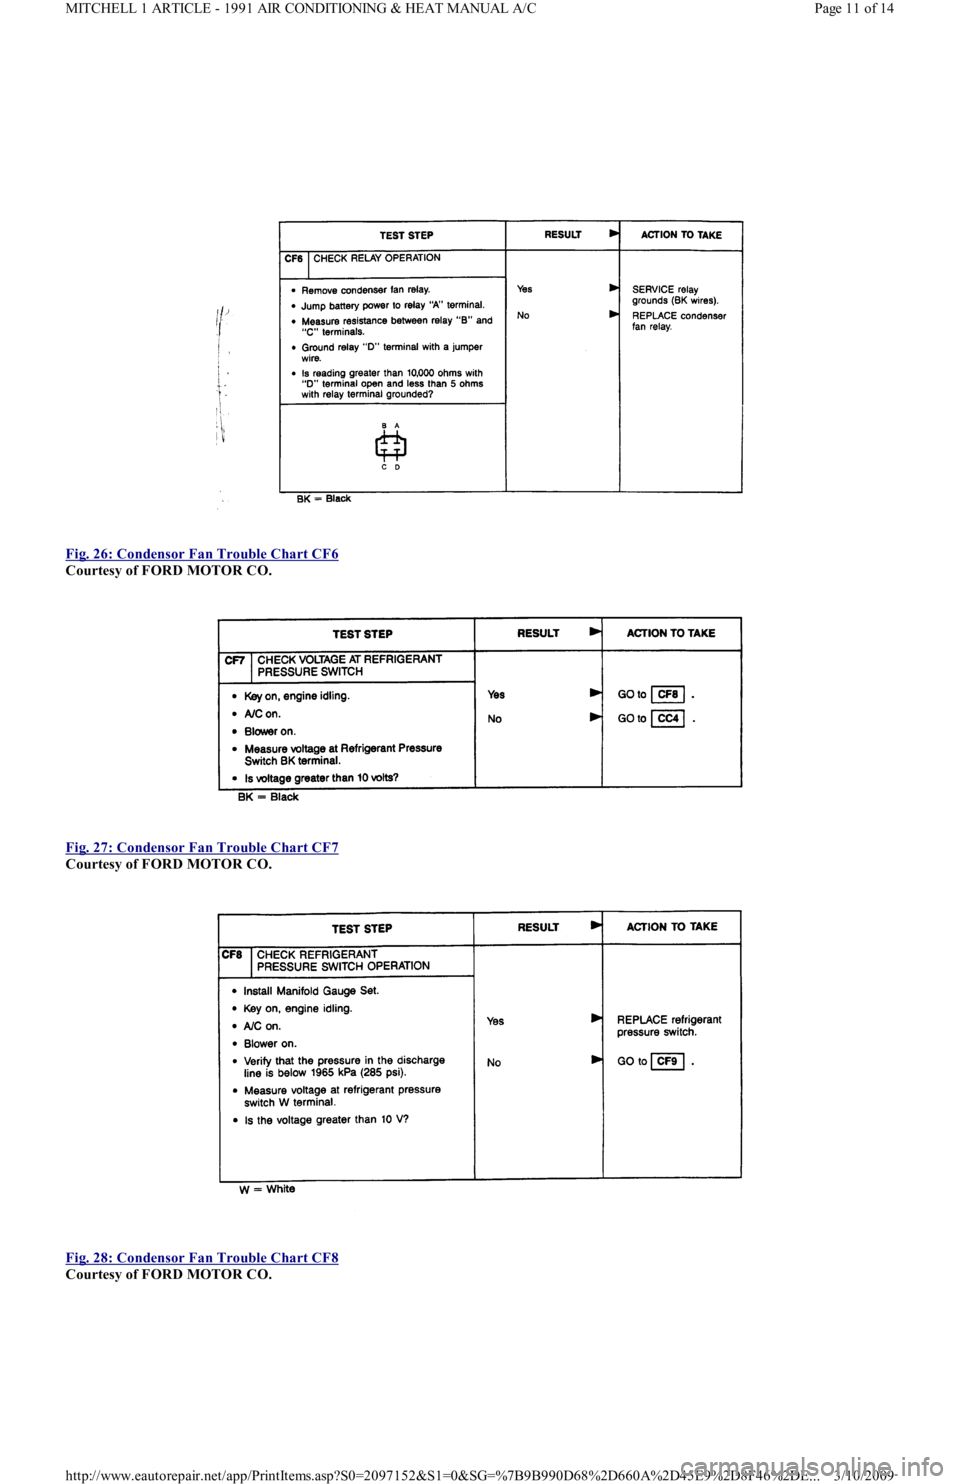
Fig. 26: Condensor Fan Trouble Chart CF6
Courtesy of FORD MOTOR CO.
Fig. 27: Condensor Fan Trouble Chart CF7
Courtesy of FORD MOTOR CO.
Fig. 28: Condensor Fan Trouble Chart CF8
Courtesy of FORD MOTOR CO.
Page 11 of 14 MITCHELL 1 ARTICLE - 1991 AIR CONDITIONING & HEAT MANUAL A/C
3/10/2009 http://www.eautorepair.net/app/PrintItems.asp?S0=2097152&S1=0&SG=%7B9B990D68%2D660A%2D45E9%2D8F46%2DE
...
Page 360 of 454
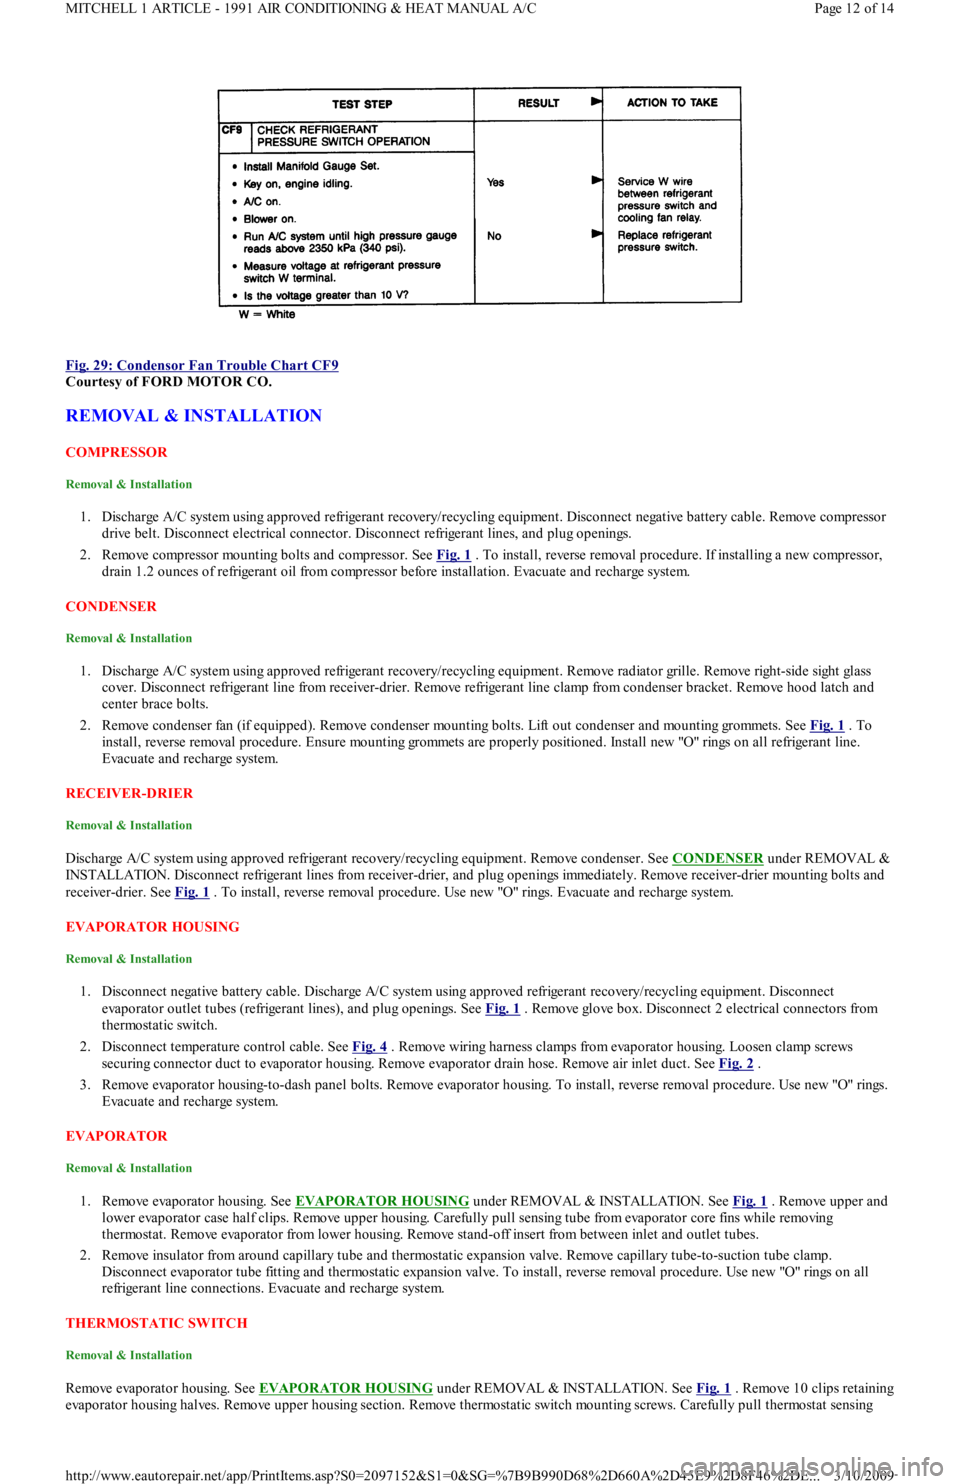
Fig. 29: Condensor Fan Trouble Chart CF9
Courtesy of FORD MOTOR CO.
REMOVAL & INSTALLATION
COMPRESSOR
Removal & Installation
1. Discharge A/C system using approved refrigerant recovery/recycling equipment. Disconnect negative battery cable. Remove compressor
drive belt. Disconnect electrical connector. Disconnect refrigerant lines, and plug openings.
2. Remove compressor mounting bolts and compressor. See Fig. 1
. To install, reverse removal procedure. If installing a new compressor,
drain 1.2 ounces of refrigerant oil from compressor before installation. Evacuate and recharge system.
CONDENSER
Removal & Installation
1. Discharge A/C system using approved refrigerant recovery/recycling equipment. Remove radiator grille. Remove right-side sight glass
cover. Disconnect refrigerant line from receiver-drier. Remove refrigerant line clamp from condenser bracket. Remove hood latch and
center brace bolts.
2. Remove condenser fan (if equipped). Remove condenser mounting bolts. Lift out condenser and mounting grommets. See Fig. 1
. To
install, reverse removal procedure. Ensure mounting grommets are properly positioned. Install new "O" rings on all refrigerant line.
Evacuate and recharge system.
RECEIVER-DRIER
Removal & Installation
Discharge A/C system using approved refrigerant recovery/recycling equipment. Remove condenser. See CONDENSER under REMOVAL &
INSTALLATION. Disconnect refrigerant lines from receiver-drier, and plug openings immediately. Remove receiver-drier mounting bolts and
receiver-drier. See Fig. 1
. To install, reverse removal procedure. Use new "O" rings. Evacuate and recharge system.
EVAPORATOR HOUSING
Removal & Installation
1. Disconnect negative battery cable. Discharge A/C system using approved refrigerant recovery/recycling equipment. Disconnect
evaporator outlet tubes (refrigerant lines), and plug openings. See Fig. 1
. Remove glove box. Disconnect 2 electrical connectors from
thermostatic switch.
2. Disconnect temperature control cable. See Fig. 4
. Remove wiring harness clamps from evaporator housing. Loosen clamp screws
securing connector duct to evaporator housing. Remove evaporator drain hose. Remove air inlet duct. See Fig. 2
.
3. Remove evaporator housing-to-dash panel bolts. Remove evaporator housing. To install, reverse removal procedure. Use new "O" rings.
Evacuate and recharge system.
EVAPORATOR
Removal & Installation
1. Remove evaporator housing. See EVAPORATOR HOUSING under REMOVAL & INSTALLATION. See Fig. 1 . Remove upper and
lower evaporator case half clips. Remove upper housing. Carefully pull sensing tube from evaporator core fins while removing
thermostat. Remove evaporator from lower housing. Remove stand-off insert from between inlet and outlet tubes.
2. Remove insulator from around capillary tube and thermostatic expansion valve. Remove capillary tube-to-suction tube clamp.
Disconnect evaporator tube fitting and thermostatic expansion valve. To install, reverse removal procedure. Use new "O" rings on all
refrigerant line connections. Evacuate and recharge system.
THERMOSTATIC SW ITCH
Removal & Installation
Remove evaporator housing. See EVAPORATOR HOUSING under REMOVAL & INSTALLATION. See Fig. 1. Remove 10 clips retaining
evaporator housing halves. Remove upper housing section. Remove thermostatic switch mounting screws. Carefully pull thermostat sensing
Page 12 of 14 MITCHELL 1 ARTICLE - 1991 AIR CONDITIONING & HEAT MANUAL A/C
3/10/2009 http://www.eautorepair.net/app/PrintItems.asp?S0=2097152&S1=0&SG=%7B9B990D68%2D660A%2D45E9%2D8F46%2DE
...