FORD FESTIVA 1991 Service Manual
Manufacturer: FORD, Model Year: 1991, Model line: FESTIVA, Model: FORD FESTIVA 1991Pages: 454, PDF Size: 9.53 MB
Page 371 of 454
whichever occurs first.
POWERTRAIN WARRANTY
Under this warranty, certain parts of the engine, transmission, axle and driveline are warranted against defects in materials and workmanship
for either 4 years/50,000 or 6 years/60,000 miles, depending on the model year. This coverage begins after 12 months or 12,000 miles. See
copy of warranty for specific components covered and length of coverage.
BUMPER-TO-BUMPER COVERAGE
All 1992-93 vehicles have complete warranty coverage against defects in materials and workmanship for 3 years or 36,000 miles, whichever
occurs first. There is no deductible with this warranty. Items not covered include tires and parts that are subject to normal wear and tear, such
as windshield wiper blades, brake linings, brake pads, clutch linings and scheduled maintenance items. There is no extended powertrain
coverage included in this warranty.
BATTERY COVERAGE
Begins at warranty start date and lasts up to 3 years or 36,000 miles, whichever occurs first. For the first 12 months in service (less than
36,000 miles), battery will be replaced at no charge. After that, battery will be replaced on a customer-participation basis: For the 13th-24th
month in service, Ford will pay 50%; for the 25th-36th month, Ford will pay 25%. Labor is covered for 3 years or 36,000 miles, whichever
occurs first.
SAFETY RESTRAINT SYSTEM COVERAGE
Begins at warranty start date and lasts for 5 years or 50,000 miles, whichever occurs first. Covers safety restraint problems not related to
comfort or appearance. Coverage for model years earlier than 1990 is 3 years with unlimited miles.
CORROSION COVERAGE
Begins at warranty start date and lasts for 6 years or 60,000 miles, whichever occurs first. 1992-93 models are covered for 6 years or 100,000
miles, whichever occurs first. Covers any holes in body sheet metal caused by corrosion.
EMISSIONS DEFECT & PERFORMANCE WARRANTIES (EXCEPT CALIFORNIA)
Defect Warranty ensures that vehicle meets applicable EPA regulations and that vehicle's emission control system is free from defects in
materials and workmanship for a period of 5 years or 50,000 miles, whichever occurs first.
The Performance Warranty covers all costs of repairing or adjusting any components or parts as needed for the vehicle to pass a Federally
required state or local emissions test.
Other emission control parts related to these components are covered by the Performance Warranty, where applicable. If another part fails due
to the failure of one of these components, both parts are covered. See customer's copy of warranty information for specific items co vered .
Performance Warranty coverage is limited to fewer components after 2 years or 24,000 miles.
EMISSIONS PERFORMANCE WARRANTY (CALIFORNIA)
If vehicle fails a Smog Check inspection, all necessary repairs and adjustments will be made by manufacturer to ensure that vehicle passes the
inspection. Warranty begins at warranty start date and lasts for a period of 3 years or 50,000 miles, whichever occurs first.
EMISSIONS DEFECT WARRANTY (CALIFORNIA)
If any emission-related part on the vehicle is defective, the part will be repaired or replaced by manufacturer. Warranty begins at warranty start
date and lasts for a period of 3 years or 50,000 miles, whichever occurs first.
Some emission-related parts are warranted for 7 years or 70,000 miles whichever occurs first, and will be repaired or replaced by manufacturer
if found to be defective in material or workmanship. See customer's copy of warranty information for specific items covered.
FUSES & FUSIBLE LINKS
FUSE PANEL & FUSIBLE LINK BLOCK LOCATIONS
The vehicle has a fuse block with fusible links and a fuse panel with circuit fuses. The fuse panel is located behind the instrument panel, left o
f
the steering column. The fuse block is located under the hood.
FUSE PANEL IDENTIFICATION NOTE:Powertrain Warranty varies in coverage length (4 years/50,000 m iles or 6 years/60,000 m iles) depending
on model year.
Page 7 of 9 MITCHELL 1 ARTICLE - MAINTENANCE INFORMATION 1988-93 MAINTENANCE Ford Motor Co. Maintenance Inform...
3/10/2009 http://www.eautorepair.net/app/PrintItems.asp?S0=2097152&S1=0&SG=%7B9B990D68%2D660A%2D45E9%2D8F46%2DE
...
Page 372 of 454
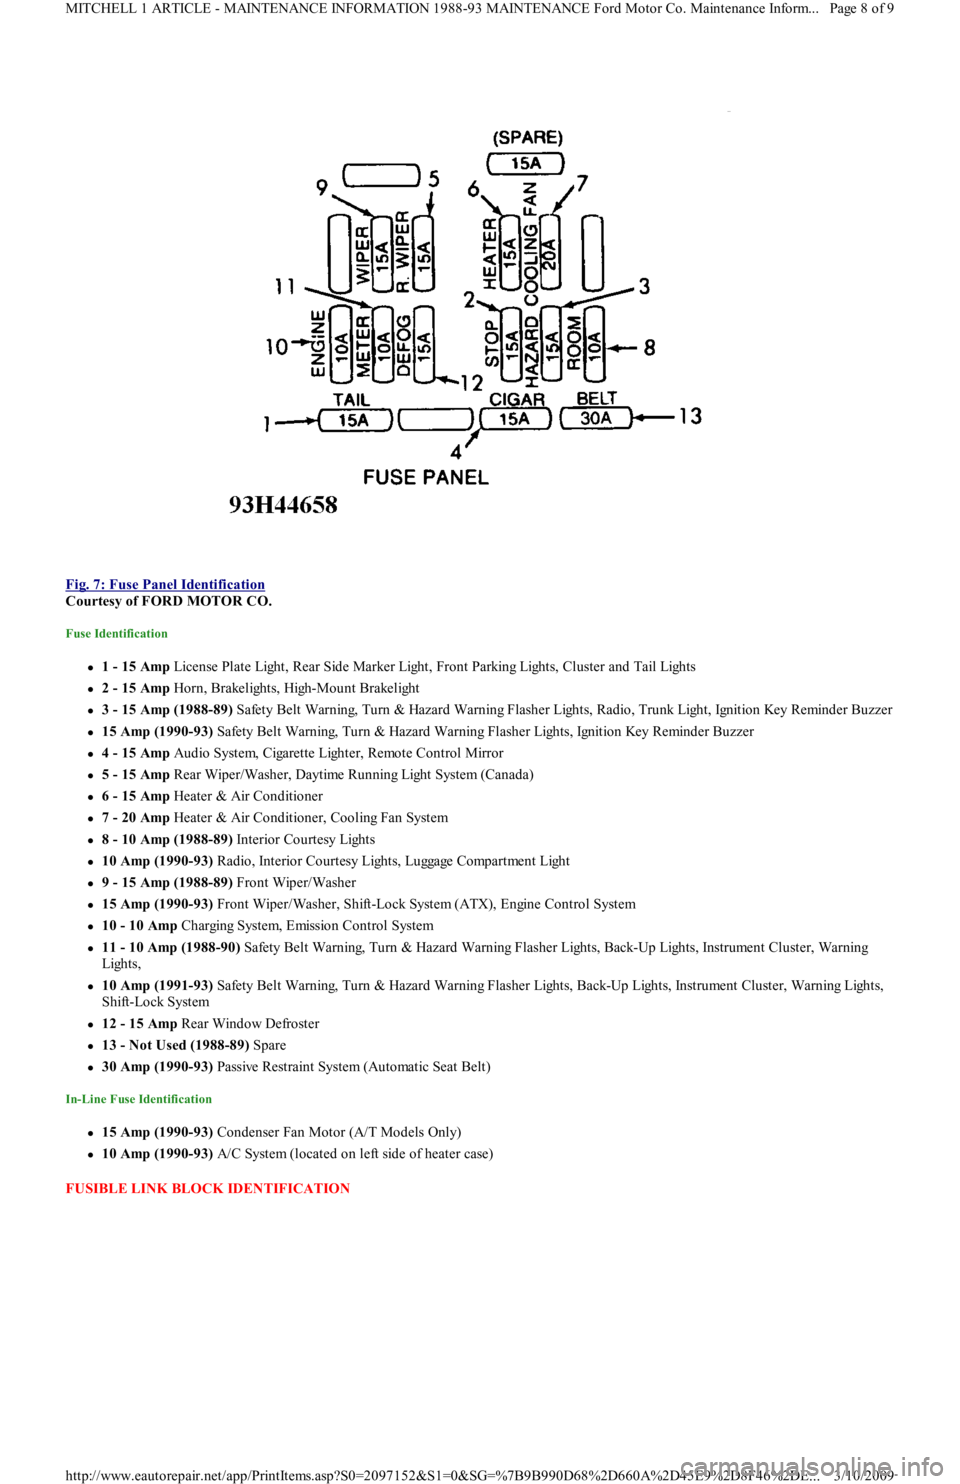
Fig. 7: Fuse Panel Identification
Courtesy of FORD MOTOR CO.
Fuse Identification
1 - 15 Amp License Plate Light, Rear Side Marker Light, Front Parking Lights, Cluster and Tail Lights
2 - 15 Amp Horn, Brakelights, High-Mount Brakelight
3 - 15 Amp (1988-89) Safety Belt Warning, Turn & Hazard Warning Flasher Lights, Radio, Trunk Light, Ignition Key Reminder Buzzer
15 Amp (1990-93) Safety Belt Warning, Turn & Hazard Warning Flasher Lights, Ignition Key Reminder Buzzer
4 - 15 Amp Audio System, Cigarette Lighter, Remote Control Mirror
5 - 15 Amp Rear Wiper/Washer, Daytime Running Light System (Canada)
6 - 15 Amp Heater & Air Conditioner
7 - 20 Amp Heater & Air Conditioner, Cooling Fan System
8 - 10 Amp (1988-89) Interior Courtesy Lights
10 Amp (1990-93) R a d io , In t e r io r C o u r t e sy Ligh t s, Lu gga ge C o mp a r t me n t Ligh t
9 - 15 Amp (1988-89) Front Wiper/Washer
15 Amp (1990-93) Front Wiper/Washer, Shift-Lock System (ATX), Engine Control System
10 - 10 Amp Charging System, Emission Control System
11 - 10 Amp (1988-90) Safety Belt Warning, Turn & Hazard Warning Flasher Lights, Back-Up Lights, Instrument Cluster, Warning
Lights,
10 Amp (1991-93) Safety Belt Warning, Turn & Hazard Warning Flasher Lights, Back-Up Lights, Instrument Cluster, Warning Lights,
Shift-Lock System
12 - 15 Amp Rear Window Defroster
13 - Not Used (1988-89) Spare
30 Amp (1990-93) Passive Restraint System (Automatic Seat Belt)
In-Line Fuse Identification
15 Amp (1990-93) Condenser Fan Motor (A/T Models Only)
10 Amp (1990-93) A/C System (located on left side of heater case)
FUSIBLE LINK BLOCK IDENTIFICATION
Page 8 of 9 MITCHELL 1 ARTICLE - MAINTENANCE INFORMATION 1988-93 MAINTENANCE Ford Motor Co. Maintenance Inform...
3/10/2009 http://www.eautorepair.net/app/PrintItems.asp?S0=2097152&S1=0&SG=%7B9B990D68%2D660A%2D45E9%2D8F46%2DE
...
Page 373 of 454
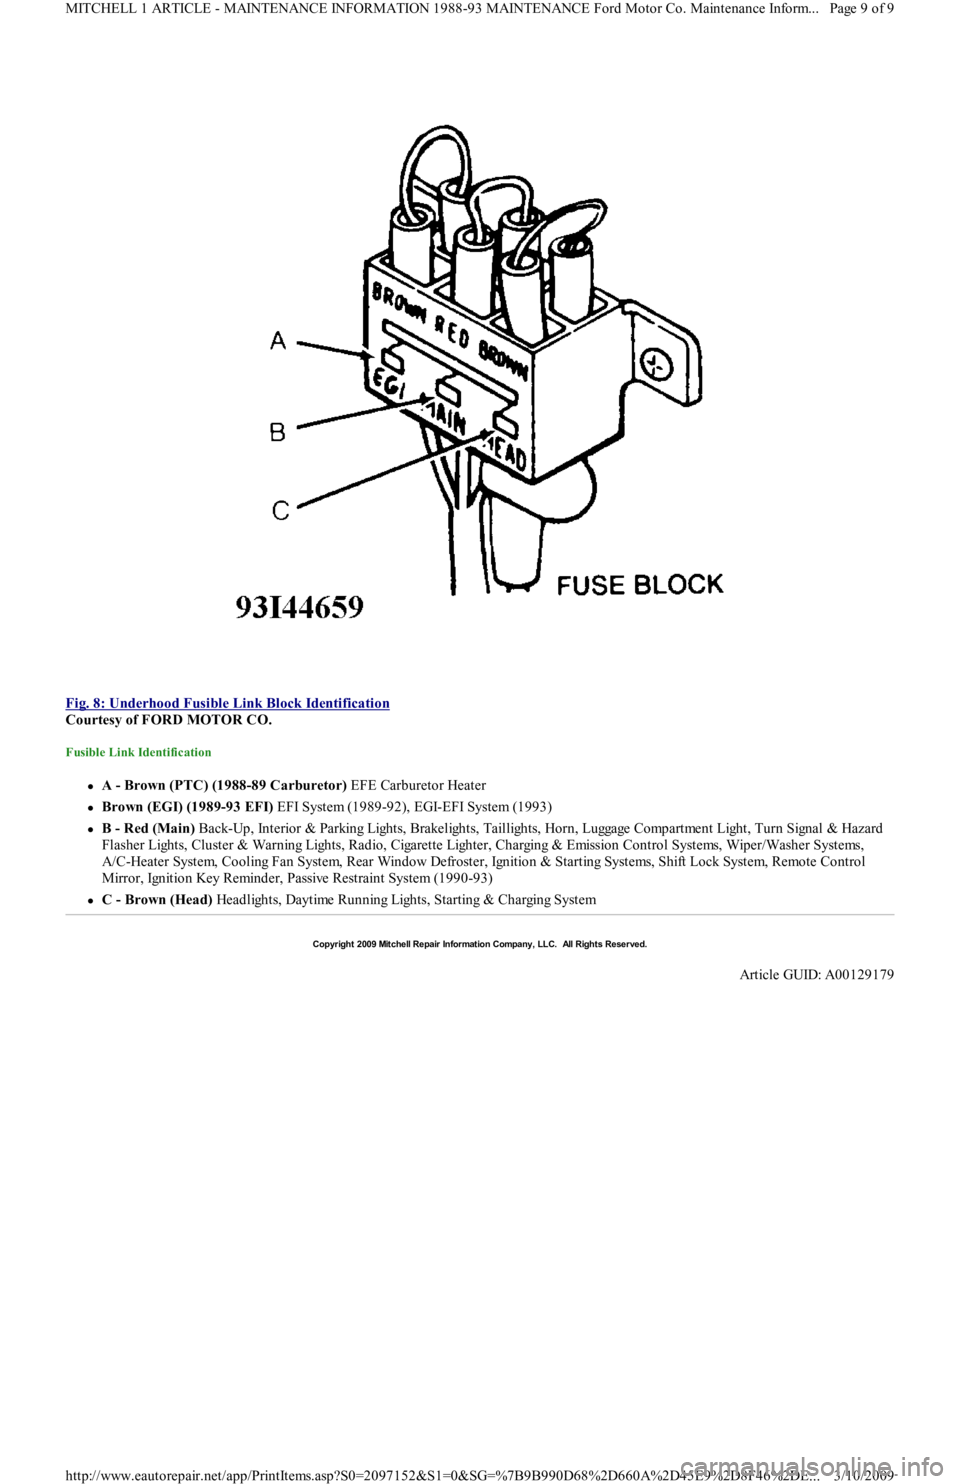
Fig. 8: Underhood Fusible Link Block Identification
Courtesy of FORD MOTOR CO.
Fusible Link Identification
A - Brown (PTC) (1988-89 Carburetor) EFE Carburetor Heater
Brown (EGI) (1989-93 EFI) EFI System (1989-92), EGI-EFI System (1993)
B - Red (Main) Back-Up, Interior & Parking Lights, Brakelights, Taillights, Horn, Luggage Compartment Light, Turn Signal & Hazard
F l a sh e r Ligh t s, C l u st e r & Wa r n in g Ligh t s, R a d io , C iga r e t t e Ligh t e r , C h a r gin g & E missio n C o n t r o l S yst e ms, Wip e r / Wa sh e r S yst e ms,
A/C-Heater System, Cooling Fan System, Rear Window Defroster, Ignition & Starting Systems, Shift Lock System, Remote Control
Mirror, Ignition Key Reminder, Passive Restraint System (1990-93)
C - Brown (Head) Headlights, Daytime Running Lights, Starting & Charging System
Copyr ight 2009 Mitchell Repair Information Company, LLC. All Rights Reserved.
Article GUID: A00129179
Page 9 of 9 MITCHELL 1 ARTICLE - MAINTENANCE INFORMATION 1988-93 MAINTENANCE Ford Motor Co. Maintenance Inform...
3/10/2009 http://www.eautorepair.net/app/PrintItems.asp?S0=2097152&S1=0&SG=%7B9B990D68%2D660A%2D45E9%2D8F46%2DE
...
Page 374 of 454
Back To Article
SERVICE INDICATOR & WARNING LIGHTS
1988-92 MAINT ENANCE Ford Motor Co. Service Indicator & Warning Lights
SERVICE INDICATOR & WARNING LIGHTS
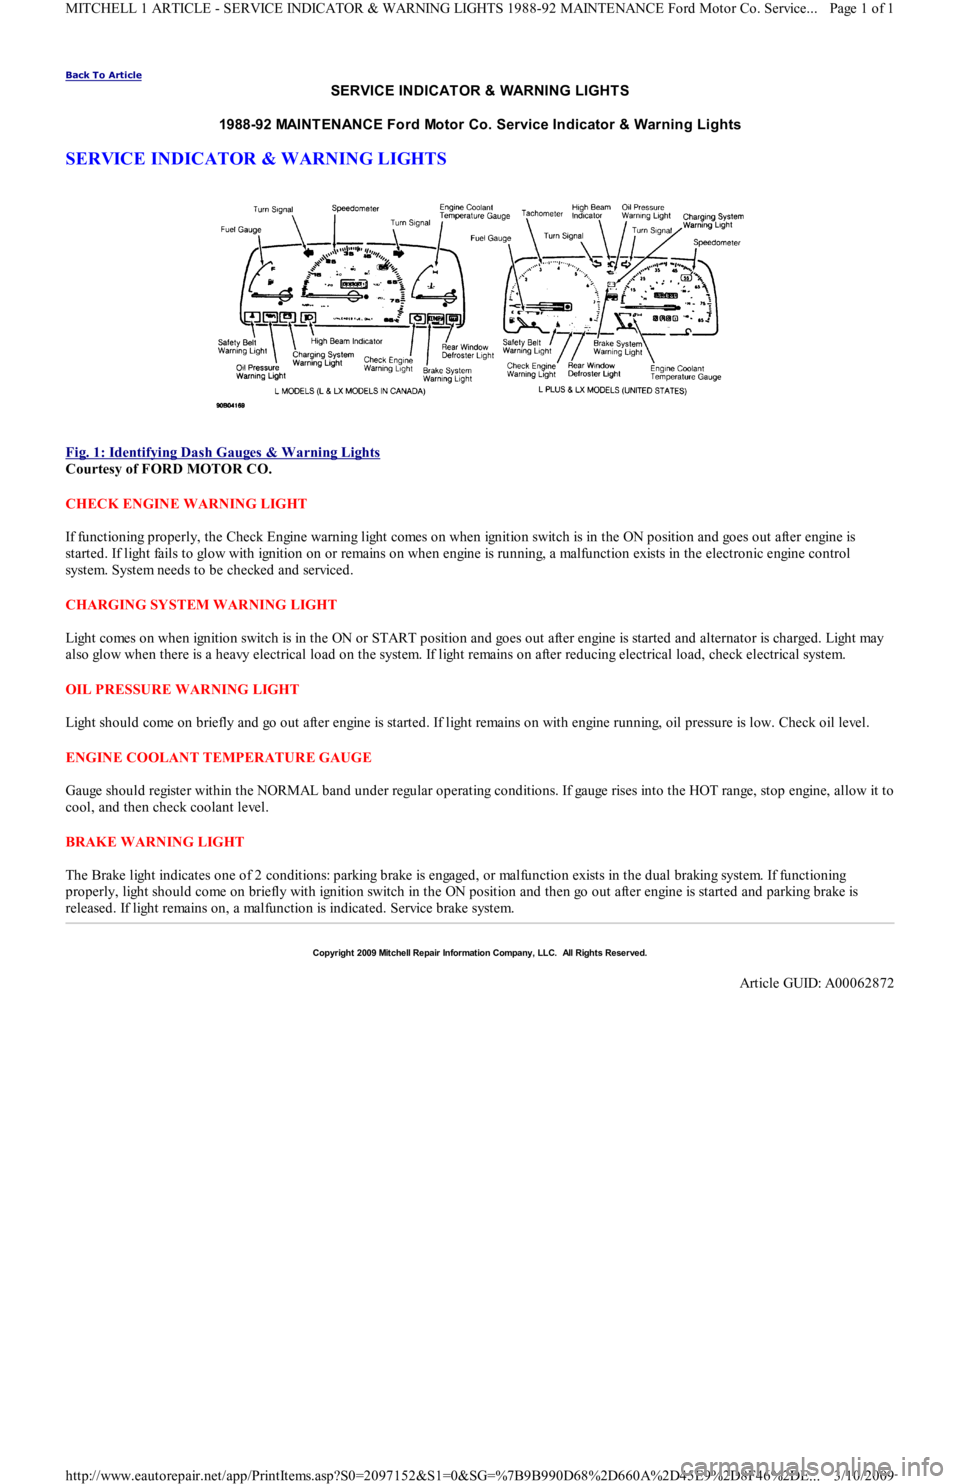
Fig. 1: Identifying Dash Gauges & W arning Lights
Courtesy of FORD MOTOR CO.
CHECK ENGINE WARNING LIGHT
If functioning properly, the Check Engine warning light comes on when ignition switch is in the ON position and goes out after engine is
started. If light fails to glow with ignition on or remains on when engine is running, a malfunction exists in the electronic engine control
system. System needs to be checked and serviced.
CHARGING SYSTEM WARNING LIGHT
Light comes on when ignition switch is in the ON or START position and goes out after engine is started and alternator is charged. Light may
also glow when there is a heavy electrical load on the system. If light remains on after reducing electrical load, check electrical system.
OIL PRESSURE WARNING LIGHT
Light should come on briefly and go out after engine is started. If light remains on with engine running, oil pressure is low. Check oil level.
ENGINE COOLANT TEMPERATURE GAUGE
Gauge should register within the NORMAL band under regular operating conditions. If gauge rises into the HOT range, stop engine, allow it to
cool, and then check coolant level.
BRAKE WARNING LIGHT
The Brake light indicates one of 2 conditions: parking brake is engaged, or malfunction exists in the dual braking system. If functioning
properly, light should come on briefly with ignition switch in the ON position and then go out after engine is started and parking brake is
released. If light remains on, a malfunction is indicated. Service brake system.
Copyr ight 2009 Mitchell Repair Information Company, LLC. All Rights Reserved.
Article GUID: A00062872
Page 1 of 1 MITCHELL 1 ARTICLE - SERVICE INDICATOR & WARNING LIGHTS 1988-92 MAINTENANCE Ford Motor Co. Service
...
3/10/2009 http://www.eautorepair.net/app/PrintItems.asp?S0=2097152&S1=0&SG=%7B9B990D68%2D660A%2D45E9%2D8F46%2DE
...
Page 375 of 454
Back To Article
ST EERING SYST EM - MANUAL
1991 ST EERING Ford Motor Co. - Steering - Manual Rack & Pinion
DESCRIPTION
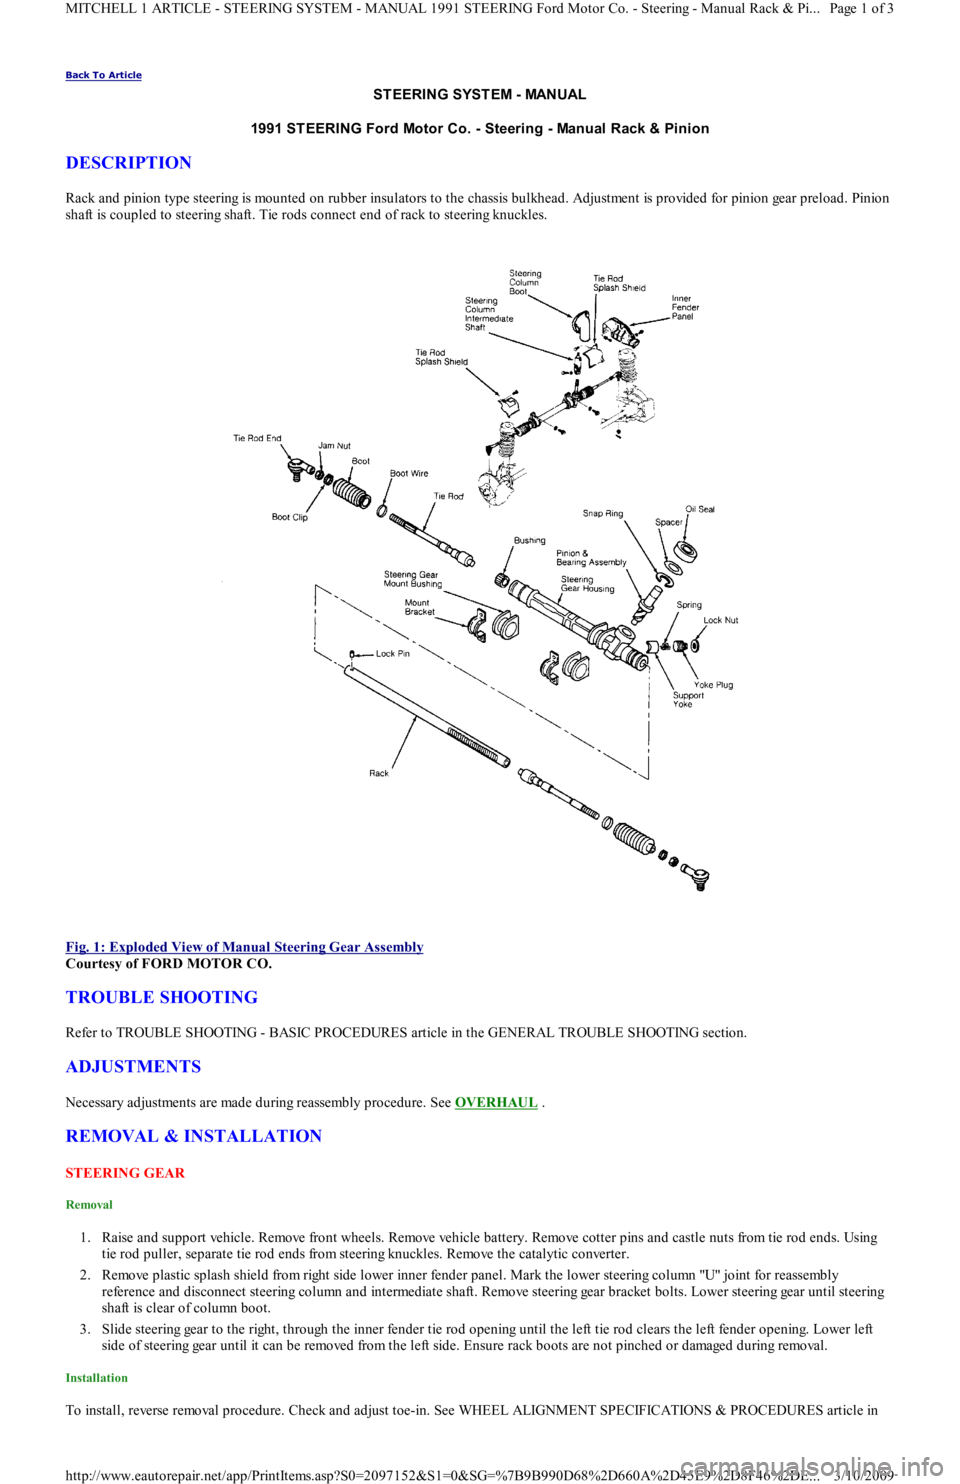
Rack and pinion type steering is mounted on rubber insulators to the chassis bulkhead. Adjustment is provided for pinion gear preload. Pinion
shaft is coupled to steering shaft. Tie rods connect end of rack to steering knuckles.
Fig. 1: Exploded View of Manual Steering Gear Assembly
Courtesy of FORD MOTOR CO.
TROUBLE SHOOTING
Refer to TROUBLE SHOOTING - BASIC PROCEDURES article in the GENERAL TROUBLE SHOOTING section.
ADJUSTMENTS
Necessary adjustments are made during reassembly procedure. See OVERHAUL .
REMOVAL & INSTALLATION
STEERING GEAR
Removal
1. Raise and support vehicle. Remove front wheels. Remove vehicle battery. Remove cotter pins and castle nuts from tie rod ends. Using
tie rod puller, separate tie rod ends from steering knuckles. Remove the catalytic converter.
2. Remove plastic splash shield from right side lower inner fender panel. Mark the lower steering column "U" joint for reassembly
reference and disconnect steering column and intermediate shaft. Remove steering gear bracket bolts. Lower steering gear until steering
shaft is clear of column boot.
3. Slide steering gear to the right, through the inner fender tie rod opening until the left tie rod clears the left fender opening. Lower left
side of steering gear until it can be removed from the left side. Ensure rack boots are not pinched or damaged during removal.
Installation
To install, reverse removal procedure. Check and adjust toe-in. See WHEEL ALIGNMENT SPECIFICATIONS & PROCEDURES article in
Page 1 of 3 MITCHELL 1 ARTICLE - STEERING SYSTEM - MANUAL 1991 STEERING Ford Motor Co. - Steering - Manual Rack & Pi
...
3/10/2009 http://www.eautorepair.net/app/PrintItems.asp?S0=2097152&S1=0&SG=%7B9B990D68%2D660A%2D45E9%2D8F46%2DE
...
Page 376 of 454
the WHEEL ALIGNMENT section.
OVERHAUL
STEERING GEAR
Disassembly
1. With steering gear removed from vehicle, place steering gear in a soft-jawed vise. Mark threaded portion of tie rod for reassembly.
Remove tie rod ends. Remove tie rod boots. Remove lock pins from both ends of rack. See Fig. 1
.
2. Remove tie rod ball socket from end of rack. Remove both tie rods. Remove lock nut from yoke plug. Remove yoke plug, spring and
yoke support. Use a small screwdriver to remove pinion oil seal from pinion shaft. Remove pinion bearing snap ring.
3. Remove pinion and bearing assembly. If necessary use Valve Body Puller (T78P-3504-B) to remove pinion and bearing assembly.
Remove rack from pinion side of housing. If lower pinion bearing needs replacing, use Blind Hole Bearing Puller (D80L-100-L) and
Slide Hammer (T50T-100-A) to remove.
4. Press bushing lock tabs into the 3 slots located at end of rack housing. Use Blind Hole Bearing Puller (D80L-100-L), to remove rack
support bushing from right end of rack housing.
Inspection
1. Check rubber boots, ball bearings and tooth surface of rack for wear or damage. Using a dial indicator and "V" blocks, check rack for
straightness. Maximum allowable runout is 0.012" (0.3 mm). If rack support bushings are worn, use a screwdriver to release the tab lock
on the side opposite the pinion. Use blind hole Bearing Puller (D80L-100R) with slide hammer to remove bushing.
2. Check tie rod ball joints for smooth operation. Replace parts as necessary. Check sliding surface of rack support and gear housing for
cracks or damage. Check rack bushing for excessive wear. Replace entire gear housing assembly if any of these parts are worn or
damaged.
Reassembly
1. Apply lithium grease to ball bearing, roller bearing, inside of gear housing, lip of oil seal, sliding surface and back of rack support,
sliding surface of rack bushing, rack pinion teeth and ball joints. Install rack support bushing into right end of rack housing. Ensure lock
tabs engage with slots in housing.
2. If previously removed, install a new lower pinion bearing using a bushing installer or a piece of wooden dowel stock. Carefully insert
non-toothed side of rack into left end of rack housing, with rack teeth facing pinion bore. Position rack in housing so rack protrudes
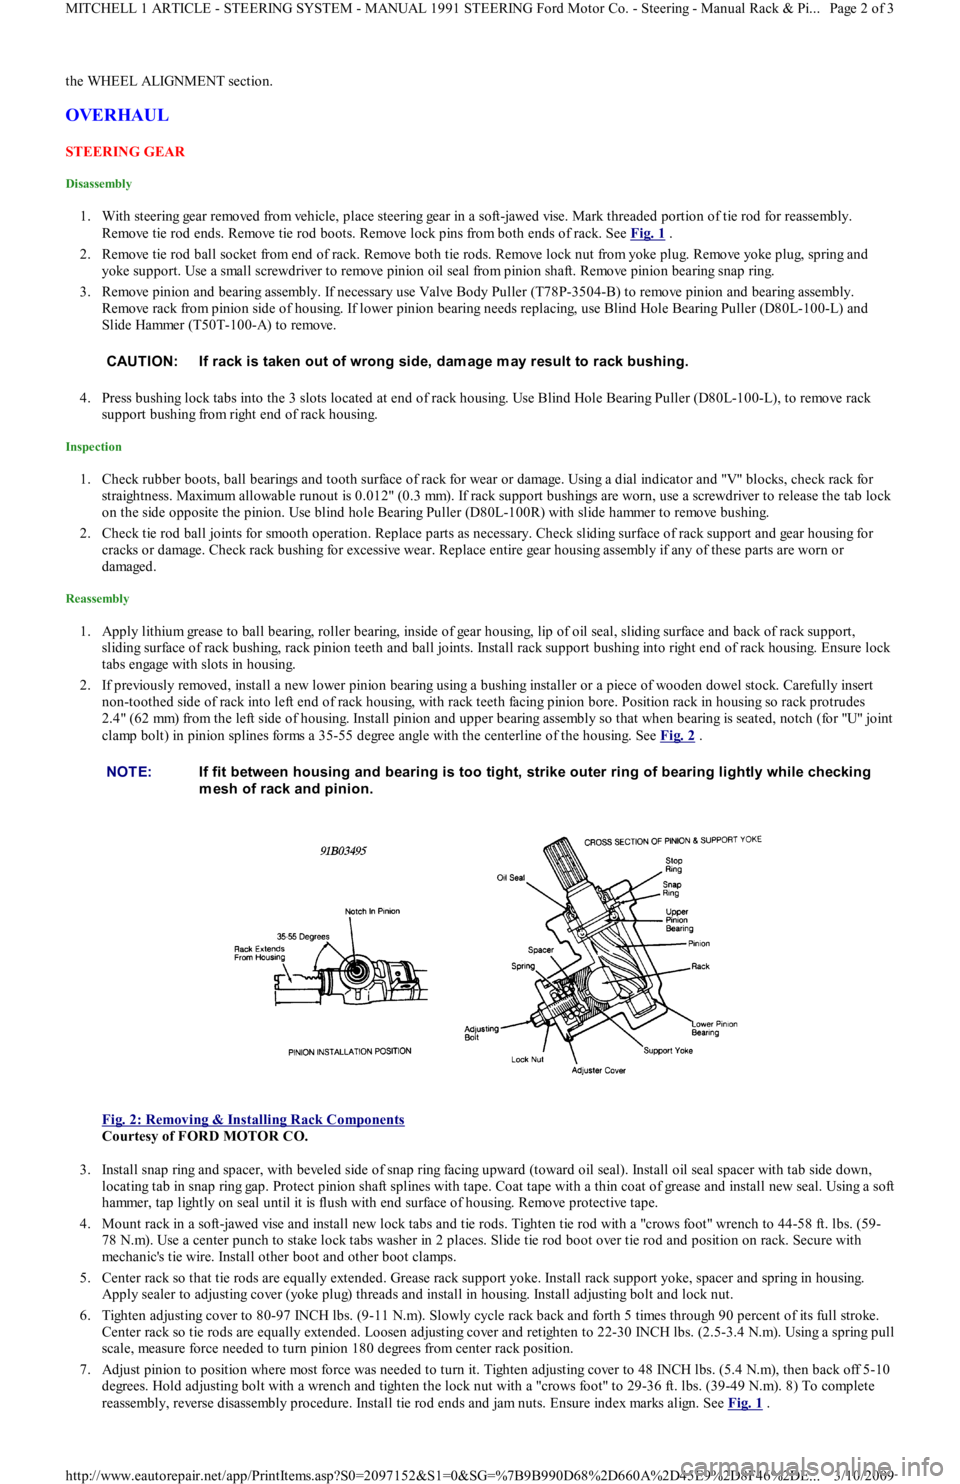
2.4" (62 mm) from the left side of housing. Install pinion and upper bearing assembly so that when bearing is seated, notch (for "U" joint
clamp bolt) in pinion splines forms a 35-55 degree angle with the centerline of the housing. See Fig. 2
.
Fig. 2: Removing & Installing Rack Components
Courtesy of FORD MOTOR CO.
3. Install snap ring and spacer, with beveled side of snap ring facing upward (toward oil seal). Install oil seal spacer with tab side down,
locating tab in snap ring gap. Protect pinion shaft splines with tape. Coat tape with a thin coat of grease and install new seal. Using a soft
hammer, tap lightly on seal until it is flush with end surface of housing. Remove protective tape.
4. Mount rack in a soft-jawed vise and install new lock tabs and tie rods. Tighten tie rod with a "crows foot" wrench to 44-58 ft. lbs. (59-
78 N.m). Use a center punch to stake lock tabs washer in 2 places. Slide tie rod boot over tie rod and position on rack. Secure with
mechanic's tie wire. Install other boot and other boot clamps.
5. Center rack so that tie rods are equally extended. Grease rack support yoke. Install rack support yoke, spacer and spring in housing.
Apply sealer to adjusting cover (yoke plug) threads and install in housing. Install adjusting bolt and lock nut.
6. Tighten adjusting cover to 80-97 INCH lbs. (9-11 N.m). Slowly cycle rack back and forth 5 times through 90 percent of its full stroke.
Center rack so tie rods are equally extended. Loosen adjusting cover and retighten to 22-30 INCH lbs. (2.5-3.4 N.m). Using a spring pull
scale, measure force needed to turn pinion 180 degrees from center rack position.
7. Adjust pinion to position where most force was needed to turn it. Tighten adjusting cover to 48 INCH lbs. (5.4 N.m), then back off 5-10
degrees. Hold adjusting bolt with a wrench and tighten the lock nut with a "crows foot" to 29-36 ft. lbs. (39-49 N.m). 8) To comp l et e
reassembly, reverse disassembly procedure. Install tie rod ends and jam nuts. Ensure index marks align. See Fig. 1
. CAUT ION: If rack is taken out of wrong side, dam age m ay result to rack bushing.
NOTE:If fit between housing and bearing is too tight, strike outer ring of bearing lightly while checking
m esh of rack and pinion.
Page 2 of 3 MITCHELL 1 ARTICLE - STEERING SYSTEM - MANUAL 1991 STEERING Ford Motor Co. - Steering - Manual Rack & Pi
...
3/10/2009 http://www.eautorepair.net/app/PrintItems.asp?S0=2097152&S1=0&SG=%7B9B990D68%2D660A%2D45E9%2D8F46%2DE
...
Page 377 of 454
WHEEL ALIGNMENT
After performing appropriate service procedures, refer to WHEEL ALIGNMENT SPECIFICATIONS & PROCEDURES article in the WHEEL
ALIGNMENT section.
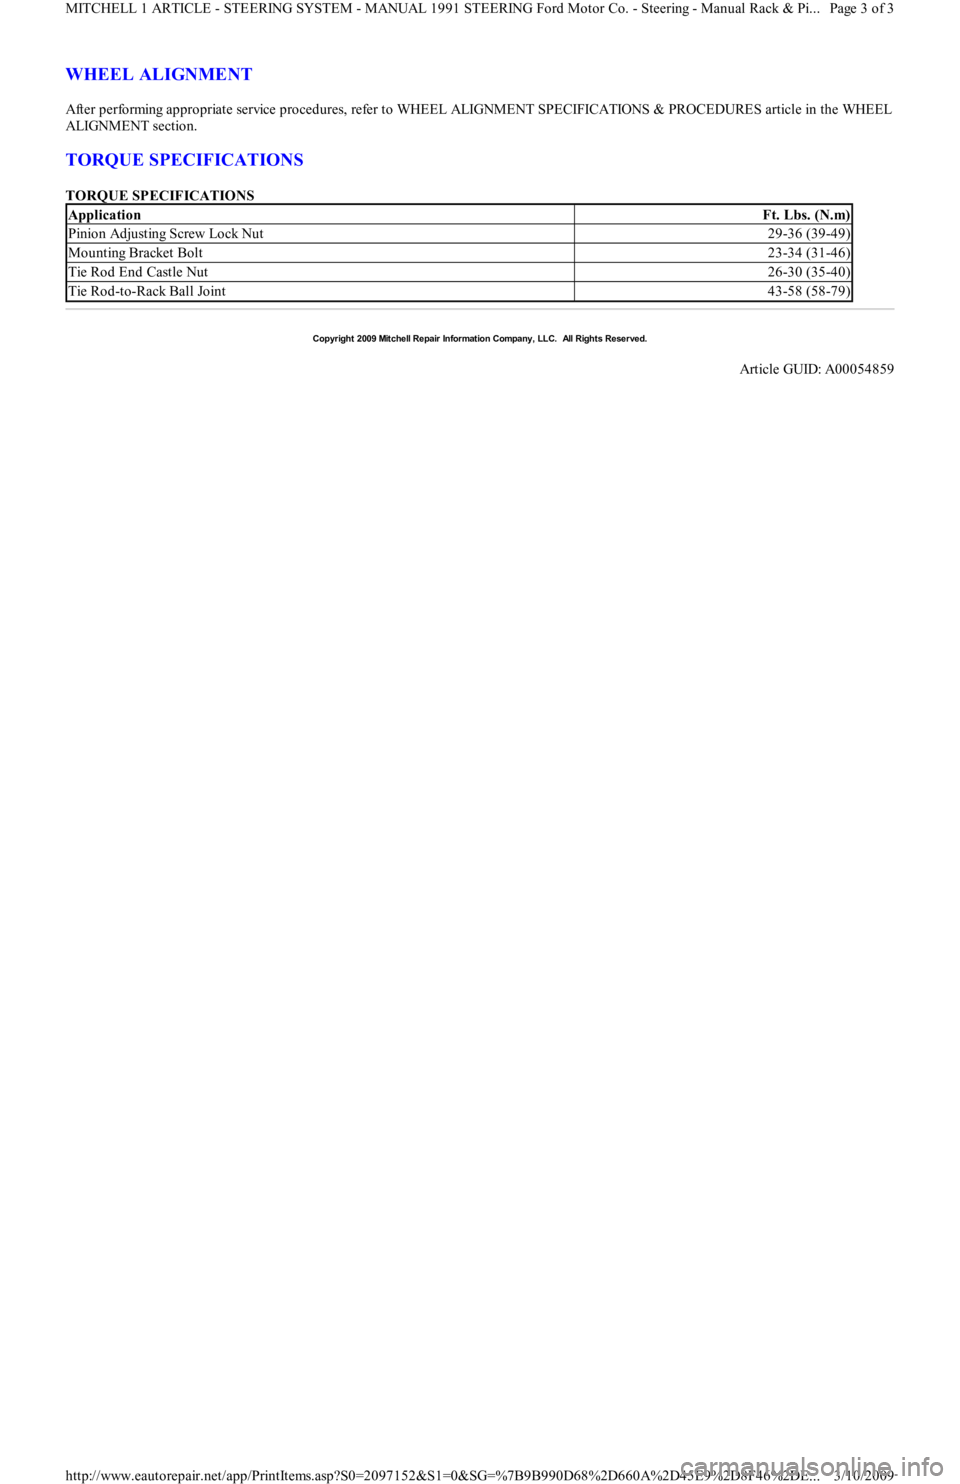
TORQUE SPECIFICATIONS
TORQUE SPECIFICATIONS
ApplicationFt. Lbs. (N.m)
Pinion Adjusting Screw Lock Nut29-36 (39-49)
Mounting Bracket Bolt23-34 (31-46)
Tie Rod End Castle Nut26-30 (35-40)
Tie Rod-to-Rack Ball Joint43-58 (58-79)
Copyr ight 2009 Mitchell Repair Information Company, LLC. All Rights Reserved.
Article GUID: A00054859
Page 3 of 3 MITCHELL 1 ARTICLE - STEERING SYSTEM - MANUAL 1991 STEERING Ford Motor Co. - Steering - Manual Rack & Pi
...
3/10/2009 http://www.eautorepair.net/app/PrintItems.asp?S0=2097152&S1=0&SG=%7B9B990D68%2D660A%2D45E9%2D8F46%2DE
...
Page 378 of 454
Back To Article
ST EERING SYST EM - POWER
1991-92 ST EERING Ford Motor Co. - Steering - Power Rack & Pinion
DESCRIPTION & OPERATION
Power steering system consists of a rack and pinion steering gear, valve body, power steering pump, fluid reservoir and interconnecting
hydraulic lines. Pressure and return lines from pump are connected to valve body. A vane-type power steering pump draws fluid from the
steering reservoir. Fluid is compressed by rotor and vanes inside steering pump and sent to steering gear. Pressure is monitored and controlled
by a pressure switch and a control valve located inside of steering pump.
TROUBLE SHOOTING
Refer to TROUBLE SHOOTING - BASIC PROCEDURES article in the GENERAL TROUBLE SHOOTING section.
LUBRICATION
CAPACITY
Information is not available.
FLUID TYPE
Use Dexron-II ATF type fluid.
FLUID LEVEL CHECK
Check fluid level before engine is started, while fluid is still cool. Remove reservoir cap fluid indicator on steering pump. Check fluid level.
Fluid should be between the "L" and "H" marks on the level gauge dipstick. If fluid is needed, fill to the "L" mark on dipstick. Run engine until
warm and turn steering wheel fully in both directions about 10 times. Return steering to straight-ahead position and shut engine off. Ensure
fluid level is between "L" and "H" marks. Add fluid if necessary.
HYDRAULIC FLUID BLEEDING
1. Raise and support front of vehicle. Ensure pump reservoir is filled to specified level. With ignition coil wire disconnected, crank engine
and add fluid to steering pump until fluid level remains constant. While cranking engine, rotate steering from stop to stop. Recheck and
add fluid as necessary.
2. Start engine and allow to idle for several minutes. Turn steering wheel completely lock-to-lock several times. Check fluid level. Add
fluid as necessary. Continue this procedure until there is no bubbling or decrease in fluid level.
ADJUSTMENTS
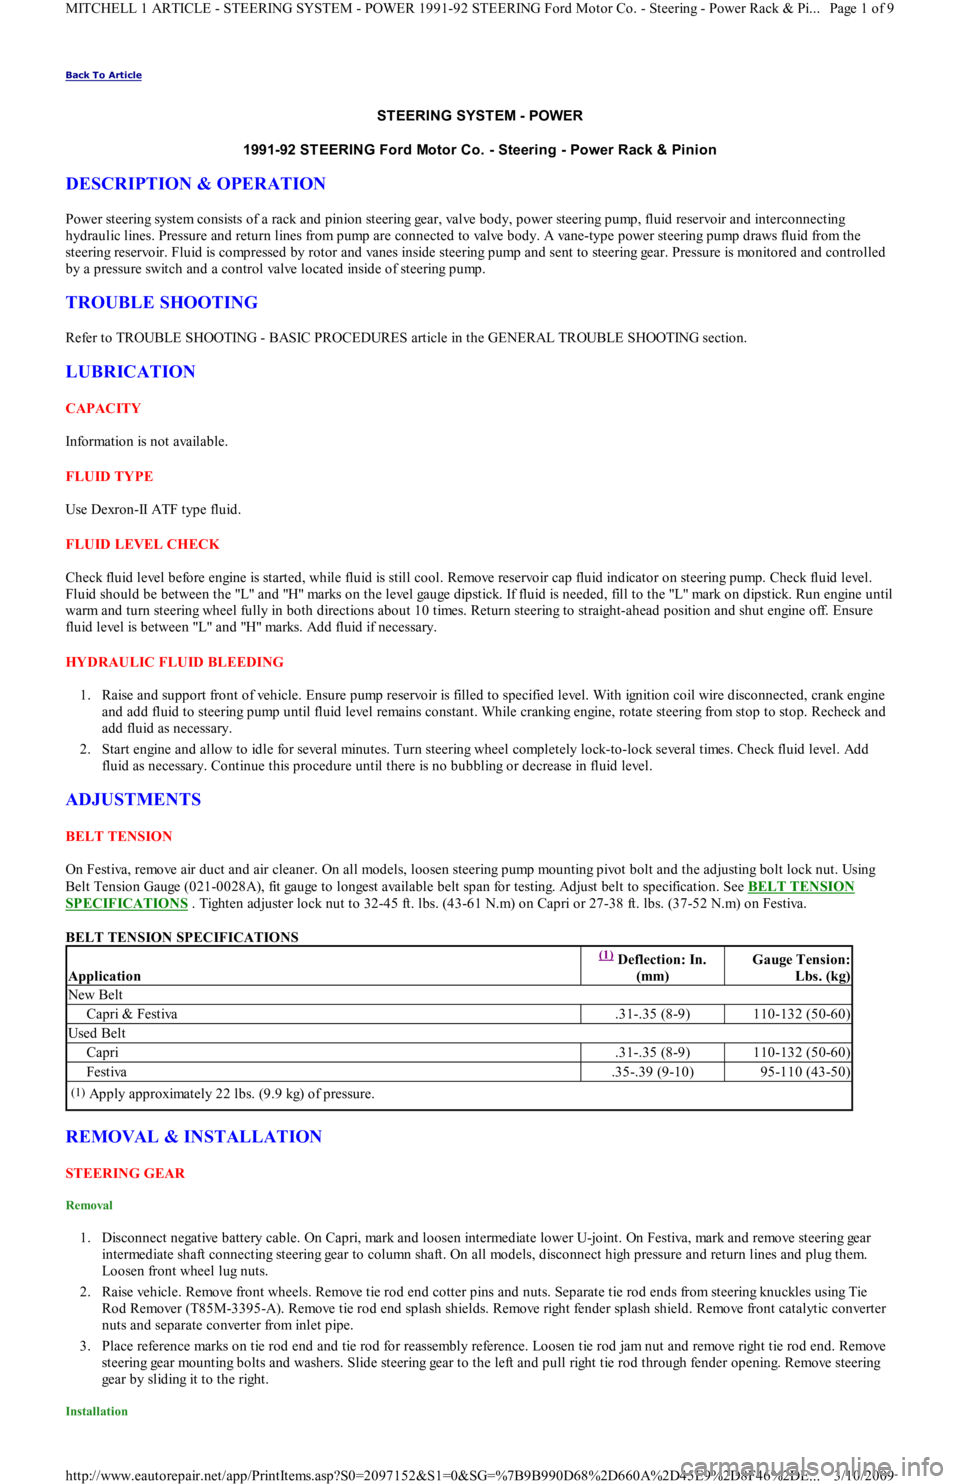
BELT TENSION
On Festiva, remove air duct and air cleaner. On all models, loosen steering pump mounting pivot bolt and the adjusting bolt lock nut. Using
Belt Tension Gauge (021-0028A), fit gauge to longest available belt span for testing. Adjust belt to specification. See BELT TENSION
SPECIFICATIONS . Tighten adjuster lock nut to 32-45 ft. lbs. (43-61 N.m) on Capri or 27-38 ft. lbs. (37-52 N.m) on Festiva.
BELT TENSION SPECIFICATIONS
REMOVAL & INSTALLATION
STEERING GEAR
Removal
1. Disconnect negative battery cable. On Capri, mark and loosen intermediate lower U-joint. On Festiva, mark and remove steering gear
intermediate shaft connecting steering gear to column shaft. On all models, disconnect high pressure and return lines and plug them.
Loosen front wheel lug nuts.
2. Raise vehicle. Remove front wheels. Remove tie rod end cotter pins and nuts. Separate tie rod ends from steering knuckles using Tie
Rod Remover (T85M-3395-A). Remove tie rod end splash shields. Remove right fender splash shield. Remove front catalytic converter
nuts and separate converter from inlet pipe.
3. Place reference marks on tie rod end and tie rod for reassembly reference. Loosen tie rod jam nut and remove right tie rod end. Remove
steering gear mounting bolts and washers. Slide steering gear to the left and pull right tie rod through fender opening. Remove steering
gear by sliding it to the right.
Installation
Application
(1) Deflection: In.
(mm)Gauge Tension:
Lbs. (kg)
New Belt
Capri & Festiva.31-.35 (8-9)110-132 (50-60)
Used Belt
Capri.31-.35 (8-9)110-132 (50-60)
Festiva.35-.39 (9-10)95-110 (43-50)
(1)Apply approximately 22 lbs. (9.9 kg) of pressure.
Page 1 of 9 MITCHELL 1 ARTICLE - STEERING SYSTEM - POWER 1991-92 STEERING Ford Motor Co. - Steering - Power Rack & Pi
...
3/10/2009 http://www.eautorepair.net/app/PrintItems.asp?S0=2097152&S1=0&SG=%7B9B990D68%2D660A%2D45E9%2D8F46%2DE
...
Page 379 of 454
1. Position steering gear in its mounting position. Attach intermediate shaft to steering gear pinion and tighten clamp bolt to 13-20 ft. lbs.
(18-26 N.m). Guide intermediate shaft into steering column hole. Lower vehicle.
2. Lift steering gear and align intermediate shaft with universal joint and install clamp bolt. Raise vehicle. Install steering gear mounting
bolts and tighten to 23-34 ft. lbs. (31-46 N.m). Install right tie rod end, using marks made during removal for installation reference.
Attach tie rod ends to steering knuckles. Install tie rod end nuts and tighten to 22-33 ft. lbs. (29-44 N.m).
3. Install tie rod end cotter pins. Attach catalytic converter to inlet pipe and install attaching nuts. Tighten nuts to 23-34 ft. lbs. (31-46
N.m). Install tie rod end splash shields. Install right fender splash shield. install front wheels. Lower vehicle.
4. Connect high pressure and return lines. Connect negative battery cable. Add power steering fluid and bleed air from system and check
for leaks. See HYDRAULIC FLUID BLEEDING
under LUBRICATION.
POWER STEERING PUMP
Removal (Capri)
1. Remove right radiator support and brace. Remove pump drive belt. Disconnect intercooler outlet hose at throttle intake (if equipped).
R e mo ve gr o u n d wir e fr o m e n gin e l ift in g e ye .
2. Remove pressure and return hoses and plug. Remove wire from pressure switch. Remove adjusting screw, nut and block from pump
bracket. Remove pivot bolt. Remove bracket retaining bolts then remove pump.
Removal (Festiva)
Remove air duct and air cleaner. Disconnect electrical connector from fluid pressure switch on power steering pump. Disconnect and plug
return and pressure lines. Remove adjustment bolt. Remove lock nut, washer and bracket bolt. Loosen mounting bolt and disconnect drive
belt. Remove mounting bolt. Remove power steering pump.
Installation (Capri & Festiva)
To install pump, reverse removal procedure. Adjust steering belt tension. Tighten all nuts and bolts to specification. See TORQUE
SPECIFICATIONS . Add power steering fluid and bleed air from system and check for leaks. See HYDRAULIC FLUID BLEEDING
under LUBRICATION.
OVERHAUL
STEERING GEAR
Disassembly (Capri)
1. Remove steering gear and place in soft-jawed vise. Remove external hydraulic lines. See Fig. 1 . Remove mount brackets and rubber
mount bushings. Remove brass tubing seats using a self-tapping screw and 2 screwdrivers.
Page 2 of 9 MITCHELL 1 ARTICLE - STEERING SYSTEM - POWER 1991-92 STEERING Ford Motor Co. - Steering - Power Rack & Pi
...
3/10/2009 http://www.eautorepair.net/app/PrintItems.asp?S0=2097152&S1=0&SG=%7B9B990D68%2D660A%2D45E9%2D8F46%2DE
...
Page 380 of 454
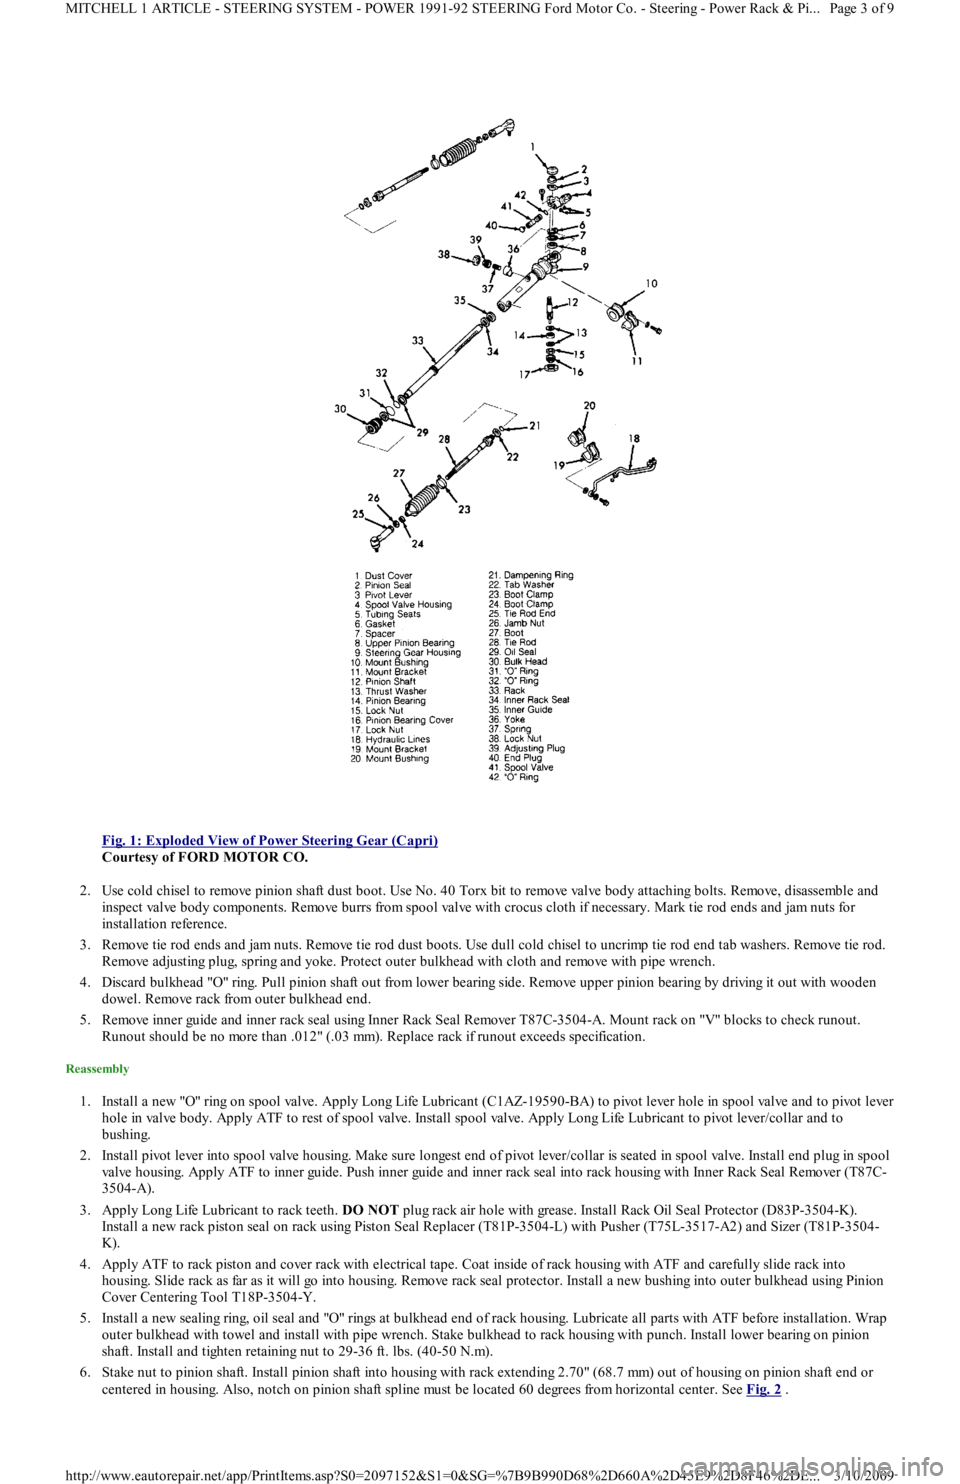
Fig. 1: Exploded View of Power Steering Gear (Capri)
Courtesy of FORD MOTOR CO.
2. Use cold chisel to remove pinion shaft dust boot. Use No. 40 Torx bit to remove valve body attaching bolts. Remove, disassemble and
inspect valve body components. Remove burrs from spool valve with crocus cloth if necessary. Mark tie rod ends and jam nuts for
installation reference.
3. Remove tie rod ends and jam nuts. Remove tie rod dust boots. Use dull cold chisel to uncrimp tie rod end tab washers. Remove tie rod.
Remove adjusting plug, spring and yoke. Protect outer bulkhead with cloth and remove with pipe wrench.
4. Discard bulkhead "O" ring. Pull pinion shaft out from lower bearing side. Remove upper pinion bearing by driving it out with wooden
dowel. Remove rack from outer bulkhead end.
5. Remove inner guide and inner rack seal using Inner Rack Seal Remover T87C-3504-A. Mount rack on "V" blocks to check runout.
Runout should be no more than .012" (.03 mm). Replace rack if runout exceeds specification.
Reassembly
1. Install a new "O" ring on spool valve. Apply Long Life Lubricant (C1AZ-19590-BA) to pivot lever hole in spool valve and to pivot lever
hole in valve body. Apply ATF to rest of spool valve. Install spool valve. Apply Long Life Lubricant to pivot lever/collar and to
bushing.
2. Install pivot lever into spool valve housing. Make sure longest end of pivot lever/collar is seated in spool valve. Install end plug in spool
valve housing. Apply ATF to inner guide. Push inner guide and inner rack seal into rack housing with Inner Rack Seal Remover (T87C-
3504-A).
3. Apply Long Life Lubricant to rack teeth. DO NOT plug rack air hole with grease. Install Rack Oil Seal Protector (D83P-3504-K).
Install a new rack piston seal on rack using Piston Seal Replacer (T81P-3504-L) with Pusher (T75L-3517-A2) and Sizer (T81P-3504-
K).
4. Apply ATF to rack piston and cover rack with electrical tape. Coat inside of rack housing with ATF and carefully slide rack into
housing. Slide rack as far as it will go into housing. Remove rack seal protector. Install a new bushing into outer bulkhead using Pinion
Cover Centering Tool T18P-3504-Y.
5. Install a new sealing ring, oil seal and "O" rings at bulkhead end of rack housing. Lubricate all parts with ATF before installation. Wrap
outer bulkhead with towel and install with pipe wrench. Stake bulkhead to rack housing with punch. Install lower bearing on pinion
shaft. Install and tighten retaining nut to 29-36 ft. lbs. (40-50 N.m).
6. Stake nut to pinion shaft. Install pinion shaft into housing with rack extending 2.70" (68.7 mm) out of housing on pinion shaft end or
centered in housing. Also, notch on pinion shaft spline must be located 60 degrees from horizontal center. See Fig. 2
.
Page 3 of 9 MITCHELL 1 ARTICLE - STEERING SYSTEM - POWER 1991-92 STEERING Ford Motor Co. - Steering - Power Rack & Pi
...
3/10/2009 http://www.eautorepair.net/app/PrintItems.asp?S0=2097152&S1=0&SG=%7B9B990D68%2D660A%2D45E9%2D8F46%2DE
...