Cylinder HONDA INTEGRA 1998 4.G Owner's Guide
[x] Cancel search | Manufacturer: HONDA, Model Year: 1998, Model line: INTEGRA, Model: HONDA INTEGRA 1998 4.GPages: 1681, PDF Size: 54.22 MB
Page 172 of 1681
Crankshaft
Installation (cont'd)
I
I
t
l;I
I
fi,
\
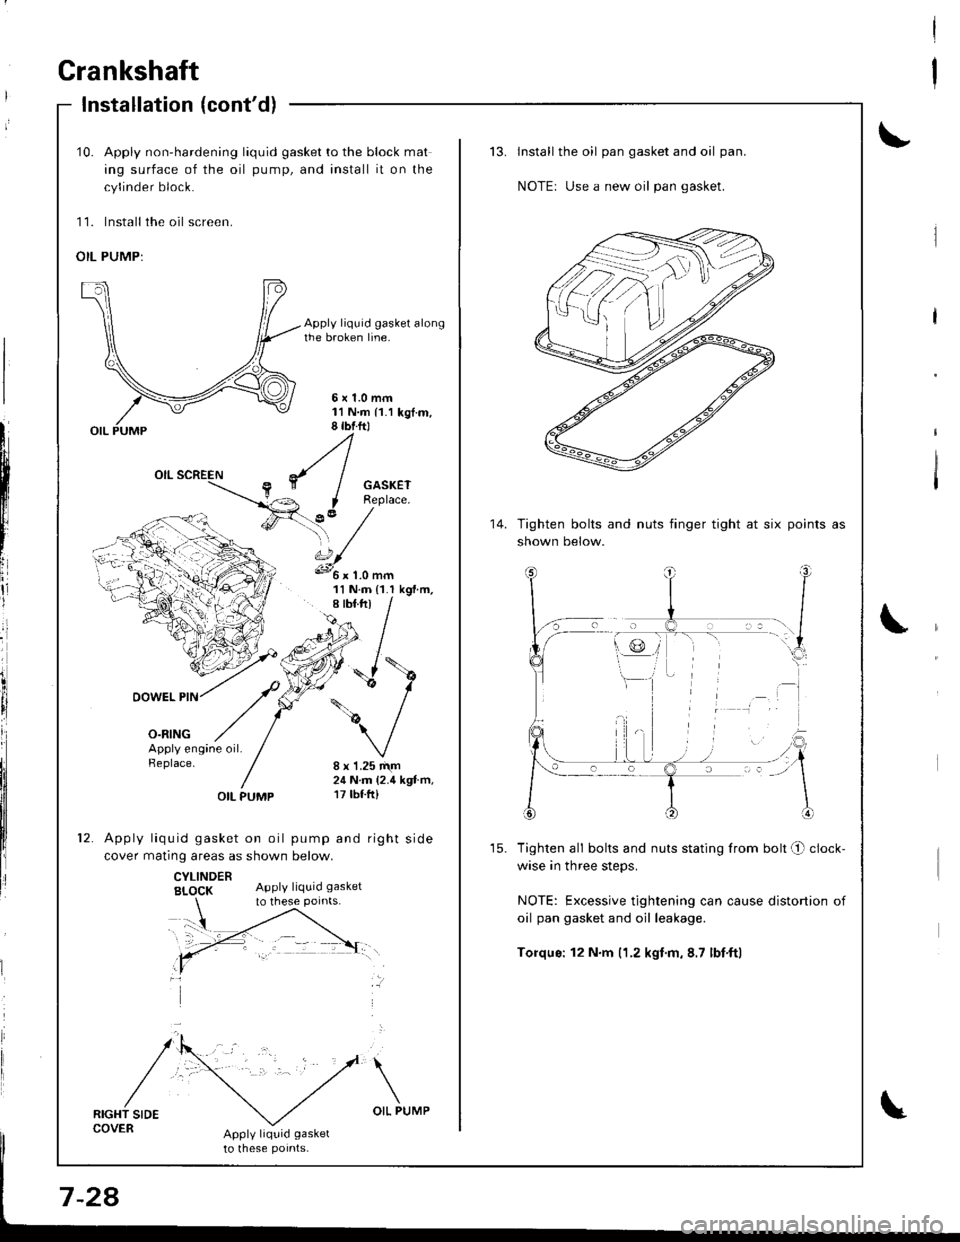
10. Apply non-hardening liquid gasket to the block mat
ing surface of the oil pump, and install it on the
cylinder block.
11. lnstall the oil screen.
OIL PUMP:
Apply liquid gasket alongthe broken line.
5x1.0mm11N.m 11.1 kgt.m,8 tbtftl
GASKETReplace.
?,' /'\, /s.../
11 N.m {1.I kgf.m,
DOWEL PIN
o-ntNG
/\
/
':'
Apply engine oil.Replace.8 x 1.25 r\m24 N.m (2.4 kgt.m,17 tbf.ft)OIL PUMP
Apply liquid gasket on oil pump and right side
cover matinq areas as shown below.
CYLINDERBI_OCK Apply liquid gasket
RIGHT SIDECOVERApply liquid gasket
to lhese potnts-
to these points.
Install the oil pan gasket and oil pan.
NOTEr Use a new oil pan gasket.
Tighten bolts and nuts finger tight at six
shown below.
points as
Tighten all bolts and nuts stating from bolt O clock-
wise in three steps.
NOTE: Excessive tightening can cause distortion of
oil pan gasket and oil leakage.
Torqus: 12 N.m (1.2 kgf.m,8.7 lbf'ftl
14.
Page 181 of 1681
Oil Filter
Replacement (cont'd)
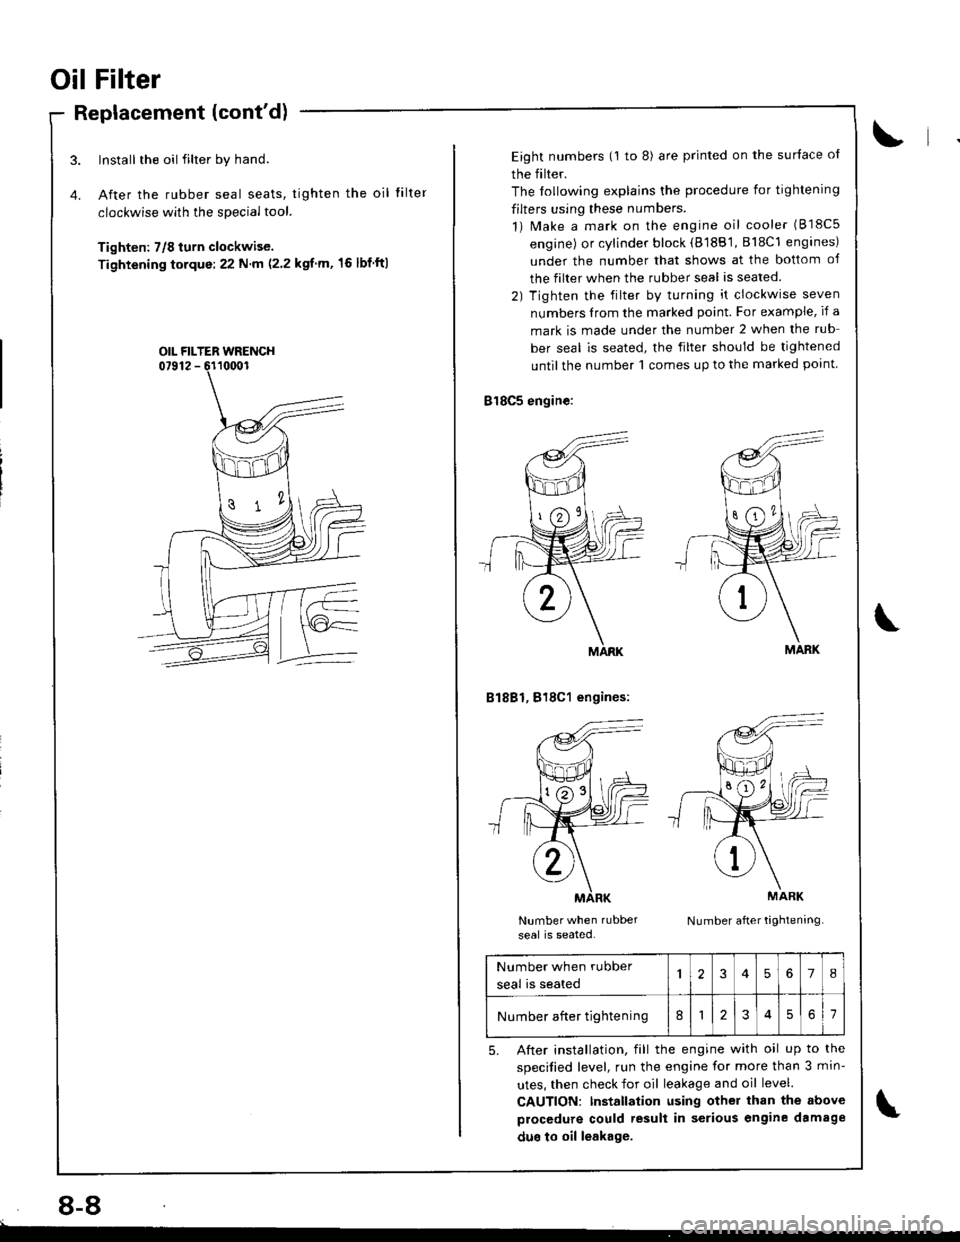
Install the oil filter by hand.
After the rubber seal seats, tighten the oil
clockwise with the special tool.
Tighten: 7/8 turn clockwise.
Tightening torque:22 N m (2.2 kgf m,'16 lbf ftl
tilte r
OIL FILTER WRENCH
8-8
Eight numbers (1 to 8) are printed on the surlace ol
the filter.
The lollowing explains the procedure for tightening
filters using these numbers.
1) Make a mark on the engine oil cooler (818c5
engine) or cylinder block (8188'1, 818C1 engines)
under the number that shows at the bottom of
the filter when the rubber seal is seated.
2) Tighten the filter by turning it clockwise seven
numbers Irom the marked point. For example, if a
mark is made under the number 2 when the rub
ber seal is seated, the filter should be tightened
until the number 1 comes up to the marked point
818C5 engine:
B1881, 818C1 engines:
Number when rubber
seal is seated.Number after tightening
MARK
MARK
Number when rubber
seal is seated
'I2345678
Number after tightening812561
5. After installation, fill the engine with oil up to the
specilied level, run the engine for more than 3 min-
utes, then check for oil leakage and oil level.
CAUTION: Installation using other than the above
procedure could result in serious engine damage
duo to oil leakage.
Page 183 of 1681
Oil Pump
Overhaul
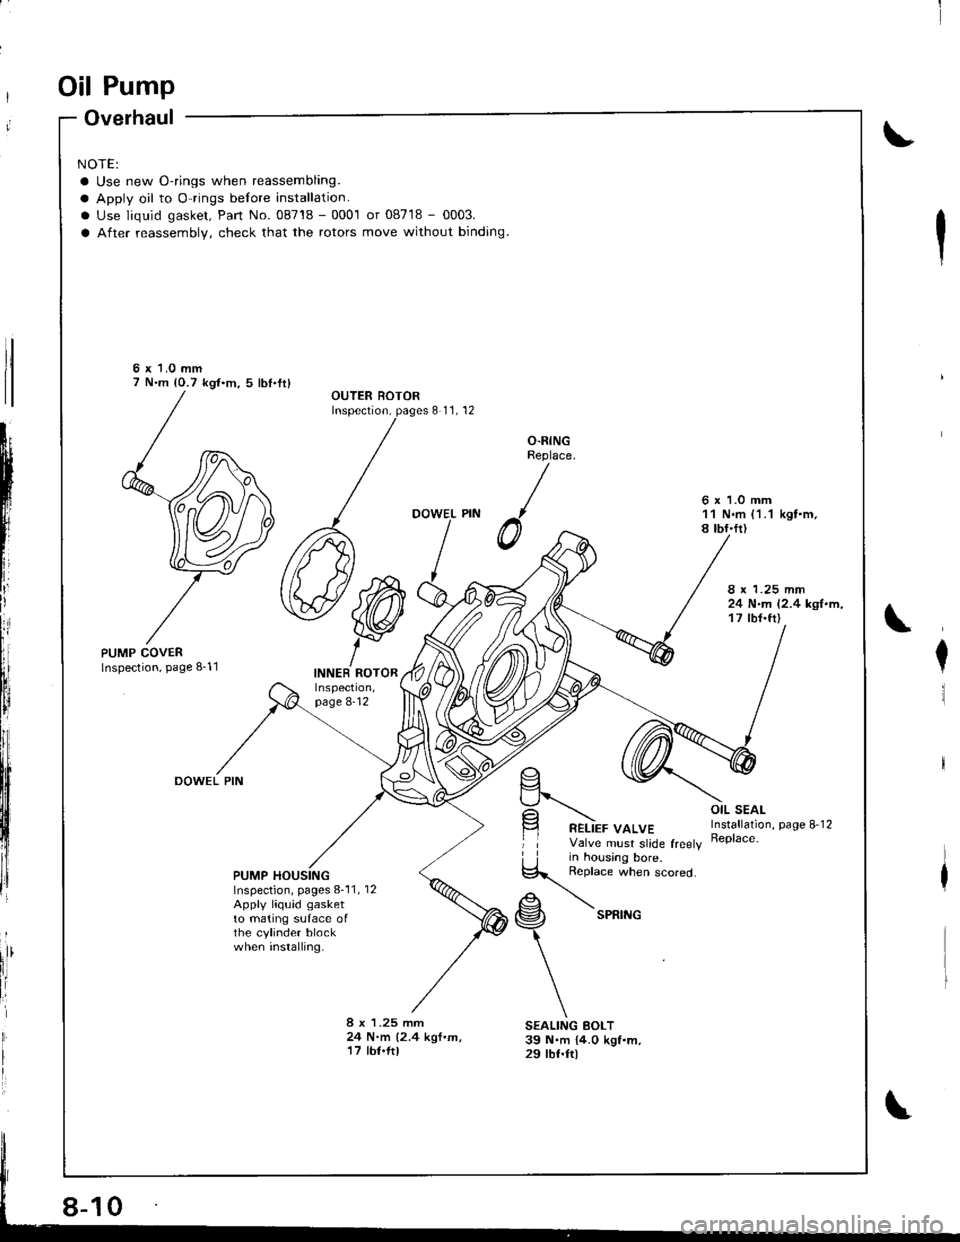
NOTE:
a Use new O-rings when reassembling.
a Apply oil to O-rings belore installation.
. Use liquid gasket, Pan No. 08718 - 0001 or 08718 - 0003.
a After reassembly, check that the rotors move without binding.
6 x 1.0 mm7 N.m 10.7 kg{.m, 5 lbf.fr}OUTER ROTORInspection, pages 8 11, 12
SEALING BOLT39 N.m {4.0 kgf.m,29 rbf.ftl
t
n
I'
F'
ii
[]lir
ffi
O.RINGReplace
/6 x 1.0 mm11 N.m (1.1 kgt.m.8 tbf.fr)
8 x 1.25 mm24 N.m 12.4 kgl.m.17 lbt.fr)
DOWEL PIN
PUMP HOUSINGInspection, pages 8-'11, 12Apply liquid gasketto mating suface ofthe cylinder blockwhen installing.
8 x 1.25 mm24 N.m (2.4 kgf.m,17 tbt.ftl
Page 184 of 1681
3.
Removal/lnspection/lnstallation
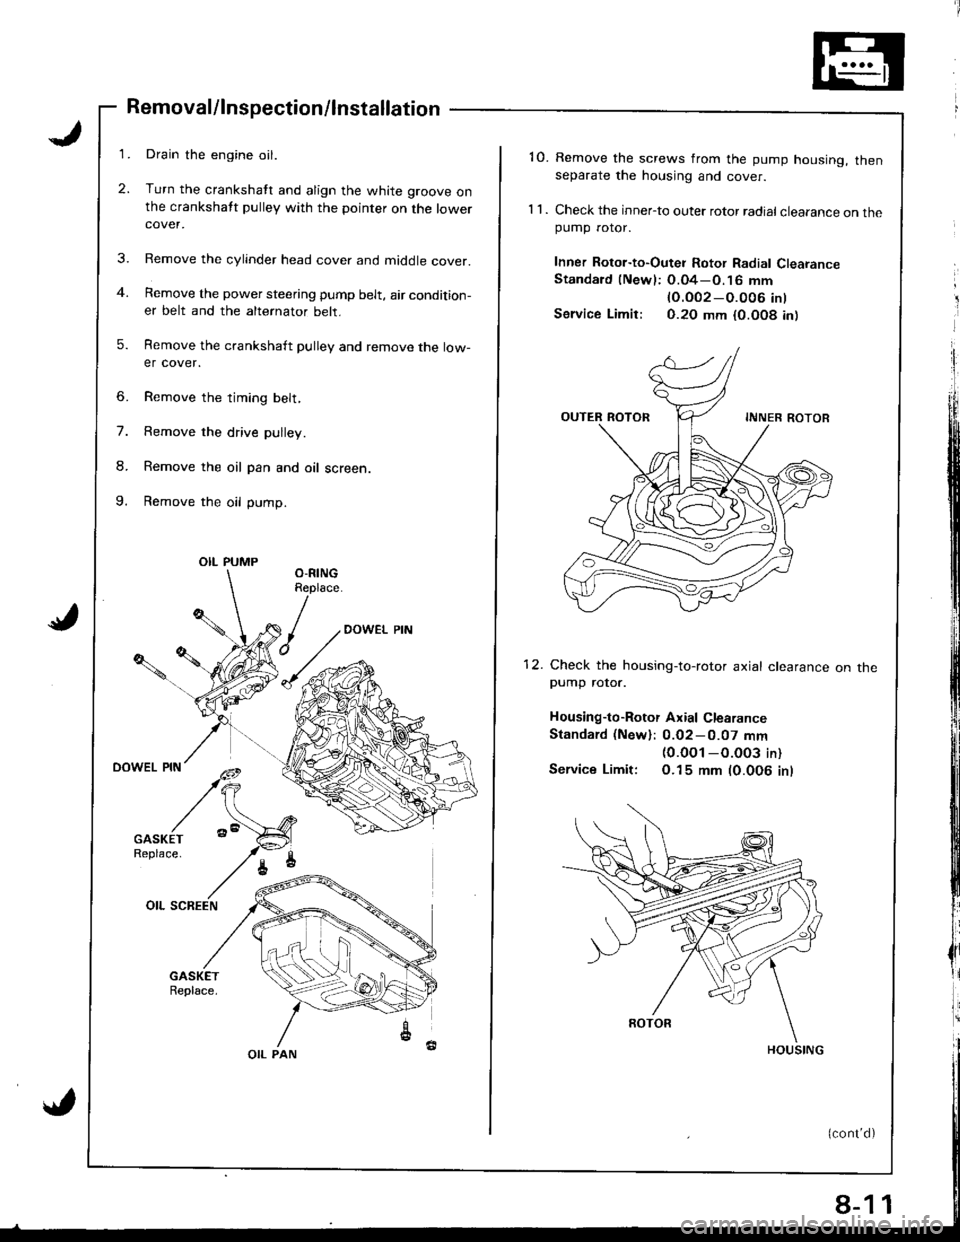
Drain the engine oil.
Turn the crankshatt and align the white groove onthe crankshatt pulley with the pointer on the lowercover.
Remove the cylinder head cover and middle cover.
Remove the power steering pump belt, air condition-er belt and the alternator belt.
Remove the crankshaft pulley and remove the low-er cover.
6. Remove the timing belt,
7. Remove the drive pulley.
8. Remove the oil pan and oil screen.
9. Remove the oil pump.
OIL PUMP
OIL PAN
8-1
'10. Remove the screws from the pump housing, thenseparate the housing and cover.
1 1 . Check the inner-to outer rotor radial clearance on thepumD rotor.
Inner Rotor-to-Outei Rotor Radial ClearanceStandard (Newl: O.04-O.16 mm
lO.OO2-O.O06 int
Service Limir: 0.20 mm {0.O08 in)
12. Check the housing-to-rotor axial clearancepump rotor.
Housing-to-Rotor Axial Clearance
Standard (New): 0.02-0.07 mm(0.0O1 -O.003 in)
Service Limit: O.15 mm (0.006 inl
on tne
1
Page 185 of 1681
Oil Pump
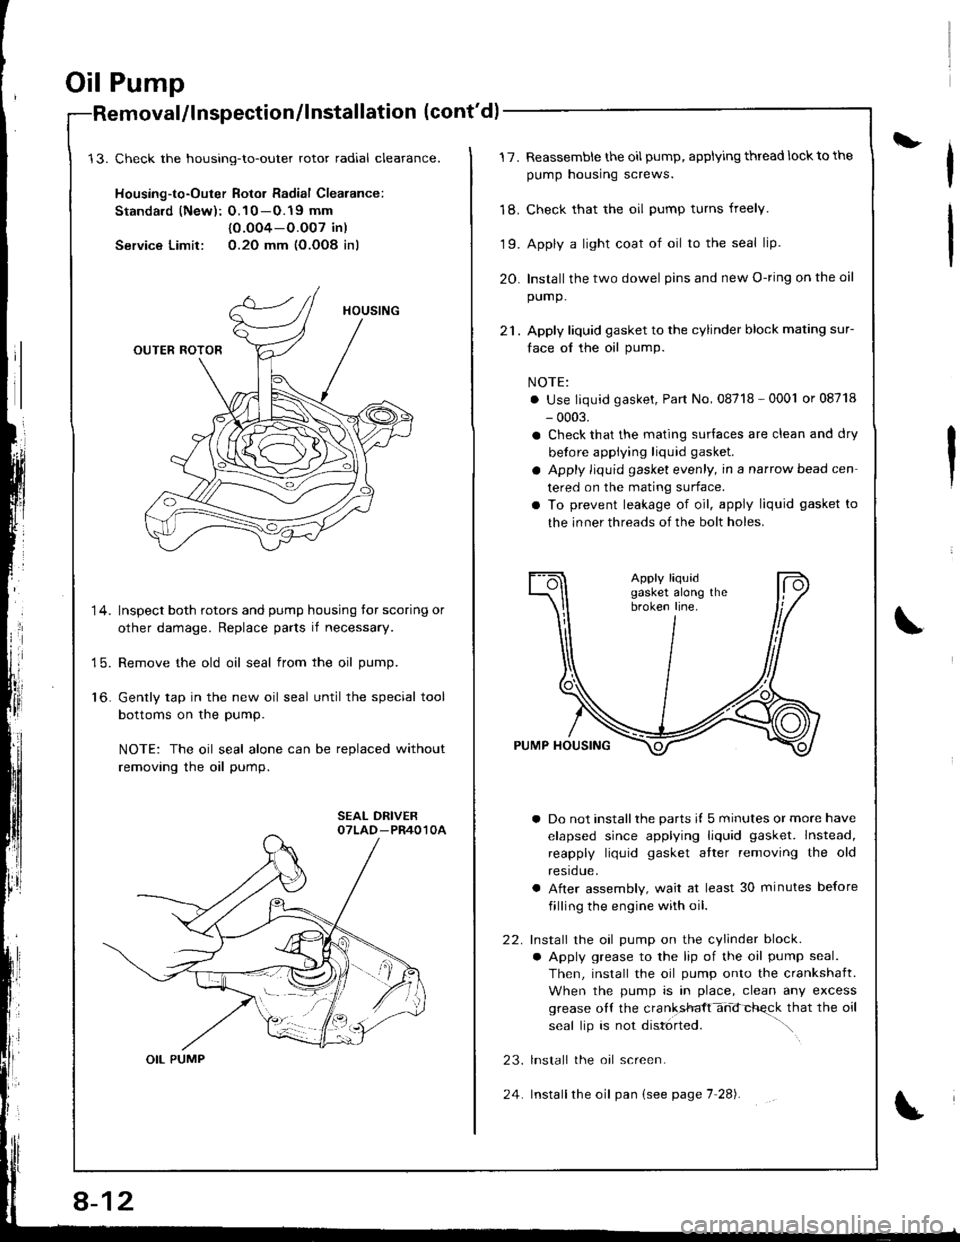
Check the housing-to-outer rotor radial cleatance.
Housing-to-Outer Rotor Radial Clearance:
Standald (New): O.10 -O.19 mm
{0.O04-O.O07 in)
Service Limit: 0.2O mm (O.OO8 inl
Inspect both rotors and pump housing tor scoring or
other damage. Replace parts if necessary.
Remove the old oil seal from the oil pump.
Gently tap in the new oil seal until the special tool
bottoms on the pump.
NOTE: The oil seal alone can be replaced without
removing the oil pump.
alllnspection/lnstallation (cont'd)
14.
15.
to.
OIL PUMP
8-12
24
L17.
'18.
19.
20.
Reassemble the oil pump, applying thread lock to the
pump housing screws.
Check that the oil pump turns freely.
Apply a light coat of oil to the seal lip.
Install the two dowel pins and new O-ring on the oil
pump.
Apply liquid gasket to the cylinder block mating sur-
face ol the oil pump.
NOTE:
. Use liquid gasket, Part No, 08718 - 0001 or 08718
- 0003.
a Check that the mating surlaces are clean and dry
betore applying liquid gasket.
a Apply liquid gasket evenly, in a narrow bead cen
tered on the mating surface.
a To prevent leakage of oil, apply liquid gasket to
the inner threads of the bolt holes.
a Do not installthe parts il 5 minutes or more have
elapsed since applying liquid gasket. Instead,
reapply liquid gasket atter removing the old
resrdue.
a After assembly, wait at least 30 minutes before
filling the engine with oil.
Install the oil pump on the cylinder block.
a Apply grease to the lip of the oil pump seal.
Then, install the oil pump onto the crankshaft.
When the pump is in place, clean any excess
grease oll the cranksfft-hd-chqck that the oil
seal lip is not disl6rted. ".\
lnstall the oal screen.
Installthe oil pan (see page 7 28).
22.
23.
Page 205 of 1681
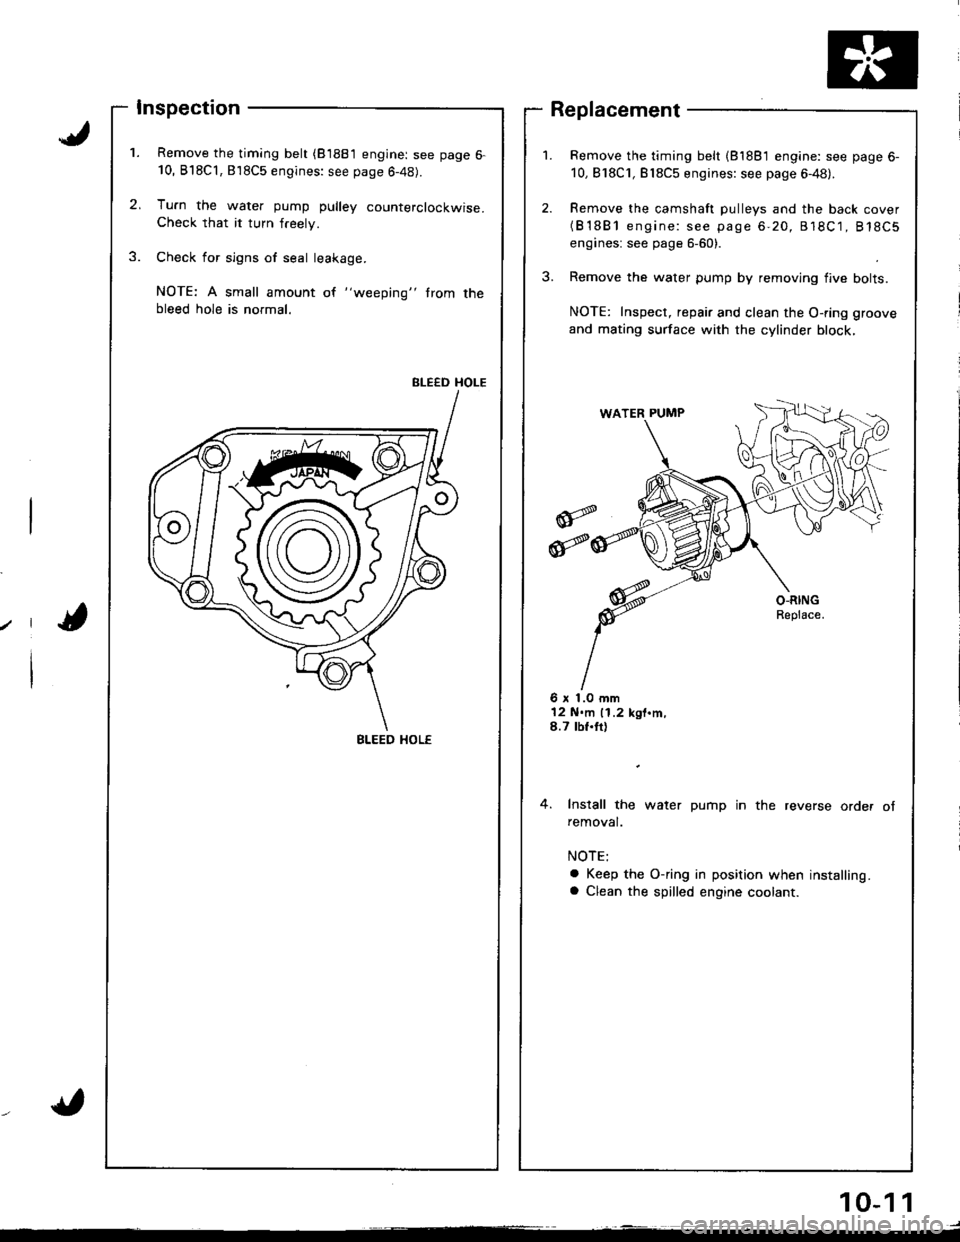
Inspection
Remove the timing belt (81881 engine: see page 6-10, B'l8Cl,818C5 engines: see page 6-48).
Tu.n the water pump pulley counterclockwise.Check that it turn freely.
Check for sign6 of seal leakage.
NOTE: A small amount of "weeping" trom thebleed hole is normal.
BLEED HOLE
Remove the timing belt (81881 engine: see page 6-
10,818C1, Bl8C5 engines: see page 6-48).
Remove the camshaft pulleys and the back cover(B'1881 engine: see page 6-20, 818C1, 818C5
engines: see page 6-60).
Remove the water pump by removing flve bolts.
NOTE: Inspect, repair and clean the O-ring groove
and mating surface with the cylinder block,
Replacement
6 x 1.0 mm12 N.m 11.2 kgt.m,8.7 tbf.tt)
4. Install the water pump in the reverse order ofremoval.
a Keep the O-ring in position when installing.a Clean the spilled engine coolant.
BLEED HOL€
10-1 1
Page 206 of 1681
i
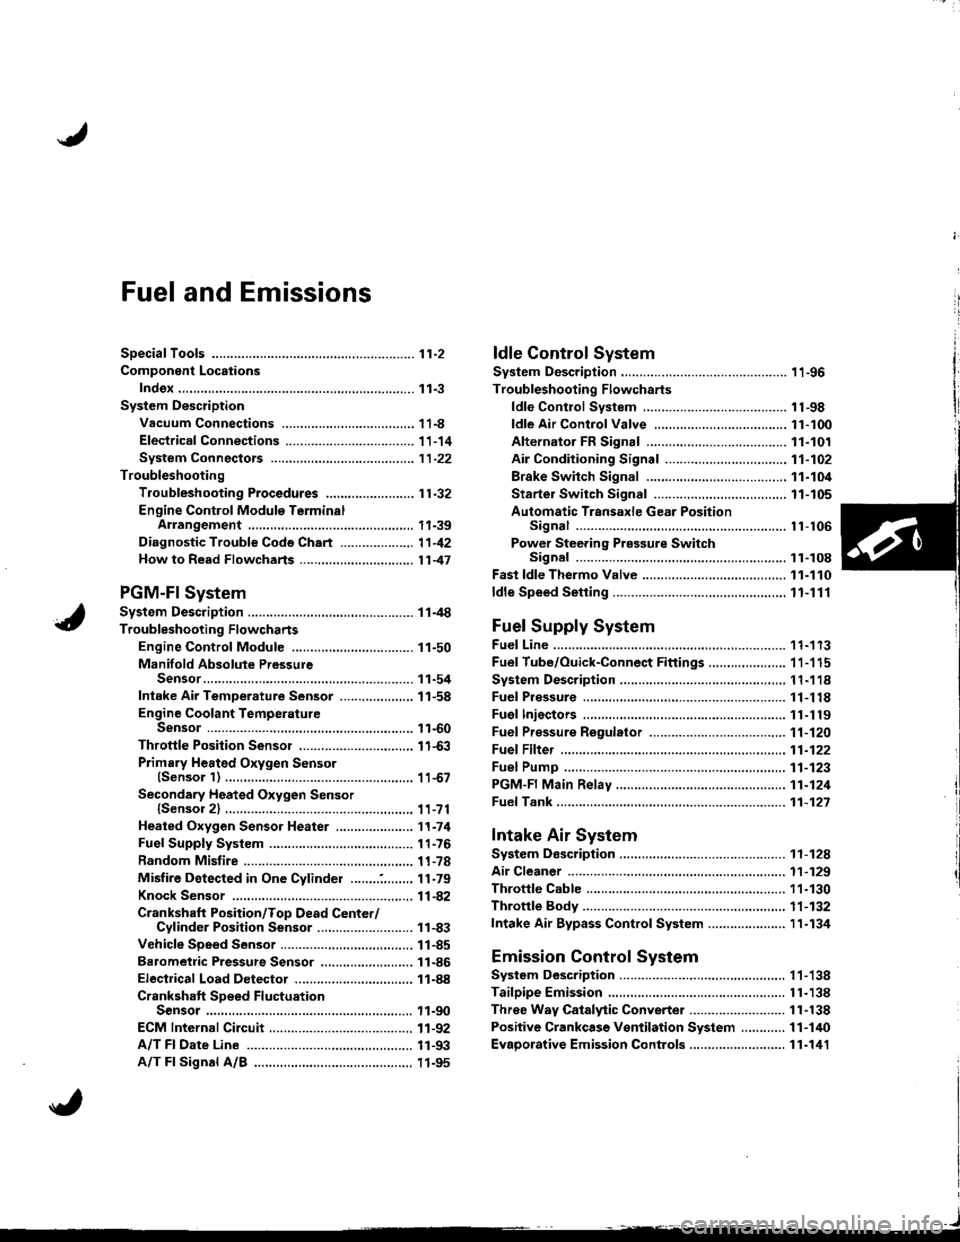
iFuel and Emissions
SDeciaf Toofs ..,...,...............11-2
Component Locations
Index.,..,.,..................................,.,.,.,.,.,..,.,....... 11-3
System Description
Vacuum Connections ..................................,. 11-8
Electrical Connections ................................... 1 1-14
System Connectors ....,.,.,.,............................ 1 1-22
Troubleshooting
Troubfeshooting Procedures ........................ 11.32
Engine Control Module T€rminalArrangement .,.,.,..,.,. 11-39
Diagnostic Trouble Cods Chart .......-.-.......... 11-42
Howto Read Flowcharts ......,..,.,................... 1147
PGM-Fl System
System Description ............ 11-4
Troubleshooting Flowcharts
Engine Control Module ............,...,..,.,........... 11-50
Manifold Absolute PressureSensor...............................,..,.,...,................ 11-54
Intake Air TemDerature Sensor ..........,...,..... 11-58
Engine Coolant TemperatureSensor ....................,.,...,.,........................... 11-60
Throttle Position Sensor .,...........................,. 11-63
Primary Heated Oxygen Sensor(Sensor'l) .......,......,.,. 11-67
Secondary Heated Oxygen Sensorlsensor 2) .................. 11-71
Heated Oxygen Sensor Heater .....................'t1.74
Fuel Supply System ....................................... 1 1-76
Random Mistire ............. 11-78
Misfire Detected in One Cylinder .....,..:,,.,.... 11-79
Knock Sensor .........,.,..,. f -A2
Crankshaft Position/Top Dead Center/Cylinder Position Sensor .,........................ 11-83
Vehicle Speed Sensor .............,.,.,.,....,........... 11-85
Barometric Prsssute Sensor ..,...................... 11-86
Electrical Load Detector ...................,.,.......... 11-88
Crankshaft SDeed FluctuationSensor ...........................................,...,........ 11-90
ECM lnternal Circuit,..............................-......, 11-92
A/T Fl Date Line ............ 11-93
A/T Fl Signal A/B .......... 11-95
I,-1
Page 208 of 1681
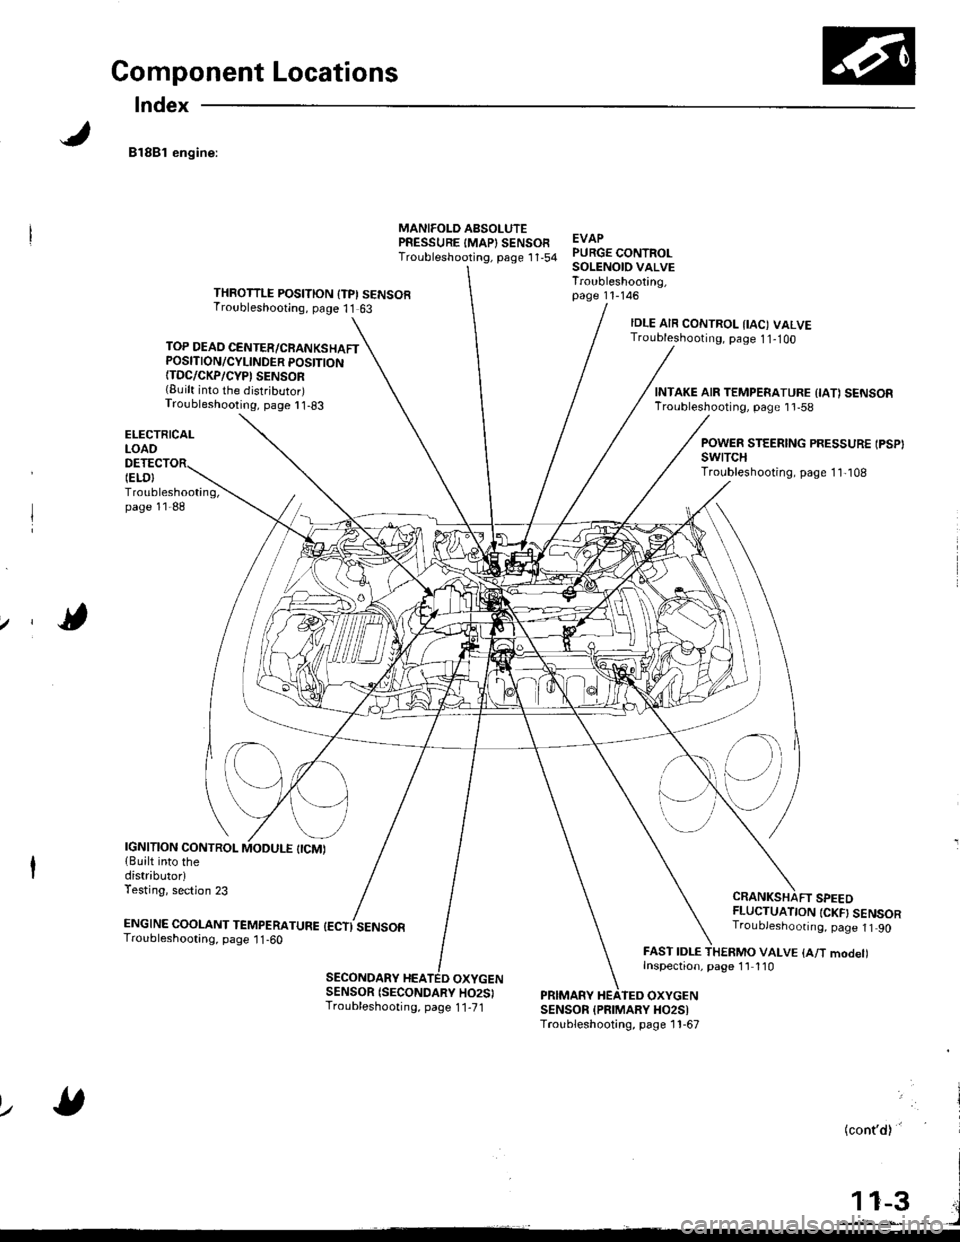
Component Locations
Index
81881 engine:
TOP DEAD CENTER/CRANKSHAFTPOSITION/CYLINDER POSITION{TDC/CKP/CYP' SENSOR(Built into the distributor)Troubleshooting, page I 1-83
ELECTRICALLOAO
Troubleshooting,page 11-88
MANIFOLD AsSOLUTEPRESSURE IMAP} SENSOFTroubleshooting, psge 1 '1,54EVAPPURGE CONTROLSOLENOID VALVETroubleshooting,page 11-146THROTTLE POSITION {TPI SENSORTroubleshooting, page 11 63
IELO}
IDLE AIR CONTROL IIAC) VALVETroubleshooting, page 1 1-1OO
CRANKSHAFT SPEEDFLUCTUATION {CKF} SENSORTroubJeshoonng. page 1t 90
FAST IDLE THERMO VALVE {A/T modet)Inspection, page 1'l 110
INTAKE AIR TEMPERATURE {IA1 SENSORTroubleshooting, page 1 'l -58
POWER STEERING PRESSURE IPSP}swtTcHTroubleshooting, page 1 1,108
IGNITION CONTROL{Built into thedistributorlTesting, section 23
ENGTNE cooLANT TEnapenerune {ectisensoaTroubleshooting, page 1 1 -60
SECONDARY HEATED OXYGENSENSOR (SECONDARY HO2SITroubleshooting, page 1 1-71PRIMARY HEATEO OXYGENSENSOR {PFIMARY HO2SITroubleshooting, page 1 1-67
lz
(cont'd)'
Page 210 of 1681
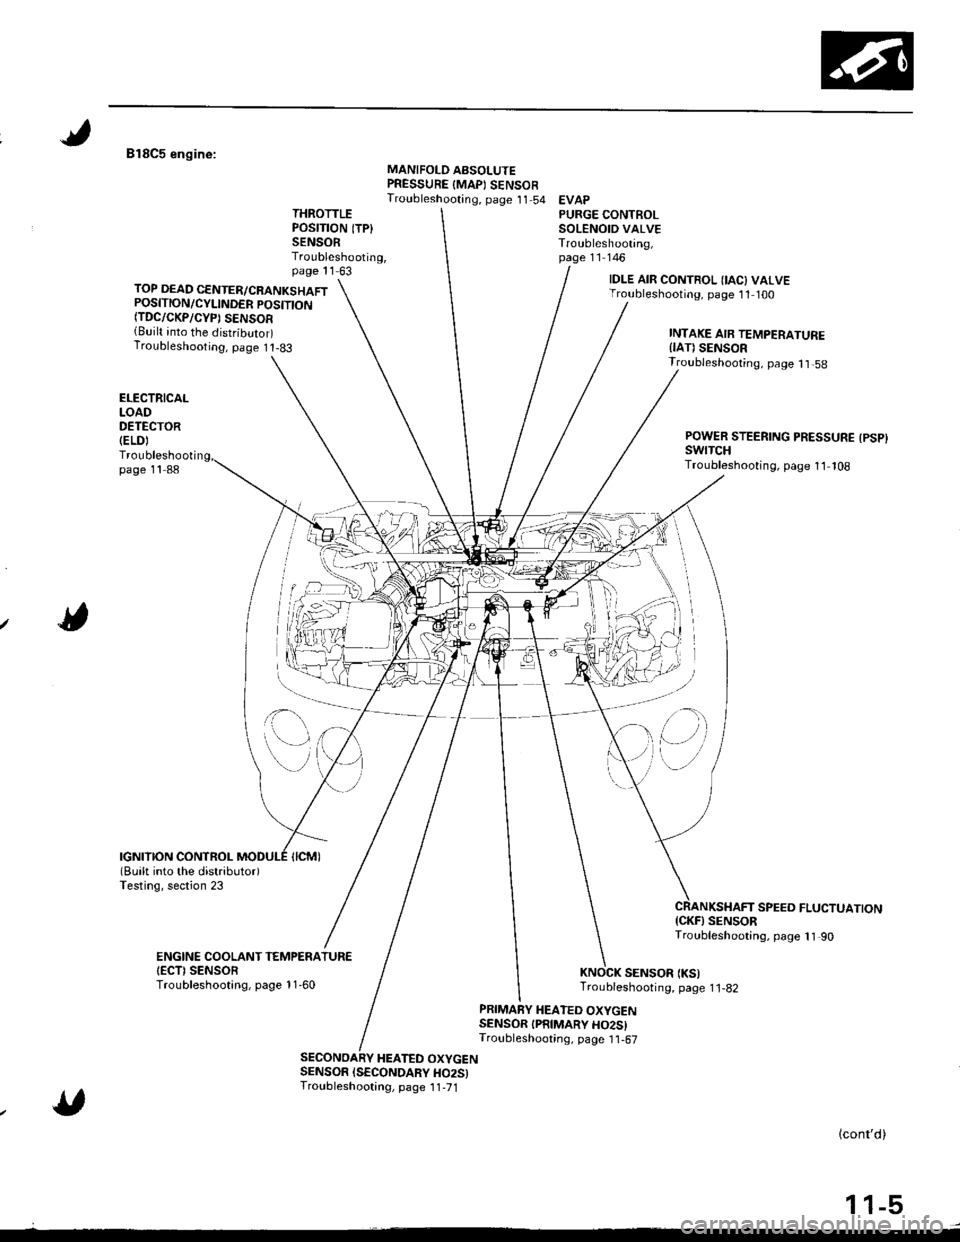
818C5 engine:MANIFOLD ABSOLUTEPRESSURE {MAPI SENSOFTroubleshooting, page 11 54 EVAPTHROTTLEPOSITION ITP}SENSORTroubleshooting,page 11 63
PURGE CONTROLSOLENOID VALVETroubleshooting,page 11 146
TOP DEAD CENTER/CRANKSHAFTPOSITION/CYLINDER POSITTONfiDC/CKP/CYP) SENSOR{Built into the distributor)Troubleshooting, page I t-83
IDLE AIR CONTROL IIAC) VALVETroubleshooting, page 11 100
INTAKE AIR TEMPERATUREIIAT) SENSOR
ELECTRICALLOADDETECTOR(ELD)
Troubleshootipage 11 88
Troubleshooting, page 1 1,58
POWER STEERING PRESSURE {PSP}swrTcHTroubleshooting, page 11 108
SPEEO FLUCTUATION{CKF} SENSORTroubleshooting, page 11 90
SENSOR (KS)Troubleshooting, page 1 1-82
ENGINE COOLANT TEMPENATUR€IECTI SENSORTroubleshootang, page 11-60
PRIMARY HEATED OXYGENSENSOR IPRIMARY HO2SITroubleshooting, page I1-67
HEATED OXYGENSENSOR ISECONDARY HO25)Troubleshootang, page 1 1,71
lcont'd)
1 1-5
,'(l)
Page 241 of 1681
Troubleshooting
Troubleshooting Procedures (cont'd)
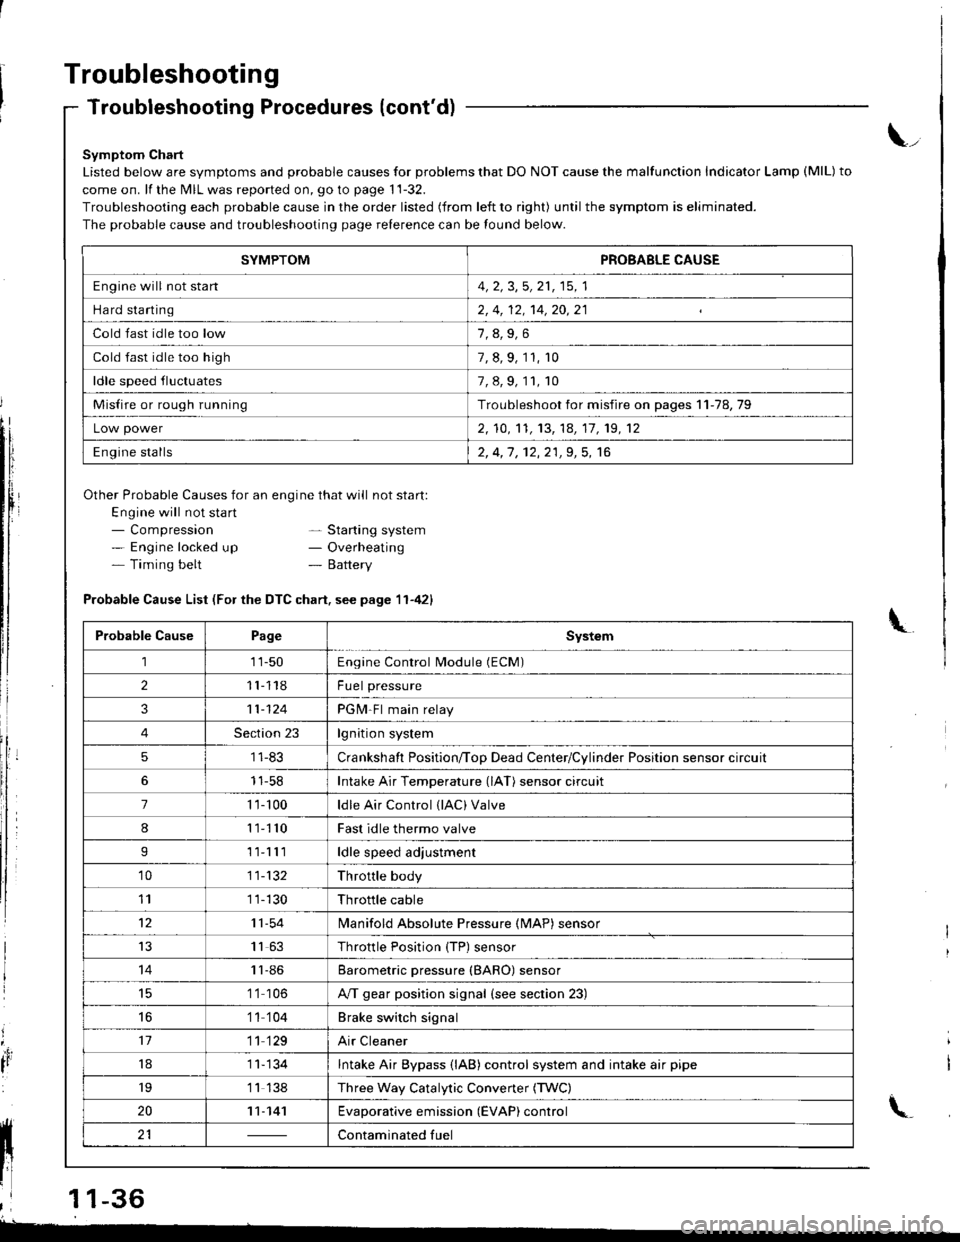
Symptom Chart
Listed below are symptoms and probable causes for problems that DO NOT cause the malfunction Indicator Lamp (MlL) to
come on. lf the MIL was reported on, go to page 11-32.
Troubleshooting each probable cause in the order listed (from left to right) until the symptom is eliminated.
The probable cause and troubleshooting page relerence can be found below.
Other Probable Causes for an engine that will not start:
Engine will not sta rt- Compression- Engine locked up- Timing belt
\_
- Starting system- Overheating- Battery
'4,
It
Probable Cause List (For the DTC chart. see page 11-421
Probable CausePageSystem
111-50Engine Control Module (ECM)
211118Fuel pressure
311-124PGM-Fl main relay
4Section 23lgnition system
51 1-83Crankshaft Position/ToD Dead Center/Cylinder Position sensor circuit
11-58Intake Air Temperature (lAT) sensor circuit
71 '�t- 100ldle Air Control (lAC) Valve
811110Fast idle thermo valve
I11lllldle speed adjustment
'1011-132Throttle body
111 1-130Throttle cable
1211-54lvlanifold Absolute Pressure {MAP) sensor
IJ1163Throttle Position {TP) sensor
1411-86Barometric pressure (BARO) sensor
1 '1 106A/T gear position signal {see section 23)
16'1 1 104Brake switch signal
1711 129Air Cleaner
181 1- 134Intake Air Bypass {lAB} control system and intake air pipe
19'1 1 138Three Way Catalytic Convener (TWC)
2011-141Evaporative emission (EVAP) control
21Contaminated fuelll ll 21 | - | cont"-in"t"o tu"
11 l-
I
,l 11-36
-
SYMPTOMPROBABLE CAUSE
Engine will not stan4, 2, 3,5, 21, 15, 1
Hard starting2, 4, 12, 14,20,21
Cold fast idle too low
Cold fast idle too high7, 8, 9, 11, r0
ldle speed fluctuates7,8,9,11,10
Misfire or rough runningTroubleshoot for misfire on pages 11-78,79
Low power2, 10,'t1, 13, 14, 17, 19, 12
Engine stalls2, 4,1 , 12,21,9, 5, 16