HONDA INTEGRA 1998 4.G Workshop Manual
Manufacturer: HONDA, Model Year: 1998, Model line: INTEGRA, Model: HONDA INTEGRA 1998 4.GPages: 1681, PDF Size: 54.22 MB
Page 571 of 1681
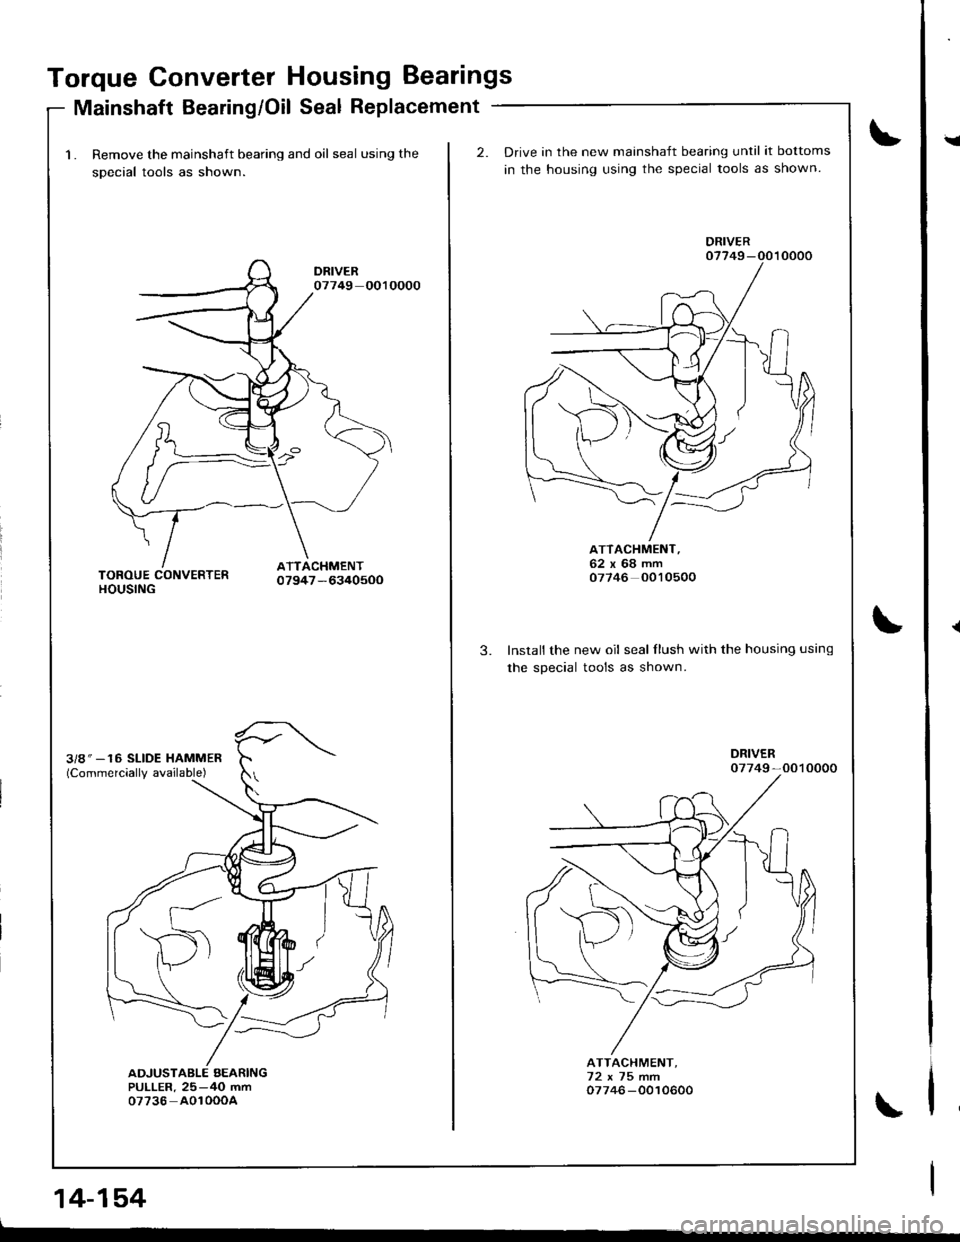
Torque Converter Housing Bearings
Mainshaft Bearing/Oil Seal Replacement
1. Remove the mainshaft bearing and oil seal using the
sDecial tools as shown.
14-154
2.Drive in the new mainshaft bearing until it bottoms
in the housing using the special tools as shown.
3.Install the new oil seal flush with the housing using
the soecial tools as shown.
ATTACHMENT,62x68mm07746 0010500
ATTACHMENT,72x75m.m07746 -0010600
I
Page 572 of 1681

Countershaft Bearing Replacement
\J
J\
\
1. Remove the countershaft bearing using the special
lools as shown.
3/8" 16 SLIDE HAMMER(Commercially available)
ADJUSTAELEBEARINGPULLER,25-40 mm07736 AO1000A
2.
3.
lnstall the ATF guide plate.
Drive the new bearing into the housing using the spe-cial tools as shown.
ATTACHMENT,62x68mm07746-0010500
0 0.03 mml0 -0.001 inl
a
14-155
Page 573 of 1681
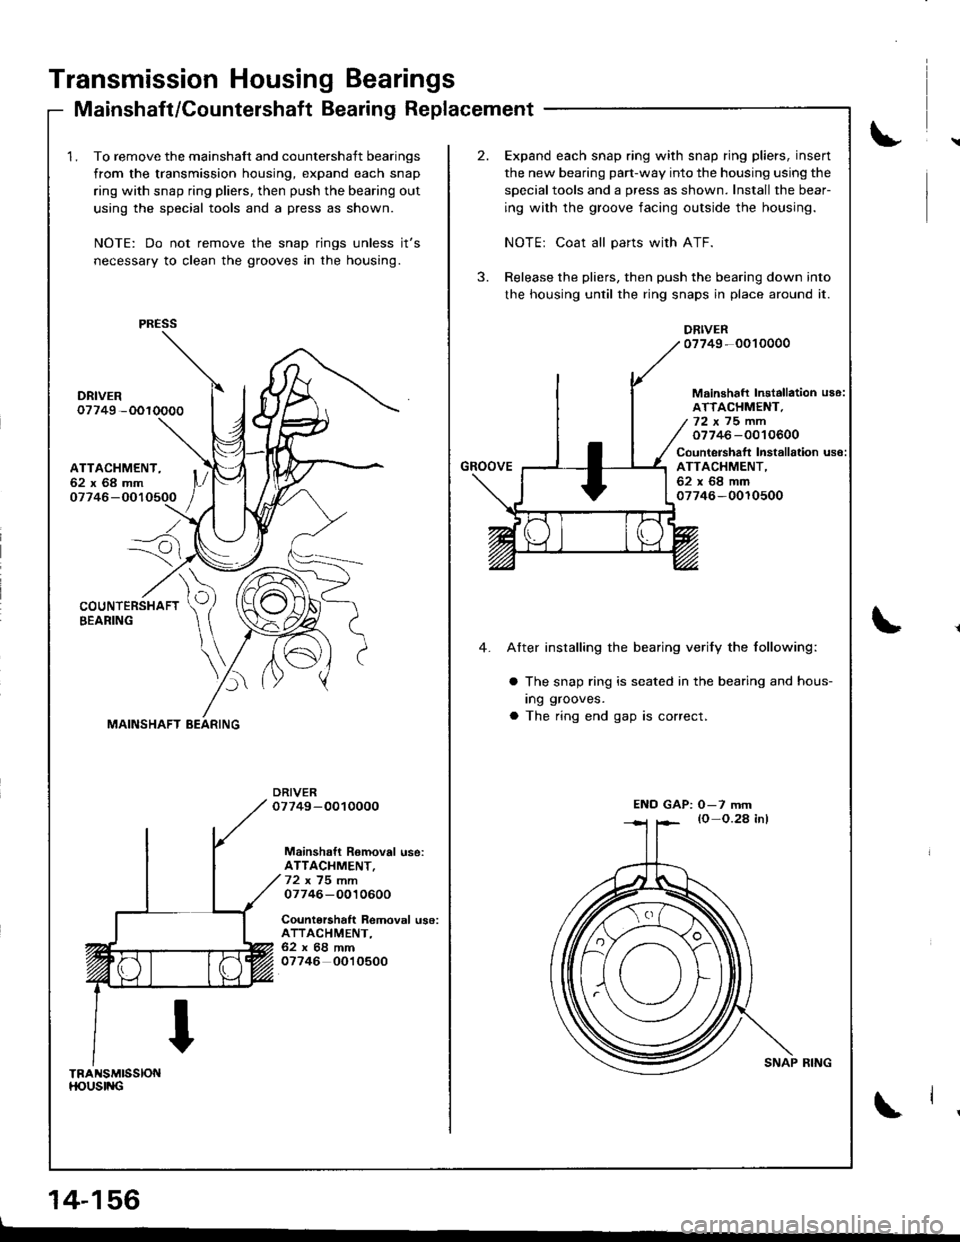
Transmission Housing Bearings
Mainshaft/Countershaft Bearing Replacement
1, To remove the mainshaft and countershaft bearings
from the transmission housing, expand each snap
ring with snap ring pliers, then push the bearing out
using the special tools and a press as shown.
NOTE: Do not remove the snap rings unless it's
necessary to clean the grooves in the housing.
DRIVER07749 -OOrOO00
ATTACHMENT,62x68mm
I07746-OO1
--_-e;
)
Mainshaft Romoval use:ATTACHMENT,
07746-0010600
Countarshaft Removal use:ATTACHMENT,62x68mm07746 0010500
TFAr{SMTSSIONT|oUSING
,,',zs>.\
/qnH
\1b22
PRESS
MAINSHAFT BEARING
2.Expand each snap ring with snap ring pliers, insert
the new bearing part-way into the housing using the
soecialtools and a oress as shown. Install the bear
ing with the groove facing outside the housing.
NOTE: Coat all parts with ATF.
Release the pliers, then push the bearing down into
the housing until the ring snaps in place around it.
DRIVER07749-0010000
Mainshafl Installation u86:ATTACHM€NT.72x75mm07746 -0010600
Countershaft Installation use:ATTACHMENT,62x68mm07746-0010500
GROOVE
4. After installing the bearing verify the following:
a The snap ring is seated in the bearing and hous-
Ing grooves.
a The ring end gap is correct.
SNAP RING
END GAP: O-7 mm
L
14-156
Page 574 of 1681
JI
JI
)
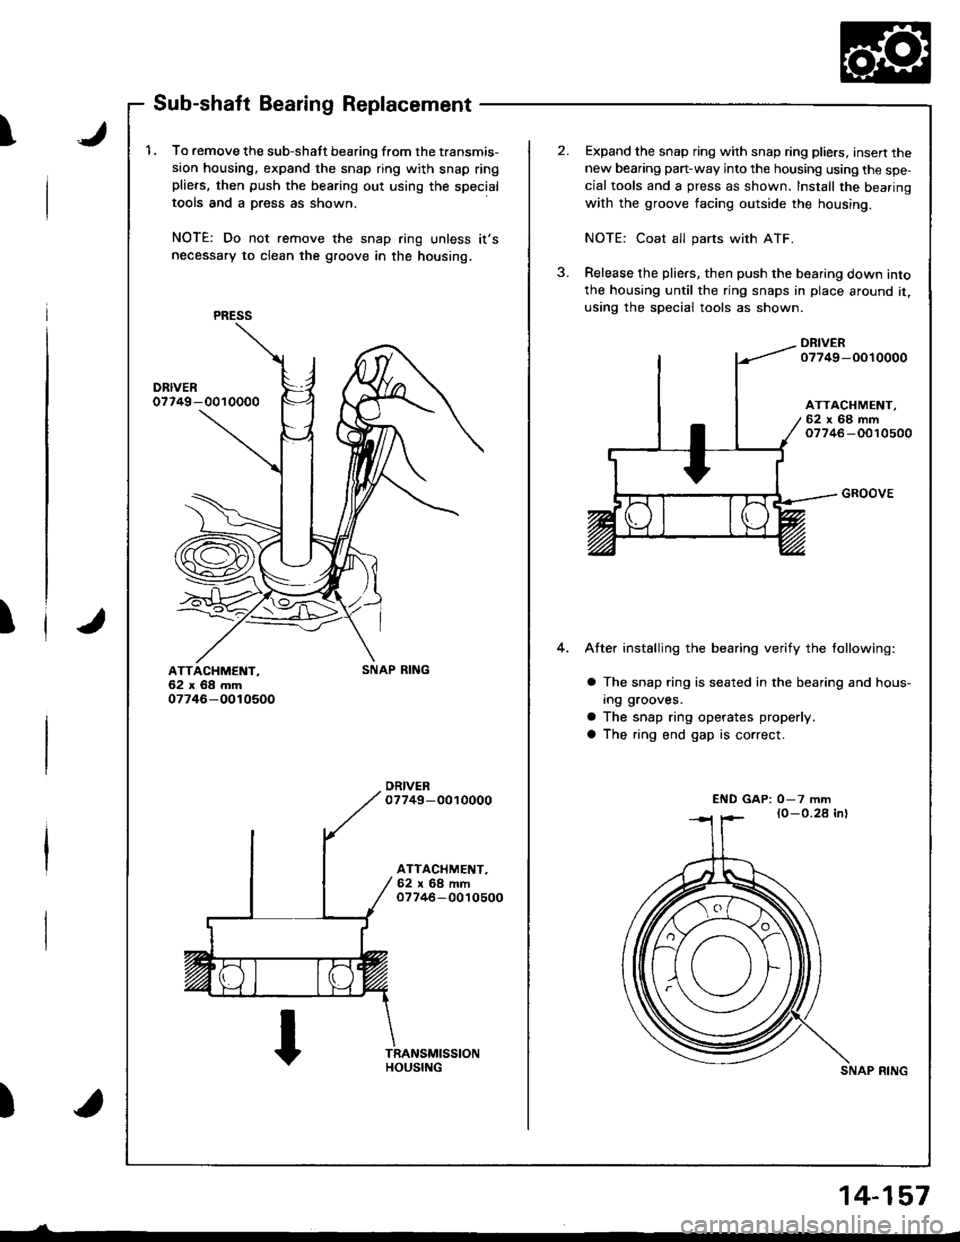
1.To remove the sub-shatt bearing from the transmis-
sion housing, expand the snap ring with snap ringplie.s, then push the bearing out using the special
tools and a Dress as shown.
NOTE: Do not remove the snap ring unless it's
necessary to clean the groove in the housing.
PRESS
ATTACHMENT-62r68mm07746-OOr 0500
SNAP RING
ATTACHMENT-62x68mm07746-0010500
Expand the snap ring with snap ring pliers, insert thenew bearing pan-way into the housing using the spe-cial tools and a press as shown. Install the bearing
with the groove facing outside the housing.
NOTE: Coat all pans with ATF.
Release the plie.s, then push the bearing down into
the housing until the ring snaps in place around it,using the special tools as shown.
DRIVER07749-OOlOO00
ATTACHMENT,62x68mm07746 -0010500
4.
GROOVE
After installing the bearing verify the following:
a The snap ring is seated in the bearing and hous-
ing grooves.
a The snap ring operates properlY
a The ring end gap is correct.
SNAP RING
END GAP: 0-7 mm
t
14-157
Page 575 of 1681
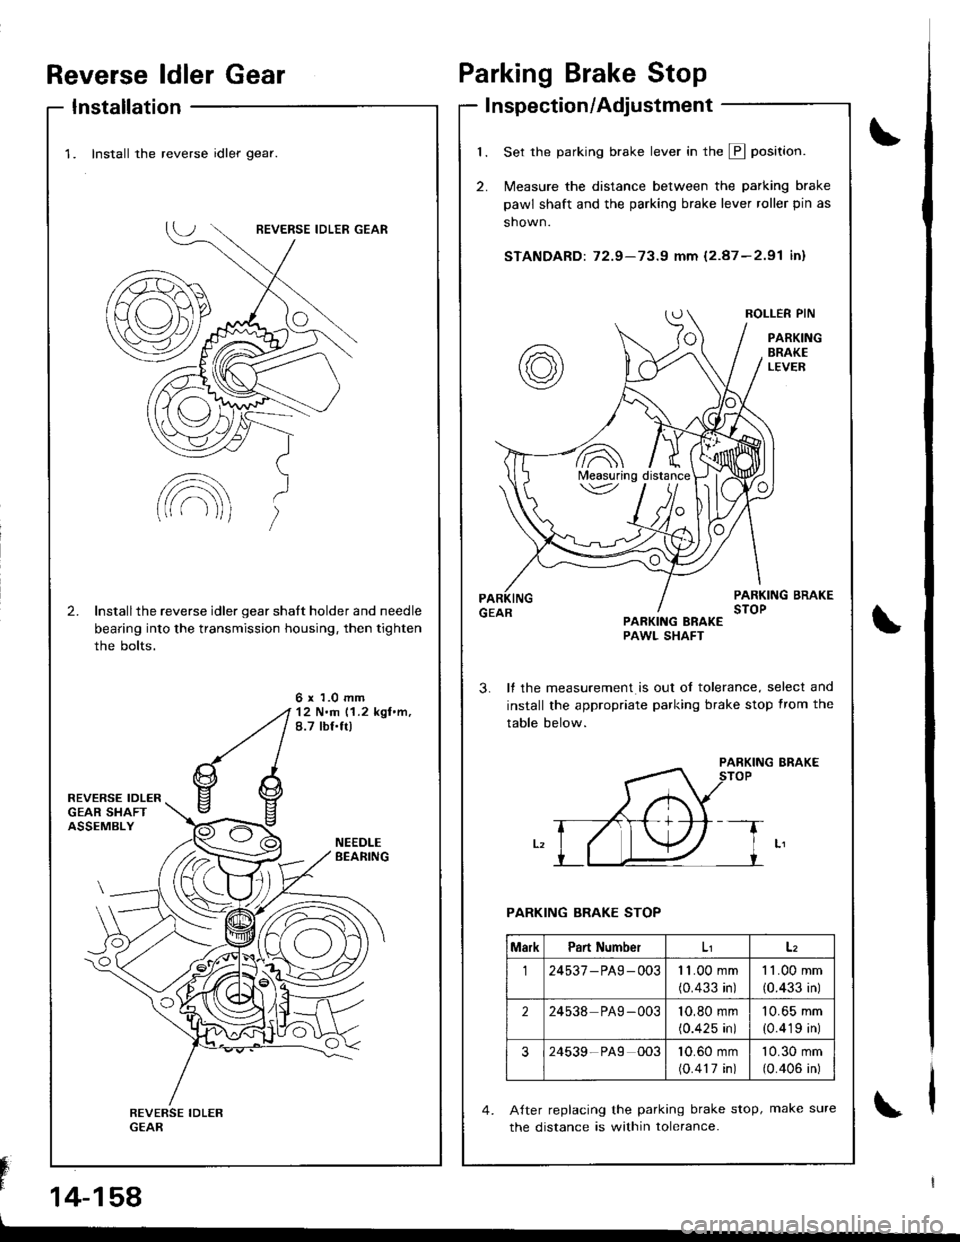
Reverse ldler Gear
Installation
Fn"
14-158
\
\
Parking Brake Stop
I nspection/Adjustment
1.
2.
Set the parking brake lever in the E position.
N4easure the distance between the parking brake
pawl shaft and the parking brake lever roller pin as
shown.
STANDARD: 72.9-73.9 mm (2.87-2.91 in)
ROLI-ER PIN
PARKINGBRAKELEVEB
PARKING BRAKESTOPPARKING BRAKEPAWL SHAFT
It the measurement is out ol tolerance, select and
install the appropriate parl
3.
PARKING ERAKE
PARKING BRAKE STOP
Atter replacing the parking brake stop, make sure
the distance is within tolerance.
'z<"
lvleasuring
MarkPart Number
l24537-PA9-00311.00mm
(0.433 in)
11.00mm
{0.433 in)
224538 PAg -00310,80 mm
{0.425 in)
10.65 mm
{0.419 in)
324539-PA9 00310.60 mm(0.417 in)
10.30 mm(0.406 in)
1. Install the reverse idler gear.
2.Installthe reverse idler gear shalt holder and needle
bearing into the transmission housing, then tighten
the bolts.
6 x 1.0 mm12 N'm 11.2 kgl.m,8.7 tbf.tt)
\
Page 576 of 1681
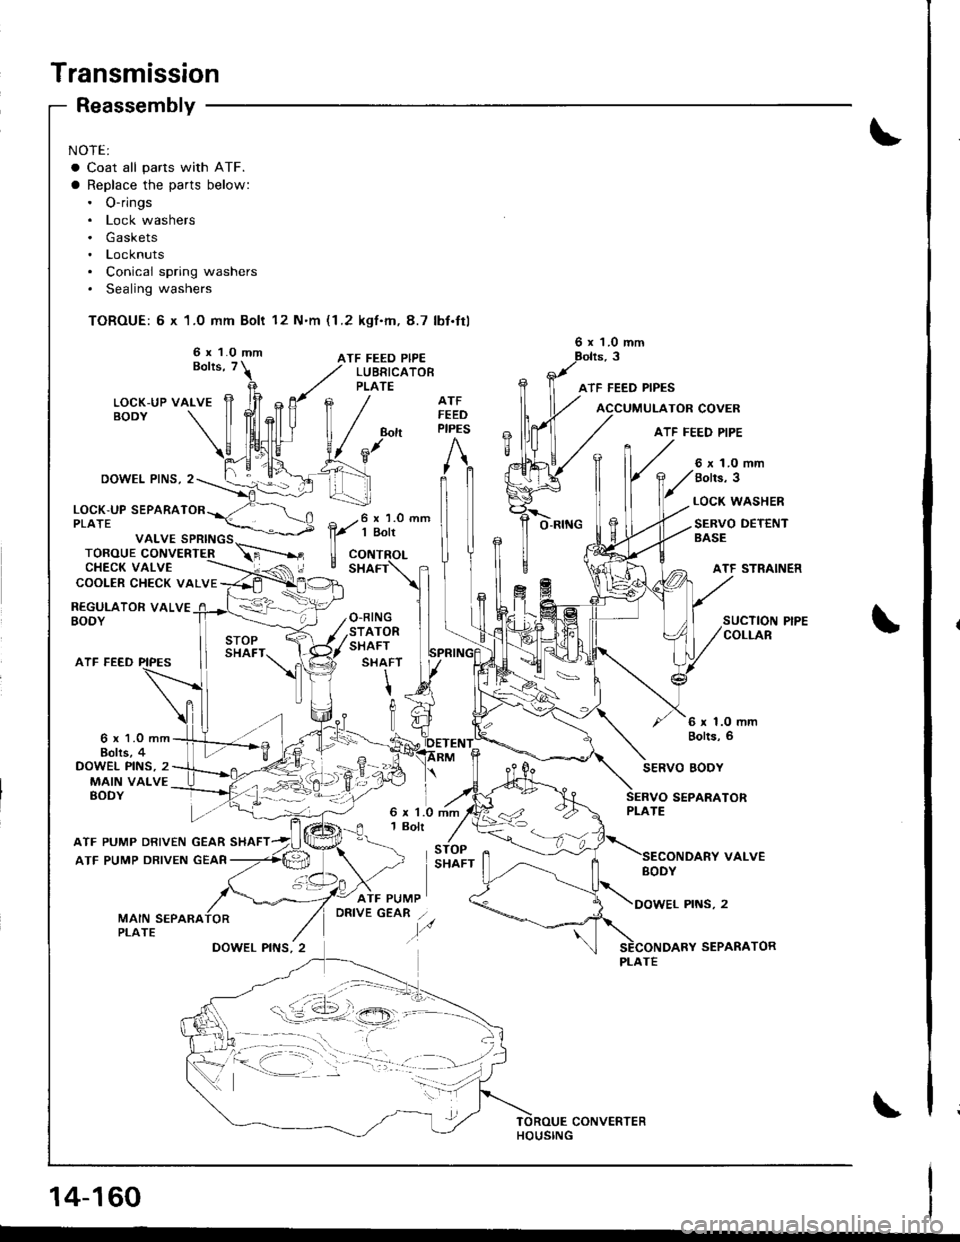
Transmission
NOTE:
a Coat all parts with ATF.
a Replace the parts below:. O-rings. Lock washers. Gaskets. Locknuts. Conical spring washers. Sealing washers
TOROUE: 6 x 1.0 mm Bolt 12 N'm (1.2 kgf.m, 8.7 lbt.ttl
6 x 1.0 mmATF FEED PIPEBolts, T
Reassembly
DOWEL PINS, 2
ATF FEED
LUBRICATOBPLATE
6 x 1.0 mm
ATF FEED PIPES
O.RINGSTATORSHAFT
SHAFT
\tIt]U
ATFFEEDPIPES
STOPSHAFT
6 x 1.0 mmBolts, 6
TOR COVER
ATF FEED PIPE
VALVE SPRINGSTOROUE CONVERTERCHECK VALVECOOLER CHECK VALVE
LOCK-UP SEPARATPLATE
REGULATOR VALVEBODY
6 x 1.0 mm8olls, 3
LOCK WASHER
SERVO DETENTBASE
ATF STRAINER
SUCTION PIPECOLLAR
6 x 1.0 mmBohs, 4DOWEL PINS, 2MAIN VALVEBODY
SERVO EODY
SEPARATOR
VALVE
PINS,2
SEPARATOR
6 x 1.0 mm1 Bolt
ATF PUMP DRIVEN GEAR SHAFT
ATF PUMP DRIVEN GEAR
GEAR /.
.,,o
{--==,.-,,..;;,,, :_ :,_11,
PLATE
14-160
CONVERTER
Page 577 of 1681
)
)
A
1.
ATF PUMP DRIVENGEAR SHAFT
ATF PUMPDRIV€N GEAR
J.
6
Grooved and ch6mleredside faces separatorplate.
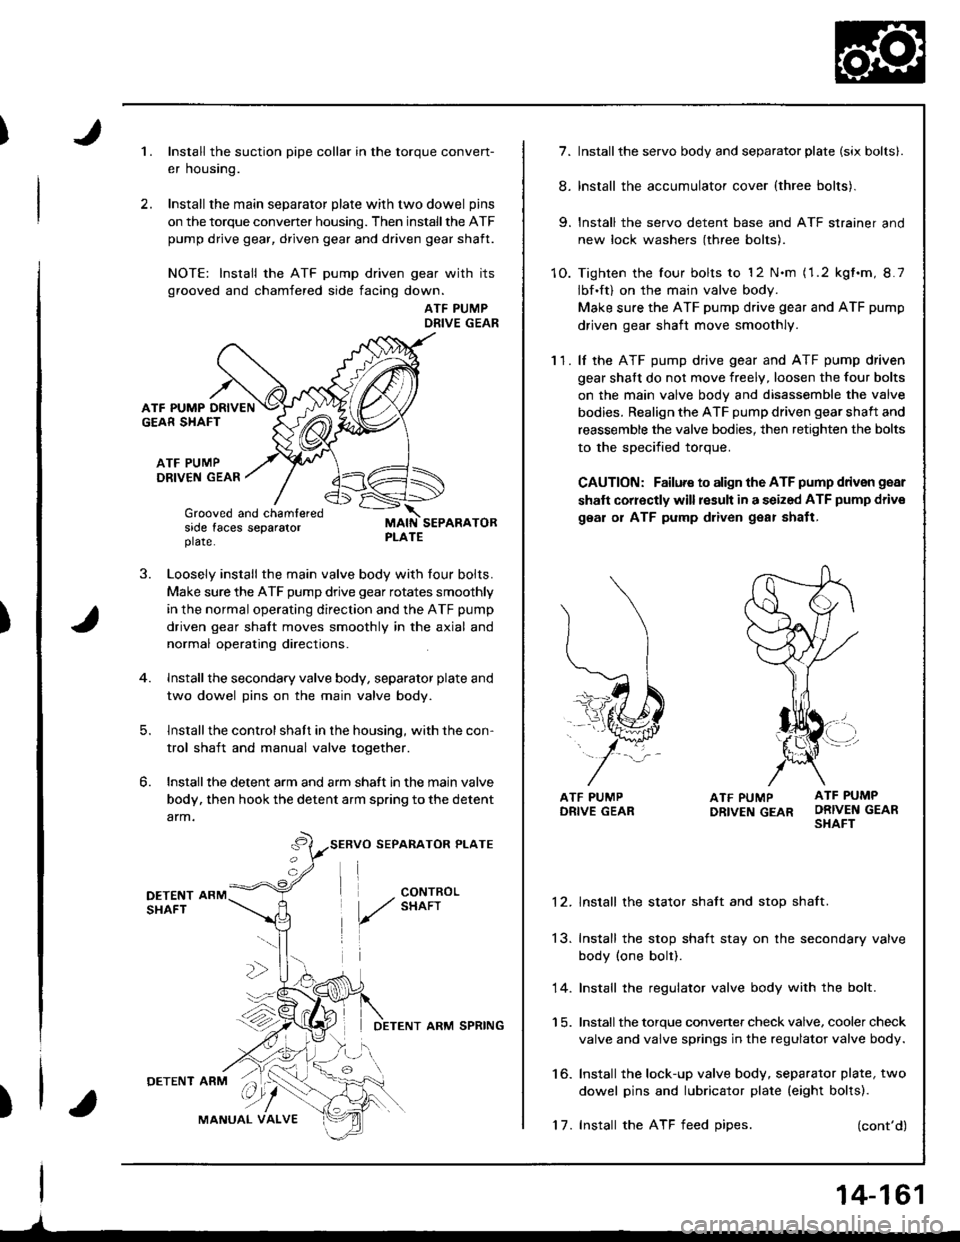
Install the suction pipe collar in the torque conven-
er housing.
Install the main separator plate with two dowel pins
on the torque convener housing. Then install the ATF
pump drive gear, driven gear and driven gear shaft.
NOTE: Install the ATF pump driven gear with its
grooved and chamfered side facing down.
ATF PUMPDRIVE GEAR
Loosely install the main valve body with four bolts.
Make sure the ATF pump drive gear rotates smoothly
in the normal operating direction and the ATF pump
driven gear shalt moves smoothly in the axial and
normal operating directions.
Install the secondary valve body, separator plate and
two dowel pins on the main valve body.
lnstallthe control shaft in the housing, with the con-
trol shaft and manual valve together.
Installthe detent arm and arm shaft in the main valve
body, then hook the detent arm spring to the detent
arm.
SERVO SEPARATOR PLATE
I
DETENT ARM SPRING
'17. Install the ATF feed oipes.
14-161
7. Install the servo body and separator plate (six bolts|.
8. Install the accumulator cover (three bolts).
9. Install the servo detent base and ATF strainer and
new lock washers (three bolts).
1O. Tighten the four bolts to '12 N.m (1.2 kgt.m, 8.7
Ibf.ft) on the main valve body.
Make sure the ATF pump drive gear and ATF pump
driven gear shaft move smoothly.
11. lf the ATF pump drive gear and ATF pump driven
gear shaft do not move freely, loosen the four bolts
on the main valve bodv and disassemble the valve
bodies. Realign the ATF pump driven gear shaft and
reassemble the valve bodies, then retighten the bolts
to the soecified toroue.
CAUTION: Failure to align the ATF pump ddven gear
shaft corr€ctly will result in a seized ATF pump driv€
gear or ATF pump dliven g€ar shatt,
ATF PUMP ATF PUMP
DRtvEN GEAR ORIVEN GEARSHAFT
12. lnstall the stator shatt and stop shaft.
13. Inslall the stop shaft stay on the secondary valve
body (one bolt).
14. Install the regulator valve body with the bolt.
1 5. Install the torque converter check valve, cooler check
valve and valve springs in the regulator valve body.
16. Install the lock-up valve body, separator plate, two
dowel pins and lubricator plate (eight bolts).
(cont'd)
Page 578 of 1681
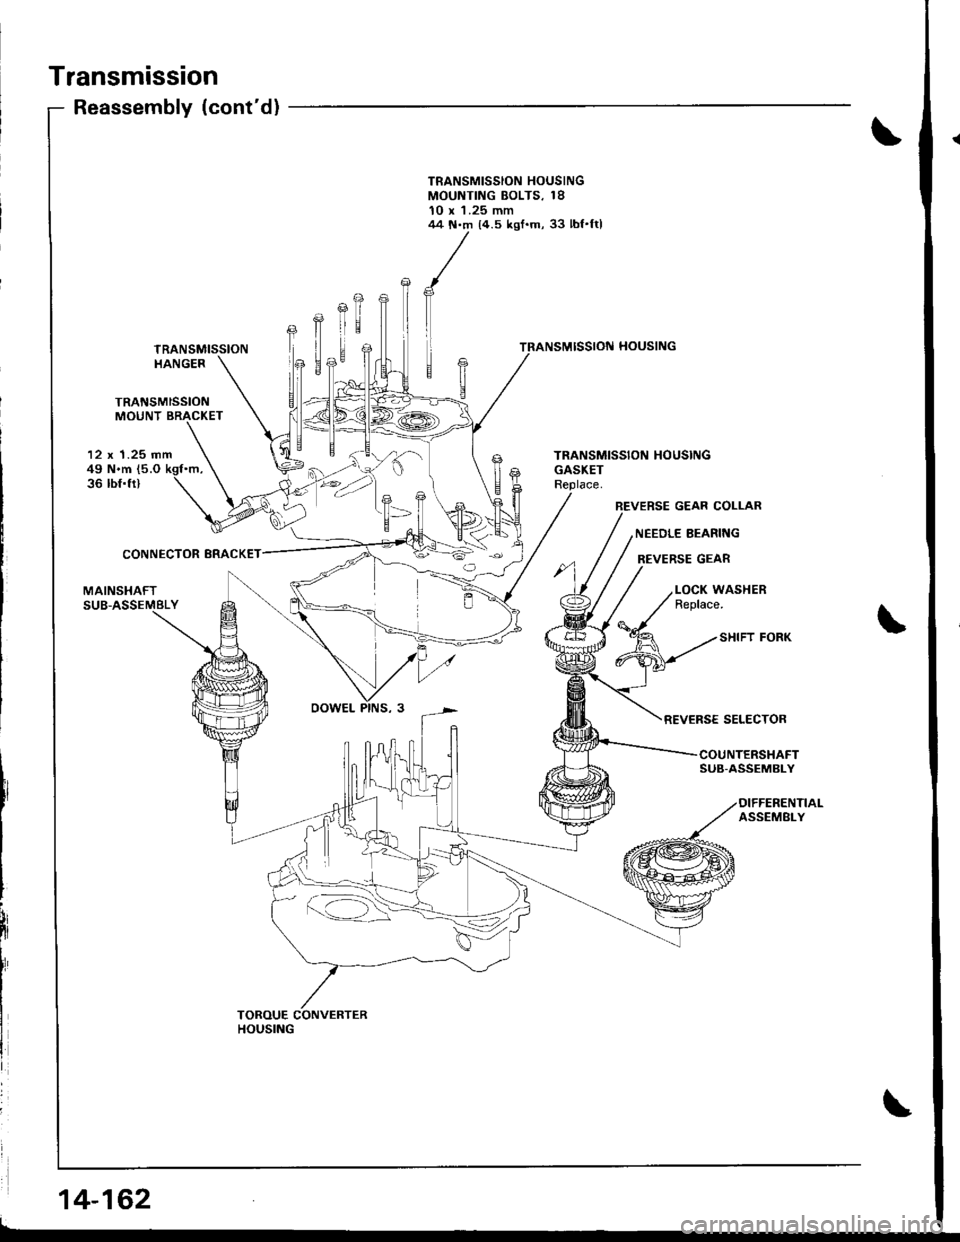
Transmission
TRANSMISSIONMOUNT BRACKET
Reassembly (cont'd)
TRANSMISSIONHANGER
Efr
E
12 x 1.25 mm49 N.m (5.O
36 tbf.fr)
CONNECTOR BRACKET
NEEDLE BEARII{G
REVERSE GEAR
MAINSHAFT
SHIFT FORK
REVERSE SELECTOR
SUB-ASSEMBLY
14-162
r=-42
TOROUE CONVERTERHOUSING
TRANSMISSION HOUSINGMOUNTING BOLTS, 1810 x 'l.25 mm44 N.m 14.5 kgf.m, 33 lbf.ftl
TRANSMISSION HOUSINGGASKET
BEVERSE GEAR COLLAR
LOCK WASHERReplace.
I
Page 579 of 1681
![HONDA INTEGRA 1998 4.G Workshop Manual 18. Install the sub-shaft assembly in the transmission
housing {see page 14-142],.
19. Install the reverse idler gear and gear shaft holder(see page 14-158).
20. Install the differential assembly in HONDA INTEGRA 1998 4.G Workshop Manual 18. Install the sub-shaft assembly in the transmission
housing {see page 14-142],.
19. Install the reverse idler gear and gear shaft holder(see page 14-158).
20. Install the differential assembly in](/img/13/6069/w960_6069-578.png)
18. Install the sub-shaft assembly in the transmission
housing {see page 14-142],.
'19. Install the reverse idler gear and gear shaft holder(see page 14-158).
20. Install the differential assembly in the torque con
verter housrng.
21. Assemble the mainshaft and countershaft sub-
assembly, then install them together in the torque
converler noustng.
22. Turn the shilt fork so the large chamlered hole is fac-
ing the fork bolt hole, then installthe shift tork with
the reverse selector and torque the lock bolt. Bend
the lock tab against the bolt head.
SHIFT FORK
23. Install the reverse gear with the collar and needte
bearing on the countershaft.
24. Align the spring pin of the control shaft with the
transmission housing groove by turning the control
shaft.
25. Place the transmission housing on the torque con-
verter housing with a new gasket and the three
dowel pins.
CONTROL
TRANSMISSION HOUSING
lnstall the transmission housing mounting bolts along
with the transmission hanger and the connector
bracket, then torque the bolts in two or more steps
in the sequence shown.
TOROUE: rt4 N'm (4.5 kgt.m, 33 lbt.lt)
TRANSMISSION
26.
LOCK WASHERReplace.
6 x 1.0 mm4 t{.m(1.4 kgf.m, 10
e
Large chamfered hole
/ -'K\,,
a
14-163
Page 580 of 1681
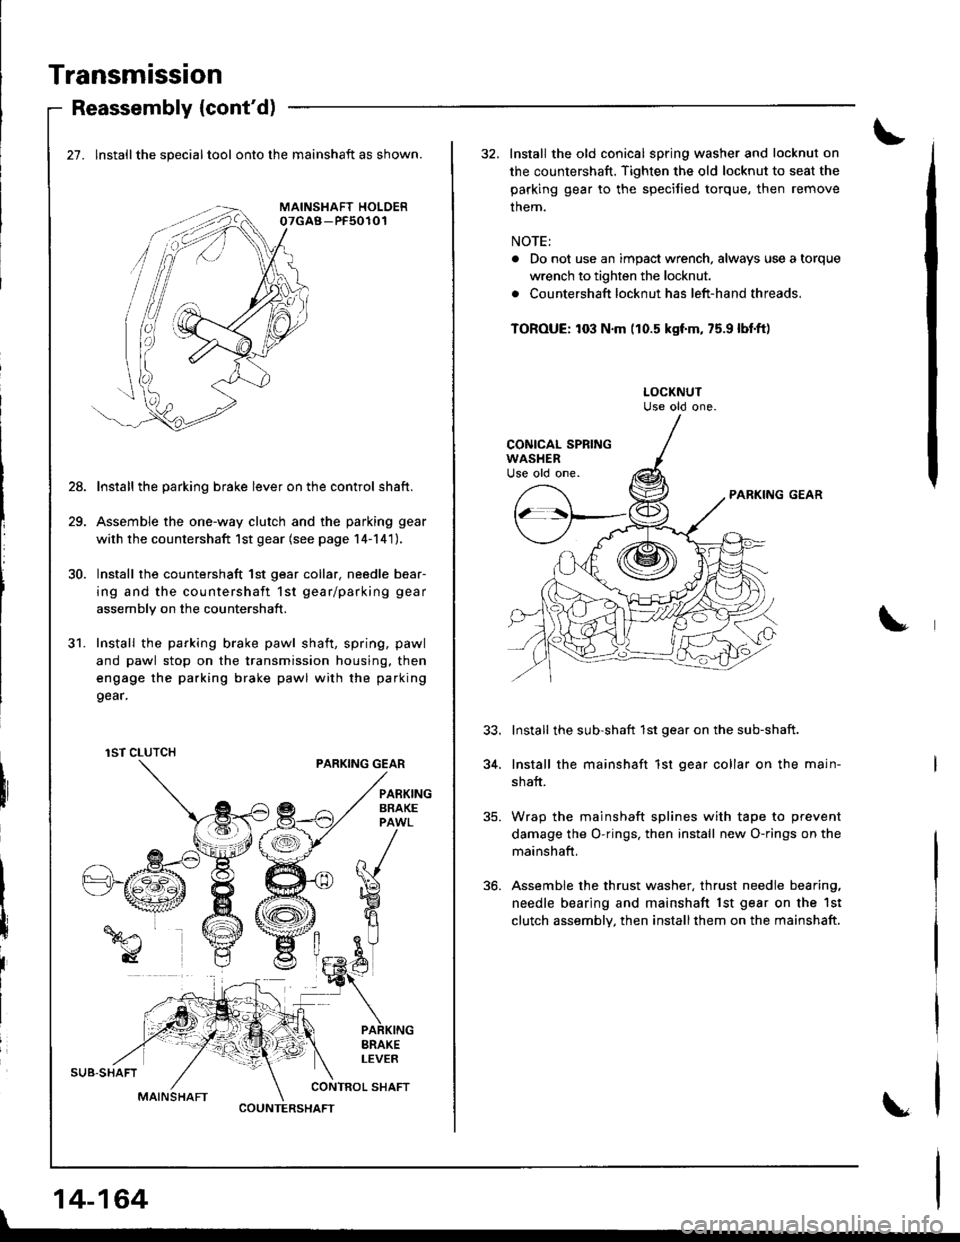
Transmission
SUB.SHAFT
MAINSHAFT
Reassembly {cont'd)
27. lnstallthe specialtool onto the mainshaft as shown.
Install the parking brake lever on the control shaft.
Assemble the one-way clutch and the parking gear
with the countershaft 1st gear (see page 14-141),
Install the countershaft 1st gear collar. needle bear-
ing and the countershaft 1st gear/parking gear
assembly on the countershaft.
Install the parking brake pawl shaft, spring, pawl
and pawl stop on the transmission housing. then
engage the parking brake pawl with the parking
9ear.
PARKING GEAR
28.
31.
I
I
iIBRAKELEVER
CONTROL SHAFT
1ST CLUTCH
COUNTERSHAFT
|
14-164
32, Install the old conical spring washer and locknut on
the countershaft. Tighten the old locknut to seat the
parking gear to the speciJied torque, then remove
them.
NOTE:
. Do not use an impact wrench, always use a torque
wrench to tighten the locknut.
. Countershaft locknut has left-hand threads,
TOROUE: to3 N.m (10.5 kgf'm, 75.9 lbl.ft)
PARKING GEAR
Install the sub-shaft 1st gear on the sub-shaft.
Install the mainshaft 1st gear collar on the main-
shaft.
Wrap the mainshaft splines with tape to prevent
damage the O-rings, then install new O-rings on the
mainshaft,
Assemble the thrust washer, thrust needle bearing,
needle bearing and mainshaft lst gear on the 1st
clutch assembly, then installthem on the mainshaft.
34.