HONDA INTEGRA 1998 4.G Workshop Manual
INTEGRA 1998 4.G
HONDA
HONDA
https://www.carmanualsonline.info/img/13/6069/w960_6069-0.png
HONDA INTEGRA 1998 4.G Workshop Manual
Trending: Cylinder, automatic transmission cable, refill oil, dimensions, warning lights, fog light, overheating
Page 551 of 1681
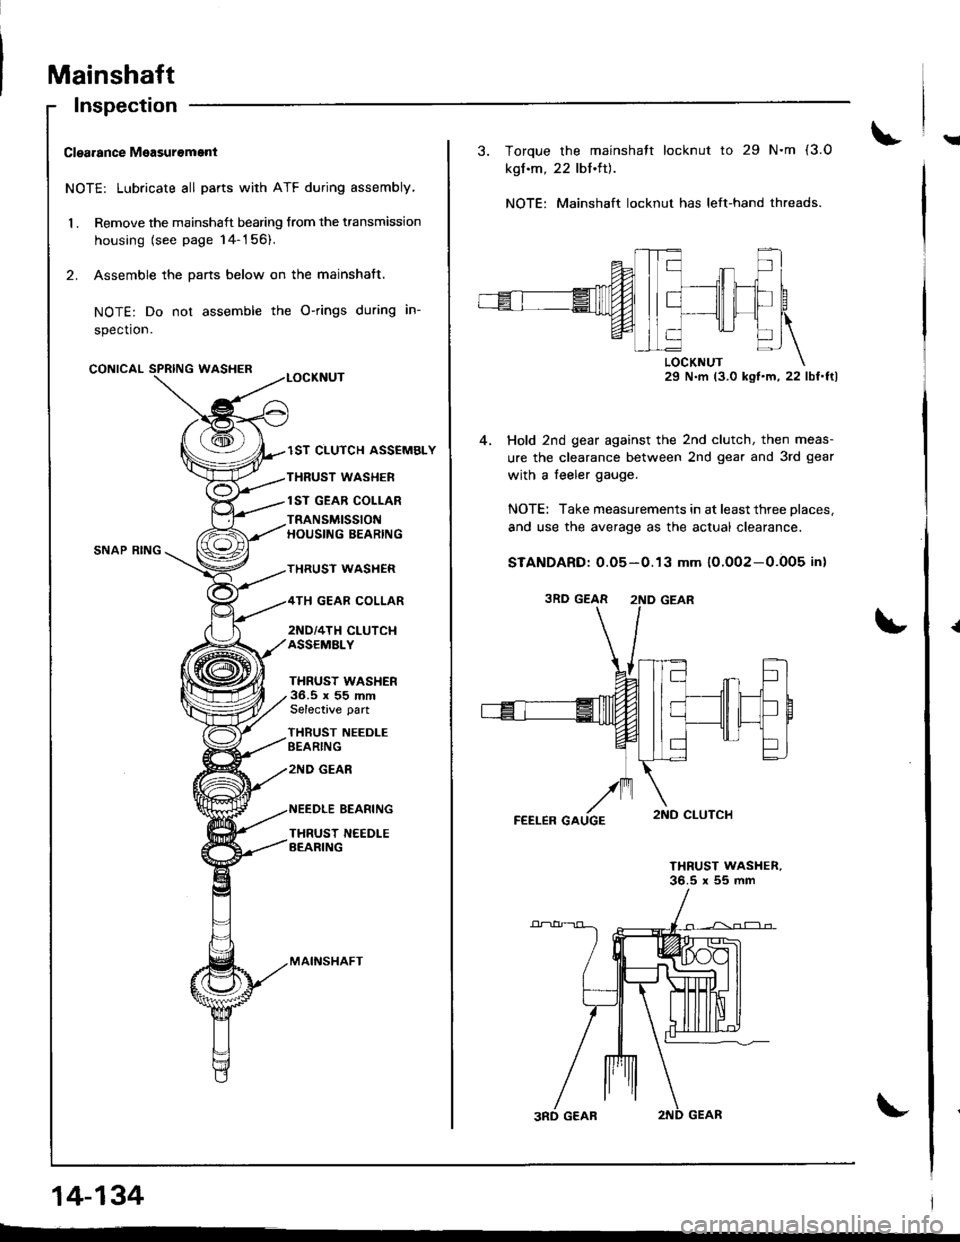
Mainshaft
!Clgarance Measurement
NOTE: Lubricate all parts with ATF during assembly,
1 . Remove the mainshaft bearing from the transmission
housing {see page 14-156).
2. Assemble the pans below on the mainshaft.
NOTE: Do not assemble the O-rings during in-
spection.
CONICALWASHER
Inspection
SNAP RING
lST CLUTCH ASSEMBLY
THRUST WASHER
lST GEAR COLLAR
TRANSMISSIONHOUSING BEARING
THRUST WASHER
TH GEAR COLLAR
2ND/4TH CLUTCI{ASSEMALY
THRUST WASHER36.5 x 55 mmSelective part
THRUST NEEDLEBEARING
zND GEAR
BEARING
THRUST N€EDLEBEARING
MAINSHAFT
14-134
3. Torque the mainshatt locknut to 29 N.m (3.O
kgf.m, 22 lbt.tt).
NOTE: Mainshaft locknut has left-hand threads.
29 N.m (3.0 ksl'm,22 lbf'ftl
Hold 2nd gear against the 2nd clutch, then meas-
ure the clearance between 2nd gear and 3rd gear
with a feeler gauge.
NOTE: Take measurements in at least three places,
and use the average as the actual clearance.
STANDARD: 0.05-0.13 mm 10.002-0.005 in)
THRUST WASHER,36.5 x 55 mm
3RD GEAR 2ND GEAR
Page 552 of 1681
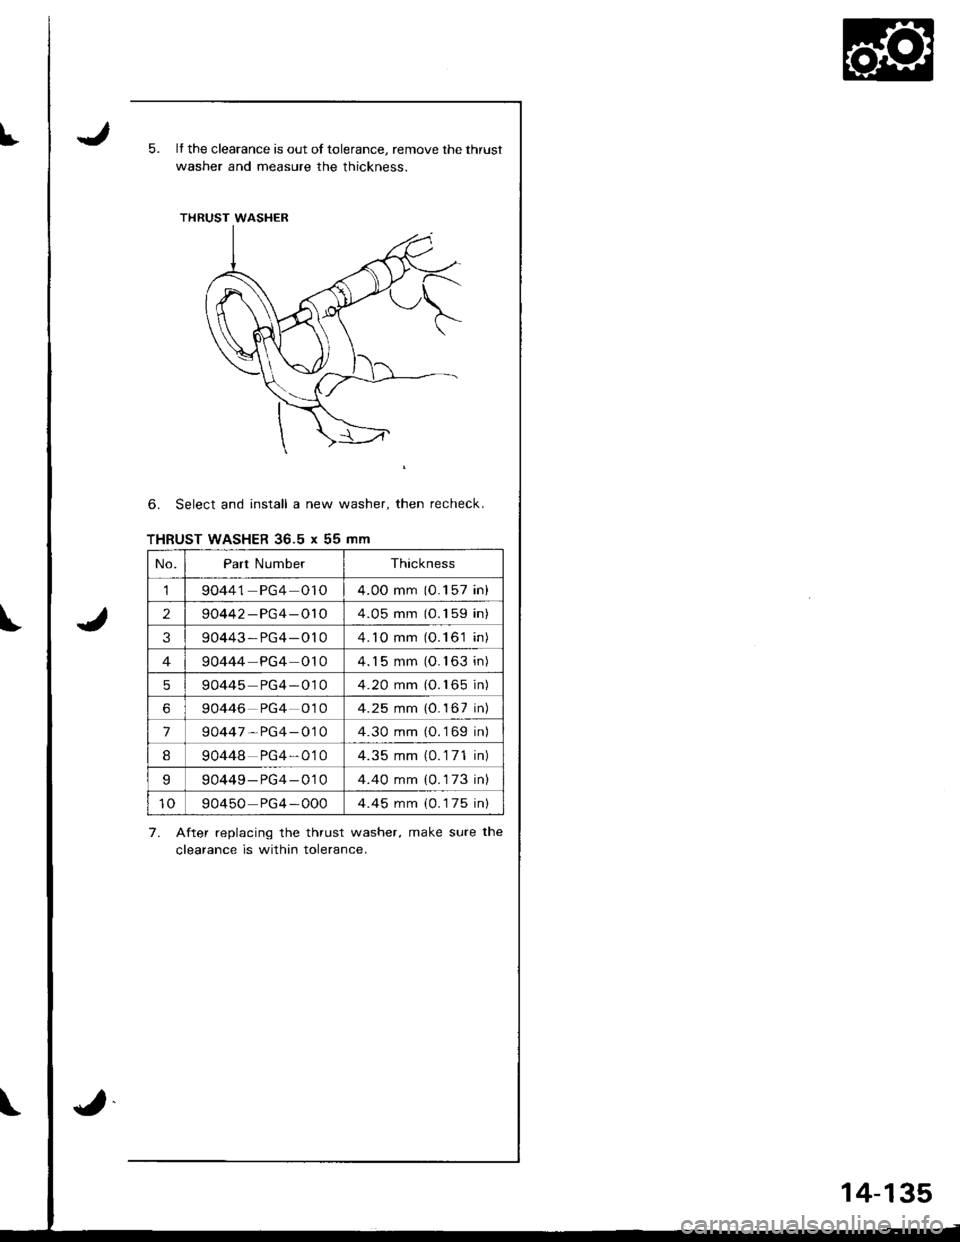
It5.It the clearance is out of tolerance, remove the thrust
washer and measure the thickness.
6. Select and install a new washer, then recheck.
THRUST WASHER 36.5 x 55 mm
7. After replacing the thrust washer, make sure the
clearance is within tolerance.
J
No.Part NumberThickness
190441 PG4 0104.0O mm (0.1 57 in)
290442 -PG4-OlO4.05 mm (0.1 59 in)
390443-PG4-O104.1O mm (O.161 in)
490444-PG4 0104.1 5 mm (O. 163 in)
590445 PG4-0104.20 mm (O.165 in)
690446 PG4 0104.25 mm {O.167 in)
790447,PG4-0104.30 mm (O.1 69 in)
I90448 PG4-0'104.35 mm (0.1 71 in)
990449-PG4-0104.40 mm {0.1 73 in)
1090450 PG4 - 0004.45 mm (0.1 75 in)
.J
14-135
Page 553 of 1681
Countershaft
Disassembly/lnspection/Reassembly
NOTEI
a Lubricate all parts with ATF before reassembly.
a Inspect the thrust needle bearings and the needle bearings for galling and rough movement.
a Before installing the O rings, wrap the shaft splines with tape to prevent damaging the O-rings.
a Locknut has left-hand threads.
CONICAL SPRINGWASHER
1ST GEAR
TFANSMISSIONHOUSING BEARING
REVERSE GEAR COLLAR
LOCKNUT {FLANGE NUTI23 x 1.25 mm103-0-1O3N.m(10.5-0-lO.5kgf.m,
75.9 - 0 - 75.9 rbf.lrlReplace.Left hand threads
BEARING
REVERSESELECTOR
REVERSE SELECTORHU8
COUNTERSHAFTCheck splines for excessivewear and damage,
4TH GEAR
NEEDLE EEARINGCheck bearing surface for scoring,scratches and excessive wear.DISTANCE COLLAR,28 mmSelective part.
2ND GEAR
THRUST NEEDLEEEARING
3RD GEAR
NEEDLE BEABING
i3RD GEAR COLI-AR
THRUST NEEDLE BEARING
SPLINED WASHER
3RD CLUTCH ASSEMBLY
14-136
Page 554 of 1681
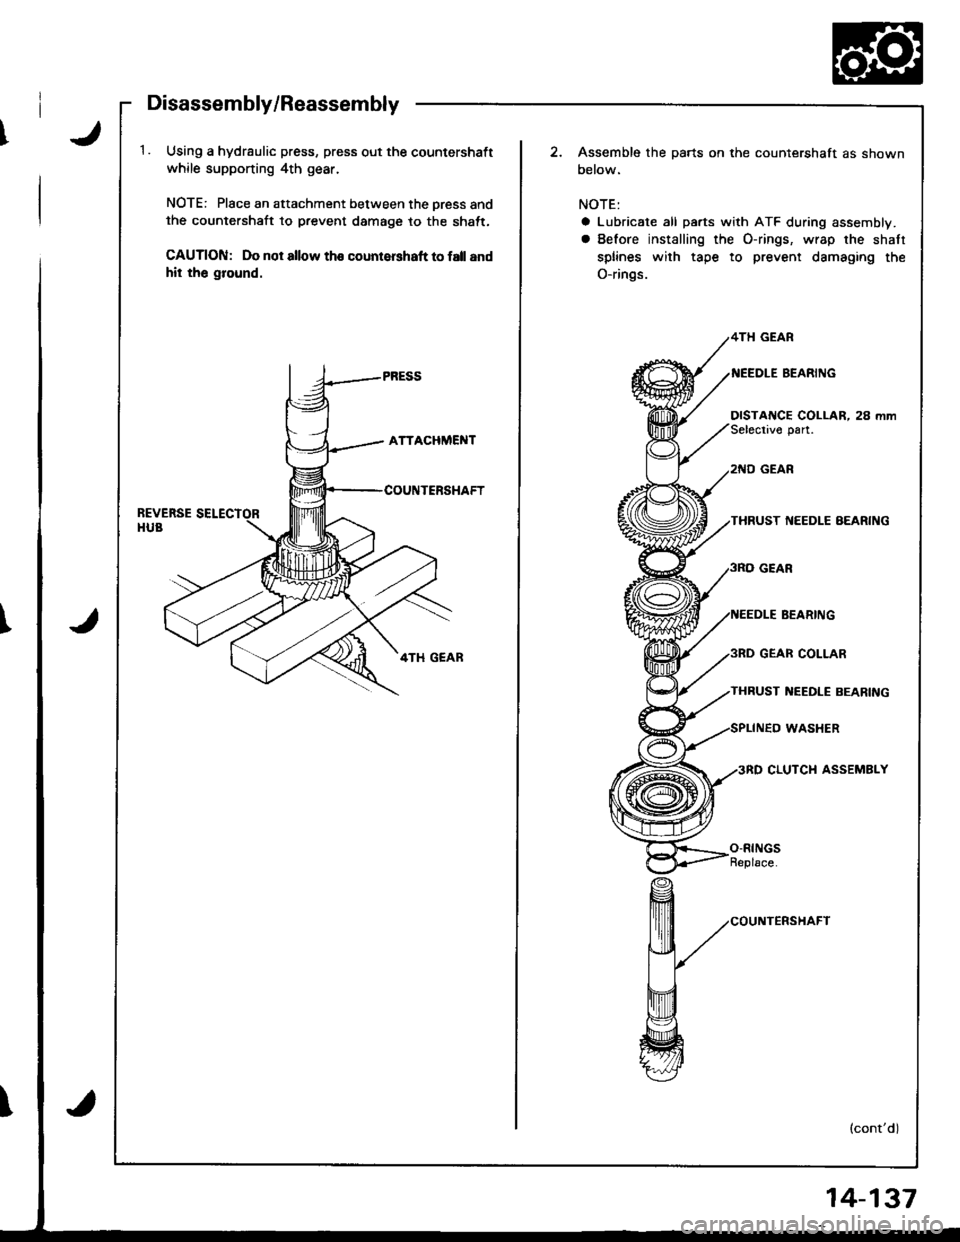
Disassembly/Reassembly
1. Using a hydrsulic press, press out the countershaft
while supponing 4th gear.
NOTE: Place an attachment between the oress andthe countershaft to prevent damage to the shatt,
CAUTION: Do not allow th€ count€rshaft to fall rnd
hit the ground.
T
T
2. Assemble the parts on the countershaft as shown
below.
NOTE:
a Lubricate all parts with ATF during assembly.
a Before installing the O-rings, wrap the shaft
splines with tape to prevent damaging the
O-rings.
'{EEDLE EEARIIIG
DISTANCE COLLAR, 28 mmSelectivo part.
THRUST NEEDLE BEARING
BEARING
GEAR COLLAR
TI{BUST NEEDLE BEARING
WASHER
CLUTCH ASSEMBLY
(cont'd)
14-137
Page 555 of 1681
Countershaft
Disassembly/Reassembly (cont'dl
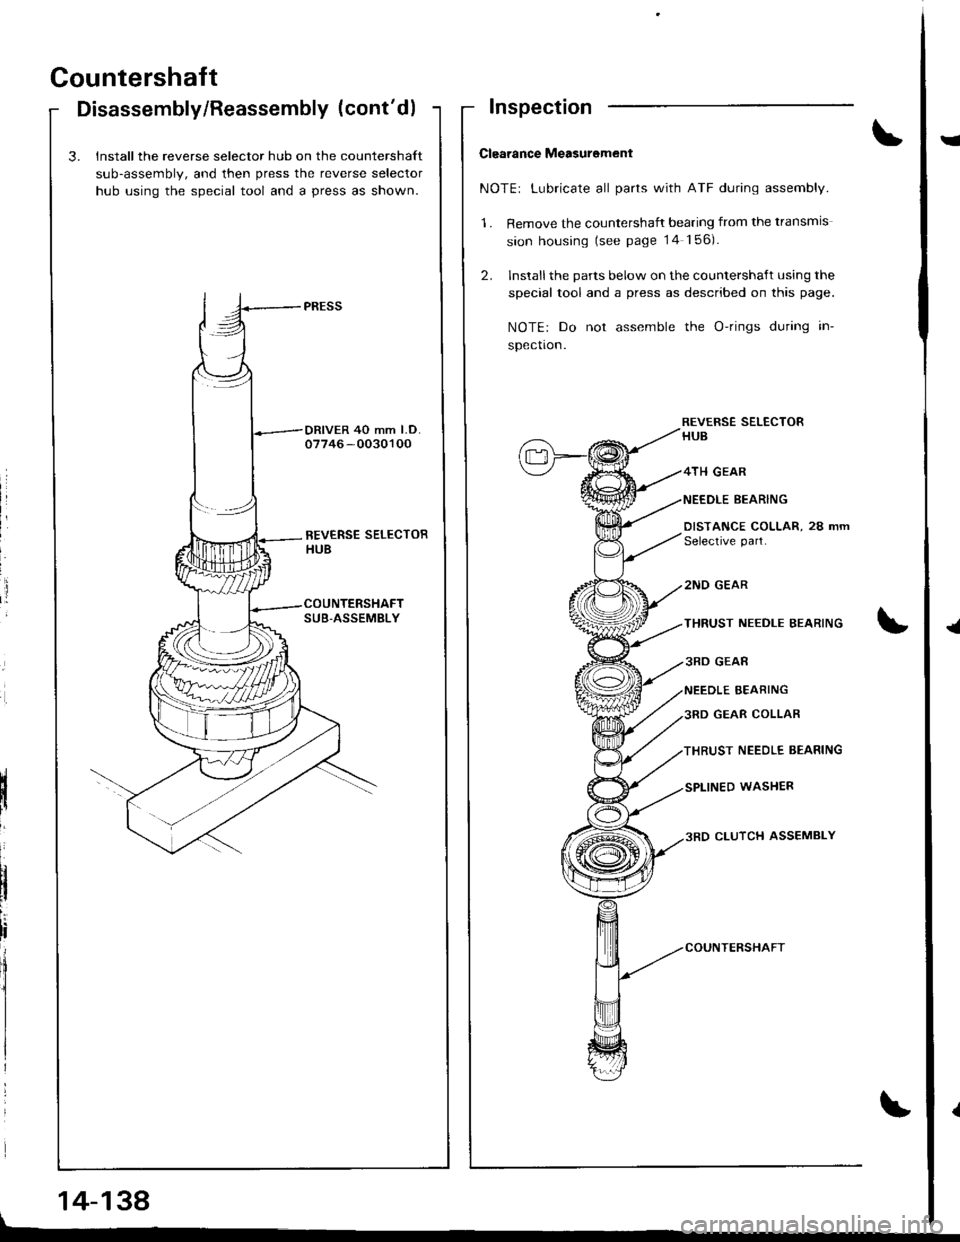
3. Install the reverse selector hub on the countershaft
sub-assembly, and then press the reverse selector
hub using the special tool and a press as shown.
Clearance Measurement
NOTEr Lubricate all parts with ATF during assembly.
1. Remove the countershaft bearing from the transmis
sion housing (see page 14 156).
2. lnstallthe parts below on the countershaft using the
special tool and a press as described on this page.
NOTE: Do not assemble the O-rings during an-
spection.
REVERSE SELECTORHUB
4TH GEAR
BEARING
DISTANCE COLLAR, 28 mmSelective part.
2ND GEAR
THRUST NEEDLE BEARING
3RO GEAR
THRUST NEEDLE BEARING
SPLINED WASHER
BEARING
GEAR COLLAR
CLUTCH ASSEMBLY
14-138
Page 556 of 1681
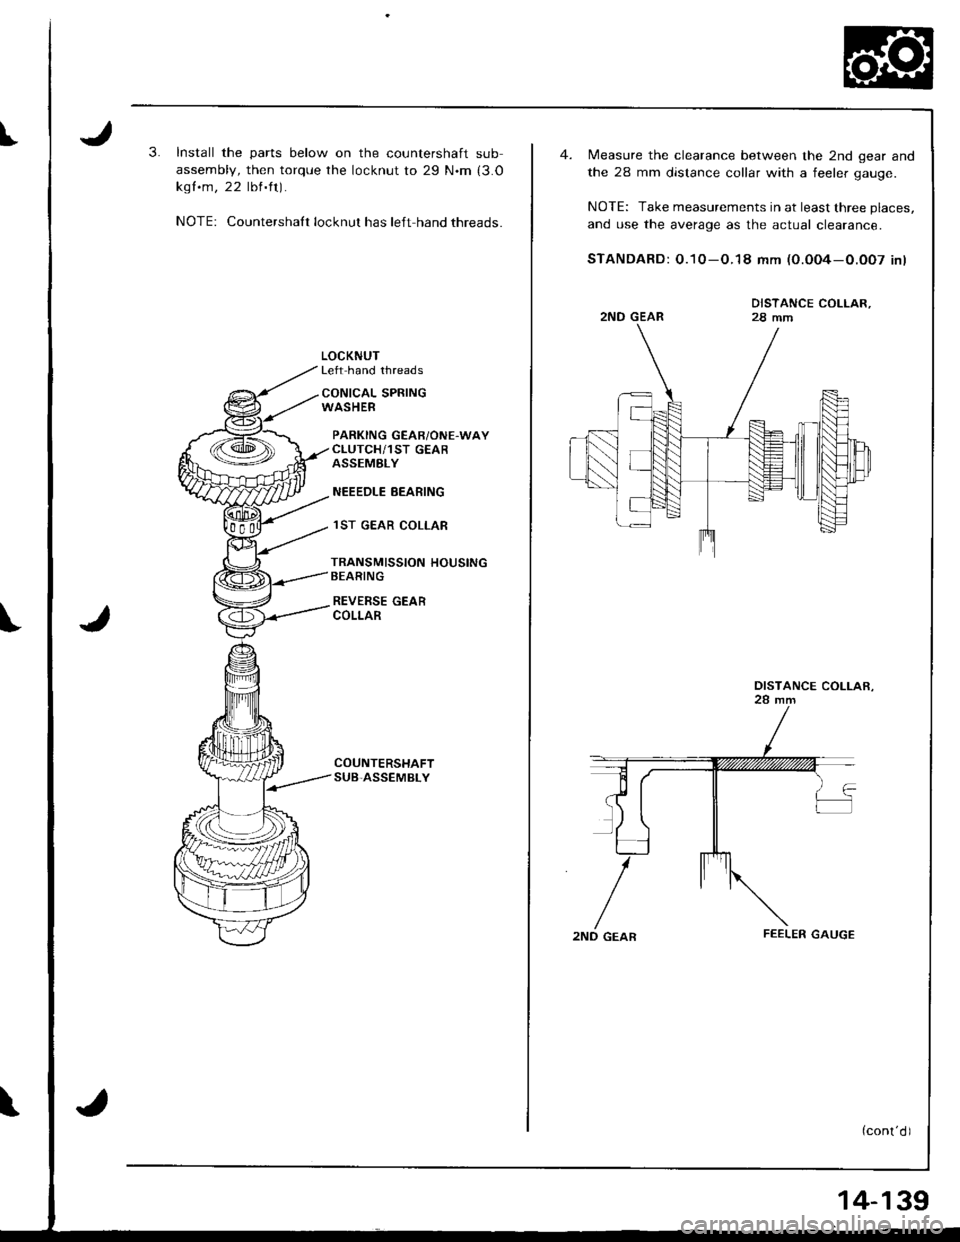
I3.Install the parts below on the countershaft sub
assembly, then torque the locknut to 29 N.m (3.O
kgf .m, 22 lbl'ft).
NOTE: Countershalt locknut has left hand threads.
LOCKNUTLeft hand threads
CONICAL SPRINGWASHEB
PARKING GEABiONE.WAYCLUTCH/1ST GEARASSEMELY
NEEEDLE EEARING
lST GEAR COLLAR
TRANSMISSION HOUSINGBEARING
REVERSE GEARCOLLAR
COUNTERSHAFTSUB,ASSEMBLY
Measure the clearance between the 2nd gear and
the 28 mm distance collar with a feeler oauoe.
NOTE: Take measurements in at least three places,
and use the average as the actual clearance.
STANDARD: O.10-O.18 mm (O.0O4-O.OO7 inl
2ND GEARFEELER GAUGE
DISTANCE COLLAR,
DISTANCE COLLAR.
14-139
Page 557 of 1681
Countershaft
Inspection (cont'd)
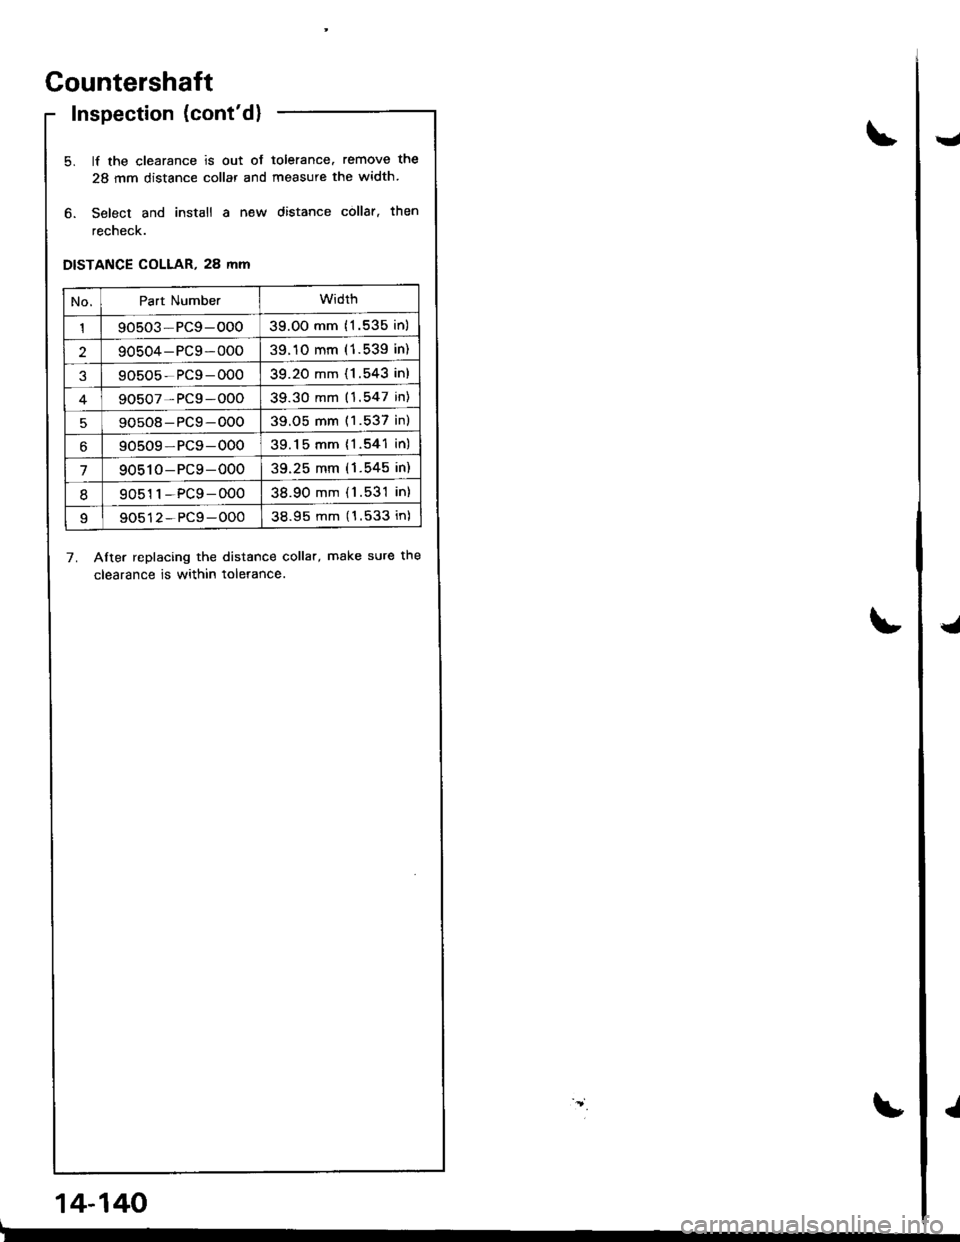
5. lf the clearance is out of tolerance. remove the
28 mm distance collar and measure the width.
6. Select and install a new distance collar. then
recheck.
DISTANCE COLLAR, 28 mm
7. Alter replacing the distance collar, make sure the
clearance is within tolerance.
No.Part Numberwidth
190503-PC9-OOO39.00 mm (1.535 in)
t90504-PC9-00039.10 mm (1 .539 in)
90505-PC9-00039.20 mm (1.543 in)
90507-PC9-O0039.3O mm (1.547 in)
590508-PC9-OOO39.05 mm (1 .537 in)
90509-PC9-00039.1 5 mm {'1.541 in)
790510-PC9-00039.25 mm (1.545 in)
I90511-PCg-00038.90 mm (1.531 in)
I90512-PC9-OO038.95 mm (1.533 in)
14-140
Y
J
./
Page 558 of 1681
One-way Glutch
I
Disassembly/lnspection/Reassembly
1 . Separate countershaft l st gear from the parking gear
by turning the parking gear in the direction shown.
PARKING GEAR
2. Remove the one-way clutch by prying it up with theend of a screwdriver.
ONE.WAY CLUTCHCOUNTERSHAFT 1sr GEAR ioie, ,n",u', In thrs drectron.
Of{E-WAY CLUTCH
COUNTERSHAFT lST GEAR
COUNTERSHAFT lST GEAR
SCREWDRIYER
14-141
Inspect the parts as follows:
PARKING GEARInspect the parking gearfor wear and scoring.
ONE-WAYInspect the one-wayclutch for damages andfaully movement,
1ST GEARInspect countershaft 1st gearIor wear and scoring,
3. After the parts are assembled, hold countershaft l stgear and turn the parking gear in the direction shown
to be sure it turns freely. AIso make sure the park
ing gear does not turn in the opposite direction.
PARKING GEAR
COUNTERSHAFT 1ST GEAR
Page 559 of 1681
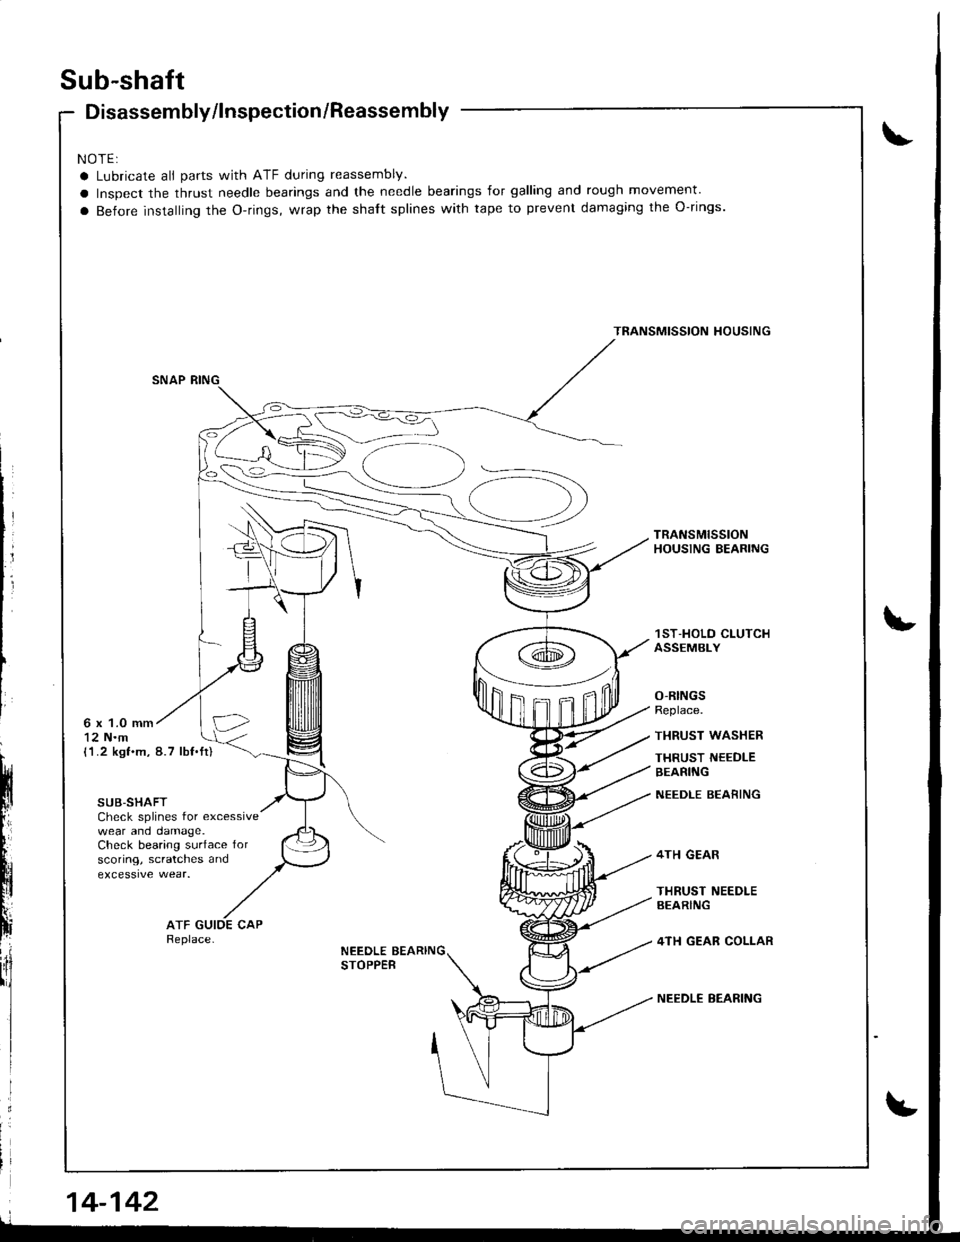
Sub-shaft
Disassembly/lnspection/Reassembly
NOTE:
a Lubricate all parts with ATF during reassembly.
a Inspect the thrust needle bearings and the needle bearings for galling and rough movement'
a Before installing the o-rings, wrap the shaft splines with tape to prevent damaging the o-rings.
TRANSMISSION HOUSING
TRANSMISSIONHOUSING BEARING
1ST-HOLO C|-UTCHASSEMBLY
O-RINGSReplace.
THRUST WASHER
THRUST NEEDLEBEARING
NEEDLE BEARING
4TH GEAR
THRUST NEEDLEAEARING
4TH GEAR COLLAR
NEEDLE BEARING
6 x 1.0 mm12 N.m(1.2 kgf.m, 8.7 lbf.tt)
SUB-SHAFTCheck splines for excessivewear and oamage.Check bearing surface forscoring, scratches and
ATFReplace-NEEDLE BEARINGSTOPPEB
14-142
Page 560 of 1681
t
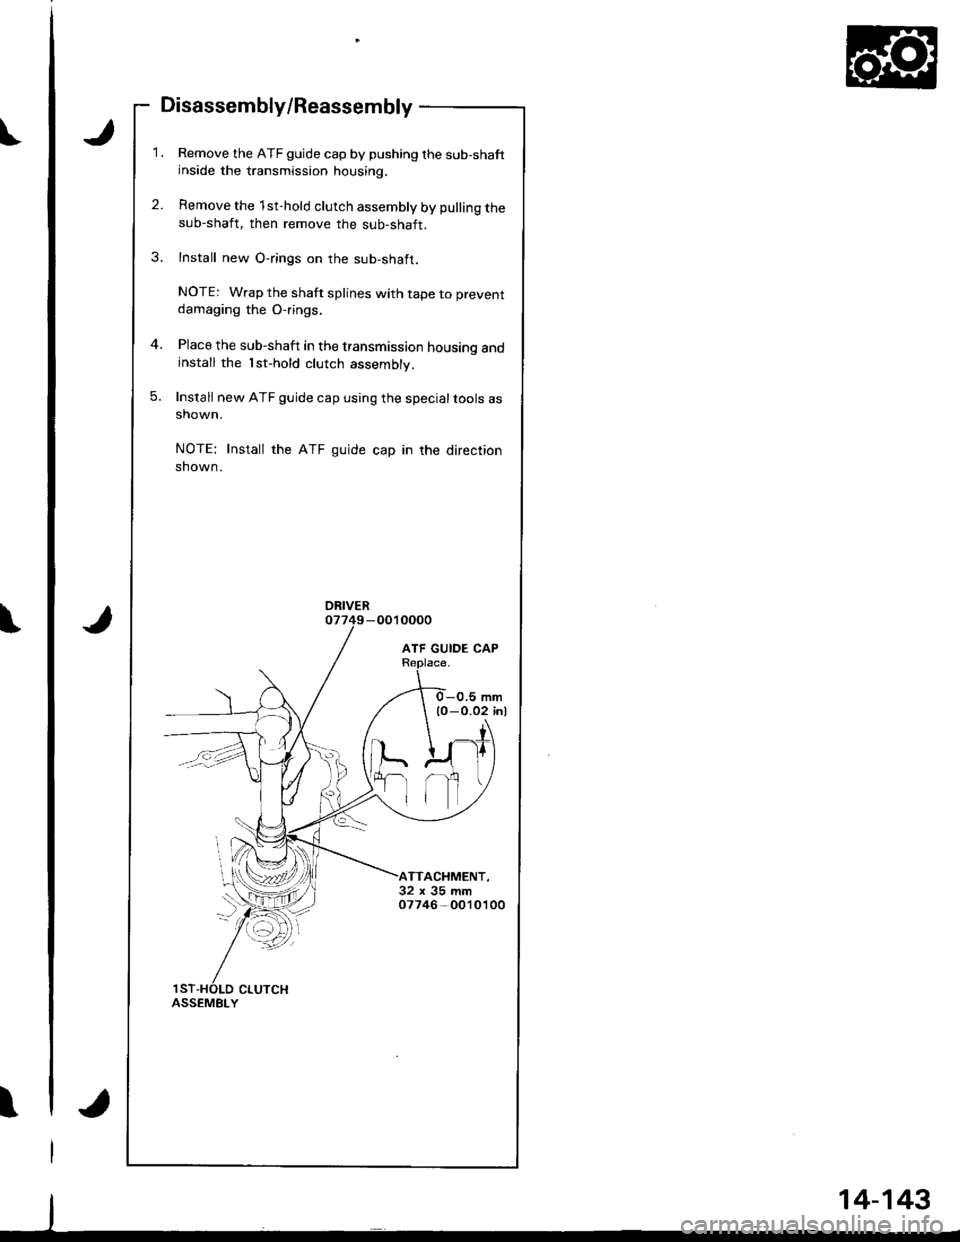
Disassembly/Reassembly
Remove the ATF guide cap by pushing the sub-shaftinside the transmission housing.
Remove the 1st-hold clutch assembly by pulling thesub-shaft, then remove the sub-shaft.
Install new O-rings on the sub-shaft.
NOTE: Wrap the shaft splines with tape to preventdamaging the Orings,
Place the sub-shaft in the transmission housing andinstall the 1st-hold clutch assembly.
Install new ATF guide cap using the specialtools asshown.
NOTE: Install the ATF guide cap in the direction
shown.
ORIVER
TTACHMENT,32x35mm07746-O010100
CLUTCHASSEMBLY
14-143
Trending: lock, brake pads, length, OBD port, wheel bolt torque, reset, ECU

