ISUZU KB P190 2007 Workshop Repair Manual
KB P190 2007
ISUZU
ISUZU
https://www.carmanualsonline.info/img/61/57177/w960_57177-0.png
ISUZU KB P190 2007 Workshop Repair Manual
Trending: gas tank size, brake, turn signal, alternator belt, weight, battery capacity, engine coolant
Page 4201 of 6020
7A4–66 UNIT REPAIR (AW30–40LE)
Before assembling new discs, soak them in ATF
for at least fifteen minutes.
248RY00045
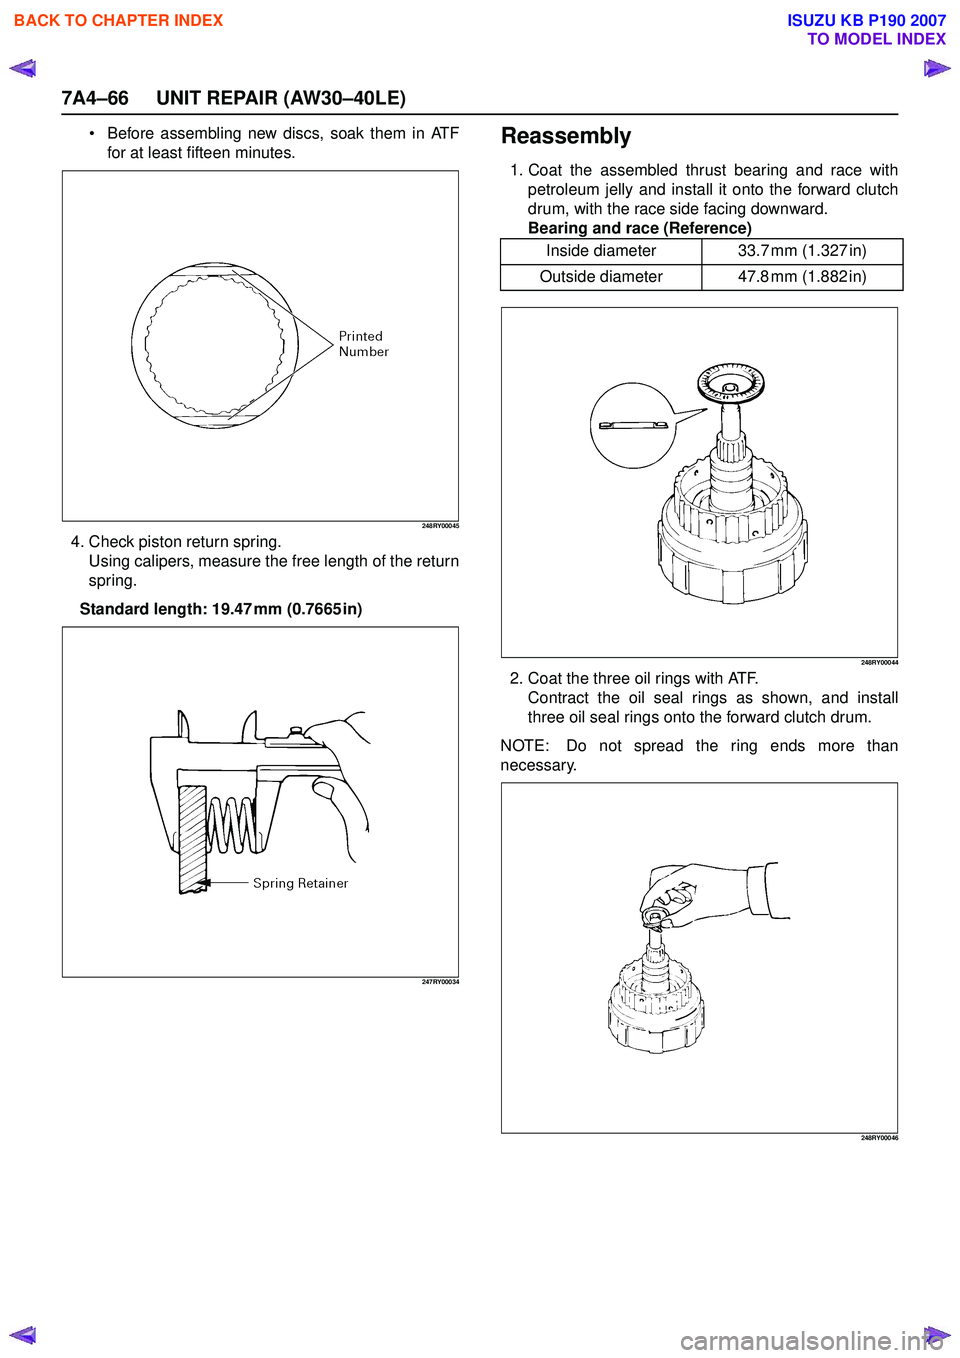
4. Check piston return spring. Using calipers, measure the free length of the return
spring.
Standard length: 19.47 mm (0.7665 in)
247RY00034
Reassembly
1. Coat the assembled thrust bearing and race with petroleum jelly and install it onto the forward clutch
drum, with the race side facing downward.
Bearing and race (Reference)
248RY00044
2. Coat the three oil rings with ATF. Contract the oil seal rings as shown, and install
three oil seal rings onto the forward clutch drum.
NOTE: Do not spread the ring ends more than
necessary.
248RY00046
Inside diameter 33.7 mm (1.327 in)
Outside diameter 47.8 mm (1.882 in)
BACK TO CHAPTER INDEX
TO MODEL INDEX
ISUZU KB P190 2007
Page 4202 of 6020
UNIT REPAIR (AW30–40LE) 7A4–67
3. Coat a new O-ring with ATF and install O-ring on theforward clutch drum.
248RY00047
4. Coat new O-rings with ATF and install two O-ringson the forward clutch piston.
5. Being careful not to damage the O-rings, press the forward clutch piston into the forward clutch drum.
248RY00049
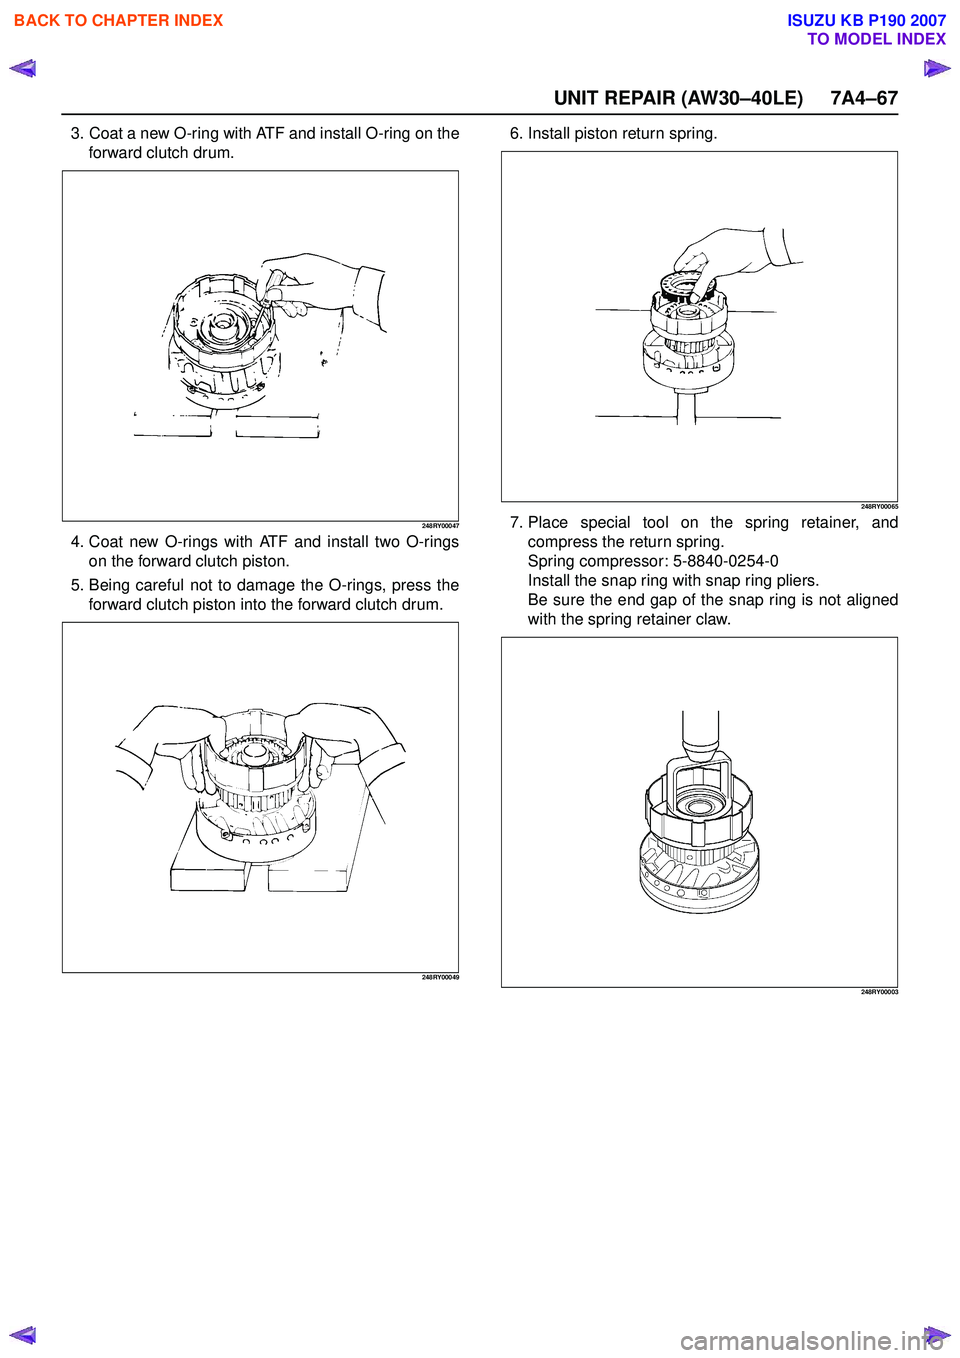
6. Install piston return spring.
248RY00065
7. Place special tool on the spring retainer, andcompress the return spring.
Spring compressor: 5-8840-0254-0
Install the snap ring with snap ring pliers.
Be sure the end gap of the snap ring is not aligned
with the spring retainer claw.
248RY00003
BACK TO CHAPTER INDEX
TO MODEL INDEX
ISUZU KB P190 2007
Page 4203 of 6020
7A4–68 UNIT REPAIR (AW30–40LE)
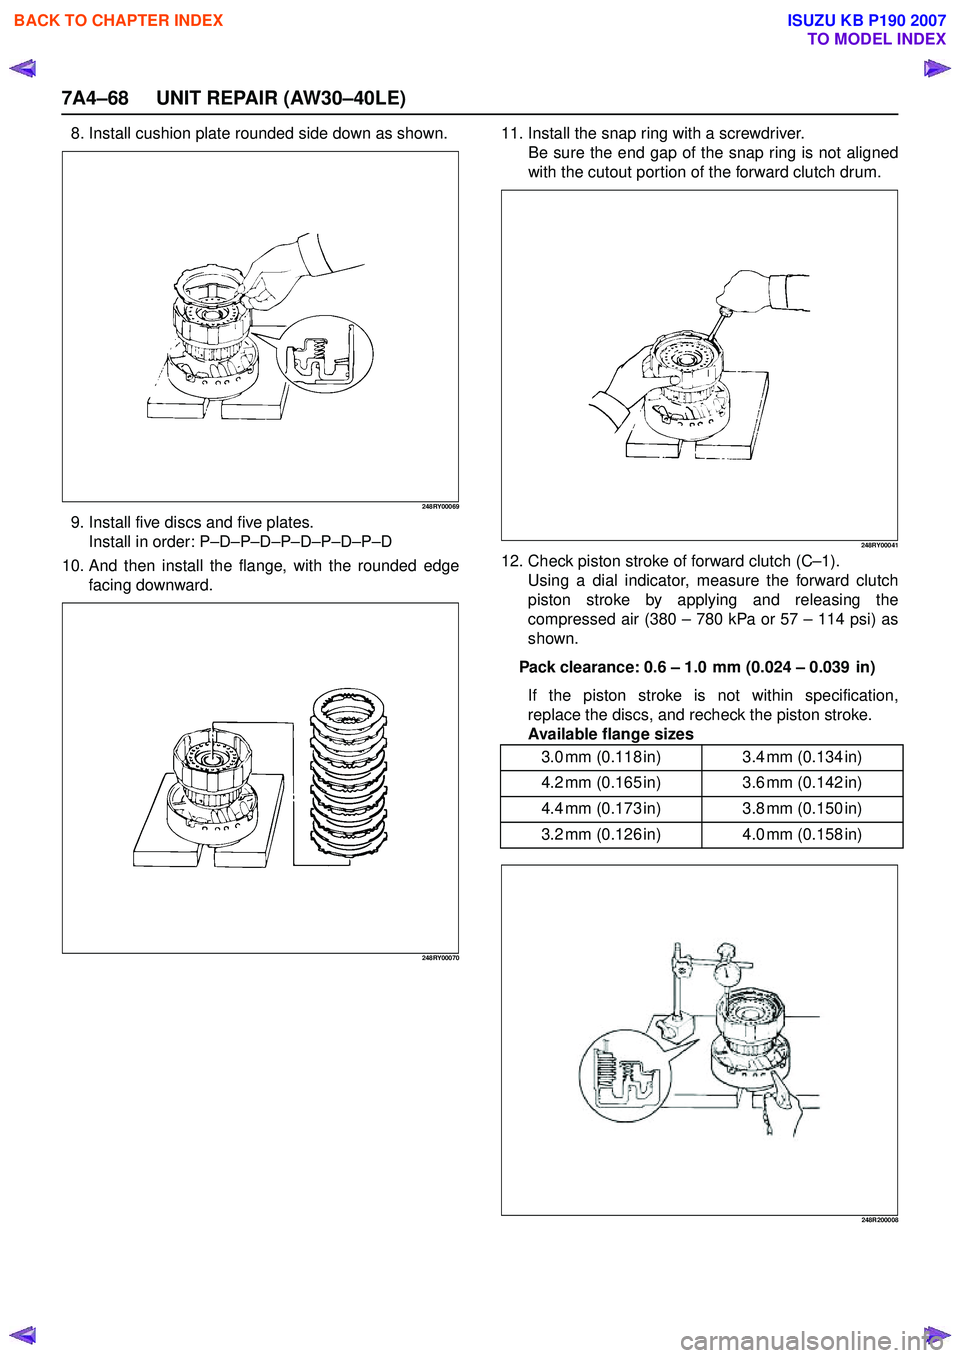
8. Install cushion plate rounded side down as shown.
248RY00069
9. Install five discs and five plates.Install in order: P –D –P –D –P –D –P –D –P –D
10. And then install the flange, with the rounded edge facing downward.
248RY00070
11. Install the snap ring with a screwdriver. Be sure the end gap of the snap ring is not aligned
with the cutout portion of the forward clutch drum.
248RY00041
12. Check piston stroke of forward clutch (C –1).
Using a dial indicator, measure the forward clutch
piston stroke by applying and releasing the
compressed air (380 – 780 kPa or 57 – 114 psi) as
shown.
Pack clearance: 0.6 – 1.0 mm (0.024 – 0.039 in)
If the piston stroke is not within specification,
replace the discs, and recheck the piston stroke.
Available flange sizes
248R200008
3.0 mm (0.118 in) 3.4 mm (0.134 in)
4.2 mm (0.165 in) 3.6 mm (0.142 in)
4.4 mm (0.173 in) 3.8 mm (0.150 in)
3.2 mm (0.126 in) 4.0 mm (0.158 in)
BACK TO CHAPTER INDEX
TO MODEL INDEX
ISUZU KB P190 2007
Page 4204 of 6020
UNIT REPAIR (AW30–40LE) 7A4–69
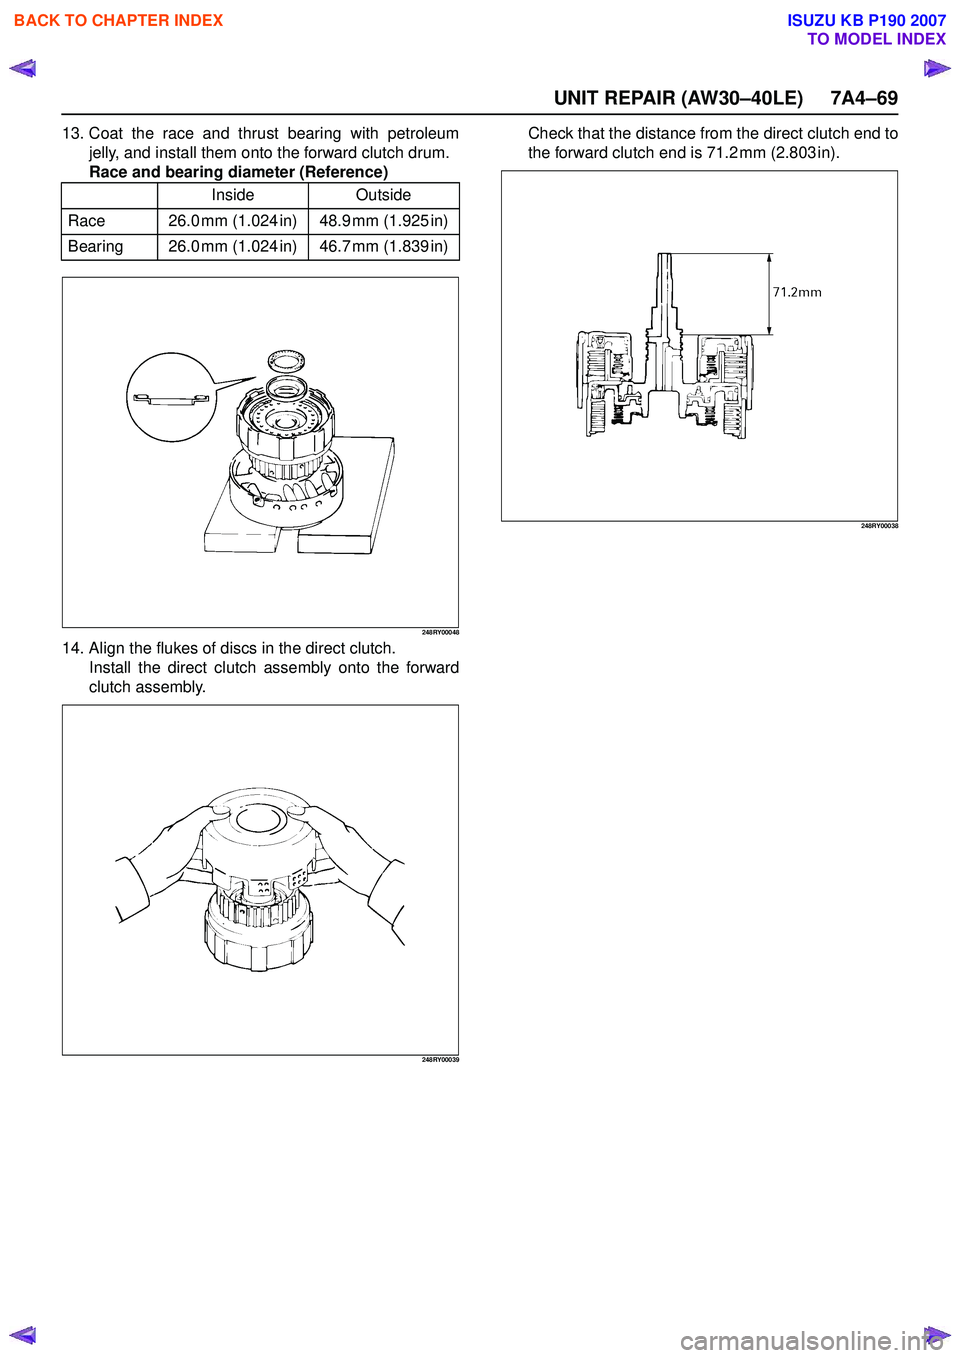
13. Coat the race and thrust bearing with petroleumjelly, and install them onto the forward clutch drum.
Race and bearing diameter (Reference)
248RY00048
14. Align the flukes of discs in the direct clutch. Install the direct clutch assembly onto the forward
clutch assembly.
248RY00039
Check that the distance from the direct clutch end to
the forward clutch end is 71.2 mm (2.803 in).
248RY00038
Inside Outside
Race 26.0 mm (1.024 in) 48.9 mm (1.925 in)
Bearing 26.0 mm (1.024 in) 46.7 mm (1.839 in)
BACK TO CHAPTER INDEX
TO MODEL INDEX
ISUZU KB P190 2007
Page 4205 of 6020
7A4–70 UNIT REPAIR (AW30–40LE)
Front Planetary Gear
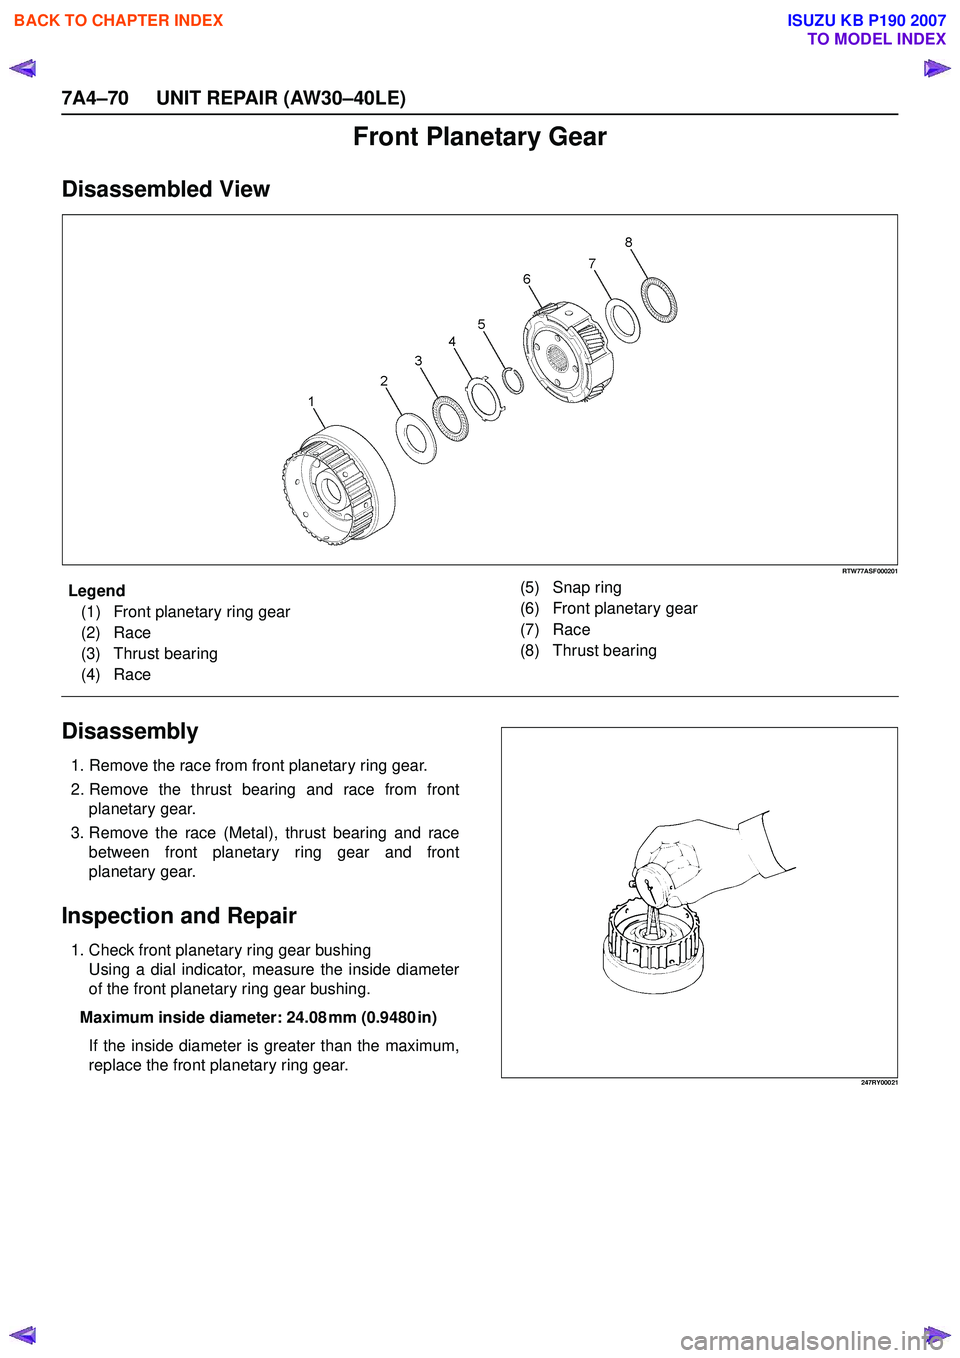
Disassembled View
RTW77ASF000201
EndOFCallout
Disassembly
1. Remove the race from front planetary ring gear.
2. Remove the thrust bearing and race from front planetary gear.
3. Remove the race (Metal), thrust bearing and race between front planetary ring gear and front
planetary gear.
Inspection and Repair
1. Check front planetary ring gear bushing Using a dial indicator, measure the inside diameter
of the front planetary ring gear bushing.
Maximum inside diameter: 24.08 mm (0.9480 in) If the inside diameter is greater than the maximum,
replace the front planetary ring gear.
247RY00021
Legend
(1) Front planetary ring gear
(2) Race
(3) Thrust bearing
(4) Race (5) Snap ring
(6) Front planetary gear
(7) Race
(8) Thrust bearing
BACK TO CHAPTER INDEX
TO MODEL INDEX
ISUZU KB P190 2007
Page 4206 of 6020
UNIT REPAIR (AW30–40LE) 7A4–71
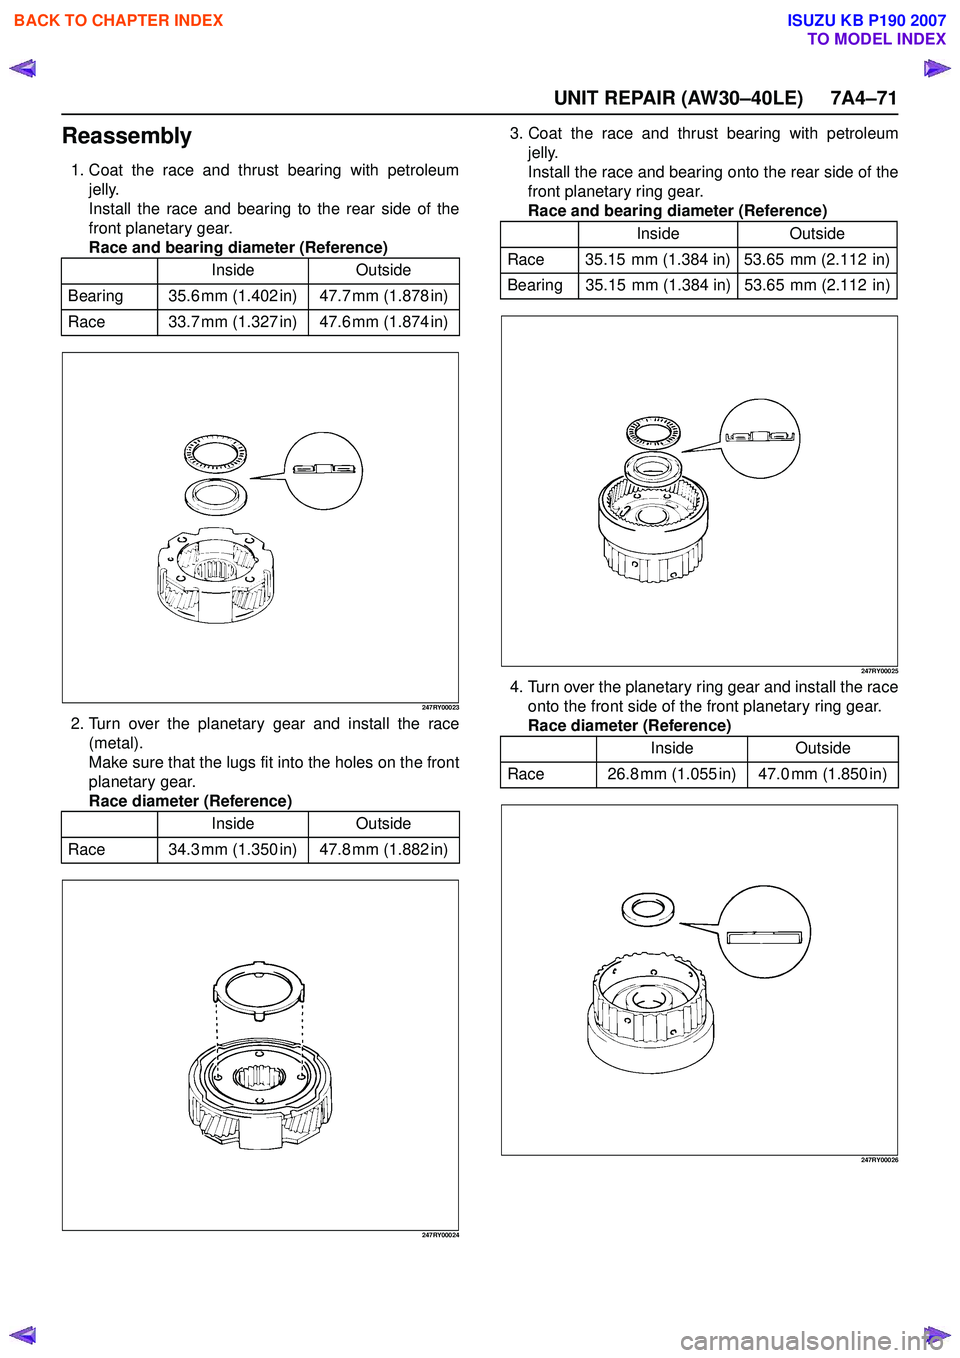
Reassembly
1. Coat the race and thrust bearing with petroleumjelly.
Install the race and bearing to the rear side of the
front planetary gear.
Race and bearing diameter (Reference)
247RY00023
2. Turn over the planetary gear and install the race (metal).
Make sure that the lugs fit into the holes on the front
planetary gear.
Race diameter (Reference)
247RY00024
3. Coat the race and thrust bearing with petroleum jelly.
Install the race and bearing onto the rear side of the
front planetary ring gear.
Race and bearing diameter (Reference)
247RY00025
4. Turn over the planetary ring gear and install the race onto the front side of the front planetary ring gear.
Race diameter (Reference)
247RY00026
Inside Outside
Bearing 35.6 mm (1.402 in) 47.7 mm (1.878 in)
Race 33.7 mm (1.327 in) 47.6 mm (1.874 in)
Inside Outside
Race 34.3 mm (1.350 in) 47.8 mm (1.882 in)
Inside Outside
Race 35.15 mm (1.384 in) 53.65 mm (2.112 in)
Bearing 35.15 mm (1.384 in) 53.65 mm (2.112 in)
Inside Outside
Race 26.8 mm (1.055 in) 47.0 mm (1.850 in)
BACK TO CHAPTER INDEX
TO MODEL INDEX
ISUZU KB P190 2007
Page 4207 of 6020
7A4–72 UNIT REPAIR (AW30–40LE)
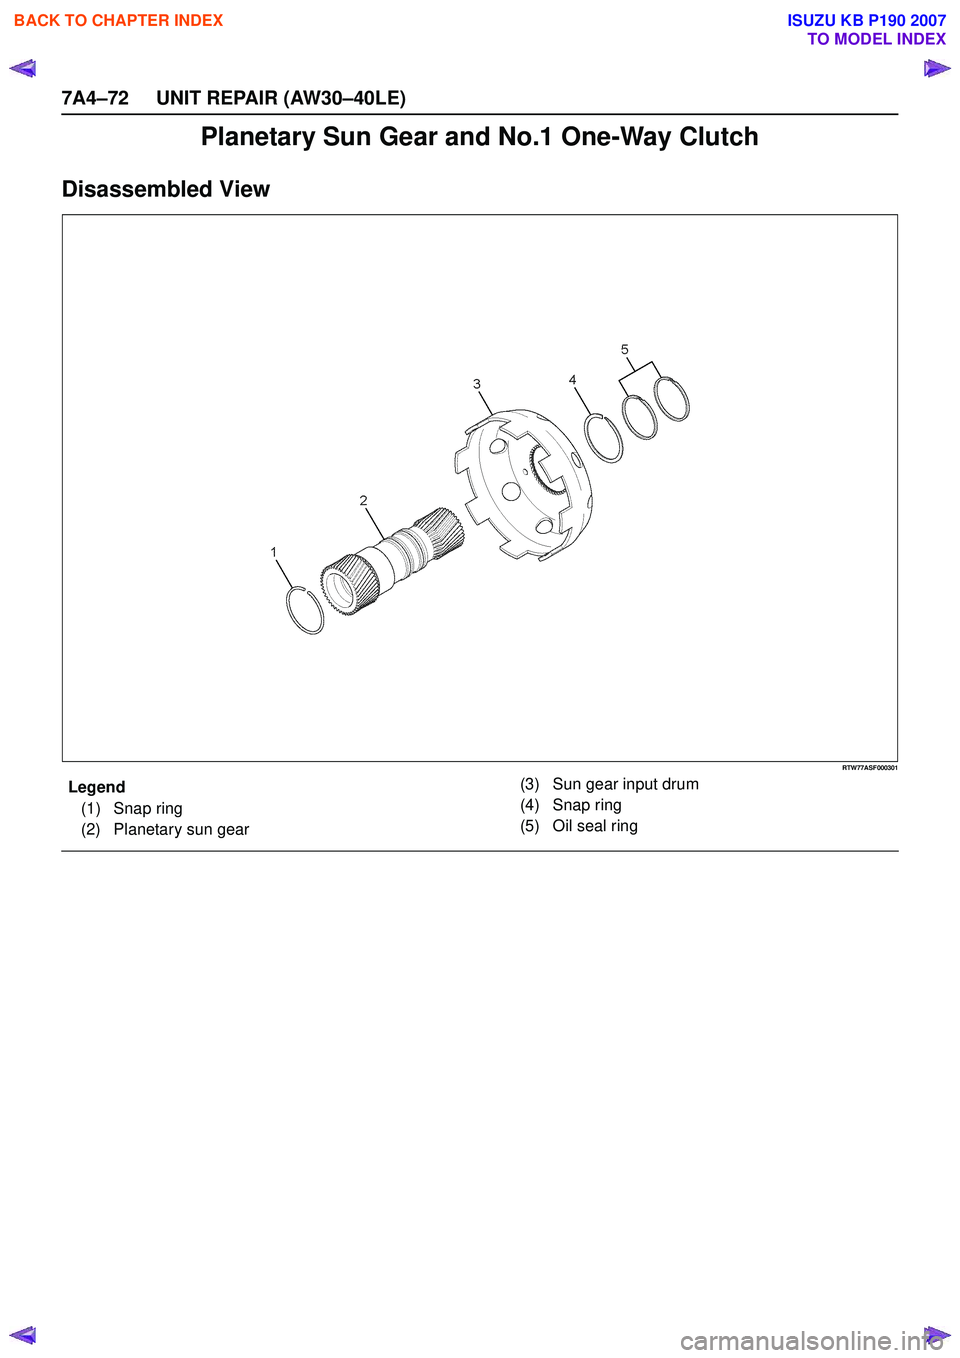
Planetary Sun Gear and No.1 One-Way Clutch
Disassembled View
RTW77ASF000301
EndOFCallout
Legend(1) Snap ring
(2) Planetary sun gear (3) Sun gear input drum
(4) Snap ring
(5) Oil seal ring
BACK TO CHAPTER INDEX
TO MODEL INDEX
ISUZU KB P190 2007
Page 4208 of 6020
UNIT REPAIR (AW30–40LE) 7A4–73
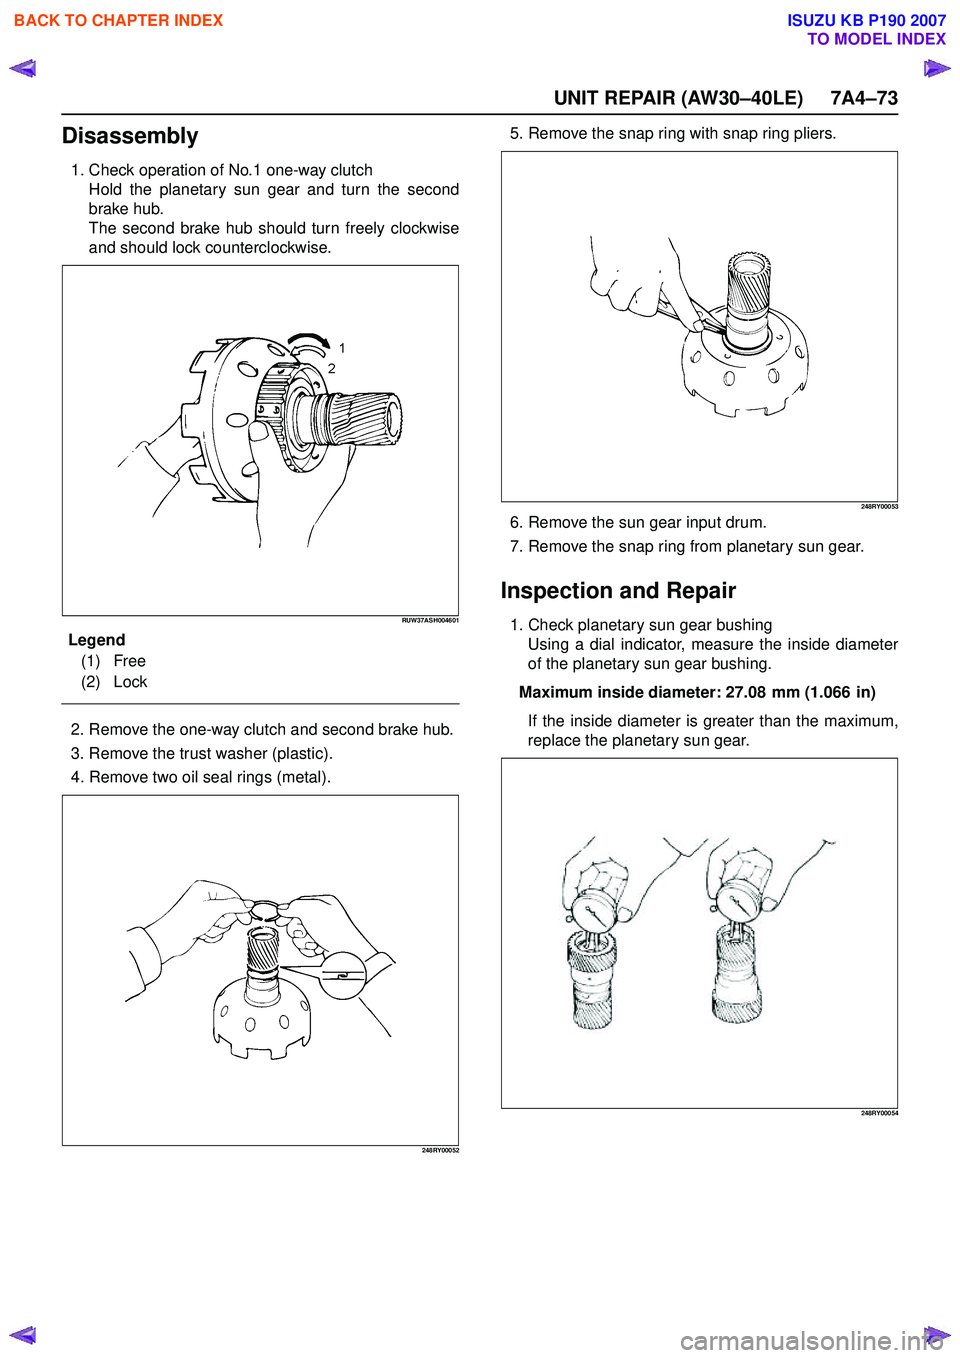
Disassembly
1. Check operation of No.1 one-way clutchHold the planetary sun gear and turn the second
brake hub.
The second brake hub should turn freely clockwise
and should lock counterclockwise.
RUW37ASH004601
E ndOFCallout
2. Remove the one-way clutch and second brake hub.
3. Remove the trust washer (plastic).
4. Remove two oil seal rings (metal).
248RY00052
5. Remove the snap ring with snap ring pliers.
248RY00053
6. Remove the sun gear input drum.
7. Remove the snap ring from planetary sun gear.
Inspection and Repair
1. Check planetary sun gear bushing Using a dial indicator, measure the inside diameter
of the planetary sun gear bushing.
Maximum inside diameter: 27.08 mm (1.066 in) If the inside diameter is greater than the maximum,
replace the planetary sun gear.
248RY00054
Legend
(1) Free
(2) Lock
BACK TO CHAPTER INDEX
TO MODEL INDEX
ISUZU KB P190 2007
Page 4209 of 6020
7A4–74 UNIT REPAIR (AW30–40LE)
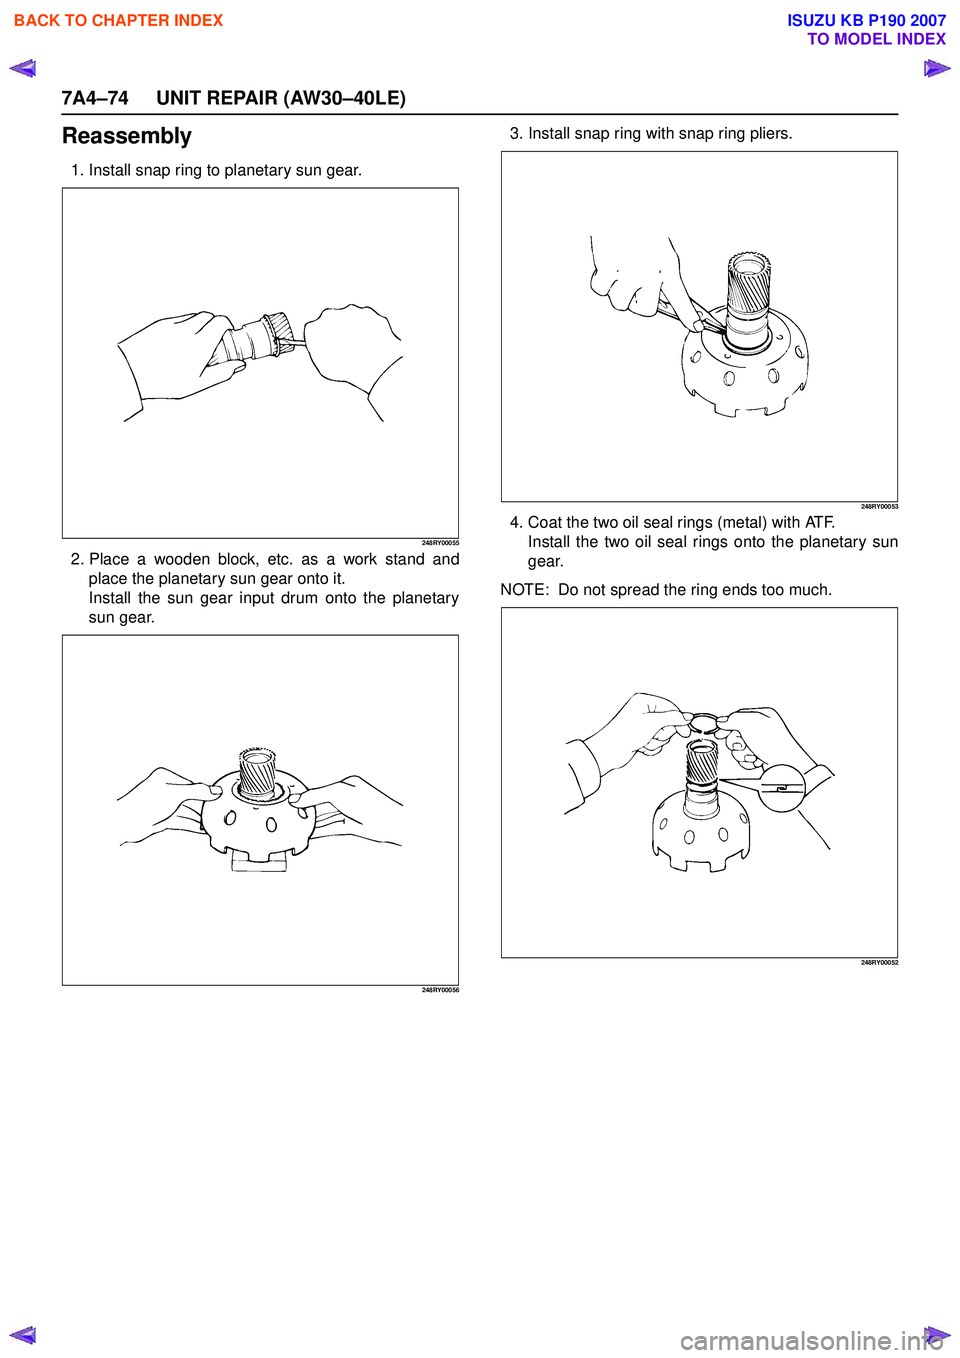
Reassembly
1. Install snap ring to planetary sun gear.
248RY00055
2. Place a wooden block, etc. as a work stand andplace the planetary sun gear onto it.
Install the sun gear input drum onto the planetary
sun gear.
248RY00056
3. Install snap ring with snap ring pliers.
248RY00053
4. Coat the two oil seal rings (metal) with ATF. Install the two oil seal rings onto the planetary sun
gear.
NOTE: Do not spread the ring ends too much.
248RY00052
BACK TO CHAPTER INDEX
TO MODEL INDEX
ISUZU KB P190 2007
Page 4210 of 6020
UNIT REPAIR (AW30–40LE) 7A4–75
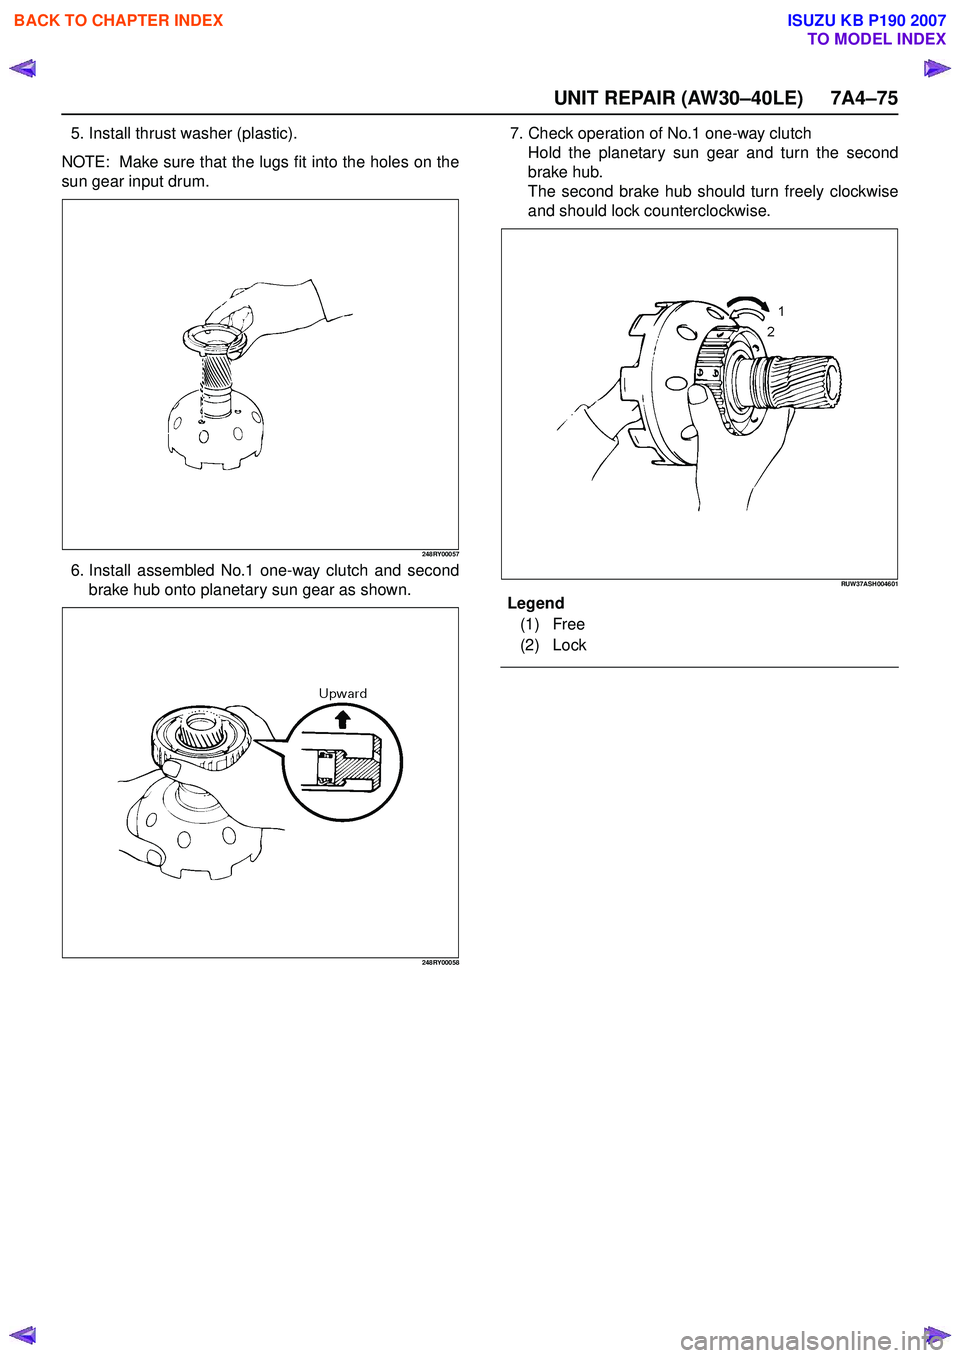
5. Install thrust washer (plastic).
NOTE: Make sure that the lugs fit into the holes on the
sun gear input drum.
248RY00057
6. Install assembled No.1 one-way clutch and second brake hub onto planetary sun gear as shown.
248RY00058
7. Check operation of No.1 one-way clutchHold the planetary sun gear and turn the second
brake hub.
The second brake hub should turn freely clockwise
and should lock counterclockwise.
RUW37ASH004601
En dOFCallout
Legend
(1) Free
(2) Lock
BACK TO CHAPTER INDEX
TO MODEL INDEX
ISUZU KB P190 2007
Trending: steering wheel, brake fluid, rear view mirror, steering wheel adjustment, seat memory, display, headlamp
