check engine ISUZU KB P190 2007 Workshop Repair Manual
[x] Cancel search | Manufacturer: ISUZU, Model Year: 2007, Model line: KB P190, Model: ISUZU KB P190 2007Pages: 6020, PDF Size: 70.23 MB
Page 2009 of 6020
ENGINE DIAGNOSIS (C24SE) 6-9
Abnormal Noise Due to Hydraulic Lash Adjuster
Should abnormal noise due to the hydraulic lash
adjuster trouble be heard immediately after the engine
is started, inspect as follows:
Condition Possible cause Correction
Abnormal noise is heard Air contaminated Bleed
HLA is spongy Check ball valve broken Repair
Safety valve in cylinder head
broken Replace
Valve clearance is not zero HLA inside stick
Replace HLA assembly
Troubleshooting Procedure
Short out each spark plug in sequence using insulated
spark plug wire removers. Locate cylinder with
defective bearing by listening for abnormal noise that
stops when spark plug is shorted out.
Condition Possible cause Correction
Noise from connecting rods or
from connecting rod bearings
(Faulty connecting rods or
connecting rod bearings usually
make an abnormal noise slightly
higher than the crank bearing
noise, which becomes more
evident when engine is
accelerated) Bearing or crankshaft pin worn Replace connecting rod bearings
and crankshaft or regrind
crankshaft and install the under
size bearing
Crankpin out of round Replace connecting rod bearings
and crankshaft or regrind
crankshaft and install the under
size bearing
Connecting rod bent Correct or replace
Connecting rod bearing seized Replace connecting rod bearings
and crankshaft or regrind
crankshaft and install the under
size bearing
Troubleshooting Procedure
Abnormal noise stops when the spark plug on the
cylinder with defective parts is shorted out.
Condition Possible cause Correction
Piston and cylinder
(Faulty piston or cylinder usually
makes a combined mechanical
thumping noise which increases
when engine is suddenly
accelerated but diminishes
gradually as the engine warms up) Piston clearance increased due to
cylinder wear Replace piston and cylinder body
Piston seized Replace piston and cylinder body
Piston ring broken Replace piston and cylinder body
Piston defective Replace pistons and others
BACK TO CHAPTER INDEX
TO MODEL INDEX
ISUZU KB P190 2007
Page 2013 of 6020
ENGINE DIAGNOSIS (C24SE) 6-13
Fuel Consumption Excessive
Condition Possible cause Correction
Trouble in fuel system Mixture too rich or too lean due to
trouble in fuel injection system Refer to "Abnormal Combustion"
Fuel cut function does not act Refer to "Abnormal Combustion"
Trouble in ignition system Misfiring or abnormal combustion
due to trouble in ignition system Refer to Hard Start or Abnormal
Combustion Troubleshooting
Guide
Others Engine idle speed too high Reset Idle Air Control Valve
Returning of accelerator control
sluggish Correct
Fuel system leakage Correct or replace
Clutch slipping Correct
Brake drag Correct
Selection of transmission gear
incorrect Caution operator of incorrect gear
selection
Oil Problems
Condition Possible cause Correction
Oil pressure too low Wrong oil in use Replace with correct engine oil
Relief valve sticking Replace
Oil pump not operating properly Correct or replace
Oil pump strainer clogged Clean or replace strainer
Oil pump worn Replace
Oil pressure gauge defective Correct or replace
Crankshaft bearing or connecting
rod bearing worn Replace
Oil contamination
Wrong oil in use Replace with new engine oil
Oil filter clogged Replace oil filter
Cylinder head gasket damage Replace gasket
Burned gases leaking Replace piston and piston rings or
rebore cylinders
Oil not reaching valve system Oil passage in cylinder head or cylinder body clogged Clean or correct
Engine Oil Pressure Check
1. Check for dirt, gasoline or water in the engine
oil.
a. Check the viscosity of the oil.
b. Change the oil if the viscosity is outside the specified standard.
c. Refer to the "Maintenance and Lubrication" section of this manual.
2. Check the engine oil level. The level should fall somewhere between the
"ADD" and the "FULL" marks on the oil level
dipstick.
If the oil level does not reach the "ADD" mark on
the oil level dipstick, engine oil must be added.
3. Remove the oil pressure unit.
4. Install an oil pressure gauge.
5. Start the engine and allow the engine to reach normal operating temperature (About 80 °C).
6. Measure the oil pressure.
Oil pressure should be:
150 kPa(21.8 psi) at idle speed.
7. Stop the engine.
8. Remove the oil pressure gauge
9. Install the oil pressure unit.
10. Start the engine and check for leaks.
BACK TO CHAPTER INDEX
TO MODEL INDEX
ISUZU KB P190 2007
Page 2014 of 6020

6-14 ENGINE DIAGNOSIS (C24SE)
Malfunction Indicator Lamp
The instrument panel "CHECK ENGINE" Malfunction
Indicator lamp (MIL) illuminates by self diagnostic
system when the system checks the starting of
engine, or senses malfunctions.
Condition Possible cause Correction
"CHECK ENGINE" MIL does not
illuminate at the starting of engine Bulb defective Replace
MIL circuit open Correct or replace
Command signal circuit to operate
self diagnostic system shorted Correct or replace
Engine Control Module (ECM)
cable loosely connected,
disconnected or defective Correct or replace
ECM
defective Replace
“CHECK ENGINE” MIL
illuminates, and stays on Deterioration heated oxygen
sensor of internal element Replace
Heated oxygen sensor connector
terminal improper contact
(If applicable) Reconnect properly
Heated oxygen sensor lead wire
shorted (If applicable) Correct
Heated oxygen sensor circuit
open (If applicable) Correct or replace
Deterioration engine coolant
temperature sensor of internal
element Replace
Engine coolant temperature
sensor connector terminal
improper contact Reconnect properly
Engine coolant temperature
sensor lead wire shorted Correct
Engine coolant temperature
sensor circuit open Correct or replace
Throttle position sensor open or
shorted circuits Correct or replace
Deterioration of crankshaft
position sensor Replace
Crankshaft position sensor circuit
open or shorted Correct or replace
Vehicle speed sensor circuit open Correct or replace
Manifold absolute pressure sensor
circuit open or shorted Correct or replace
Intake air temperature sensor
circuit open or shorted Correct or replace
Fuel injector circuit open or shorted Correct or replace
ECM driver transistor defective Replace EPROM or ECM
Malfunctioning of ECM RAM
(Random Access Memory) or
Malfunctioning of ECM PROM
(Programmed Read Only Memory) Replace EPROM or ECM
BACK TO CHAPTER INDEX
TO MODEL INDEX
ISUZU KB P190 2007
Page 2015 of 6020
ENGINE MECHANICAL (C24SE) 6A-1
SECTION 6A
ENGINE MECHANICAL
TABLE OF CONTENTS
PAGE
General Description ........................................................................................................ 6A- 4
ENGINE PICTORIAL .................................................................................................... 6A- 6
Main Data and Specification ........................................................................................... 6A-11 CRANKCASE VENTILATION SYSTEM ....................................................................... 6A-16
ENGINE ASSEMBLY & LOOSE PARTS ..................................................................... 6A-17
OPERATIONS ON ENGINE AGGREGATES.................................................................... 6A-18 Engine Damping Blocks(Engine without Transmission) ........................................ 6A-18
Toothed Belt and Timing Check ............................................................................... 6A-21
Toothed Belt Tension, Adjust .................................................................................... 6A-23
Toothed Belt, Replace ................................................................................................ 6A-24
OPERATIONS ON INSTALLED ENGINE ......................................................................... 6A-26 Gasket, Exhaust Manifold, Cylinder Head ................................................................ 6A-26
Gasket, Intake Manifold, Cylinder Head .................................................................... 6A-26
Seal Ring, Camshaft Housing, Timing Side.............................................................. 6A-27
Seal Ring, Thermostat Housing, Cylinder Head....................................................... 6A-27
Seal Ring - Front Camshaft Housing, Replace ......................................................... 6A-28
Toother Belt Rear Cover............................................................................................. 6A-30
Toother Belt Tension Roller ....................................................................................... 6A-31
COMPONENT PARTS ...................................................................................................... 6A-32 Cylinder Head .............................................................................................................. 6A- 32
Hydraulic Valve Lifter ................................................................................................. 6A-33
OPERATIONS ON CYLINDER HEAD AND CAMSHAFT HOUSING ............................... 6A-34 Camshaft ..................................................................................................................... 6 A-34
Camshaft Housing Removal and Installation ........................................................... 6A-35
Cylinder Head .............................................................................................................. 6A- 35
Hydraulic Valve Lifers, Replace................................................................................. 6A-37
Camshaft Housing, Replace ...................................................................................... 6A-37
BACK TO CHAPTER INDEX
TO MODEL INDEX
ISUZU KB P190 2007
Page 2016 of 6020

6A-2 ENGINE MECHANICAL (C24SE)
PAGE
Camshaft Housing, Check for Plance Surface ......................................................... 6A-39
Cylinder Head, Removal and Installation.................................................................. 6A-39
Cylinder Head, Disassemble and Assemble............................................................. 6A-42
Valve, Grind ................................................................................................................. 6 A-44
Valve Guide, Ream .................................................................................................... 6A-44
Valve Seating, Mill ...................................................................................................... 6A-45
Cylinder Head, Overhaul ............................................................................................ 6A-45
Flywheel....................................................................................................................... 6A-46
Starter Ring Gear(Manual Transmission) ................................................................. 6A-47
Seal Ring, Crankshaft................................................................................................. 6A-48
Seal Ring, Crankshaft Rear ........................................................................................ 6A-48
Oil Pan and Bearing Bridge ....................................................................................... 6A-49
OPERATIONS ON CRANK DRIVE ................................................................................... 6A-51 Con-Rod Bearing ........................................................................................................ 6A-51
Piston with Con-Rod................................................................................................... 6A-51
Con-Rod....................................................................................................................... 6A-52
Pistion Rings ............................................................................................................... 6A -53
OPERATIONS ON REMOVED ENGINE........................................................................... 6A-55 Crankshaft ................................................................................................................... 6 A-55
Bearing Free Play Measurement ............................................................................... 6A-57
Plastigage Method ...................................................................................................... 6A-57
Micrometer and gauge method.................................................................................. 6A-58
Bypass Valve ............................................................................................................... 6A- 59
Oil Filter ..................................................................................................................... .. 6A-59
Oil Pump ...................................................................................................................... 6A-59
Oil Pump Safety Valve ................................................................................................ 6A-60
Oil Pump(Overhaul) .................................................................................................... 6A-60
OPERATIONS ON OIL CIRCULATION ............................................................................ 6A-61 Cylinder Head Safety Valve ........................................................................................ 6A-61
OPERATIONS ON COOLING SYSYTEM ......................................................................... 6A-63 Cooling System, Check for Leakes ........................................................................... 6A-63
Cooling System, Fill Up and Bleed ............................................................................ 6A-63
Refill Coolant............................................................................................................... 6 A-64
Ignition Timing, Check ............................................................................................... 6A-64
BACK TO CHAPTER INDEX
TO MODEL INDEX
ISUZU KB P190 2007
Page 2029 of 6020

ENGINE MECHANICAL (C24SE) 6A-15
Engine Specification Matrix for destination
04 HEO FOR TF MODEL:
VEHICLE MODEL TFR/S 2.4L
Major Description
AUSTRALIA, CHILE,
GULF, NEW
ZEALAND, SAUDI ARABIA, SOUTH AFRICA COLOMBIA, COSTA
RICA, EQUADOR, GUATEMALA BOLIVIA, GENERAL
EXPORT, PERU, VENEZUELA
VEHICLE TYPE 4× 2 4x4 4 ×2 4 ×4 4 ×2
VEHICLE IDENT. CODE TX TY TX TY TX
ENGINE TYPE C24SE ← ←
FUEL CONTROL SYSYTEM CLOSE LOOP CLOSED LOOP OPEN LOOP
COMPRESSION RATIO 9.6:1 ← ←
FUEL OCTANE(ROD) 91RON 85RON 80RON
FUEL TYPE UN-LEADED UN-LEADED LEADED
HO2 YES YES YES NO
EVAP CANISTER YES YES YES YES
PURGE CONTROL
SOLENOID YES
YES YES YES
CHECK & RELIEF VALVE YES YES YES YES
ECM YES YES YES YES
EXHAUST SYSTEM
FRONT PIPE
SILENCER
TW C YES YES YES NO
CO ADJUSTMENT NO NO NO YES
Refer to 6A-77 Refer to 6A-77 Refer to 6A-77
BACK TO CHAPTER INDEX
TO MODEL INDEX
ISUZU KB P190 2007
Page 2034 of 6020
6A-20 ENGINE MECHANICAL (C24SE)
6. Install power steering pump and V-belt.
Adjust
Adjust power steering pump V-belt tension according to the
corresponding operation.
Installation
7. Install radiator according to the corresponding operation.
8. Install air inlet hose.
9. Install all electrical cable connections, hoses and lines to engine.
10. Install accelerator cable from inlet pipe.
11. Install bonnet.
Inspection
1. Check engine oil level.
2. Fill up cooling system and bleed according to the corresponding operation.
BACK TO CHAPTER INDEX
TO MODEL INDEX
ISUZU KB P190 2007
Page 2035 of 6020
ENGINE MECHANICAL (C24SE) 6A-21
Toothed Belt and Timing Check
Removal
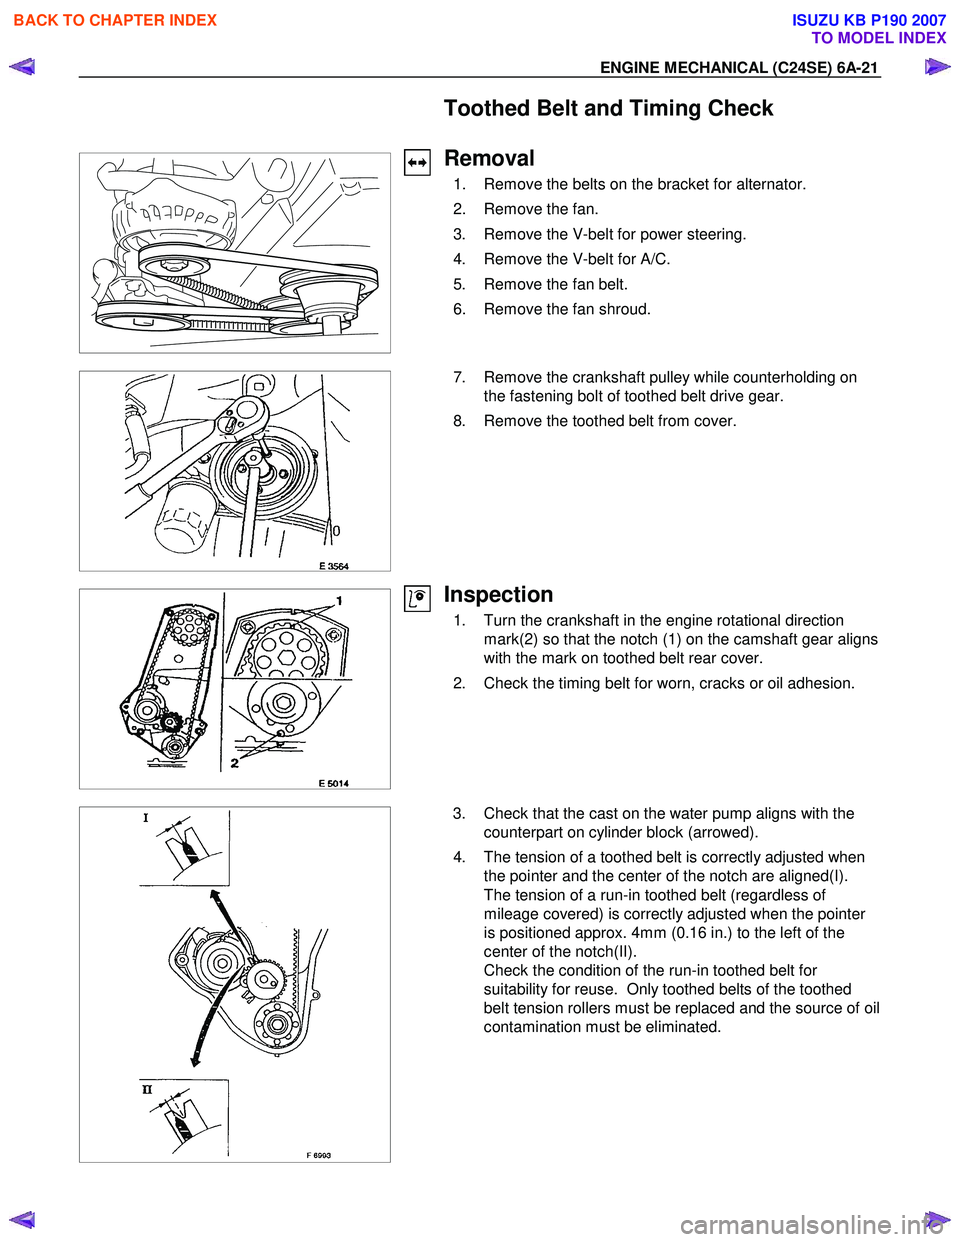
1. Remove the belts on the bracket for alternator.
2. Remove the fan.
3. Remove the V-belt for power steering.
4. Remove the V-belt for A/C.
5. Remove the fan belt.
6. Remove the fan shroud.
7. Remove the crankshaft pulley while counterholding on
the fastening bolt of toothed belt drive gear.
8. Remove the toothed belt from cover.
Inspection
1. Turn the crankshaft in the engine rotational direction mark(2) so that the notch (1) on the camshaft gear aligns
with the mark on toothed belt rear cover.
2. Check the timing belt for worn, cracks or oil adhesion.
3. Check that the cast on the water pump aligns with the counterpart on cylinder block (arrowed).
4. The tension of a toothed belt is correctly adjusted when the pointer and the center of the notch are aligned(I).
The tension of a run-in toothed belt (regardless of
mileage covered) is correctly adjusted when the pointer
is positioned approx. 4mm (0.16 in.) to the left of the
center of the notch(II).
Check the condition of the run-in toothed belt for
suitability for reuse. Only toothed belts of the toothed
belt tension rollers must be replaced and the source of oil
contamination must be eliminated.
BACK TO CHAPTER INDEX
TO MODEL INDEX
ISUZU KB P190 2007
Page 2037 of 6020
ENGINE MECHANICAL (C24SE) 6A-23
Toothed Belt Tension, Adjust
(Engines with toothed belt tension
roller)
Removal
Refer to 6A-21. Toothed Belt and Timing check and removal
steps.
Adjust
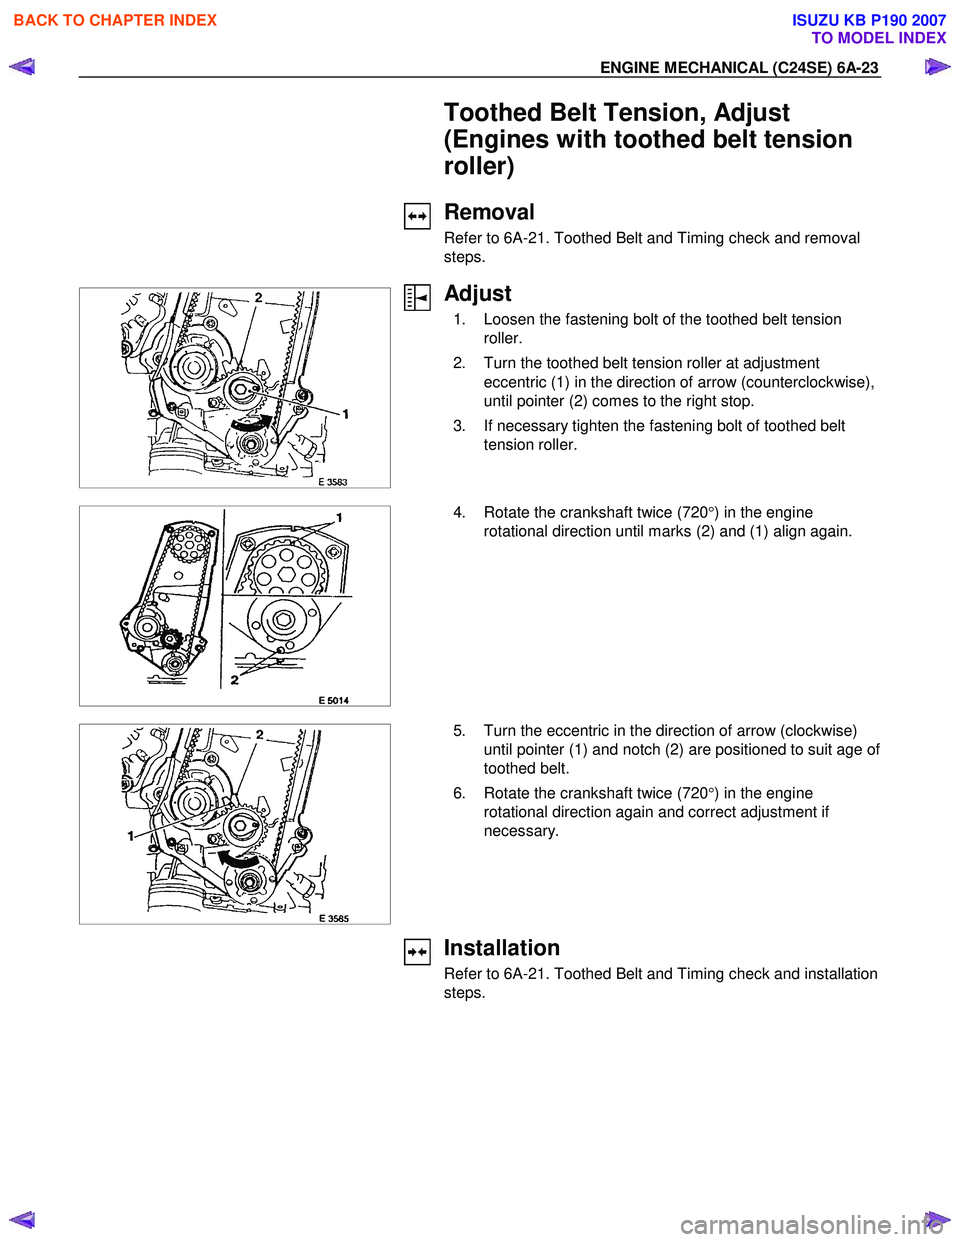
1. Loosen the fastening bolt of the toothed belt tension roller.
2. Turn the toothed belt tension roller at adjustment eccentric (1) in the direction of arrow (counterclockwise),
until pointer (2) comes to the right stop.
3. If necessary tighten the fastening bolt of toothed belt tension roller.
4. Rotate the crankshaft twice (720
°) in the engine
rotational direction until marks (2) and (1) align again.
5. Turn the eccentric in the direction of arrow (clockwise)
until pointer (1) and notch (2) are positioned to suit age of
toothed belt.
6. Rotate the crankshaft twice (720 °) in the engine
rotational direction again and correct adjustment if
necessary.
Installation
Refer to 6A-21. Toothed Belt and Timing check and installation
steps.
BACK TO CHAPTER INDEX
TO MODEL INDEX
ISUZU KB P190 2007
Page 2042 of 6020
6A-28 ENGINE MECHANICAL (C24SE)
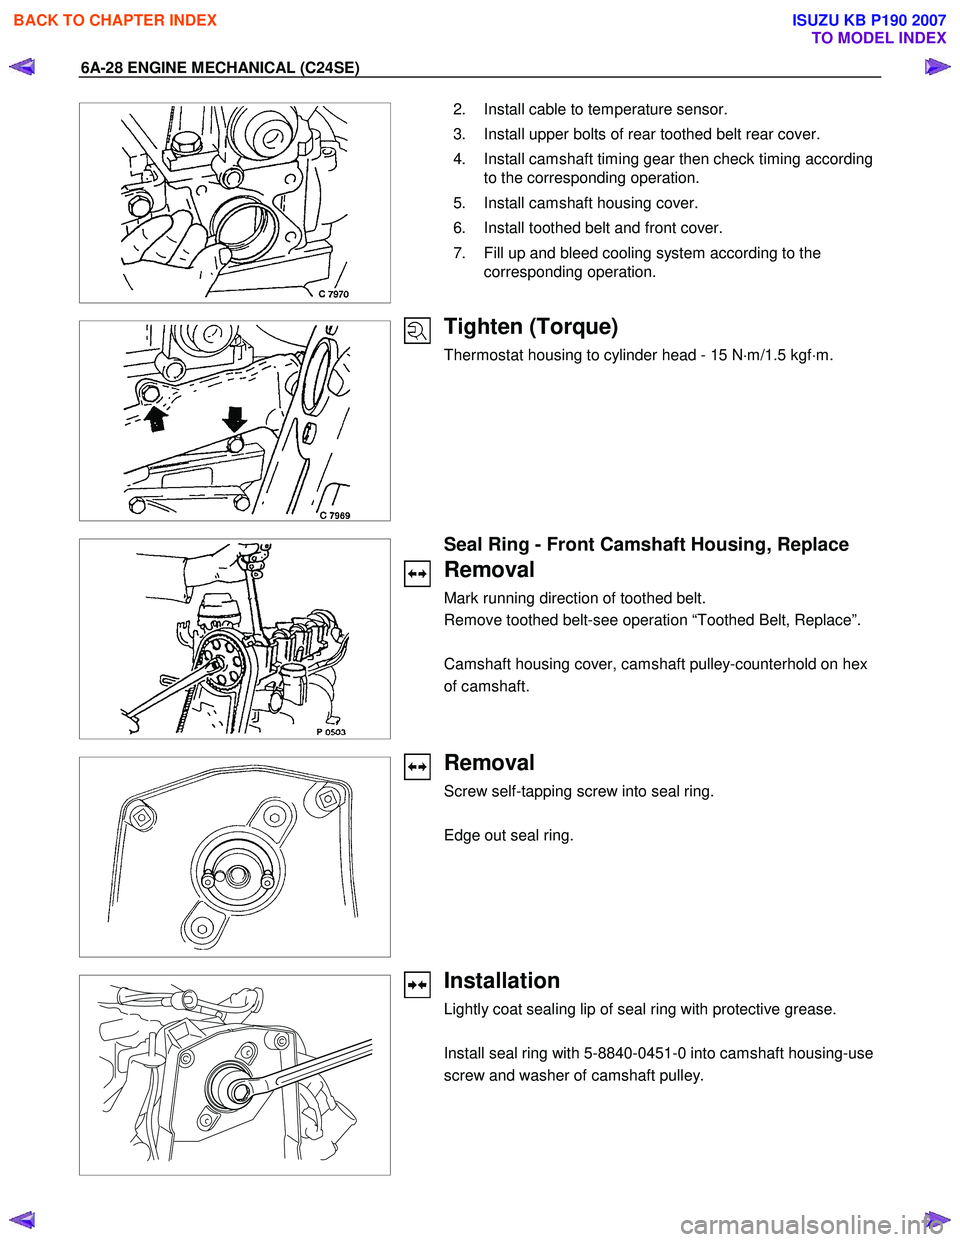
2. Install cable to temperature sensor.
3. Install upper bolts of rear toothed belt rear cover.
4. Install camshaft timing gear then check timing according to the corresponding operation.
5. Install camshaft housing cover.
6. Install toothed belt and front cover.
7. Fill up and bleed cooling system according to the corresponding operation.
Tighten (Torque)
Thermostat housing to cylinder head - 15 N ⋅m/1.5 kgf ⋅m.
Seal Ring - Front Camshaft Housing, Replace
Removal
Mark running direction of toothed belt.
Remove toothed belt-see operation “Toothed Belt, Replace”.
Camshaft housing cover, camshaft pulley-counterhold on hex
of camshaft.
Removal
Screw self-tapping screw into seal ring.
Edge out seal ring.
Installation
Lightly coat sealing lip of seal ring with protective grease.
Install seal ring with 5-8840-0451-0 into camshaft housing-use
screw and washer of camshaft pulley.
BACK TO CHAPTER INDEX
TO MODEL INDEX
ISUZU KB P190 2007