ISUZU KB P190 2007 Workshop Repair Manual
Manufacturer: ISUZU, Model Year: 2007, Model line: KB P190, Model: ISUZU KB P190 2007Pages: 6020, PDF Size: 70.23 MB
Page 4741 of 6020
7B1-22 Manual Transmission (MUX)
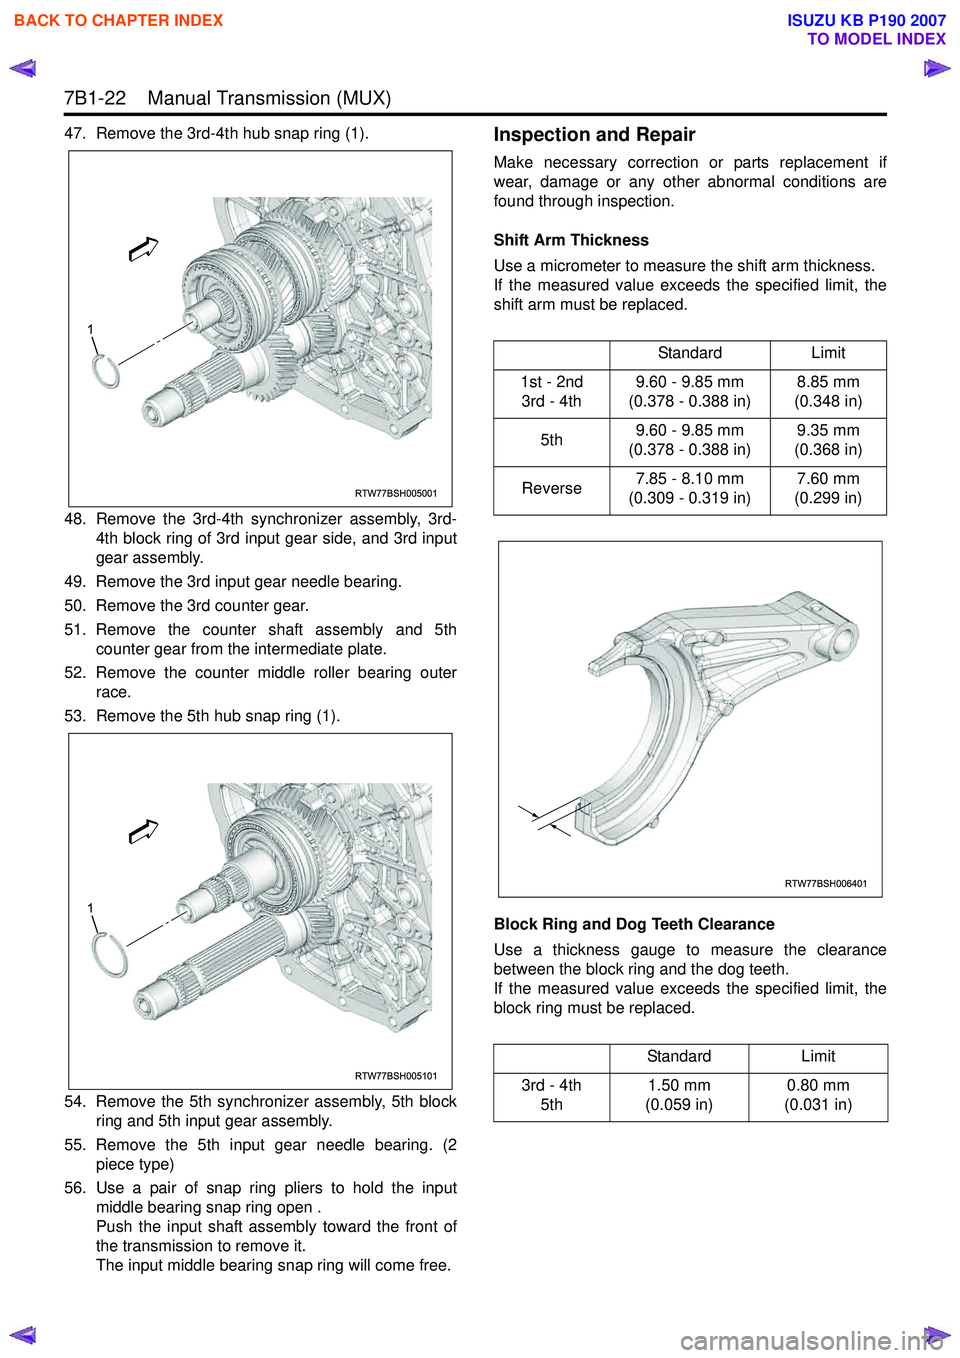
47. Remove the 3rd-4th hub snap ring (1).
48. Remove the 3rd-4th synchronizer assembly, 3rd-4th block ring of 3rd input gear side, and 3rd input
gear assembly.
49. Remove the 3rd input gear needle bearing.
50. Remove the 3rd counter gear.
51. Remove the counter shaft assembly and 5th counter gear from the intermediate plate.
52. Remove the counter middle roller bearing outer race.
53. Remove the 5th hub snap ring (1).
54. Remove the 5th synchronizer assembly, 5th block ring and 5th input gear assembly.
55. Remove the 5th input gear needle bearing. (2 piece type)
56. Use a pair of snap ring pliers to hold the input middle bearing snap ring open .
Push the input shaft assembly toward the front of
the transmission to remove it.
The input middle bearing snap ring will come free.Inspection and Repair
Make necessary correction or parts replacement if
wear, damage or any other abnormal conditions are
found through inspection.
Shift Arm Thickness
Use a micrometer to measure the shift arm thickness.
If the measured value exceeds the specified limit, the
shift arm must be replaced.
Block Ring and Dog Teeth Clearance
Use a thickness gauge to measure the clearance
between the block ring and the dog teeth.
If the measured value exceeds the specified limit, the
block ring must be replaced.
RTW77BSH005001
1
RTW77BSH005101
1
Standard Limit
1st - 2nd 3rd - 4th 9.60 - 9.85 mm
(0.378 - 0.388 in) 8.85 mm
(0.348 in)
5th 9.60 - 9.85 mm
(0.378 - 0.388 in) 9.35 mm
(0.368 in)
Reverse 7.85 - 8.10 mm
(0.309 - 0.319 in) 7.60 mm
(0.299 in)
Standard Limit
3rd - 4th 5th 1.50 mm
(0.059 in) 0.80 mm
(0.031 in)
RTW77BSH006401
BACK TO CHAPTER INDEX
TO MODEL INDEX
ISUZU KB P190 2007
Page 4742 of 6020
Manual Transmission (MUX) 7B1-23
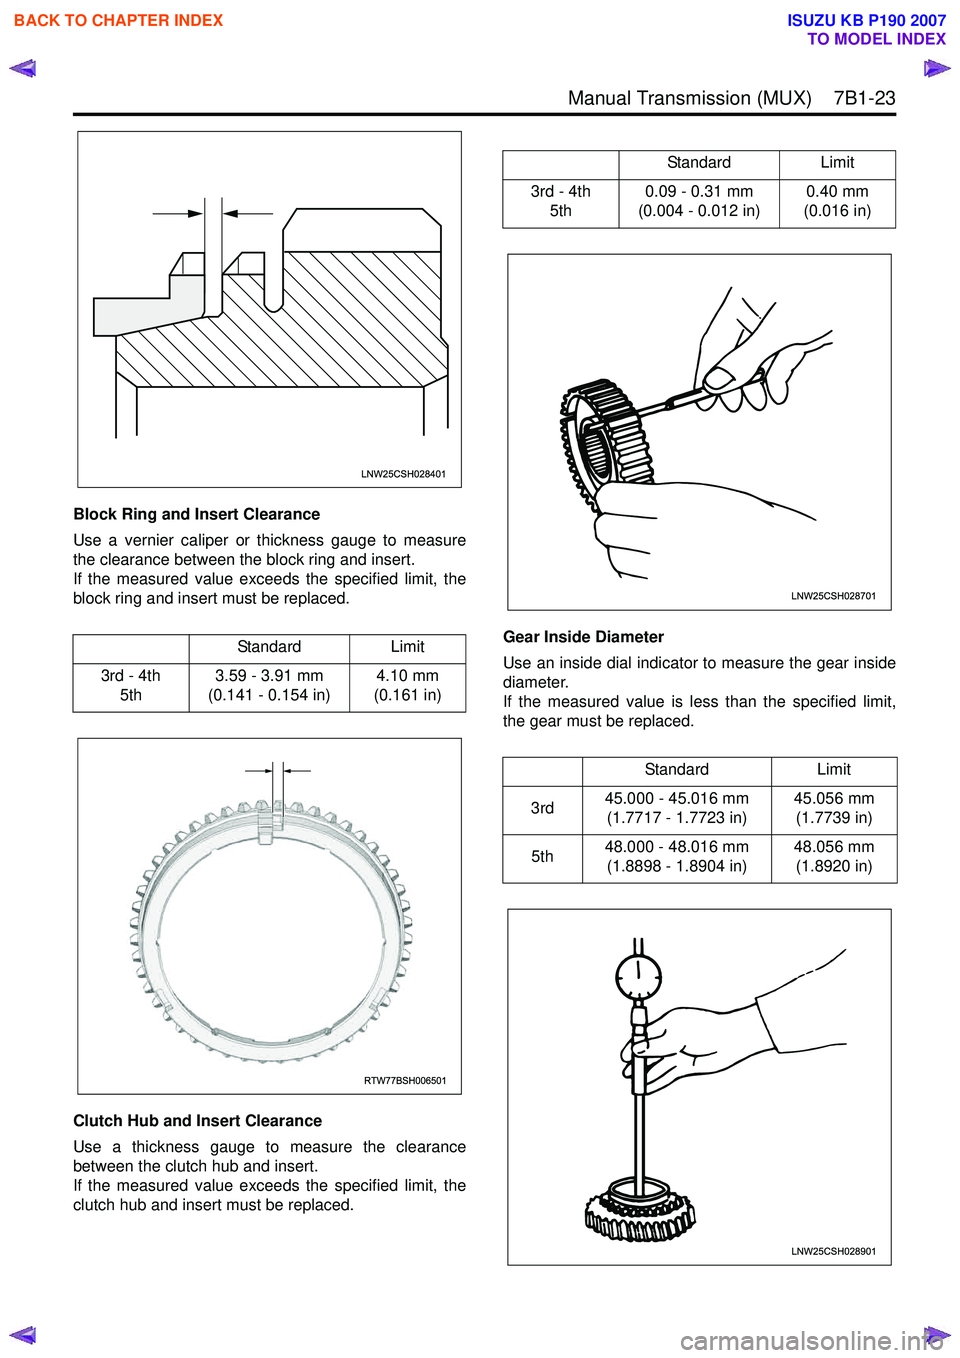
Block Ring and Insert Clearance
Use a vernier caliper or thickness gauge to measure
the clearance between the block ring and insert.
If the measured value exceeds the specified limit, the
block ring and insert must be replaced.
Clutch Hub and Insert Clearance
Use a thickness gauge to measure the clearance
between the clutch hub and insert.
If the measured value exceeds the specified limit, the
clutch hub and insert must be replaced. Gear Inside Diameter
Use an inside dial indicator to measure the gear inside
diameter.
If the measured value is less than the specified limit,
the gear must be replaced.
Standard
Limit
3rd - 4th 5th 3.59 - 3.91 mm
(0.141 - 0.154 in) 4.10 mm
(0.161 in)
LNW25CSH028401
RTW77BSH006501
Standard Limit
3rd - 4th 5th 0.09 - 0.31 mm
(0.004 - 0.012 in) 0.40 mm
(0.016 in)
Standard Limit
3rd 45.000 - 45.016 mm
(1.7717 - 1.7723 in) 45.056 mm
(1.7739 in)
5th 48.000 - 48.016 mm
(1.8898 - 1.8904 in) 48.056 mm
(1.8920 in)
LNW25CSH028701
LNW25CSH028901
BACK TO CHAPTER INDEX
TO MODEL INDEX
ISUZU KB P190 2007
Page 4743 of 6020

7B1-24 Manual Transmission (MUX)
Clutch Hub Spline Play• Set a dial indicator to the clutch hub to be measured.
• Move the clutch hub as far as possible to both the right and the left.
Note the dial indicator reading.
If the measured value exceeds the specified limit, the
clutch hub must be replaced.
Counter Gear Spline Play
Refer to Counter Shaft Assembly in this section.
Installation
1. Use a pair of snap ring pliers to hold the new input middle bearing snap ring open .
Install the input shaft assembly to the intermediate
plate.
• Never reinstall the used snap ring.
2. Install the input middle bearing snap ring.
3. Install the 5th input gear needle bearing. (2 piece type)
4. Install the 5th input gear assembly. • Apply engine oil to the gear internal surface.
5. Assemble the 5th synchronizer assembly by performing the following steps.
• Turn the clutch hub face (2) toward the sleeve groove (1) (rear side) on the outer
circumference. • Check that the inserts (3) fit snugly into the
clutch hub (6) ring insert grooves.
• Check that the inserts springs (4) are fitted to the inserts as shown in the figure.
• Check that the clutch hub (6) and the sleeve (5) slide smoothly.
• The insert springs (4) must be set in such a way that the opening of spring faces different
direction.
6. Install the 5th block ring and 5th synchronizer assembly.
7. Install the new 5th hub snap ring (1).
• Never reinstall the used snap ring.
• Choose the thickest snap ring among ones whitch can be assembled.
Snap Ring Availability
Standard
Limit
3rd - 4th 0.010 - 0.102 mm
(0.0004 - 0.0040 in) 0.15 mm
(0.0059 in)
5th 0.009 - 0.104 mm
(0.0004 - 0.0041 in) 0.15 mm
(0.0059 in)
LNW25CSH029101
Thickness Identification color
1.95 mm(0.077 in) No color
2.10 mm(0.083 in) Yellow
1
2
LNW25CSH025601
3 45
6
LNW25CSH025701
BACK TO CHAPTER INDEX
TO MODEL INDEX
ISUZU KB P190 2007
Page 4744 of 6020

Manual Transmission (MUX) 7B1-25
8. Install the counter middle roller bearing outer race,counter shaft assembly and 5th counter gear to the
intermediate plate.
• Apply engine oil to the gear internal surface.
9. Install the 3rd counter gear. • Apply engine oil to the gear internal surface.
10. Iinstall the 3rd input gear needle bearing.
11. Assemble the 3rd-4th synchronizer assembly by performing the following steps.
• Turn the clutch hub face (2) toward the sleeve groove (1) (rear side) on the outer
circumference.
• Check that the inserts (3) fit snugly into the clutch hub (6) ring insert grooves.
• Check that the inserts springs (4) are fitted to the inserts as shown in the figure.
• Check that the clutch hub (6) and the sleeve (5) slide smoothly.
• The insert springs (4) must be set in such a way that the opening of spring faces different
direction. 12. Install the 3rd input gear assembly, 3rd-4th block
ring of 3rd input gear side, and 3rd-4th
synchronizer assembly.
• Apply engine oil to the gear internal surface.
13. Install the new 3rd-4th hub snap ring (1).
• Never reinstall the used snap ring.
• Choose the thickest snap ring among ones whitch can be assembled.
Snap Ring Availability
RTW77BSH005101
1
Thickness Identification color
1.9 mm(0.075 in) No color
2.1 mm(0.083 in) Yellow
2.3 mm(0.091 in) Pink
1
2
LNW25CSH025601
3 45
6
LNW25CSH025701
BACK TO CHAPTER INDEX
TO MODEL INDEX
ISUZU KB P190 2007
Page 4745 of 6020

7B1-26 Manual Transmission (MUX)
14. Install the plate spring.
Notice:
Painted identification color (Blue) side to be
Transmission rear side.
Legend 1. Transmission rear side
2. Painted area of identification color (Blue)
15. Install the 3rd-4th block ring of output shaft side.
16. Install the output counter gear.
• Apply engine oil to the gear internal surface.
17. Install the new counter end snap ring (1). • Never reinstall the used snap ring.
• Choose the thickest snap ring among ones whitch can be assembled.
Snap Ring Availability 18. Use the installer 5-8840-2346-0 (1) to install the
new rubber seal.
• Never reinstall the used rubber seal.
• When seal press fitted, clearance not exists between lip and end surface of gear.
19. Install the pilot bearing spacer.
20. Install the pilot bearing. • Apply grease (BESCO L-2 or equivalent) to thebearing roller.
21. Install the output shaft assembly.
22. Install the 3rd-4th shift arm assembly.
23. Install the 5th-reverse shift block assembly.
24. Install the 5th shift arm.
25. Install the 3rd-4th-5th shift rod.
26. Install the new 3rd-4th-5th shift rod snap ring (1).
• Never reinstall the used snap ring.
Thickness
Identification color
2.3 mm(0.091 in) Pink
2.5 mm(0.098 in) White
RTW77BSH005001
1
RTW77BSH008801
1
2
2.7 mm(0.106 in) Green
Thickness
Identification color
RTW77BSH005201
1
RTW77BSH003601
1
BACK TO CHAPTER INDEX
TO MODEL INDEX
ISUZU KB P190 2007
Page 4746 of 6020
Manual Transmission (MUX) 7B1-27
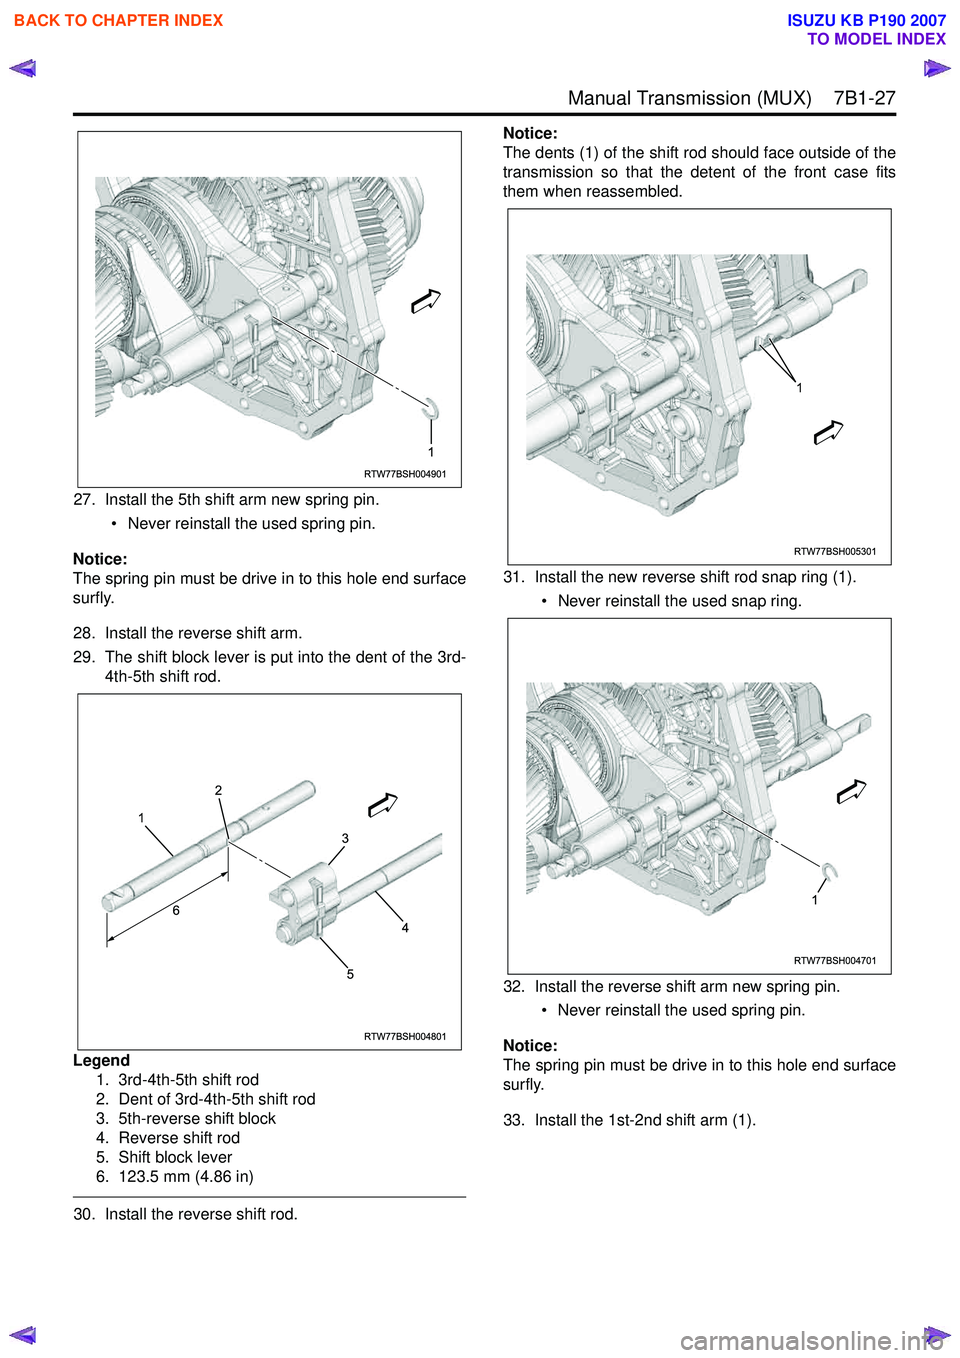
27. Install the 5th shift arm new spring pin.• Never reinstall the used spring pin.
Notice:
The spring pin must be drive in to this hole end surface
surfly.
28. Install the reverse shift arm.
29. The shift block lever is put into the dent of the 3rd- 4th-5th shift rod.
Legend 1. 3rd-4th-5th shift rod
2. Dent of 3rd-4th-5th shift rod
3. 5th-reverse shift block
4. Reverse shift rod
5. Shift block lever
6. 123.5 mm (4.86 in)
30. Install the reverse shift rod. Notice:
The dents (1) of the shift rod should face outside of the
transmission so that the detent of the front case fits
them when reassembled.
31. Install the new reverse shift rod snap ring (1). • Never reinstall the used snap ring.
32. Install the reverse shift arm new spring pin. • Never reinstall the used spring pin.
Notice:
The spring pin must be drive in to this hole end surface
surfly.
33. Install the 1st-2nd shift arm (1).
RTW77BSH004901
1
RTW77BSH004801
1
6
2
5
4
3
RTW77BSH005301
1
RTW77BSH004701
1
BACK TO CHAPTER INDEX
TO MODEL INDEX
ISUZU KB P190 2007
Page 4747 of 6020

7B1-28 Manual Transmission (MUX)
34. Install the shift rod (2) with the 1st-2nd shft block(3).
35. Install the 1st-2nd shift arm new spring pin. • Never reinstall the used spring pin.
Notice:
The spring pin must be drive in to this hole end surface
surfly.
36. Install the control rod assembly (1). 37. Install the shift & select rod assembly (1) and bolts
temporarily.
38. Install the shift rod bracket (1) and bolts temporarily.
39. Install the bolts to the shift & select rod assembly and shift rod bracket.
• Tighten the shift & select rod bolts and the shift rod bracket bolts to the specified torque.
Torque: 25 N ⋅m (2.5 kgf ⋅m/18 lb ⋅ft)
40. Install the counter 2nd gutter (4) and counter 5th gutter (2).
• Tighten the gutter bolts to the specified torque.
Torque: 9 N ⋅m (0.9 kgf ⋅m/78 lb ⋅in)
41. Install the new front gutter (1) and new rear gutter (3).
• Never reinstall the used gutters.
RTW77BSH008001
3
2
1
RTW77BSH007901
1
RTW77BSH007801
1
RTW77BSH007701
1
BACK TO CHAPTER INDEX
TO MODEL INDEX
ISUZU KB P190 2007
Page 4748 of 6020
Manual Transmission (MUX) 7B1-29
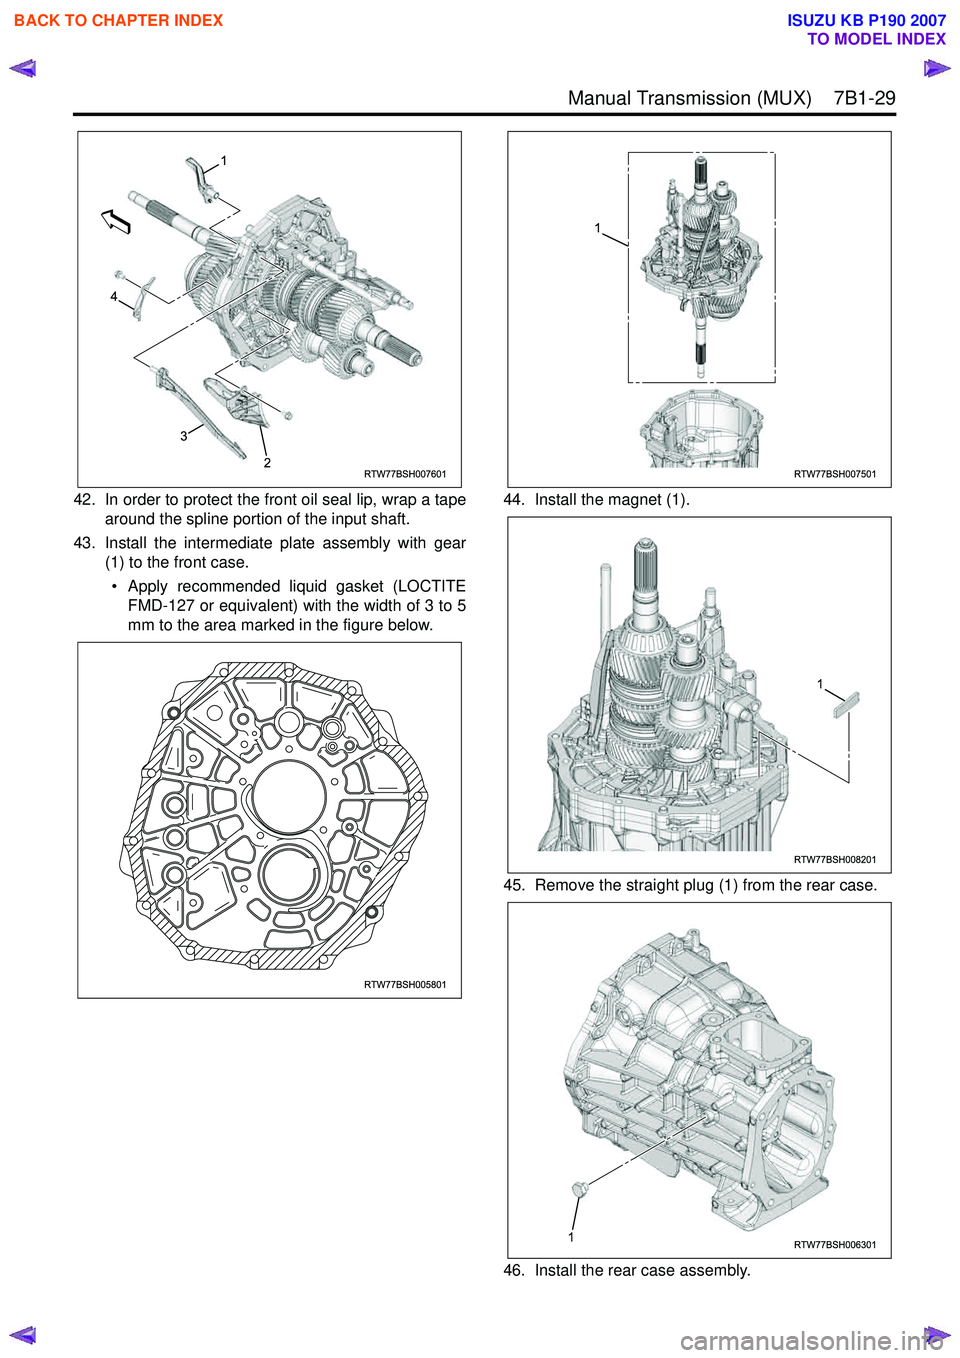
42. In order to protect the front oil seal lip, wrap a tapearound the spline portion of the input shaft.
43. Install the intermediate plate assembly with gear (1) to the front case.
• Apply recommended liquid gasket (LOCTITE FMD-127 or equivalent) with the width of 3 to 5
mm to the area marked in the figure below. 44. Install the magnet (1).
45. Remove the straight plug (1) from the rear case.
46. Install the rear case assembly.
RTW77BSH007601
1
4
3
2
RTW77BSH005801
RTW77BSH007501
1
RTW77BSH008201
1
RTW77BSH0063011
BACK TO CHAPTER INDEX
TO MODEL INDEX
ISUZU KB P190 2007
Page 4749 of 6020
7B1-30 Manual Transmission (MUX)
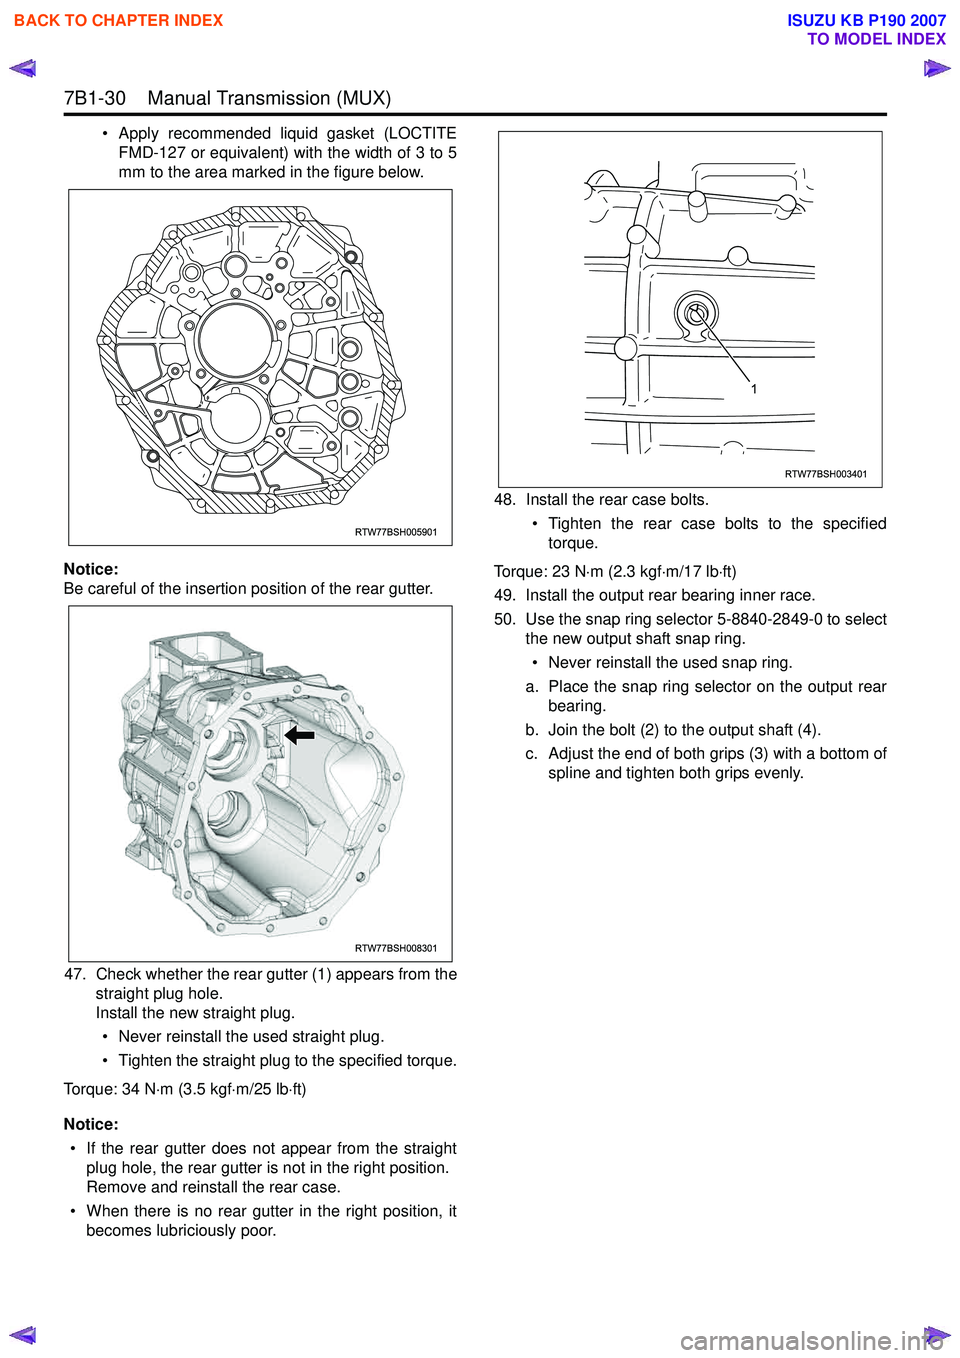
• Apply recommended liquid gasket (LOCTITEFMD-127 or equivalent) with the width of 3 to 5
mm to the area marked in the figure below.
Notice:
Be careful of the insertion position of the rear gutter.
47. Check whether the rear gutter (1) appears from the straight plug hole.
Install the new straight plug.
• Never reinstall the used straight plug.
• Tighten the straight plug to the specified torque.
Torque: 34 N ⋅m (3.5 kgf ⋅m/25 lb ⋅ft)
Notice: • If the rear gutter does not appear from the straight plug hole, the rear gutter is not in the right position.
Remove and reinstall the rear case.
• When there is no rear gutter in the right position, it becomes lubriciously poor. 48. Install the rear case bolts.
• Tighten the rear case bolts to the specifiedtorque.
Torque: 23 N ⋅m (2.3 kgf ⋅m/17 lb ⋅ft)
49. Install the output rear bearing inner race.
50. Use the snap ring selector 5-8840-2849-0 to select the new output shaft snap ring.
• Never reinstall the used snap ring.
a. Place the snap ring selector on the output rear bearing.
b. Join the bolt (2) to the output shaft (4).
c. Adjust the end of both grips (3) with a bottom of spline and tighten both grips evenly.
RTW77BSH005901
RTW77BSH008301
RTW77BSH003401
1
BACK TO CHAPTER INDEX
TO MODEL INDEX
ISUZU KB P190 2007
Page 4750 of 6020

Manual Transmission (MUX) 7B1-31
d. Tighten the nut (1) till the height of springreaches 29 mm (1.142 in) (a). e. Turn the output shaft rear bearing inner race (6)
and the snap ring selector (5) together 16 times
or more in order to make the output shaft rear
bearing inner and outer race fit well.
f. Try to insert gauges (7) of six different thickness in turn to the snap ring groove of
output shaft.
Select the thickest gauge that could be
inserted.
g. The thickness of the selected gauge shows the thickness of the snap ring to be installed.
RTW77BMH000201
1
a
2
3
4
3
RTW77BMH000301
5
6
RTW77BSH008401
7
BACK TO CHAPTER INDEX
TO MODEL INDEX
ISUZU KB P190 2007