ISUZU TROOPER 1995 Workshop Manual
Manufacturer: ISUZU, Model Year: 1995, Model line: TROOPER, Model: ISUZU TROOPER 1995Pages: 1928
Page 1621 of 1928
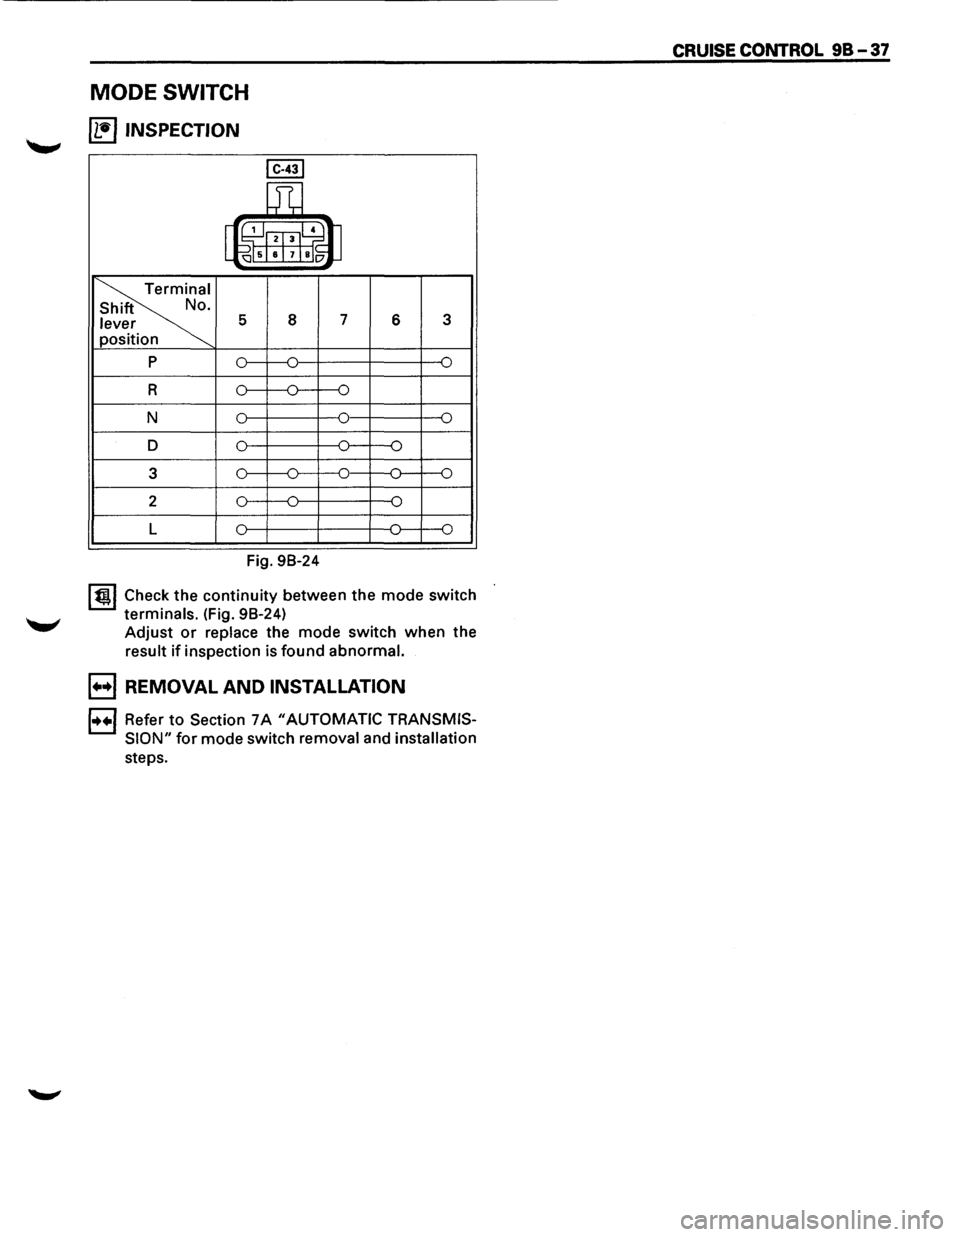
MODE SWITCH
[1!) INSPECTION
5
p 0
R
N
0
D 3
0
2
L
8
Fig. 98-24
7 6 3
lt!tl Check
the continuity between the mode switch
terminals. (Fig. 98-24)
Adjust
or replace the mode switch when the
result if inspection is found abnormal.
B REMOVAL AND INSTALLATION
1++1 Refer to Section 7A "AUTOMATIC TRANSMIS
SION"
for mode switch removal and installation
steps.
CRUISE CONTROL 98-37
Page 1622 of 1928
![ISUZU TROOPER 1995 Workshop Manual 98-38 CRUISE CONTROL
VEHICLE SPEED SENSOR (INCORPO
RATED IN SPEEDOMETER)
(1!] INSPECTION
GND GND
SEN 4P
~
I Red(+) Black(-) Black(-) Red(+)
a
I
4P GND 4P GND
4P-GND
13.5K-16.5K 00
Note:](/img/61/57183/w960_57183-1621.png "ISUZU TROOPER 1995 Workshop Manual 98-38 CRUISE CONTROL
VEHICLE SPEED SENSOR (INCORPO
RATED IN SPEEDOMETER)
(1!] INSPECTION
GND GND
SEN 4P
~
I Red(+) Black(-) Black(-) Red(+)
a
I
4P GND 4P GND
4P-GND
13.5K-16.5K 00
Note:")
98-38 CRUISE CONTROL
VEHICLE SPEED SENSOR (INCORPO
RATED IN SPEEDOMETER)
(1!] INSPECTION
GND GND
SEN 4P
~
I Red(+) Black(-) Black(-) Red(+)
a
I
4P GND 4P GND
4P-GND
13.5K-16.5K 00
Note: Use an analog type circuit tester.
Fig. 98-25
~~~ Removethespeedometerfromthemeterassem-DIODE
bly, and measure the resistance value between
the
terminals. (Fig. 98-26) IL•IINSPECTION
Replace the speedometer assembly when the
result of inspection is found abnormal.
B REMOVAL AND INSTALLATION
1•+1 Refer to Section 8 "METER AND WARNING/
INDICATOR LIGHT"
for vehicle speed sensor
removal and installation steps.
I B-451
~
Terminal No. 1 2
Connection A
G 0
pattern
0 G 8
Fig.
98-26
I~~ There should be continuity in either A or 8 when
a circuit tester is connected
with diode terminal.
(Fig. 98-26)
Replace the diode when the result of inspection
is
found abnormal.
..
Page 1623 of 1928
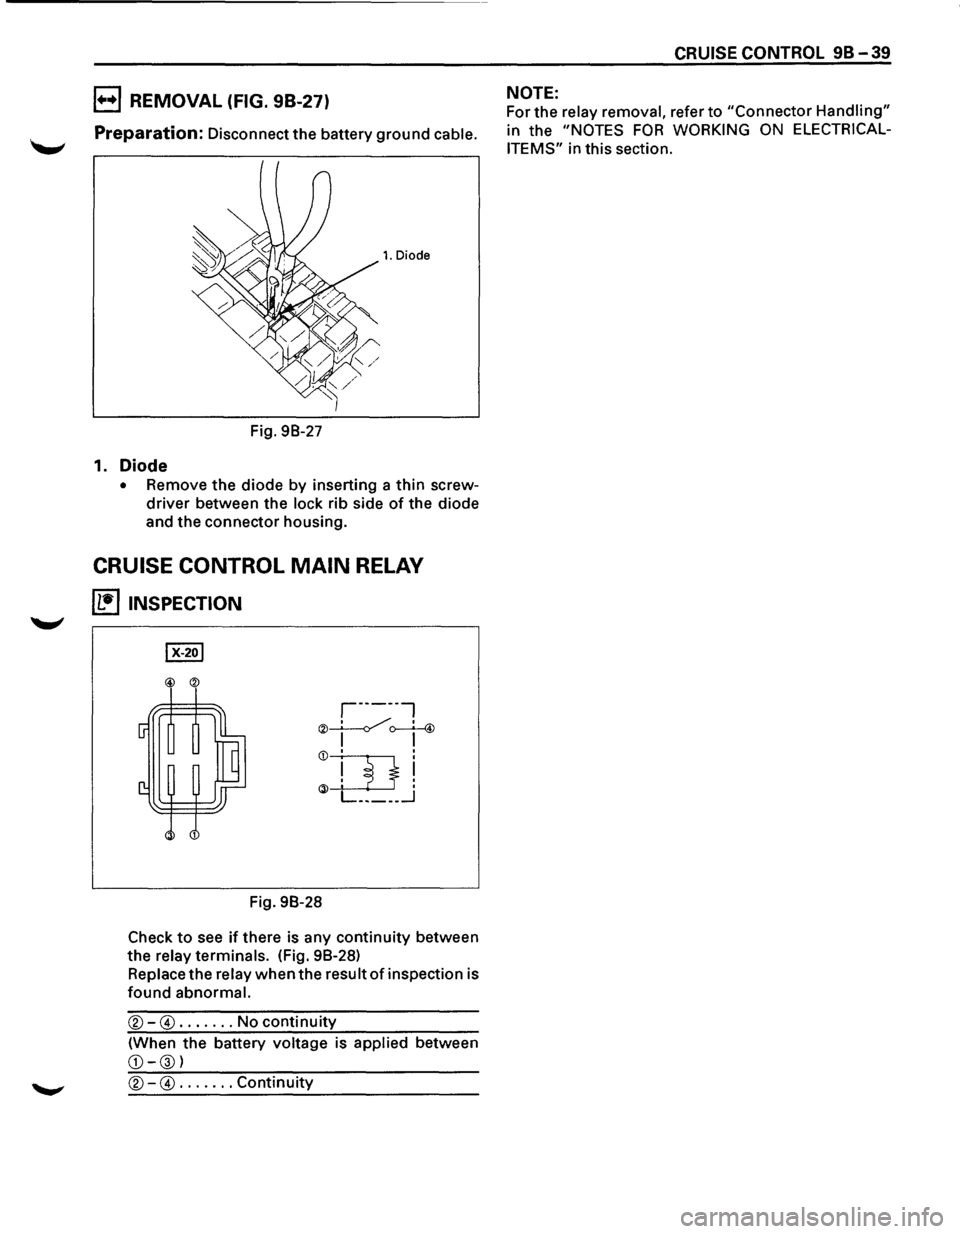
B REMOVAL (FIG. 98-27)
Preparation: Disconnect the battery ground cable.
1. Diode
Fig. 98-27
1. Diode
• Remove the diode by inserting a thin screw
driver between the lock rib side of the diode
and the connector housing.
CRUISE CONTROL MAIN RELAY
~ INSPECTION
@ ®
,-----,
®~~ I I
Q)~!
~J___l___J . L _____ _j
Fig. 98-28
Check
to see if there is any continuity between
the
relay terminals. (Fig. 98-28)
Replace the relay when the result of inspection is
found abnormal.
®-@ ....... No continuity
(When the battery voltage is applied between
CD-®l
®-@ ....... Continuity
CRUISE CONTROL 98-39
NOTE:
For the relay removal, refer to "Connector Handling"
in the "NOTES FOR WORKING ON ELECTRICAL
ITEMS"
in this section.
Page 1624 of 1928

MEMO
•
Page 1625 of 1928
Supplemental Restraint System 9J-1
SECTION 9J
SUPPLEMENTAL RESTRAINT SYSTEM
(SRS)
WARNING: THIS VEHICLE IS EQUIPPED WITH A SUPPLEMENTAL INFLATABLE RESTRAINT SYSTEM (SRS).
REFER TO WARNING IN THIS SECTION UNDER "ON-VEHICLE SERVICE" AND THE SRS COMPONENT AND
WIRING LOCATION VIEW IN THIS SECTION BEFORE PERFORMING SERVICE ON OR AROUND SRS
COMPONENTS OR WIRING. FAILURE TO FOLLOW WARNING COULD RESULT IN POSSIBLE AIR BAG
DEPLOYMENT, PERSONAL INJURY, OR OTHERWISE UNNEEDED SRS REPAIRS.
TABLE OF CONTENTS
SUPPLEMENTAL RESTRAINT SYSTEM
(SRS)
SECTION 1 -INTRODUCTION
CAUTION: WHEN FASTENERS ARE REMOVED, ALWAYS REINSTALL THEM AT THE SAME LOCATION
FROM WHICH THEY WERE REMOVED. IF A FASTENER NEEDS TO BE REPLACED, USE THE CORRECT PART
NUMBER FASTENER FOR THAT APPLICATION. IF THE CORRECT PART NUMBER FASTENER IS NOT
AVAILABLE, A FASTENER OF EQUAL SIZE AND STRENGTH (OR STRONGER) MAY BE USED. FASTENERS
THAT ARE NOT REUSED, AND THOSE REQUIRING THREAD LOCKING COMPOUND WILL BE CALLED OUT.
THE CORRECT TORQUE VALUE MUST BE USED WHEN INSTALLING FASTENERS THAT REQUIRE IT. IF THE
ABOVE CONDITIONS ARE NOT FOLLOWED, PARTS OR SYSTEM DAMAGE COULD RESULT.
GENERAL DESCRIPTION • • • . • . . . . • . . . . . . . . . • . . . . • . . . . . . . . • . . . . . . . . • . . . . • . • . . 3
Restraint Devices • • • • • • • • • • • • • • • • • • • • • • • • • • .. • • • • • • • • • • • • • • • • • • • • • • • • • • • • • • • • 3
'W' System Description • • • • • • • • • • • • • • • • • • • • • • • • • • • • • • • • • • • • • • • • • • • • • • • • • • • • • • • • • • 4
SRS Component and wiring Location View . . . . . . • . . . . . . . . . . . • . . . . • . . . . . . . . . . • • 5
COMPONENT DESCRIPTION • • . .
. .
• . . • . .
.
• . . • . . . . . . . . . . . . . . . . . • . • . • . . . . • . • • . . 6
DERM ••••••••••••••••••\
••••••••••••••••••\
••••••••••••••••••\
•••••••• ~ • • • • • 6
"AIR BAG"Warnlng Lamp • • • • • • • • • • • • • • • • • • • • • • • • • • • • • • • • • • • • • • • • .. • • • • • • • • • • • • 6
Dual Pole Arming Sensor • • • • • • • • • • • • • • • • • • • • • • • • • • • • • • • • • • • • • • • • • • • • • • • • • • • • • 6
Discriminating Sensors • • • • • • • • • • • • • • • • • • • • • • • • • • • • • • • • • • • • • • • • • • • • • • • • • • • • • • • 6
SRS Coli Assembly • • • • • • • • • • • • • • • • • • • • • • • • • • • • • • • • • • • • • • • • • • • • • • • • • • • • • • • • • • 7
Inflator Modules • • • • • • • • • • • • • • • • • • • • • • • • • • • • • • • • • • • • • • • • • • • • • • • • • • • • • • • • • • • • 7
Steering Column • • • • • • • • • • • • • • • • • • • • • • • • • • • • • • • • • • • • • • • • • • • • • • • • • • • • • • • • • • • • 7
Knee Bolster • • • • • • • • • • • • • • • • • • • • • • • • • • • • • • • • • • • • • • • • • • • • • • • • • • • • • • • • • • • • • • • 7
DEFINITIONS • • . • . . • • • . • • . • • • • • . • . . • • . • . . . . . . . . . . . . . . . . . . . . . . . . . . . • . . . • • • • • • 8
DIAGNOSIS • • • • • • • • • • • • • • • • • • • • • • • • • • • . • • • • • • . • • • • • . . • • . . . . • • • • • . • • • • • • • • • • • 1 0
Diagnostic Trouble Codes • • • • • • • • • • • • • • • • • • • • • • • • • • • • • • • • • • • • • • • • • • • • • • • • • • • • • 1 0
Scan Tool Diagnostic • • • • • • • • • • • • • • • • • • • • • • • • • • • • • • • • • • • • • • • • • • • • • • • • • • • • • • • • 1 0
Use of Special Tools • • • • • • • • • • • • • • • • • • • • • • • • • • • • • • • • • • • • • • • • • • • • • • • • • • • • • • • • • 1 0
SRS CONNECTOR BODY FACE VIEWS . . . . . . . . . . . • . . . . . . . . . . . . . . . . . . . . . • . . . . . 11
REPAIRS AND INSPECTION REQUIRED AFTER AN ACCIDENT . . . . . • . . . . . . . . . . . 12
Accident With Deployment-component Replacement and Inspections • • • • • • • • • • • • • • • • • • 12
Accident With or Without Deployment-Component Inspections • • • • • • • • • • • • • • • • • • • • • • • 12
Sensor Replacement Guideline ••••••••• II • • • • • • • • • • • • • • • • • • • • • • • • • • • • • • • • • • • • • • • 12
Wiring Damage ••••••••••••••••••\
••• II • • • • • • • • • • • • • • • • • • • • • • • • • • • • • • • • • • • • • • • 12
SRS Conector (Plastic Body and Terminal Metal Pin) Damage • • • • • • • • • • • • • • • • • • • • • • • • • 12
Page 1626 of 1928
9J-2 Supplemental Restraint System
SRS Wire Pigtail Damage ..........................•..........•...............
SRS Wire Damage ...........................................•...............
ON-VEHICLE SERVICE ......................................•.•..•..........
Service Precautions ••••.••••••••••••••\
••••••••••••••••••\
••••••••••••••••••\
••
Disabling the SRS ...........................................•...............
Enabling the SRS ................................•..........•....•.....•.... \
Handling/Installation/Diagnosis ..........•.••.......•......•...•........•.•.•\
.•
INFLATOR MODULE HANDLING/SHIPPING/SCRAPPING •....•••••..•.....•••..
Live (Undeployed) Inflator Module ••••••••••••••••••\
••••••••••••••••••\
••••••••••
Inflator Module Shipping Procedures for Live (Undeployed) Inflator Modules •••••••••••••
Deployed Inflator Module ••••••••••••••••••\
••••••••••••••••••\
•••••••••••••••••
Inflator Module Scrapping Procedure ••••••••••••••••••\
••••••••••••••••••\
••••••••
Deployment Outside Vehicle (Driver Inflator Module) ••••••••••••••••••\
••••••••••••••
Deployment Outside Vehicle(Passenger Inflator Module) ••••••••••••••••••\
•••••••••••
Deployment Inside Vehicle(Vehlcle Scrapping Procedure) ••••••••••••••••••\
••••••••••
Deployed Inflator Module Handling ••••••••••••••••••\
••••••••••••••••••\
••••••••••
SPECIAL TOOLS ............................................................ .
SRS Driver/Passenger Load Tool .................•.....••.•••••....•••.\
•••.••••
J-39200 DVM . . . . . . . . . . . . . . • . . . . . . . . . . • . . . . . . . . . . . . . . . • • . • . • . . • . • • . . . . . . . • . .
Scan Tool ...............................................•..•..••.•\
••.....•
J-35616-A Connector Test Adapter Kit ••••••••••••••••••\
••••••••••••••••••\
•••••••
J-41434 SRS Deployment Tool ••••••••••••••••••\
••••••••••••••••••\
•••••••••••••
J-41497 SRS Deployment Fixture ••••••••••••••••••\
••••••••••••••••••\
•••••••••••
12
12
~ 13
13
13 13
13
14
14
14
14
15 16
19
22
24
25
25
26
26
26
26
26
~
•
Page 1627 of 1928
Supplemental Restraint System 9J-3
GENERAL DESCRIPTION
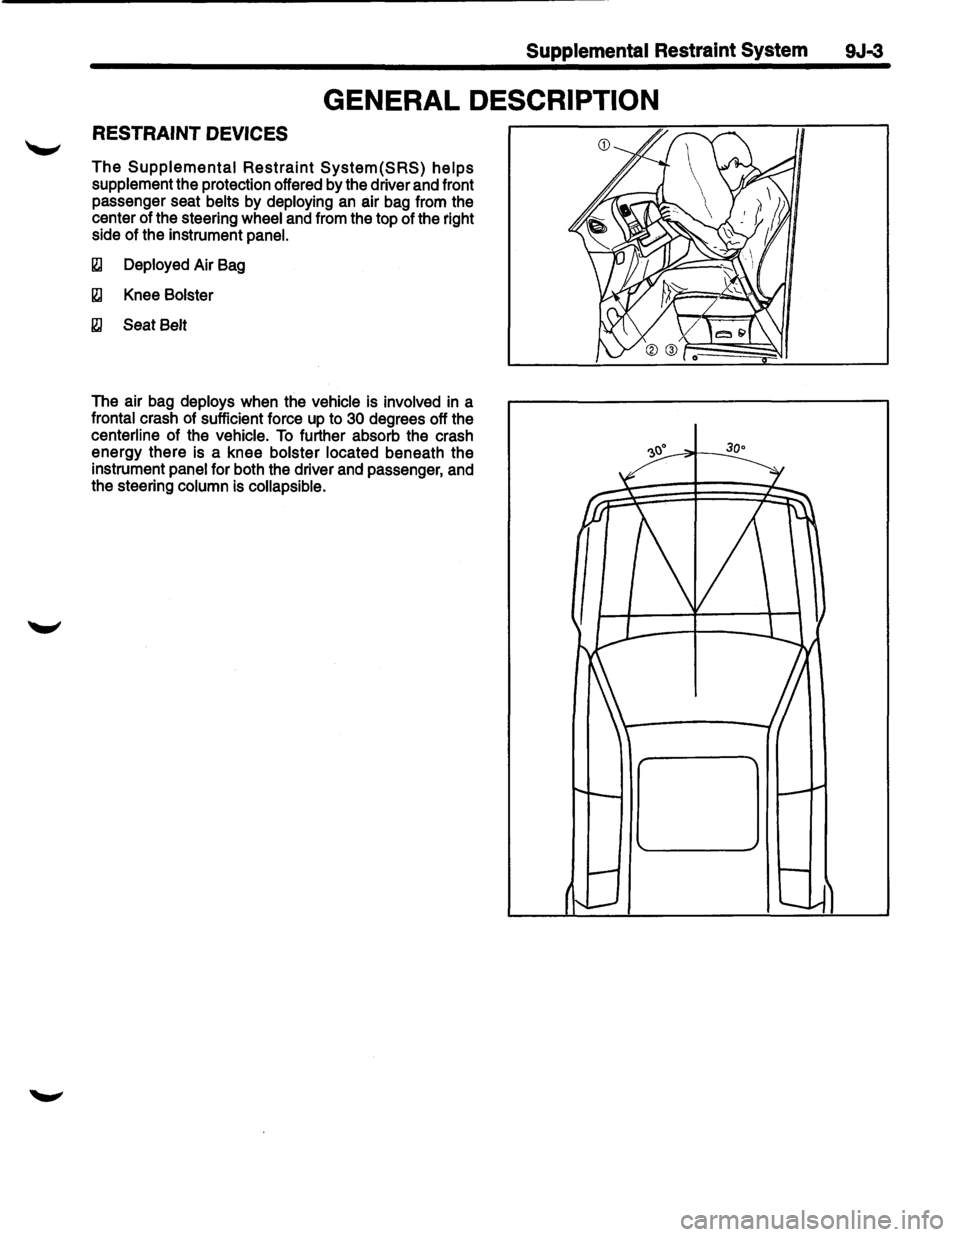
RESTRAINT DEVICES
The Supplemental Restraint System(SRS) helps
supplement the protection offered by the driver and front
passenger seat
belts by deploying an air bag from the
center of the steering
wheel and from the top of the right
side of the instrument
panel.
~ Deployed Air Bag
~ Knee Bolster
~ Seat Belt
The air bag deploys when the vehicle is involved in a
frontal crash of sufficient force up to 30 degrees off the
centerline of the vehicle. To further absorb the crash
energy there is a knee
bolster located beneath the
instrument
panel for both the driver and passenger, and
the steering
column is collapsible.
Page 1628 of 1928
9J-4 Supplemental Restraint System
'"""'t::~h-l--"b~RM PASSENGER SlOE HIGH
SYSTEM DESCRIPTION
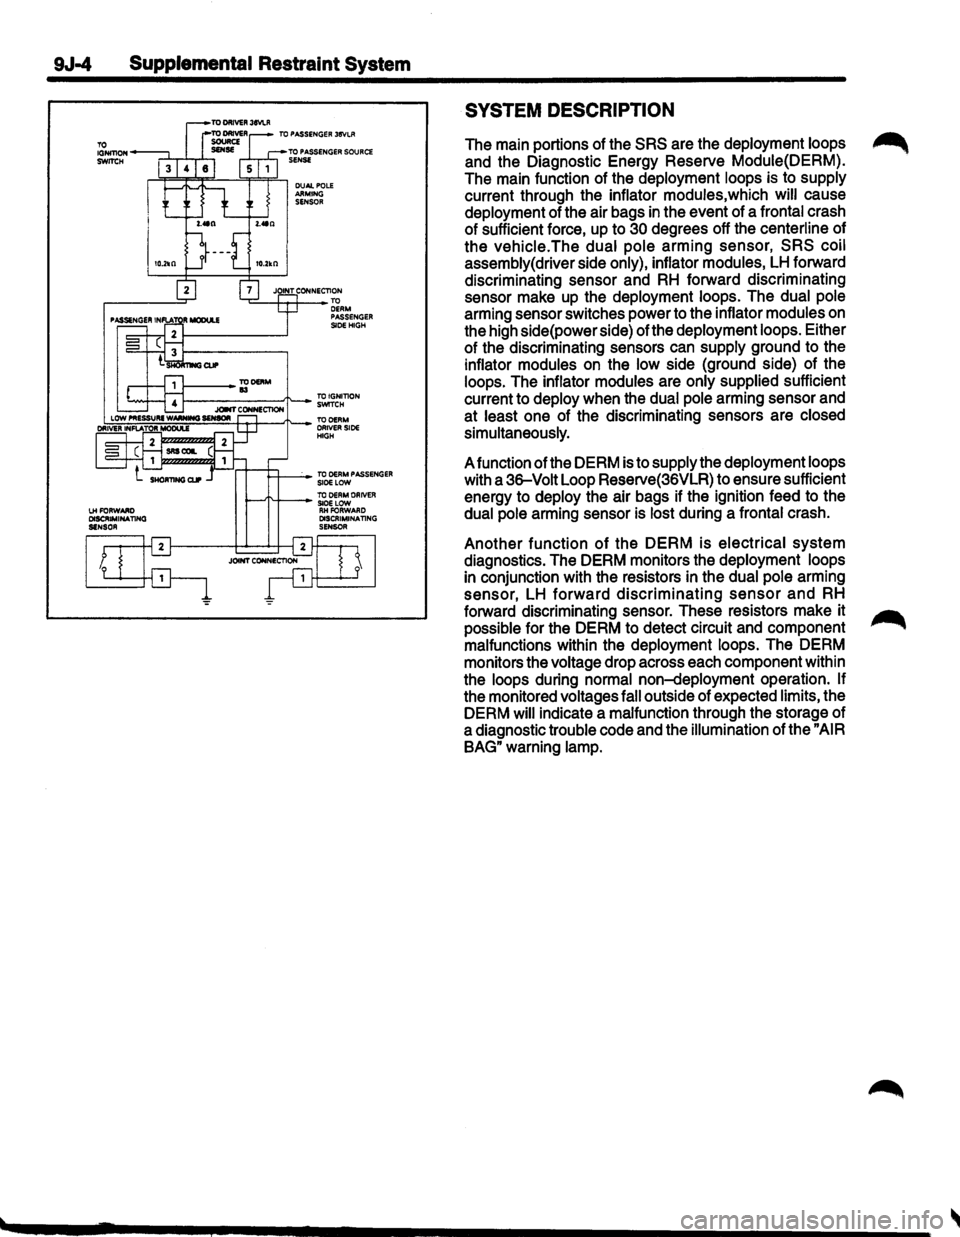
The main portions of the SRS are the deployment loops ~
and the Diagnostic Energy Reserve Module(DERM).
The main function of the deployment loops is to supply
current through the inflator modules,which will cause
deployment of the air bags in the event of a frontal crash
of sufficient force, up to
30 degrees off the centerline of
the vehicle.The dual pole arming sensor, SRS coil
assembly(
driver side only), inflator modules, LH forward
discriminating sensor and
RH forward discriminating
sensor make up the
deployment loops. The dual pole
arming sensor switches power to the inflator modules on
the high side(power side) of the
deployment loops. Either
of the discriminating sensors can
supply ground to the
inflator modules on the low side (ground side) of the
loops. The inflator modules are only supplied sufficient
current to
deploy when the dual pole arming sensor and
at
least one of the discriminating sensors are closed
simultaneously.
A function of the DERM is to supply the deployment loops
with a 36-Volt Loop Reserve(36VLR) to ensure sufficient
energy to
deploy the air bags if the ignition feed to the
dual pole arming sensor is lost during a frontal crash.
Another function of the DERM is electrical system
diagnostics. The DERM monitors the deployment loops
in conjunction with the resistors in the dual pole arming
sensor, LH
forward discriminating sensor and RH
forward discriminating sensor. These resistors make it
possible for the DERM to detect circuit and component
malfunctions within the deployment loops. The DERM
monitors the
voltage drop across each component within
the
loops during normal non-deployment operation. If
the monitored voltages fall outside of expected limits, the
DERM
will indicate a malfunction through the storage of
a diagnostic trouble code and the illumination of the "AIR
BAG"
warning lamp.
Page 1629 of 1928
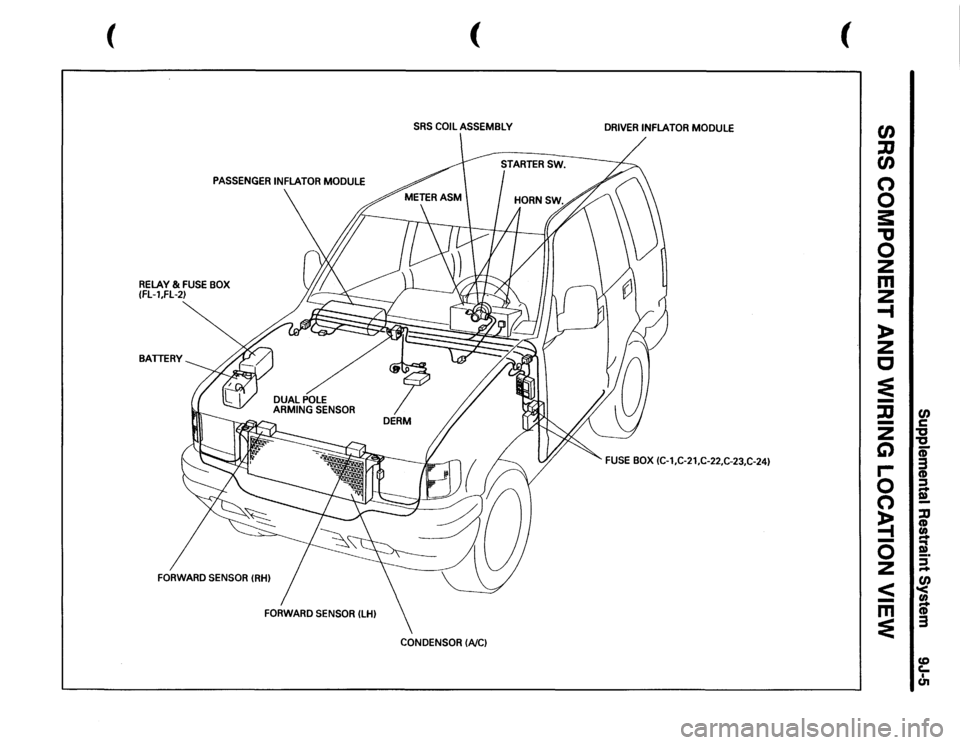
(
PASSENGER
INFLATOR
MODULE
RELAY
& FUSE
BOX
(FL-l,FL-2) BATTERY
FORWARD
SENSOR
IRH)
(
(
SRS
COIL
ASSEMBLY
DRIVER
INFLATOR
MODULE
FUSE
BOX
(C-1,C-21,C-22,C-23,C-24)
CONDENSOR
(A/C)
t/) :::0 t/) 0 0 s:: "tJ 0 z m z -1 )> z c == -:::0 -z C) r-0 0 ~ -0 z
< -m ==
en c "tJ
"tJ a; 3 CD :::J -!. lJ CD (I) -!. :::J -en i 3 U) c.. I c.n
Page 1630 of 1928
9J-6 Supplemental Restraint System <
COMPONENT DESCRIPTION
DERM
CAUTION: DO NOT OPEN THE DERM CASE FOR
ANY REASON. TOUCHING THE CONNECTOR PINS
OR SOLDERED COMPONENTS MAY CAUSE
ELECTROSTATIC DISCHARGE DAMAGE. REPAIR
OF A MALFUNCTIONING DERM IS BY
REPLACEMENT ONLY.
The DERM is designed to perform the following functions
in the SRS:
1. Energy Reserve- The DERM maintains two 36-Volt
Loop Reserve(36VLR) energy supplies to provide
deployment energy when the vehicle voltage is low
or lost in a frontal crash.
2. Malfunction Detection-The DERM performs
diagnostic monitoring of SRS electrical components.
3. Malfunction Recording- The DERM provides SRS
diagnostic trouble code information through a scan
tool.
4. Driver Notification- The DERM warns the vehicle
driver of SRS malfunctions by controlling the "AIR
BAG"
warning lamp.
5. Frontal Crash Recording- The DERM records the
SRS status during a frontal crash.
The DERM is connected to the
SRS wiring harness by
a
24-way connector. This harness connector uses a
shorting
clip across certain terminals in the contact area.
This shorting
clip connects the "AIR BAG" warning lamp
to ground when the DERM harness connector is
disconnected. This will cause the "AIR BAG" warning
lamp to come "ON" steady whenever the ignition switch
is at the RUN,BULB
TEST or START positions with the
DERM disconnected.
"AIR BAG"WARNING LAMP
Ignition voltage is applied to the "AIR BAG" warning lamp
when the ignition switch is at the RUN,BULB TEST or
START positions. The DERM controls the lamp by
providing ground with a
lamp driver. The "AIR BAG"
warning lamp is used in the SRS to do the following:
1. Verify lamp and DERM operation by flashing SEVEN
times when the ignition switch is first turned"ON".
2. Warn the vehicle driver of SRS electrical system
malfunctions which could potentially affect the
operation of the
SRS. These malfunctions could
result
in non-deployment in case of a frontal crash
or deployment for conditions less severe than
intended.
The "AIR BAG" warning lamp is the key to driver
notification of SRS malfunctions. For proper lamp
operation, refer to the "SRS Diagnostic System Check"
in this section.
DUAL POLE ARMING SENSOR ~
The dual pole arming sensor is a protective switch
located in the high side(power side) of the deployment
loops.
The dual pole arming sensor is calibrated to close
at low level velocity changes(lower than the
discriminating sensors).
This ensures that the
inflator modules are connected
directly to the "36 VLR" outputs of the DERM or "Ignition
1" voltage
when any discriminating sensor closes.
The dual pole arming sensor consists of: a sensing
element, two sets of normally open switch contacts,
diagnostic resistors and diodes. The sensing
element
closes
both sets of switch contacts when the velocity of
the
vehicle changes at a rate indicating a potential need
for
deployment.
Two of the diagnostic resistors are connected in parallel
with the switch contacts. This allows a small amount of
current to
flow through each of the deployment loops
during normal, non-deployment operation. This current
flow results in voltage drops across each component in
the
deployment loops. The DERM monitor these voltage
drops to detect circuit or component malfunctions. There
are two
additional diagnostic resistors within the dual
pole
arming sensor which allow the DERM to monitor the
voltage supplied to the high side ofthe deployment loops.
These monitored voltages are used by the diagnostic
logic of the DERM to make a more precise determination
of the
actual deployment loop malfunction. ~
The diodes within the dual pole arming sensor provide
isolation between the "36VLR" outputs of the DERM and
the
vehicle electrical system "Ignition 1" voltage. The
presence of the diodes prevents a direct continuity
measurement through the
dual pole arming sensor
resistors to
terminals"3","4" or "5".
DISCRIMINATING SENSORS
The discriminating sensors are protective switches wired
in parallel on the low side(ground side) of the deployment
loops.
These sensors are calibrated to close with velocity
changes which are severe enough to warrant
deployment.
The discriminating sensors consist of a sensing element
and normally open switch contacts when the vehicle
velocity changes are severe enough to warrant
deployment.
A diagnostic resistor is connected in parallel with the
switch contacts within the
LH forward discriminating
sensor and
RH forward discriminating sensor. These
parallel resistors supply the ground path for the current
passing through the
deployment loops during normal,
non-deployment operation. This current flow results in
voltage drops across each component within the
deployment loops. The DERM monitors these voltage
drops to detect circuit or component malfunctions.
II