sensor ISUZU TROOPER 1995 Workshop Manual
[x] Cancel search | Manufacturer: ISUZU, Model Year: 1995, Model line: TROOPER, Model: ISUZU TROOPER 1995Pages: 1928
Page 1635 of 1928
Supplemental Restraint System 9J-11
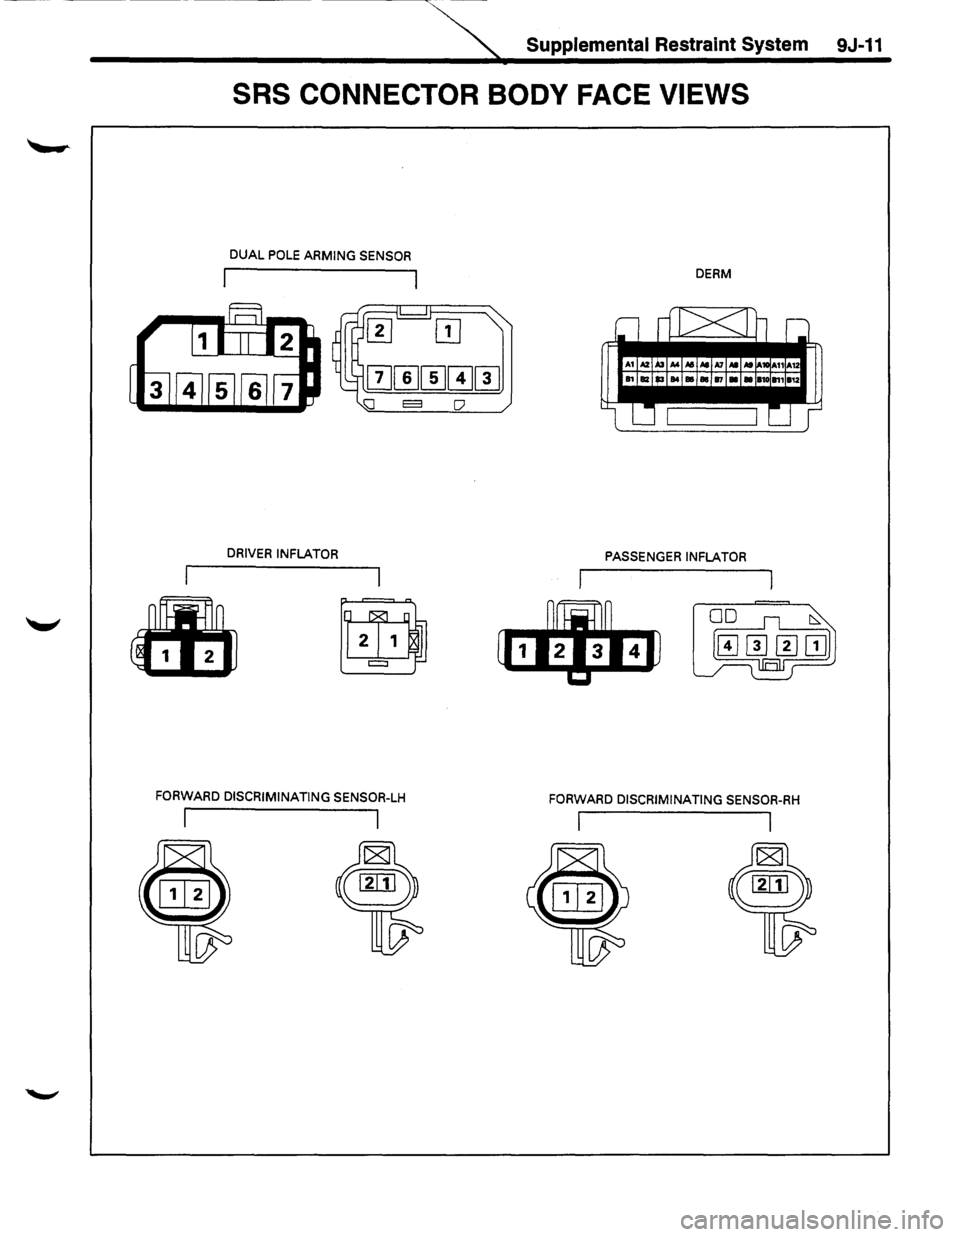
SRS CONNECTOR BODY FACE VIEWS
DUAL POLE ARMING SENSOR
DERM
DRIVER INFLATOR PASSENGER INFLATOR
FORWARD DISCRIMINATING SENSOR-LH FORWARD DISCRIMINATING SENSOR-RH
Page 1636 of 1928
9J-12 Supplemental Restraint System
REPAIRS AND INSPECTIONS REQUIRED AFTER AN
ACCIDENT
NOTE
• If
any SRS components are damaged, they must be
replaced. If SRS component mounting points are
damaged, they must be
replaced.
•
Never use SRS parts from another vehicle. This
does not
include remanufactured parts purchased
from an authorized
dealer; they may be used for SRS
repairs.
• Do not attempt to service discriminating sensors, the
dual pole arming sensor, the DERM, the SRS coil
assembly,
or the inflator modules. Service of these
items is by
replacement only.
•
Verify the part number of replacement inflator
modules.
CAUTION: PROPER OPERATION OF THE
SENSORS AND SUPPLEMENTAL RESTRAINT
SYSTEM (SRS) REQUIRES THAT ANY REPAIRS TO
THE VEHICLE STRUCTURE RETURN IT TO THE
ORIGINAL PRODUCTION CONFIGURATION.
DEPLOYMENT REQUIRES, AT A MINIMUM,
REPLACEMENT OF THE SENSORS, THE INFLATOR
MODULE,
AND DIMENSIONAL INSPECTION OF THE
STEERING COLUMN. ANY VISIBLE DAMAGE TO
THE DERM MOUNTING BRACKET(S) REQUIRES
REPLACEMENT, SENSORS MUST BE REPLACED,
AND THE
STEERING COLUMN MUST BE
DIMENSIONALLY INSPECTED, WHETHER
DEPLOYMENT
OCCURRED OR NOT.
ACCIDENT WITH DEPLOYMENT-COMPONENT
REPLACEMENT AND
INSPECTIONS
Certain SRS components must be replaced for damage
after a
frontal crash involving air bag deployment. Those
components are:
• Inflator modules.
• All
sensors. It is include among the Dual pole Arming
Sensor.
CAUTION
•
Refer to "Sensor Replacement Guidelines"
below for Important Information on sensor
replacement In both deployment and
non-deployment crashes.
• SRS coil assembly, Inspect wiring and connector for
any signs of scorching,
melting, or damage due to
excessive heat.
Replace if damaged. Refer to this in
section
3.
ACCIDENT WITH OR WITHOUT DEPLOYMENT
COMPONENT INSPECTIONS
Certain SRS and restraint system components must be
inspected after any crash, whether the air bag
deployed
or not. Those components are:
• Steering column-Dimensionally inspect per
"Checking Steering Column for Accident Damage" in
section 3.
• Sensors, if in the area of accident damage. If with
deployment, All sensors must be replaced.
CAUTION
•
Refer to "Sensor Replacement Guidelines"
below for Important information on sensor
replacement in both deployment and
non-deployment crashes.
• Knee bolsters and mounting points-Inspect for any
distortion, bending, cracking, or other damage.
• 1/P steering column reinforcement plate-Inspect for
any distortion, bending, cracking, or other damage.
• liP braces-Inspect for any distortion, bending,
cracking, or other damage.
~
• Seat belts and mounting points-Refer to "Seat Belts"
in SECTION 10.
SENSOR REPLACEMENT GUIDELINES
SRS sensor replacement policy requires replacement of
the all sensors, after crash Involving Air Bag
Deployment.
WIRING DAMAGE
If any SRS wire harness is damaged, it should be
replaced. Don't repair SRS HARNESS. It is replace only.
SRS CONNECTOR {PLASTIC BODY AND
TERMINAL METAL PIN) DAMAGE
If any connector or terminal in the SRS wire harness
(except
pigtails) is damaged, it should be replaced.
SRS WIRE PIGTAIL DAMAGE
If the wiring pigtail (a wire or wires attached directly to the
device,
not by a connector)is damaged, the entire
component(with pigtail)must be replaced. Examples of
"pigtail" components are the driver inflator module, the
passenger
inflator module, the discriminating sensors,
the
dual pole arming sensor and the SRS coil assembly. ~
SRS WIRE DAMAGE
If any wire except the pigtail is damaged, the wire should
be replaced.
Ill
Page 1637 of 1928
Supplemental Restraint System 9J-13
ON-VEHICLE SERVICE
SERVICE PRECAUTIONS
WARNING: WHEN PERFORMING SERVICE ON OR
AROUND SRS COMPONENTS OR SRS WIRING,
FOLLOW
THE PROCEDURES LISTED BELOW TO
TEMPORARILY DISABLE THE SRS. FAILURE TO
FOLLOW PROCEDURES COULD RESULT IN
POSSIBLE AIR
BAG DEPLOYMENT, PERSONAL
INJURY OR OTHERWISE
UNNEEDED SRS
REPAIRS.
The DERM in Driver-Passenger SRS can maintain
sufficient voltage to cause a deployment for up to 2
minutes after the ignition switch is turned
"OFF," the
battery is disconnected, or the fuse powering the DERM
is removed.
Many of the service procedures require removal of the
"AIR BAG" fuse, and disconnection of the inflator
modules from the deployment loop to avoid an accidental
deployment.
If the inflator module is disconnected from
the deployment loop as noted in the "Disabling the
SRS"
procedure that follows, service can begin immediately
without waiting for the 2-minute time period to expire.
DISABLING THE SRS
REMOVAL
Turn the ignition switch to "OFF"
1. Remove SRS fuse C-21, C-22, C-23 and C-24 from
left dash side lower fuse block.
2. Disconnect yellow 3-way connector at the base of
steering column.
3. Remove 1/P compartment door assembly, Refer to
"Passenger inflator module replacement" in section
9J-132.
4. Disconnect yellow 4-way connector behind the 1/P
compartment door assembly.
IMPORTANT
• With the "AIR BAG" fuse removed and ignition switch
"ON," if Fuse 21 left. the "AIR BAG" warning lamp will
be "ON." This is normal operation and does not
indicate an
SRS malfunction.
ENABLING THE SRS
INSTALLATION
Turn ignition switch to "LOCK" and remove key.
1. Connect yellow 4-way connector for passenger
inflator module.
2. 1/P compartment door assembly, Refer to
"Passenger inflator module replacemenf' in section
9J-3.
3. Connect yellow 2-way connector at the base of the
steering column.
4. Install "AIR BAG" fuse C-21, C-22, C-23 and C-24 to
left dash side lower fuse block.
Turn ignition switch to
"RUN" and verify that the "AIR
BAG"
warning lamp flashes seven times and then turns
"OFP' If it does not operate as described, perform the
"SRS Diagnostic System Check" in section 9J-2.
HANDLING/INSTALLATION/DIAGNOSIS
1. Inflator modules should not be subjected to
temperatures above
65°C{150°F).
2. Discriminating sensors, inflator modules, arming
sensors, or DERMs should not be used if they have
been dropped from a height
of 91.4 centimeters
{3feet).
3. When a discriminating sensor or arming sensor is
replaced, it must be oriented with the arrow on the
sensor pointing toward the front of the vehicle.
It is
very important for the discriminating sensors and
arming sensor to be located flat on the mounting
surface, parallel to the vehicle datum line.
It is
important that the sensor mounting surface is free of
any dirt or other foreign material.
4. Do not apply power to the SRS unless all
components are connected or a diagnostic chart
requests it, as this
will set a diagnostic trouble code.
5. The "SRS Diagnostic System Check" must be the
starting point of any
SRS diagnostics. The "SRS
Diagnostic System Check" will verify proper "AIR
BAG"
warning lamp operation and will lead you to the
correct chart to diagnose any
SRS malfunctions.
Bypassing these procedures may result
in extended
diagnostic time, incorrect diagnosis, and incorrect
parts replacements.
Page 1651 of 1928
Suppleme~tralnt System
TABLE OF CONTENTS
SUPPLEMENTAL RESTRAINT SYSTEM
{SRS)
SECTION 2-SYSTEM DIAGNOSIS
9J-27
CAUTION: WHEN FASTENERS ARE REMOVED, ALWAYS REINSTALL THEM AT THE SAME LOCATION
FROM WHICH THEY WERE REMOVED. IF A FASTENER NEEDS TO BE REPLACED, USE THE CORRECT PART
NUMBER
FASTENER FOR THAT APPLICATION. IF THE CORRECT PART NUMBER FASTENER IS NOT
AVAILABLE, A FASTENER OF EQUAL SIZE AND STRENGTH (OR STRONGER) MAY BE USED. FASTENERS
THAT ARE NOT REUSED, AND THOSE REQUIRING THREAD LOCKING COMPOUND WILL BE CALLED OUT.
THE CORRECT TORQUE VALUE
MUST BE USED WHEN INSTALLING FASTENERS THAT REQUIRE IT. IF THE
ABOVE CONDITIONS ARE NOT FOLLOWED, PARTS OR SYSTEM DAMAGE COULD RESULT.
HOW TO USE THIS SECTION . . . . . . . . • . . . . . . . . . . . • . . . . . . . . . • • • • • • . • . • • . . . . . • • . 30
Diagnostic Procedures • • • • • • • • • • • • • • • • • • • • • • • • • • • • • • • • • • • • • • • • • • • • • • • • • • • • • • • 30
Diagnostic Codes • • • • • • • • • • • • • • • • • • • • • • • • • • • • • • • • • • • • • • • • • • • • • • • • • • • • • • • • • • • 30
How to Read Trouble Codes • • • • • • • • • • • • • • • • • • • • • • • • • • • • • • • • • • • • • • • • • • • • • • • • • • • 30
How to Clear Trouble Codes • • • • • • • • • • • • • • • • • • • • • • • • • • • • • • • • • • • • • • • • • • • • • • • • • • • 30
Scan
Tool Diagnostics • • • • • • • • • • • • • • • • • • • • • • • • • • • • • • • • • • • • • • • • • • • • • • • • • • • • • • • 30
Basic Knowledge Required • • • • • • • • • • • • • • • • • • • • • • • • • • • • • • • • • • • • • • • • • • • • • • • • • • • • 30
Basic Electrical Circuits • • • • • • • • • • • • • • • • • • • • • • • • • • • • • • • • • • • • • • • • • • • • • • • • • • • • • • 30
"Flash Code"
Diagnostics • • • • • • • • • • • • • • • • • • • • • • • • • • • • • • • • • • • • • • • • • • • • • • • • • • • • • 30
SYSTEM SCHEMATIC . . • . • . . . . • • • • • • • • . • . . • . . • . • • . • • • . . . • • . . . . . . . • • . . • • • • • • • 31
SRS DIAGNOSTIC SYSTEM CHECK • . • • • . • • . • . . . . . • . • . • . • • • . . . • . • . . • . . . . . . . • . 32
,_.., TABLE A DERM INTEGRITY CHECK • . • • • . . . . . . . . . . • . • • • . • • • . • • . • . . . • . . . . . . . . . 34
TABLE B "AIR BAG" WARNING LAMP COMES "ON" STEADY . . . . . . . . . . . . . . . . • . 36
TABLE C "AIR BAG" WARNING LAMP DOES NOT COME "ON" . . . . . . . . . . . . . . . • . 38
TABLED "AIR BAG" WARNING LAMP DOES NOT COME "ON" STEADY DURING
CRANK .......................................................... .
DTC 14 DUAL POLE ARMING SENSOR DISCONNECTED ..•.••••••.•...........
DTC 15 PASSENGER INITIATOR CIRCUIT RESISTANCE HIGH •.................
DTC 16 PASSENGER INITIATOR CIRCUIT RESISTANCE LOW ...........•...••..
DTC 17 PASSENGER INITIATOR CIRCUIT OPEN ..••.•.......•.•••...•......••.
DTC 18 DISCRIMINATING SENSOR INTERCONNECT OPEN ................... .
DTC
19 PASSENGER INITIATOR CIRCUIT VOLTAGE HIGH •....•.....••.•..•.•..
DTC 21 DRIVER INITIATOR CIRCUIT RESISTANCE HIGH
DTC 22 DRIVER INITIATOR CIRCUIT RESISTANCE LOW ..••••.••.•.••..•.•.•••
DTC 23 DRIVER INITIATOR CIRCUIT VOLTAGE HIGH ........................•.
DTC 24 INITIATOR CIRCUIT VOLTAGE LOW .....••....•..•...•................
DTC 25 INITIATOR CIRCUIT SHORT TO IGNITION .............•.............•..
DTC 26 DRIVER INITIATOR CIRCUIT OPEN •.••........................••..•.••
DTC 28 CURRENT SINK OR SOURCE FAILURE ............................... .
DTC 31 DRIVER LOOP ENERGY RESERVE FEED OPEN ....................... .
40
42
44
46
48
50
52
54
56
58
60
66
70
72
74
Page 1652 of 1928
-
9J-28 Supplemental Restraint System
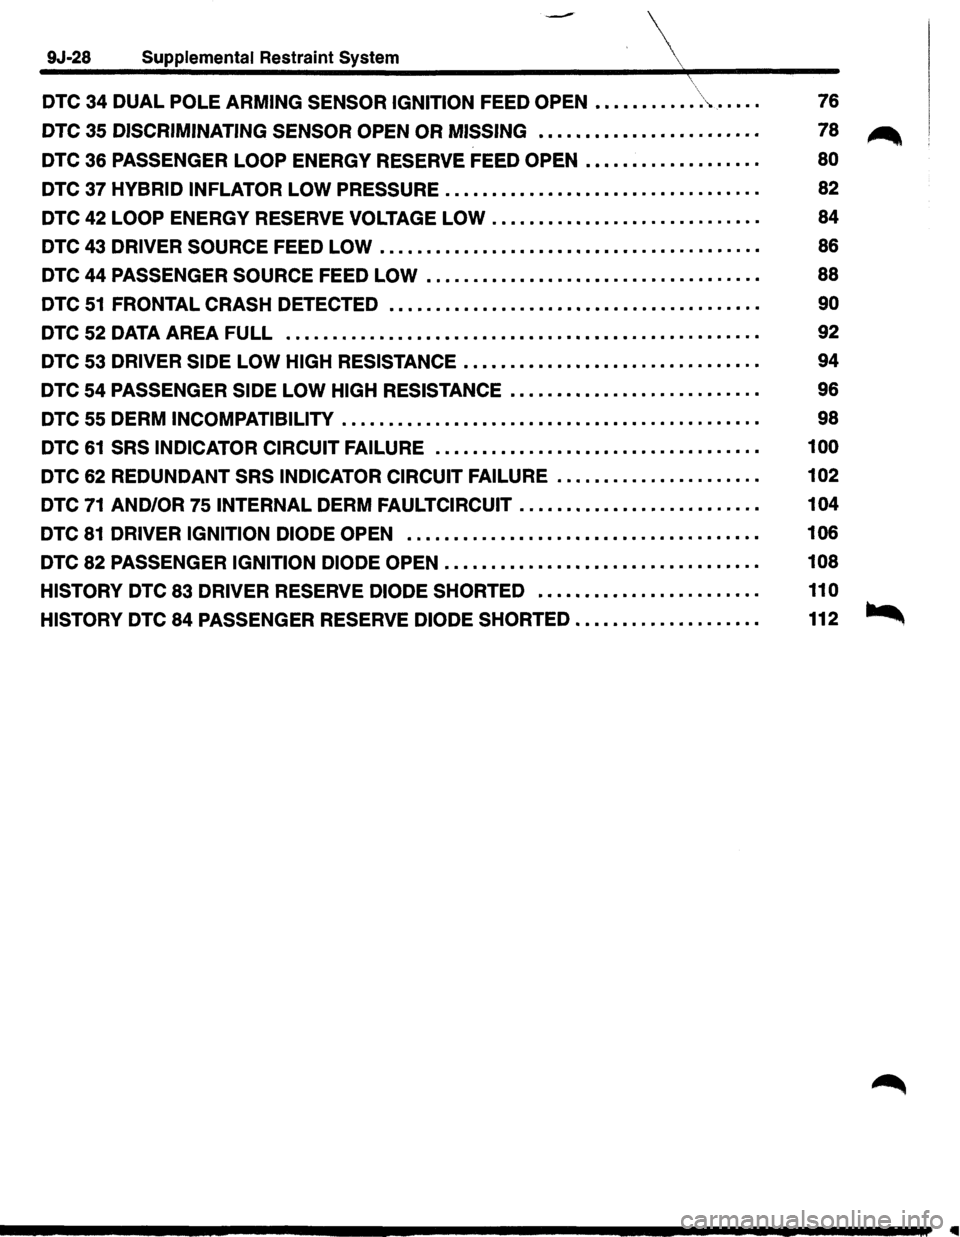
DTC 34 DUAL POLE ARMING SENSOR IGNITION FEED OPEN •••••••.••• \> ...... .
DTC 35 DISCRIMINATING SENSOR OPEN OR MISSING •••••••••••••••••.•\
•••••
DTC 36 PASSENGER LOOP ENERGY RESERVE FEED OPEN ••••••••••••••..•••
76
78
~
80
DTC 37 HYBRID INFLATOR LOW PRESSURE . . • • • • • • • • . • • • • • • • • • • . • • • . .
.
• • • • . . 82
DTC 42
LOOP ENERGY RESERVE VOLTAGE LOW • • • • • • • • • • • • • . • • • • . .
.
• . • . . • • • 84
DTC 43
DRIVER SOURCE FEED LOW • • . • • • • • • • • • • • • • • • • • • • • • • • • • . • • • • . • • • • • • • 86
DTC 44
PASSENGER SOURCE FEED LOW • . • • . • • • • • • • • • • • • • • • . . • . • . • . . • • . . . • • 88
DTC
51 FRONTAL CRASH DETECTED • • • • • . • • • • • • • • . • • • • • • • • • • • • • • • . . • • • . • • • • 90
DTC 52 DATA AREA FULL . . . . . . . . . . . . . . . . . . . . . . . . . . . . . . . . . . . . . . . . . . . . . . . . . . . 92
DTC 53 DRIVER SIDE LOW HIGH RESISTANCE • • • • • • • • • • • • • • • • • • • . • • • • • . • • • • . • 94
DTC 54
PASSENGER SIDE LOW HIGH RESISTANCE • • • • . • • • • • • . • • • • • . . • . • . . • . • 96
DTC 55 DERM
INCOMPATIBILITY • • • • . • • • . • . • • • • • • • • • • • • • • • • • • • • • . . • . . • . • • • • . • 98
DTC
61 SRS INDICATOR CIRCUIT FAILURE • • • • • • • • • • • • • • • • • • • • • • • • . • • • . • • • • • • 100
DTC 62 REDUNDANT SRS INDICATOR CIRCUIT FAILURE • • • • • • • . .
. .
• . .
. . . .
• • . • 102
DTC 71 AND/OR 75 INTERNAL DERM FAULTCIRCUIT • • • • • • • • • • • • • • • . • • • • • • • . . • 104
DTC 81 DRIVER IGNITION DIODE OPEN • . • • • • • • • • • • • • • • • • • • • • • • • • • • • • • • • • • • • • 106
DTC 82 PASSENGER IGNITION DIODE OPEN • • • • • • • • • • • • • • • • • • • • • • • • • . • • • • • • . • 108
HISTORY
DTC 83 DRIVER RESERVE DIODE SHORTED • • • • • • • • • • • • • . • • . • • • . • • • 110
HISTORY
DTC 84 PASSENGER RESERVE DIODE SHORTED •••••••••.•••.•..•••
Page 1655 of 1928
Supplemental Restraint System
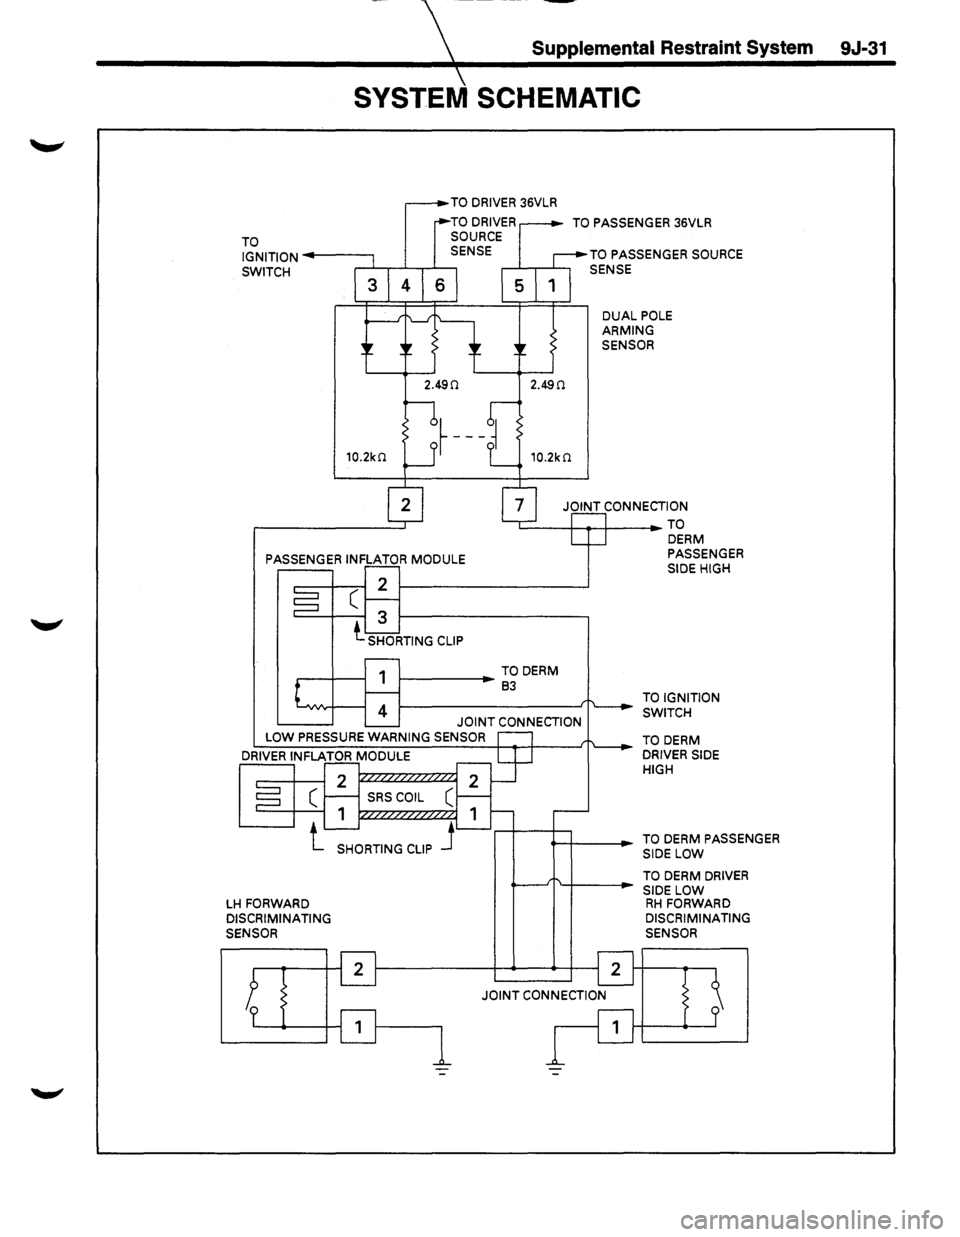
SYSTEM SCHEMATIC
TO IGNITION-----,
TO DRIVER 36VLR
SWITCH ,.--Ji........,--L--r-1----,
TO PASSENGER 36VLR
TO PASSENGER SOURCE
SENSE
DUAL POLE ARMING SENSOR
JOINT CONNECTION
'-----+---.--+---TO
PASSENGER INFLATOR
MODULE
1-----.-TO DERM 83
JOINT CONNECTION LOW PRESSURE WARNING SENSOR
LH FORWARD DISCRIMINATING
SENSOR
DERM PASSENGER
SIDE HIGH
TO IGNITION
SWITCH
TO
DERM DRIVER SIDE
HIGH
TO
DERM PASSENGER
SIDE LOW
TO
DERM DRIVER
SIDE LOW RH FORWARD DISCRIMINATING
SENSOR
9J-31
Page 1660 of 1928
9J-36 Supplemental Restraint System
TABLE B
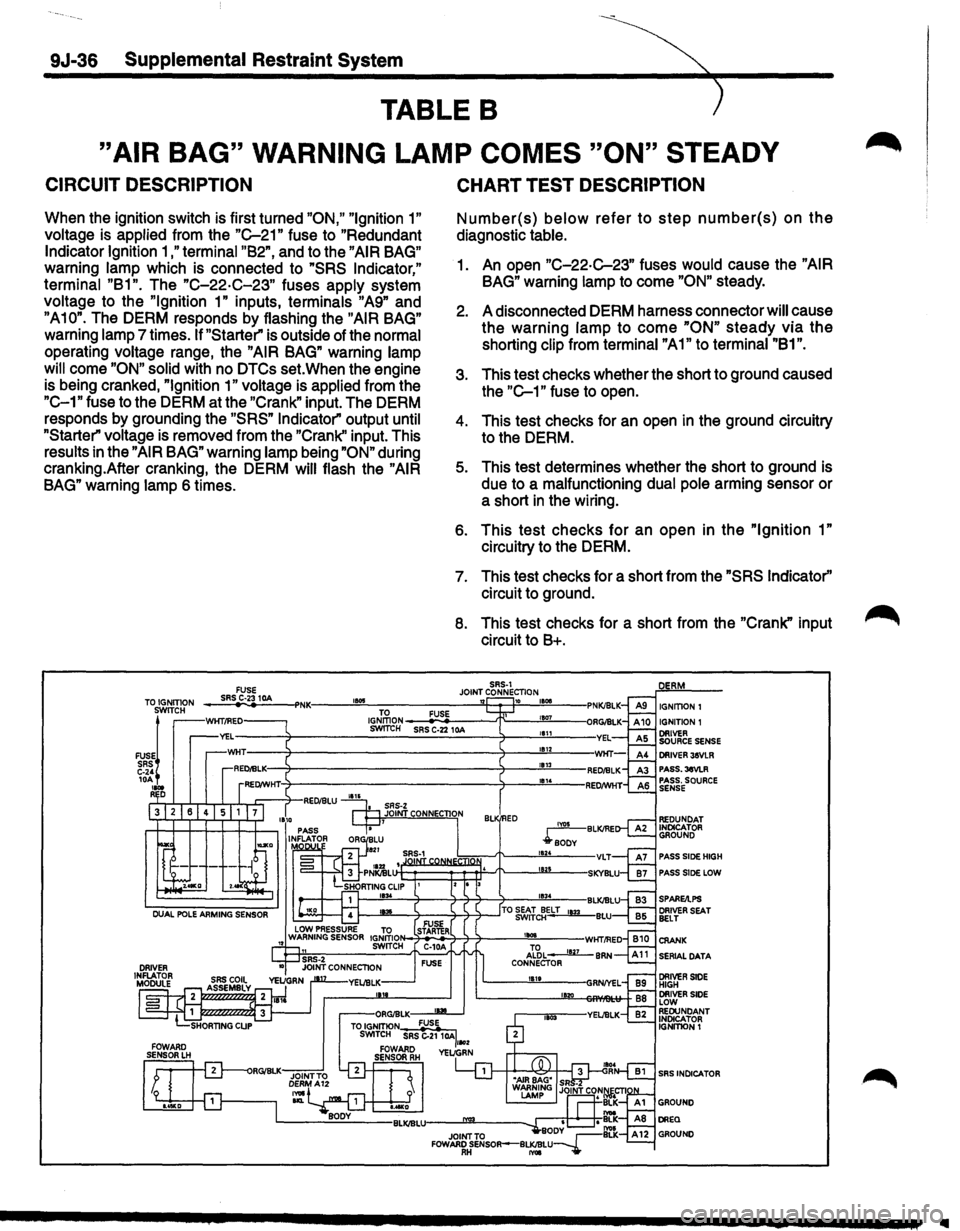
"AIR BAG" WARNING LAMP COMES "ON" STEADY
CIRCUIT DESCRIPTION
When the ignition switch is first turned "ON," "Ignition 1"
voltage is applied from the "C-21" fuse to "Redundant
Indicator Ignition 1 ,"terminal "B2", and to the "AIR BAG"
warning lamp which is connected to "SRS Indicator,"
terminal "B1". The "C-22·C-23" fuses apply system
voltage to the
"Ignition 1" inputs, terminals "A9" and
"A10". The DERM responds by flashing the "AIR BAG"
warning lamp 7 times. If "Starter" is outside of the normal
operating voltage range, the
"AIR BAG" warning lamp
will
come "ON" solid with no DTCs set. When the engine
is being cranked,
"Ignition 1" voltage is applied from the
"C-1" fuse to the DERM at the "Crank" input. The DERM
responds by grounding the
"SRS" Indicator" output until
"Starter" voltage is removed from the "Crank'' input. This
results in the
"AIR BAG" warning lamp being "ON" during
cranking.After cranking, the DERM
will flash the "AIR
BAG" warning lamp 6 times.
CHART TEST DESCRIPTION
Number(s) below refer to step number(s) on the
diagnostic table.
1. An open "C-22-C-23" fuses would cause the "AIR
BAG" warning lamp to come "ON" steady.
2. A disconnected DERM harness connector will cause
the warning
lamp to come "ON" steady via the
shorting clip from terminal "A1" to terminal "81".
3. This test checks whether the short to ground caused
the
"C-1" fuse to open.
4. This test checks for an open in the ground circuitry
to the DERM.
5. This test determines whether the short to ground is
due to a malfunctioning dual pole arming sensor or
a short
in the wiring.
6. This test checks for an open in the "Ignition 1"
circuitry to the DERM.
7. This test checks for a short from the "SRS Indicator''
circuit to ground.
8. This test checks for a short from the "Crank" input
circuit to 8+.
SRS-1 JOINT CONNECTION TO IGNITION FUSE SRS C·23 10A 1!015 '12 10 IGNITION I IGNITION 1 SWITCH
FUSE~ SRS C-24 10A .... R D
PASS.3eVLR PASS. SOURCE SENSE
PASS SlOE HIGH
PASS SlOE LOW
SERIAL DATA
SRS INDICATOR
..
Page 1661 of 1928
Supplemental Restraint S~m 9J-37
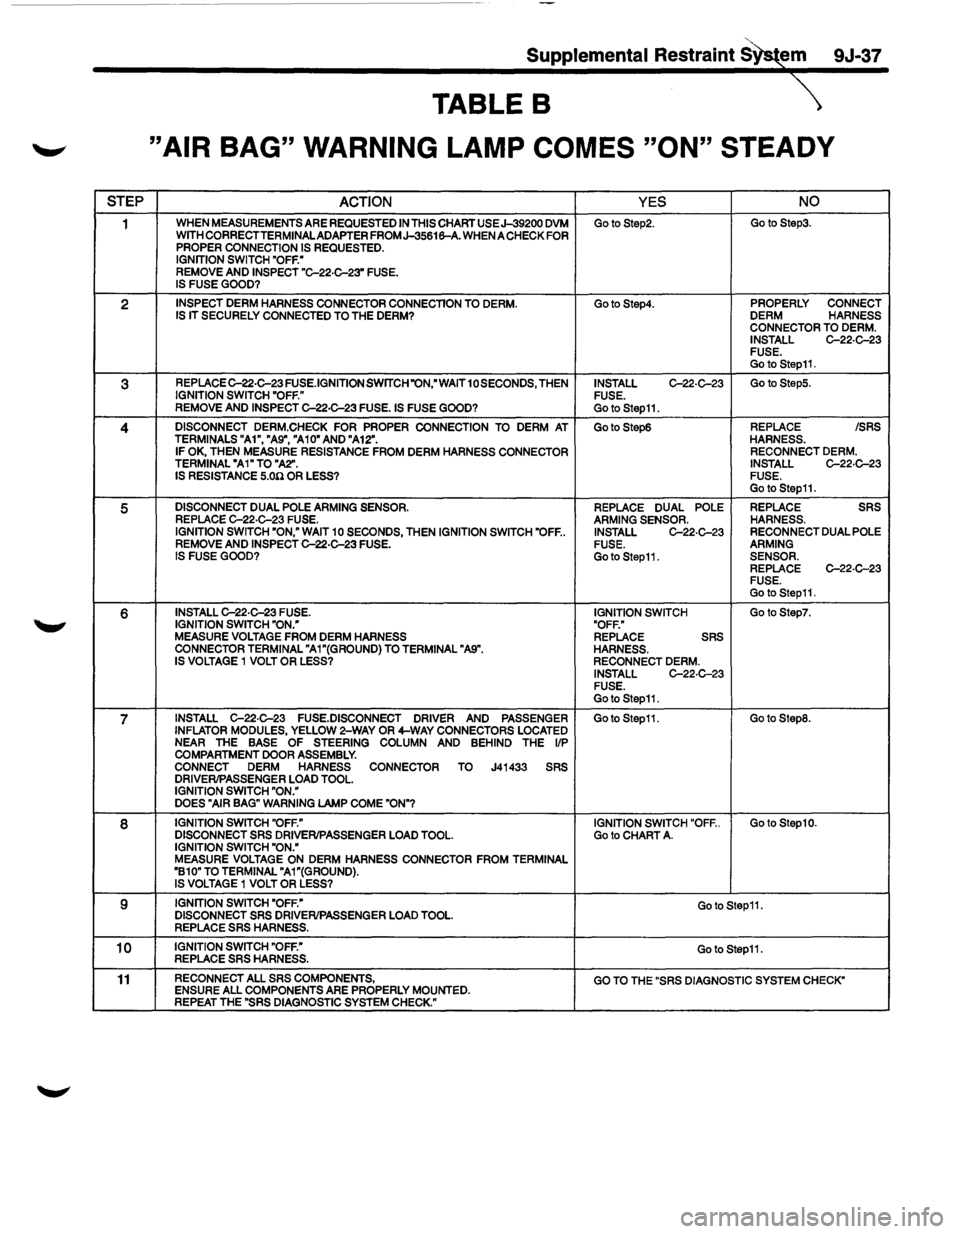
TABLE B
"AIR BAG" WARNING LAMP COMES "ON" STEADY
STEP ACTION YES NO
1 WHEN MEASUREMENTS ARE REQUESTED IN THIS CHART USEJ-39200 DVM GotoStep2. GotoStep3. WITH CORRECTTERMINALADAPTER FROMJ-35616-A. WHEN A CHECK FOR PROPER CONNECTION IS REQUESTED. IGNITION SWITCH "OFF."
REMOVE AND INSPECT "C-22·C-23" FUSE.
IS FUSE GOOD?
2 INSPECT DERM HARNESS CONNECTOR CONNECTION TO DERM. GotoStep4. PROPERLY CONNECT
IS IT SECURELY CONNECTED TO THE DERM? DERM HARNESS
CONNECTOR TO DERM. INSTALL C-22·C-23 FUSE. GotoStep11.
3 REPLACEC-22·C-23 FUSE.JGNITION SWITCH "ON," WAIT 10SECONDS, THEN INSTALL C-22·C-23 Go to StepS.
IGNITION SWITCH "OFF."
FUSE.
REMOVE
AND INSPECT C-22·C-23 FUSE. IS FUSE GOOD? GotoStep11.
4 DISCONNECT DERM.CHECK FOR PROPER CONNECTION TO DERM AT Go to StepS REPLACE /SRS
TERMINALS "A1", "A9", "A10" AND "A12". HARNESS. IF OK, THEN MEASURE RESISTANCE FROM DERM HARNESS CONNECTOR RECONNECT DERM. TERMINAL "A1" TO "A2". INSTALL C-22·C-23 IS
RESISTANCE 5.00 OR LESS?
FUSE. Go to Step11.
5 DISCONNECT DUAL POLE ARMING SENSOR. REPLACE DUAL POLE REPLACE SRS REPLACE C-22·C-23 FUSE.
ARMING SENSOR. HARNESS.
IGNITION SWITCH "ON," WAIT 10 SECONDS, THEN IGNITION SWITCH "OFF .. INSTALL C-22·C-23 RECONNECT DUAL POLE
REMOVE AND INSPECT C-22·C-23 FUSE. FUSE. ARMING
IS FUSE GOOD? GotoStep11. SENSOR. REPLACE C-22·C-23 FUSE. Go to Step11.
6 INSTALL C-22·C-23 FUSE. IGNITION SWITCH GotoStep7. IGNITION SWITCH "ON."
"OFF."
MEASURE VOLTAGE FROM DERM HARNESS REPLACE SRS
CONNECTOR TERMINAL "A1"(GROUND) TO TERMINAL "A9". HARNESS.
IS VOLTAGE 1 VOLT OR LESS? RECONNECT DERM. INSTALL C-22·C-23 FUSE. GotoStep11.
7 INSTALL C-22·C-23 FUSE.DISCONNECT DRIVER AND PASSENGER GotoStep11. Go to StepS.
INFLATOR MODULES, YELLOW 2-WAY OR 4-WAY CONNECTORS LOCATED NEAR THE BASE OF STEERING COLUMN AND BEHIND THE liP COMPARTMENT DOOR ASSEMBLY.
CONNECT DERM HARNESS CONNECTOR TO J41433 SRS
DRIVER/PASSENGER LOAD TOOL.
IGNITION SWITCH "ON."
DOES "AIR
BAG" WARNING LAMP COME "ON"?
8 IGNITION SWITCH "OFF."
IGNITION SWITCH "OFF .. Go to Step10.
DISCONNECT SRS DRIVER/PASSENGER LOAD TOOL. Go to CHART A. IGNITION SWITCH "ON."
MEASURE VOLTAGE ON DERM HARNESS CONNECTOR FROM TERMINAL
"B10" TO TERMINAL "A1"(GROUND). IS VOLTAGE 1 VOLT OR LESS?
9 IGNITION SWITCH "OFF." GotoStep11. DISCONNECT SRS DRIVER/PASSENGER LOAD TOOL. REPLACE SRS HARNESS.
10 IGNITION SWITCH "OFF." Go to Step11. REPLACE SRS HARNESS.
11 RECONNECT ALL SRS COMPONENTS,
GO TO THE "SRS DIAGNOSTIC SYSTEM CHECK" ENSURE ALL COMPONENTS ARE PROPERLY MOUNTED.
REPEAT THE "SRS DIAGNOSTIC SYSTEM CHECK."
Page 1666 of 1928
9J-42 Supplemental Restraint System
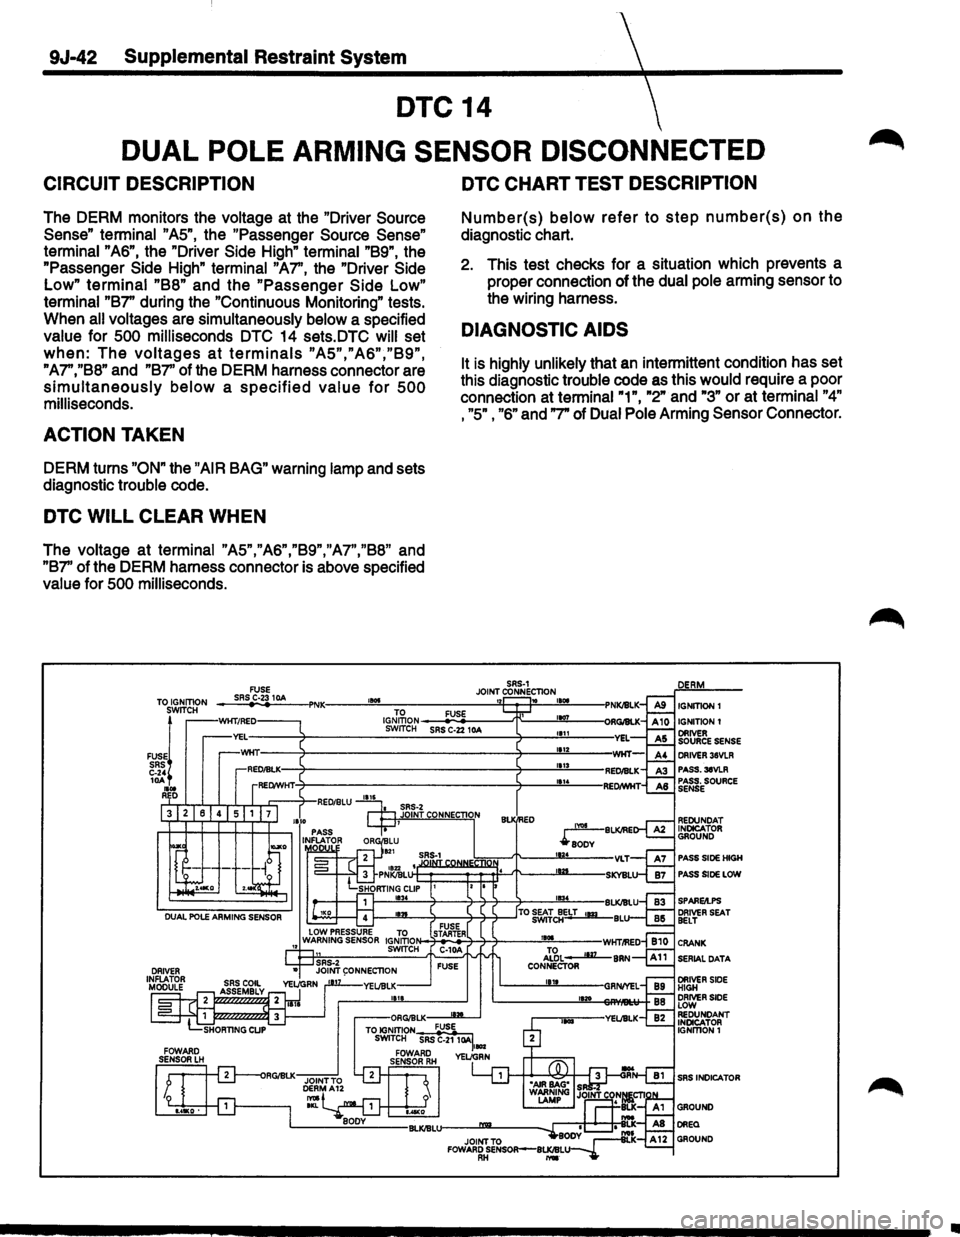
DTC 14
DUAL
POLE ARMING SENSOR DISCONNECTED
CIRCUIT DESCRIPTION
The DERM monitors the voltage at the "Driver Source
Sense" terminal
"AS", the "Passenger Source Sense"
terminal "AS",
the "Driver Side High" terminal "B9", the
"Passenger
Side High" terminal "A7'', the "Driver Side
Low" terminal
"88" and the "Passenger Side Low"
terminal "87" during the "Continuous Monitoring" tests.
When
all voltages are simultaneously below a specified
value for 500 milliseconds DTC 14 sets.DTC will set
when: The voltages at terminals "A5","A6","B9",
"A7","B8" and "B7'' of the DERM harness connector are
simultaneously below a specified value for 500
milliseconds.
ACTION TAKEN
DERM turns "ON" the "AIR BAG" warning lamp and sets
diagnostic
trouble code.
DTC WILL CLEAR WHEN
The voltage at terminal "A5","A6","B9","A7","B8" and
"87'' of the DERM harness connector is above specified
value for 500 milliseconds.
~~ 10A 1101 RD
DTC CHART TEST DESCRIPTION
Number(s) below refer to step number(s) on the
diagnostic chart.
2. This test checks for a situation which prevents a
proper connection of the
dual pole arming sensor to
the wiring harness.
DIAGNOSTIC AIDS
It is highly unlikely that an intermittent condition has set
this diagnostic
trouble code as this would require a poor
connection at
terminal"1", "2" and "3" or at terminal "4"
, "5" ,
"6" and "7" of Dual Pole Arming Sensor Connector.
IGNmDNt
PASS.38VLR PASS. SOURCE SENSE
PASS SIDE HIGH
PASS SIDE LOW
SERIAL DATA
SRS INDICATOR
Ill
Page 1667 of 1928
Supplemental Restraint System 9J-43
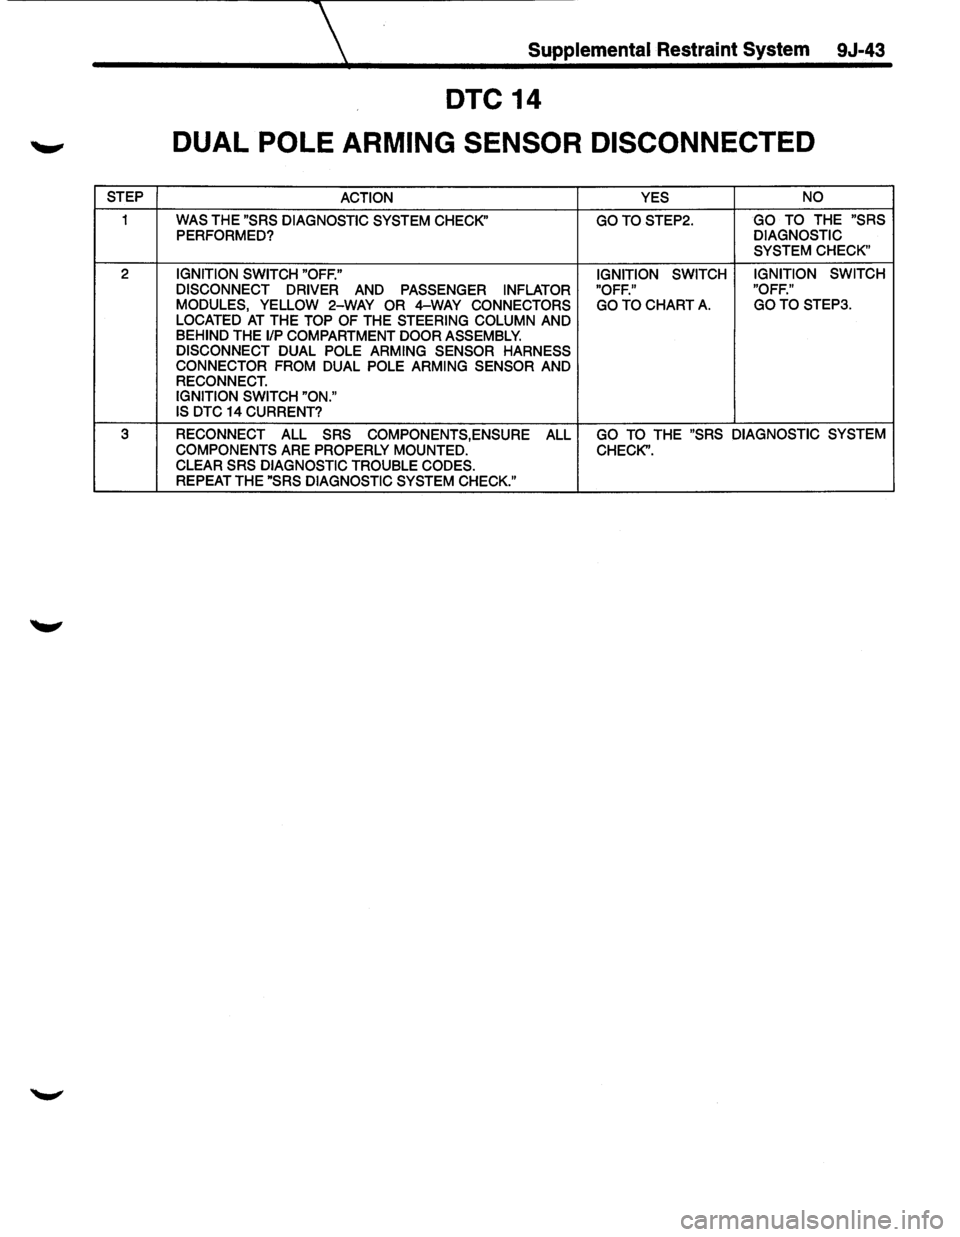
DTC 14
DUAL POLE
ARMING SENSOR DISCONNECTED
STEP ACTION YES NO
1 WAS THE "SRS
DIAGNOSTIC SYSTEM CHECK" GOTOSTEP2. GO TO THE "SRS PERFORMED? DIAGNOSTIC
SYSTEM CHECK"
2 IGNITION SWITCH "OFF." IGNITION SWITCH IGNITION
SWITCH
DISCONNECT DRIVER AND PASSENGER INFLATOR "OFF." "OFF."
MODULES, YELLOW 2-WAY OR 4-WAY CONNECTORS GO TO CHART A. GOTO STEP3.
LOCATED AT THE TOP OF THE STEERING COLUMN AND BEHIND THE 1/P COMPARTMENT DOOR ASSEMBLY.
DISCONNECT DUAL POLE ARMING SENSOR HARNESS CONNECTOR FROM DUAL POLE ARMING SENSOR AND RECONNECT.
IGNITION SWITCH "ON."
IS DTC
14 CURRENT?
3
RECONNECT ALL SRS COMPONENTS, ENSURE ALL GO TO THE "SRS DIAGNOSTIC SYSTEM
COMPONENTS
ARE PROPERLY MOUNTED. CHECK".
CLEAR SRS DIAGNOSTIC TROUBLE CODES.
REPEAT THE "SRS DIAGNOSTIC SYSTEM CHECK."