oil ISUZU TROOPER 1995 Workshop Manual
[x] Cancel search | Manufacturer: ISUZU, Model Year: 1995, Model line: TROOPER, Model: ISUZU TROOPER 1995Pages: 1928
Page 1170 of 1928

70-12 TRANSFER CASE
5. Speedometer drive gear
6. Ball
7. Collar
8. Bearing snap ring
• Use a pair of snap ring pliers to remove the
snap ring.
9. Ball bearing
10. Rear output shaft
l'iC\1 • Use a bench press and the bearing remover to
~ remove the ball bearing (Fig. 70-24).
Bearing remover: J-22912-01
11. Transfer rear case (with oil seal)
Fig. 70-24
Wtl INSPECTION AND REPAIR
Refer to "TRANSFER CASE ASSEMBLY" in this Section
for inspection and repair.
l•!•l REASSEMBLY
11. Transfer rear case (with oil seal)
Oil seal
replacement
• Remove the oil seal from the transfer rear case.
D • Apply engine oil to the oil seal outer surfaces. 12::::]
§1•
~·
Fill in recommended grease (BESCO L2) or
equivalent in the oil seal lip.
Use the oil seal installer to install the rear oil
seal
to the transfer rear case (Fig. 70-25).
Oil
seal installer: J-39208
Fig. 70-25
10.
Rear output shaft
9. Ball bearing
l'iC\1 • Use the ball bearing installer and the adapter to
~ instalil the ball bearing (Fig. 70-26).
Ball
bearing installer: J-37223
Adap1ter: J-37486
Fig. 70-26
8. Bearing snap ring
7. Collar
6. Ball
J.37486
5. Speedometer drive gear (Fig. 70-27)
4. Ball bearing
liC\1 • Use the ball bearing installer to install the ball
~ bearing (Fig. 70-28).
Ball
be1aring installer: J-37223
•
Page 1175 of 1928
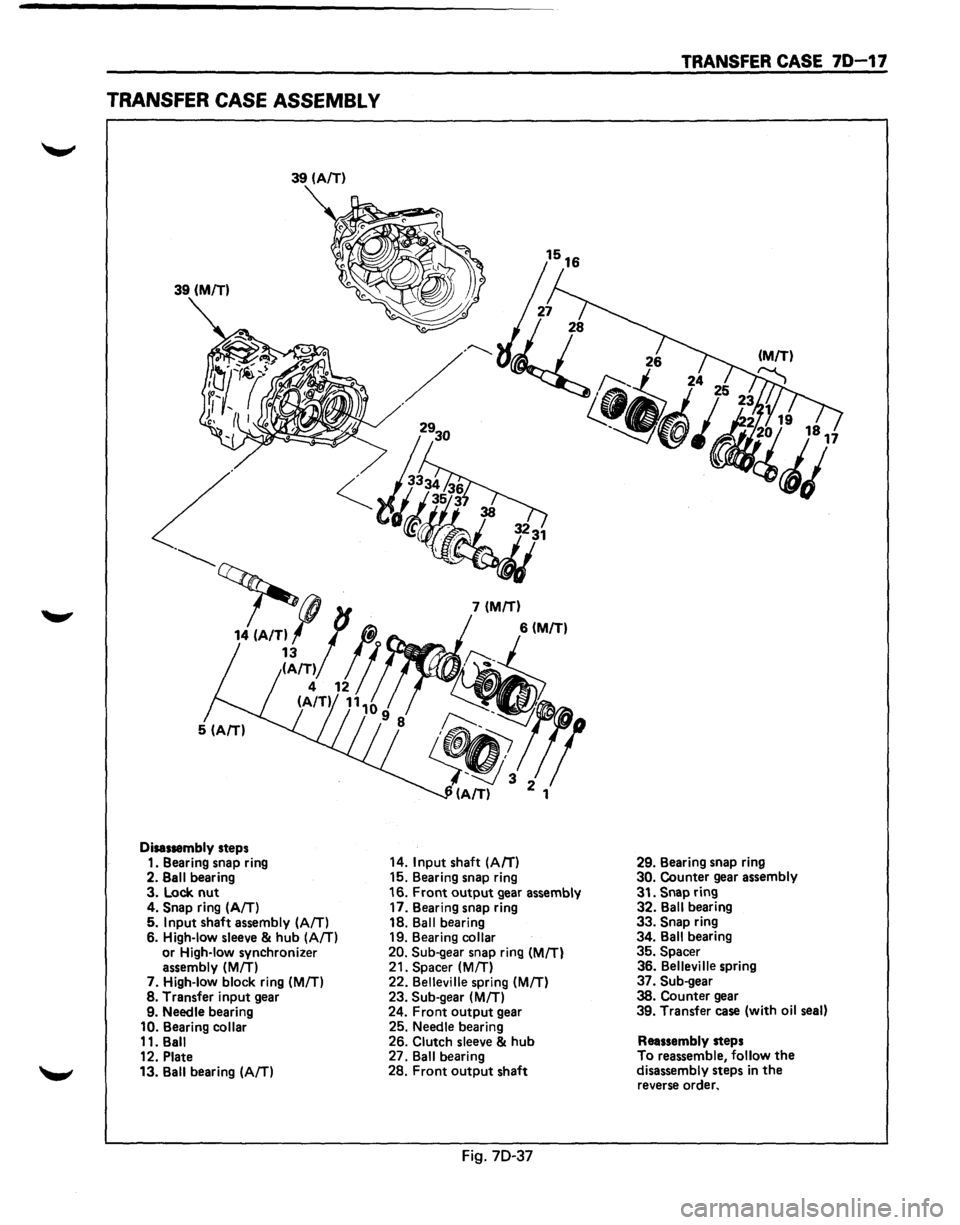
TRANSFER CASE ASSEMBL V
39 (AfT)
39
(MIT)
Disassembly steps
1. Bearing snap ring
2.
Sail bearing 3. Lock nut 4. Snap ring (AIT) 5. Input shaft assembly (AIT) 6. High-low sleeve & hub (AIT) or High-low synchronizer
assembly (MIT) 7. High-low block ring (MIT) 8. Transfer input gear
9. Needle bearing
10. Bearing collar 11. Ball
12. Plate
13. Ball bearing
(AIT)
14. Input shaft (A/T)
15. Bearing snap ring
16.
Front output gear assembly
17. Bearing snap ring
18.
Ball bearing
19. Bearing collar
20. Sub-gear snap ring (MIT) 21. Spacer (M/T)
22. Belleville spring (MIT) 23. Sub-gear (MIT) 24. Front output gear
25. Needle bearing
26.
Clutch sleeve & hub 27. Ball bearing
28. Front output shaft
Fig. 70-37
TRANSFER CASE 7D-17
29. Bearing snap ring 30. Counter gear assembly
31.
Snap ring 32. Ball bearing 33. Snap ring
34. Ball bearing
35. Spacer 36. Belleville spring
37. Sub-gear
38. Counter gear 39. Transfer case (with oil seal)
Reassembly steps
To reassemble,
follow the disassembly steps in the reverse order.
Page 1178 of 1928
70-20 TRANSFER CASE
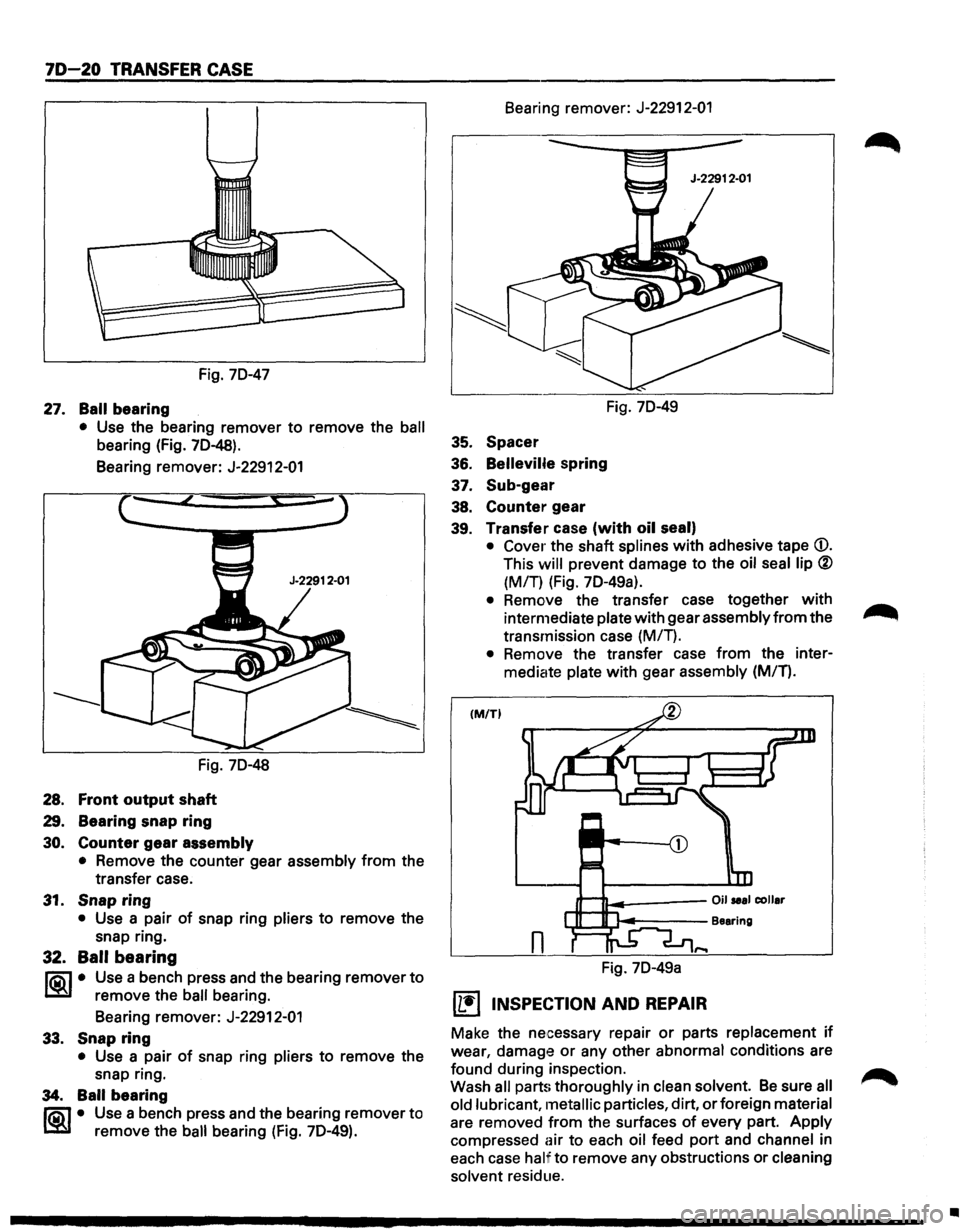
Fig. 70-47
27. Ball bearing
• Use the bearing remover to remove the ball
bearing (Fig. 70-48).
Bearing remover: J-22912-01
Fig. 70-48
28. Front output shaft
29. Bearing snap ring
30. Counter gear
assembly
• Remove the counter gear assembly from the
transfer case.
31. Snap ring
• Use a pair of snap ring pliers to remove the
snap ring.
32. Ball bearing
j®_j• Use a bench press and the bearing remover to
remove the ball bearing.
Bearing remover: J-22912-01
33. Snap ring
• Use a pair of snap ring pliers to remove the
snap ring.
34. Ball bearing
~ • Use a bench press and the bearing remover to
remove the
ball bearing (fig. 70-49). Bearing
remover: J-22912-01
Fig. 70-49
35. Spacer
36.
Bellevilfe spring
37. Sub-gear
38. Counter gear
39. Transfer case
(with oil seal)
• Cover the shaft splines with adhesive tape CD.
This will prevent damage to the oil seal lip ®
(MIT) (Fig. 70-49a).
• Remove the transfer case together with
intermediate plate with gear assembly from the ~
transmission case (MIT).
• Remove the transfer case from the inter
mediate plate
with gear assembly (MIT).
IM/TI
Fig. 70-49a
IL•I INSPECTION AND REPAIR
Make the necessary repair or parts replacement if
wear, damage or any other abnormal conditions are
found during inspection.
Wash
all parts thoroughly in clean solvent. Be sure all
old
lubricant, metallic particles, dirt, or foreign material
are removed from the surfaces
of every part. Apply
compressed
air to each oil feed port and channel in
each case
half to remove any obstructions or cleaning
solvent residue.
•
Page 1179 of 1928
GEARS
• Inspect all gear teeth for signs of excessive wear
'--" or damage and check all gear splines for burrs,
nicks,
wear or damage. Remove minor nicks or
scratches on an oil stone. Replace any part
exhibiting excessive wear or damage.
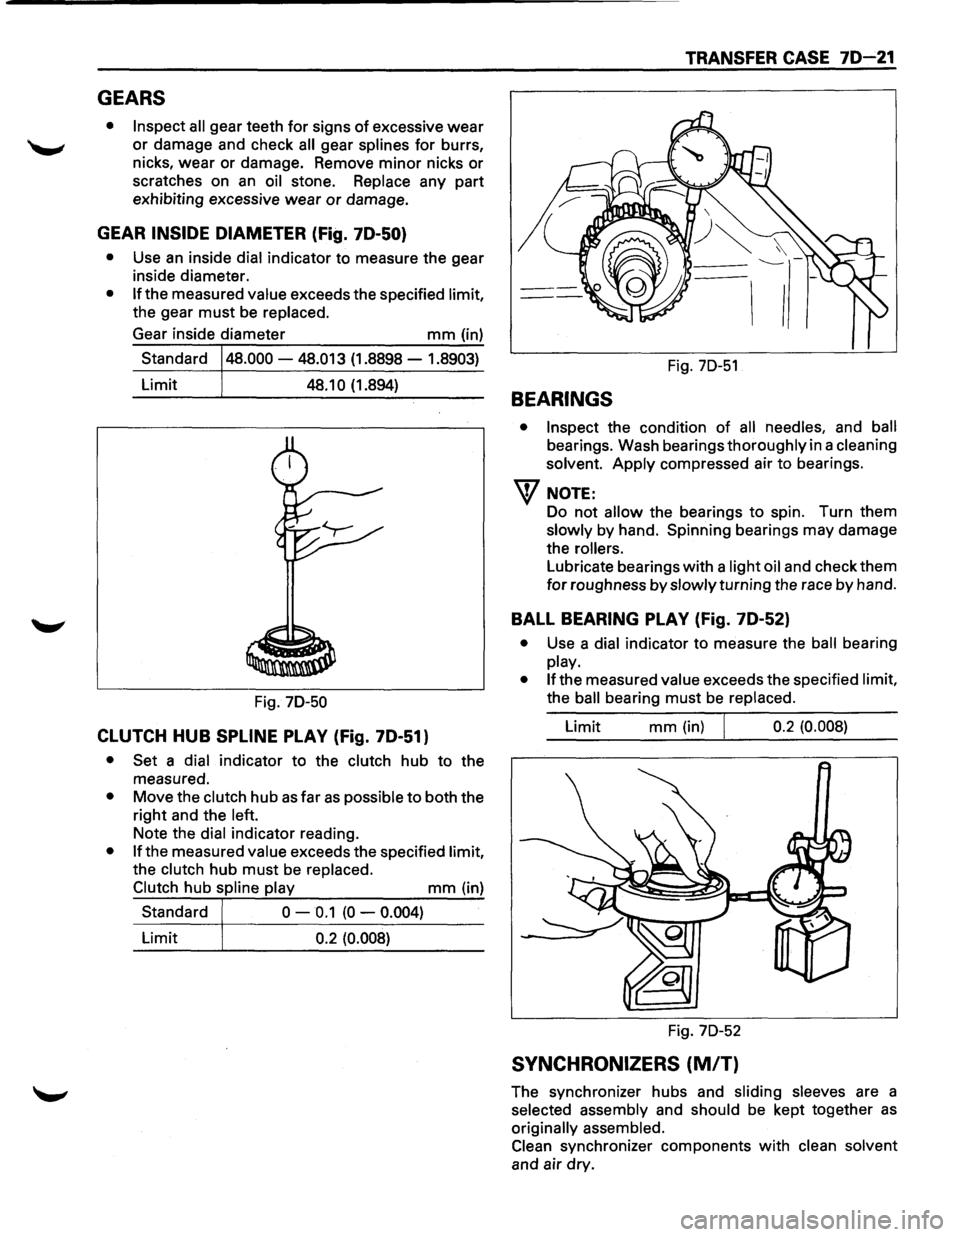
GEAR INSIDE DIAMETER (Fig. 7D-50}
• Use an inside dial indicator to measure the gear
inside diameter.
• If the measured value exceeds the specified limit,
the gear
must be replaced.
Gear inside diameter
mm (in)
Standard
48.000 -48.013 (1.8898 -1.8903)
Limit 48.1 0 (1.894)
Fig.
70-50
CLUTCH HUB SPLINE PLAY (Fig. 7D-51)
• Set a dial indicator to the clutch hub to the
measured.
• Move the clutch hub as far as possible to both the
right and the left.
Note the dial indicator reading.
• If the measured value exceeds the specified limit,
the clutch hub
must be replaced.
Clutch hub spline play
mm (in)
Standard
0 -0.1 (0 -0.004)
Limit 0.2 (0.008)
TRANSFER CASE 7D-21
I I
Fig. 70-51
BEARINGS
• Inspect the condition of all needles, and ball
bearings. Wash bearings thoroughly in a cleaning
solvent.
Apply compressed air to bearings.
W NOTE:
Do not allow the bearings to spin. Turn them
slowly by hand. Spinning bearings may damage
the
rollers.
Lubricate bearings with a light oil and check them
for roughness by slowly turning the race by hand.
BALL BEARING PLAY (Fig. 7D-52}
• Use a dial indicator to measure the ball bearing
play.
• If the measured value exceeds the specified limit,
the
ball bearing must be replaced.
Limit
mm (in) I 0.2 (0.008)
Fig. 70-52
SYNCHRONIZERS (MIT)
The synchronizer hubs and sliding sleeves are a
selected assembly and should be kept together
as
originally assembled.
Clean synchronizer components
with clean solvent
and air dry.
Page 1181 of 1928
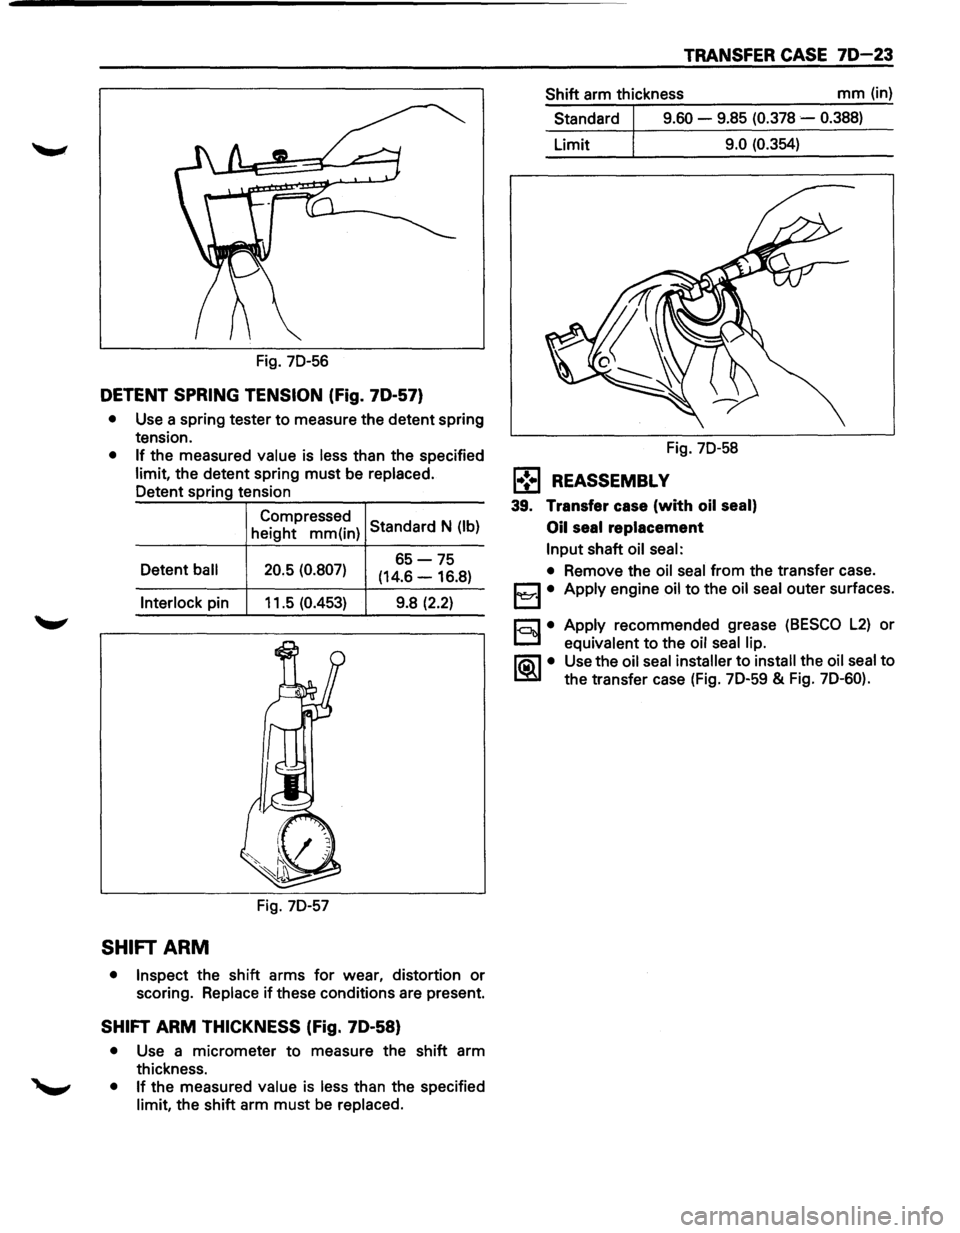
Fig. 7D-56
DETENT SPRING TENSION (Fig. 70-57)
• Use a spring tester to measure the detent spring
tension.
• If the measured value is less than the specified
limit, the detent spring must be replaced.
Detent spring tension
Compressed Standard N (lb)
height mm(in)
Detent
ball 20.5 (0.807) 65-75
(14.6 -16.8)
Interlock pin 11.5 (0.453) 9.8 (2.2)
Fig. 7D-57
SHIFT ARM
•
Inspect the shift arms for wear, distortion or
scoring. Replace
if these conditions are present.
SHIFT ARM THICKNESS (Fig. 70-58)
• Use a micrometer to measure the shift arm
thickness.
• If the measured value is less than the specified
limit, the shift arm must be replaced.
TRANSFER CASE 70-23
Shift arm thickness mm (in)
Standard
9.60 - 9.85 (0.378 -0.388)
Limit 9.0 (0.354)
Fig. 7D-58
l•!•l REASSEMBL V
39. Transfer case (with oil seal)
Oil
seal replacement
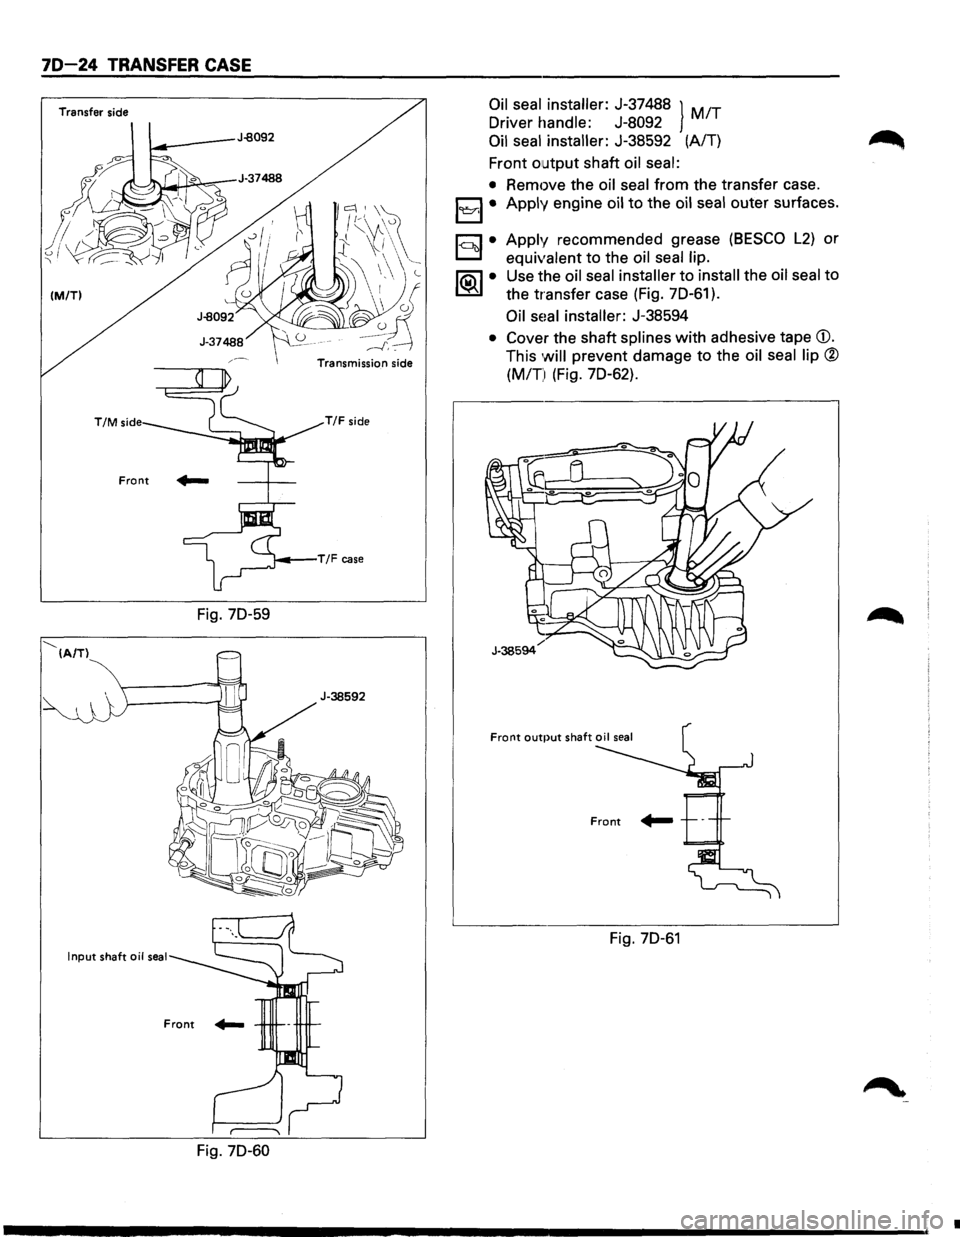
Input shaft oil seal:
• Remove the oil seal from the transfer case.
j3 • Apply engine oil to the oil seal outer surfaces.
r.:;::'l • Apply recommended grease (BESCO L2) or
D equivalent to the oil seal lip.
li:\1 • Use the oil seal installer to install the oil seal to
~ the transfer case (Fig. 7D-59 & Fig. 7D-60).
Page 1182 of 1928
70-24 TRANSFER CASE
Transfer side
(M/TI
--...___ (A/TI
T/M side
Front
Input shaft oil seal
Fig. 70-59
Fig. 70-60
lc::: I \f~ /(\A\~
t \l(
~~~
-------'"'-~'~
Transmission side
T/F side
Oil seal installer: J-37488 } MIT
Driver handle: J-8092
Oil
seal installer: J-38592 (AIT)
Front
output shaft oil seal:
• Remove the oil seal from the transfer case.
j
~·
Apply recommended grease (BESCO L2) or
equivalent to the oil seal lip.
Use the oil seal
installer to install the oil seal to
the transfer case (Fig.
70-61 ).
Oil sHal installer: J-38594
• Cover the shaft splines with adhesive tape CD.
This will prevent damage to the oil seal lip ®
(MIT) (Fig. 70-62).
Fig. 70-61
•
Page 1184 of 1928
70-26 TRANSFER CASE
Fig. 70-66
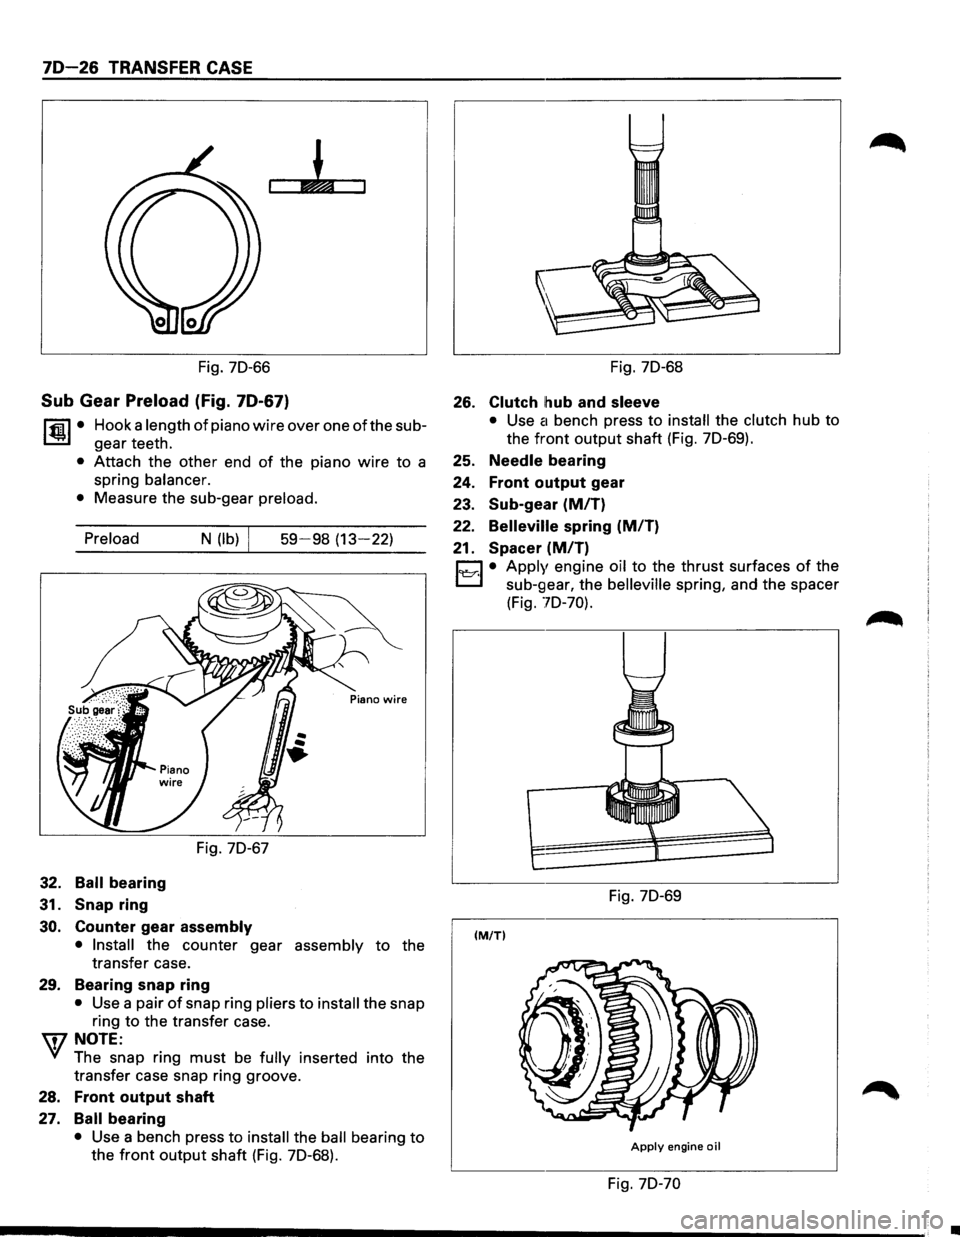
Sub Gear Preload (Fig. 70-67)
~·
Hook a length of piano wire over one of the sub
gear teeth.
• Attach the other end of the piano wire to a
spring
balancer.
•
Measure the sub-gear preload.
Preload
32. Ball bearing
31.
Snap ring
N (lb)
Fig. 70-67
30. Counter gear assembly
59-98 (13-22)
• Install the counter gear assembly to the
transfer case.
29. Bearing snap ring
• Use a pair of snap ring pliers to install the snap
ring
to the transfer case.
W NOTE:
~ The snap ring must be fully inserted into the
transfer case snap ring groove.
28. Front output shaft
27. Ball bearing
• Use a bench press to install the ball bearing to
the front output shaft (Fig. 70-68).
Fig. 70-68
26. Clutch hub and sleeve
• Use a bench press to install the clutch hub to
the front output shaft (Fig. 70-69).
25. Needle bearing
24.
Front output gear
23. Sub-gear
(MIT)
22. Belleville spring (MIT)
21. Spacer (M/T)
C1 • Apply engine oil to the thrust surfaces of the
t.::::::J sub-gear, the belleville spring, and the spacer
(Fig.
70-70).
Fig. 70-69
(M/TI
Apply engine oil
Fig. 70-70
•
Page 1187 of 1928
TRANSFER CASE 70-29
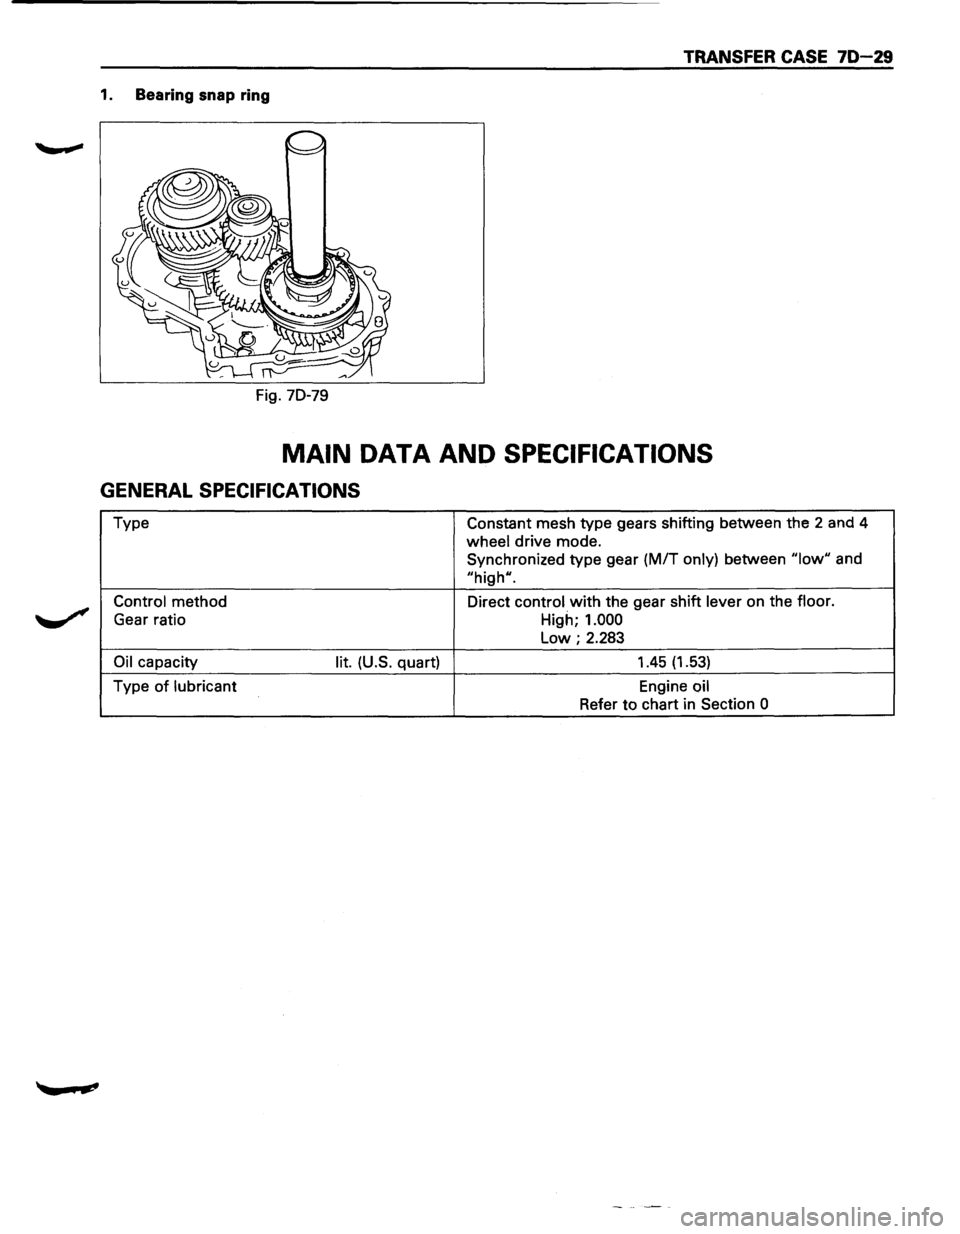
1. Bearing snap ring
Fig. 70-79
MAIN DATA AND SPECIFICATIONS
GENERAL SPECIFICATIONS
Type Constant mesh type gears shifting between the 2 and 4
wheel drive mode.
Synchronized type gear
(M/T only) between "low" and
"high".
Control method Direct control with the gear shift lever on the floor.
Gear ratio
High; 1.000
Low; 2.283
Oil capacity lit. (U.S. quart) 1.45 (1.53)
Type of lubricant Engine oil
Refer to chart in Section
0
Page 1190 of 1928
70-32 TRANSFER CASE
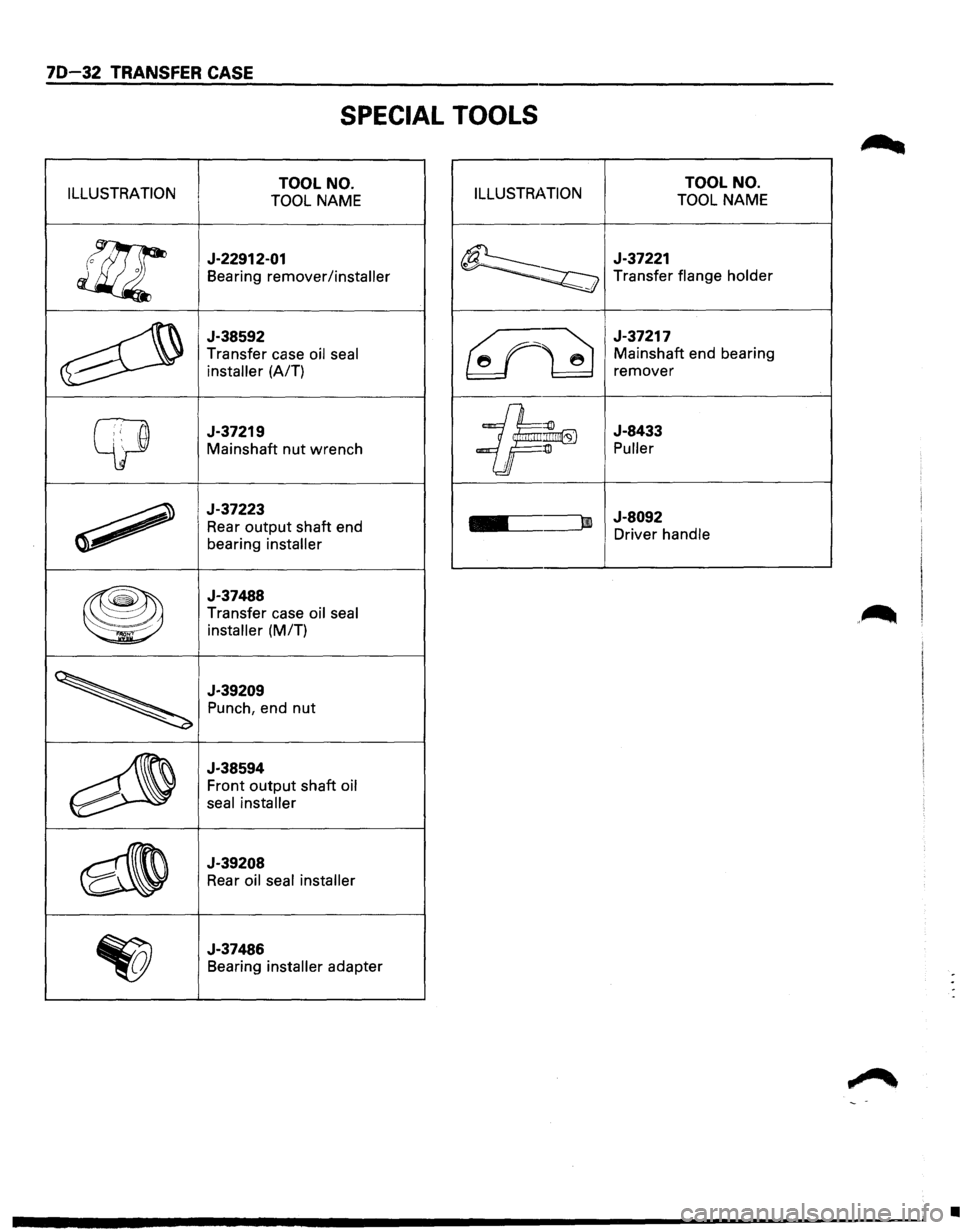
SPECIAL TOOLS
ILLUSTRATION TOOL NO.
TOOL NAME ILLUSTRATION TOOL NO.
TOOL NAME
!l!l
J-22912-01
Bearing remover/installer
~
J-37221
--~ Transfer flange holder
~
J-38592
Transfer case
oil seal
installer
(A/T) ~
J-37217 Mainshaft end bearing
remover
y
J-37219
Mainshaft nut wrench
~
J-8433
Puller 1
~
J-37223
Rear
output shaft end ..... bearing installer ===-
J-8092
-Driver handle
~
J-37488
Transfer case
oil seal
installer
(MIT)
~
J-39209
Punch, end nut
~
J-38594
Front
output shaft oil
seal installer
~
J-39208
Rear oil seal installer
~
J-37486
Bearing
installer adapter
•
Page 1198 of 1928
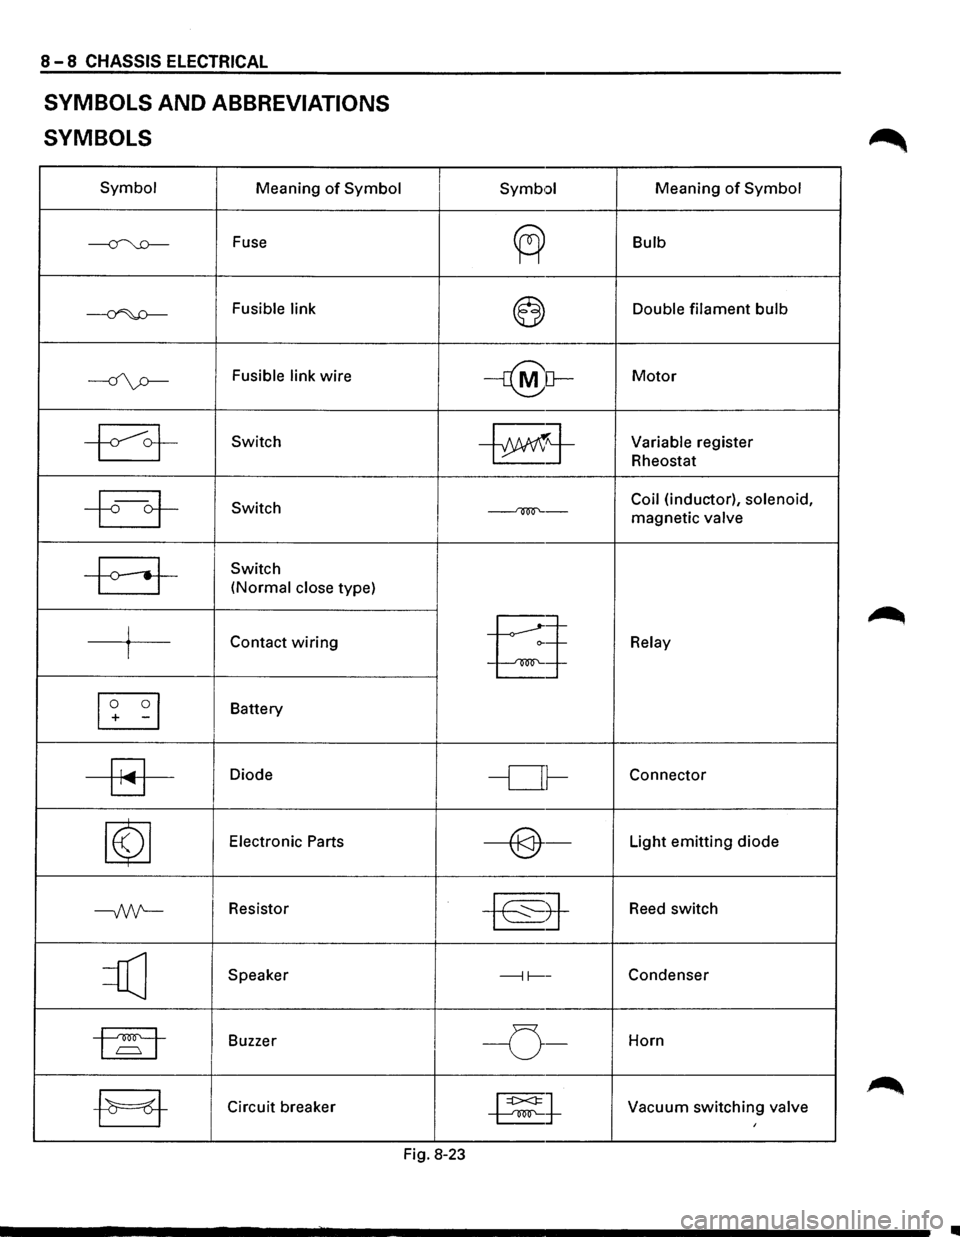
8-8 CHASSIS ELECTRICAL
SYMBOLS AND ABBREVIATIONS
SYMBOLS
Symbol Meaning of Symbol
~ Fuse
~ Fusible link
----if\p-Fusible link wire
~ Switch
~ Switch
-a-
Switch
(Normal close type)
j Contact wiring I
[I] -I
Battery
~
Diode
~
Electronic Parts
--Nt-Resistor
=Q] Speaker
1~1 Buzzer I
-EJ-Circuit breaker
I Symb•:>l Meaning of Symbol
~
Bulb
~ Double filament bulb
-r@[}-Motor
~j-Variable register
Rheostat
Coil (inductor), solenoid,
~-magnetic valve I
§
Relay
-or-Connector
----@-Light emitting diode
~8-
Reed switch
---11----Condenser
I -o-Horn
~t Vacuum switching valve I
Fig. 8-23
•