oil ISUZU TROOPER 1995 Workshop Manual
[x] Cancel search | Manufacturer: ISUZU, Model Year: 1995, Model line: TROOPER, Model: ISUZU TROOPER 1995Pages: 1928
Page 1133 of 1928
MANUAL TRANSMISSION 78-43
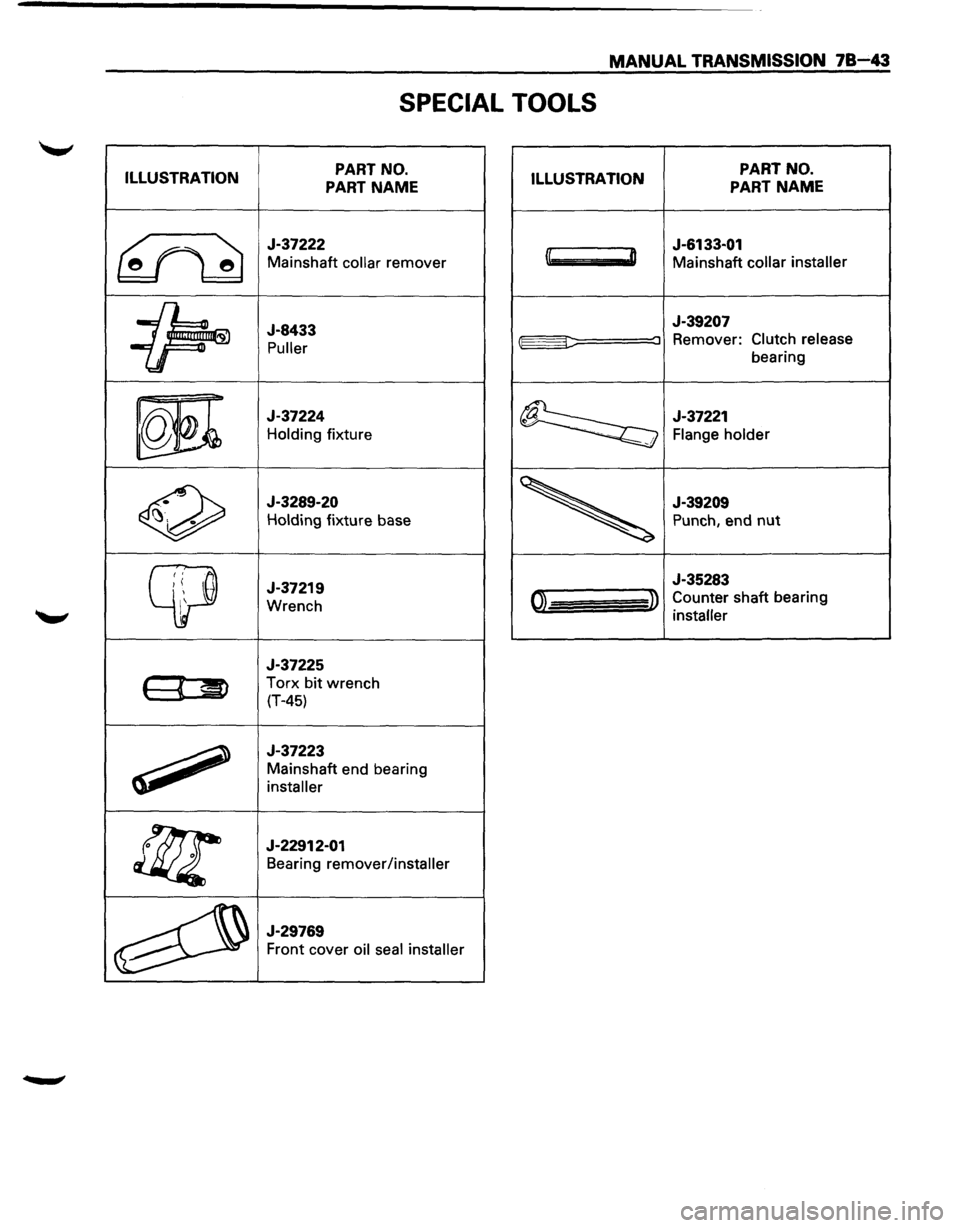
SPECIAL TOOLS
ILLUSTRATION PART
NO.
PART NAME ILLUSTRATION PART
NO.
PART NAME
~
J-37222
Mainshaft collar remover
J-6133-01
l~ D Mainshaft collar installer
~
J-8433
Puller
J-39207
::::: :J Remover: Clutch release
bearing
m
J-37224
Holding fixture ~
J-37221
Flange holder !.
0
J-3289-20
Holding fixture base
J-39209
Punch, end nut
~
J-37219
Wrench I '
J-35283
01 » Counter shaft bearing
installer
J-37225
( « ~ Torx bit wrench
(T-45)
~
J-37223
Mainshaft end bearing
installer
!f;r
J-22912-01
Bearing remover/installer
~
J-29769
Front cover oil seal installer
Page 1139 of 1928
CLUTCH 7C-5
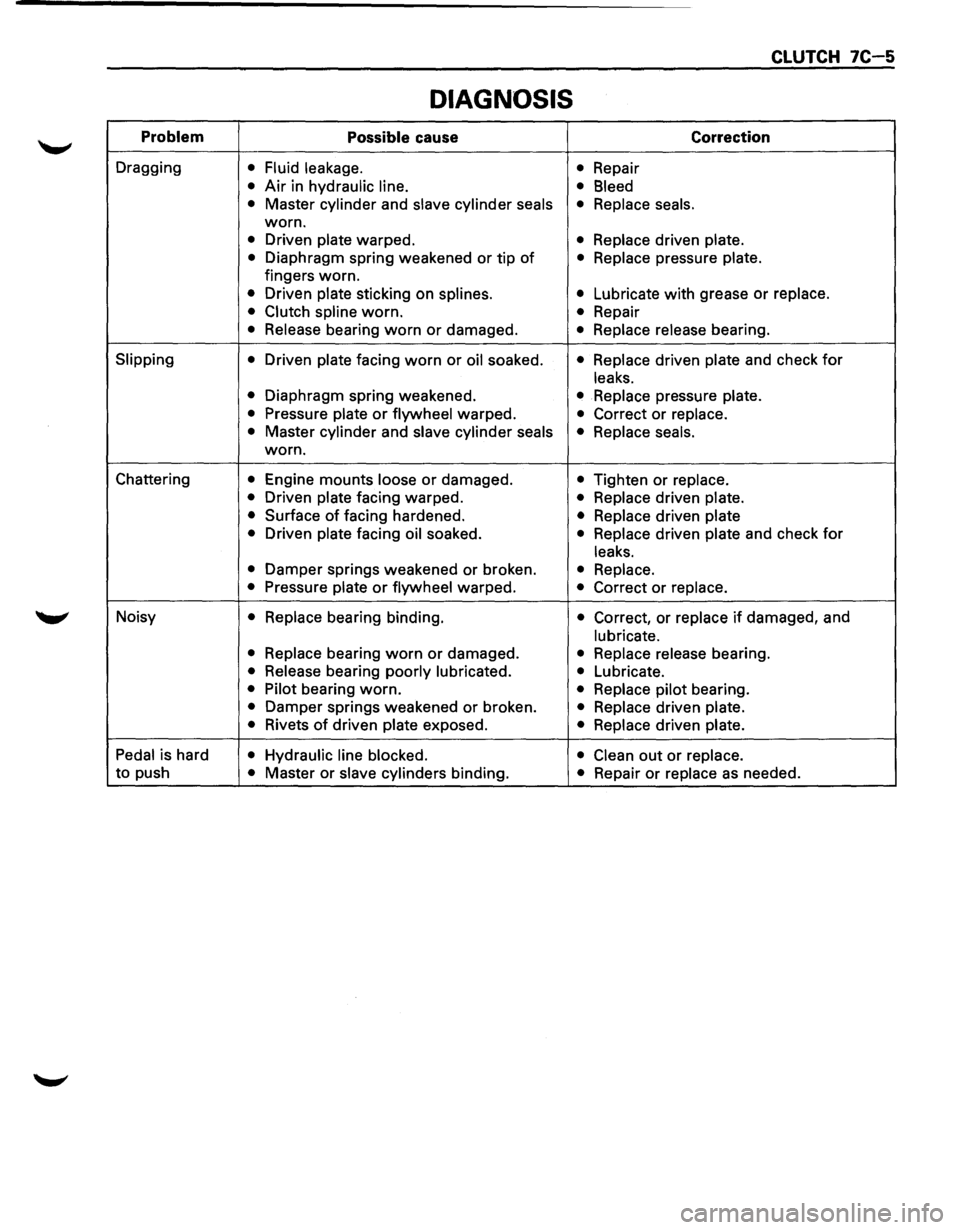
DIAGNOSIS
Problem Possible cause Correction
Dragging • Fluid leakage.
• Repair
• Air in hydraulic line.
• Bleed
•
Master cylinder and slave cylinder seals • Replace seals.
worn.
• Driven plate warped. • Replace driven plate.
•
Diaphragm spring weakened or tip of • Replace pressure plate.
fingers worn.
• Driven plate sticking on splines. • Lubricate with grease or replace.
• Clutch spline
worn. • Repair
• Release bearing worn or damaged. • Replace release bearing.
Slipping
• Driven plate facing worn or oil soaked. • Replace driven plate and check for
leaks.
•
Diaphragm spring weakened. • Replace pressure plate.
•
Pressure plate or flywheel warped. • Correct or replace.
•
Master cylinder and slave cylinder seals
• Replace seals.
worn.
Chattering
• Engine mounts loose or damaged. • Tighten or replace.
•
Driven plate facing warped. • Replace driven plate.
•
Surface of facing hardened. • Replace driven plate
•
Driven plate facing oil soaked. • Replace driven plate and check for
leaks.
•
Damper springs weakened or broken. • Replace.
•
Pressure plate or flywheel warped. • Correct or replace.
Noisy • Replace bearing binding. • Correct, or replace if damaged, and
lubricate.
• Replace
bearing worn or damaged. • Replace release bearing.
• Release bearing poorly lubricated.
• Lubricate.
• Pilot bearing worn. • Replace pilot bearing.
• Damper springs weakened or broken. • Replace driven plate.
•
Rivets of driven plate exposed. • Replace driven plate.
Pedal
is hard • Hydraulic line blocked.
• Clean out or replace.
to push • Master or slave cylinders binding. • Repair or replace as needed.
Page 1143 of 1928
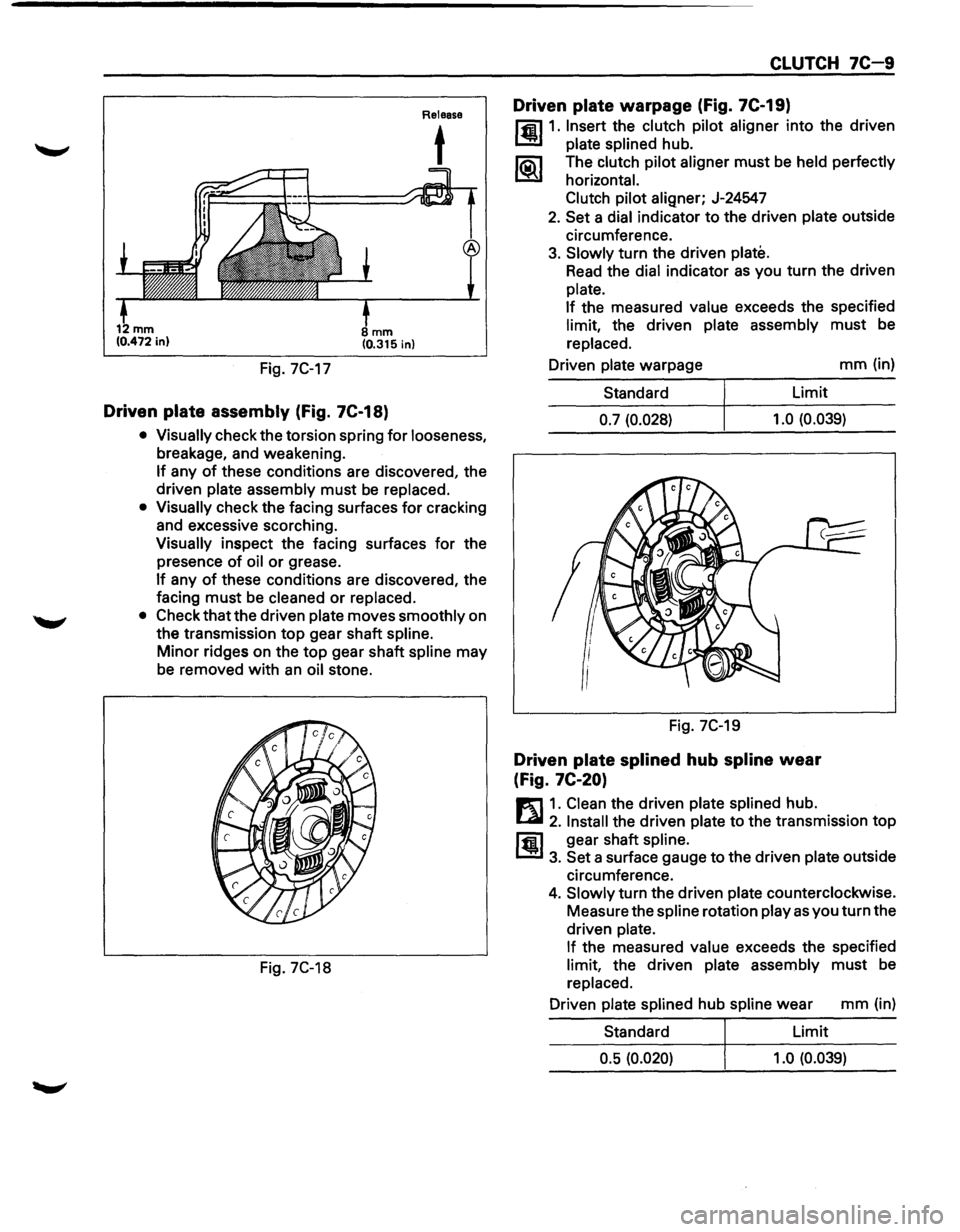
Fig. 7C-17
mm (0.315 in)
Driven plate assembly (Fig. 7C-18)
Release
t
• Visually check the torsion spring for looseness,
breakage, and weakening.
If any of these conditions are discovered, the
driven
plate assembly must be replaced.
• Visually check the facing surfaces for cracking
and excessive scorching.
Visually inspect the facing surfaces for the
presence
of oil or grease.
If any of these conditions are discovered, the
facing
must be cleaned or replaced.
• Check that the driven plate moves smoothly on
the transmission
top gear shaft spline.
Minor ridges on the top gear shaft spline may
be removed
with an oil stone.
Fig. 7C-18
CLUTCH 7C-9
Driven plate warpage (Fig. 7C-19)
l'fil1. Insert the clutch pilot aligner into the driven
1.!!!1 plate splined hub.
li5\l The clutch pilot aligner must be held perfectly
I.::2Y horizontal.
Clutch pilot
aligner; J-24547
2. Set a dial indicator to the driven plate outside
circumference.
3. Slowly turn the driven plate.
Read the dial indicator as you turn the driven
plate.
If
the measured value exceeds the specified
limit, the driven plate assembly must be
replaced.
Driven
plate warpage mm (in)
Standard Limit
0.7 (0.028) 1.0
(0.039)
Fig. 7C-19
Driven plate splined hub spline wear
(Fig.
7C-20)
E1 1. Clean the driven plate splined hub.
l...al 2. Install the driven plate to the transmission top
ffi1 gear shaft spline.
1.!!1 3. Set a surface gauge to the driven plate outside
circumference.
4. Slowly turn the driven plate counterclockwise.
Measure the
spline rotation play as you turn the
driven
plate.
If
the measured value exceeds the specified
limit, the driven plate assembly must be
replaced.
Driven
plate splined hub spline wear mm (in)
Standard Limit
0.5 (0.020) 1.0 (0.039)
Page 1145 of 1928
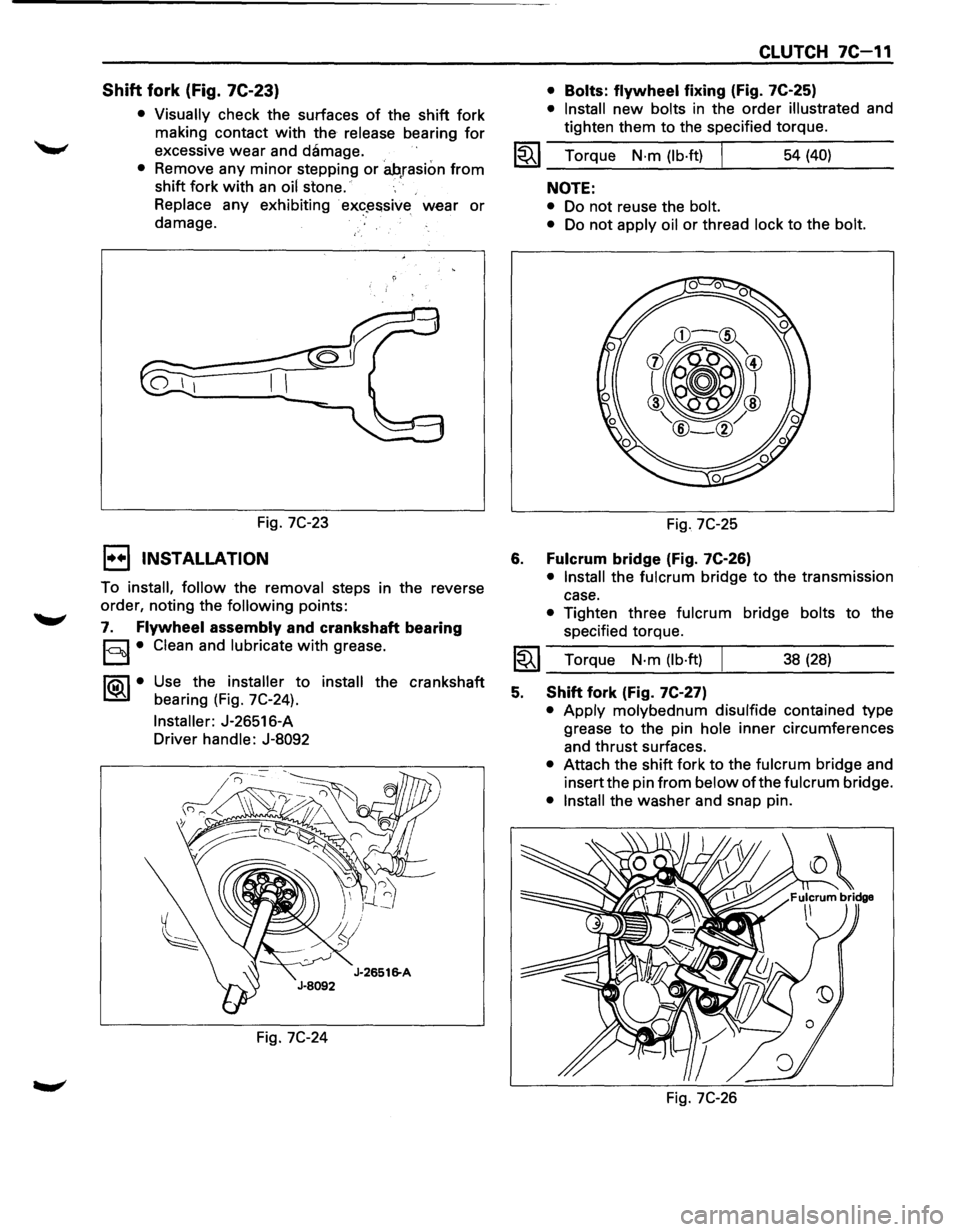
Shift fork (Fig. 7C-23)
• Visually check the surfaces of the shift fork
making contact
with the release bearing for
excessive wear and damage.
• Remove any minor stepping or ah,rasion from
shift fork with an oil stone.
Replace any exhibiting
· ex«?~ssive wear or
damage.
Fig.
7C-23
1••1 INSTALLATION
To install, follow the removal steps in the reverse
order, noting the
following points:
7. Flywheel assembly and crankshaft bearing
§I• Clean and lubricate with grease.
1®..1• Use the installer to install the crankshaft
bearing (Fig. 7C-24).
Installer: J-26516-A
Driver handle: J-8092
Fig.
7C-24
CLUTCH 7C-11
• Bolts: flywheel fixing (Fig. 7C-25)
• Install new bolts in the order illustrated and
tighten them to the specified torque.
1~1 Torque N·m (lb·ft) I 54 (40)
6.
NOTE:
• Do not reuse the bolt.
•
Do not apply oil or thread lock to the bolt.
Fig. 7C-25
Fulcrum bridge (Fig. 7C-26)
• Install the fulcrum bridge to the transmission
case.
• Tighten three fulcrum bridge bolts to the
specified torque.
I~I __ T_o_rq~u_e __ N_·_m~(_lb_·ft_l~ _____ 3_8_(_28_) ____ _
5. Shift fork (Fig. 7C-27)
• Apply molybednum disulfide contained type
grease
to the pin hole inner circumferences
and thrust surfaces.
• Attach the shift fork to the fulcrum bridge and
insert the pin
from below of the fulcrum bridge.
• Install the washer and snap pin.
Fig.
7C-26
Page 1147 of 1928
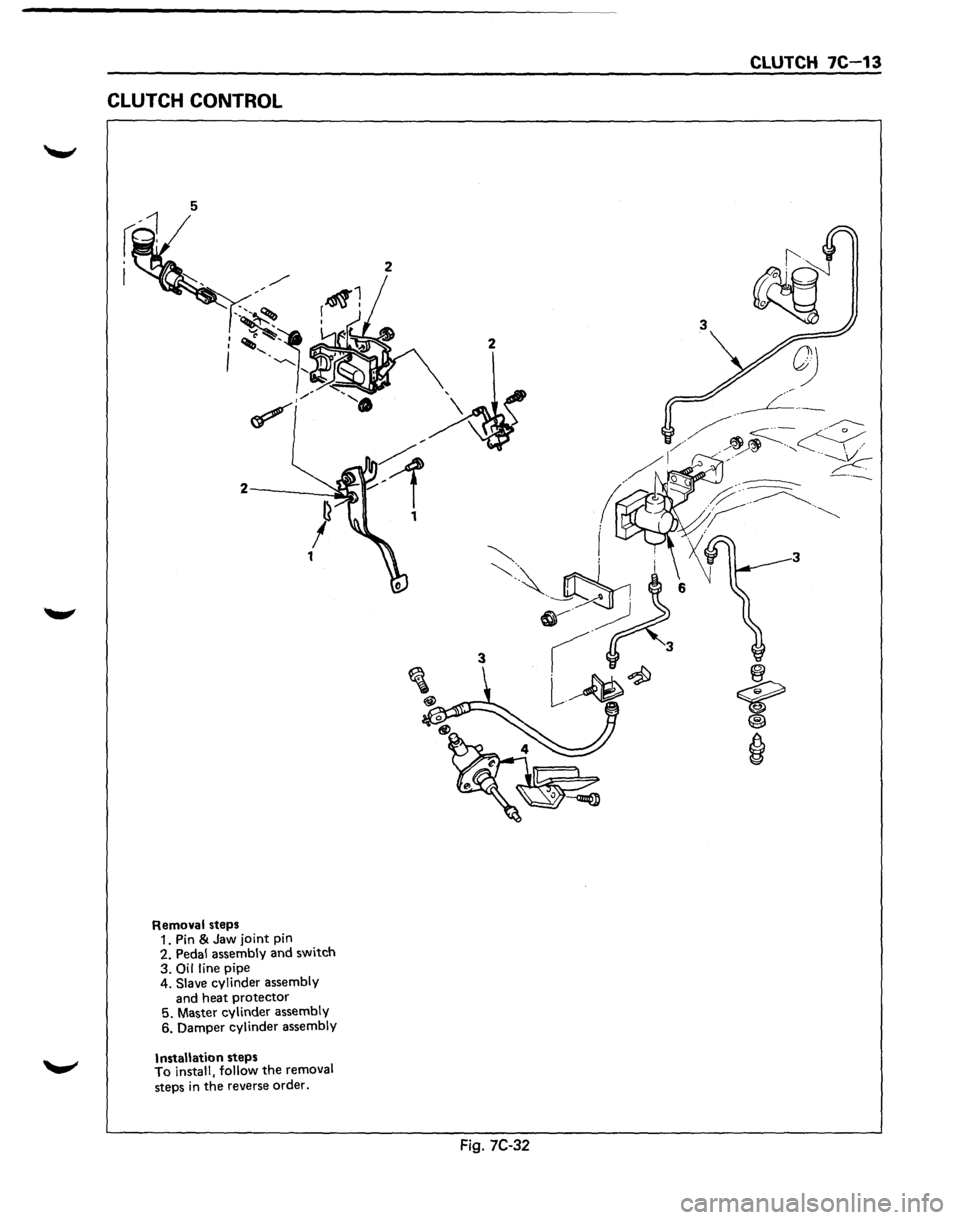
CLUTCH CONTROL
5
Removal steps
1. Pin & Jaw joint pin
2. Pedal assembly and switch
3.
Oil line pipe
4. Slave cylinder assembly
and heat protector
5. Master cylinder assembly
6. Damper cylinder assembly
Installation steps
To install, follow the removal
steps
in the reverse order.
CLUTCH 7C 13
Fig. 7C-32
Page 1148 of 1928
7C 14 CLUTCH
1••1 REMOVAL
1. Pin and jaw joint pin
2. Pedal assembly and switch
3. Oil line pipe
4. Slave cylinder assembly and heat protector
5. Master cylinder assembly
6. Damper cylinder assembly
ll.•l INSPECTION AND REPAIR
Make necessary adjustments, repairs, and part
replacement
if wear, damage or other problems are
discovered during inspection.
1••1 INSTALLATION
To install, follow the removal steps in the reverse
order, noting the
following points:
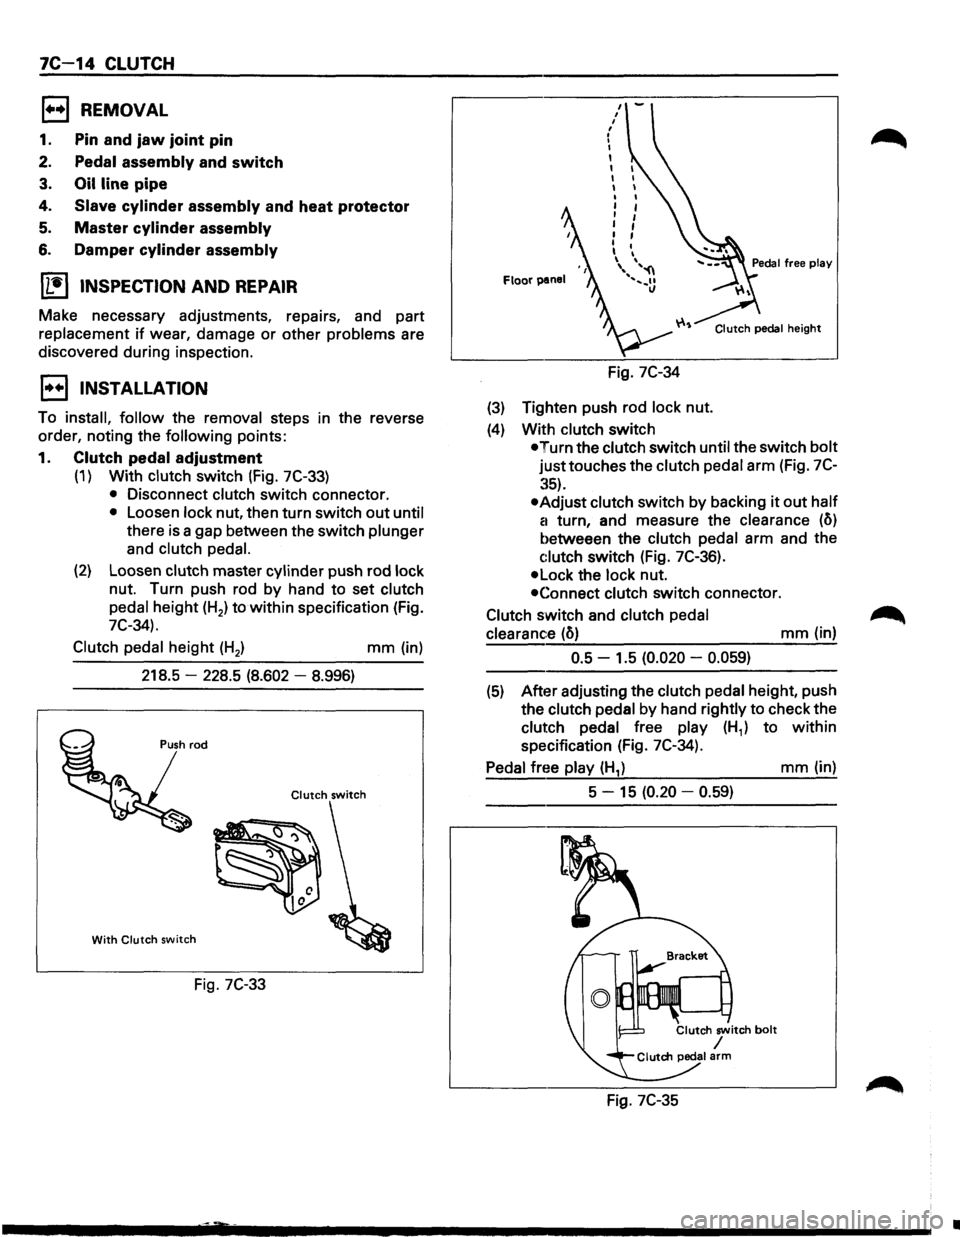
1. Clutch pedal adjustment
(1) With clutch switch (Fig. 7C-33)
• Disconnect clutch switch connector.
• Loosen lock nut, then turn switch out until
there is a gap between the switch plunger
and
clutch pedal.
(2) Loosen clutch master cylinder push rod lock
nut. Turn push rod by hand to set clutch
pedal height (H2) to
within specification (Fig.
7C-34).
Clutch
pedal height (H2 ) mm (in)
218.5
-228.5 (8.602 -8.996)
Clutch switch
With Clutch switch
Fig. 7C-33
Floor panel
Fig. 7C-34
(3) Tighten push rod lock nut.
(4) With clutch switch
Clutch pedal height
•Turn the clutch switch until the switch bolt
justtouches the clutch pedal arm (Fig. 7C
:~5).
•Adjust clutch switch by backing it out half
a
turn, and measure the clearance (o)
betweeen the clutch pedal arm and the
c:lutch switch (Fig. 7C-36).
•Lock the lock nut.
•Connect clutch switch connector.
Clutch switch and clutch
pedal
clearance
(o) mm (in)
0.5 -1.5 (0.020 -0.059)
(5) After adjusting the clutch pedal height, push
the clutch pedal
by hand rightly to check the
clutch pedal free play (H1) to within
specification (Fig. 7C-34).
Pedal free play (H1) mm (in)
5 -
15 (0.20 -0.59)
Fig. 7C-35
•
Page 1159 of 1928
TRANSFER CASE 7D-1
SECTION 70
TRANSFER CASE
w CAUTION:
When fasteners are removed, always reinstall them at the same location from which they were removed. If a
fastener needs
to be replaced, use the correct part number fastener for that application. If the correct part
number is not available, a fastener
of equal size and strength (or stronger) may be used. Fasteners that are
not reused, and those requiring thread locking compound, will
be called out. The correct torque values must
be used when installing fasteners that require torque.
If the above conditions are not followed, parts or
system damage could result.
CONTENTS
General Description ................... 7D-1
Construction . . . . . . . . . . . . . . . . . . . . . . . . . 7D-2
On-Vehicle Service .................... 7D-3
Transfer
Case (A/T) .................. 7D-3
Transfer Rear
Oil Seal ................ 7D-5
Unit Repair ........................... 7D-8
Transfer
Case Assembly (AfT) ........ 7D-8
Transfer Rear
Case Assembly . .
. . . . . 7D-11
Detent, Shift Arm, And
Interlock Pin (Transfer
Case Assembly) . .
. . . . . . . . . . . . . . . . . . 7D-14 Transfer
Case
Assembly . .
. . . . . . . . . .
7D-17
Main Data And Specifications . . . . . . . .
70-29
General
Specifications . .
. . . . . . . . . . . .
70-29
Torque
Specifications ............... 7D-30
Special Tools
........................ 7D-32
GENERAL DESCRIPTION
The transfer case is used to provide a means of
providing power flow to the front axle. The transfer
case also provides a means of disconnecting the front
axle, providing better fuel economy and quieter
operation when the vehicle is driven
on improved
roads where four wheel drive is not required.
In
addition, the transfer case provides an additional gear
reduction when placed in low range, which
is useful
when difficult off-road conditions are encountered. A
floor mounted shift lever is used to select the
operating range. When four wheel drive has been
selected, the four wheel drive indicator light is
designed to come
on when the front axle has been
engaged.
Page 1163 of 1928
46/34
30
T/F Case
T/M case
+/F Case
T/M Case
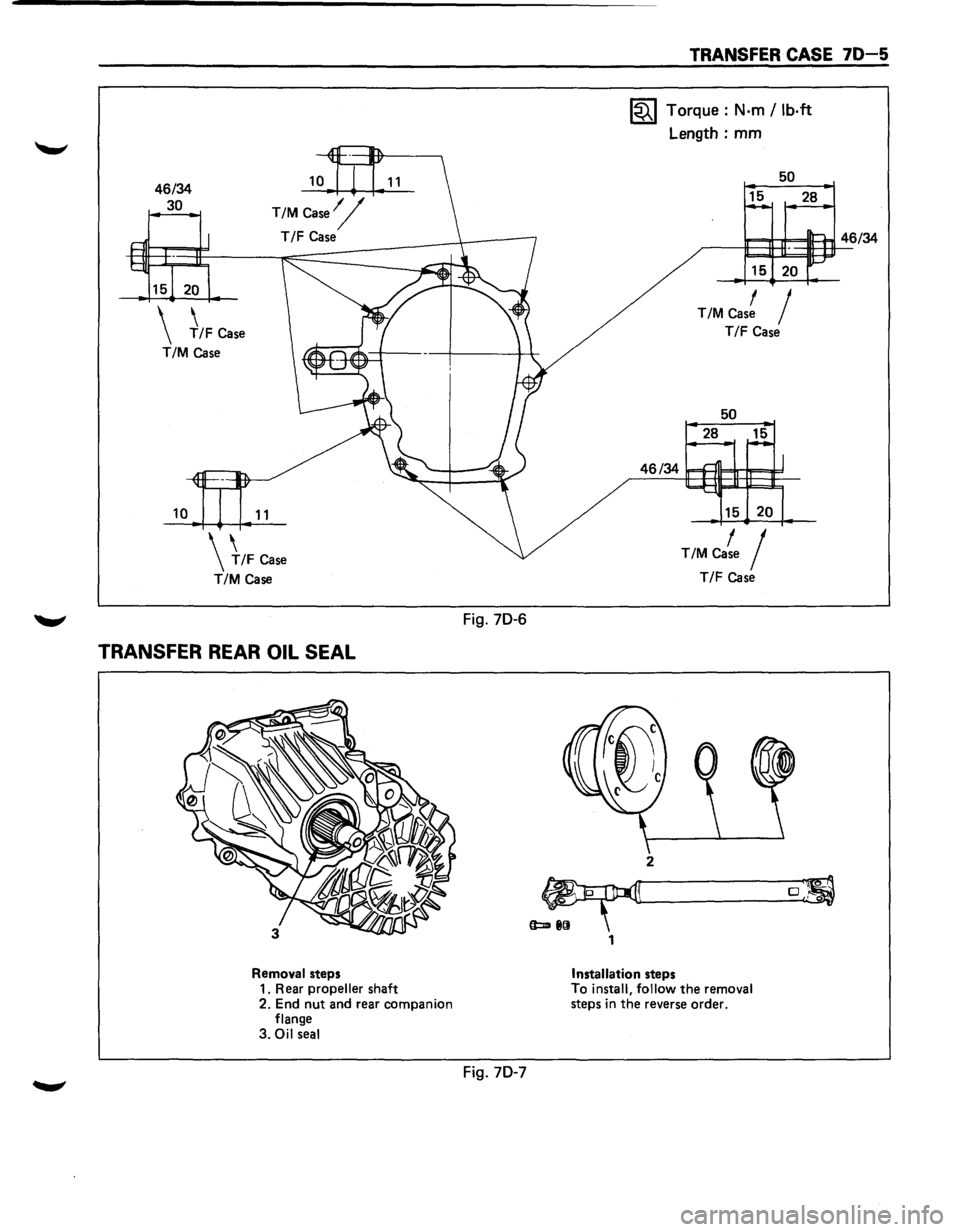
TRANSFER REAR OIL SEAL
Removal steps
1. Rear propeller shaft
2. End nut and rear companion
flange
3.
Oil seal
Fig. 70-6
Fig. 70-7
1
TRANSFER CASE 70-5
1~1 Torque: N·m /lb·ft
Length: mm
50
15 28
15 20
T/M Cas! I
T/F Case
50
28 15
T/M Ca~e I
T/F case
2
0 ,""o
Installation steps
To install, follow the removal
steps in the reverse order.
Page 1164 of 1928
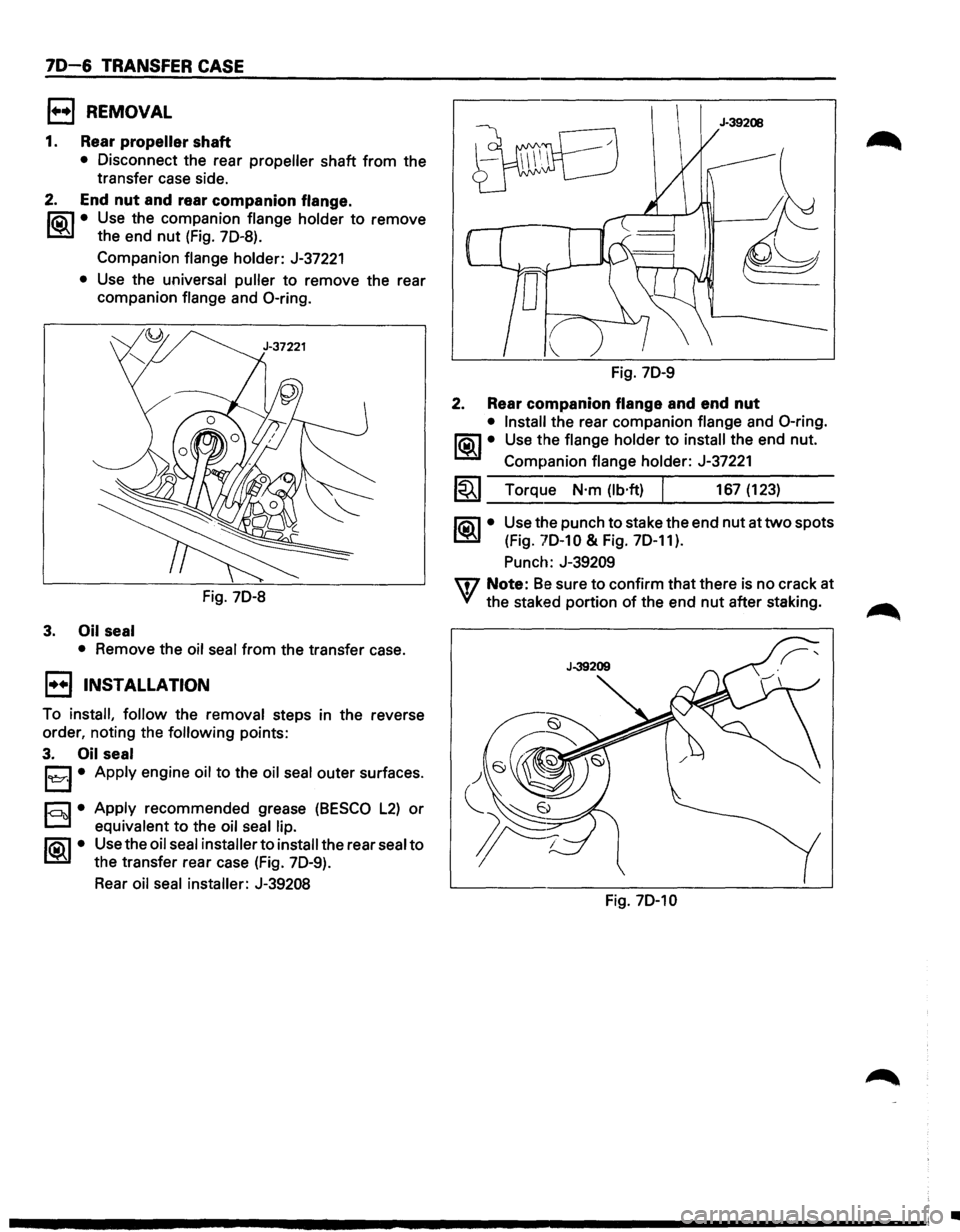
70-6 TRANSFER CASE
EJ REMOVAL
1. Rear propeller shaft
• Disconnect the rear propeller shaft from the
transfer case side.
2. End nut and rear companion flange.
li5\l • Use the companion flange holder to remove
~ the end nut (Fig. 70-8).
Companion flange holder: J-37221
• Use the universal puller to remove the rear
companion flange and 0-ring.
Fig. 70-8
3. Oil seal
•
Remove the oil seal from the transfer case.
1••1 INSTALLATION
To install, follow the removal steps in the reverse
order, noting the
following points:
3. Oil seal
l
D equivalent to the oil seal lip.
li5\l • Use the oil seal installer to install the rear seal to
~ the transfer rear case (Fig. 70-9).
Rear oil seal installer: J-39208
Fig. 70-9
2. Rear companion flange and end nut
• Install the rear companion flange and 0-ring.
l<9l..l• Use the flange holder to install the end nut.
Companion flange holder:
J-37221
1~1 Torque N·m (lb·ft) I 167 (123)
~·
Use the punch to stake the end nut at two spots
(Fig.
70-10 & Fig. 70-11).
Punch: J-39209
m Note: Be sure to confirm that there is no crack at
VI the staked portion of the end nut after staking.
Fig. 70-10
•
Page 1169 of 1928
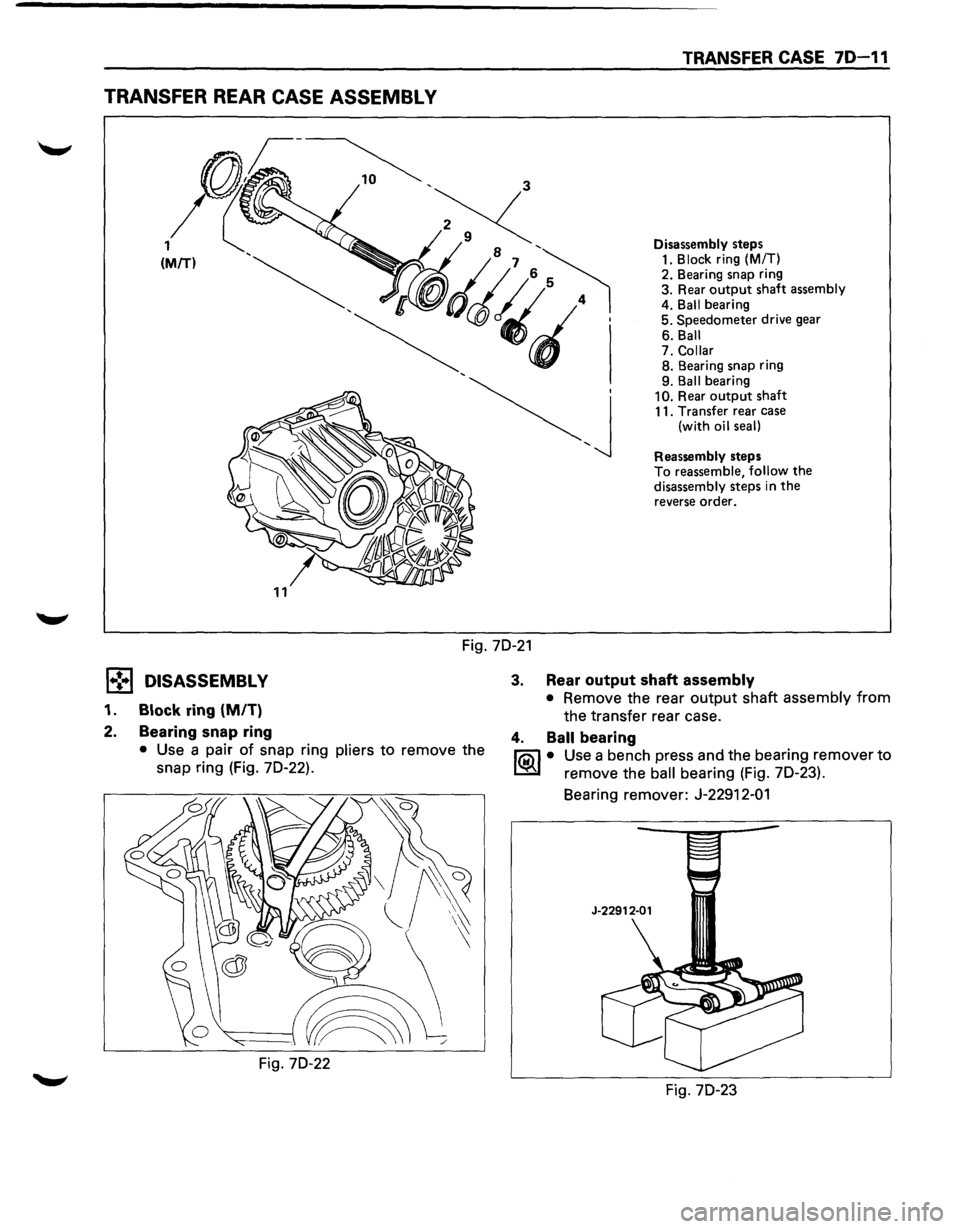
TRANSFER REAR CASE ASSEMBL V
TRANSFER CASE 70-11
Disassembly steps 1. Block ring (M/T)
2. Bearing snap ring
3. Rear
output shaft assembly
4. Ball bearing
5. Speedometer drive gear
6. Ball
7.
Collar 8. Bearing snap ring
9. Ball bearing
10. Rear output shaft 11. Transfer rear case
(with oil seal)
Reassembly steps
To reassemble, follow the disassembly steps in the reverse order.
Fig. 70-21
l•!•l DISASSEMBLY
1. Block ring (MIT)
2. Bearing snap ring
• Use a pair of snap ring pliers to remove the
snap ring (Fig. 70-22).
Fig. 70-22
3. Rear output shaft assembly
• Remove the rear output shaft assembly from
the transfer rear case.
4. Ball bearing
I'Qi) • Use a bench press and the bearing remover to
~ remove the ball bearing (Fig. 70-23).
Bearing remover:
J-22912-01
J-22912-01
Fig. 70-23