key ISUZU TROOPER 1995 Repair Manual
[x] Cancel search | Manufacturer: ISUZU, Model Year: 1995, Model line: TROOPER, Model: ISUZU TROOPER 1995Pages: 1928
Page 481 of 1928
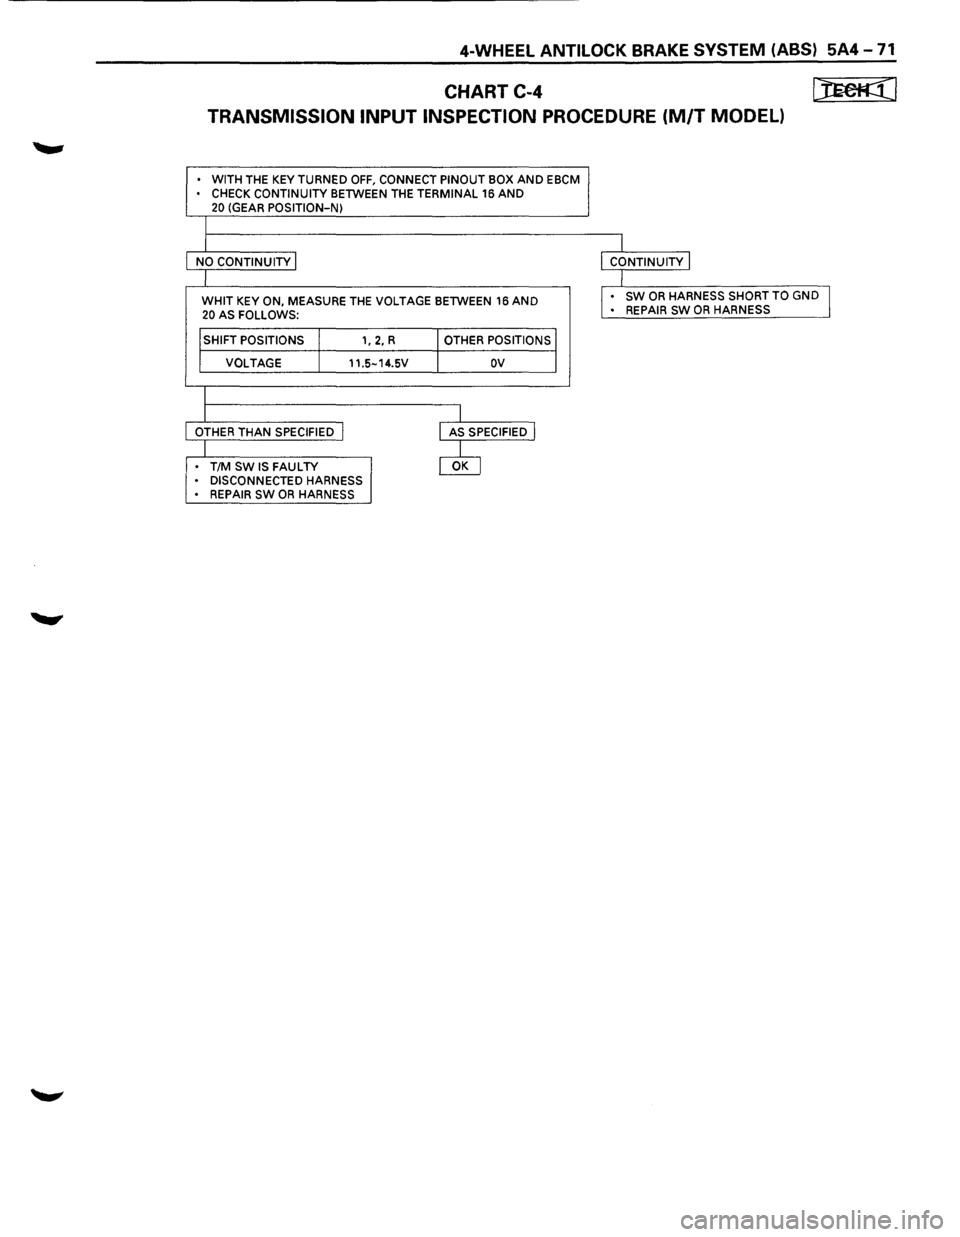
4-WHEEL ANTILOCK BRAKE SYSTEM (ABS) 5A4 -71
CHART C-4 [JEefl:(l
TRANSMISSION INPUT INSPECTION PROCEDURE (M/T MODEL)
• WITH THE KEY TURNED OFF, CONNECT PINOUT BOX AND EBCM • CHECK CONTINUITY BETWEEN THE TERMINAL 16 AND 20 (GEAR POSITION-N)
I
I I
NO
CONTINUITY I I CONTINUITY I
I I
WHIT KEY ON, MEASURE
THE VOLTAGE BETWEEN 16 AND I . sw OR HARNESS SHORT TO GND I
20 AS FOLLOWS: •
REPAIR SW OR HARNESS
I SHIFT POSITIONS I 1, 2, R I OTHER POSITIONS I
I
VOLTAGE I 11.5-14.5V I ov I
I
I I
OTHER THAN SPECIFIED I
I AS SPECIFIED I
I @ . T/M SW IS FAULTY • DISCONNECTED HARNESS • REPAIR SW OR HARNESS
Page 660 of 1928
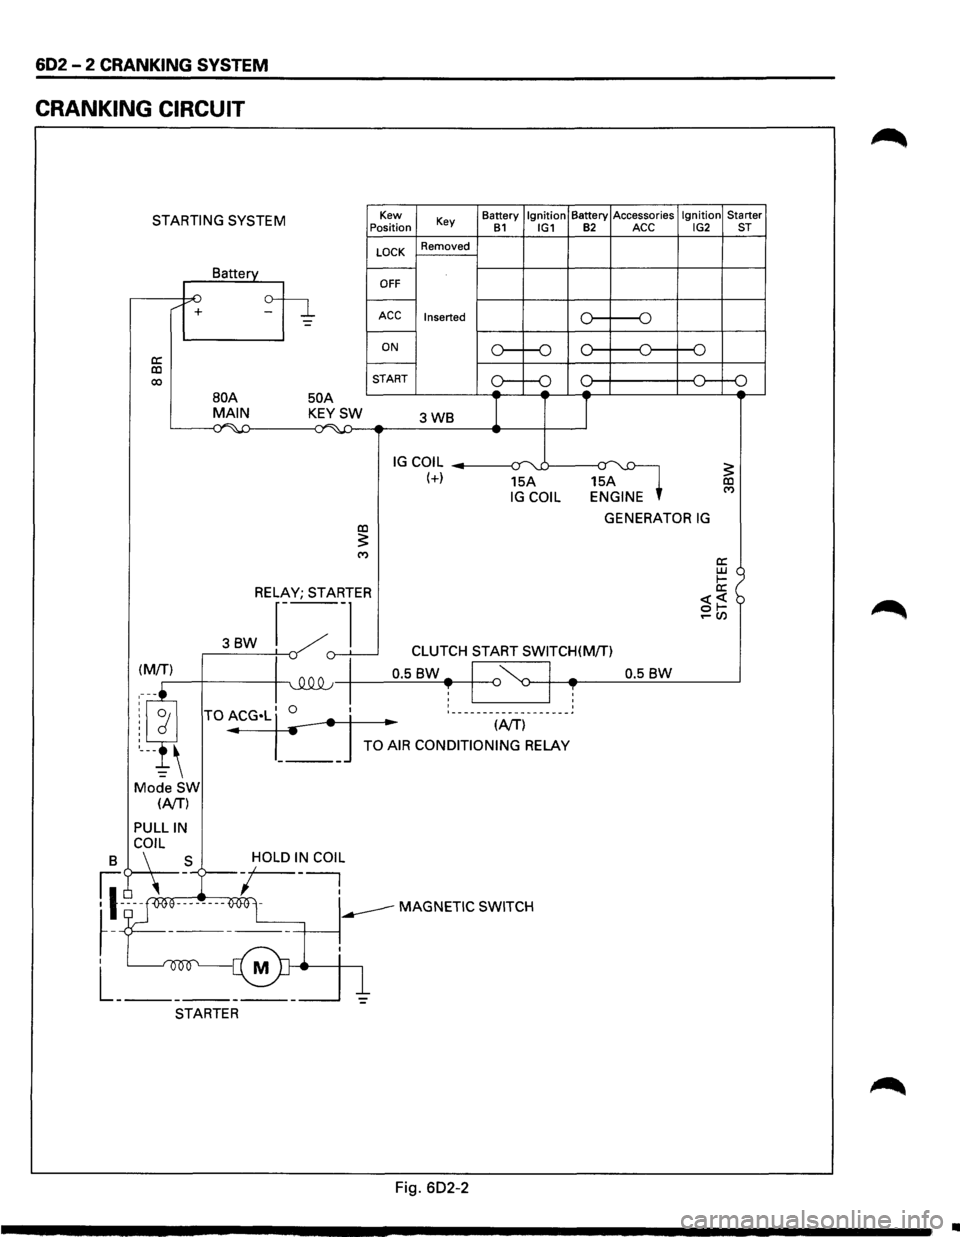
602 - 2 CRANKING SYSTEM
CRANKING CIRCUIT
STARTING SYSTEM
a: co 00
/ +
Battery
50 A
Kew
Position
LOCK
OFF
Key
Removed
ACC Inserted
ON
START Battery
Ignition Battery
Accessories Ignition Starter B1 IG1 B2 ACC IG2 ST
o----o
o----o
oc l---+----+--<0---o
BOA MAIN KEYSW 3WB I I ~~ ...;~-4:) -
IG COIL --------1~-:r uJ----a~ (+) 15A 15A IG COIL ENGINE
GENERATOR IG co :5: ('f)
RELAY; STARTER
3BW r---~
._,()-.L___j -v CLUTCH START SWITCH(M/T)
0.5
BW-I '~ I -0.5 BW ~-+-4~--~~~------~ T I ~ I T : ___________________ ~
.. (NT)
TO AIR CONDITIONING RELAY
Mode SW (NT)
PULLIN
B C\~L _S -/OLD I~ COl~
fl-~ooe--------O<>Ol -----MAGNETIC SWITCH
~-T ------+-----~.
I M
L _______ _
STARTER
Fig. 602-2
•
Page 665 of 1928
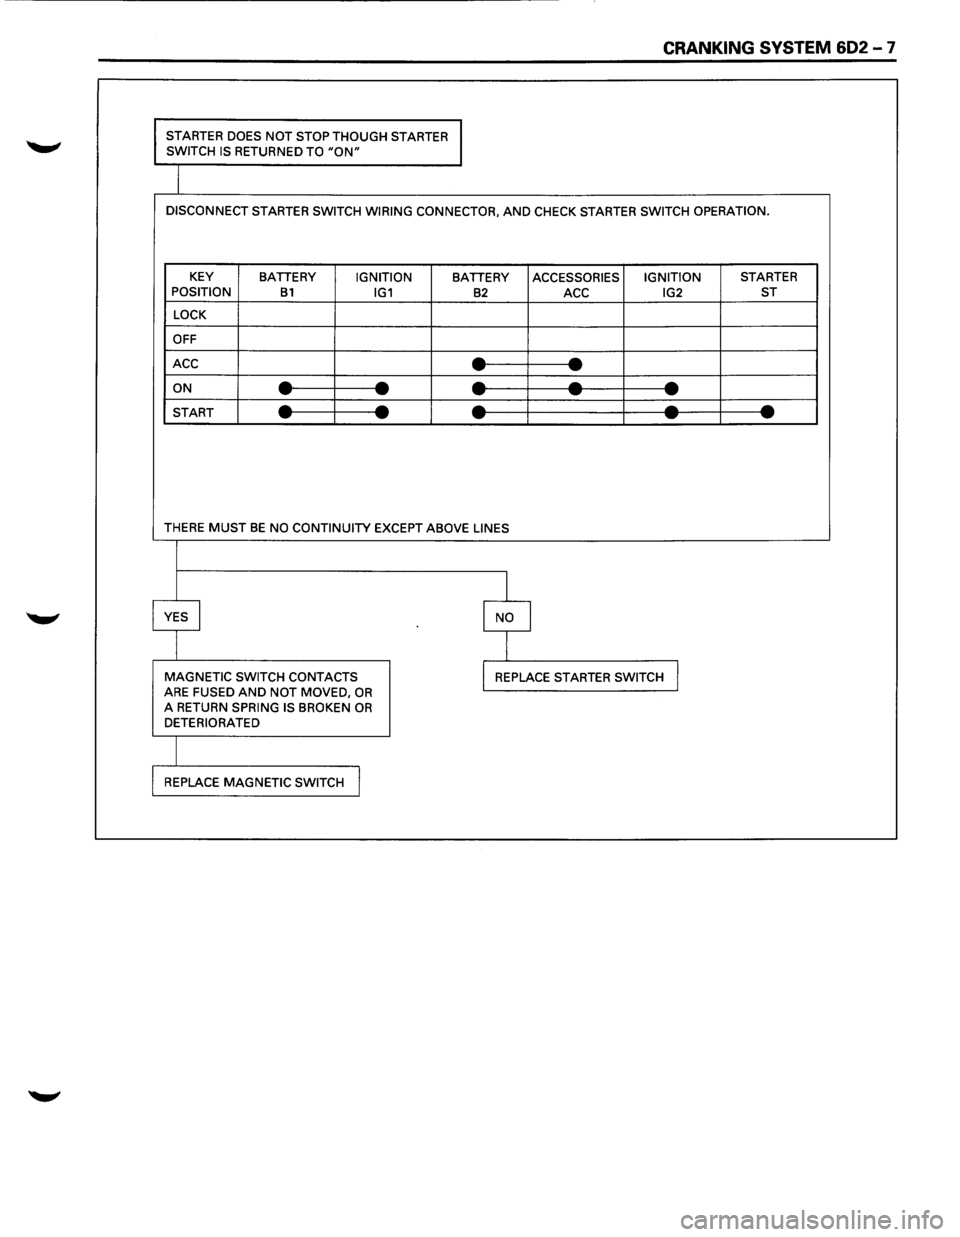
CRANKING SYSTEM 602 -7
STARTER DOES NOT STOP THOUGH STARTER
SWITCH IS RETURNED TO "ON"
DISCONNECT STARTER SWITCH WIRING CONNECTOR, AND CHECK STARTER SWITCH OPERATION.
KEY
BATTERY IGNITION BATTERY ACCESSORIES IGNITION STARTER
POSITION B1 IG1 B2 ACC IG2 ST
LOCK
OFF
ACC
--- -ON ----------START ----------
THERE MUST BE NO CONTINUITY EXCEPT ABOVE LINES
I
YES I I NO
I
MAGNETIC SWITCH CONTACTS I REPLACE STARTER SWITCH J ARE FUSED AND NOT MOVED, OR A RETURN SPRING IS BROKEN OR DETERIORATED
REPLACE
MAGNETIC SWITCH I
Page 678 of 1928
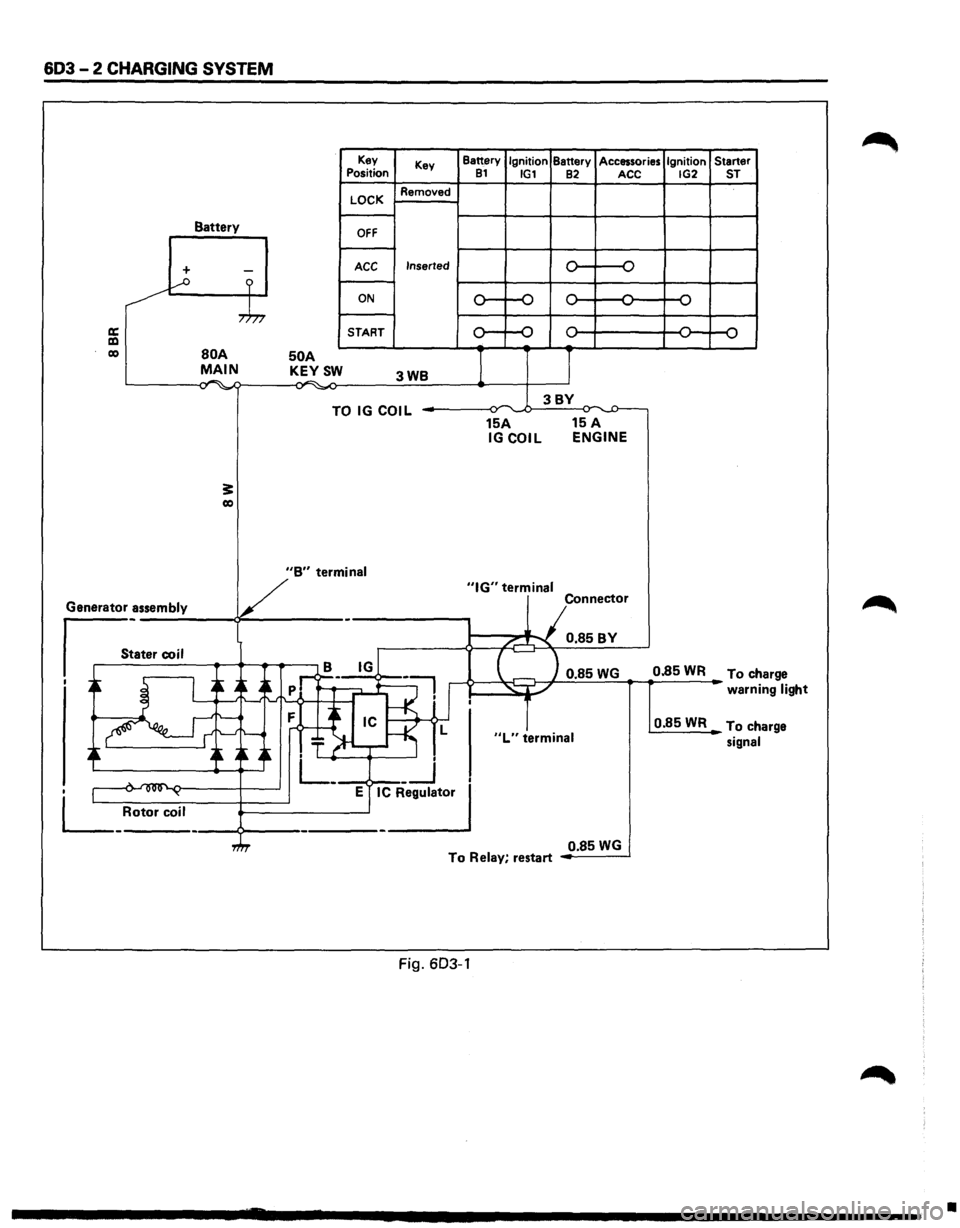
603-2 CHARGING SYSTEM
Battery
+ -...--o ?
,.h,
a: a:l co BOA MAIN . .-. -,., ~
3: co
50 A KEYSW
Key
Position
LOCK
OFF
ACC
ON
START Key
Removed
Inserted
3WB
TO IG COIL
Battery Ignition Battery Accessories Ignition Starter 81 IG1 82 ACC IG2 ST
0 -o
,.... ,....
,.... ,... ,.... ...., ...., ...., ...., ....,
0 ,.... ,.... ,.... 0 ....,
...., ....,
I J
3BY ~ ,.,.
15A 15 A IGCOIL ENGINE
V
"B" termin_a_I _____ _,"IG" terminal
Generator assembly
s_:a_t_er_co __ i_l __ ~~~.-.-~ - Connector
/...-"""\. 0.85BY
B IG
I ~ I ~ A~
-~ ..->--~~ 0.85 WG 0.85 WR To ch arge
' _-: .~:f--<·1'
.~ ~ ~~~~ T ~-r-~ L
. L_ __j
• 1 .... ~ ~ E IC Regulator
L_ Rotor coil ----9---------------'
"L" terminal
warni ng light
0.85WR To ch arge
signal
0.85
WG To Relay, restart
Fig. 603-1
•
Page 690 of 1928
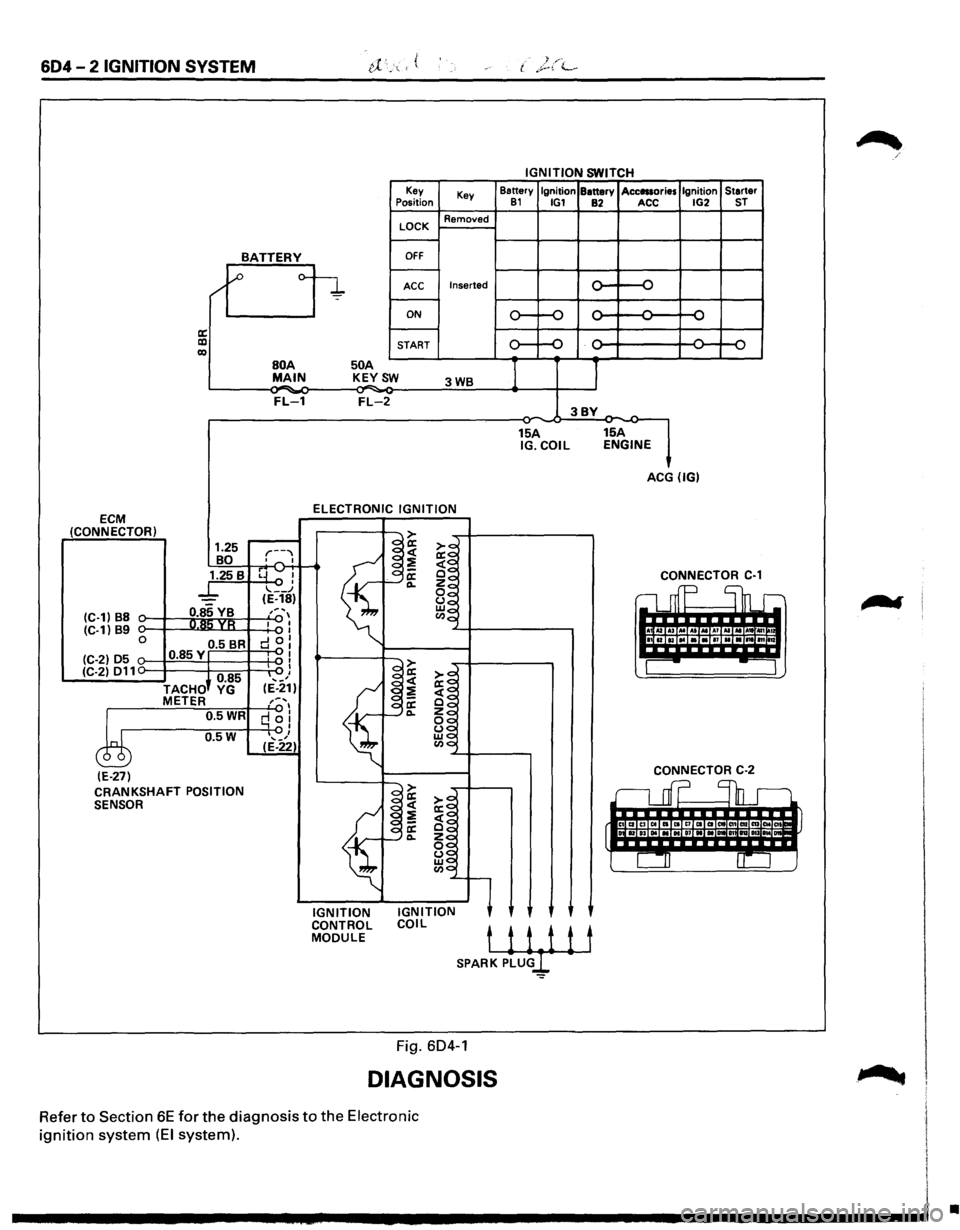
604-2 IGNITION SYSTEM
IGNITION SWITCH
Key
Key Battery
Ignition Battery Acc111ories Ignition
Starter Position 81 IG1 82 ACC IG2 ST
LOCK Removed
BATTERY OFF
/'1 ~ o-
~ Inserted ...... {) ACC ..., -
ON ...... ..... ...... ...... ...... ~ -.....
a: ...... -lXI START Q II) '-' '-' ...., ,_,
BOA 50 A
I 1 MAIN K~YSW 3WB
FL-1 FL-2 3BY -15A 15A IG.COIL ENGINE
ACG (IG)
ELECTRONIC
IGNITION ECM (CONNECTOR) > 1.25 r--""
~~ ~~ BO o""' I
~
1.25 B rrvl -~~ ' f"--~ CONNECTOR C-1
_l_ .... __ .J ~~ c1 mp Shr (E-18)
(C-1) B8 0.85 VB ,, ... , ~~ R!'i YR I I Cl.lo
I !ita lui (C-1) 89 I 0 0.5 BR d 0: IBIBIIIINIBI111Io
(C-2) 05 0.85Y "'I I I > ---(C-2) 011 I
I
)+ 0.85 '-'I a:
~~ ,_, <( TACHO YG (E-21)
~
;;!] METER ,:. .... , a: ~~ 0.5WR q 0! 0... ~~
0.5W I ~$ ... _, ~0 c ( (E-22)
(E-27) CONNECTOR C-2
CRANKSHAFT POSITION .::::> rL
r;::::l enD. .-SENSOR I~ ~~
~ ~ ~~ rt~·· IC4 IT>TiiTiil
f §~
~g l CIJ 0::
·~'l
IGNITION IGNITION CONTROL
COIL MODULE tii1it SPARK PLU
DIAGNOSIS
Refer to Section 6E for the diagnosis to the Electronic
ignition system (EI system).
•
Page 700 of 1928
6E2-4 DRIVEABILITY AND EMISSIONS
BASIC KNOWLEDGE REQUIRED
Before using this section of the Service Manual,
there are some areas that you should be familiar
with. Without this basic knowledge, you will have
trouble using the diagnostic procedures
contained in this section.
BASIC ELECTRIC CIRCUITS
You should understand the basic theory of
electricity, and know the meaning of voltage,
amps, and ohms. You should understand what
happens in a circuit with an open or a shorted
wire. You
should be able to read and understand a
wiring diagram. A shortto ground is referred to as
a ground to distinguish it from a short between
wires.
USE OF CIRCUIT TESTING TOOLS
You should know how to use a test light, how to
connect and use a tachometer, and
how to use
jumper wires to by-pass components to test
circuits. Care
should be taken to not deform the
terminal when testing.
USE OF DIGITAL VOLT-OHM METER
(DVOM)
You should be familiar with the Digital Volt-Ohm
Meter, particularly special tool J-39200 or
equivalent. You should be able to measure
voltage, resistance, and current and know how to
use the meter correctly.
The
Digital Volt-Ohm Meter is covered in the
"Special Tools" portion of this section.
DIAGNOSTIC INFORMATION
The diagnostic "Trouble Tree" charts and func
tional checks in this manual are designed to locate
a faulty circuit or component through logic based
on the process
of elimination. The charts are
prepared
with the requirement that the vehicle
functioned correctly at the time of assembly and
that there are no multiple failures.
The Engine Control Module (ECM) performs a
continual self-diagnosis on certain control
functions. This diagnostic capability is
complemented by the diagnostic procedures
contained in this
manual. The ECM's language for
communicating the source of a malfunction is a
system
of Diagnostic Trouble Codes (DTCs). The
DTC(s) are
two or three digit numbers that can
range from12 to
51. When a malfunction is
detected by the ECM, a DTC is set and the
Malfunction Indicator Lamp is illuminated.
"CHECK ENGINE" MALFUNCTION
INDICATOR
LAMP (MIL)
This light is on the instrument panel and has two
functions:
• It is used to tell the driver that a problem has
occurred, and that the
vehicle should be
taken
for service as soon as reasonably
possible.
• It
is used by the technician to read out
'Trouble Codes" to help diagnose system
problems.
As a bulb and system check, the light will come
"ON" with the key "ON" and the engine not
running. When the engine is started, the light will
turn off. If the light remains on, the self-diagnostic
system has detected a
problem. If the problem
goes away, the light will go out in most cases after
10 seconds, but a Trouble Code will remain stored
in the
ECM.
When the light remains "ON" while the engine is
running,
or when a malfunction is suspected due
to a
driveability or emissions problem, a on-board
diagnostic system check
must be performed. The
procedures
for these checks are given in Section
"A". These checks will expose malfunctions
which may
not be detected if other diagnostics
are performed
prematurely.
INTERMITTENT "CHECK ENGINE"
MALFUNCTION INDICATOR
LAMP (MIL)
In the case of an "intermittent" problem, the
"Check Engine"
malfunction indicator lamp will
light
for ten (1 0) seconds and then will go out.
However, the corresponding
trouble code will be
stored in the
memory of the ECM until the battery
positive
voltage to the ECM has been removed.
When unexpected DTC(s) appear during the
DTC
code reading process, one can assume that these
DTC(s) were set by an intermittent malfunction
and could be helpful in diagnosing the system.
An intermittent
DTC may or may not re-set. If it is
an intermittent failure, a DTC Chart is not used.
Consult the "Diagnostic Aids" on the intermittent
trouble code. Section "B" also covers the topic of
"intermittents". A physical inspection of the
applicable sub-system most often will resolve the
problem.
II
Page 701 of 1928
......, .., LU
READING DIAGNOSTIC TROUBLE CODES
(Fig. 6E2-1)
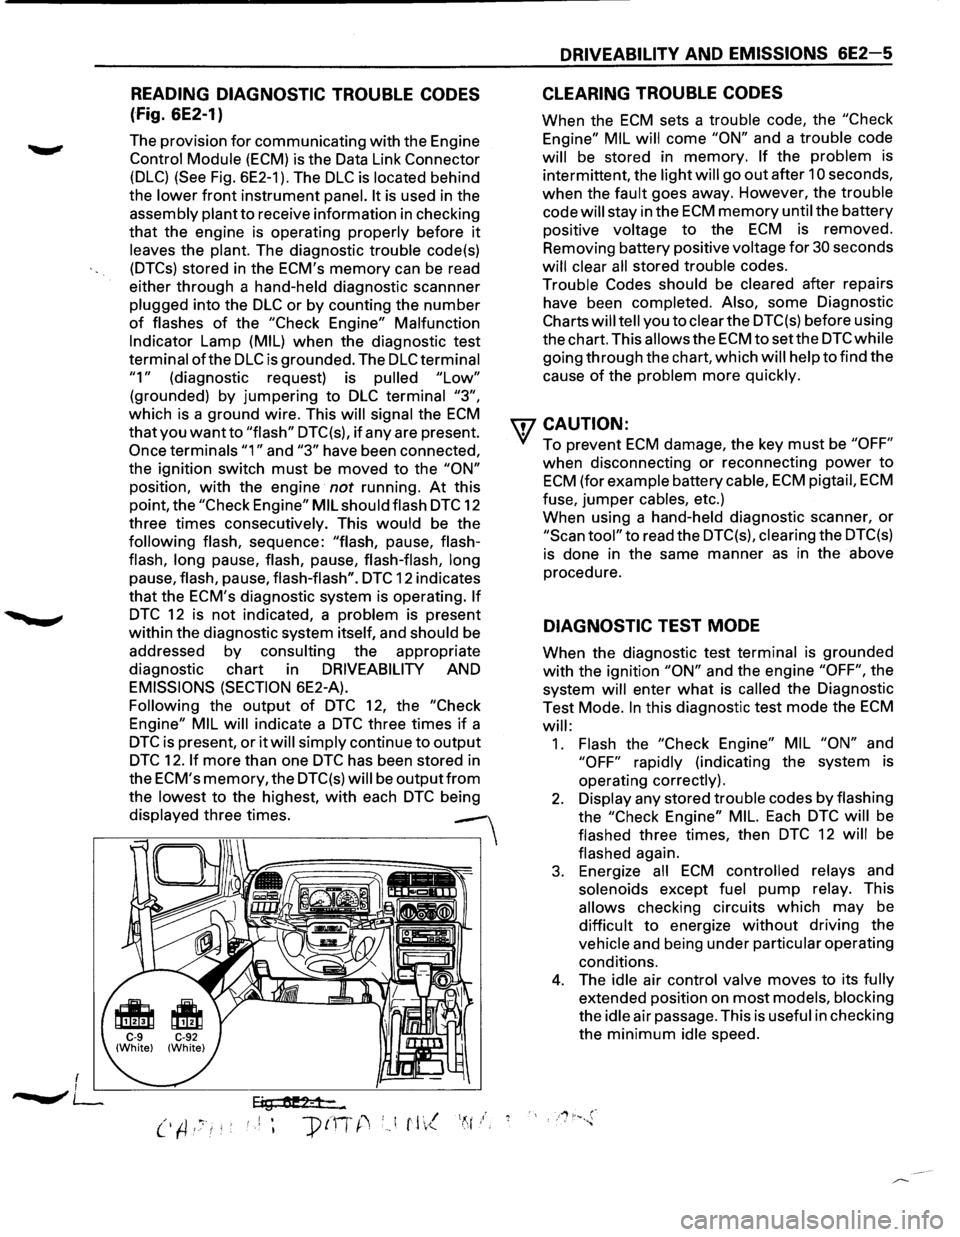
The provision for communicating with the Engine
Control Module (ECM) is the Data Link Connector
(DLC) (See Fig. 6E2-1 ). The DLC is located behind
the
lower front instrument panel. It is used in the
assembly plant
to receive information in checking
that the engine is operating properly before it
leaves the plant. The diagnostic trouble code(s)
(DTCs) stored in the ECM's memory can be read
either through a hand-held diagnostic scannner
plugged into the
DLC or by counting the number
of flashes of the "Check Engine" Malfunction
Indicator Lamp (MIL) when the diagnostic test
terminal
ofthe DLC is grounded. The DLC terminal
"1" (diagnostic request) is pulled "Low"
(grounded) by jumpering to DLC terminal "3",
which is a ground wire. This will signal the ECM
that you want to "flash" DTC(s), if any are present.
Once terminals "1" and "3" have been connected,
the ignition switch
must be moved to the "ON"
position, with the engine not running. At this
point, the
"Check Engine" MIL should flash DTC 12
three times consecutively. This
would be the
following flash, sequence: "flash, pause, flash
flash,
long pause, flash, pause, flash-flash, long
pause, flash, pause, flash-flash". DTC 12 indicates
that the ECM's diagnostic system is operating.
If
DTC 12 is not indicated, a problem is present
within the diagnostic system itself, and should be
addressed
by consulting the appropriate
diagnostic chart in
DRIVEABILITY AND
EMISSIONS (SECTION 6E2-A).
Following the output of DTC 12, the "Check
Engine" MIL
will indicate a DTC three times if a
DTC is present, or it will simply continue to output
DTC 12. If more than one DTC has been stored in
the
ECM's memory, the DTC(s) will be outputfrom
the lowest to the highest, with each DTC being
displayed three times.
--
Eig tU!2-1-...
DRIVEABILITY AND EMISSIONS 6E2-5
CLEARING TROUBLE CODES
When the ECM sets a trouble code, the "Check
Engine" MIL
will come "ON" and a trouble code
will be stored in memory. If the problem is
intermittent, the light
will go out after 10 seconds,
when the fault goes away. However, the trouble
code
will stay in the ECM memory until the battery
positive voltage
to the ECM is removed.
Removing battery positive voltage
for 30 seconds
will clear all stored trouble codes.
Trouble
Codes should be cleared after repairs
have been completed. Also, some Diagnostic
Charts will tell you to clear the DTC(s) before using
the chart. This
allows the ECM tosetthe DTCwhile
going through the chart, which will help to find the
cause
of the problem more quickly.
wcAUTION:
• To prevent ECM damage, the key must be "OFF"
when disconnecting or reconnecting power to
ECM (for example battery cable, ECM pigtail, ECM
fuse, jumper cables, etc.)
When using a hand-held diagnostic scanner,
or
"Scan tool" to read the DTC(s), clearing the DTC(s)
is done in the same manner as in the above
procedure.
DIAGNOSTIC TEST MODE
When the diagnostic test terminal is grounded
with the ignition "ON" and the engine "OFF", the
system
will enter what is called the Diagnostic
Test Mode.
In this diagnostic test mode the ECM
will:
1. Flash the "Check Engine" MIL "ON" and
"OFF" rapidly (indicating the system is
operating correctly).
2. Display any stored trouble codes by flashing
the
"Check Engine" MIL. Each DTC will be
flashed three times, then
DTC 12 will be
flashed again.
3. Energize all ECM controlled relays and
solenoids except
fuel pump relay. This
allows checking circuits which may be
difficult to energize without driving the
vehicle and being under particular operating
conditions.
4. The idle air control valve moves to its fully
extended position on most models, blocking
the
idle air passage. This is useful in checking
the
minimum idle speed.
Page 710 of 1928
6E2-14 DRIVEABILITY AND EMISSIONS
DATA LINK CONNECTOR ''SCAN TOOLS''
The Engine Control Module (ECM) can communicate a
variety
of information through data link connector
terminal
"2". This data is transmitted at a high frequecy
which requires a
"Scan tool" for interpretation. There
are several
"Scan tools" available for reading this
information.
With an understanding
of the data which the tool
displays, and knowledge of the circuits involved, the
tool can be
very useful in obtaining information which
would be more difficult or impossible to obtain with
other equipment.
"Scan tools" do not make the use of diagnostic charts
unnecessary, nor
can they indicate exactly where a
problem is in a particular circuit. Trouble Tree
Charts
incorporate diagnosis procedures using a "Scan tool"
where possible and most charts require the use of a
"Scan tool" when it is applicable.
A "SCAN TOOL" THAT DISPLAYS FAUL TV
DATA SHOULD NOT BE USED AND THE
PROBLEM SHOULD BE REPORTED TO THE
MANUFACTURER. THE USE OF A FAUL TV
"SCAN TOOL" CAN RESULT IN MIS
DIAGNOSIS
AND UNNECESSARY PARTS
REPLACEMENT.
ECM's have two (2) modes for transmitting
information. The
following information will describe
the system operation in each
of the modes.
Data List (FO)
On engines that can be monitored in the "Open"
mode, certain parameters can be observed
without changing the engine operating
characteristics. The parameters capable
of being
read vary with engine families.
Most "Scan tools"
are programmed so that the system will go
directly into the data link connector mode
if the
"Open" mode is not available.
''SCAN TOOL'' LIMITATIONS AND USE
The "Scan tool" allows a quick check of sensors
and switches which are inputs
to the ECM. The
"Scan tool" allows one to manipulate wiring
harnesses or components under the hood while
observing the "Scan Tool" readout. This helps in
locating intermittents
with the engine not
running.
INTERMITTENT CONDITIONS
The "Scan tool" is helpful in cases of intermittent
operation. The
tool can be plugged in and
observed while driving the vehicle under the
condition
where the light comes "ON" momen- tarily,
or the
engine driveability is poor
momentarily.
If the problem seems to be related
to certain areas
that can be checked on the "Scan ~
tool", then those are the positions that should be
checked while driving the vehicle. If there does
not seem to
be any correlation between the
problem and any specific circuit, the
"Scan tool"
can be checked on each position, watching for a
period
of time to see if there is any change in the
readings that indicates intermittent operation.
The
"Scan tool" is also a useful and quick way of
comparing operating parameters of a poorly
operating engine with a known good one. For
example; A sensor may shift in
value but not set a
diagnostic trouble code. Comparing with a known
good vehicle may uncover the problem.
The
"Scan tool" has the ability to save time in
diagnosis and prevent the replacement
of good
parts. The key to using the
"Scan tool" success
fully
for diagnosis lies in the technicians ability to
understand the system he is trying to diagnose as
well as an understanding of the "Scan tool's"
limitations. Therefore, the technician should read
the tool operating manual to become familiar
with
the tool. The following information will describe
most of the "Scan tool" positions and how they
can be helpful in diagnosis.
"SCAN TOOL" POSITIONS
INJECTOR PULSE WIDTH
In this position, the reading is given in milli
seconds which is the on time that the ECM is
commanding to the injector(s).
CLOSED LOOP/OPEN LOOP
This position will indicate whether the engine
control system
is operating in open or closed
loop. Most systems go closed loop after a certain
amount of run time, when engine coolant
temperature
is high enough, and the oxygen
sensor becomes active.
TROUBLE CODES
Will display any trouble codes stored in the ECM
memory.
THROTTLE POSITION (TP) SENSOR
Values read will be the voltage as seen by the ~
ECM. The voltage should be the TP sensor
specification
with the throttle closed and go up to
about 5 volts with
wide open throttle.
•
Page 729 of 1928
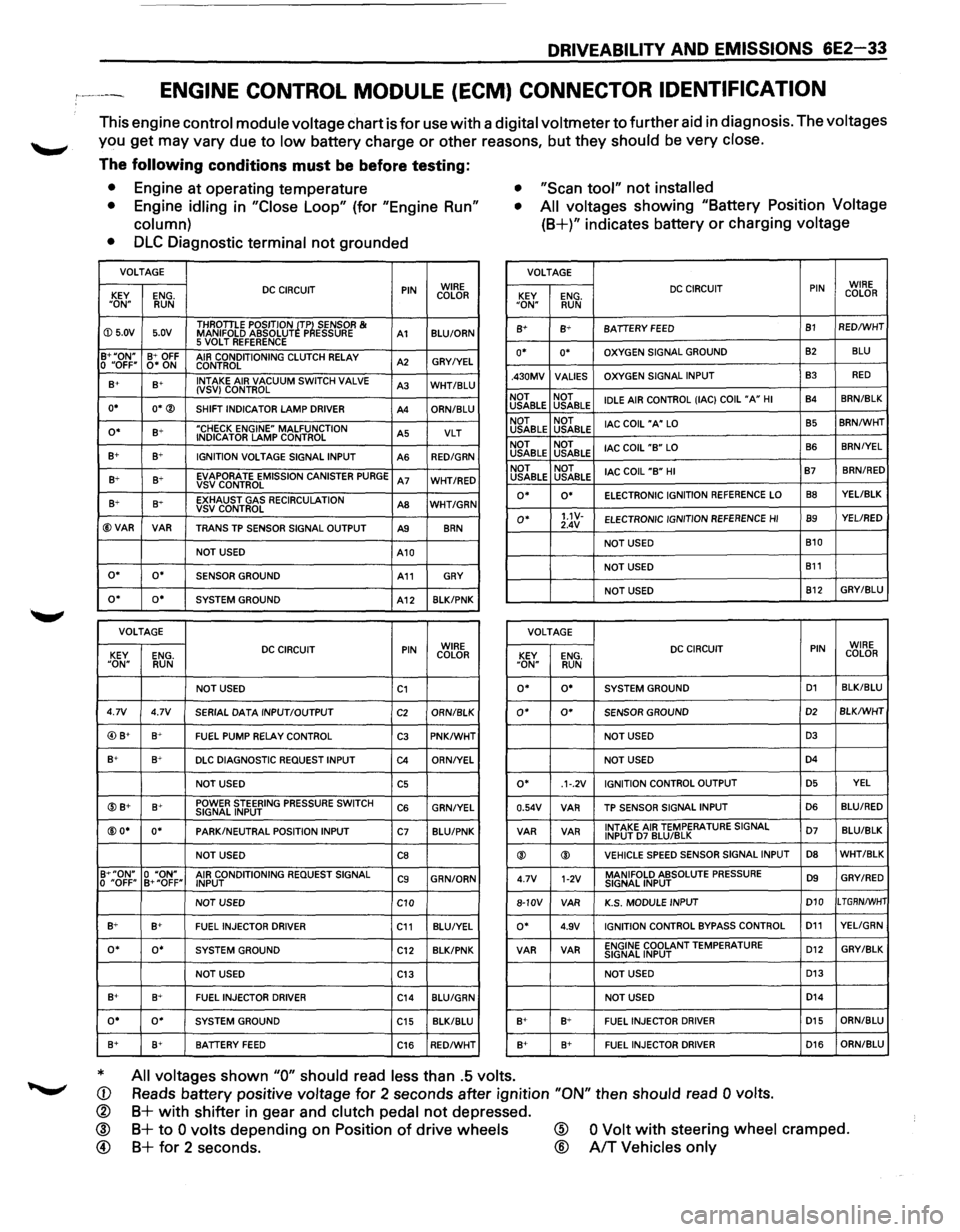
DRIVEABILITY AND EMISSIONS 6E2-33
ENGINE CONTROL MODULE (ECM) CONNECTOR IDENTIFICATION
This engine control module voltage chart is for use with a digital voltmeter to further aid in diagnosis. The voltages
you get may vary due to low battery charge or other reasons, but they should be very close.
The following conditions must be before testing:
• Engine at operating temperature • "Scan tool" not installed
•
Engine idling in "Close Loop" (for "Engine Run"
column) •
All voltages showing "Battery Position Voltage
(8+)" indicates battery or charging voltage
•
DLC Diagnostic terminal not grounded
VOLTAGE VOLTAGE
DC CIRCUIT PIN WIRE
KEY ENG. COLOR
"ON" RUN
DC CIRCUIT PIN WIRE
KEY ENG. COLOR "ON" RUN
ID 5.0V 5.0V THROTILE
POSITION ~TP~ SENSOR & MANIFOLD ABSOLUT P ESSURE A1 BLU/ORN 8+ B+ BATIERY FEED B1 RED/WHT
5 VOLT REFERENCE B+"ON" B+ OFF AIR CONDITIONING CLUTCH RELAY A2 GRY/YEL 0 "OFF" 0* ON
CONTROL o• o• OXYGEN SIGNAL GROUND 82 BLU
B+ s+ INTAKE
AIR VACUUM SWITCH VALVE A3 WHT/BLU (VSV) CONTROL
o• O*® SHIFT INDICATOR LAMP DRIVER A4 ORN/BLU .430MV
VALlES OXYGEN
SIGNAL INPUT
B3 RED
NOT NOT
IDLE AIR CONTROL (lAC) COIL "A" HI B4 8RN/BLK USABLE
USABLE
o• B+ "CHECK ENGINE" MALFUNCTION A5 VLT INDICATOR LAMP CONTROL
B+ B+ IGNITION VOLTAGE SIGNAL INPUT
AS RED/GRN
NOT NOT
lAC COIL "A" LO B5 8RN/WHT USABLE USABLE
NOT NOT
lAC COIL
"B" LO B6 BRN/YEL USABLE
USABLE
B+ B+ EVAPORATE EMISSION CANISTER PURGE A7 WHT/RED VSVCONTROL NOT
NOT
lAC COIL "B" HI B7 BRN/RED USABLE
USABLE
B+ 8~ EXHAUST GAS RECIRCULATION AS WHT/GRN VSV CONTROL
@VAR VAR TRANS TP SENSOR SIGNAL OUTPUT A9 8RN
o• o• ELECTRONIC IGNITION REFERENCE LO 88 YEL/BLK
o• 1.1V-ELECTRONIC
IGNITION REFERENCE HI B9 YEL/RED
2.4V
NOT USED B10
NOT USED
A10
NOT USED
B11 o• o• SENSOR GROUND A11 GRY
NOT USED B12 GRY/BLU o• o• SYSTEM
GROUND A12 8LK/PNK
VOLTAGE
VOLTAGE
DC CIRCUIT PIN WIRE
KEY ENG. COLOR DC CIRCUIT PIN WIRE
KEY ENG. COLOR "ON" RUN "ON" RUN
NOT USED C1 o• o• SYSTEM GROUND D1 BLK/BLU
4.7V 4.7V
SERIAL DATA INPUT/OUTPUT C2 ORN/8LK o• 0* SENSOR GROUND D2 BLK/WHT
@) B+ B+ FUEL PUMP RELAY CONTROL C3 PNK/WHT NOT USED D3
B+ B+ DLC DIAGNOSTIC REQUEST INPUT C4 ORN/YEL NOT USED D4
NOT USED C5 o• .1·.2V IGNITION
CONTROL OUTPUT D5 YEL
@B+ B+ POWER STEERING PRESSURE SWITCH C6 GRN/YEL SIGNAL INPUT 0.54V VAR
TP SENSOR
SIGNAL INPUT D6 BLU/RED
@O* o• PARK/NEUTRAL POSITION
INPUT C7 BLU/PNK VAR
VAR INTAKE AIR TEMPERATURE SIGNAL D7 BLU/BLK INPUT D7 BLU/BLK
NOT USED CB ® ® VEHICLE SPEED SENSOR
SIGNAL INPUT D8 WHT/BLK
B+"ON" 0 "ON" AIR CONDITIONING REQUEST SIGNAL C9 GRN/ORN
0 "OFF" B+"OFF"
INPUT 4.7V 1-2V MANIFOLD ABSOLUTE PRESSURE D9 GRY/RED SIGNAL
INPUT
NOT USED
C10 8-10V
VAR K.S.
MODULE INPUT D10 LTGRN/WHT
B+ B+ FUEL INJECTOR
DRIVER C11 BLU/YEL o• 4.9V IGNITION CONTROL BYPASS CONTROL D11 YELIGRN
o• o• SYSTEM GROUND
C12 BLK/PNK VAR VAR ENGINE COOLANT TEMPERATURE
D12 GRY/BLK SIGNAL
INPUT
NOT USED
C13 NOT USED D13
B+ 8+
FUEL INJECTOR DRIVER C14 BLU/GRN NOT USED D14
o• o• SYSTEM GROUND
C15 BLK/BLU B+ B+ FUEL INJECTOR DRIVER D15 ORN/BLU
8+ B+ BATIERY FEED C16 RED/WHT B+ 8+
FUEL INJECTOR DRIVER D16 ORN/8LU
* All voltages shown "0" should read less than .5 volts.
Reads battery positive voltage for 2 seconds after ignition "ON" then should read 0 volts. CD
®
® @
B+ with shifter in gear and clutch pedal not depressed.
B+ to 0 volts depending on Position of drive wheels
B+ for 2 seconds.
@
®
0 Volt with steering wheel cramped.
A/T Vehicles only
Page 744 of 1928
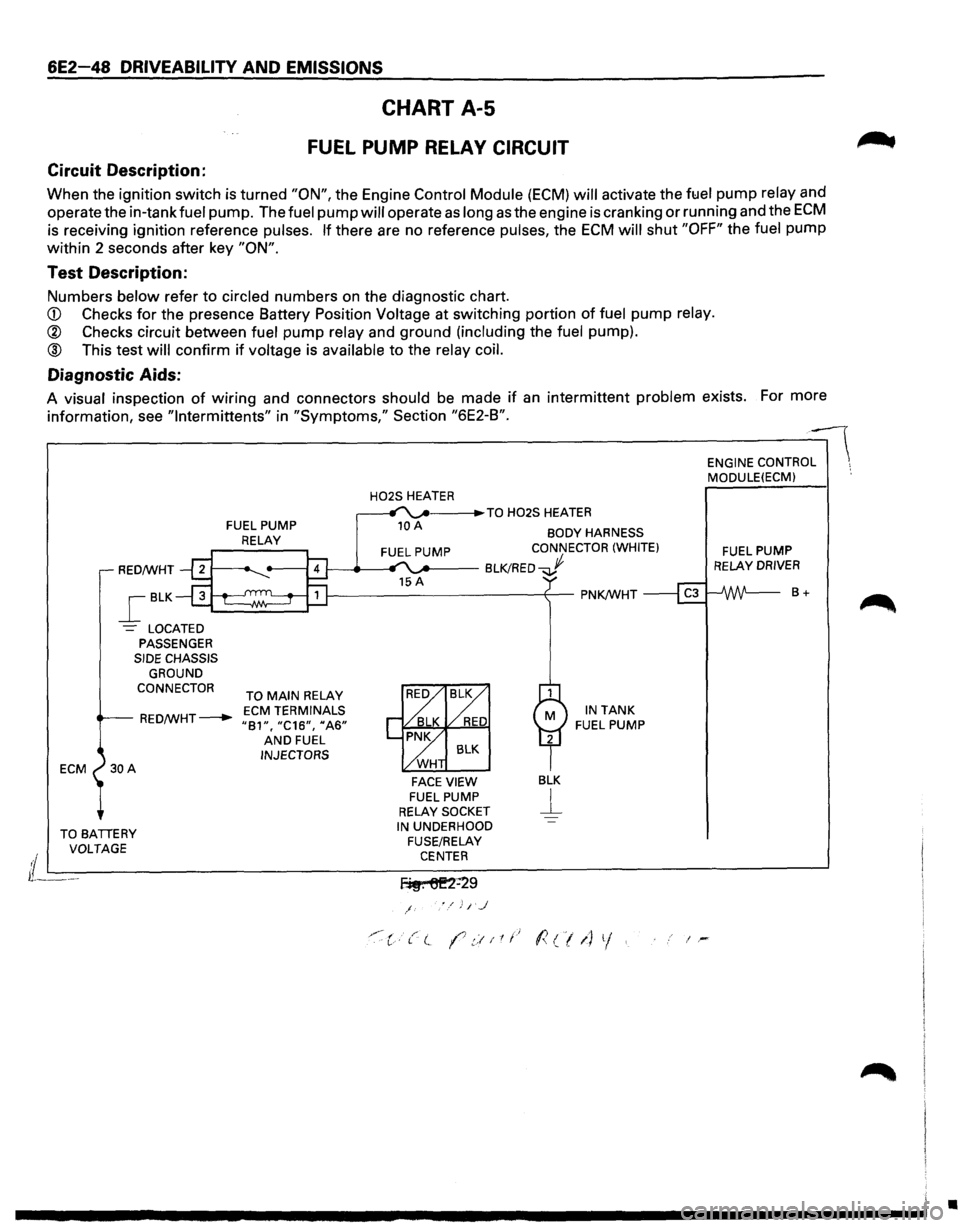
6E2-48 DRIVEABILITY AND EMISSIONS
CHART A-5
FUEL PUMP RELAY CIRCUIT
Circuit Description:
When the ignition switch is turned "ON", the Engine Control Module (ECM) will activate the ft:Jel pump relay and
operate the in-tank
fuel pump. The fuel pump will operate as long as the engine is cranking or running and the ECM
is receiving ignition reference pulses. If there are no reference pulses, the ECM will shut "OFF" the fuel pump
within 2 seconds after key
"ON".
Test Description:
Numbers below refer to circled numbers on the diagnostic chart.
CD Checks for the presence Battery Position Voltage at switching portion of fuel pump relay.
® Checks circuit between fuel pump relay and ground (including the fuel pump).
® This test will confirm if voltage is available to the relay coil.
Diagnostic Aids:
A visual inspection of wiring and connectors should be made if an intermittent problem exists. For more
information, see
"lntermittents" in "Symptoms," Section "6E2-B".
ECM
FUEL PUMP
RELAY
H02S HEATER _. ___ .,.TO H02S HEATER
10 A BODY HARNESS CONNECTOR (WHITE)
RED/WHT 1---_.__.., '"..._.. __ BLK!RED...J
_[BLK
-= LOCATED PASSENGER SIDE CHASSIS
GROUND
CONNECTOR
TO MAIN RELAY
RED/WHT---+-ECM TERMINALS "81", "C16", 11A6" AND FUEL INJECTORS
FACE VIEW FUEL PUMP RELAY SOCKET
BLK
j__
IN TANK FUEL PUMP
TO BATIERY IN UNDERHOOD ENGINE
CONTRO:-- MODULE(ECM) ·.
FUEL PUMP RELAY DRIVER
8+
VOLTAGE
FUSE/RELAY
i L---------------------------C-EN_T_E_R _______________________ ~
lL---f~. 6E2=29
/
'"·:c·t( (7.::!11t.~ l<(/1) 1/. i-
•