cruise control ISUZU TROOPER 1995 Repair Manual
[x] Cancel search | Manufacturer: ISUZU, Model Year: 1995, Model line: TROOPER, Model: ISUZU TROOPER 1995Pages: 1928
Page 1606 of 1928
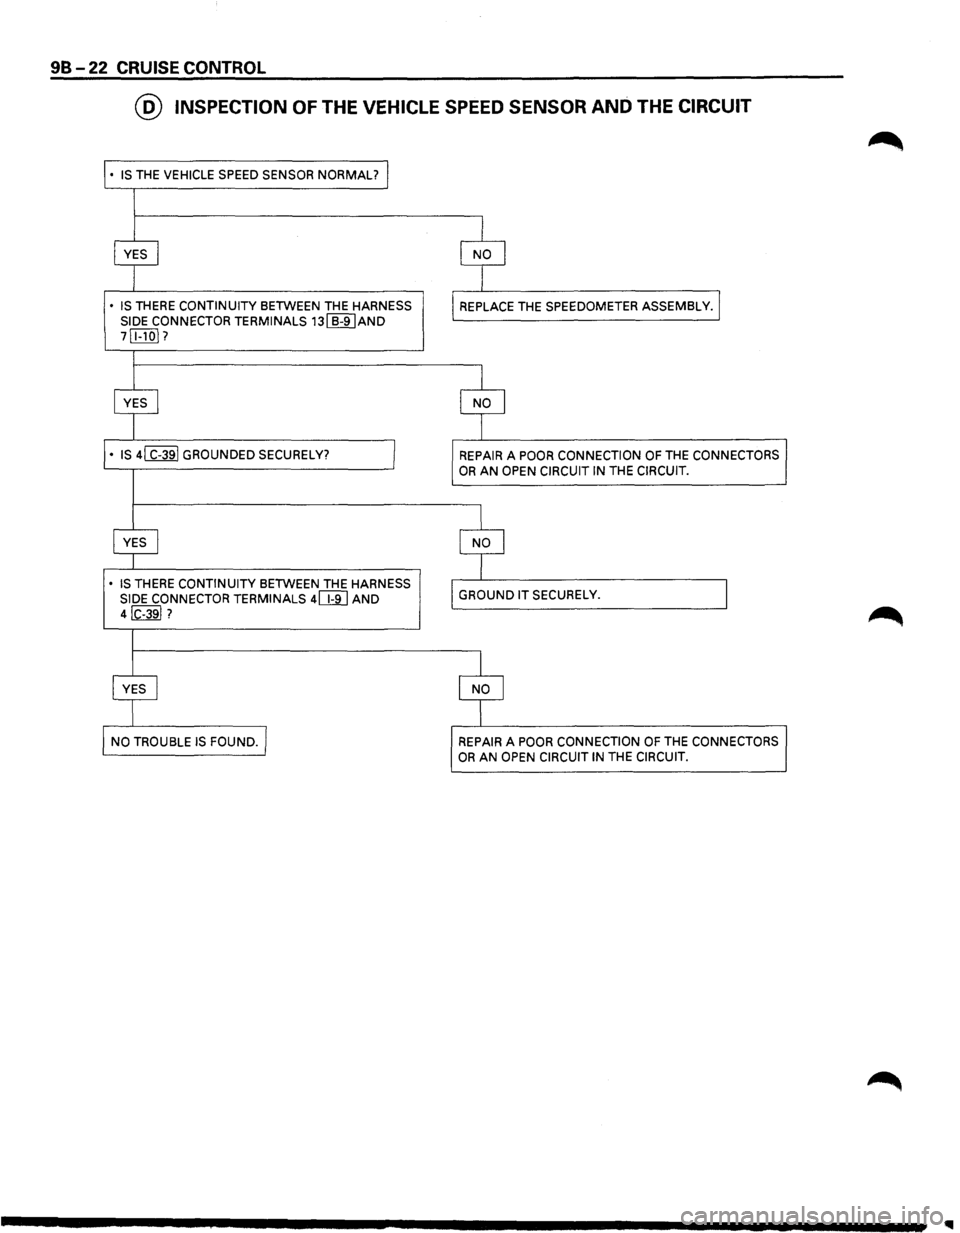
98 -22 CRUISE CONTROL
@ INSPECTION OF THE VEHICLE SPEED SENSOR AND THE CIRCUIT
• IS THE VEHICLE SPEED SENSOR NORMAL?
•
IS THERE CONTINUITY BETWEEN THE HARNESS SIDE CONNECTOR TERMINALS 131 B-9IAND
7[8]]?
• IS THERE CONTINUITY BETWEEN THE HARNESS SIDE CONNECTOR TERMINALS 4(m AND 4IC-39I?
REPAIR A POOR CONNECTION OF THE CONNECTORS OR AN OPEN CIRCUIT IN THE CIRCUIT.
REPAIR
A POOR CONNECTION OF THE CONNECTORS OR AN OPEN CIRCUIT IN THE CIRCUIT.
Page 1607 of 1928
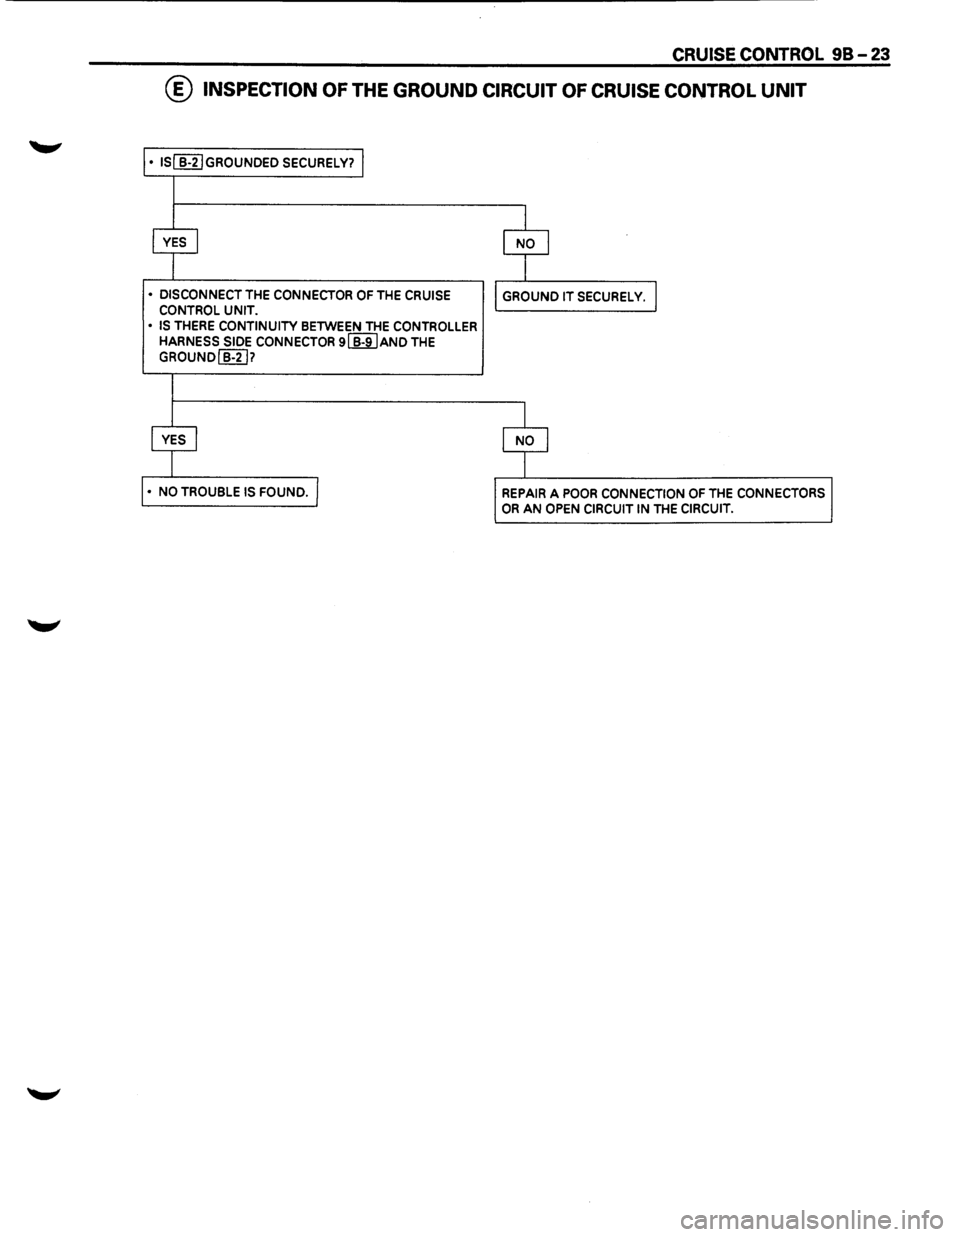
CRUISE CONTROL 98-23
@ INSPECTION OF THE GROUND CIRCUIT OF CRUISE CONTROL UNIT
• lSI B-2IGROUNDED SECURELY?
• DISCONNECT THE CONNECTOR OF THE CRUISE CONTROL UNIT.
•
IS THERE CONTINUITY BETWEEN THE CONTROLLER HARNESS SIDE CONNECTOR 9[H)AND THE
GROUNDIB-21?
REPAIR A POOR CONNECTION OF THE CONNECTORS OR AN OPEN CIRCUIT IN THE CIRCUIT.
Page 1608 of 1928
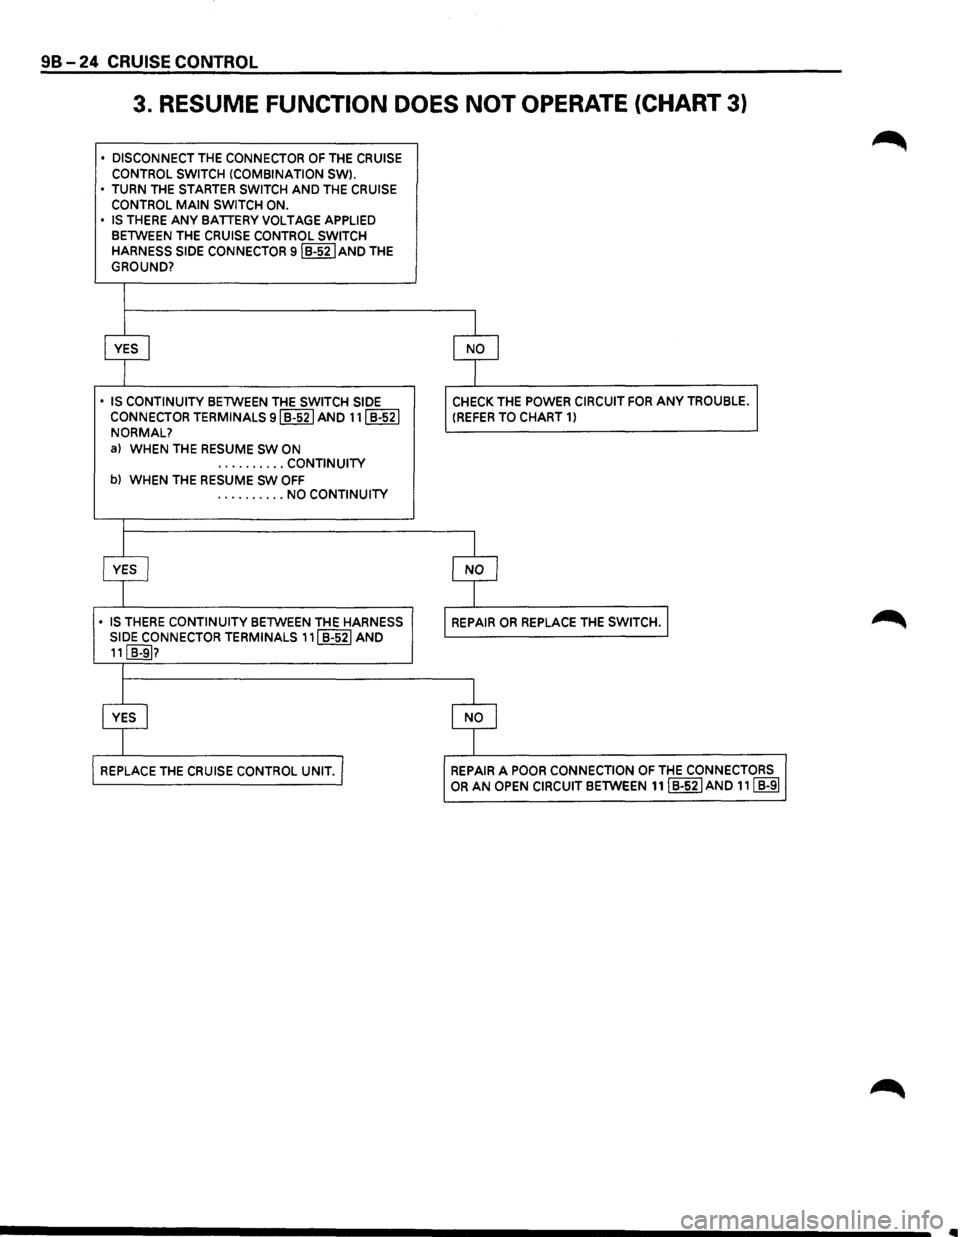
98-24 CRUISE CONTROL
3. RESUME FUNCTION DOES NOT OPERATE (CHART 3)
• DISCONNECT THE CONNECTOR OF THE CRUISE CONTROL SWITCH !COMBINATION SW).
• TURN THE STARTER SWITCH AND THE CRUISE
CONTROL MAIN SWITCH ON. • IS THERE ANY BATIERY VOLTAGE APPLIED
BETWEEN THE CRUISE CONTROL SWITCH HARNESS SIDE CONNECTOR 9IB-52IAND THE
GROUND?
~ $
• IS CONTINUITY BETWEEN THE SWITCH SIDE CHECK THE POWER CIRCUIT FOR ANY TROUBLE.
CONNECTOR TERMINALS 91 B-521 AND 111 B-521 (REFER TO CHART 1)
NORMAL?
a) WHEN THE RESUME SW ON .......... CONTINUITY
b) WHEN THE RESUME SW OFF .......... NO CONTINUITY
I
$ $
• IS THERE CONTINUITY BETWEEN THE HARNESS REPAIR OR REPLACE THE SWITCH. I SIDE CONNECTOR TERMINALS 111 B-521 AND 111 B-91?
$ $
REPLACE THE CRUISE CONTROL UNIT./ REPAIR A POOR CONNECTION OF THE CONNECTORS OR AN OPEN CIRCUIT BETWEEN 111 B-521 AND 111 B-91
Page 1609 of 1928
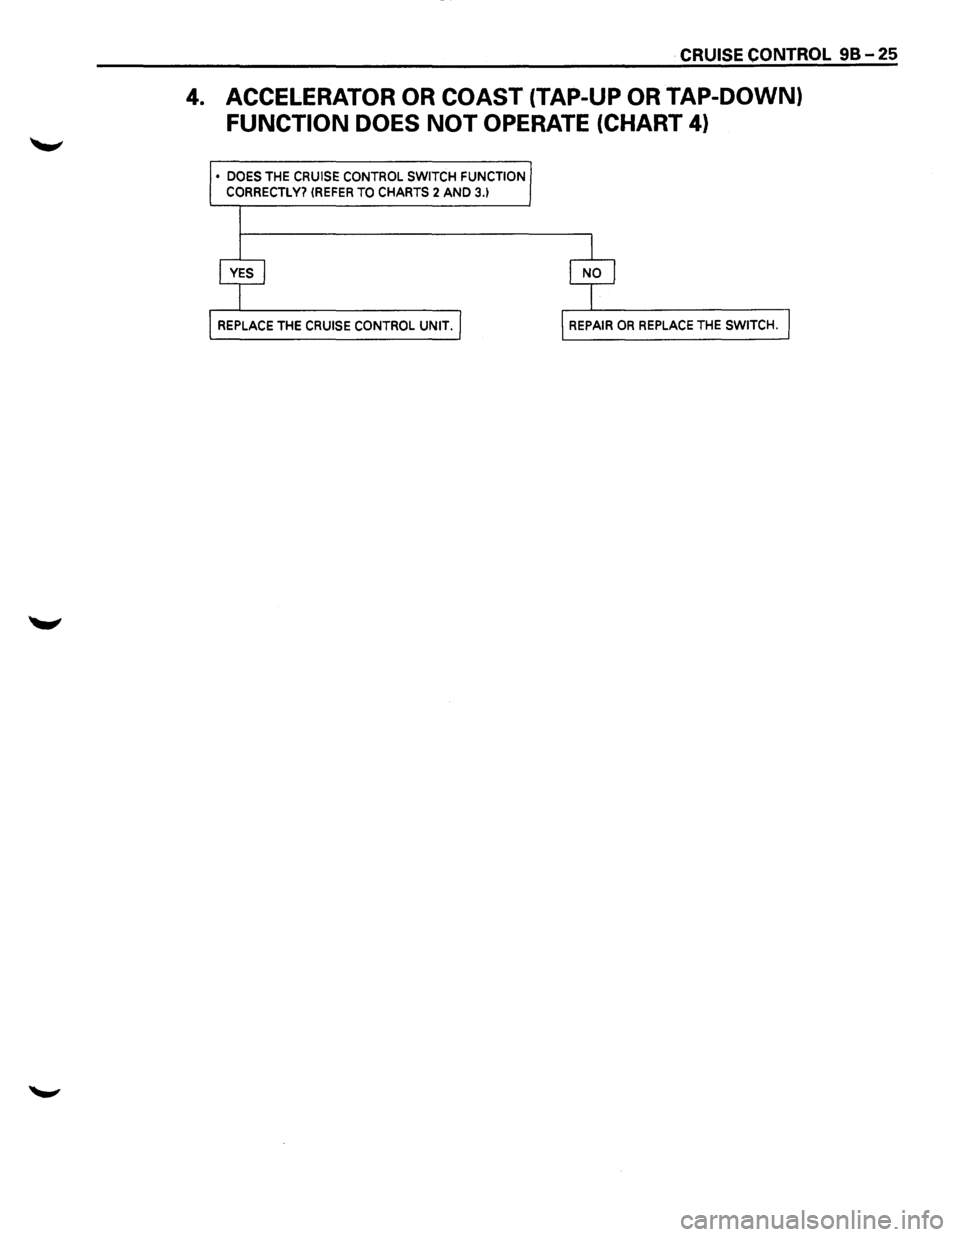
CRUISE CONTROL 98-25
4. ACCELERATOR OR COAST (TAP-UP OR TAP-DOWN)
FUNCTION DOES NOT OPERATE (CHART 4)
• DOES THE CRUISE CONTROL SWITCH FUNCTION
CORRECTLY? (REFER TO CHARTS 2 AND 3.1
Page 1610 of 1928
...... f-. r:
98-26 CRUISE CONTROL
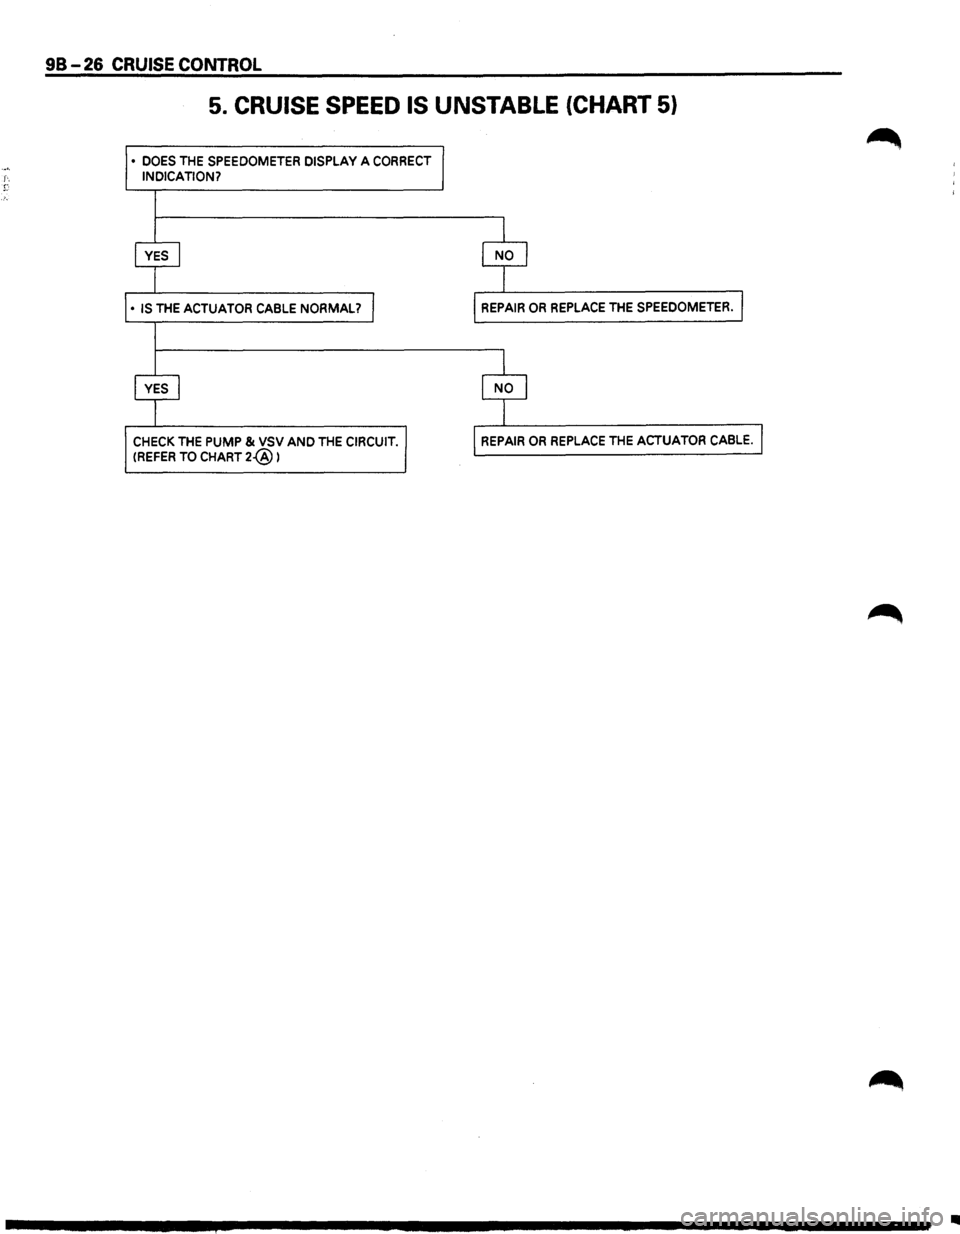
5. CRUISE SPEED IS UNSTABLE (CHART 5)
• DOES THE SPEEDOMETER DISPLAY A CORRECT INDICATION?
CHECK THE PUMP & VSV AND THE CIRCUIT. (REFER TO CHART 2-@ )
..
Page 1611 of 1928
CRUISE CONTROL 9B-27
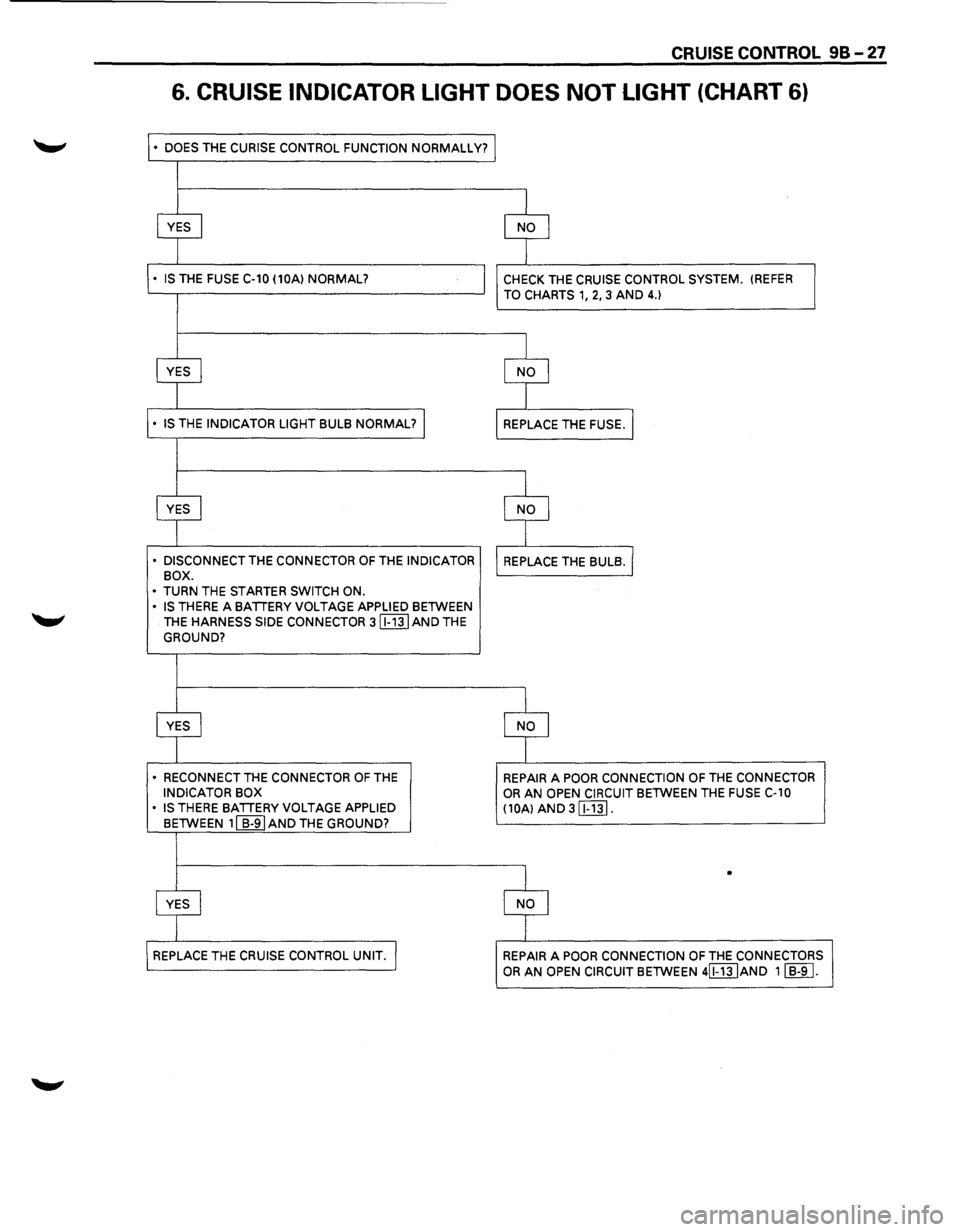
6. CRUISE INDICATOR LIGHT DOES NOT LIGHT (CHART 6)
• DOES THE CURISE CONTROL FUNCTION NORMALLY?
• DISCONNECT THE CONNECTOR OF THE INDICATOR
BOX.
•
TURN THE STARTER SWITCH ON.
• IS THERE A BATIERY VOLTAGE APPLIED BETWEEN
THE
HARNESS SIDE CONNECTOR 3 (EIT] AND THE
GROUND?
• RECONNECT THE CONNECTOR OF THE INDICATOR BOX
• IS THERE BATIERY VOLTAGE APPLIED
BETWEEN 11 B-91 AND THE GROUND?
CHECK THE CRUISE CONTROL SYSTEM. (REFER
TO CHARTS 1, 2, 3 AND 4.)
REPAIR A POOR CONNECTION OF THE CONNECTOR OR AN OPEN CIRCUIT BETWEEN THE FUSE C-10
(10A) AND 3 [Ej1].
•
REPAIR A POOR CONNECTION OF THE CONNECTORS
OR AN OPEN CIRCUIT BETWEEN 4[f"j]JAND 11 B-9 I.
Page 1612 of 1928
98-28 CRUISE CONTROL
ON-VEHICLE SERVICE
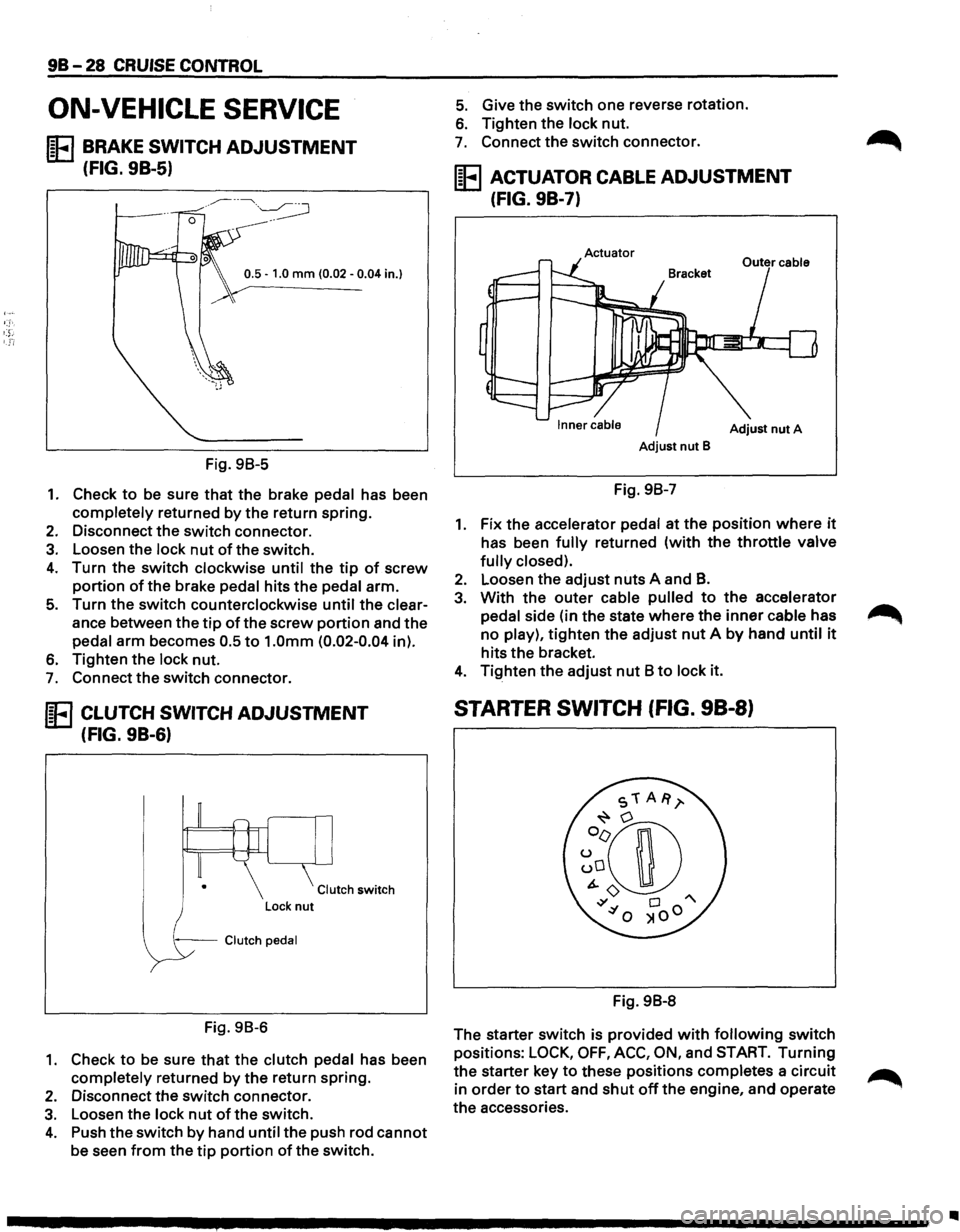
IE BRAKE SWITCH ADJUSTMENT
(FIG. 9B-5)
0.5 -1.0 mm (0.02 -0.04 in.}
Fig. 98-5
1. Check to be sure that the brake pedal has been
completely returned by the return spring.
2. Disconnect the switch connector.
3. Loosen the lock nut of the switch.
4. Turn the switch clockwise until the tip of screw
portion of the brake pedal hits the pedal arm.
5. Turn the switch counterclockwise until the clear
ance between the
tip of the screw portion and the
pedal arm becomes 0.5
to 1.0mm (0.02-0.04 in).
6. Tighten the lock nut.
7. Connect the switch connector.
IE CLUTCH SWITCH ADJUSTMENT
(FIG. 9B-6)
Clutch switch
--Clutch pedal
Fig. 98-6
1. Check to be sure that the clutch pedal has been
completely returned by
the return spring.
2. Disconnect the switch connector.
3. Loosen the lock nut of the switch.
4. Push the switch by hand until the push rod cannot
be seen from the tip portion of the switch.
5. Give the switch one reverse rotation.
6. Tighten the lock nut.
7. Connect the switch connector.
IE ACTUATOR CABLE ADJUSTMENT
(FIG. 9B-7)
Actuator
Adjust nut A
Adjust nut B
Fig. 98-7
1. Fix the accelerator pedal at the position where it
has been fully returned (with the throttle valve
fully closed).
2. Loosen the adjust nuts A and B.
3. With the outer cable pulled to the accelerator
pedal side (in the state
where the inner cable has
no play),
tighten the adjust nut A by hand until it
hits the bracket.
4. Tighten the adjust nut 8 to lock it.
STARTER SWITCH (FIG. 98-8)
Fig. 98-8
The starter switch is provided
with following switch
positions:
LOCK, OFF, ACC, ON, and START. Turning
the starter key to these positions completes a circuit
in
order to start and shut off the engine, and operate
the accessories.
Page 1613 of 1928
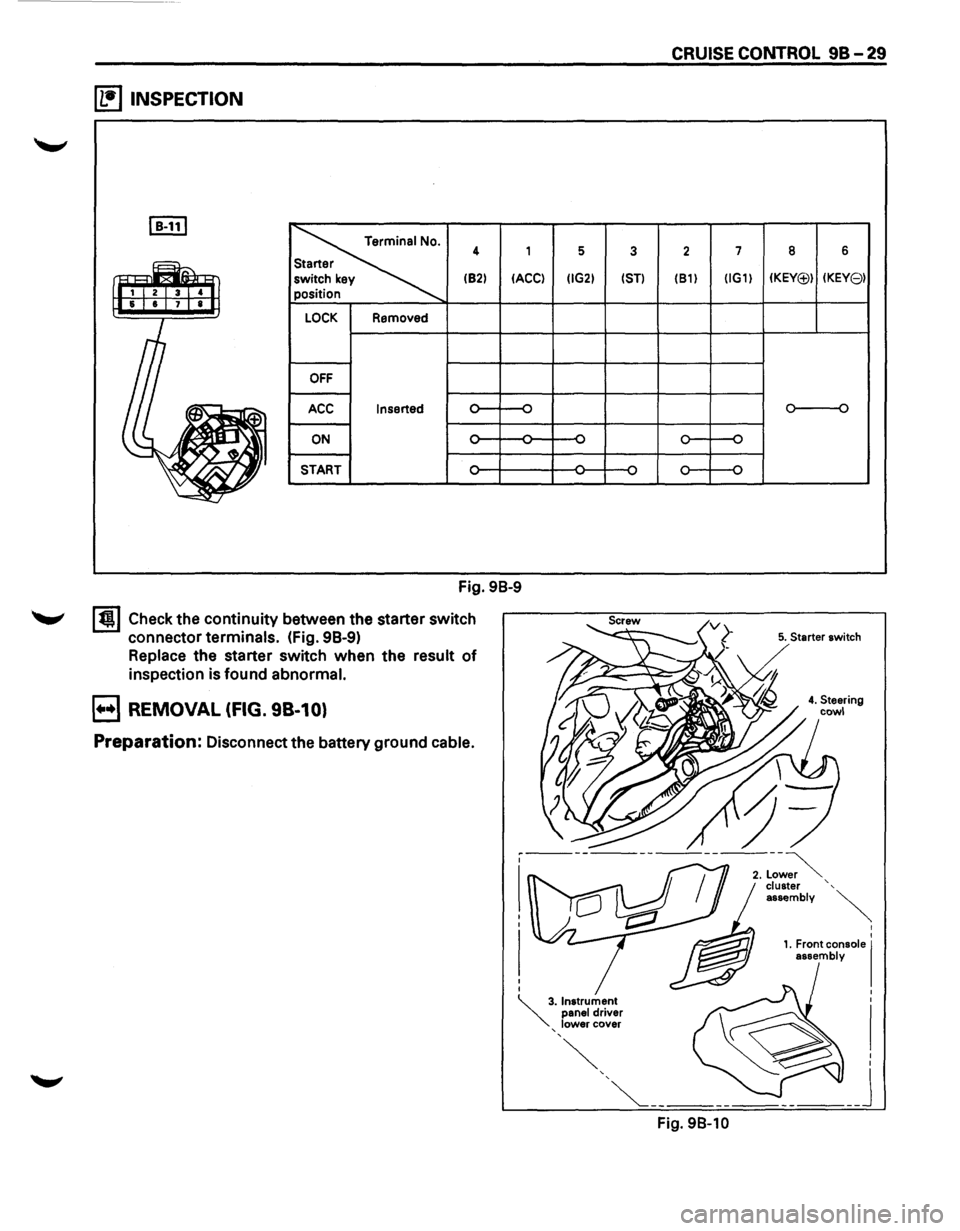
~ INSPECTION
I B-111
~
4 1
(82)
IACCI
LOCK Removed
OFF
ACC Inserted
ON -
START
Fig. 98-9
I t!l Check the continuity between the starter switch
connector
terminals. (fig. 98-9)
Replace the starter switch when the result of
inspection is found abnormal.
B REMOVAL (FIG. 98-10)
Preparation: Disconnect the battery ground cable.
5 3
IIG2) 1ST)
CRUISE CONTROL 98-29
2 7
(81) IIG1)
Fig. 98-10
8 6
IKEY(j;)) IKEY81
o----o
5. Starter switch
I
I
1. Front console I assembly
Page 1614 of 1928
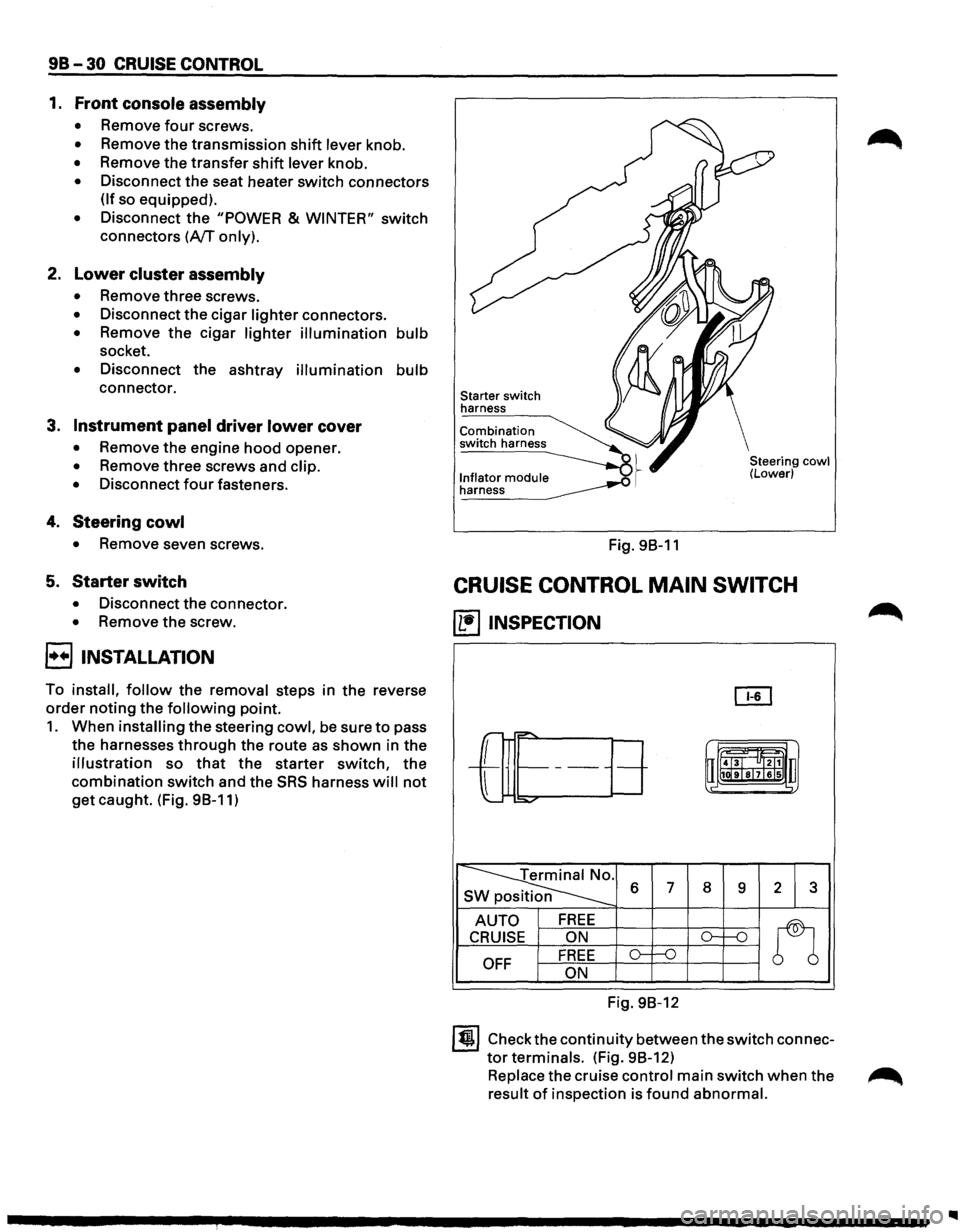
9B-30 CRUISE CONTROL
1. Front console assembly
• Remove four screws.
• Remove the transmission shift lever knob.
• Remove the transfer shift lever knob.
• Disconnect the seat heater switch connectors
(If so equipped).
• Disconnect the "POWER & WINTER" switch
connectors (A/T only).
2. Lower cluster assembly
• Remove three screws.
• Disconnect the cigar lighter connectors.
• Remove the cigar lighter illumination bulb
socket.
• Disconnect the ashtray illumination bulb
connector.
3. Instrument panel driver lower cover
• Remove the engine hood opener.
• Remove three screws and clip.
•
Disconnect four fasteners.
4. Steering cowl
• Remove seven screws.
5. Starter switch
• Disconnect the connector.
• Remove the screw.
8 INSTALLATION
To install, follow the removal steps in the reverse
order noting the following point.
1. When installing the steering cowl, be sure to pass
the harnesses
through the route as shown in the
illustration so that the starter switch, the
combination switch and the SRS harness will not
get caught. (Fig. 98-11)
Starter switch
harness
Combination
switch harness
l._n!~~~o!_ module __..o .~ ~
Fig. 98-11
Steering cowl (Lower)
CRUISE CONTROL MAIN SWITCH
(1!1 INSPECTION
OI1
r-="'
-L
r= t-------uii4J~l "ltl1 u
l
1111ilr9Tsl7lels .,
:::o.,..o-
~ s 6 7 8 9 2 3
AUTO FREE
n
CRUISE ON ()-1---n
OFF FREE o-f--0
ON
Fig. 98-12
ltjl Check the continuity between the switch connec
tor terminals. (Fig. 98-12)
Replace the cruise control main switch when the ~
result of inspection is found abnormal.
Page 1615 of 1928
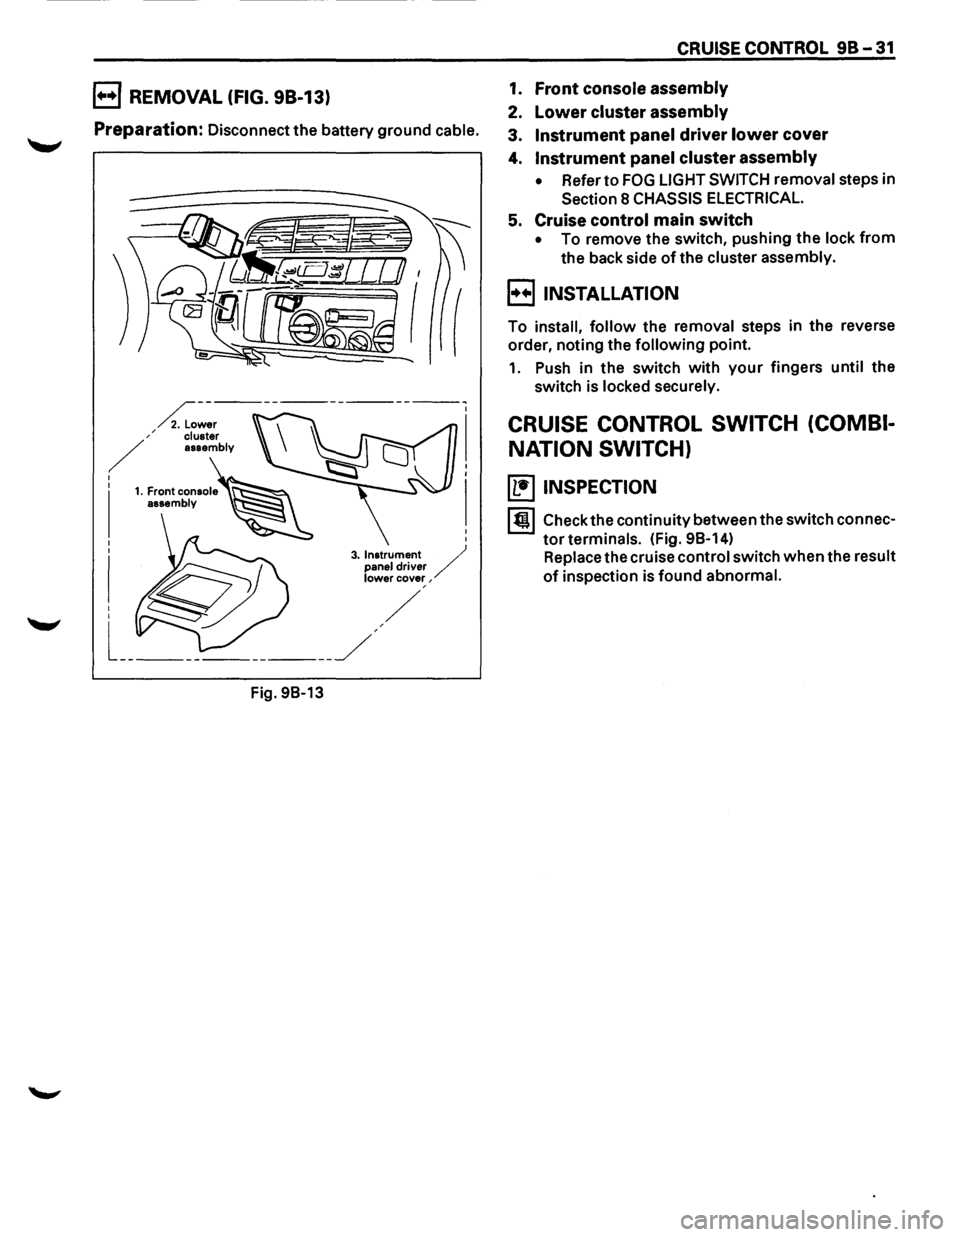
B REMOVAL (FIG. 98-13)
Preparation: Disconnect the battery ground cable.
Fig.
98-13
CRUISE CONTROL 98-31
1. Front console assembly
2. Lower cluster assembly
3. Instrument panel driver lower cover
4. Instrument panel cluster assembly
• Refer to FOG LIGHT SWITCH removal steps in
Section 8 CHASSIS ELECTRICAL.
5. Cruise control main switch
• To remove the switch, pushing the lock from
the back side of the cluster assembly.
B INSTALLATION
To install, follow the removal steps in the reverse
order, noting the
following point.
1. Push in the switch with your fingers until the
switch is locked securely.
CRUISE CONTROL SWITCH (COMBI
NATION SWITCH)
(b!] INSPECTION
I till Check the continuity between the switch connec
tor terminals. (Fig. 98-14)
Replace the cruise control switch when the result
of inspection is found abnormal.