JAGUAR X308 1998 2.G Workshop Manual
Manufacturer: JAGUAR, Model Year: 1998, Model line: X308, Model: JAGUAR X308 1998 2.GPages: 2490, PDF Size: 69.81 MB
Page 2421 of 2490
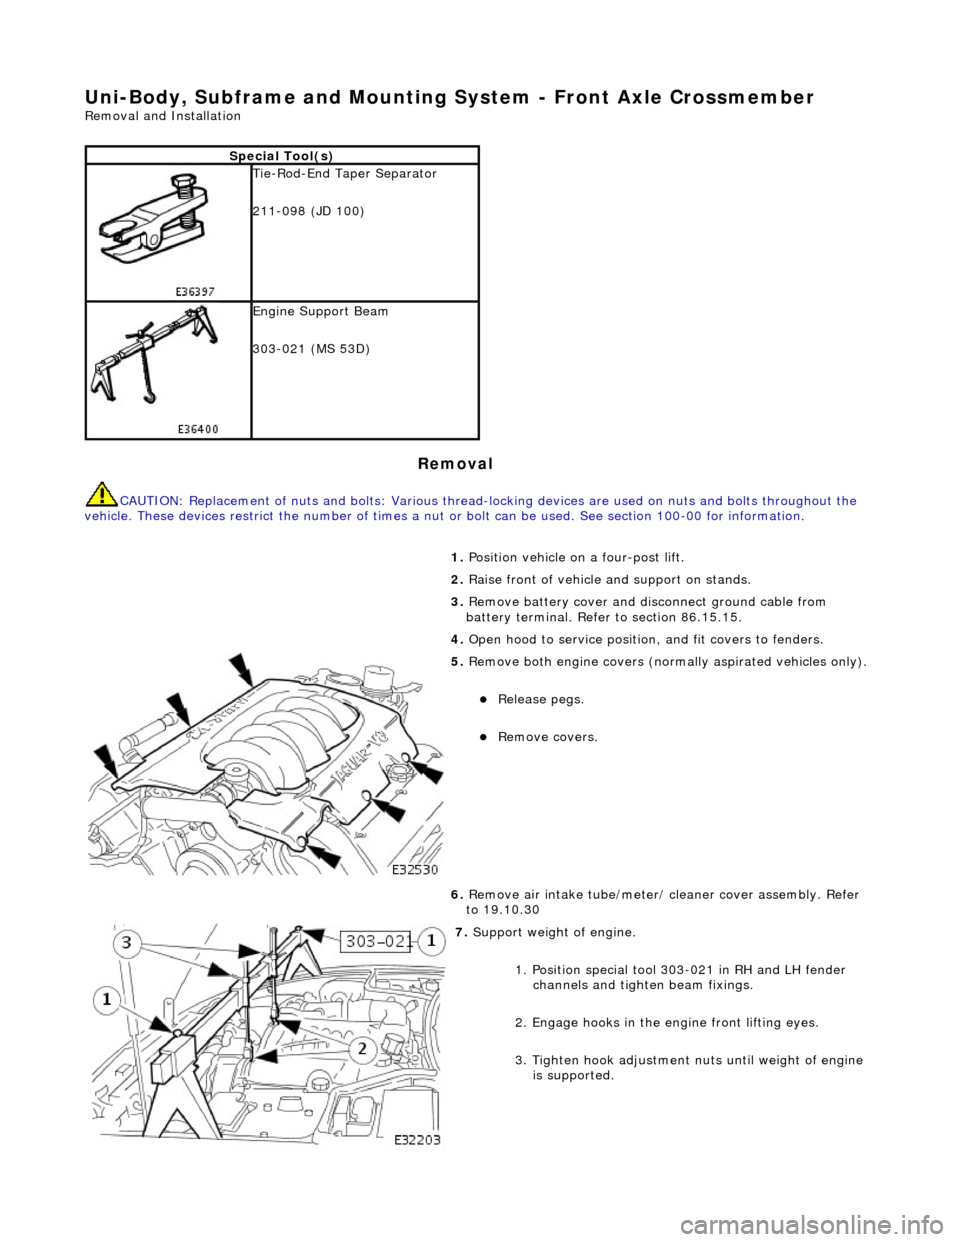
Uni-Body, Subframe and Mounting System - Front Axle Crossmember
Removal and Installation
Removal
CAUTION: Replacement of nuts and bolts: Various thread-locking devices are used on nuts and bolts throughout the
vehicle. These devices restrict the number of times a nut or bolt can be used. See section 100-00 for information.
Special Tool(s)
Tie-Rod-End Taper Separator
211-098 (JD 100)
Engine Support Beam
303-021 (MS 53D)
1. Position vehicle on a four-post lift.
2. Raise front of vehicle and support on stands.
3. Remove battery cover and disc onnect ground cable from
battery terminal. Refer to section 86.15.15.
4. Open hood to service position, and fit covers to fenders.
5. Remove both engine covers (nor mally aspirated vehicles only).
Release pegs.
Remove covers.
6. Remove air intake tube/meter/ cleaner cover assembly. Refer
to 19.10.30
7. Support weight of engine.
1. Position special tool 303-021 in RH and LH fender channels and tighte n beam fixings.
2. Engage hooks in the en gine front lifting eyes.
3. Tighten hook adjustment nuts until weight of engine is supported.
Page 2422 of 2490

8. Remove generator front cooling duct.
Remove bolt.
Move duct rearwards to rele ase tang from undertray.
Release front duct from rear vertical duct.
9. Remove scrivets or screws se curing undertray to bumper
cover. Discard scrivets.
10. Remove and discard tiestrap securing undertray to body
brace.
11. At each side of vehicle, remo ve and discard scrivet securing undertray to wheelarch liner.
12. Remove undertray from vehicle.
13. Remove both front road wheels. Refer to Section 100-02.
14. Remove both front road springs. Refer to 60. 20.02.
15. Disconnect wheel speed sensor harness connectors.
Page 2423 of 2490
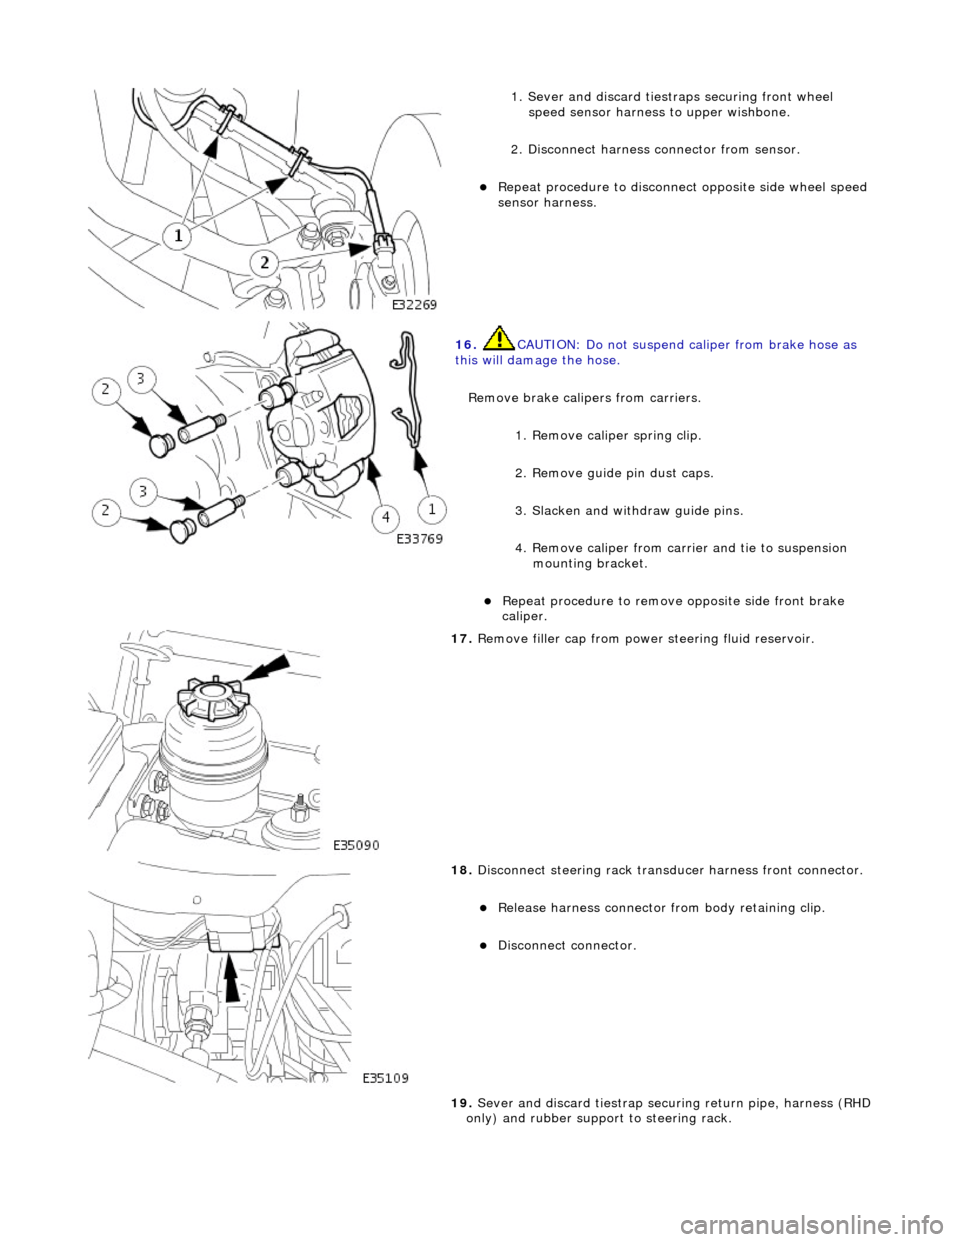
1. Sever and discard tiestraps securing front wheel
speed sensor harness to upper wishbone.
2. Disconnect harness connector from sensor.
Repeat procedure to disconnect opposite side wheel speed
sensor harness.
16. CAUTION: Do not suspend caliper from brake hose as
this will damage the hose.
Remove brake calipers from carriers.
1. Remove caliper spring clip.
2. Remove guide pin dust caps.
3. Slacken and withdraw guide pins.
4. Remove caliper from carrier and tie to suspension mounting bracket.
Repeat procedure to remove opposite side front brake
caliper.
17. Remove filler cap from power steering fluid reservoir.
18. Disconnect steering rack transducer harness front connector.
Release harness connector from body retaining clip.
Disconnect connector.
19. Sever and discard tiestrap secu ring return pipe, harness (RHD
only) and rubber support to steering rack.
Page 2424 of 2490

20. RHD vehicles. Sever and discard tiestrap securing harness to
steering rack.
21. Route harness from behind steering return pipe.
22. Position a drain receptacle below pinion housing.
23. Remove pipe retaining plate secu ring bolt and withdraw plate.
24. Drain power steering fluid.
Disconnect pipes and al low fluid to drain.
Remove and discard 'O'-ring seals from pipe connectors.
Fit blanking plugs to pipe connectors and pinion housing
ports.
25. Remove drain receptacle.
26. Remove pipe support from steering rack.
Release return pipe from support.
Page 2425 of 2490
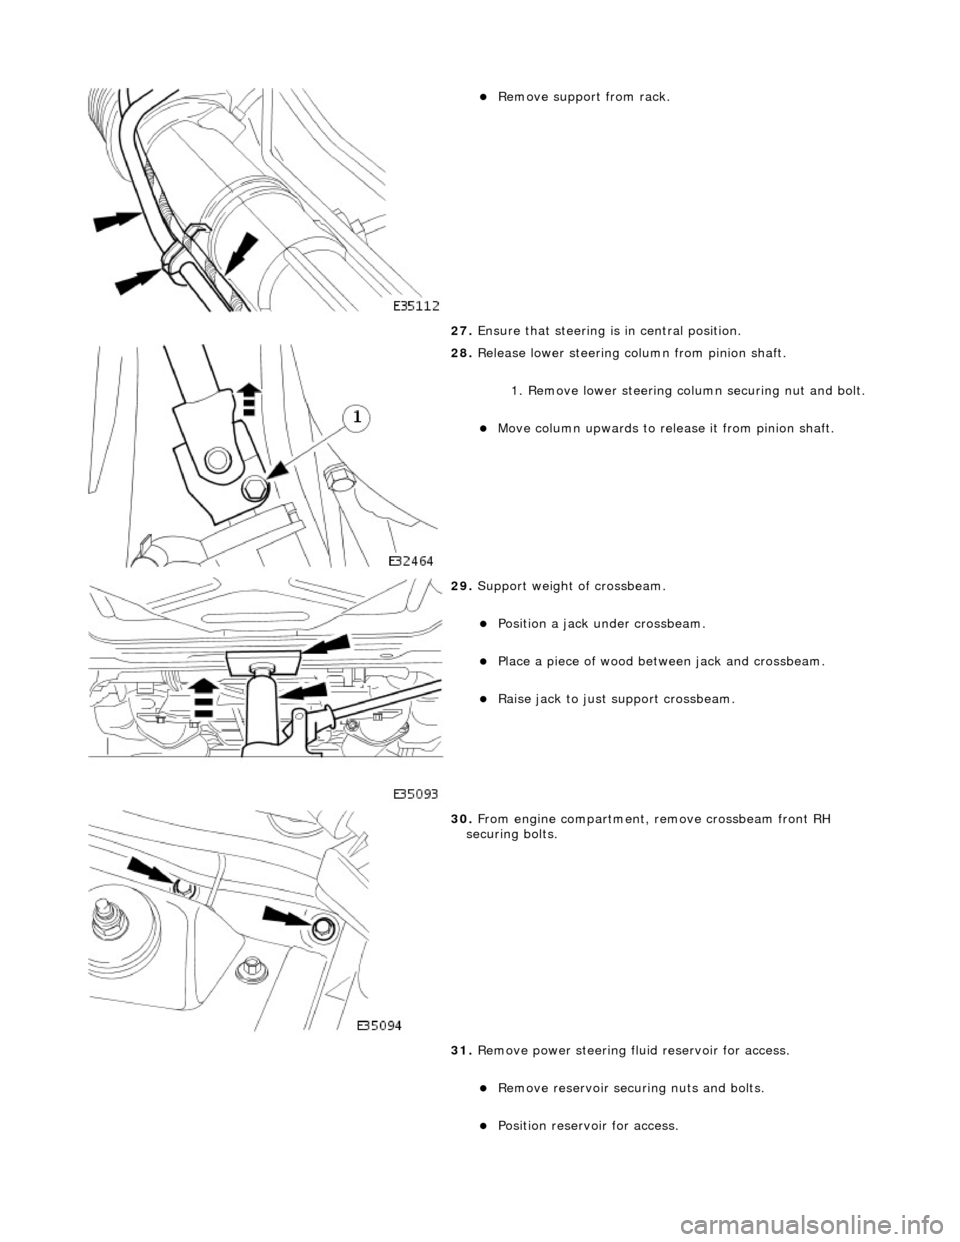
Remove support from rack.
27. Ensure that steering is in central position.
28. Release lower steering column from pinion shaft.
1. Remove lower steering co lumn securing nut and bolt.
Move column upwards to release it from pinion shaft.
29. Support weight of crossbeam.
Position a jack under crossbeam.
Place a piece of wood between jack and crossbeam.
Raise jack to just support crossbeam.
30. From engine compartment, remove crossbeam front RH
securing bolts.
31. Remove power steering fl uid reservoir for access.
Remove reservoir securing nuts and bolts.
Position reservoir for access.
Page 2426 of 2490
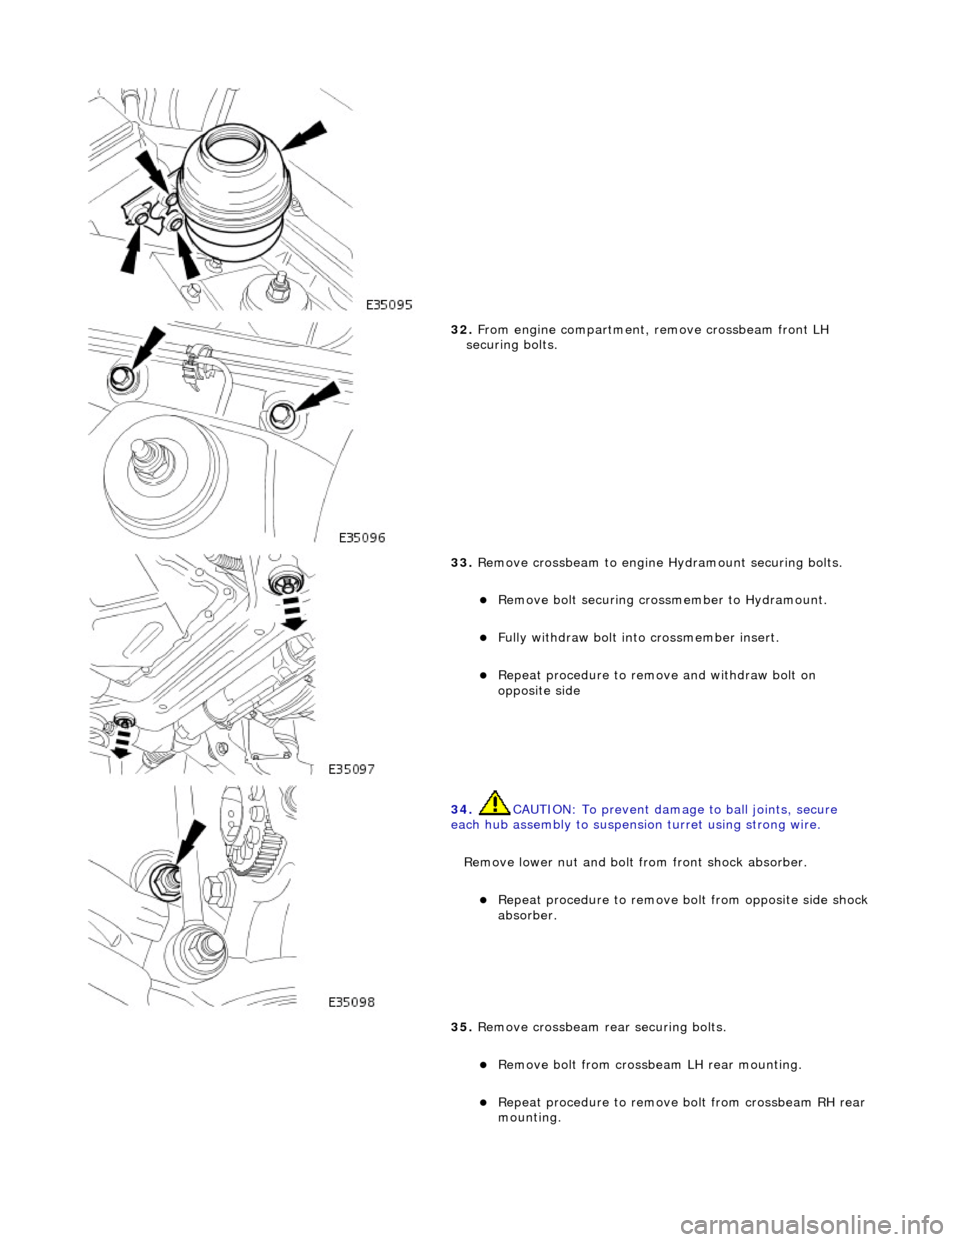
32. From engine compartment, remove crossbeam front LH
securing bolts.
33. Remove crossbeam to engine Hydramount securing bolts.
Remove bolt securing cros smember to Hydramount.
Fully withdraw bolt into crossmember insert.
Repeat procedure to remove and withdraw bolt on
opposite side
34. CAUTION: To prevent damage to ball joints, secure
each hub assembly to suspensi on turret using strong wire.
Remove lower nut and bolt from front shock absorber.
Repeat procedure to remove bo lt from opposite side shock
absorber.
35. Remove crossbeam rear securing bolts.
Remove bolt from crossbeam LH rear mounting.
Repeat procedure to remove bolt from crossbeam RH rear
mounting.
Page 2427 of 2490

36. Ensure that steering transducer harness is clear of return pipe and LH side body.
37. Lower and traverse front suspension assembly clear of
vehicle.
38. With assistance, lift front suspension as sembly onto bench.
39. Remove nut securing each tie ro d outer ball joint to steering
arm.
40. Release tie rod ball joint from steering arm.
1. Install special tool 211-098 on tie rod outer ball joint.
2. Tighten tool bolt to re lease ball joint taper pin.
3. Remove tool and release tie rod from steering arm.
Repeat procedure to release opposite side tie rod ball
joint.
41. Remove steering harness fr om LH suspension turret.
Release harness securing clip s from suspension turret.
Mark position of clips on harness.
Remove tape securing clips to harness and discard clips.
42. Disconnect and remove steering harness.
Page 2428 of 2490

Disconnect harness connector from transducer.
Remove harness from suspension assembly.
43. Remove steering rack from crossbeam.
1. Remove steering rack securing bolts.
2. Remove steering rack and mounting brackets.
44. Release stabilizer bar from link arms.
Remove link arm to stabil izer bar securing nut.
Release link arm from stabilizer bar.
Repeat procedure to release opposite end of stabilizer bar
from link arm.
45. Remove stabilizer bar from crossbeam.
Remove stabilizer bar securing bolts.
Remove stabilizer bar mountin g brackets and remove bar
from crossbeam.
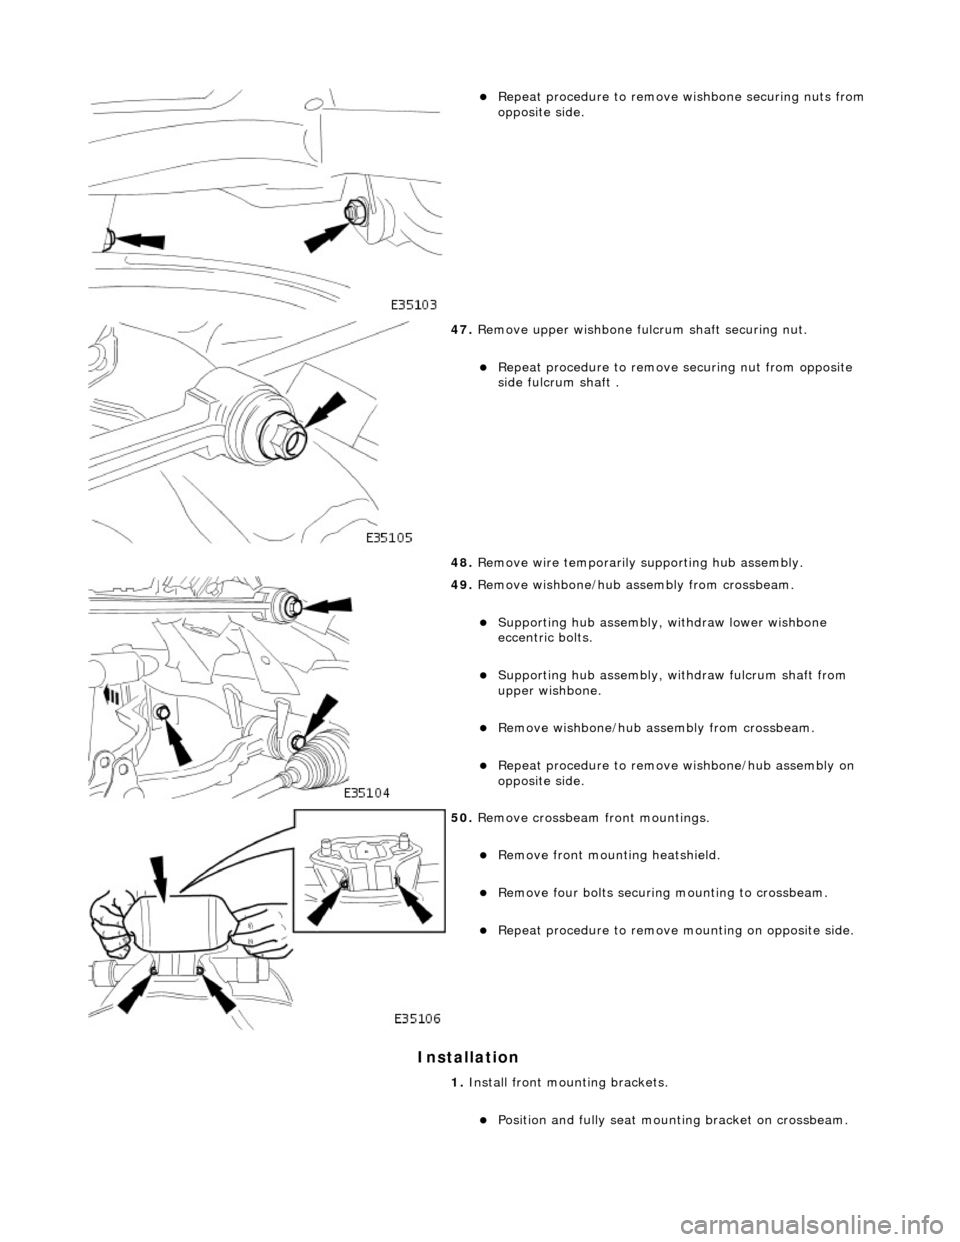
46. Remove wishbone securing nuts.
1. Remove lower wishbone front arm eccentric bolt
securing nut.
2. Remove lower wishbone rear arm eccentric bolt
securing nut.
Page 2429 of 2490
Installation
Repeat procedure to remove wishbone securing nuts from
opposite side.
47. Remove upper wishbone fu lcrum shaft securing nut.
Repeat procedure to remove securing nut from opposite
side fulcrum shaft .
48. Remove wire temporarily supporting hub assembly.
49. Remove wishbone/hub assembly from crossbeam.
Supporting hub assembly, wi thdraw lower wishbone
eccentric bolts.
Supporting hub assembly, wi thdraw fulcrum shaft from
upper wishbone.
Remove wishbone/hub assembly from crossbeam.
Repeat procedure to remove wishbone/hub assembly on
opposite side.
50. Remove crossbeam front mountings.
Remove front mounting heatshield.
Remove four bolts securing mounting to crossbeam.
Repeat procedure to remove mounting on opposite side.
1. Install front mounting brackets.
Position and fully seat mounting bracket on crossbeam.
Page 2430 of 2490
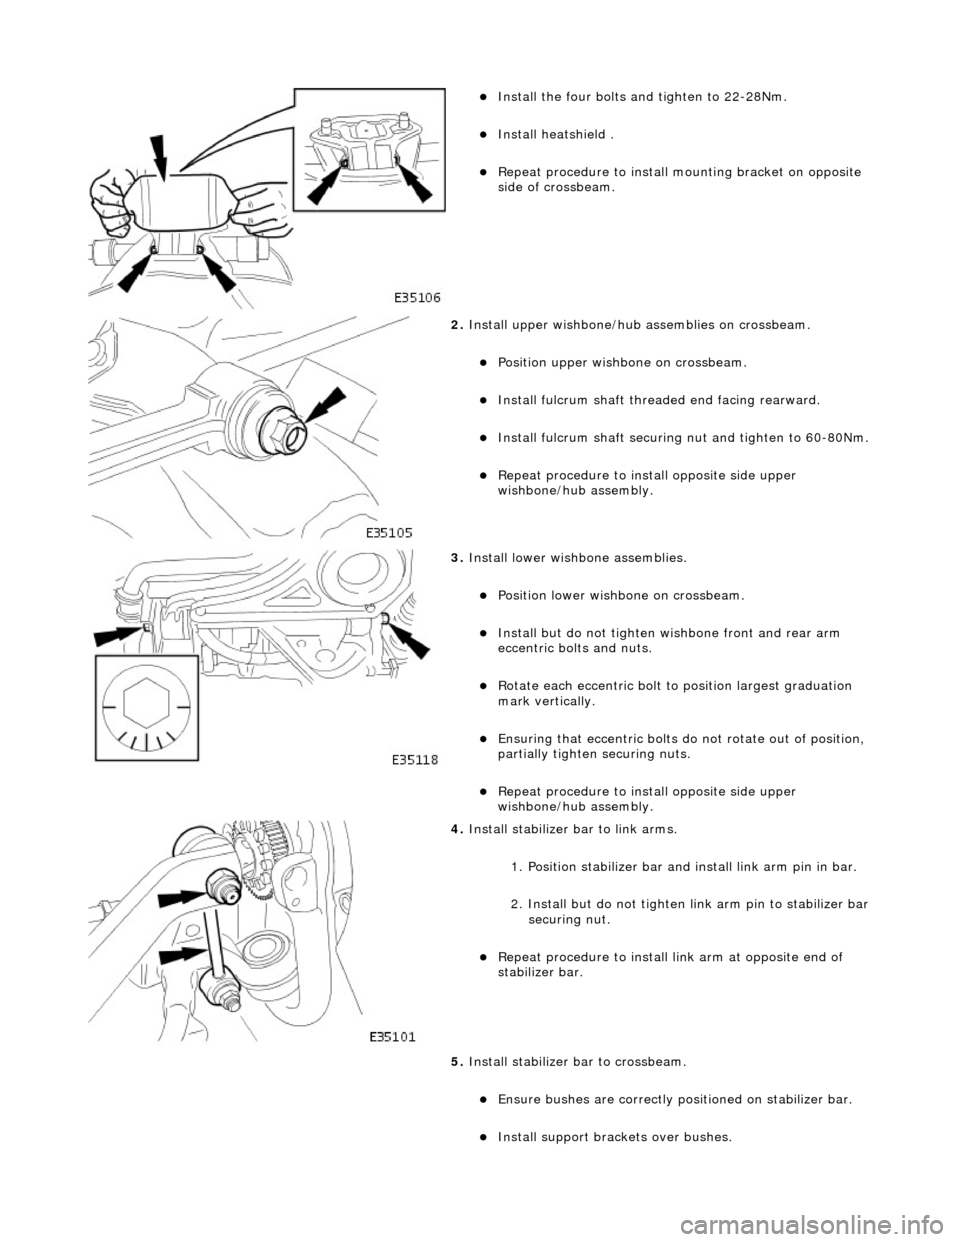
Install the four bolts and tighten to 22-28Nm.
Install heatshield .
Repeat procedure to install mounting bracket on opposite
side of crossbeam.
2. Install upper wishbone/hub assemblies on crossbeam.
Position upper wishbone on crossbeam.
Install fulcrum shaft thread ed end facing rearward.
Install fulcrum shaft securing nut and tighten to 60-80Nm.
Repeat procedure to install opposite side upper
wishbone/hub assembly.
3. Install lower wishbone assemblies.
Position lower wishbone on crossbeam.
Install but do not tighten wi shbone front and rear arm
eccentric bolts and nuts.
Rotate each eccentric bolt to position largest graduation
mark vertically.
Ensuring that eccentric bolts do not rotate out of position,
partially tighten securing nuts.
Repeat procedure to inst all opposite side upper
wishbone/hub assembly.
4. Install stabilizer bar to link arms.
1. Position stabilizer bar and install link arm pin in bar.
2. Install but do not tighten li nk arm pin to stabilizer bar
securing nut.
Repeat procedure to install link arm at opposite end of
stabilizer bar.
5. Install stabilizer bar to crossbeam.
Ensure bushes are correctly posi tioned on stabilizer bar.
Install support brackets over bushes.