Seat JAGUAR X308 1998 2.G Owner's Manual
[x] Cancel search | Manufacturer: JAGUAR, Model Year: 1998, Model line: X308, Model: JAGUAR X308 1998 2.GPages: 2490, PDF Size: 69.81 MB
Page 119 of 2490

I
nstallation
1.
CAUTI
ON: Make sure the Ca
strol NTR grease is only
applied to the inner surface of the mounting bushes. Failure to
follow this instruction may affect the retention of the bushes in
the retaining brackets.
Apply a thin film of Castrol NTR grease to the inner surface of
the bushes.
2. Install
mounting rubbers on stabilizer bar.
3. N
OTE: Ensure mounti
ng rubbers seat correctly between
flanges.
Install and fully seat mounti ng brackets on rubbers.
4. Position stabil
izer bar assembly
on link arms and install but do
not tighten ball joint securing nuts.
5. Install stabilizer bar mounting bolts.
Page 124 of 2490

Apply a thi
n film of Castrol NTR
grease to the inner surface of
the bushes.
2. Position mounti n
g rubbers on stabilizer bar.
3. NO
TE: Ensure mounti
ng rubbers seat correctly between
flanges.
Install and fully seat mounti ng brackets on rubbers.
4. Position stabil izer bar assembl
y
on link arms and install but do
not tighten nuts.
5. Ins t
all stabilizer bar mounting bolts.
Install but do not tighten
stabilizer bar LH mounting
bracket bolts.
Instal
l stabilizer bar RH
mounting bracket bolts and
tighten to 30-40Nm.
Tigh ten LH mountin
g bracke
t bolts to 30-40Nm.
6. Secure link arms to stabilizer bar.
Tight
en LH link arm to stabilizer bar nut to 60-80Nm.
Tighte
n RH link arm to stabilizer bar nut to 60-80Nm.
Page 132 of 2490

2. Apply a su
itable lubricant to exterior of each half-bush.
3. Install soft covers to vise jaws.
4. Install half-bush
/spacer tu
be assembly in wishbone.
1. Align half-bush/spacer tube assembly with wishbone bore.
2. Position wishbone and half bush/spacer tube assembly between vise jaws.
Cl
ose vise jaws until half-bush/tube assembly is fully
seated in wishbone.
5. Remove wishbone from vise.
6. Instal
l second half-bush in wishbone.
1. Align and engage second half-bush with installed
spacer tube.
2. Position wishbone and half bush assembly between vise jaws.
Close
vise jaws until second half-bush assembly is fully
seated.
7. Remove wishbone from vise.
8. Following steps 1 to 7, install final bush assembly to wishbone.
9. Inst al
l wishbone on crossbeam.
Posi
ti
on wishbone on crossbeam.
Install
fulcrum shaft with threaded end rearward.
Install nut an
d tighten to 60-80Nm.
10. Remove wire temporarily securing vertical link to road spring.
Page 138 of 2490

In
stallation
1.
Position the vertical link so that inboard side of the
bearing bore is resting on suitable supports on the
press-bed.
2. Position special tool 204-197 on top of bearing.
3. Operate press to remove bearing from vertical link,
discard bearing.
11. Clean relevant parts.
1. NOTE : Th
e gap between the ears of the circlip must be
positioned so that it is in the lowest position of the bore when the
vertical link is installed on the vehicle. Refer to General
Procedures for further information.
Install outboard circlip in vertical link.
2. Using a h y
draulic press, install
bearing in the vertical link.
1. Position vertical link on the press bed with outboard
side of the vertical link face down.
2. Position bearing on vertical link.
3. Position special tool on top of wheel bearing.
4. Operate press to install be aring, applying a three-ton
load to ensure that the bearing is fully seated.
3. CAUTIO
N: To prevent damage to the integral wheel-
bearing seal, select circlip plier en ds that do not protrude through
the circlip ears.
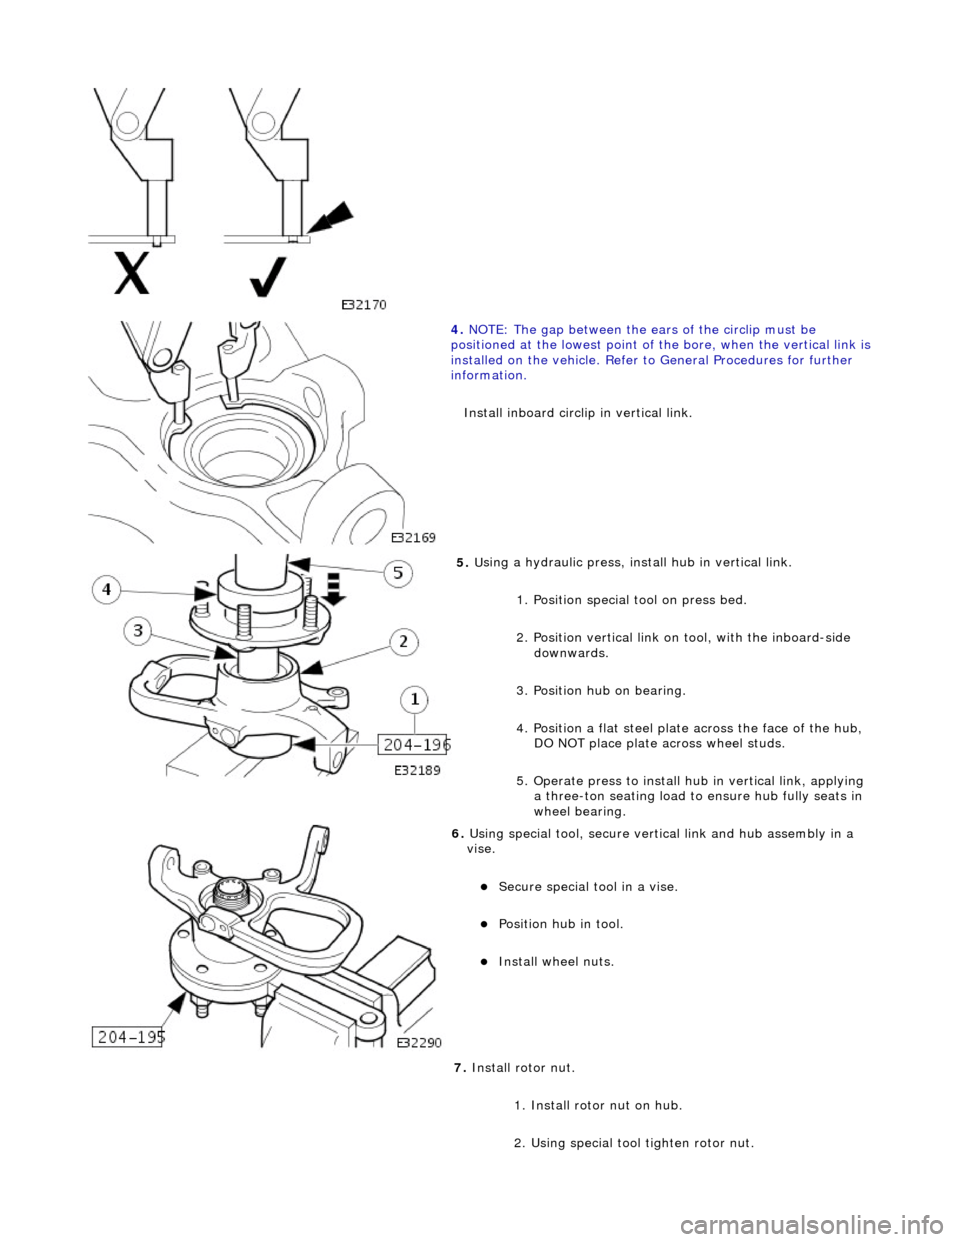
4. NOTE : Th
e gap between the ears of the circlip must be
positioned so that it is in the lowest position of the bore, when the
vertical link is installed on the vehicle. Refer to General
Procedures for further information.
Page 139 of 2490

Inst
all inboard circli
p in vertical link.
5. U
sing a hydraulic press, install hub in vertical link.
1. Position special tool on press bed.
2. Position the vertical link on the tool, with the inboard-side face down.
3. Position hub on bearing.
4. Position a flat steel plate across the face of the hub,
DO NOT place plate ac ross wheel studs.
5. Operate press to install the hub, applying a three-ton
load to ensure hub is fully seated in bearing.
6. U
sing special tool, secure vertical link and hub assembly in a
vise.
Secure special
tool in a vise.
Posit
ion hub in tool.
Inst
all wheel nuts.
7. Install
rotor nut .
1. Install rotor nut on hub.
2. Using special tool tighten rotor nut.
8. CAUTION: Do not slacken the rotor nut to engage the
spring clip.
• NOTE: If the castellated slots of the rotor nut are not aligned,
tighten the rotor nut further unti l the spring clip engages the
Page 144 of 2490

In
stallation
the vertical li
nk.
13 . N
OTE: Ensure
the vertical link is level, and the supports are
situated as near to the bearing bore as possible.
Using a hydraulic press, remove wheel bearing from the vertical
link.
1. Position the vertical link so that the inboard side of the bearing bore is resting on suit able supports on
the press-bed.
2. Position special tool 204-197 on top of bearing.
3. Operate press to remove bearing from vertical link,
discard bearing.
14. Clean relevant parts.
1. NOTE : Th
e gap between the ears of the circlip must be
positioned so that it is in the lowest position of the bore when the
vertical link is installed on the vehicle. Refer to General
Procedures for further information.
Install outboard circlip in vertical link.
2. Usi ng a h
ydraulic press, install wheel bearing in vertical link.
1. Position vertical link on the press bed with outboard
side of the vertical link face down.
2. Position wheel bearing on vertical link.
3. Position special tool on top of wheel bearing.
4. Operate press to install be aring, applying a three-ton
seating load to ensure the bearing is fully seated.
3. CAUTION: To prevent damage to the integral bearing
seal, select circlip plier ends th at do not protrude through the
circlip ears.
Page 145 of 2490

4. NOTE
: The gap between the ears of the circlip must be
positioned at the lowest point of the bore, when the vertical link is
installed on the vehicl e. Refer to General Procedures for further
information.
Install inboard circli p in vertical link.
5. U
sing a hydraulic press, install hub in vertical link.
1. Position special tool on press bed.
2. Position vertical link on tool, with the inboard-side downwards.
3. Position hub on bearing.
4. Position a flat steel plate across the face of the hub,
DO NOT place plate ac ross wheel studs.
5. Operate press to install hu b in vertical link, applying
a three-ton seating load to ensure hub fully seats in
wheel bearing.
6. U
sing special tool, secure vertical link and hub assembly in a
vise.
Secure special
tool in a vise.
Posit
ion hub in tool.
Inst
all wheel nuts.
7. Install rotor nut.
1. Install rotor nut on hub.
2. Using special tool tighten rotor nut.
Page 150 of 2490

In
stallation
Using a hy
draulic press, remove
wheel bearing from the vertical
link.
1. Position the vertical link so that the inboard side of the bearing bore is resting on suit able supports on
the press-bed.
2. Position special tool on top of bearing.
3. Operate press to remove bearing from vertical link,
discard bearing.
14. Clean relevant parts.
1. NOTE : Th
e gap between the ears of the circlip must be
positioned so that it is in the lowest position of the bore when the
vertical link is installed on the vehicle. Refer to General
Procedures for further information.
Install outboard circlip in vertical link.
2. Using a h y
draulic press, instal
l bearing in vertical link.
1. Position vertical link on the press bed with outboard
side of the vertical link face down.
2. Position wheel bearing on vertical link.
3. Position special tool on top of wheel bearing.
4. Operate press to install the bearing, applying a three- ton seating load to ensure bearing is fully seated.
3. CAUTIO
N: To prevent damage to the integral bearing
seal, select circlip plier ends th at do not protrude through the
circlip ears.
4. NOTE : Th
e gap between the ears of the circlip must be
positioned at the lowest point of the bore, when the vertical link is
installed on the vehicl e. Refer to General Procedures for further
information.
Page 151 of 2490

Inst
all inboard circli
p in vertical link.
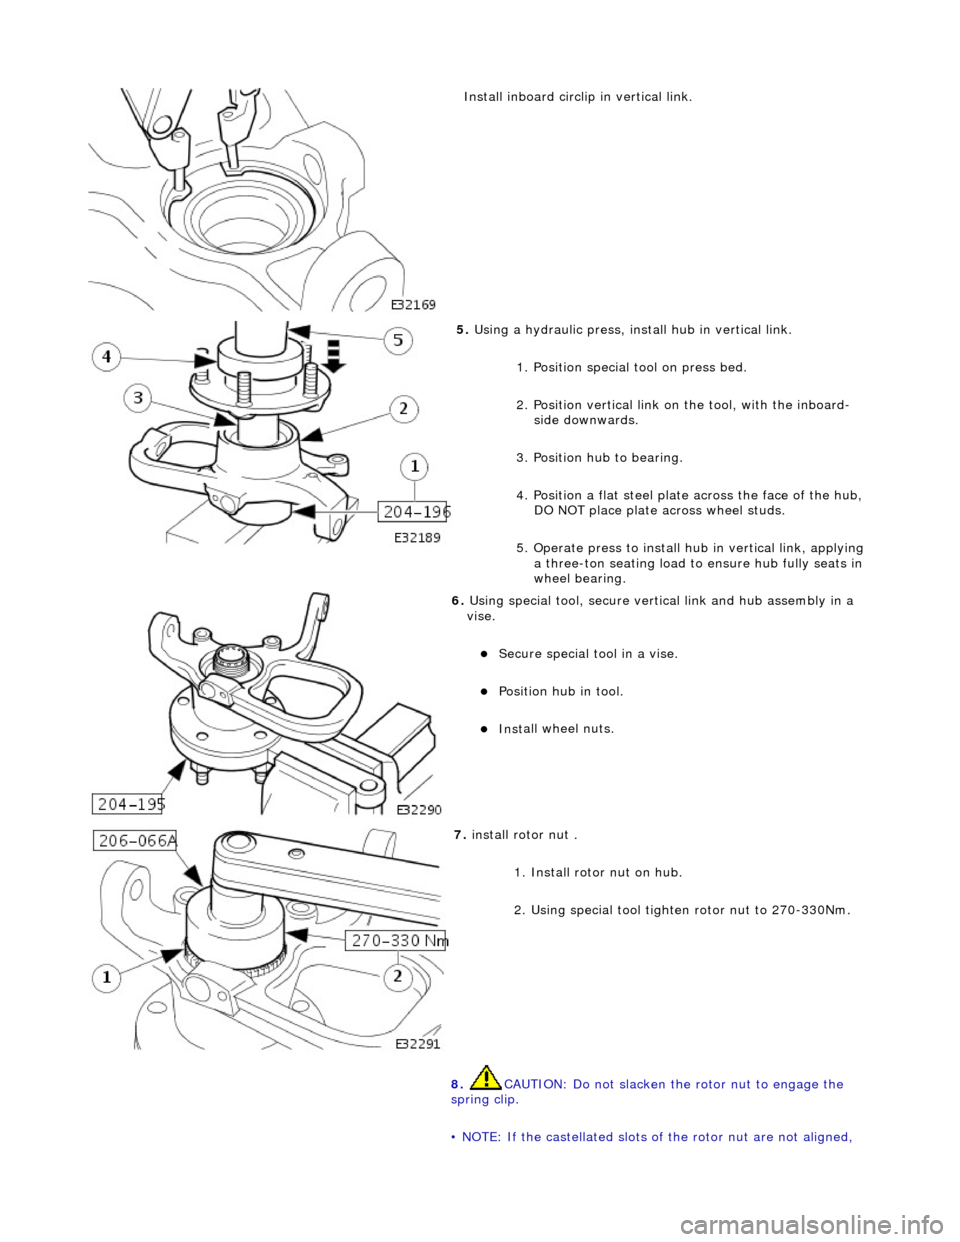
5. U
sing a hydraulic press, install hub in vertical link.
1. Position special tool on press bed.
2. Position vertical link on the tool, with the inboard-side downwards.
3. Position hub to bearing.
4. Position a flat steel plate across the face of the hub,
DO NOT place plate ac ross wheel studs.
5. Operate press to install hu b in vertical link, applying
a three-ton seating load to ensure hub fully seats in
wheel bearing.
6. U
sing special tool, secure vertical link and hub assembly in a
vise.
Secure special
tool in a vise.
Posit
ion hub in tool.
Inst
all wheel nuts.
7. i
nstall rotor nut .
1. Install rotor nut on hub.
2. Using special tool tighten rotor nut to 270-330Nm.
8. CAUTION: Do not slacken the rotor nut to engage the
spring clip.
• NOTE: If the castellated slots of the rotor nut are not aligned,
Page 168 of 2490

Each r
oad spring and is located between the wishbone in
tegral spring seat and the body suspension turret.
Each shoc
k absorber unit is installed
co-axially within the road spring.
The lo
wer end of each shock absorber is secured to the
wishbone by a bolt which also functions as a pivot.
Adaptive damping is av
ailable as an option.
A
rear stabi
lizer bar is installed on
Supercharged and Sport Suspension models . Mounted at the rear of the wishbone
tie assembly, the stabilizer bar is connected to the wishbone by short links.
Op era
tion
As each road wheel r
i
ses, move
ment is transmitted through th e hub carrier assembly to the wishbone and axle shaft. The
corresponding rise of the wishbone compre sses the road spring and partially telescopes the shock absorber. During this
action, the spring absorbs result ing shocks and the shock absorber minimizes spring oscillation.
During cornering, vehicle weight is transferred to the outer road wheel with a resulting tendency for the inner wheel to lift.
On Supercharged and Sport Suspension vehicl es, a rear stabilizer bar assists in minimizing this tendency by transferring a
proportion of potential lift of the inner wheel to the outer wheel. This results in enhanced body stability with improved
cornering capabilities.