torque JAGUAR X308 1998 2.G Service Manual
[x] Cancel search | Manufacturer: JAGUAR, Model Year: 1998, Model line: X308, Model: JAGUAR X308 1998 2.GPages: 2490, PDF Size: 69.81 MB
Page 567 of 2490
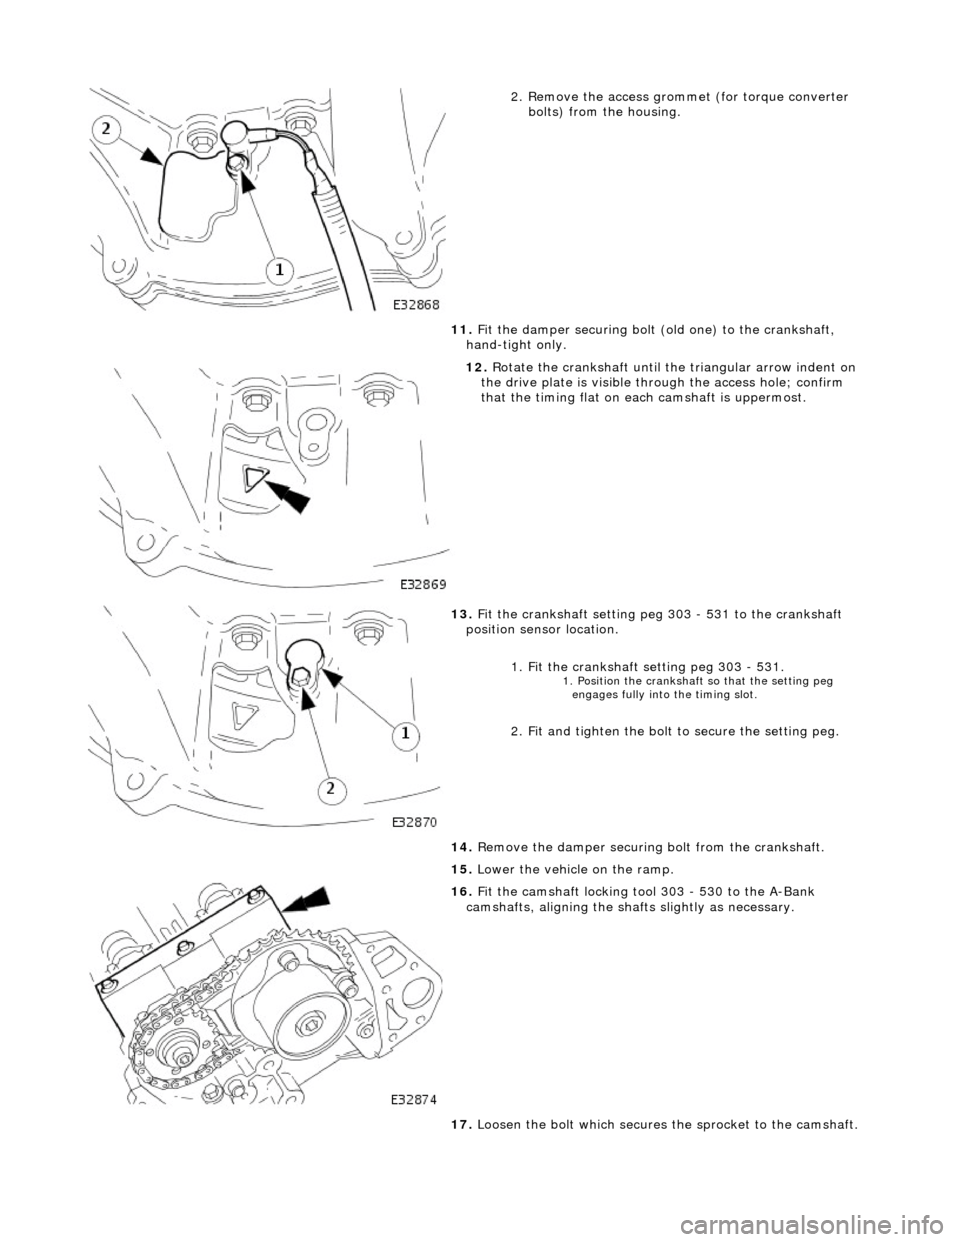
2
. Remove the access grommet (for torque converter
bolts) from the housing.
11. Fit the damper securing bolt (old one) to the crankshaft,
hand-tight only.
12
.
Rotate the crankshaft until the triangular arrow indent on
the drive plate is visible thro ugh the access hole; confirm
that the timing flat on ea ch camshaft is uppermost.
13
.
Fit the crankshaft setting peg 303 - 531 to the crankshaft
position sensor location.
1. Fit the crankshaft setting peg 303 - 531.
1. P
osition the crankshaft so that the setting peg
engages fully into the timing slot.
2
. Fit and tighten the bolt to secure the setting peg.
14. Remove the damper securing bolt from the crankshaft.
15. Lower the vehicle on the ramp.
16
.
Fit the camshaft locking tool 303 - 530 to the A-Bank
camshafts, aligning the shafts slightly as necessary.
17. Loosen the bolt which secures the sprocket to the camshaft.
Page 577 of 2490
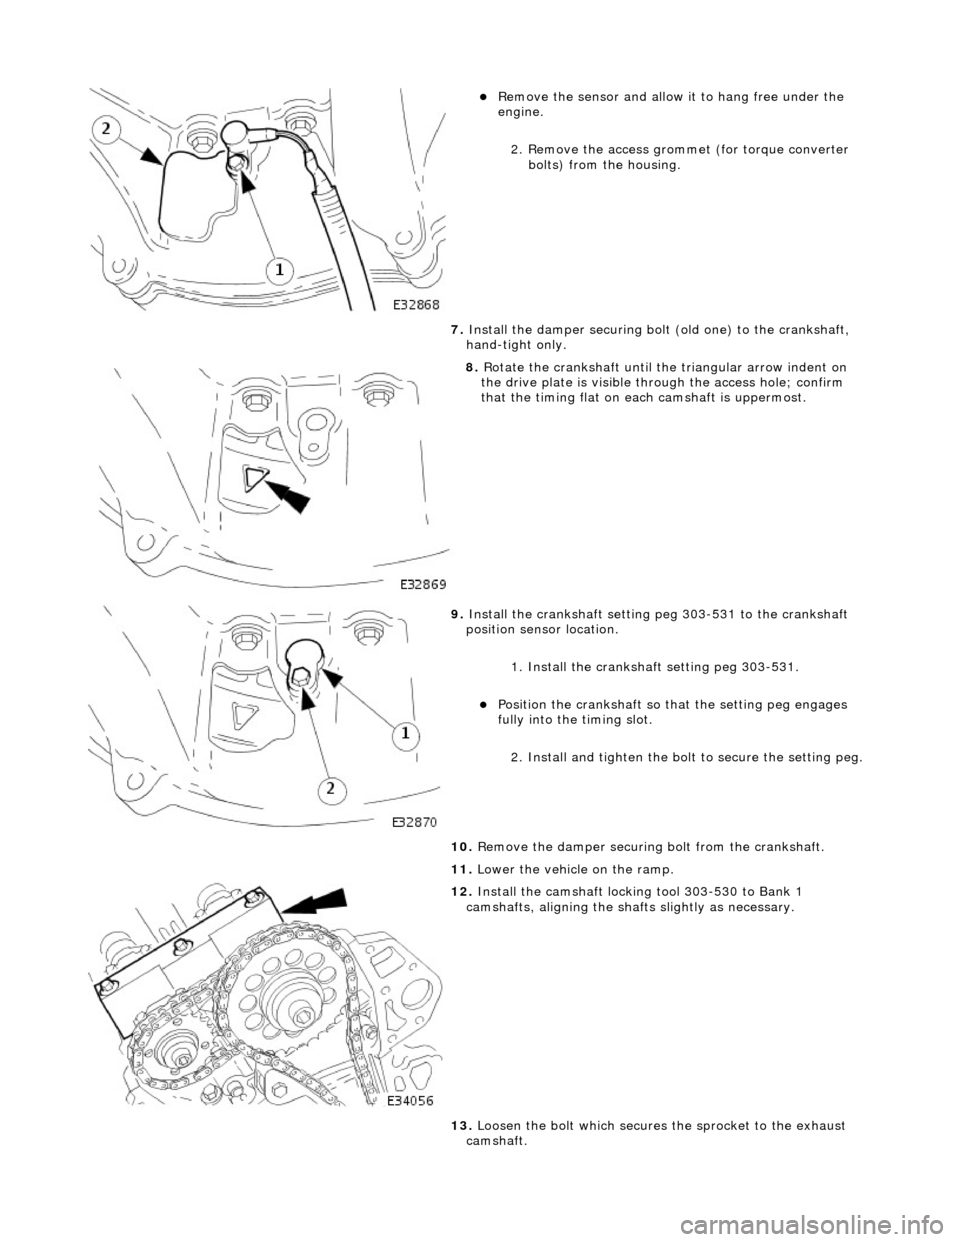
пЃ¬Remove the
sensor and allow
it to hang free under the
engine.
2. Remove the access grommet (for torque converter bolts) from the housing.
7. Install the damper securing bolt (old one) to the crankshaft,
hand-tight only.
8. R
otate the crankshaft until the triangular arrow indent on
the drive plate is visible thro ugh the access hole; confirm
that the timing flat on ea ch camshaft is uppermost.
9. Inst
all the crankshaft setting peg 303-531 to the crankshaft
position sensor location.
1. Install the crankshaft setting peg 303-531.
пЃ¬Position the crankshaft so that the settin
g peg engages
fully into the timing slot.
2. Install and tighten the bolt to secure the setting peg.
10. Remove the damper securing bolt from the crankshaft.
11. Lower the vehicle on the ramp.
12
.
Install the camshaft locking tool 303-530 to Bank 1
camshafts, aligning the shafts slightly as necessary.
13. Loosen the bolt which secures the sprocket to the exhaust
camshaft.
Page 587 of 2490
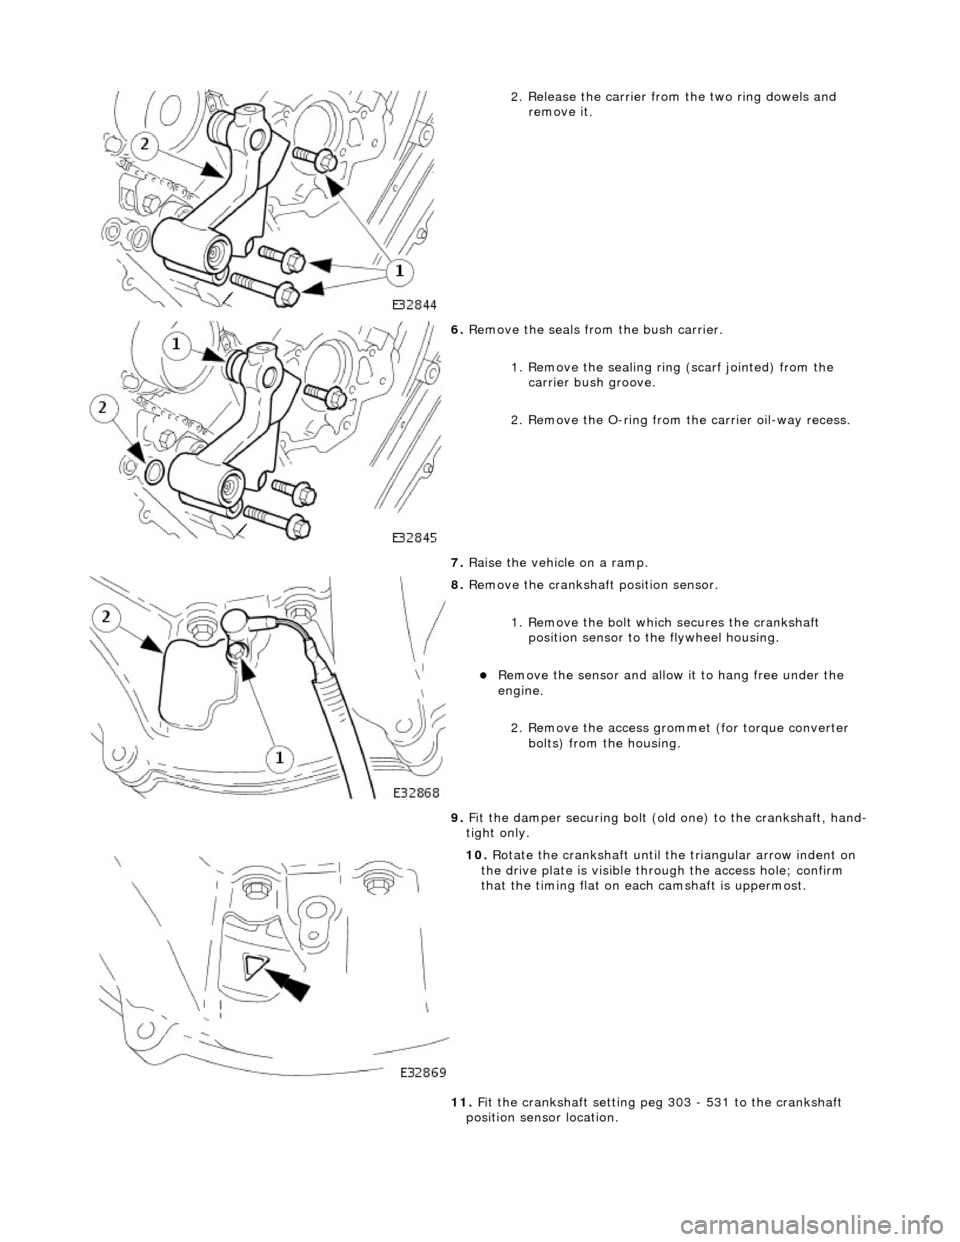
2
. Release the carrier from
the two ring dowels and
remove it.
6. R
emove the seals from the bush carrier.
1. Remove the sealing ring (scarf jointed) from the
carrier bush groove.
2. Remove the O-ring from the carrier oil-way recess.
7. Raise the vehicle on a ramp.
8. R
emove the crankshaft position sensor.
1. Remove the bolt which secures the crankshaft position sensor to the flywheel housing.
пЃ¬Remove the
sensor and allow
it to hang free under the
engine.
2. Remove the access grommet (for torque converter bolts) from the housing.
9. Fit the damper securing bolt (old one) to the crankshaft, hand-
tight only.
10
.
Rotate the crankshaft until the triangular arrow indent on
the drive plate is visible thro ugh the access hole; confirm
that the timing flat on ea ch camshaft is uppermost.
11. Fit the crankshaft setting peg 303 - 531 to the crankshaft
position sensor location.
Page 593 of 2490

Engine - Cr
ankshaft
Pulley4.0L NA V8 - AJ 27/3.2L NA V8 - AJ26
In-v
ehicle Repair
Remov
al
S
pecial Tool(s)
Cr
ankshaft locking, main tool
303-191
Adaptor
303-191-02
Crankshaft front
seal remover
303-541
Crankshaft front seal replacer
3
03-542
Crankshaft pull
ey/damper remover
303-588
1. Open the engine compartment and fit paintwork protection
sheets.
2. Set the engine compartment cover to the service access
position.
3. Remove the drive belt from the fro nt accessory drive. Refer to
Operation 12.10.40.
4. Remove the twin fan and motor assembly for access. Refer to
Operation 26.25.12
5. CAUTION: Under no circumstan ces should the crankshaft
setting peg 303-531 be used in the following operations, to lock
the crankshaft.
• NOTE: Should extra locking of the crankshaft be required, use a
lever against one torque converte r boss. Remove the plastic mesh
cover from the torque converter housing for access.
Page 596 of 2490
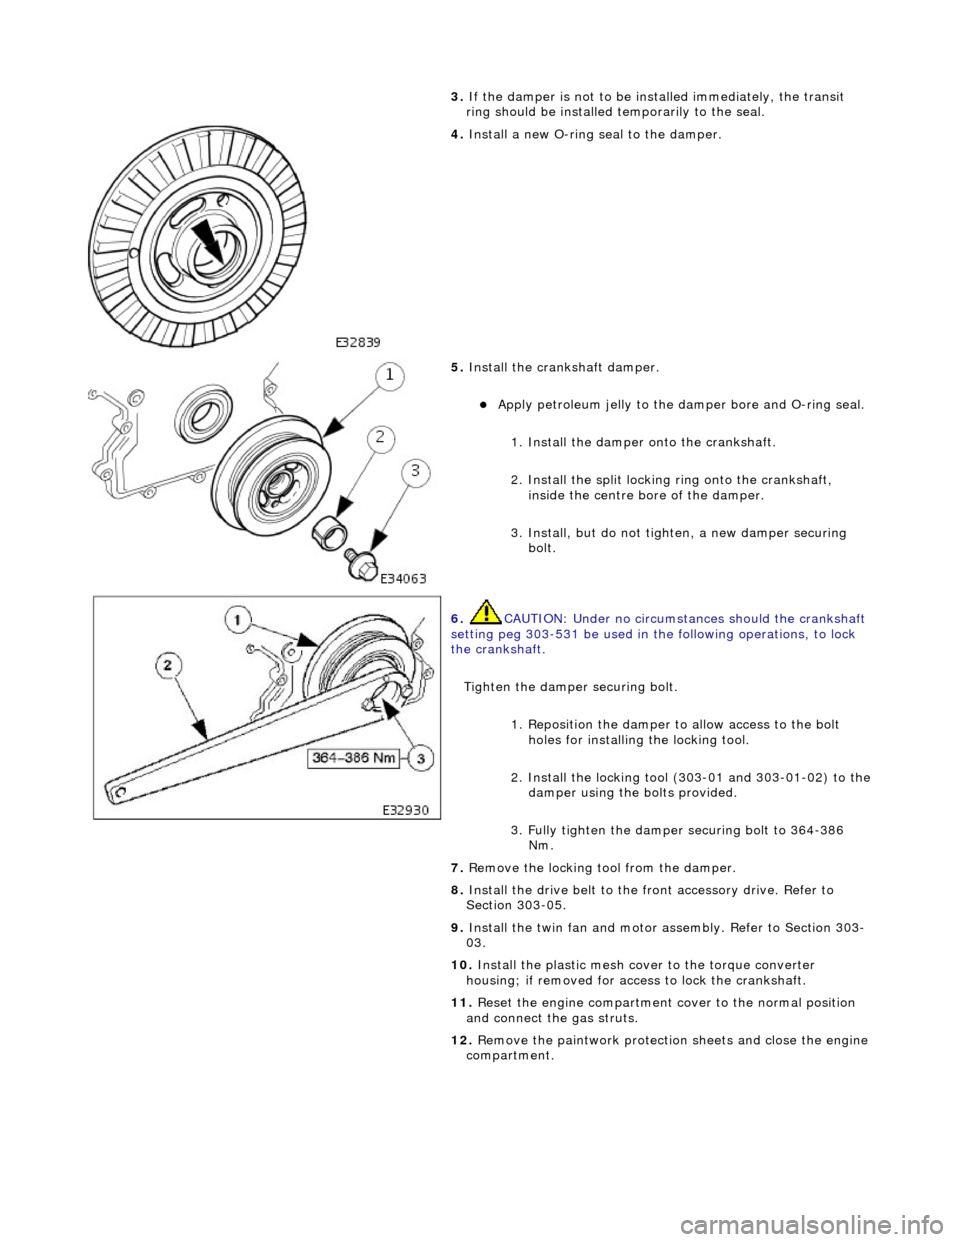
3.
If
the damper is not to be installed immediately, the transit
ring should be installed temporarily to the seal.
4. Install a new O-ri
ng seal to the damper.
5. Instal
l the crankshaft damper.
пЃ¬Apply petroleum jelly to the damper
bore and O-ring seal.
1. Install the damper onto the crankshaft.
2. Install the split locking ring onto the crankshaft,
inside the centre bo re of the damper.
3. Install, but do not tigh ten, a new damper securing
bolt.
6. CAUTIO
N: Under no circumstan
ces should the crankshaft
setting peg 303-531 be used in the following operations, to lock
the crankshaft.
Tighten the damper securing bolt. 1. Reposition the damper to allow access to the bolt holes for installing the locking tool.
2. Install the locking tool (303-01 and 303-01-02) to the
damper using the bolts provided.
3. Fully tighten the damper securing bolt to 364-386 Nm.
7. Re
move the locking tool from the damper.
8. Install the drive belt to the fr ont accessory drive. Refer to
Section 303-05.
9. Install the twin fan and motor assembly. Refer to Section 303-
03.
10. Install the plastic mesh cove r to the torque converter
housing; if removed for acce ss to lock the crankshaft.
11. Reset the engine compartment cover to the normal position
and connect the gas struts.
12. Remove the paintwork protection sheets and close the engine
compartment.
Page 599 of 2490

5
. Remove the twin fan and motor assembly for access. Refer to Operation 26.25.12
6
.
C
AUTION:
Under no circumstances should the crankshaft setting peg 303-531 be used in the following
operations, to lock the crankshaft.
NOTE:
Should extra locking of the crankshaft be required, use a lever against one torque converter boss.
Remove the plastic mesh cover from the torque converter housing for access.
Install the crankshaft locking tool to the damper. 1. Install adaptor 303-191-03 to the main locking tool 303-191.
2. Reposition the crankshaft/damper to align the mounting holes and install the locking tool to the damper using the bolts provided with the tool.
3. Loosen, but do not remove the damper securing bolt from the crankshaft.
7. Remove the locking tool from the damper. п‚·пЂ Remove the damper securing bolt.
Page 604 of 2490

6.
CA
UTION:
Under no circumstances should the crankshaft setting peg 303-531 be used in the following
operations, to lock the crankshaft.
Tighten the damper securing bolt. 1. Reposition the damper to allow access to the bolt holes for installing the locking tool.
2. Install the locking tool (303-191 and 303-191-03) to the damper using the bolts provided.
3. Fully tighten the damper securing bolt to 364-386 Nm.
7. Remove the locking tool from the damper.
8. Install the drive belt to the front accessory drive. Refer to Operation <<12.10.40>>.
9. Install the supercharger drive belt. Refer to Operation <<18.50.08>>.
10. Install the twin fan and motor assembly. Refer to Section 303-03.
11. Install the plastic mesh cover to the torque converter housing; if removed for access to lock the
crankshaft.
12. Reset the engine compartment cover to the normal position and connect the gas struts.
13. Remove the paintwork protection sheets and close the engine compartment.
Page 613 of 2490
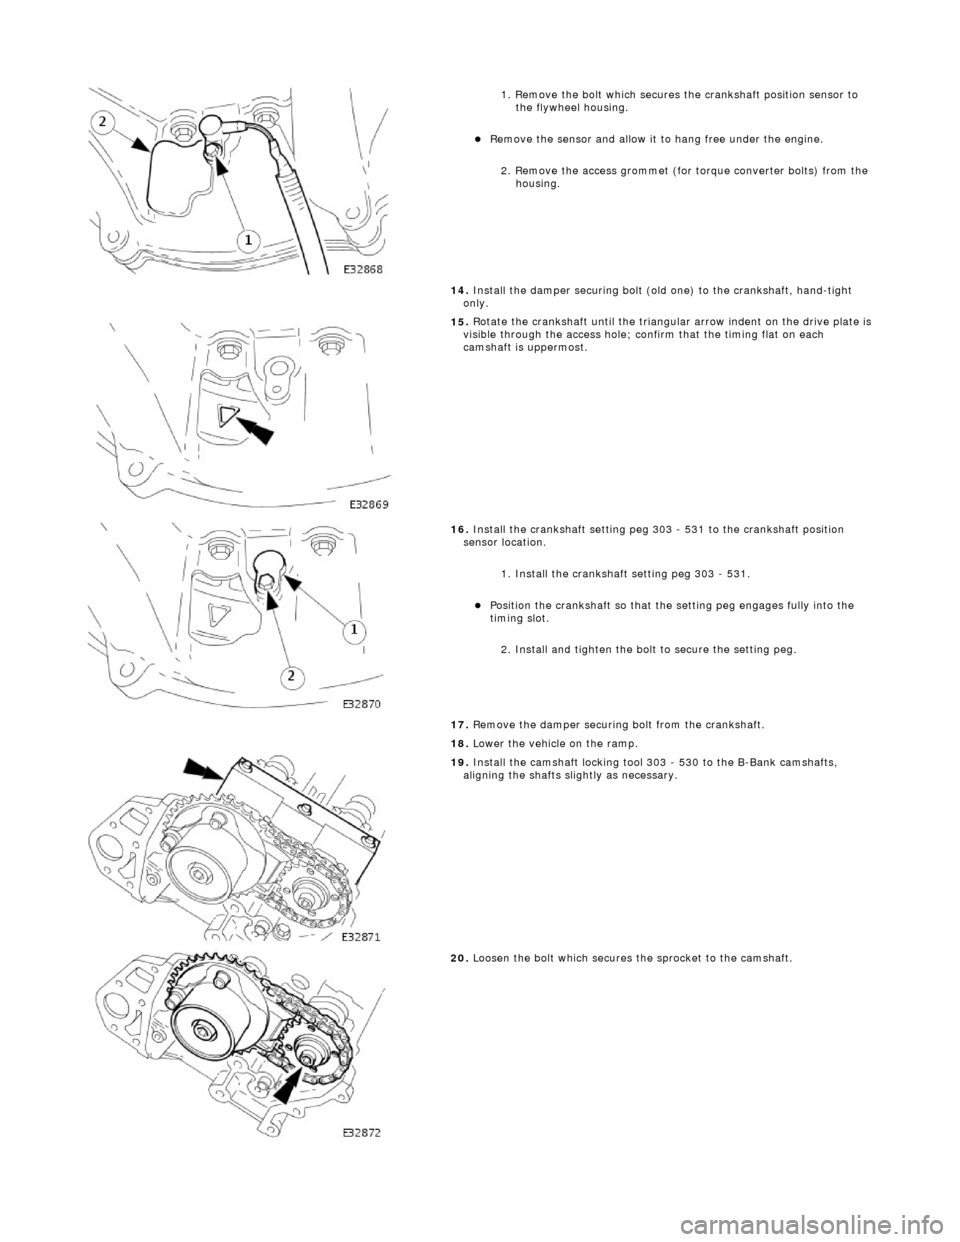
1
. Remove the bolt which secures the crankshaft position sensor to
the flywheel housing.
пЃ¬R
emove the sensor and allow it to hang free under the engine.
2. Remove the access grommet (for torque converter bolts) from the housing.
14. Install the damper securing bolt (old one) to the crankshaft, hand-tight
only.
15
.
Rotate the crankshaft until the triangular arrow indent on the drive plate is
visible through the access hole; confirm that the timing flat on each
camshaft is uppermost.
16
.
Install the crankshaft setting peg 3 03 - 531 to the crankshaft position
sensor location.
1. Install the crankshaft setting peg 303 - 531.
пЃ¬Position
the crankshaft so that the setting peg engages fully into the
timing slot.
2. Install and tighten the bolt to secure the setting peg.
17. Remove the damper securing bolt from the crankshaft.
18. Lower the vehicle on the ramp.
19
.
Install the camshaft locking tool 303 - 530 to the B-Bank camshafts,
aligning the shafts slightly as necessary.
20
.
Loosen the bolt which secures the sprocket to the camshaft.
Page 629 of 2490
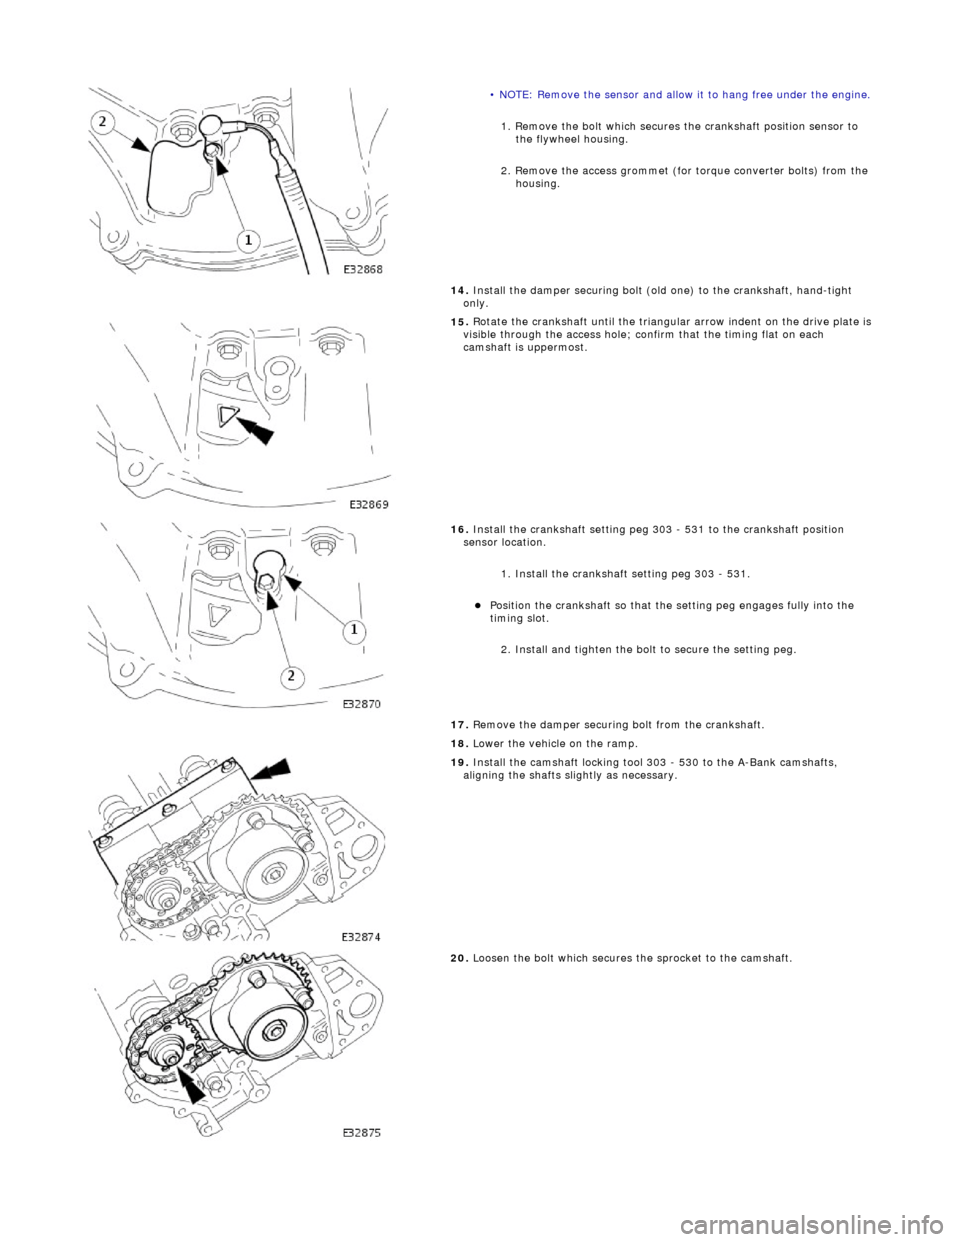
• N
OTE: Remove the sensor and allow it to hang free under the engine.
1
. Remove the bolt which secures the crankshaft position sensor to
the flywheel housing.
2. Remove the access grommet (for torque converter bolts) from the housing.
14. Install the damper securing bolt (old one) to the crankshaft, hand-tight
only.
15
.
Rotate the crankshaft until the triangular arrow indent on the drive plate is
visible through the access hole; confirm that the timing flat on each
camshaft is uppermost.
16
.
Install the crankshaft setting peg 3 03 - 531 to the crankshaft position
sensor location.
1. Install the crankshaft setting peg 303 - 531.
пЃ¬Position
the crankshaft so that the setting peg engages fully into the
timing slot.
2. Install and tighten the bolt to secure the setting peg.
17. Remove the damper securing bolt from the crankshaft.
18. Lower the vehicle on the ramp.
19
.
Install the camshaft locking tool 303 - 530 to the A-Bank camshafts,
aligning the shafts slightly as necessary.
20
.
Loosen the bolt which secures the sprocket to the camshaft.
Page 649 of 2490
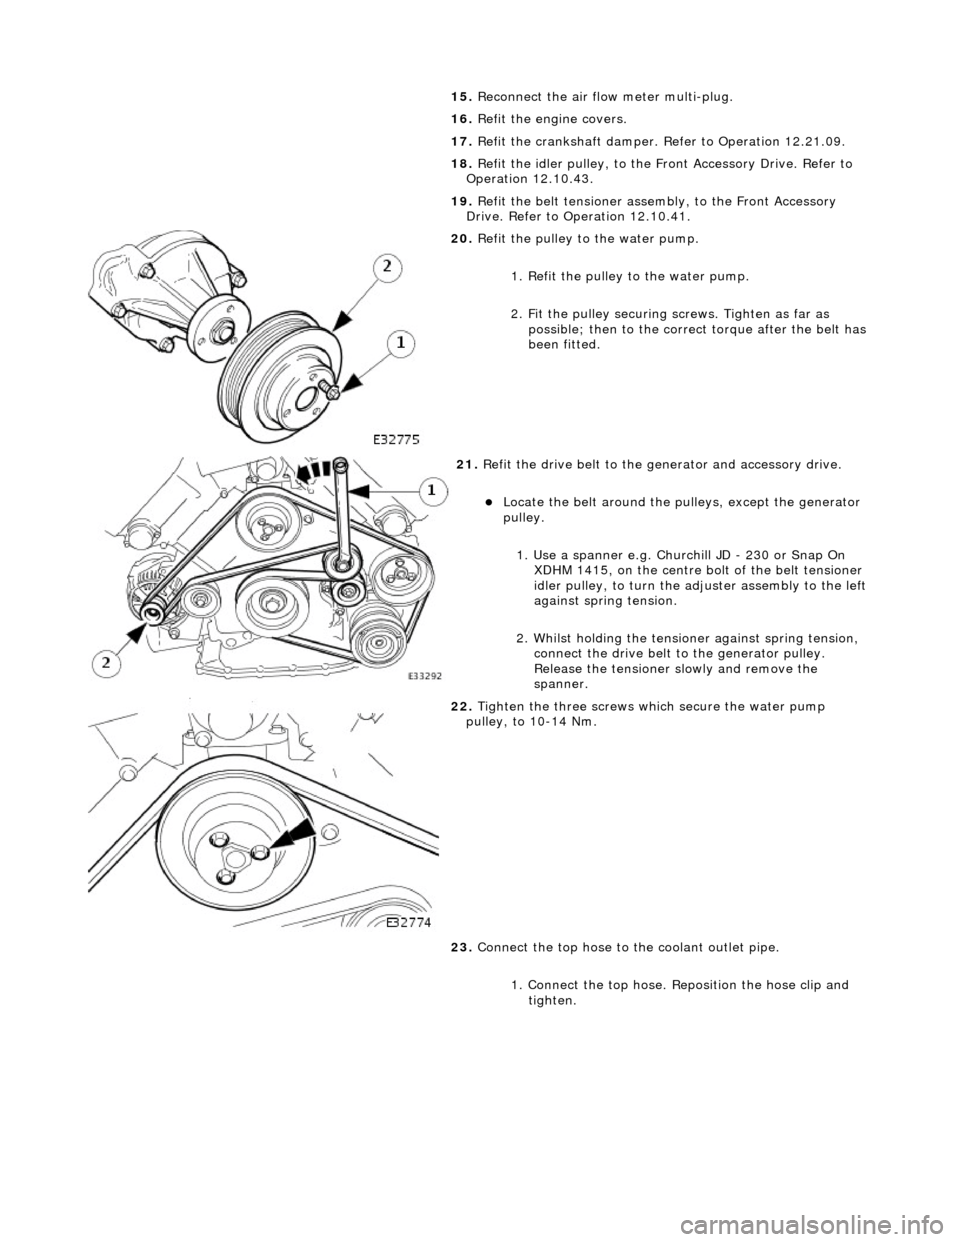
15
.
Reconnect the air flow meter multi-plug.
16. Refit the engine covers.
17. Refit the crankshaft damper. Refer to Operation 12.21.09.
18. Refit the idler pulley, to the Front Accessory Drive. Refer to
Operation 12.10.43.
19. Refit the belt tensioner assembly, to the Front Accessory
Drive. Refer to Operation 12.10.41.
20
.
Refit the pulley to the water pump.
1. Refit the pulley to the water pump.
2. Fit the pulley securing screws. Tighten as far as
possible; then to the correct torque after the belt has
been fitted.
21
.
Refit the drive belt to the generator and accessory drive.
пЃ¬Locat
e the belt around the pulleys, except the generator
pulley.
1. Use a spanner e.g. Churchill JD - 230 or Snap On XDHM 1415, on the centre bo lt of the belt tensioner
idler pulley, to turn the adju ster assembly to the left
against spring tension.
2. Whilst holding the tensioner against spring tension, connect the drive belt to the generator pulley.
Release the tensioner sl owly and remove the
spanner.
22
.
Tighten the three screws wh ich secure the water pump
pulley, to 10-14 Nm.
23. Connect the top hose to the coolant outlet pipe.
1. Connect the top hose. Reposition the hose clip and tighten.