air filter LAND ROVER DISCOVERY 2002 Repair Manual
[x] Cancel search | Manufacturer: LAND ROVER, Model Year: 2002, Model line: DISCOVERY, Model: LAND ROVER DISCOVERY 2002Pages: 1672, PDF Size: 46.1 MB
Page 446 of 1672
ENGINE MANAGEMENT SYSTEM - TD5
REPAIRS 18-1-53
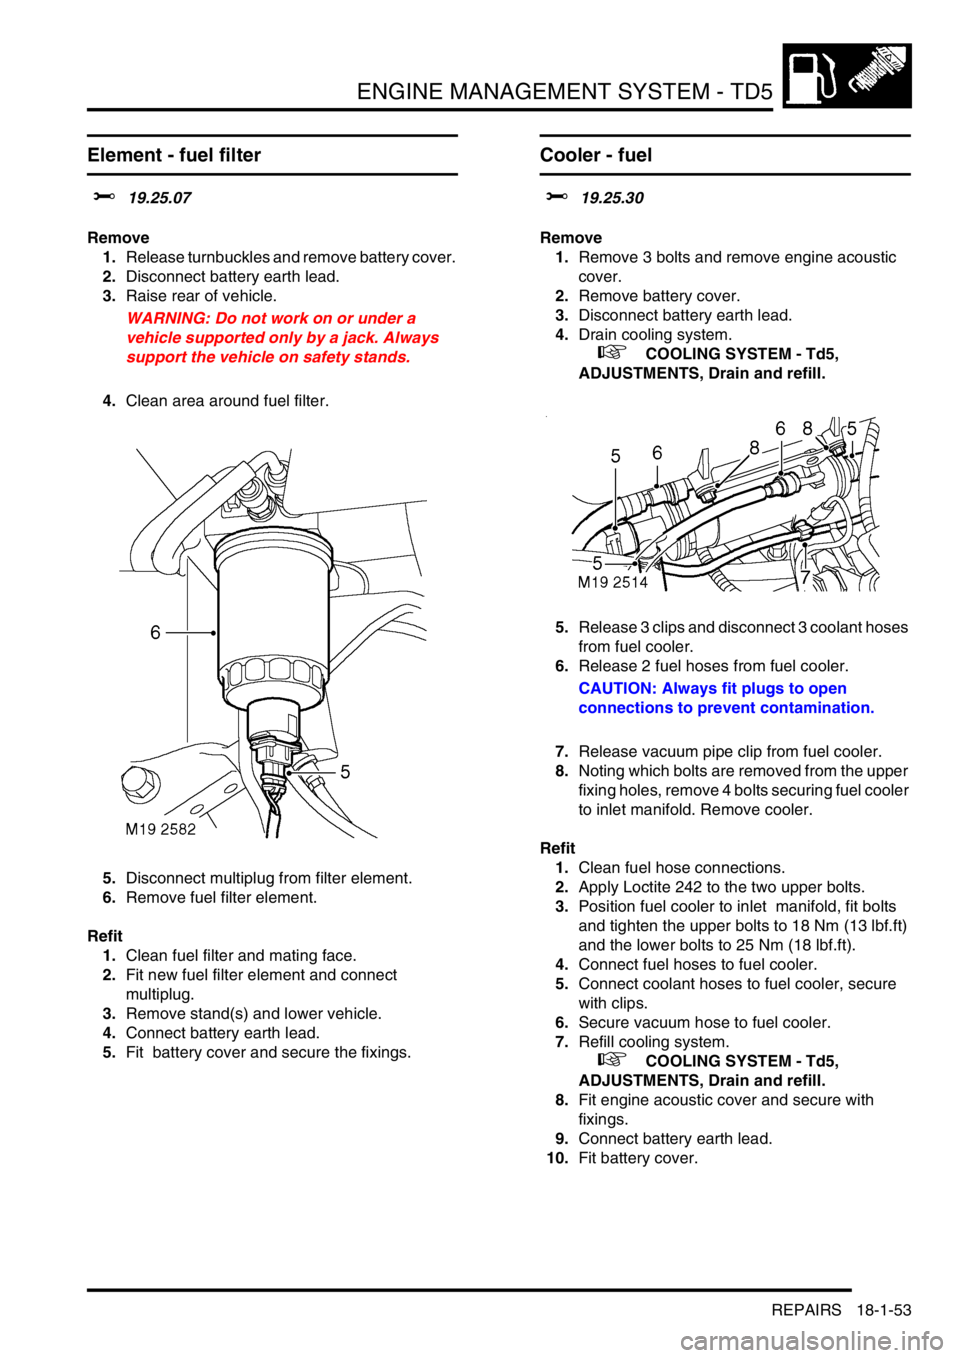
Element - fuel filter
$% 19.25.07
Remove
1.Release turnbuckles and remove battery cover.
2.Disconnect battery earth lead.
3.Raise rear of vehicle.
WARNING: Do not work on or under a
vehicle supported only by a jack. Always
support the vehicle on safety stands.
4.Clean area around fuel filter.
5.Disconnect multiplug from filter element.
6.Remove fuel filter element.
Refit
1.Clean fuel filter and mating face.
2.Fit new fuel filter element and connect
multiplug.
3.Remove stand(s) and lower vehicle.
4.Connect battery earth lead.
5.Fit battery cover and secure the fixings.
Cooler - fuel
$% 19.25.30
Remove
1.Remove 3 bolts and remove engine acoustic
cover.
2.Remove battery cover.
3.Disconnect battery earth lead.
4.Drain cooling system.
+ COOLING SYSTEM - Td5,
ADJUSTMENTS, Drain and refill.
5.Release 3 clips and disconnect 3 coolant hoses
from fuel cooler.
6.Release 2 fuel hoses from fuel cooler.
CAUTION: Always fit plugs to open
connections to prevent contamination.
7.Release vacuum pipe clip from fuel cooler.
8.Noting which bolts are removed from the upper
fixing holes, remove 4 bolts securing fuel cooler
to inlet manifold. Remove cooler.
Refit
1.Clean fuel hose connections.
2.Apply Loctite 242 to the two upper bolts.
3.Position fuel cooler to inlet manifold, fit bolts
and tighten the upper bolts to 18 Nm (13 lbf.ft)
and the lower bolts to 25 Nm (18 lbf.ft).
4.Connect fuel hoses to fuel cooler.
5.Connect coolant hoses to fuel cooler, secure
with clips.
6.Secure vacuum hose to fuel cooler.
7.Refill cooling system.
+ COOLING SYSTEM - Td5,
ADJUSTMENTS, Drain and refill.
8.Fit engine acoustic cover and secure with
fixings.
9.Connect battery earth lead.
10.Fit battery cover.
Page 452 of 1672

ENGINE MANAGEMENT SYSTEM - TD5
REPAIRS 18-1-59
Regulator - fuel pressure
$% 19.45.06
Remove
1.Release turnbuckles and remove battery cover
2.Disconnect battery earth lead.
3.Remove 3 bolts and remove engine acoustic
cover.
4.Remove 2 bolts and remove engine lifting eye.
5.Position cloth to absorb fuel spillage.
6.Release and disconnect hose from fuel cooler. 7.Release and disconnect fuel hose from
pressure regulator.
Always fit plugs to open connections to
prevent contamination.
8.Disconnect multiplug from fuel temperature
sensor.
9.Remove 3 bolts, remove pressure regulator
from cylinder head and collect gasket.
10.Remove and discard 'O' ring and fuel filter.
Page 453 of 1672

ENGINE MANAGEMENT SYSTEM - TD5
18-1-60 REPAIRS
11.Remove fuel temperature sensor and discard
sealing washer.
12.Remove fuel hose and fuel pipe and discard 'O'
rings.
Refit
1.Clean fuel pressure regulator and mating face.
2.Clean fuel pipe unions.
3.Using new 'O' rings, fit fuel pipe and fuel hose
to pressure regulator and tighten unions to 25
Nm (18 lbf.ft).
4.Using new sealing washer, fit fuel temperature
sensor and tighten to 14 Nm (10 lbf.ft).
5.Fit new fuel filter and 'O' ring.
6.Using a new gasket, position pressure
regulator and tighten bolts to 25 Nm (18 lbf.ft).
7.Connect multiplug to fuel temperature sensor.
8.Connect fuel hoses to pressure regulator and
fuel cooler.
9.Fit engine lifting eye and tighten bolts to 25 Nm
(18 lbf.ft).
10.Fit engine acoustic cover and tighten bolts to 10
Nm (6 lbf.ft).
11.Connect battery earth lead.
12.Fit battery cover and secure fixings.
Glow plugs
$% 19.60.31
Remove
1.Remove 3 bolts and remove engine acoustic
cover.
2.Release turnbuckles and remove battery cover.
3.Disconnect battery earth lead.
4.Disconnect 4 glow plug leads.
5.Loosen and remove 4 glow plugs.
Refit
1.Thoroughly clean glow plugs and seating area
in cylinder head.
2.Apply a suitable anti-sieze compound to
threads of glow plugs.
3.Fit glow plugs and tighten to 16 Nm (12 lbf. ft).
4.Connect glow plug leads.
5.Fit engine acoustic cover and secure fixings.
6.Connect battery earth lead.
7.Fit battery cover and secure fixings.
Page 477 of 1672
ENGINE MANAGEMENT SYSTEM - V8
18-2-20 DESCRIPTION AND OPERATION
Should a malfunction occur, the following fault codes may be evident and can be retrieved by TestBook:
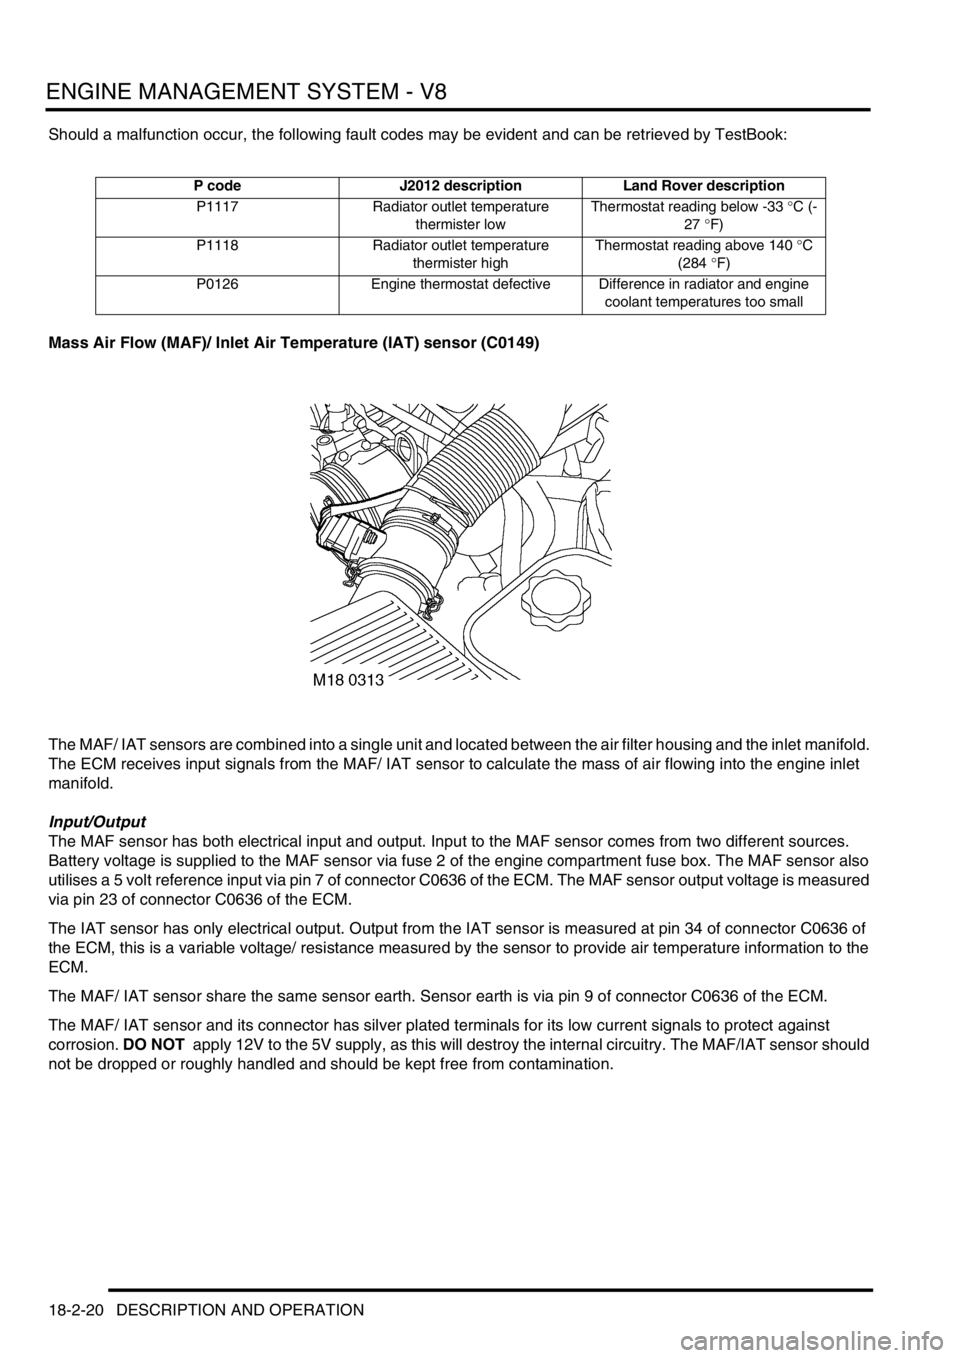
Mass Air Flow (MAF)/ Inlet Air Temperature (IAT) sensor (C0149)
The MAF/ IAT sensors are combined into a single unit and located between the air filter housing and the inlet manifold.
The ECM receives input signals from the MAF/ IAT sensor to calculate the mass of air flowing into the engine inlet
manifold.
Input/Output
The MAF sensor has both electrical input and output. Input to the MAF sensor comes from two different sources.
Battery voltage is supplied to the MAF sensor via fuse 2 of the engine compartment fuse box. The MAF sensor also
utilises a 5 volt reference input via pin 7 of connector C0636 of the ECM. The MAF sensor output voltage is measured
via pin 23 of connector C0636 of the ECM.
The IAT sensor has only electrical output. Output from the IAT sensor is measured at pin 34 of connector C0636 of
the ECM, this is a variable voltage/ resistance measured by the sensor to provide air temperature information to the
ECM.
The MAF/ IAT sensor share the same sensor earth. Sensor earth is via pin 9 of connector C0636 of the ECM.
The MAF/ IAT sensor and its connector has silver plated terminals for its low current signals to protect against
corrosion. DO NOT apply 12V to the 5V supply, as this will destroy the internal circuitry. The MAF/IAT sensor should
not be dropped or roughly handled and should be kept free from contamination.
P code J2012 description Land Rover description
P1117 Radiator outlet temperature
thermister lowThermostat reading below -33 °C (-
27 °F)
P1118 Radiator outlet temperature
thermister highThermostat reading above 140 °C
(284 °F)
P0126 Engine thermostat defective Difference in radiator and engine
coolant temperatures too small
Page 481 of 1672

ENGINE MANAGEMENT SYSTEM - V8
18-2-24 DESCRIPTION AND OPERATION
Air intake duct – Gulf models from 2000MY
1Heat reflective insulation
2Supplementary air intake duct
The density of the intake air is partly dependent on altitude and temperature. Hot air has a lower density than cold air;
consequently in hot climates, the low air density can result in low power due to low volumetric efficiency.
In order to improve engine performance, Gulf specification models from 2000MY have a secondary air intake duct
which is located under the front left inner wing of the vehicle. Cooler air from the side of the vehicle is routed through
the duct to the air cleaner, where it combines with air entering via the front grille.
In addition to the secondary air duct, the vehicles are fitted with a larger front grille and have larger cooling and
condenser fans.
The MAF/IAT sensor, air cleaner and air cleaner duct are encased in insulation bags to help keep the intake air cool
and so increase the mass of air entering the engine intake manifold.
The air cleaner includes a cyclone filter and also a dump valve in the bottom of the unit. Sand and dust particles which
are carried into the air cleaner with the air flow are automatically expunged via the dump valve.
M180452
1
2
Page 482 of 1672
ENGINE MANAGEMENT SYSTEM - V8
DESCRIPTION AND OPERATION 18-2-25
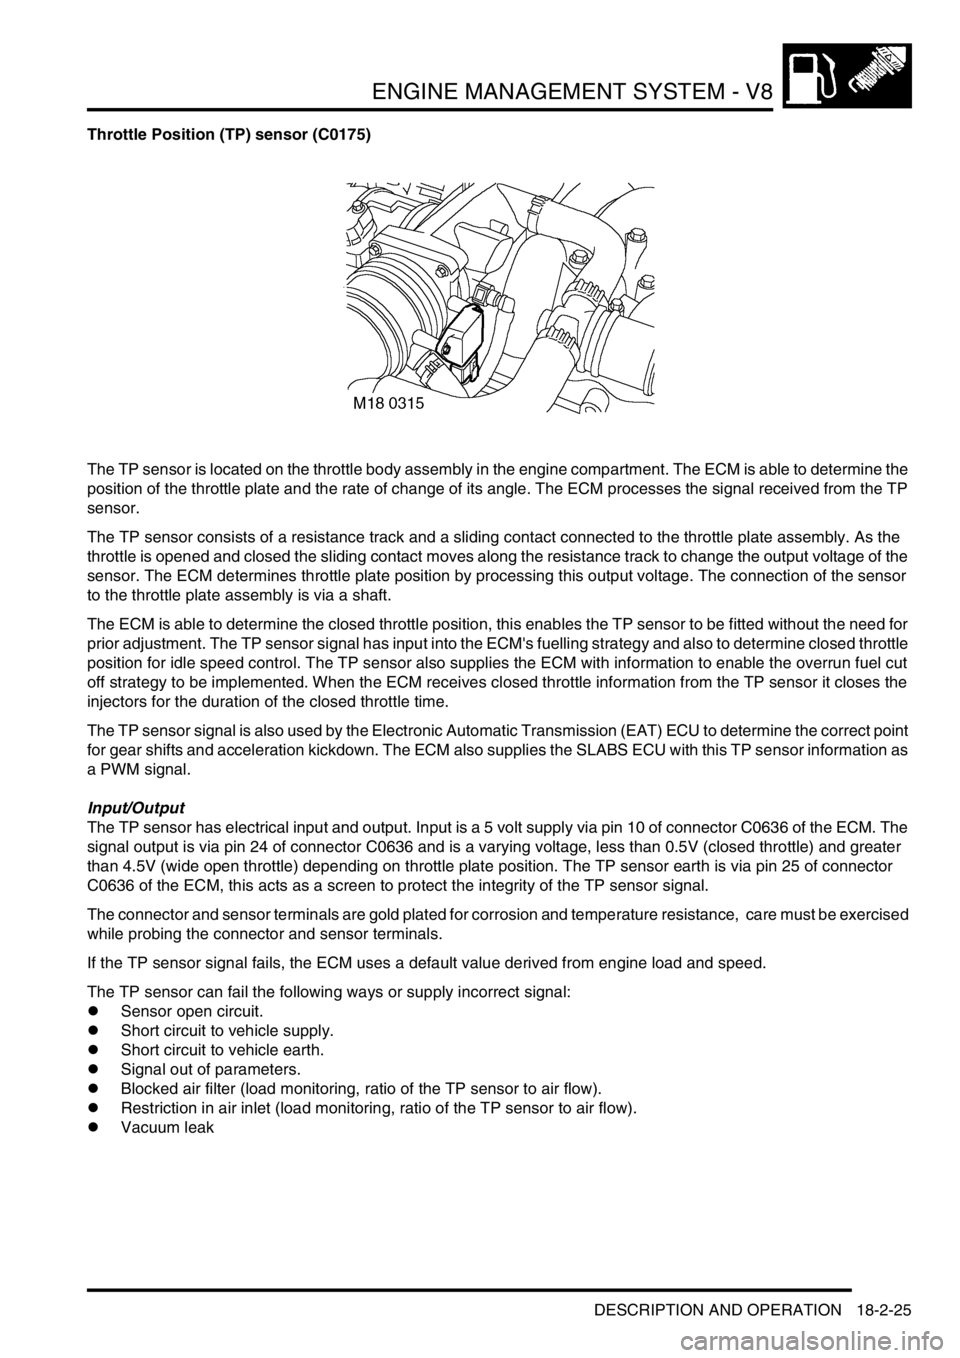
Throttle Position (TP) sensor (C0175)
The TP sensor is located on the throttle body assembly in the engine compartment. The ECM is able to determine the
position of the throttle plate and the rate of change of its angle. The ECM processes the signal received from the TP
sensor.
The TP sensor consists of a resistance track and a sliding contact connected to the throttle plate assembly. As the
throttle is opened and closed the sliding contact moves along the resistance track to change the output voltage of the
sensor. The ECM determines throttle plate position by processing this output voltage. The connection of the sensor
to the throttle plate assembly is via a shaft.
The ECM is able to determine the closed throttle position, this enables the TP sensor to be fitted without the need for
prior adjustment. The TP sensor signal has input into the ECM's fuelling strategy and also to determine closed throttle
position for idle speed control. The TP sensor also supplies the ECM with information to enable the overrun fuel cut
off strategy to be implemented. When the ECM receives closed throttle information from the TP sensor it closes the
injectors for the duration of the closed throttle time.
The TP sensor signal is also used by the Electronic Automatic Transmission (EAT) ECU to determine the correct point
for gear shifts and acceleration kickdown. The ECM also supplies the SLABS ECU with this TP sensor information as
a PWM signal.
Input/Output
The TP sensor has electrical input and output. Input is a 5 volt supply via pin 10 of connector C0636 of the ECM. The
signal output is via pin 24 of connector C0636 and is a varying voltage, less than 0.5V (closed throttle) and greater
than 4.5V (wide open throttle) depending on throttle plate position. The TP sensor earth is via pin 25 of connector
C0636 of the ECM, this acts as a screen to protect the integrity of the TP sensor signal.
The connector and sensor terminals are gold plated for corrosion and temperature resistance, care must be exercised
while probing the connector and sensor terminals.
If the TP sensor signal fails, the ECM uses a default value derived from engine load and speed.
The TP sensor can fail the following ways or supply incorrect signal:
lSensor open circuit.
lShort circuit to vehicle supply.
lShort circuit to vehicle earth.
lSignal out of parameters.
lBlocked air filter (load monitoring, ratio of the TP sensor to air flow).
lRestriction in air inlet (load monitoring, ratio of the TP sensor to air flow).
lVacuum leak
Page 533 of 1672

ENGINE MANAGEMENT SYSTEM - V8
18-2-76 REPAIRS
Sensor - camshaft position (CMP)
$% 18.30.24
Remove
1.Release fixings and remove battery cover.
2.Disconnect battery earth lead.
3.Raise front of vehicle.
WARNING: Do not work on or under a
vehicle supported only by a jack. Always
support the vehicle on safety stands.
4.Release fixings and remove underbelly panel.
5.Remove engine oil filter.
+ ENGINE - V8, REPAIRS, Filter - oil.
6.Disconnect engine harness from CMP sensor
and release CMP sensor multiplug from
bracket.
7.Remove bolt from clamp securing CMP sensor
to timing gear cover.
8.Remove clamp and CMP sensor. Discard 'O'
ring from CMP sensor.
Refit
1.Ensure CMP sensor is clean, fit new 'O' ring
and sensor to cover.
2.Fit clamp to CMP sensor and tighten bolt to 8
Nm (6 lbf.ft).
3.Fit sensor multiplug to bracket and connect
engine harness to multiplug.
4.Fit engine oil filter.
+ ENGINE - V8, REPAIRS, Filter - oil.
5.Fit underbelly panel and secure with fixings.
6.Lower vehicle and connect battery earth lead.
7.Fit battery cover and secure with fixings.
Knock sensor (KS)
$% 18.30.28
Remove
1.Release fixings and remove battery cover.
2.Disconnect battery earth lead.
3.Raise front of vehicle.
WARNING: Do not work on or under a
vehicle supported only by a jack. Always
support the vehicle on safety stands.
4.Remove fixings securing underbelly panel and
remove panel.
5.Disconnect multiplug from KS.
6.Remove nut securing KS to cylinder block and
remove KS.
Refit
1.Clean mating faces of KS and cylinder block.
2.Fit KS to cylinder block and tighten nut to 22
Nm (16 lbf.ft).
3.Connect multiplug to KS.
4.Fit underbelly panel and secure with fixings.
5.Remove stand(s) and lower vehicle.
6.Connect battery earth lead.
7.Fit battery cover and secure the fixings.
Page 535 of 1672

ENGINE MANAGEMENT SYSTEM - V8
18-2-78 REPAIRS
Element - air filter
$% 19.10.10
Remove
1.Release 2 clips and disconnect MAF sensor
from air filter cover, remove and discard 'O'
ring.
2.Release 2 clips and remove cover from air
filter.
3.Remove air filter element.
Refit
1.Clean air filter body and cover.
2.Fit new air filter element.
3.Position air cleaner cover and secure clips.
CAUTION: Ensure clips are correctly
located on cover.
4.Fit a new MAF sensor 'O' ring, position MAF
sensor and secure clips.
CAUTION: Ensure 'O' ring is not displaced
during fitting.
Cable - throttle
$% 19.20.06
Remove
1.Release 3 fasteners and remove drivers side
closing panel and move aside.
2.Release inner cable from throttle pedal.
3.Release outer cable from bulkhead.
Page 546 of 1672
FUEL DELIVERY SYSTEM - TD5
DESCRIPTION AND OPERATION 19-1-1
FUEL DELIVERY SYST EM - Td5 DESCRIPTION AND OPERAT ION
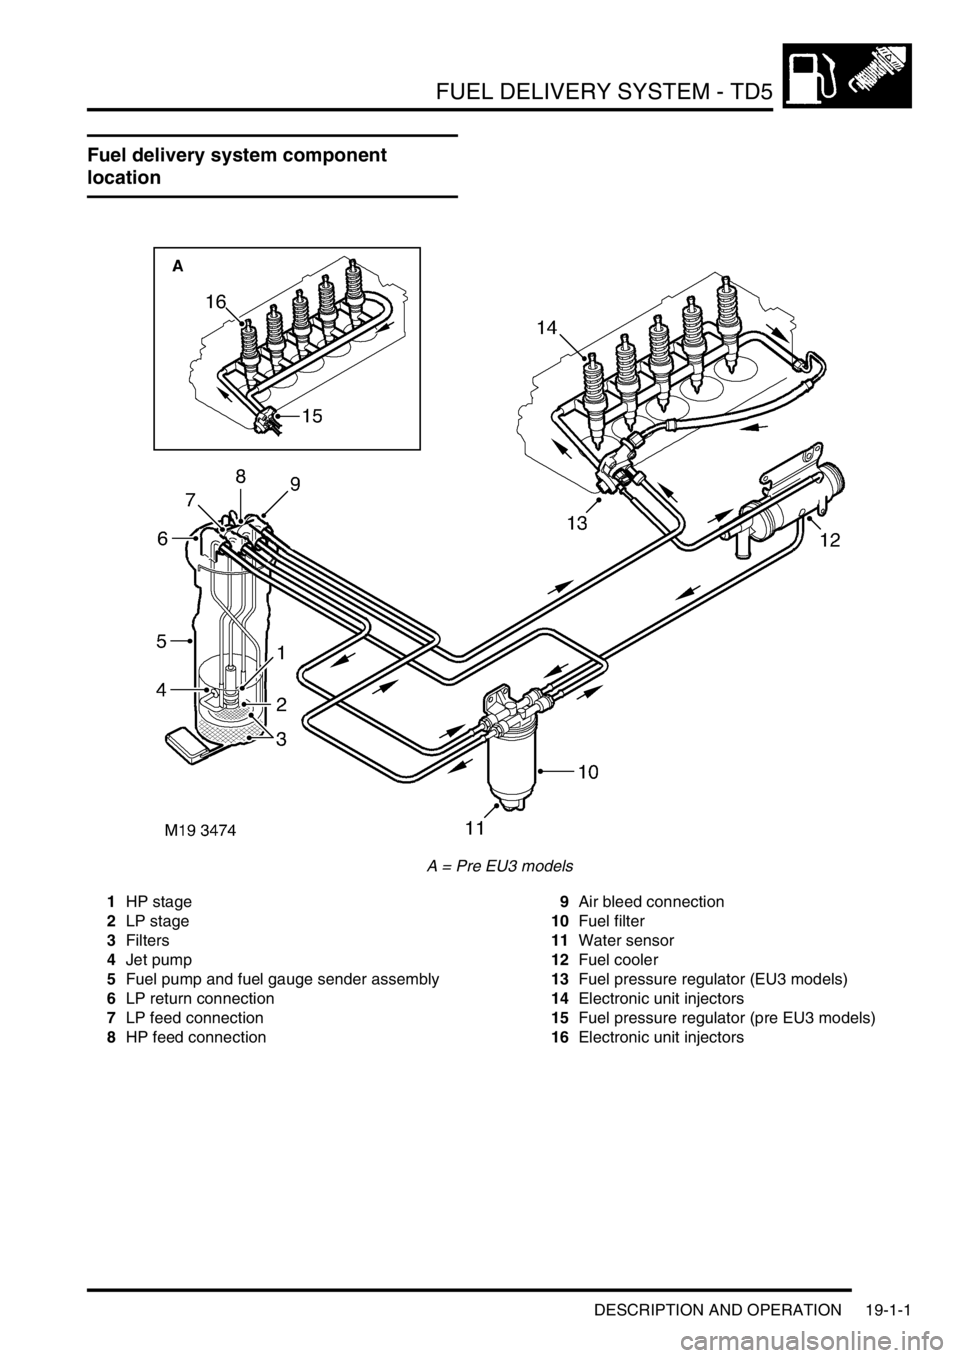
Fuel delivery system component
location
A = Pre EU3 models
1HP stage
2LP stage
3Filters
4Jet pump
5Fuel pump and fuel gauge sender assembly
6LP return connection
7LP feed connection
8HP feed connection9Air bleed connection
10Fuel filter
11Water sensor
12Fuel cooler
13Fuel pressure regulator (EU3 models)
14Electronic unit injectors
15Fuel pressure regulator (pre EU3 models)
16Electronic unit injectors
Page 549 of 1672
FUEL DELIVERY SYSTEM - TD5
19-1-4 DESCRIPTION AND OPERATION
Fuel tank breather system
The filler tube incorporates a tank vent which allows air and fuel vapour displaced from the tank when filling to vent to
atmosphere via the filler neck.
A breather spout within the tank controls the tank 'full' height. When fuel covers the spout it prevents fuel vapour and
air from escaping from the tank. This causes the fuel to 'back-up' in the filler tube and shuts off the filler gun. The
position of the spout ensures that when the filler gun shuts off, a vapour space of approximately 10% of the tanks total
capacity remains. The vapour space ensures that the Roll Over Valve (ROV) is always above the fuel level and vapour
can escape and allow the tank to breathe.
The ROV is welded on the top surface of the tank. The ROV is connected by a tube to the filler tube, which in turn is
connected to the atmospheric vent pipe. The ROV allows fuel vapour to pass through it during normal vehicle
operation. In the event of the vehicle being overturned the valve shuts off, sealing the tank and preventing fuel from
spilling from the atmospheric vent pipe.
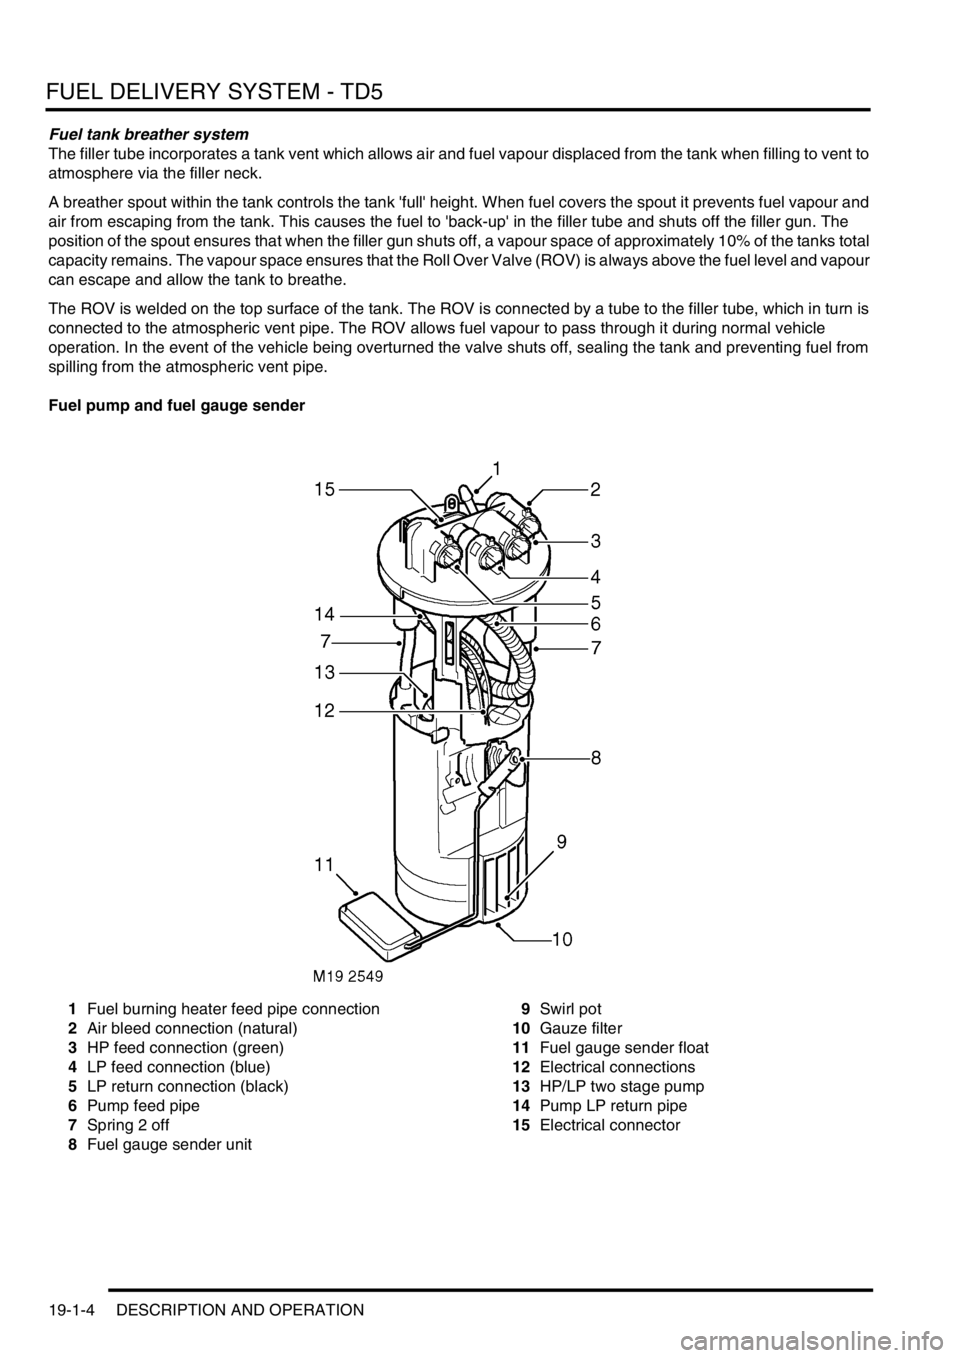
Fuel pump and fuel gauge sender
1Fuel burning heater feed pipe connection
2Air bleed connection (natural)
3HP feed connection (green)
4LP feed connection (blue)
5LP return connection (black)
6Pump feed pipe
7Spring 2 off
8Fuel gauge sender unit9Swirl pot
10Gauze filter
11Fuel gauge sender float
12Electrical connections
13HP/LP two stage pump
14Pump LP return pipe
15Electrical connector