LAND ROVER FRELANDER 2 2006 Repair Manual
FRELANDER 2 2006
LAND ROVER
LAND ROVER
https://www.carmanualsonline.info/img/64/57251/w960_57251-0.png
LAND ROVER FRELANDER 2 2006 Repair Manual
Trending: spare tire, fuses, auxiliary battery, coolant temperature, rims, engine overheat, transmission fluid
Page 2081 of 3229
Publi s hed: 11-May-2011
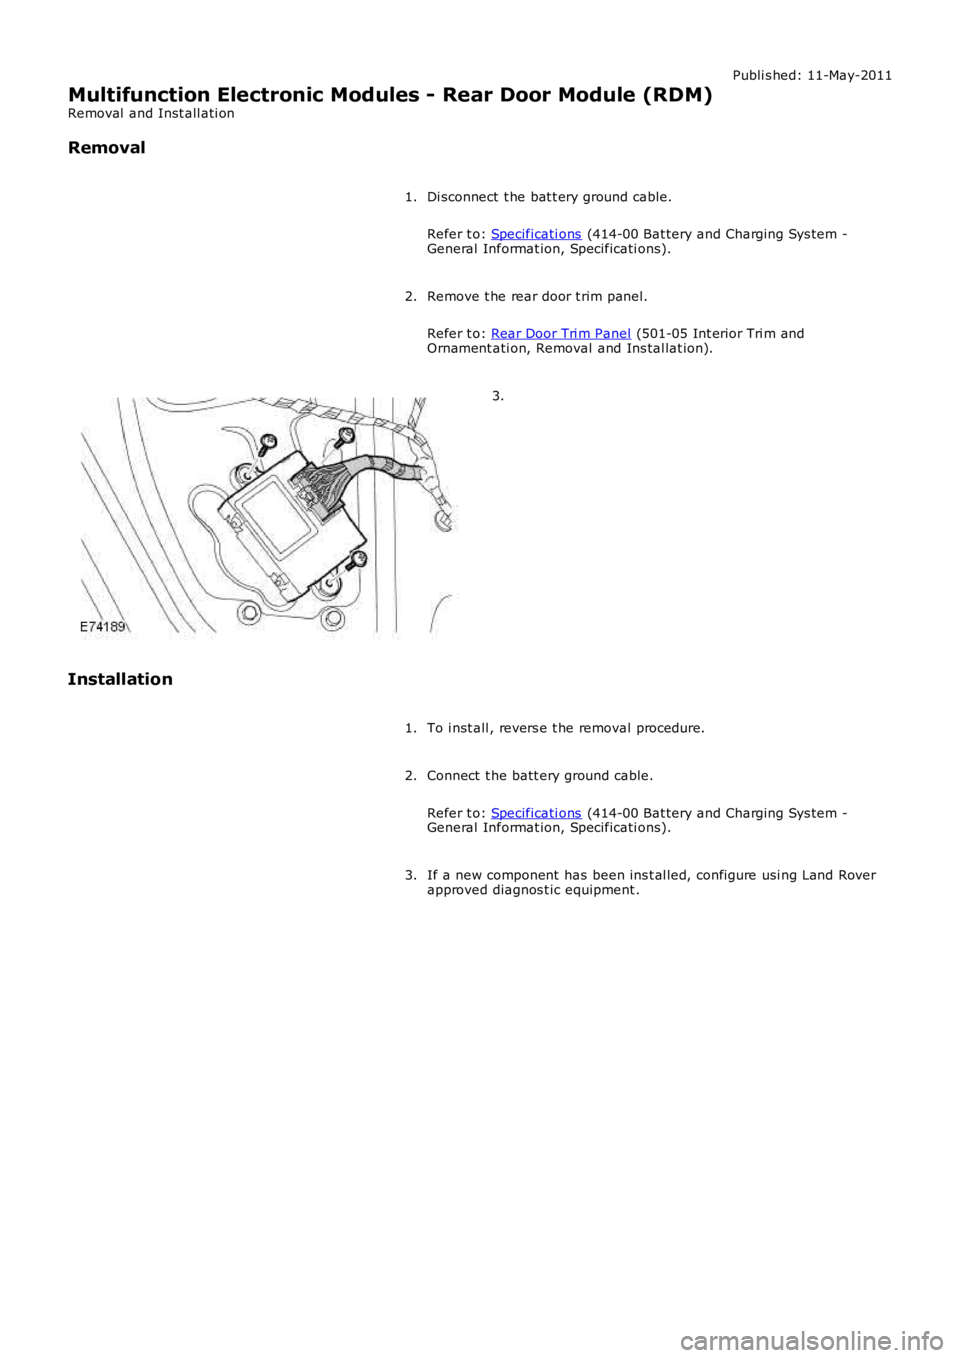
Multifunction Electronic Modules - Rear Door Module (RDM)
Removal and Inst all ati on
Removal
Di sconnect t he bat t ery ground cable.
Refer t o: Specificati ons (414-00 Bat tery and Charging Sys tem -
General Informat ion, Specificati ons).
1.
Remove t he rear door t rim panel.
Refer t o: Rear Door Tri m Panel (501-05 Int erior Tri m and
Ornament ati on, Removal and Ins tal lat ion).
2. 3.
Installation To i nst all , revers e t he removal procedure.
1.
Connect t he batt ery ground cable.
Refer t o: Specificati ons (414-00 Bat tery and Charging Sys tem -
General Informat ion, Specificati ons).
2.
If a new component has been ins t al led, configure usi ng Land Rover
approved diagnos t ic equipment .
3.
Page 2082 of 3229
Publi s hed: 11-May-2011
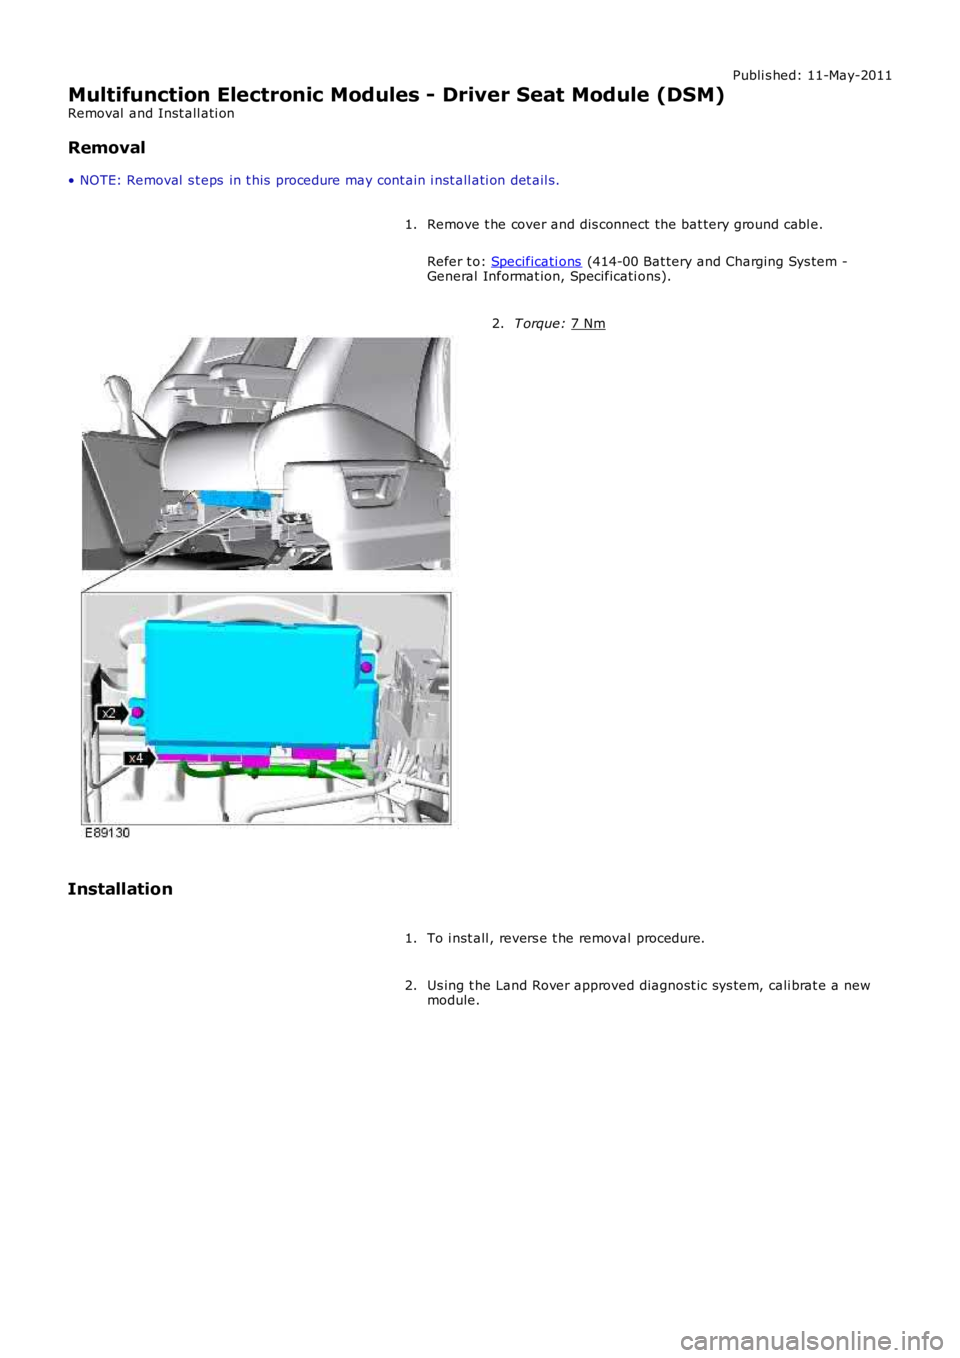
Multifunction Electronic Modules - Driver Seat Module (DSM)
Removal and Inst all ati on
Removal
• NOTE: Removal s t eps in t his procedure may cont ain i nst all ati on det ail s.
Remove t he cover and dis connect the bat tery ground cabl e.
Refer t o: Specificati ons (414-00 Bat tery and Charging Sys tem -
General Informat ion, Specificati ons).
1. T orque:
7 Nm 2.
Installation To i nst all , revers e t he removal procedure.
1.
Us ing t he Land Rover approved diagnost ic sys tem, cali brat e a new
module.
2.
Page 2083 of 3229
Publi s hed: 11-May-2011
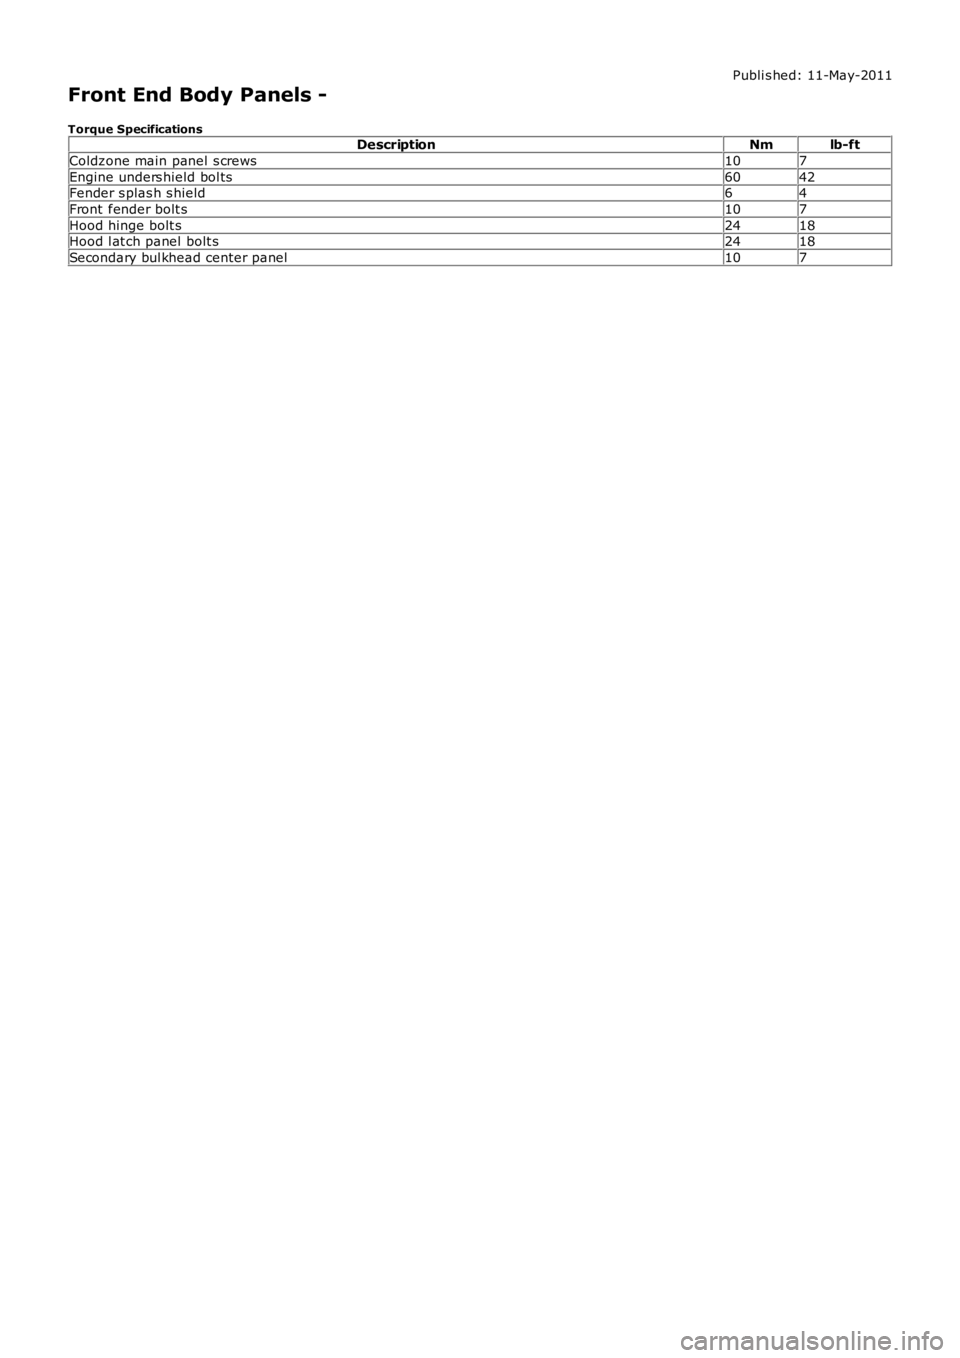
Front End Body Panels -
Torque SpecificationsDescriptionNmlb-ft
Coldzone main panel s crews107
Engine unders hield bol ts6042Fender s plas h s hield64
Front fender bolt s107
Hood hinge bolt s2418Hood l at ch panel bolt s2418
Secondary bul khead center panel107
Page 2084 of 3229
Publi s hed: 11-May-2011
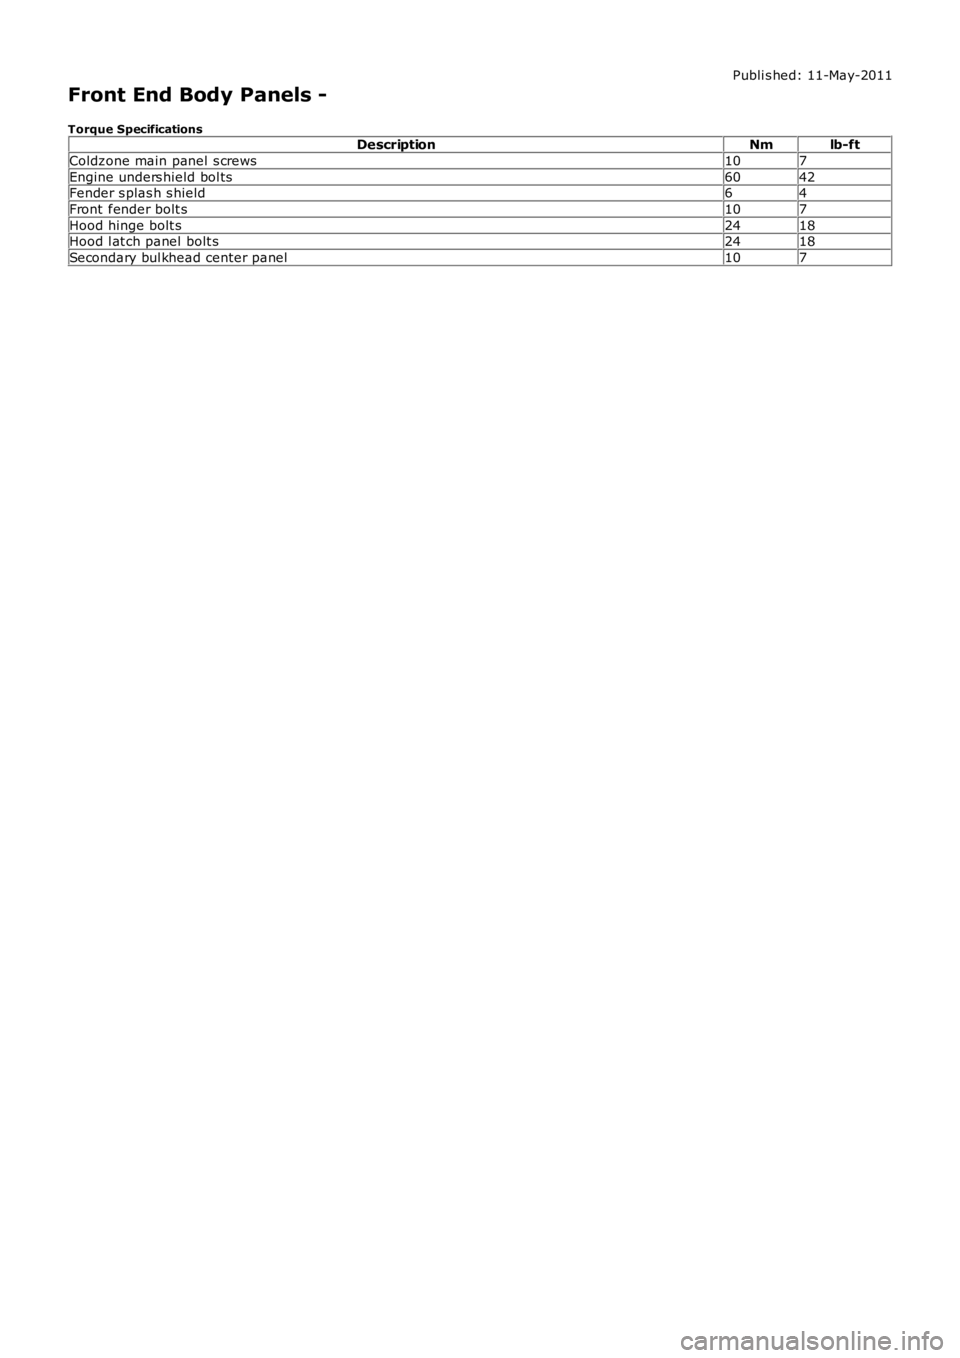
Front End Body Panels -
Torque Specifications Description Nmlb-ft
Coldzone main panel s crews 107
Engine unders hield bol ts 6042
Fender s plas h s hield 64
Front fender bolt s 107
Hood hinge bolt s 2418
Hood l at ch panel bolt s 2418
Secondary bul khead center panel 107
Page 2085 of 3229
Publi s hed: 11-May-2011
Front End Body Panels - Fender Splash Shield
Removal and Inst all ati on
Removal
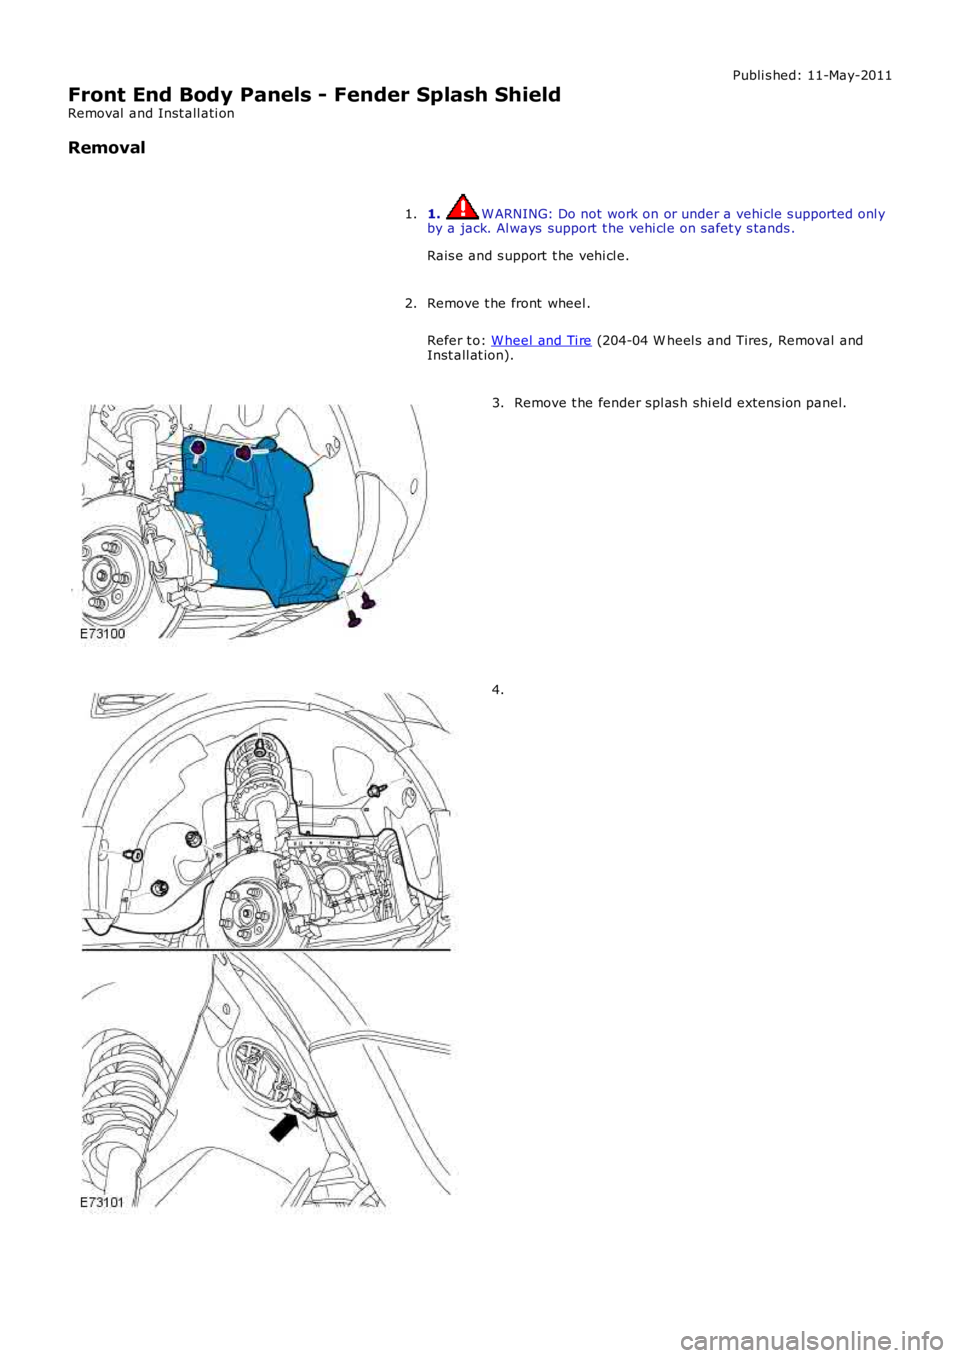
1. W ARNING: Do not work on or under a vehi cle s upported onl yby a jack. Al ways support t he vehi cl e on s afet y s tands .
Rais e and s upport t he vehi cl e.
1.
Remove t he front wheel .
Refer t o: W heel and Ti re (204-04 W heel s and Tires, Removal andInst all at ion).
2.
Remove t he fender spl as h shi el d extens ion panel.3.
4.
Page 2086 of 3229
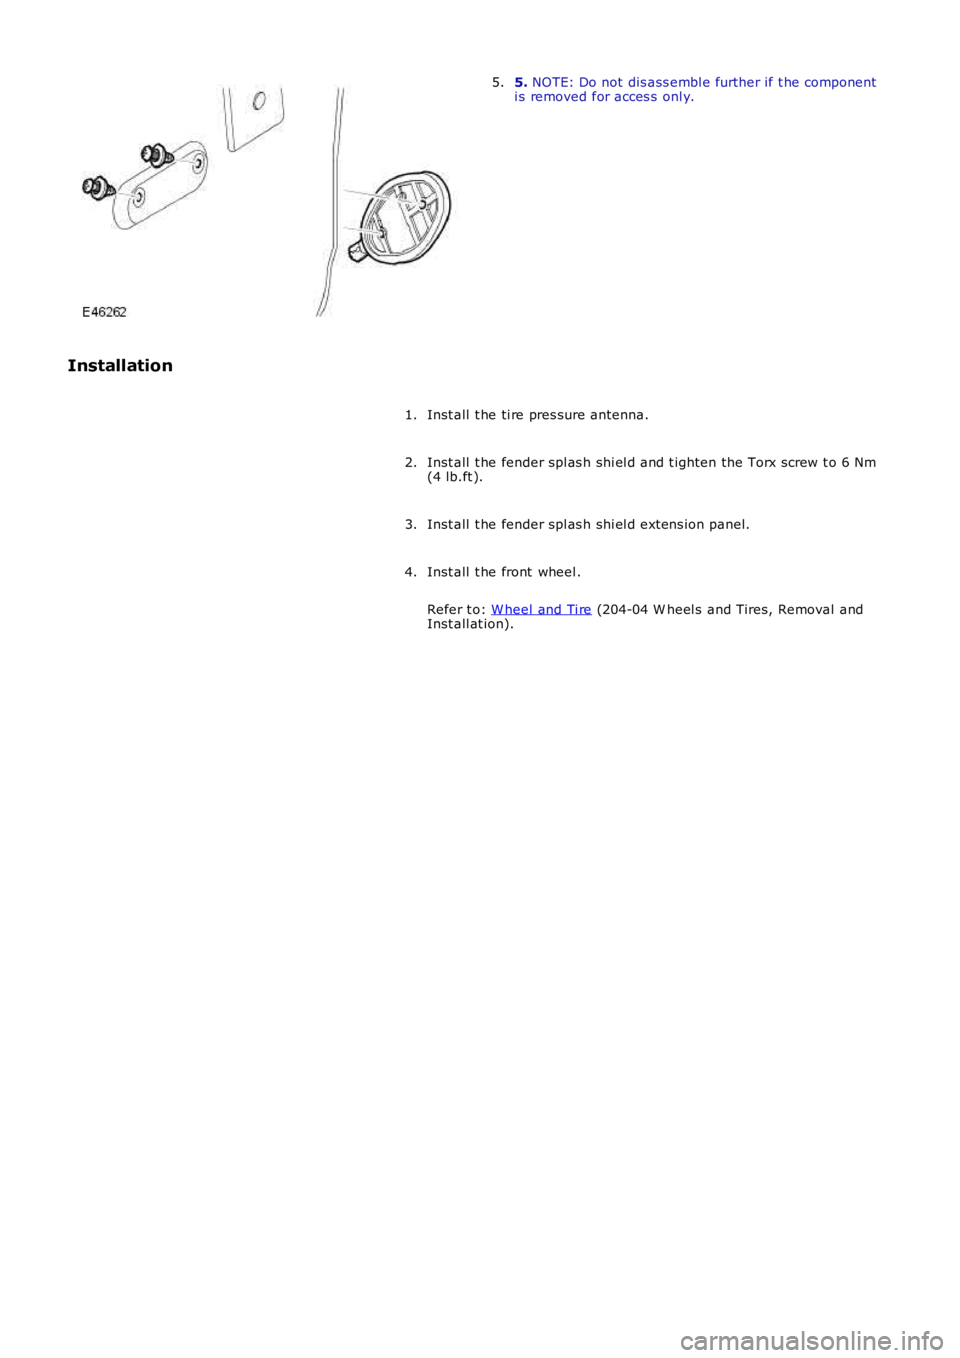
5. NOTE: Do not dis ass embl e further if t he componenti s removed for acces s onl y.5.
Installation
Inst all t he ti re pres sure antenna.1.
Inst all t he fender spl as h shi el d and t ighten the Torx screw t o 6 Nm(4 lb.ft ).2.
Inst all t he fender spl as h shi el d extens ion panel.3.
Inst all t he front wheel .
Refer t o: W heel and Ti re (204-04 W heel s and Tires, Removal andInst all at ion).
4.
Page 2087 of 3229
Publi s hed: 11-May-2011
Front End Body Panels - Engine Undershield
Removal and Inst all ati on
Removal
• NOTE: Removal s t eps in t his procedure may cont ain i nst all ati on det ail s.
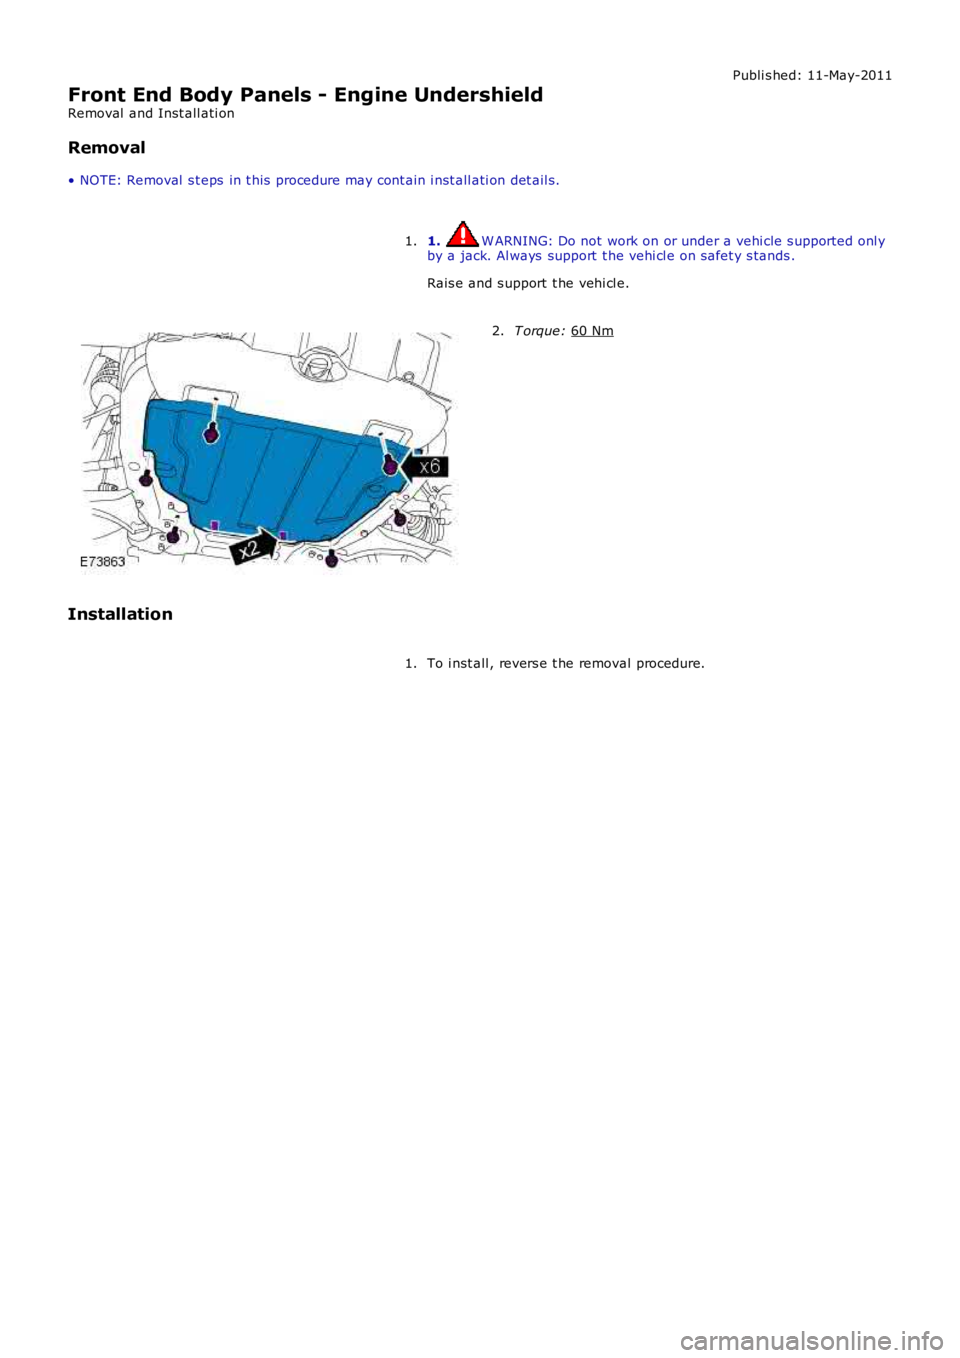
1. W ARNING: Do not work on or under a vehi cle s upported onl y
by a jack. Al ways support t he vehi cl e on s afet y s tands .
Rais e and s upport t he vehi cl e.
1. T orque:
60 Nm 2.
Installation To i nst all , revers e t he removal procedure.
1.
Page 2088 of 3229
Publi s hed: 11-May-2011
Front End Body Panels - Secondary Bulkhead Center PanelI6 3.2L Petrol
Removal and Inst all ati on
Removal
• NOTE: Removal s t eps in t his procedure may cont ain i nst all ati on det ail s.
1. W ARNING: Make sure t o s upport the vehicle wit h axle
s tands .
Rais e and s upport t he vehi cl e.
1.
Remove t he engi ne cover.
Refer t o: Engi ne Cover - I6 3.2L Pet rol (501-05 Int eri or Trim and
Ornament ati on, Removal and Ins tal lat ion).
2.
Remove t he plenum chamber.
Refer t o: Plenum Chamber (412-01 Cl imat e Control, Removal and
Inst all at ion).
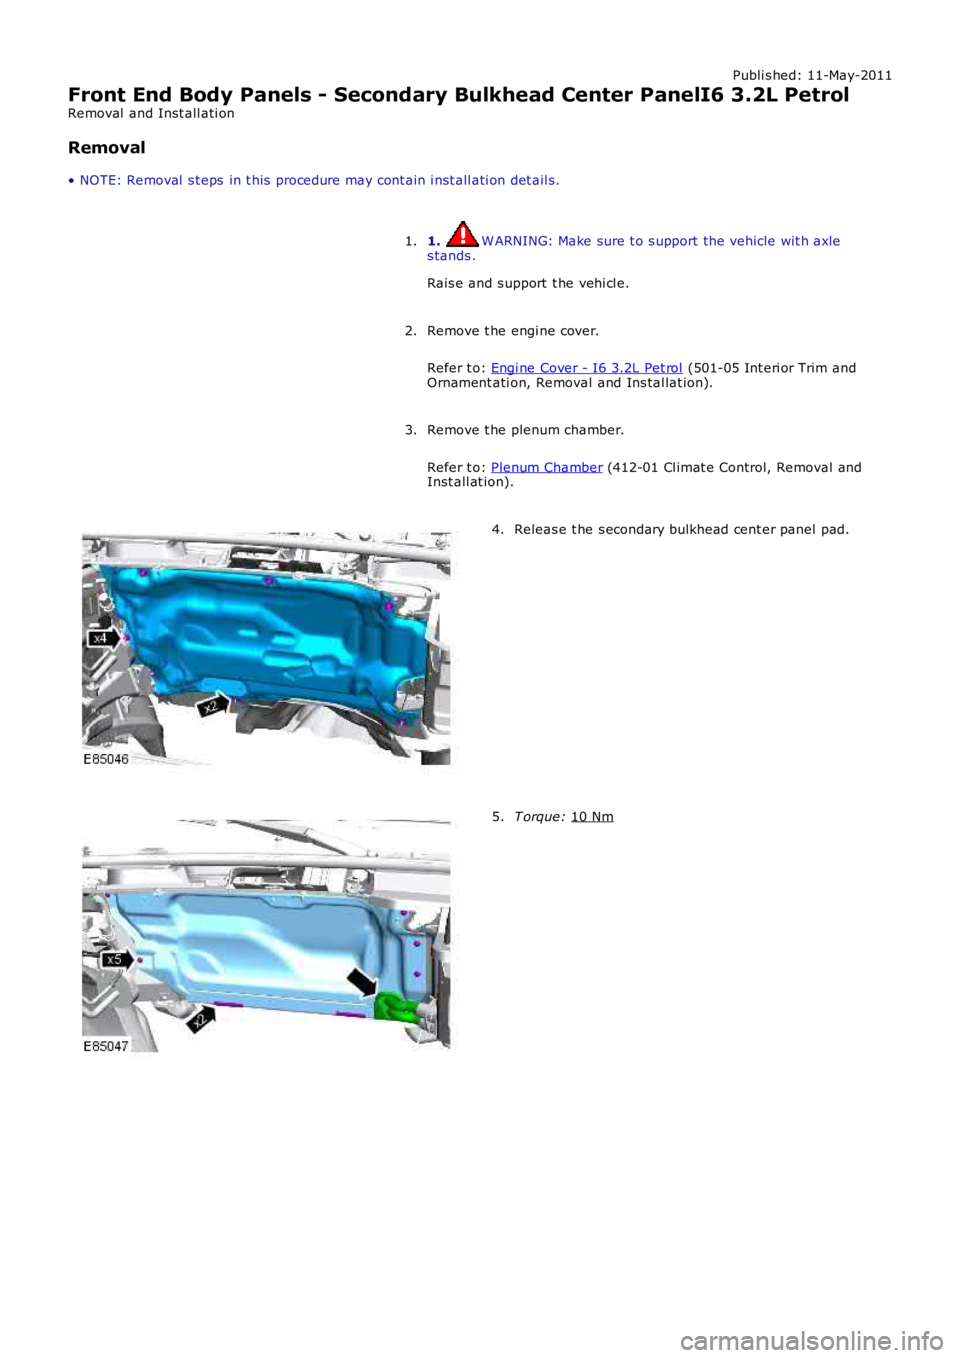
3. Releas e t he s econdary bulkhead cent er panel pad.
4. T orque:
10 Nm 5.
Page 2089 of 3229
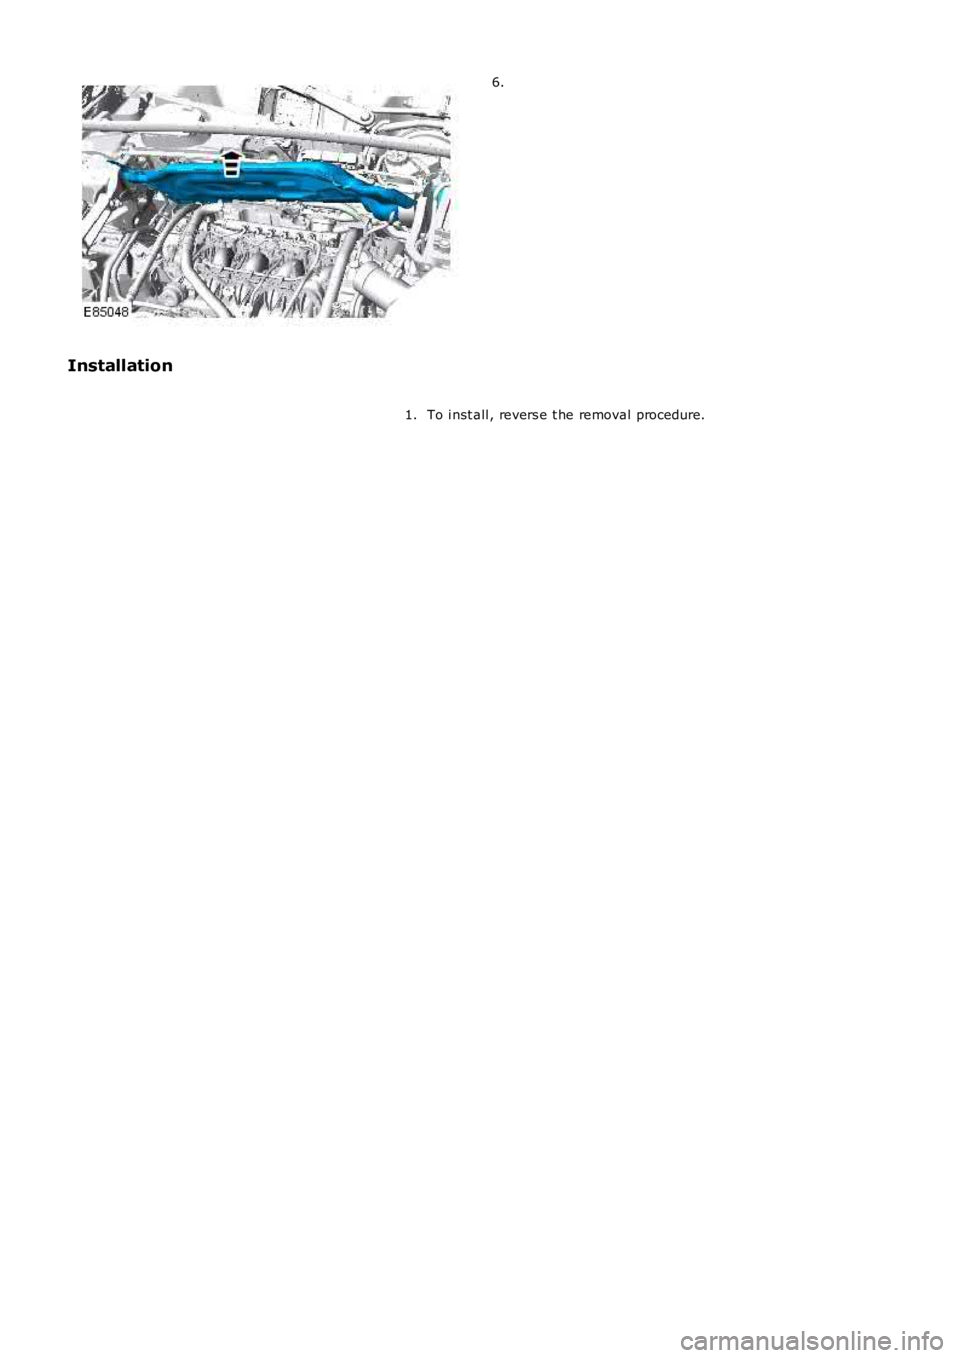
6.
Installation
To i nst all , revers e t he removal procedure.1.
Page 2090 of 3229
Publi s hed: 11-May-2011
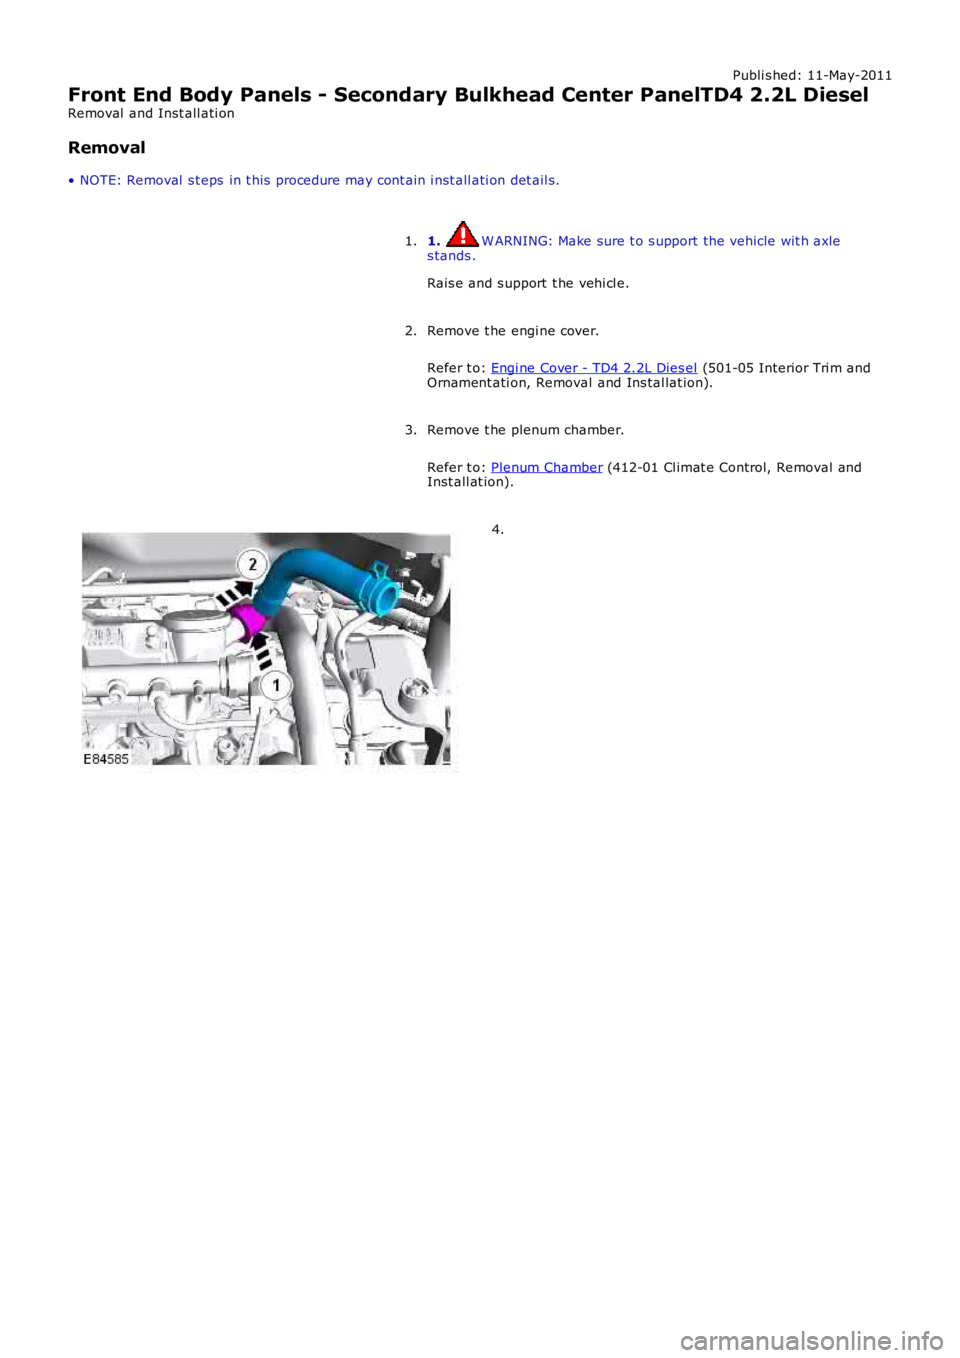
Front End Body Panels - Secondary Bulkhead Center PanelTD4 2.2L Diesel
Removal and Inst all ati on
Removal
• NOTE: Removal s t eps in t his procedure may cont ain i nst all ati on det ail s.
1. W ARNING: Make sure t o s upport the vehicle wit h axles tands .
Rais e and s upport t he vehi cl e.
1.
Remove t he engi ne cover.
Refer t o: Engi ne Cover - TD4 2.2L Dies el (501-05 Interior Tri m andOrnament ati on, Removal and Ins tal lat ion).
2.
Remove t he plenum chamber.
Refer t o: Plenum Chamber (412-01 Cl imat e Control, Removal andInst all at ion).
3.
4.
Trending: fuse box diagram, steering wheel, mirror, park assist, fuses, climate control, jump start terminals
