LEXUS LS430 2003 Factory Repair Manual
Manufacturer: LEXUS, Model Year: 2003,
Model line: LS430,
Model: LEXUS LS430 2003
Pages: 4500, PDF Size: 87.45 MB
LEXUS LS430 2003 Factory Repair Manual
LS430 2003
LEXUS
LEXUS
https://www.carmanualsonline.info/img/36/57050/w960_57050-0.png
LEXUS LS430 2003 Factory Repair Manual
Trending: driver seat adjustment, warning light, C1752, lane assist, remote control, hood release, air filter
Page 1071 of 4500
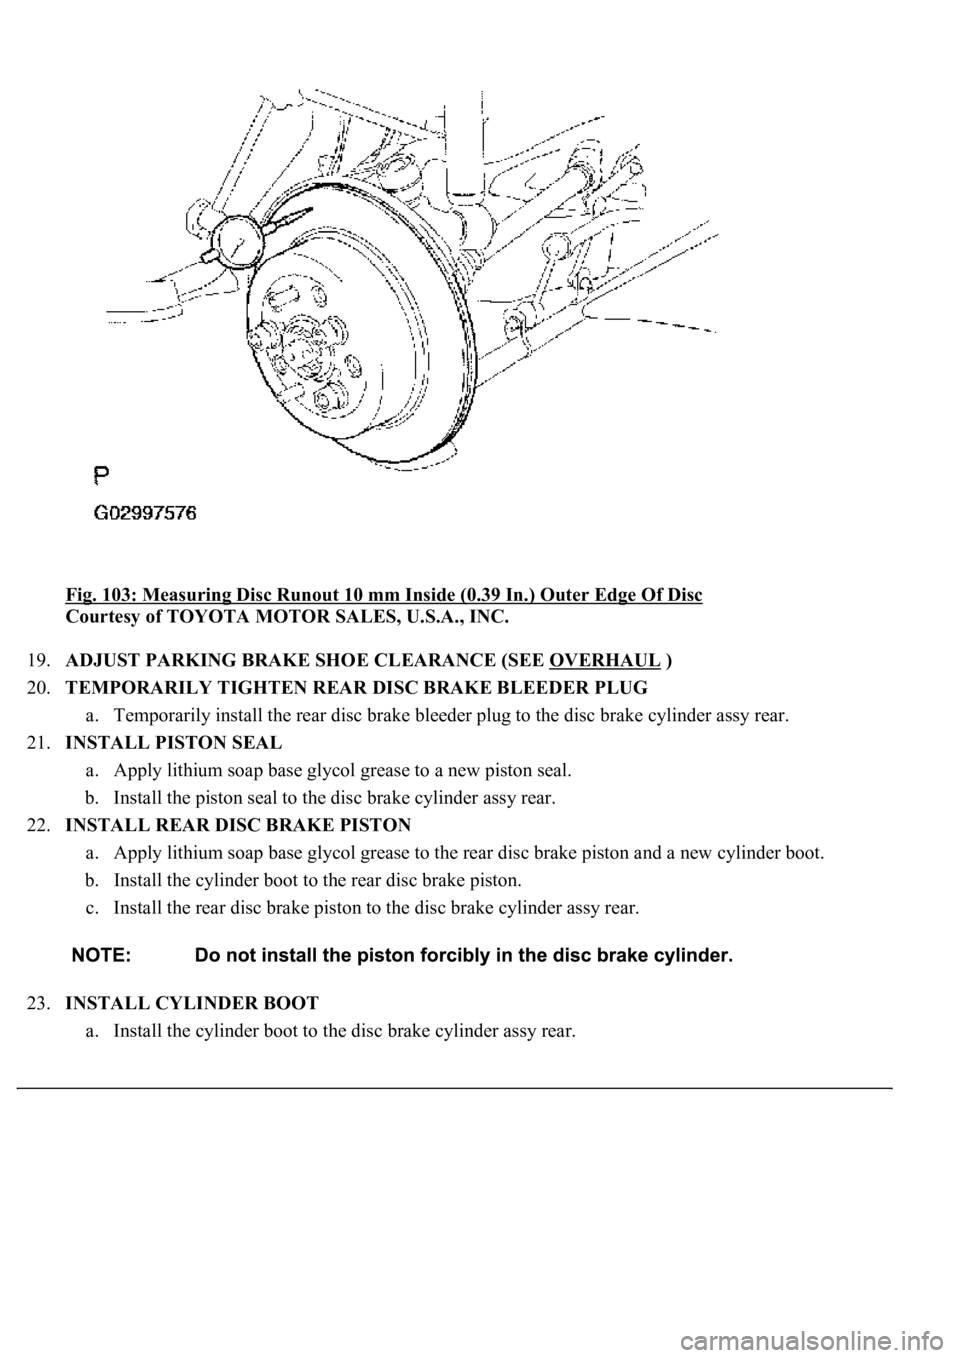
Fig. 103: Measuring Disc Runout 10 mm Inside (0.39 In.) Outer Edge Of Disc
Courtesy of TOYOTA MOTOR SALES, U.S.A., INC.
19.ADJUST PARKING BRAKE SHOE CLEARANCE (SEE OVERHAUL
)
20.TEMPORARILY TIGHTEN REAR DISC BRAKE BLEEDER PLUG
a. Temporarily install the rear disc brake bleeder plug to the disc brake cylinder assy rear.
21.INSTALL PISTON SEAL
a. Apply lithium soap base glycol grease to a new piston seal.
b. Install the piston seal to the disc brake cylinder assy rear.
22.INSTALL REAR DISC BRAKE PISTON
a. Apply lithium soap base glycol grease to the rear disc brake piston and a new cylinder boot.
b. Install the cylinder boot to the rear disc brake piston.
c. Install the rear disc brake piston to the disc brake cylinder assy rear.
23.INSTALL CYLINDER BOOT
a. Install the cylinder boot to the disc brake cylinder assy rear.
Page 1072 of 4500
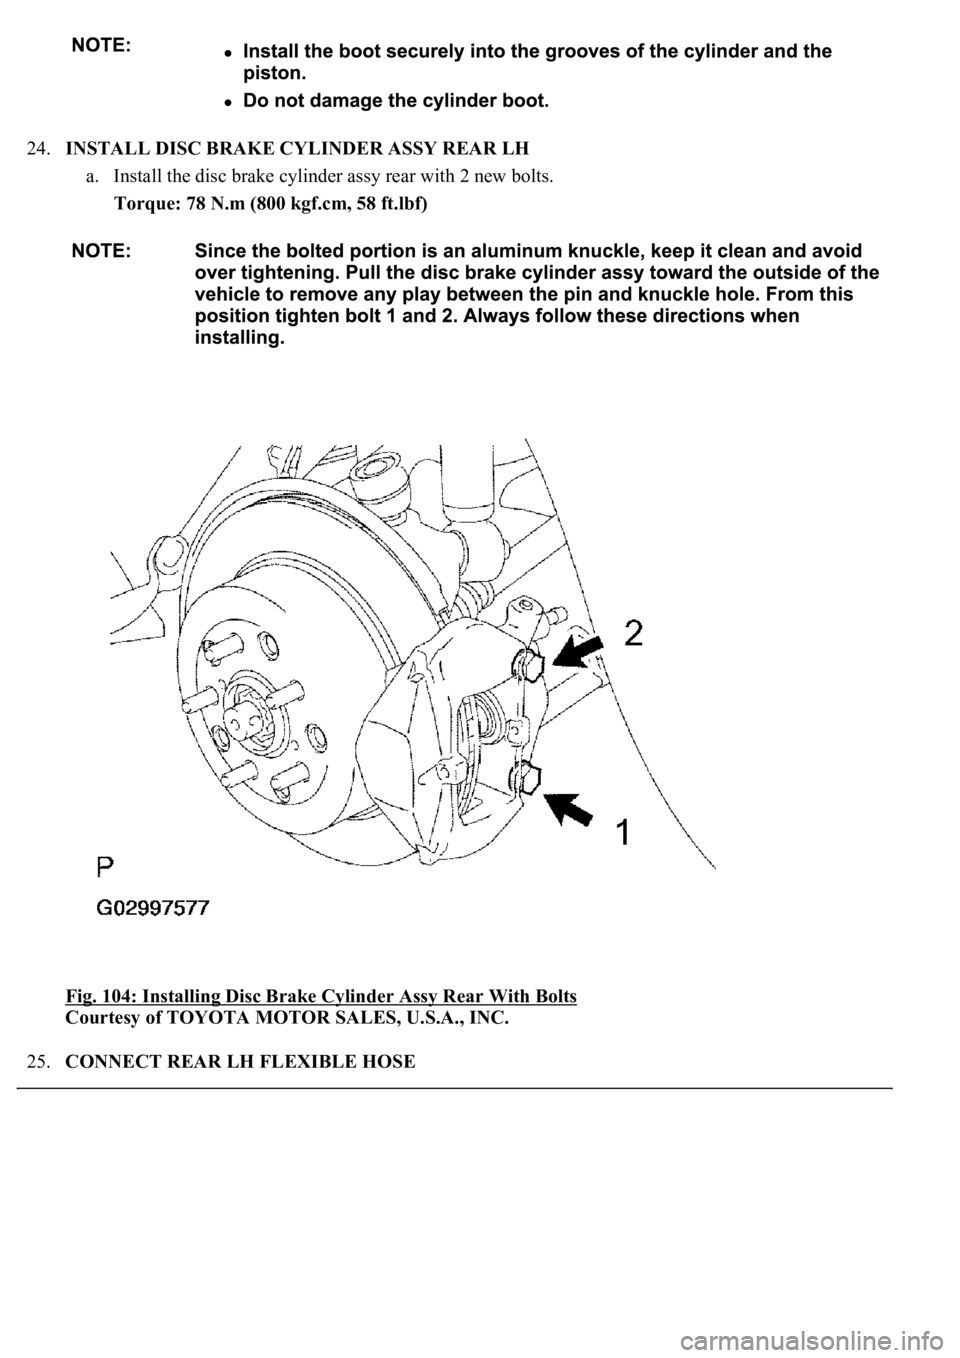
24.INSTALL DISC BRAKE CYLINDER ASSY REAR LH
a. Install the disc brake cylinder assy rear with 2 new bolts.
Torque: 78 N.m (800 kgf.cm, 58 ft.lbf)
Fig. 104: Installing Disc Brake Cylinder Assy Rear With Bolts
Courtesy of TOYOTA MOTOR SALES, U.S.A., INC.
25.CONNECT REAR LH FLEXIBLE HOSE
Page 1073 of 4500
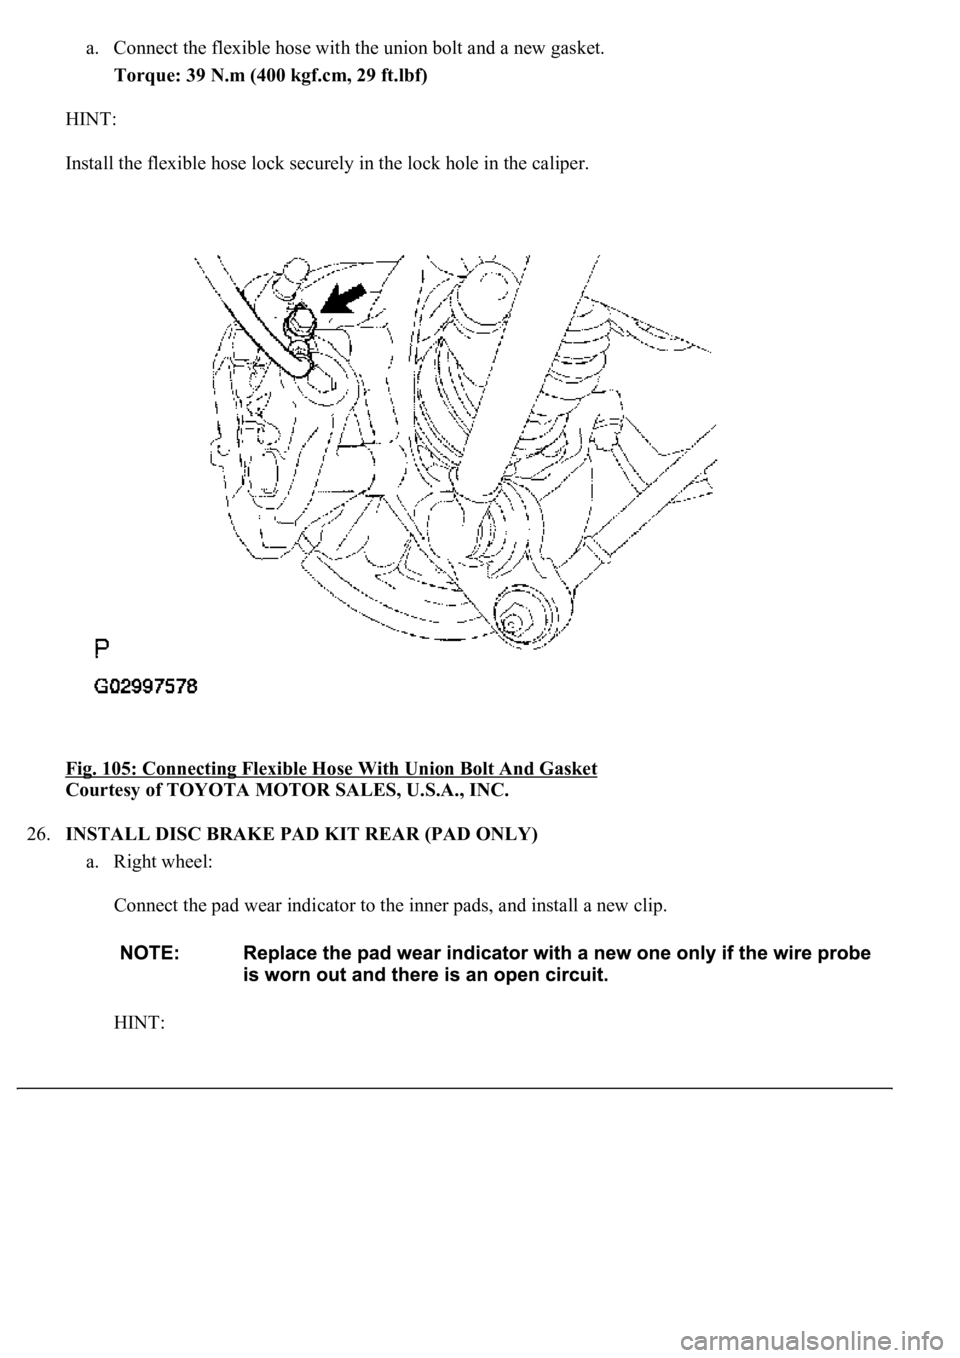
a. Connect the flexible hose with the union bolt and a new gasket.
Torque: 39 N.m (400 kgf.cm, 29 ft.lbf)
HINT:
Install the flexible hose lock securely in the lock hole in the caliper.
Fig. 105: Connecting Flexible Hose With Union Bolt And Gasket
Courtesy of TOYOTA MOTOR SALES, U.S.A., INC.
26.INSTALL DISC BRAKE PAD KIT REAR (PAD ONLY)
a. Right wheel:
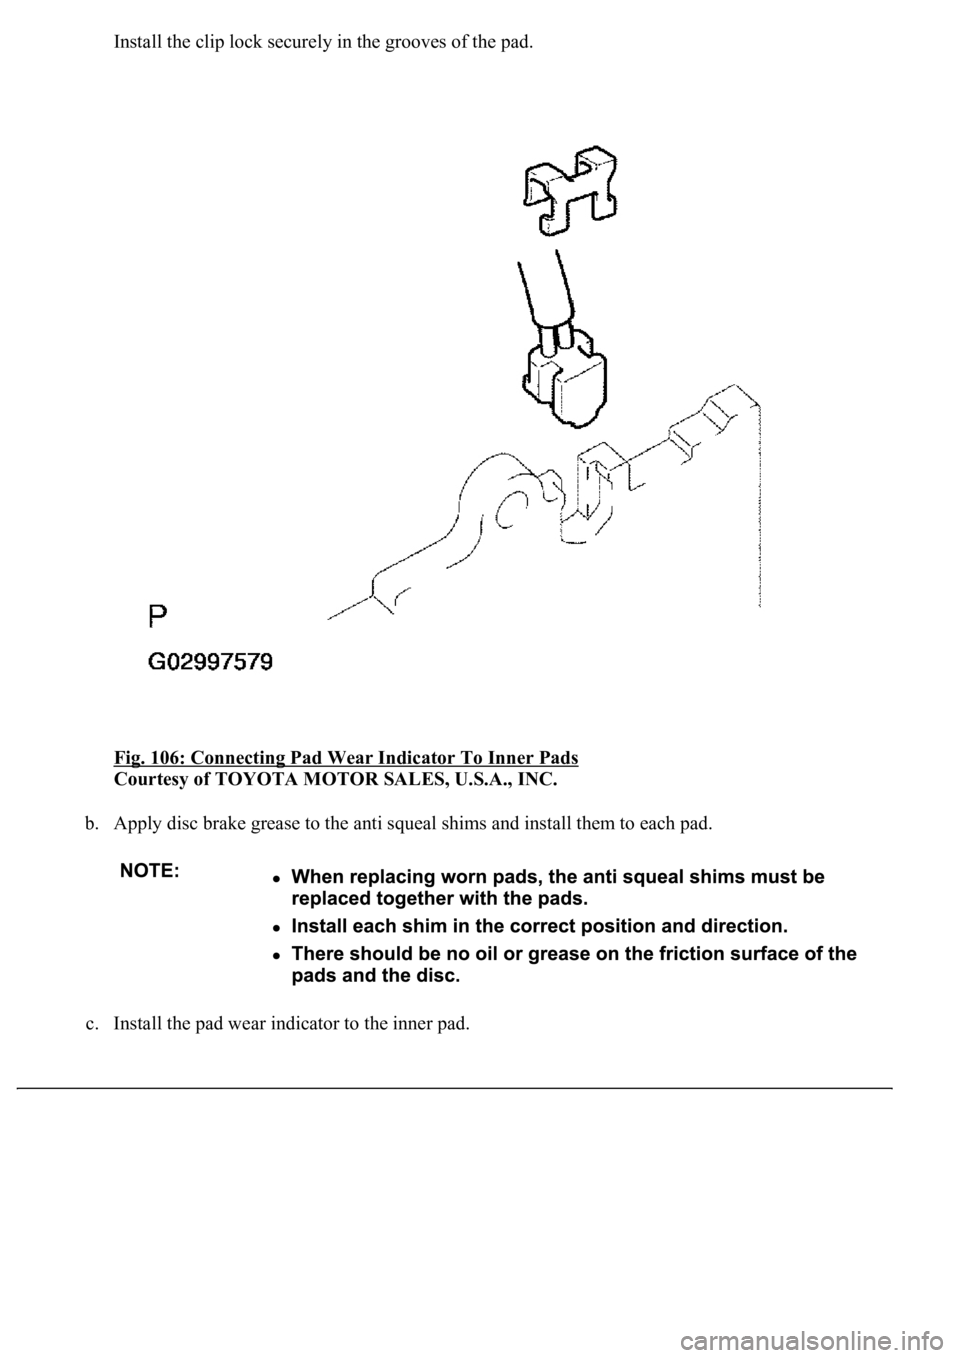
Connect the pad wear indicator to the inner pads, and install a new clip.
HINT:
Page 1074 of 4500
Install the clip lock securely in the grooves of the pad.
Fig. 106: Connecting Pad Wear Indicator To Inner Pads
Courtesy of TOYOTA MOTOR SALES, U.S.A., INC.
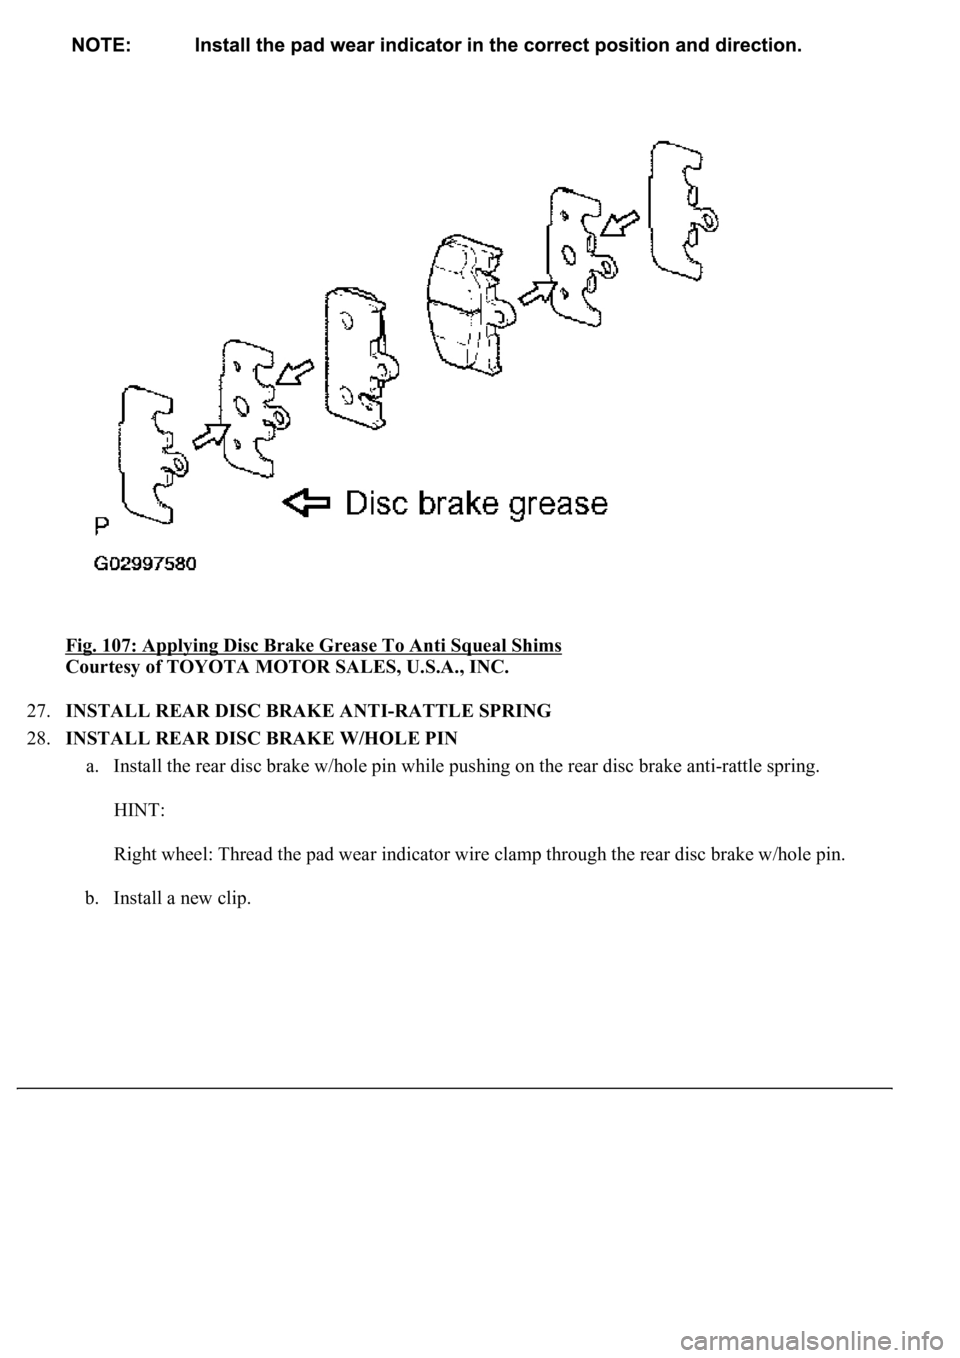
b. Apply disc brake grease to the anti squeal shims and install them to each pad.
c. Install the pad wear indicator to the inner pad.
Page 1075 of 4500
Fig. 107: Applying Disc Brake Grease To Anti Squeal Shims
Courtesy of TOYOTA MOTOR SALES, U.S.A., INC.
27.INSTALL REAR DISC BRAKE ANTI-RATTLE SPRING
28.INSTALL REAR DISC BRAKE W/HOLE PIN
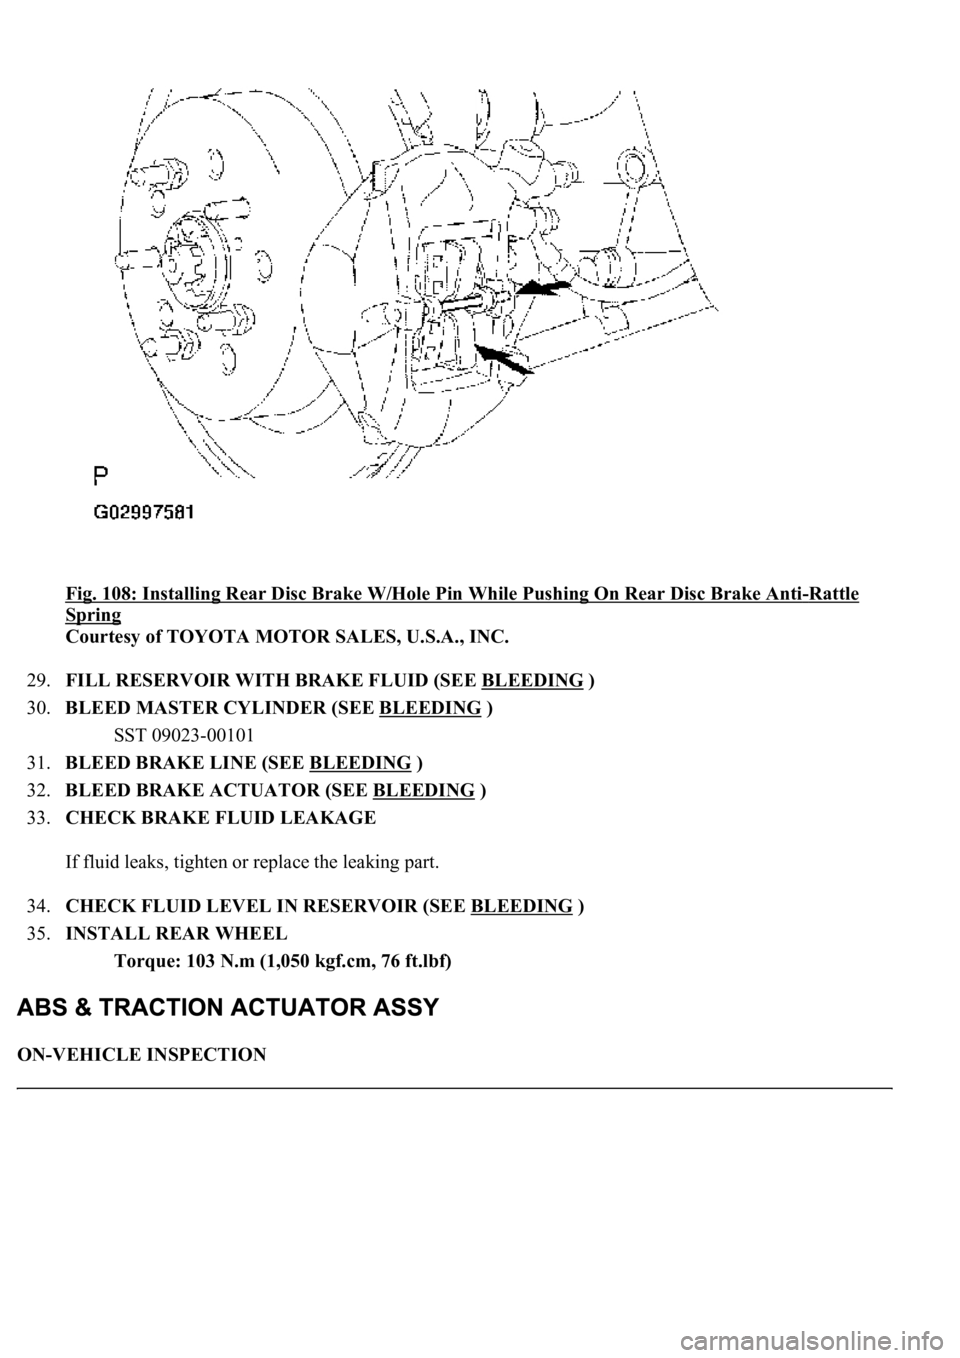
a. Install the rear disc brake w/hole pin while pushing on the rear disc brake anti-rattle spring.
HINT:
Right wheel: Thread the pad wear indicator wire clamp through the rear disc brake w/hole pin.
b. Install a new clip.
Page 1076 of 4500
Fig. 108: Installing Rear Disc Brake W/Hole Pin While Pushing On Rear Disc Brake Anti-Rattle
Spring
Courtesy of TOYOTA MOTOR SALES, U.S.A., INC.
29.FILL RESERVOIR WITH BRAKE FLUID (SEE BLEEDING
)
30.BLEED MASTER CYLINDER (SEE BLEEDING
)
SST 09023-00101
31.BLEED BRAKE LINE (SEE BLEEDING
)
32.BLEED BRAKE ACTUATOR (SEE BLEEDING
)
33.CHECK BRAKE FLUID LEAKAGE
If fluid leaks, tighten or replace the leaking part.
34.CHECK FLUID LEVEL IN RESERVOIR (SEE BLEEDING
)
35.INSTALL REAR WHEEL
Torque: 103 N.m (1,050 kgf.cm, 76 ft.lbf)
ON-VEHICLE INSPECTION
Page 1077 of 4500
1.CONNECT HAND-HELD TESTER:
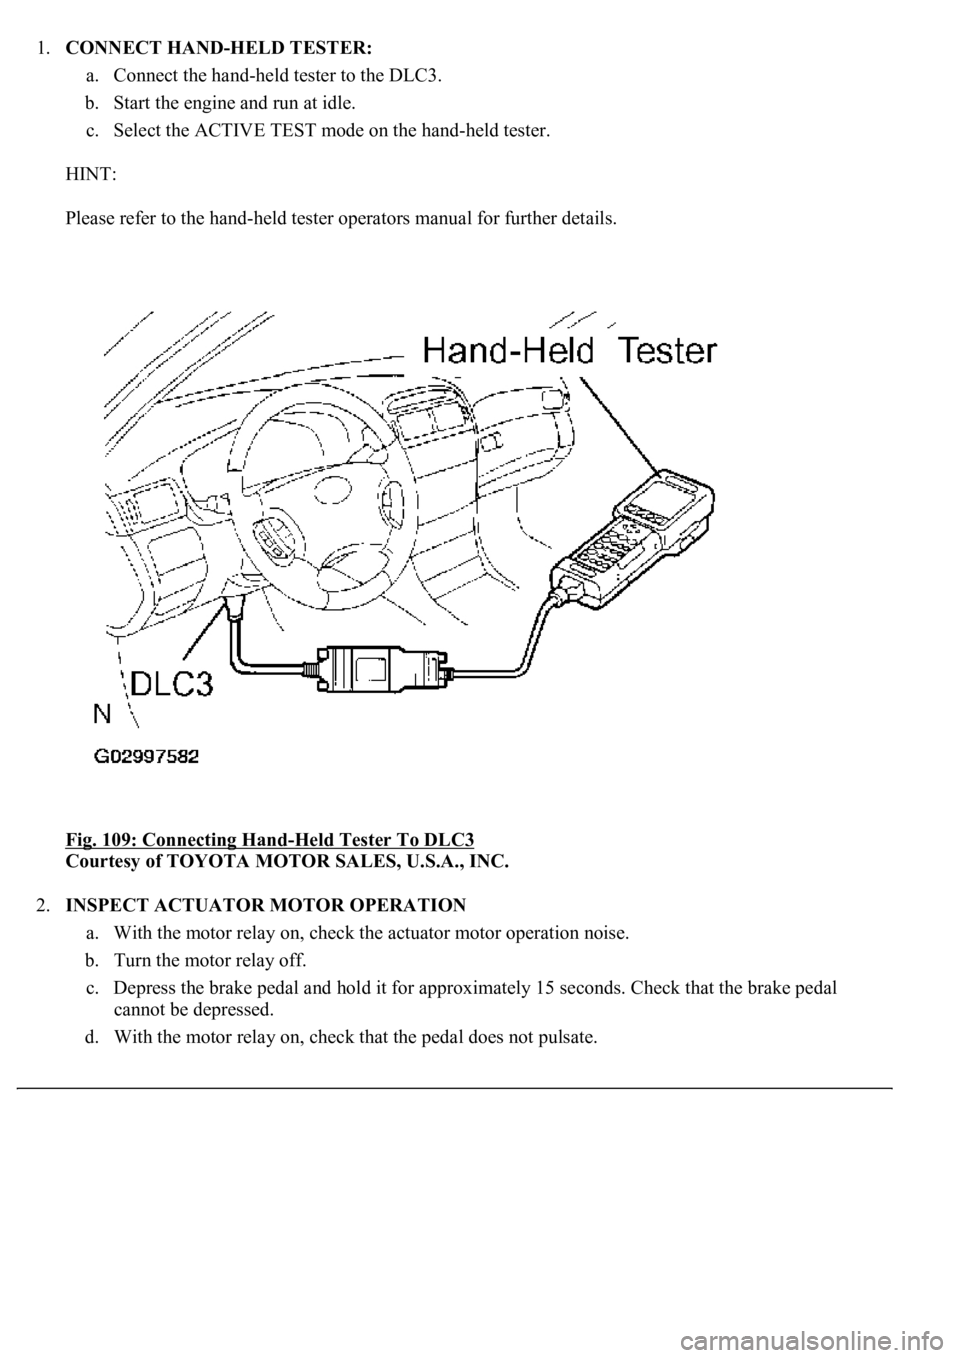
a. Connect the hand-held tester to the DLC3.
b. Start the engine and run at idle.
c. Select the ACTIVE TEST mode on the hand-held tester.
HINT:
Please refer to the hand-held tester operators manual for further details.
Fig. 109: Connecting Hand
-Held Tester To DLC3
Courtesy of TOYOTA MOTOR SALES, U.S.A., INC.
2.INSPECT ACTUATOR MOTOR OPERATION
a. With the motor relay on, check the actuator motor operation noise.
b. Turn the motor relay off.
c. Depress the brake pedal and hold it for approximately 15 seconds. Check that the brake pedal
cannot be depressed.
d. With the motor rela
y on, check that the pedal does not pulsate.
Page 1078 of 4500
If the pedal pulsates, replace the motor relay (see DTC C0273/13, C0274/14, C1361/91: OPEN
CIRCUIT IN ABS MOTOR RELAY CIRCUIT, B+ SHORT CIRCUIT IN ABS MOTOR
RELAY CIRCUIT, SHORT CIRCUIT IN ABS MOTOR FAIL SAFE RELAY CIRCUIT ).
e. Turn the motor relay off and release the brake pedal.
3.INSPECT RIGHT FRONT WHEEL OPERATION
a. With the brake pedal depressed, perform the following operations.
b. Turn the SFRH and SFRR solenoids on simultaneously, and check that the pedal cannot be
depressed.
c. Turn the SFRH and SFRR solenoids off simultaneously, and check that the pedal can be depressed.
If the pedal cannot be depressed, replace the ABS & TRACTION ACTUATOR ASSY.
d. Turn the motor relay on, and check that the pedal returns.
e. Turn the motor relay off and release the brake pedal.
4.INSPECT OTHER WHEEL OPERATION
a. Using the same procedure, check the solenoids of the other wheels.
HINT:
Left front wheel: SFLH, SFLR
Right rear wheel: SRRH, SRRR
Left rear wheel: SRLH, SRLR
5.CLEAR DTC (SEE DIAGNOSIS SYSTEM
)
Page 1079 of 4500
REPLACEMENT
1.REMOVE ENGINE ROOM SIDE COVER
2.SEPARATE ENGINE ROOM NO.3 R/B
a. Remove the bolt and separate the engine room No.3 R/B.
3.REMOVE FRONT WHEEL
4.REMOVE FRONT FENDER LINER
Remove the front fender outside moulding, front fender splash shield and front fender liner LH.
5.DRAIN BRAKE FLUID
a. Draw out fluid with syringe.
6.REMOVE ABS & TRACTION ACTUATOR ASSY WITH BRACKET
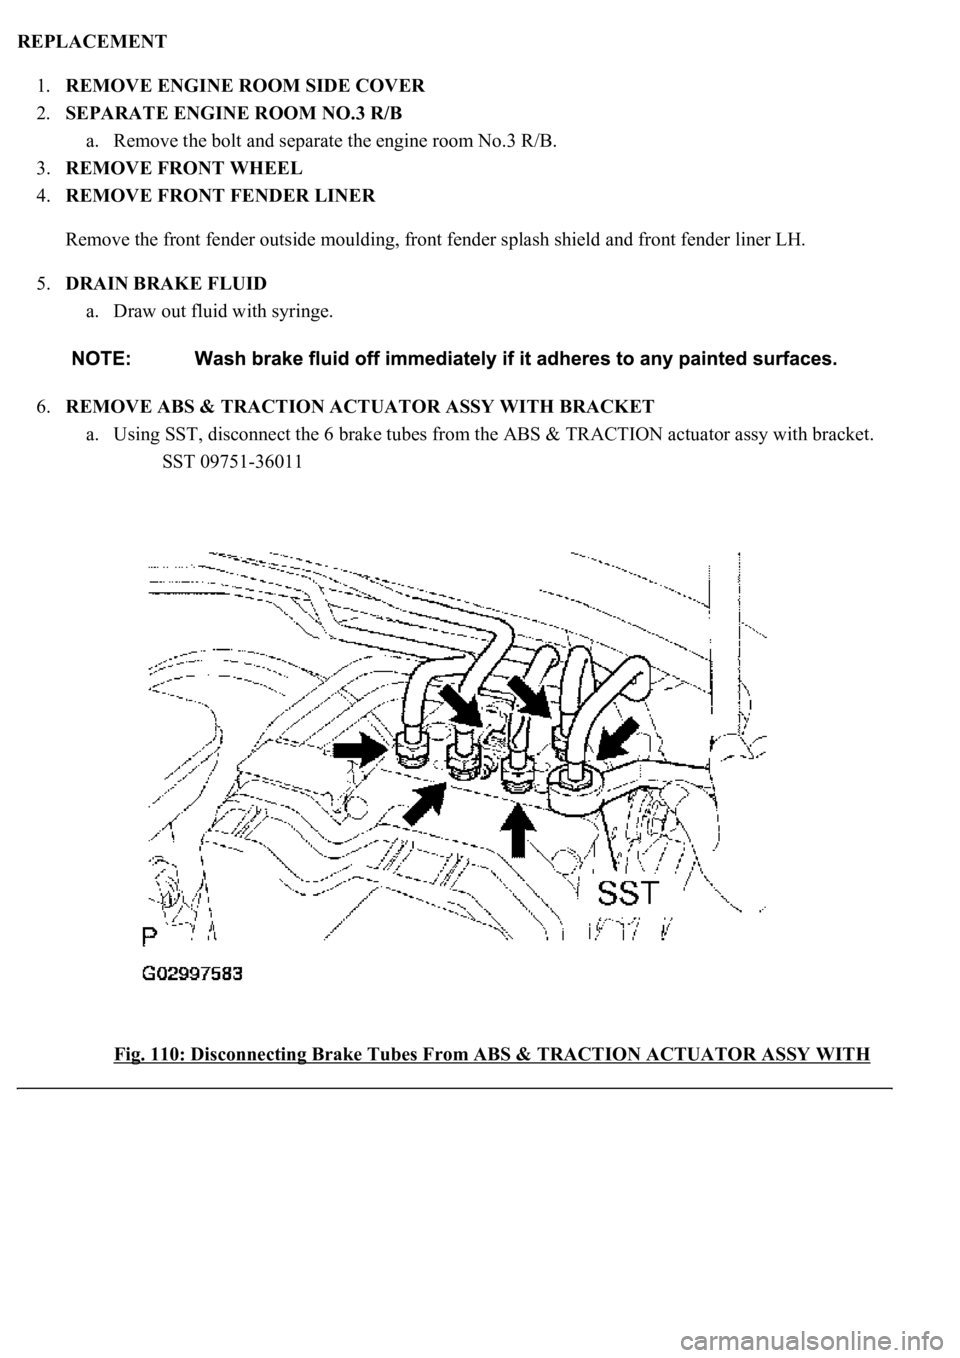
a. Using SST, disconnect the 6 brake tubes from the ABS & TRACTION actuator assy with bracket.
SST 09751-36011
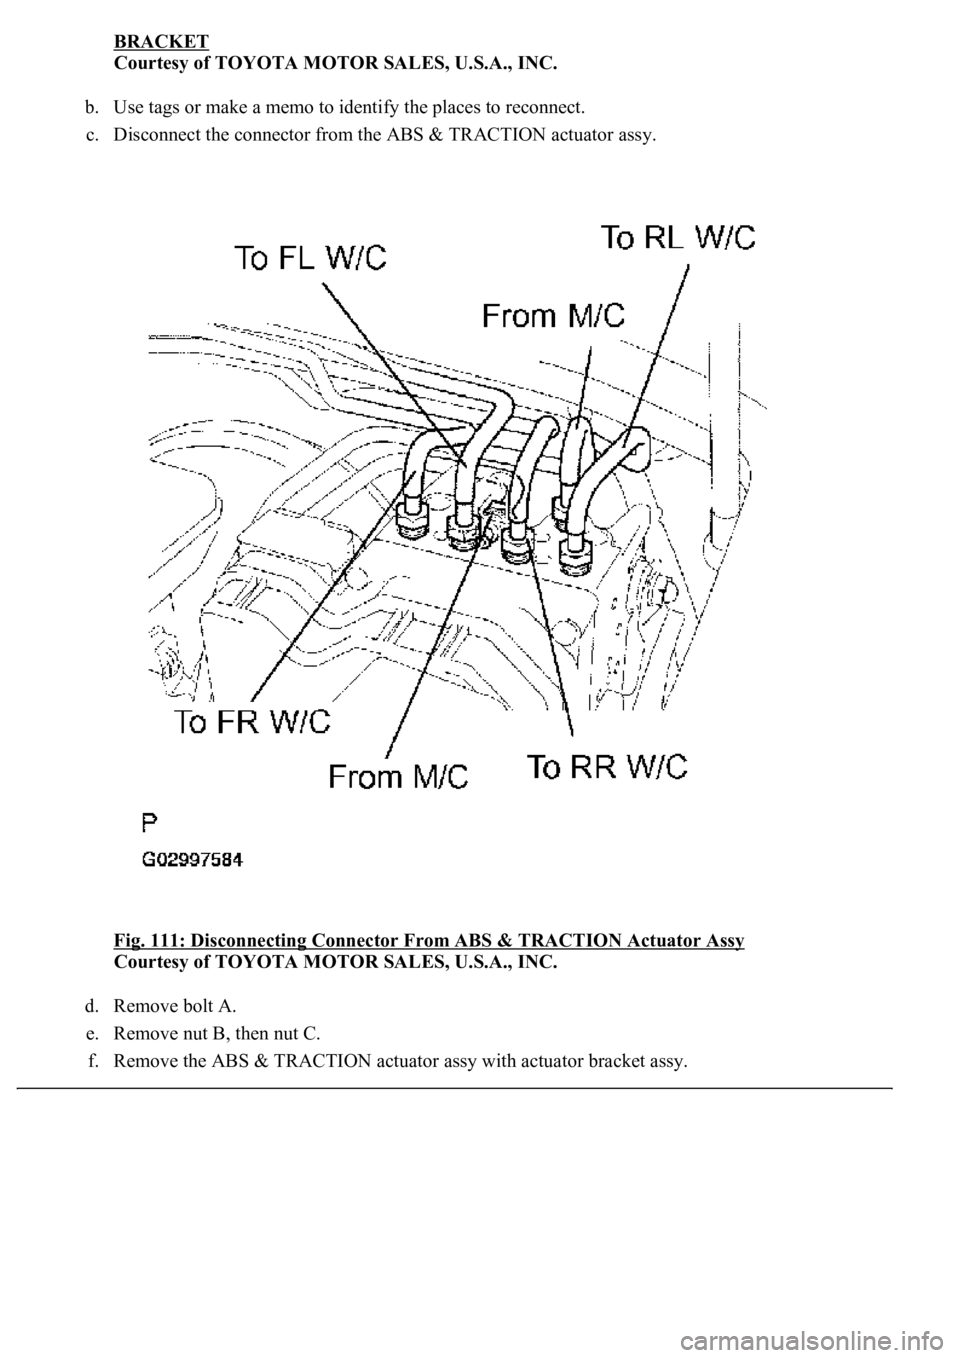
Fig. 110: Disconnecting Brake Tubes From ABS & TRACTION ACTUATOR ASSY WITH
Page 1080 of 4500
BRACKET
Courtesy of TOYOTA MOTOR SALES, U.S.A., INC.
b. Use tags or make a memo to identify the places to reconnect.
c. Disconnect the connector from the ABS & TRACTION actuator assy.
Fig. 111: Disconnecting Connector From ABS & TRACTION Actuator Assy
Courtesy of TOYOTA MOTOR SALES, U.S.A., INC.
d. Remove bolt A.
e. Remove nut B, then nut C.
f. Remove the ABS & TRACTION actuator ass
y with actuator bracket assy.
Trending: roof, mileage, width, Rear control Arm, steering interlock cable, immobilizer, diagnostic menu
