MAZDA 6 2002 Workshop Manual Suplement
Manufacturer: MAZDA, Model Year: 2002, Model line: 6, Model: MAZDA 6 2002Pages: 909, PDF Size: 17.16 MB
Page 621 of 909

PROPELLER SHAFT
L–5
L
End Of SiePROPELLER SHAFT REMOVAL/INSTALLATIONA6E6110250022011. Remove in the order indicated in the table.
2. Install in the reverse order of removal.
.
7
6
4
1
1
2
4
2
6
N·m {kgf·m, ft·lbf} 37.3—52.0 {3.81—5.30, 27.6—38.3}37.3—52.0 {3.81—5.30, 27.6—38.3} 49—58
{4.2—5.9, 36—42}
49—58
{4.2—5.9, 36—42}
5
5
3
3
A6E6110W001
1Nut
(See L–6 Nut Removal Note)
2Nut
3 Bush, Spacer
4Washer5 Propeller shaft heat shield
(See L–6 Propeller Shaft Heat Shield Installation
Note)
6 Bush, Spacer
7 Propeller shaft
(See L–7 Propeller Shaft Installation Note)
Page 622 of 909

L–6
PROPELLER SHAFT
Nut Removal Note
Caution
•Do not mark with the ponch to prevent unbalance.
1. Before removing the nut, put marks on the front
companion flange, tripod joint and the rear
companion flange, rear universal joint yoke for
proper reinstallation.
Propeller Shaft Heat Shield Installation Note
Caution
•When assembling the propeller shaft heat shield to the bearing support, narrowing the bolt hole
inner diameter can lower serviceability. Align the bolt hole edge of the propeller shaft heat shield
with the bolt hole inner side of the bearing support to assemble.
1. Set the propeller shaft heat shield to the bearing
support.
Front side
Rear side
2. Bend the edges of the propeller shaft heat shield
toward the bearing support as shown.
A6J6110W006
OK NGBOLT HOLE OF
PROPELLER SHAFT HEAT SHIELD
BOLT HOLE OF
BEARING SUPPORT
A6E6110W022
PROPELLER SHAFT
HEAT SHIELDBEARING SUPPORT
EDGE
4.5—4.7
mm
A6E6110W016
4.5—4.7
mm
PROPELLER SHAFT
HEAT SHIELDBEARING SUPPORT
EDGE
A6E6110W017
Page 623 of 909

PROPELLER SHAFT
L–7
L
Propeller Shaft Installation Note
1. Align the mark made during removal, and install the propeller shaft.
Front side
2. Installing a new propeller shaft, align the
differential companion flange precast marking
with the tag on the propeller shaft.
End Of Sie
PROPELLER SHAFT DISASSEMBLY/ASSEMBLYA6E611025002202
Caution
•To prevent damage to parts when using a clamp, be sure to place an aluminum plate between
parts and the clamp.
1. Disassemble in the order indicated in the table.
2. Assemble in the reverse order of disassembly.
A6J6110W006
MARK TA G
A6E6110W002
Page 624 of 909

L–8
PROPELLER SHAFT
.
SST
SST
SST
SST
SST
SST
R
SST
RR
R
R
R
R
R
R
SST
R
11
11
10
10
9
9
7
5
3
3
11
2
2
12
12
13
6
8
87157—177
{16.1—18.0,
116—130}
N·m {kgf·m, ft·lbf} 157—177
{16.1—18.0,
116—130}
R
R
3
1
2
4
R
A6E6110W003
1 Snap ring
(See L–9 Snap Ring Disassembly Note)
(See L–12 Bearing Cup and Snap Ring Assembly
Note)
2 Bearing cup
(See L–9 Bearing Cup Disassembly Note)
(See L–12 Bearing Cup and Snap Ring Assembly
Note)
3Spider
4 Flange yoke
5 Rear propeller shaft
6 Front propeller shaft
7 Locknut
(See L–9 Locknut Disassembly Note)
(See L–12 Locknut Assembly Note)
8 Spring washer9 Center yoke
(See L–10 Center Yoke Disassembly Note)
10 Bearing support
(See L–10 Bearing support Disassembly Note)
(See L–11 Bearing Support Assembly Note)
11 Dust cover
(See L–10 Dust Cover and Bearing Disassembly
Note)
(See L–11 Dust Cover Assembly Note)
12 Bearing
(See L–10 Dust Cover and Bearing Disassembly
Note)
(See L–11 Bearing Assembly Note)
13 Center propeller shaft
Page 625 of 909

PROPELLER SHAFT
L–9
L
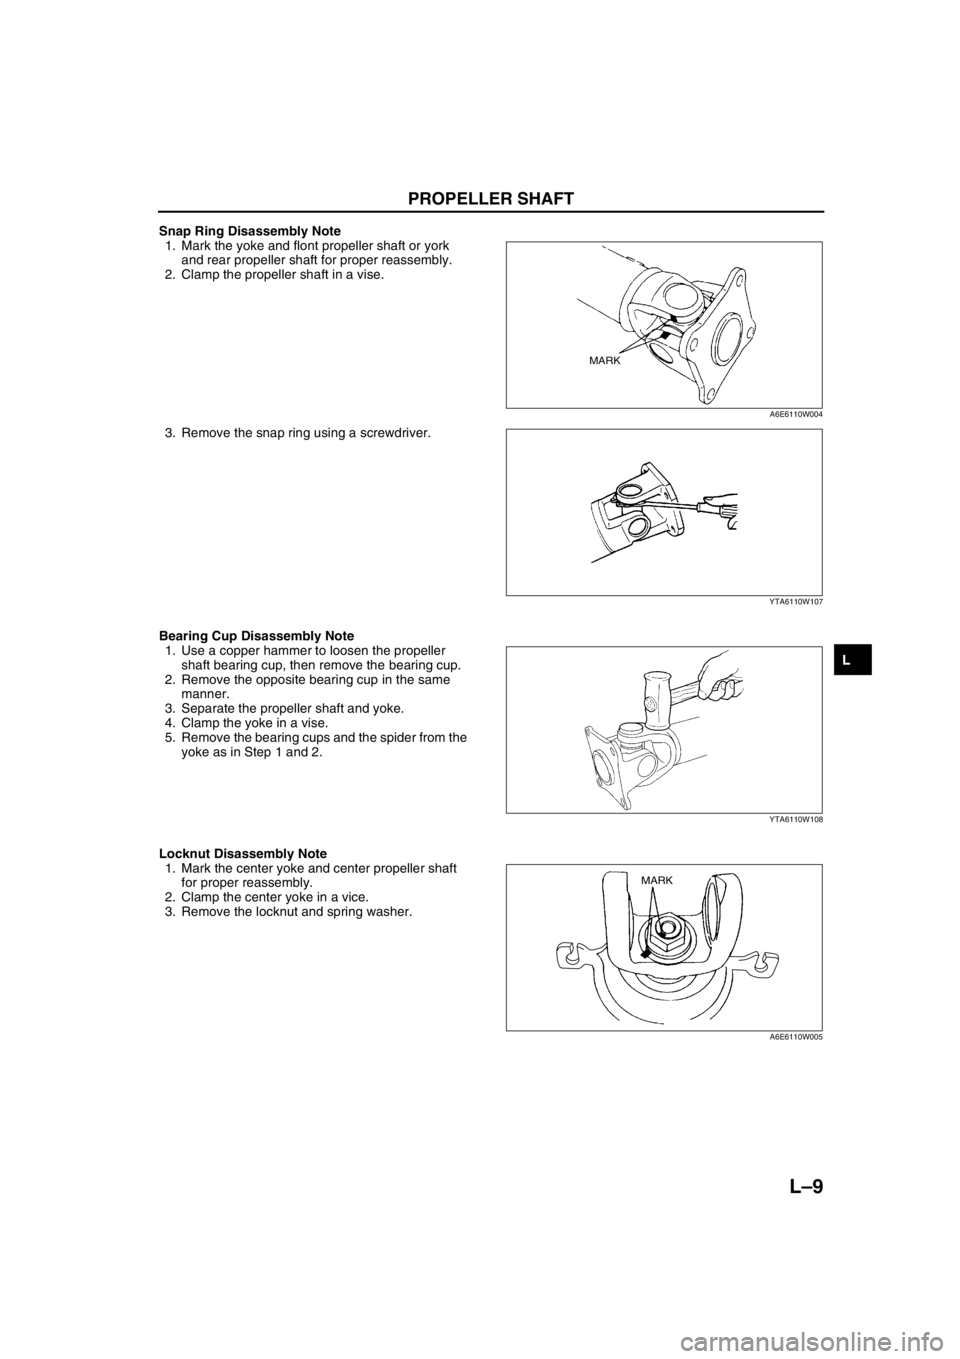
Snap Ring Disassembly Note
1. Mark the yoke and flont propeller shaft or york
and rear propeller shaft for proper reassembly.
2. Clamp the propeller shaft in a vise.
3. Remove the snap ring using a screwdriver.
Bearing Cup Disassembly Note
1. Use a copper hammer to loosen the propeller
shaft bearing cup, then remove the bearing cup.
2. Remove the opposite bearing cup in the same
manner.
3. Separate the propeller shaft and yoke.
4. Clamp the yoke in a vise.
5. Remove the bearing cups and the spider from the
yoke as in Step 1 and 2.
Locknut Disassembly Note
1. Mark the center yoke and center propeller shaft
for proper reassembly.
2. Clamp the center yoke in a vice.
3. Remove the locknut and spring washer.
MARK
A6E6110W004
YTA6110W107
YTA6110W108
MARK
A6E6110W005
Page 626 of 909

L–10
PROPELLER SHAFT
Center Yoke Disassembly Note
1. Remove the center yoke using the SST.
Center yoke (front side)
Center yoke (rear side)
Bearing support Disassembly Note
1. Remove the bearing support using the SST.
Dust Cover and Bearing Disassembly Note
1. Remove the dust cover and bearing from bearing
support using the SST and a press.
49 0839 425C
A6J6110W017
49 0839 425C
49 H027 002
A6J6110W011
49 0839 425C
49 G030 370
A6J6110W012
BEARING BEARING SUPPORT
DUSR COVER
49 F015 002
49 0636 145
A6E6110W007
Page 627 of 909

PROPELLER SHAFT
L–11
L
Bearing Assembly Note
1. Install the bearing onto the bearing support using
the SST and a press.
Dust Cover Assembly Note
1. Install the dust cover onto the bearing support
using the SST and a press.
Bearing Support Assembly Note
1. Install the bearing support using the SST.
Bearing side (front side)
Bearing support (rear side)
49 G030 797
49 H033 101
49 U027 005
A6J6110W014
49 F401 331
49 B034 201
49 U027 005
A6J6110W015
49 F401 335A
49 F401 331
A6J6110W018
49 F401 331
49 B034 201
A6J6110W019
Page 628 of 909

L–12
PROPELLER SHAFT
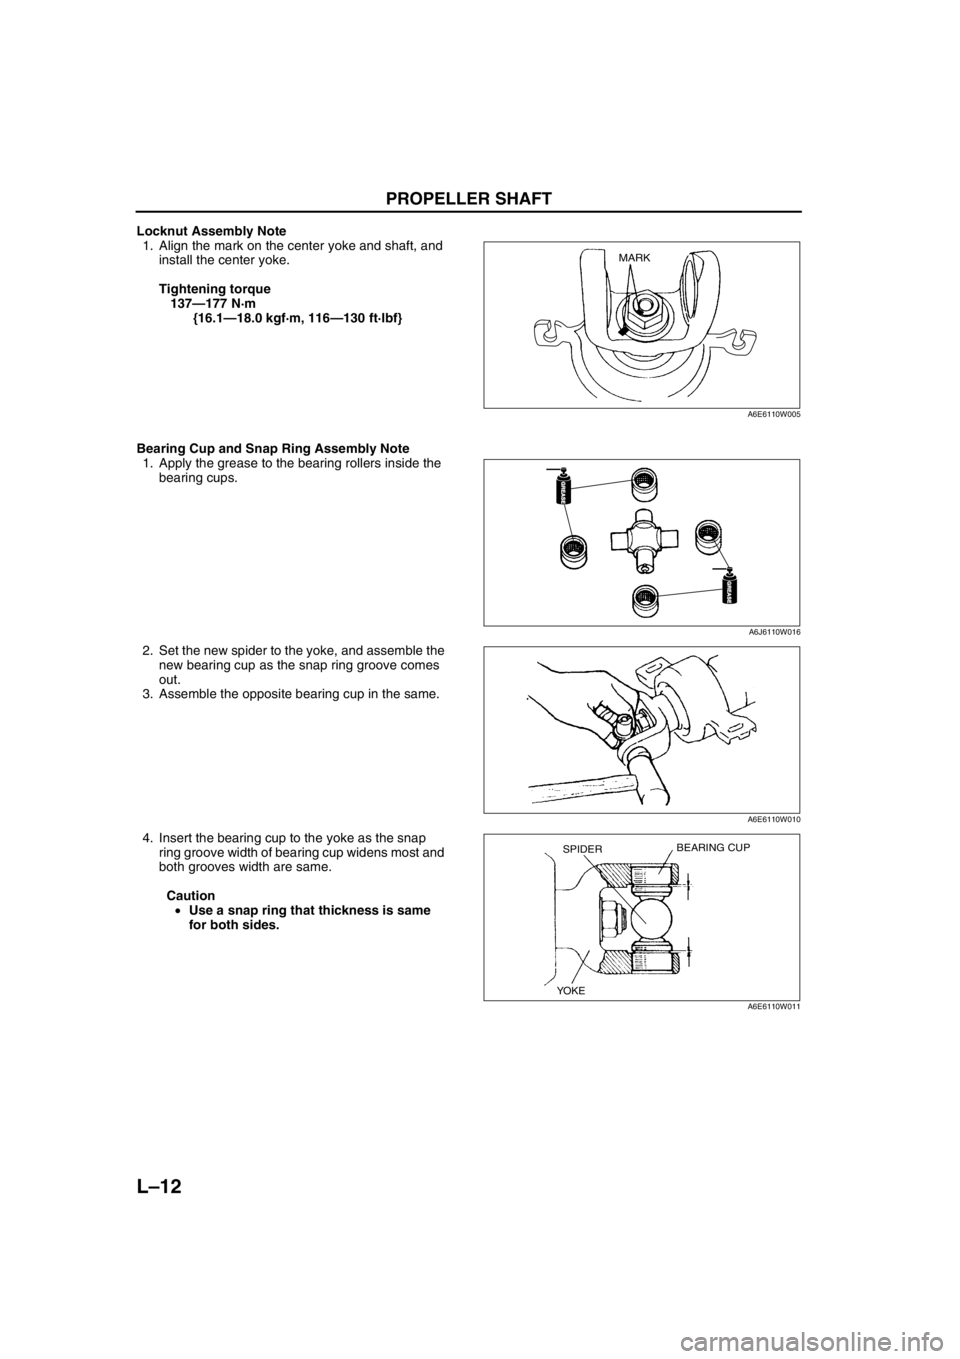
Locknut Assembly Note
1. Align the mark on the center yoke and shaft, and
install the center yoke.
Tightening torque
137—177 N·m
{16.1—18.0 kgf·m, 116—130 ft·lbf}
Bearing Cup and Snap Ring Assembly Note
1. Apply the grease to the bearing rollers inside the
bearing cups.
2. Set the new spider to the yoke, and assemble the
new bearing cup as the snap ring groove comes
out.
3. Assemble the opposite bearing cup in the same.
4. Insert the bearing cup to the yoke as the snap
ring groove width of bearing cup widens most and
both grooves width are same.
Caution
•Use a snap ring that thickness is same
for both sides.
MARK
A6E6110W005
GREASEGREASE
GREASEGREASE
A6J6110W016
A6E6110W010
BEARING CUPSPIDER
YOKE
A6E6110W011
Page 629 of 909

PROPELLER SHAFT
L–13
L
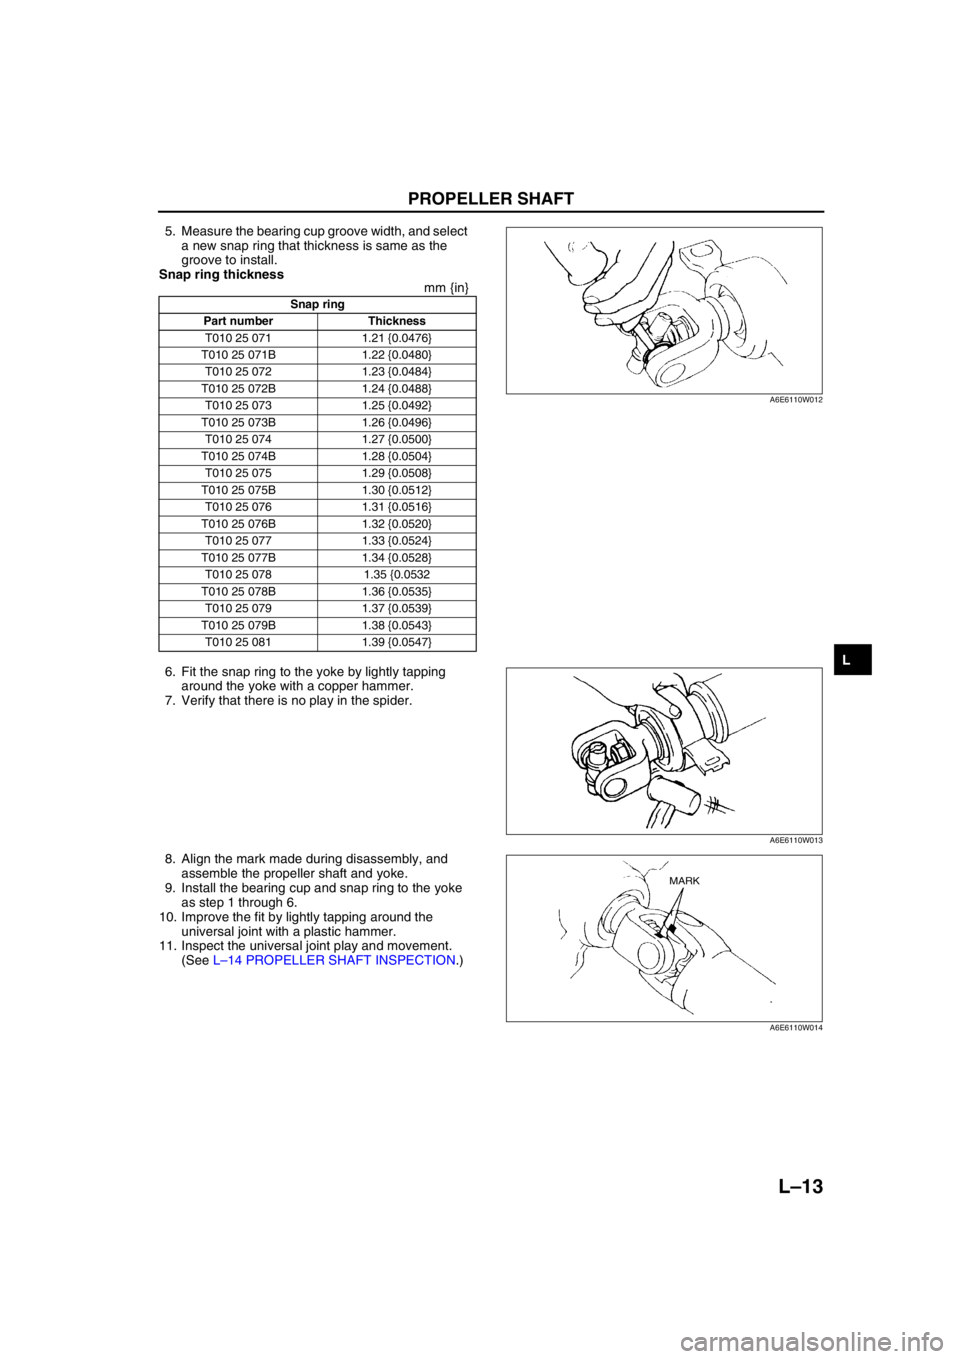
5. Measure the bearing cup groove width, and select
a new snap ring that thickness is same as the
groove to install.
Snap ring thickness
mm {in}
6. Fit the snap ring to the yoke by lightly tapping
around the yoke with a copper hammer.
7. Verify that there is no play in the spider.
8. Align the mark made during disassembly, and
assemble the propeller shaft and yoke.
9. Install the bearing cup and snap ring to the yoke
as step 1 through 6.
10. Improve the fit by lightly tapping around the
universal joint with a plastic hammer.
11. Inspect the universal joint play and movement.
(See L–14 PROPELLER SHAFT INSPECTION.)
End Of Sie
Snap ring
Part number Thickness
T010 25 071 1.21 {0.0476}
T010 25 071B 1.22 {0.0480}
T010 25 072 1.23 {0.0484}
T010 25 072B 1.24 {0.0488}
T010 25 073 1.25 {0.0492}
T010 25 073B 1.26 {0.0496}
T010 25 074 1.27 {0.0500}
T010 25 074B 1.28 {0.0504}
T010 25 075 1.29 {0.0508}
T010 25 075B 1.30 {0.0512}
T010 25 076 1.31 {0.0516}
T010 25 076B 1.32 {0.0520}
T010 25 077 1.33 {0.0524}
T010 25 077B 1.34 {0.0528}
T010 25 078 1.35 {0.0532
T010 25 078B 1.36 {0.0535}
T010 25 079 1.37 {0.0539}
T010 25 079B 1.38 {0.0543}
T010 25 081 1.39 {0.0547}
A6E6110W012
A6E6110W013
MARK
A6E6110W014
Page 630 of 909

L–14
PROPELLER SHAFT
PROPELLER SHAFT INSPECTIONA6E6110250022031. Disassemble the propeller shaft.
2. Measure the propeller shaft runout with a dial
indicator.
•If the runout is excessive, replace the
propeller shaft.
Runout limit
0.3 mm {0.01 in}
3. Move the universal joint in the direction shown,
and inspect joint play.
•If the joint play is not within the specification,
adjust the universal joint using snap rings.
Starting torque
0.29—0.78 N·m {3.0—7.9 kgf·cm}
End Of Sie
A6E6110W015
YTA6110W120