MAZDA 6 2002 Workshop Manual Suplement
Manufacturer: MAZDA, Model Year: 2002, Model line: 6, Model: MAZDA 6 2002Pages: 909, PDF Size: 17.16 MB
Page 591 of 909

K2–176
ON-BOARD DIAGNOSTIC
Diagnostic procedure
STEP INSPECTION ACTION
1VERIFY RELATED REPAIR INFORMATION
AVAILABILITY
•Check for related Service Bulletins and/or on-
line repair information availability.
•Is any related repair information available?Yes Perform repair or diagnosis according to available repair
information.
•If vehicle is not repaired, go to next step.
No Go to next step.
2INSPECT TERMINAL COMPONENT NO.1 (12-
PIN) FOR POOR CONNECTION
•Turn ignition key to OFF.
•Disconnect terminal componentNo.1 (12-pin).
•Check for poor connection (damaged, pulled-
out, terminals, corrosion, etc.).
•Are terminals okay?Yes Go to next step.
No Repair or replace terminals, then go to Step 12.
3INSPECT RESISTANCE
•Check resistance between terminal component
No.1 (12-pin) terminal C (transaxle case side)
and body ground.
•Is resistance within 2.6—3.2 ohms?
(See K2–88 SOLENOID VALVE INSPECTION.)Yes Go to Step 8.
No Go to next step.
4INSPECT COUPLER COMPONENT (10-PIN)
FOR POOR CONNECTION
•Disconnect coupler component (10-pin)
connector.
•Check for poor connection (damaged, pulled-
out, terminals, corrosion, etc.).
•Is terminal okay?Yes Go to next step.
No Repair or replace terminal, then go to Step 12.
5INSPECT RESISTANCE
•Check resistance between coupler component
(10-pin) terminal F (part side) and body
ground.
•Is resistance within 2.6—3.2 ohms?
(See K2–88 SOLENOID VALVE INSPECTION.)Yes Repair or replace coupler component No.1 (12-pin), then
go to Step 12.
No Go to next step.
6INSPECT HIGH CLUTCH SOLENOID VALVE
CONNECTOR FOR POOR CONNECTION
•Disconnect high clutch solenoid valve
connector.
•Check for poor connection (damaged, pulled-
out, terminals, corrosion, etc.).
•Is terminal okay?Yes Go to next step.
No Repair or replace terminal, then go to Step 12.
7INSPECT RESISTANCE
•Check resistance between high clutch solenoid
valve connector terminal A (part side) and body
ground.
•Is resistance within 2.6—3.2 ohms?
(See K2–88 SOLENOID VALVE INSPECTION.)Yes Repair or replace coupler component (10-pin), then go to
Step 12.
No Verify high clutch solenoid valve installation.
•If high clutch solenoid valve is installed correctly,
replace high clutch solenoid, then go to Step 13
(See K2–90 SOLENOID VALVE REMOVAL/
INSTALLATION.)
8INSPECT TCM CONNECTOR FOR POOR
CONNECTION
•Disconnect TCM connector.
•Check for poor connection (damaged, pulled-
out, terminals, corrosion, etc.).
•Are terminals okay?Yes Go to next step.
No Repair terminals, then go to Step 12.
9INSPECT TERMINAL COMPONENT NO.1 (12-
PIN) CIRCUIT FOR OPEN CIRCUIT
•Check continuity between TCM terminal 2U
(harness-side) and terminal component No.1
(12-pin) terminal C (harness-side).
•Is there continuity between terminals?Yes Go to next step.
No Repair or replace harness, then go to Step 12.
10INSPECT TERMINAL COMPONENT NO.1 (12-
PIN) CIRCUIT FOR SHORT TO POWER
•Turn ignition key to ON (engine OFF).
•Check voltage at terminal component No.1 (12-
pin) terminal C (harness-side).
•Is voltage 0 V?Yes Go to next step.
No Repair or replace harness, then go to Step 12.
Page 592 of 909

ON-BOARD DIAGNOSTIC
K2–177
K2
End Of Sie
11INSPECT TCM CIRCUIT FOR SHORT TO
GROUND
•Turn ignition key to OFF.
•Check continuity between TCM terminal 2U
(harness-side) and body ground.
•Is there any continuity?Yes Repair or replace harness, then go to next step.
No Go to next step.
12VERIFY TROUBLESHOOTING OF DTC P0798
COMPLETED
•Make sure to reconnect all disconnected
connectors.
•Clear DTC from memory using WDS or
equivalent.
•Drive vehicle in D range and make sure that
gears shift smoothly from 1GR to 5GR.
•Is same DTC present?Yes Replace TCM, then go to next step.
(See K2–96 TCM REMOVAL/INSTALLATION.)
No Go to next step.
13VERIFY AFTER REPAIR PROCEDURE
•Perform “After Repair Procedure”.
(See K2–124 AFTER REPAIR PROCEDURE.)
•Is there any DTC present?Yes Go to applicable DTC inspection.
No Troubleshooting completed. STEP INSPECTION ACTION
Page 593 of 909

K2–178
ON-BOARD DIAGNOSTIC
DTC P1710A6E577018901229
DTC P1710 GND return circuit malfunction
DETECTION
CONDITION•TCM detects open circuit in GND return signal line from solenoid valve.
Diagnostic support note:
•This is a diagnostic support DTC (monitored one per key cycle).
•MIL does not illuminate.
•PENDING CODE is not available.
•FREEZE FRAME DATA is not available.
•AT warning light does not indication.
•DTC is stored in TCM memory.
POSSIBLE
CAUSE•Open circuit between duty type solenoid valves terminal and TCM terminal 2P
•Damaged connector between solenoid valve and TCM
•TCM malfunction
A J 2PB TCM
CPU
CPUAT X
TCM
HARNESS SIDE CONNECTOR TERMINAL COMPONENT
NO.1(12-PIN)
HARNESS SIDE CONNECTOR
COUPLER COMPONENT
(10-PIN)
PART SIDE CONNECTORSOLENOID VALVE
SOLENOID VALVE
HARNESS SIDE CONNECTOR
Page 594 of 909

ON-BOARD DIAGNOSTIC
K2–179
K2
Diagnostic procedure
STEP INSPECTION ACTION
1VERIFY RELATED REPAIR INFORMATION
AVAILABILITY
•Check for related Service Bulletins and/or on-
line repair information availability.
•Is any related repair information available?Yes Perform repair or diagnosis according to available repair
information.
•If vehicle is not repaired, go to next step.
No Go to next step.
2INSPECT TCM CONNECTOR FOR POOR
CONNECTION
•Turn ignition key to OFF.
•Disconnect TCM connector.
•Check for poor connection (damaged, pulled-
out, terminals, corrosion, etc.).
•Are terminals okay?Yes Go to next step.
No Repair or replace terminals, then go to Step 9.
3INSPECT TCM CIRCUIT FOR SHORT TO
GROUND
•Verify that TCM connector is disconnected.
•Check continuity between TCM harness
connector terminal 2P and ground.
•Is there continuity?Yes Go to next step.
No Go to Step 5.
4INSPECT TCM INTERNAL CIRCUIT FOR OPEN
•Verify that TCM connector is disconnected.
•Check continuity between TCM terminal 2P
and TCM body.
•Is there any continuity?Yes Go to Step 9.
No Replace TCM, then go to Step 9.
5INSPECT TERMINAL COMPONENT NO.1 (12-
PIN) CONNECTOR FOR POOR CONNECTION
•Disconnect terminal component No.1 (12-pin)
connector.
•Check for poor connection (damaged, pulled-
out, terminals, corrosion, etc.).
•Are terminals okay?Yes Go to next step.
No Repair or replace terminals, then go to Step 9.
6INSPECT TERMINAL COMPONENT NO.1 (12-
PIN) CIRCUIT FOR SHORT TO GROUND
•Verify that terminal component No.1 (12-pin)
connector is disconnected.
•Check continuity between terminal component
No.1 (12-pin) connector terminal J (transaxle
case side) and ground.
•Is there continuity?Yes Repair or replace TCM harness, then go to Step 9.
No Go to next step.
7INSPECT COUPLER COMPONENT (10-PIN)
CONNECTOR FOR POOR CONNECTION
•Disconnect coupler component (10-pin)
connector.
•Check for poor connection (damaged, pulled-
out, terminals, corrosion, etc.).
•Are terminals okay?Yes Go to next step.
No Repair or replace terminals, then go to Step 9.
8INSPECT COUPLER COMPONENT (10-PIN)
CIRCUIT FOR SHORT TO GROUND
•Verify that coupler component (10-pin)
connector is disconnected.
•Check continuity between coupler component
(10-pin) connector terminal A (part side) and
ground.
•Is there continuity?Yes Repair or replace terminal component, then go to next step.
No Repair or replace coupler component, then go to next step.
9VERIFY TROUBLESHOOTING OF DTC P0763
COMPLETED
•Make sure to reconnect all disconnected
connectors.
•Clear DTC from memory using WDS or
equivalent.
•Drive vehicle in D range and make sure that
gears shift smoothly from 1GR to 5GR.
•Is same DTC present?Yes Replace TCM, then go to next step.
(See K2–96 TCM REMOVAL/INSTALLATION.)
No Go to next step.
Page 595 of 909
K2–180
ON-BOARD DIAGNOSTIC
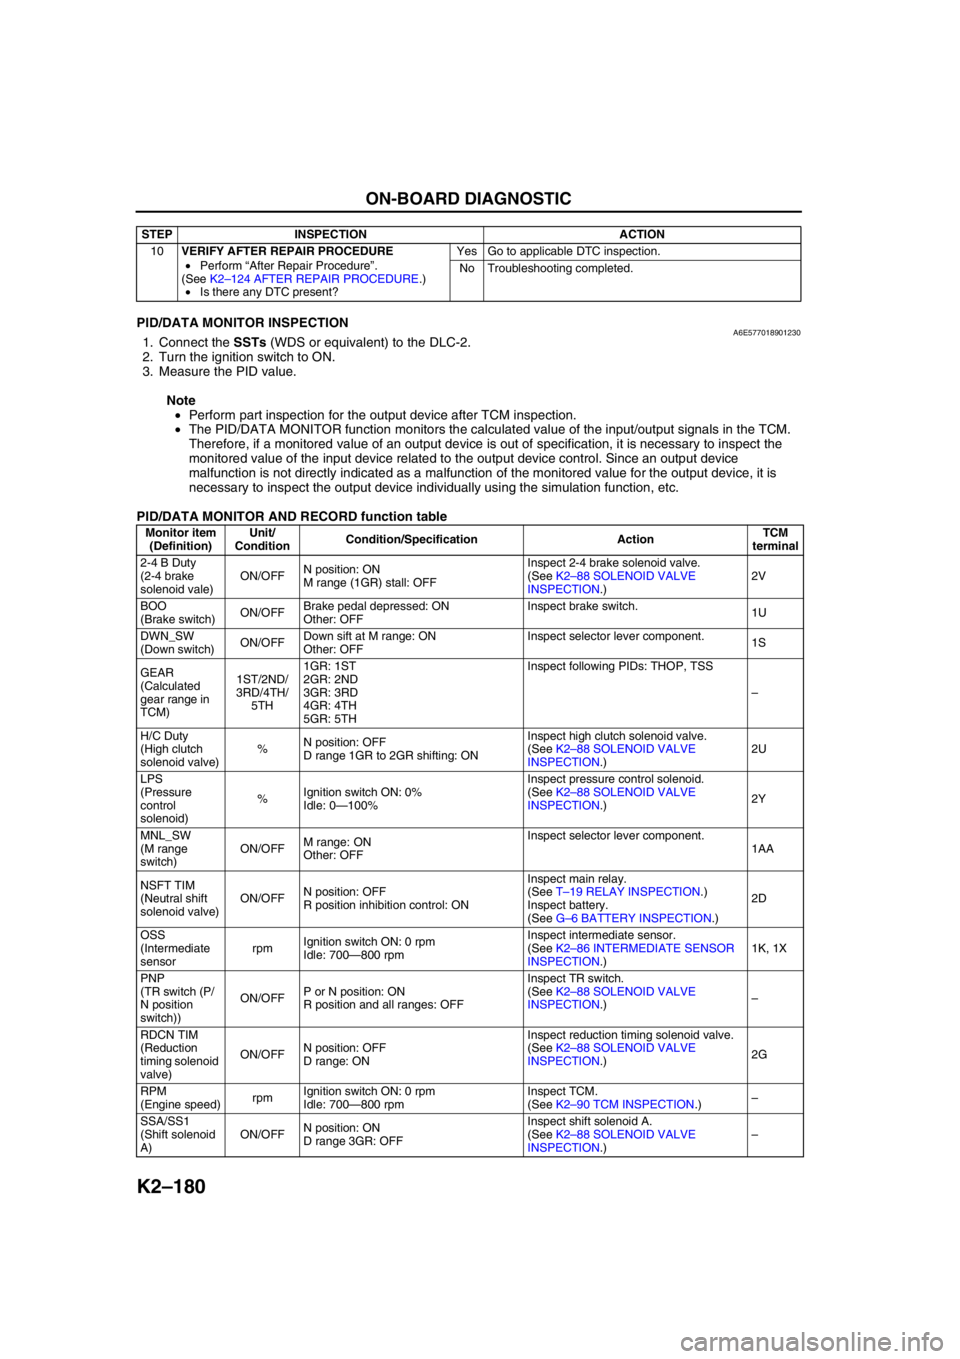
End Of SiePID/DATA MONITOR INSPECTIONA6E5770189012301. Connect the SSTs (WDS or equivalent) to the DLC-2.
2. Turn the ignition switch to ON.
3. Measure the PID value.
Note
•Perform part inspection for the output device after TCM inspection.
•The PID/DATA MONITOR function monitors the calculated value of the input/output signals in the TCM.
Therefore, if a monitored value of an output device is out of specification, it is necessary to inspect the
monitored value of the input device related to the output device control. Since an output device
malfunction is not directly indicated as a malfunction of the monitored value for the output device, it is
necessary to inspect the output device individually using the simulation function, etc.
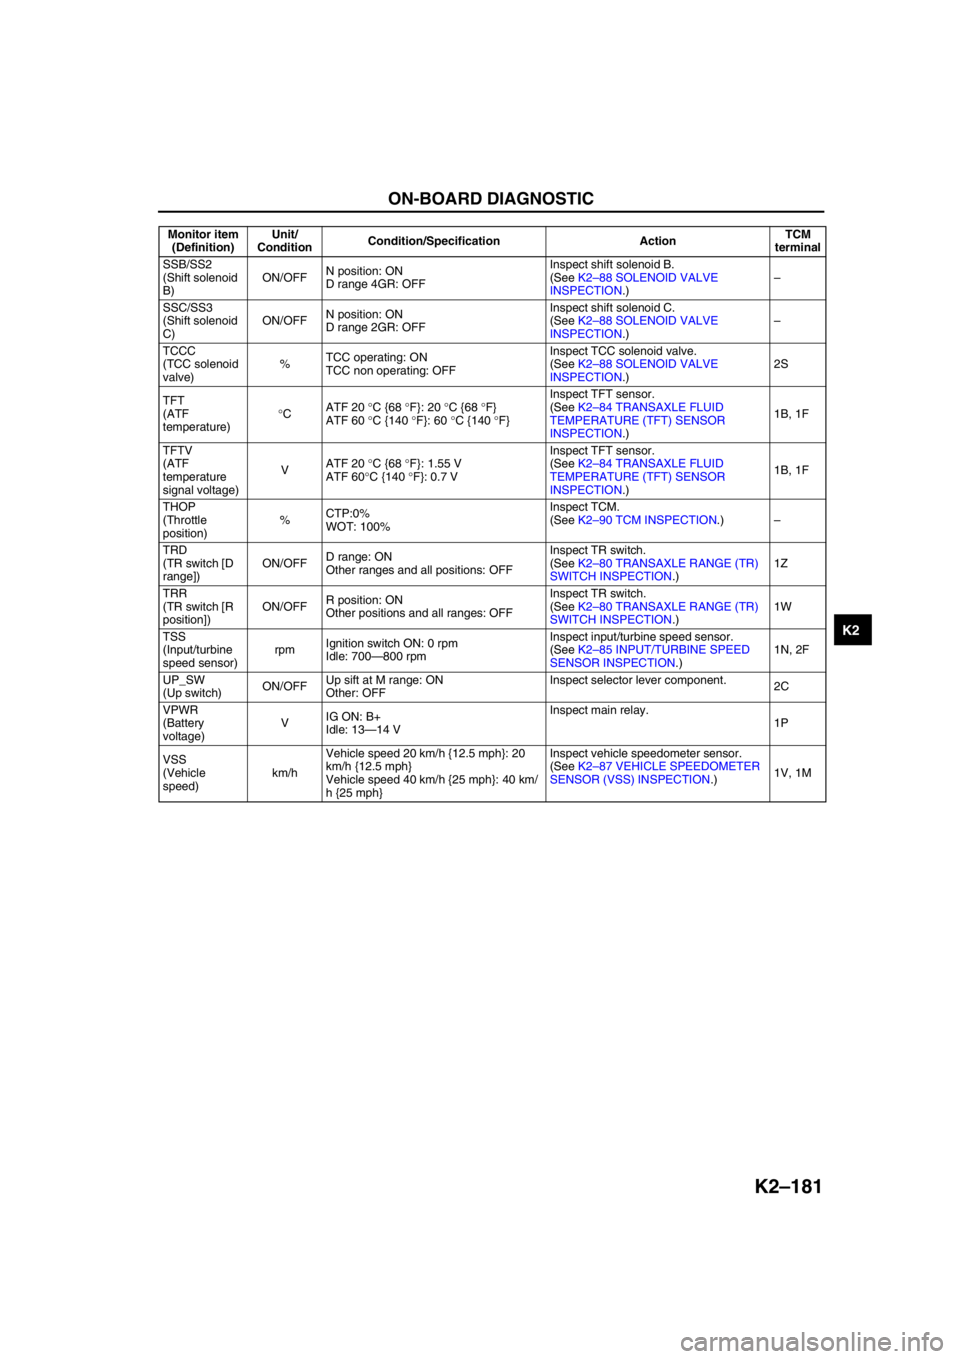
PID/DATA MONITOR AND RECORD function table
10VERIFY AFTER REPAIR PROCEDURE
•Perform “After Repair Procedure”.
(See K2–124 AFTER REPAIR PROCEDURE.)
•Is there any DTC present?Yes Go to applicable DTC inspection.
No Troubleshooting completed. STEP INSPECTION ACTION
Monitor item
(Definition)Unit/
ConditionCondition/Specification ActionTCM
terminal
2-4 B Duty
(2-4 brake
solenoid vale)ON/OFFN position: ON
M range (1GR) stall: OFFInspect 2-4 brake solenoid valve.
(See K2–88 SOLENOID VALVE
INSPECTION.)2V
BOO
(Brake switch)ON/OFFBrake pedal depressed: ON
Other: OFFInspect brake switch.
1U
DWN_SW
(Down switch)ON/OFFDown sift at M range: ON
Other: OFFInspect selector lever component.
1S
GEAR
(Calculated
gear range in
TCM)1ST/2ND/
3RD/4TH/
5TH1GR: 1ST
2GR: 2ND
3GR: 3RD
4GR: 4TH
5GR: 5THInspect following PIDs: THOP, TSS
–
H/C Duty
(High clutch
solenoid valve)%N position: OFF
D range 1GR to 2GR shifting: ONInspect high clutch solenoid valve.
(See K2–88 SOLENOID VALVE
INSPECTION.)2U
LPS
(Pressure
control
solenoid)%Ignition switch ON: 0%
Idle: 0—100%Inspect pressure control solenoid.
(See K2–88 SOLENOID VALVE
INSPECTION.)2Y
MNL_SW
(M range
switch)ON/OFFM range: ON
Other: OFFInspect selector lever component.
1AA
NSFT TIM
(Neutral shift
solenoid valve)ON/OFFN position: OFF
R position inhibition control: ONInspect main relay.
(See T–19 RELAY INSPECTION.)
Inspect battery.
(See G–6 BATTERY INSPECTION.)2D
OSS
(Intermediate
sensorrpmIgnition switch ON: 0 rpm
Idle: 700—800 rpmInspect intermediate sensor.
(See K2–86 INTERMEDIATE SENSOR
INSPECTION.)1K, 1X
PNP
(TR switch (P/
N position
switch))ON/OFFP or N position: ON
R position and all ranges: OFFInspect TR switch.
(See K2–88 SOLENOID VALVE
INSPECTION.)–
RDCN TIM
(Reduction
timing solenoid
valve)ON/OFFN position: OFF
D range: ONInspect reduction timing solenoid valve.
(See K2–88 SOLENOID VALVE
INSPECTION.)2G
RPM
(Engine speed)rpmIgnition switch ON: 0 rpm
Idle: 700—800 rpmInspect TCM.
(See K2–90 TCM INSPECTION.)–
SSA/SS1
(Shift solenoid
A)ON/OFFN position: ON
D range 3GR: OFFInspect shift solenoid A.
(See K2–88 SOLENOID VALVE
INSPECTION.)–
Page 596 of 909
ON-BOARD DIAGNOSTIC
K2–181
K2
End Of Sie
SSB/SS2
(Shift solenoid
B)ON/OFFN position: ON
D range 4GR: OFFInspect shift solenoid B.
(See K2–88 SOLENOID VALVE
INSPECTION.)–
SSC/SS3
(Shift solenoid
C)ON/OFFN position: ON
D range 2GR: OFFInspect shift solenoid C.
(See K2–88 SOLENOID VALVE
INSPECTION.)–
TCCC
(TCC solenoid
valve)%TCC operating: ON
TCC non operating: OFFInspect TCC solenoid valve.
(See K2–88 SOLENOID VALVE
INSPECTION.)2S
TFT
(ATF
temperature)°CATF 20 °C {68 °F}: 20 °C {68 °F}
ATF 60 °C {140 °F}: 60 °C {140 °F}Inspect TFT sensor.
(See K2–84 TRANSAXLE FLUID
TEMPERATURE (TFT) SENSOR
INSPECTION.)1B, 1F
TFTV
(ATF
temperature
signal voltage)VATF 20 °C {68 °F}: 1.55 V
ATF 60°C {140 °F}: 0.7 VInspect TFT sensor.
(See K2–84 TRANSAXLE FLUID
TEMPERATURE (TFT) SENSOR
INSPECTION.)1B, 1F
THOP
(Throttle
position)%CTP:0%
WOT: 100%Inspect TCM.
(See K2–90 TCM INSPECTION.)–
TRD
(TR switch [D
range])ON/OFFD range: ON
Other ranges and all positions: OFFInspect TR switch.
(See K2–80 TRANSAXLE RANGE (TR)
SWITCH INSPECTION.)1Z
TRR
(TR switch [R
position])ON/OFFR position: ON
Other positions and all ranges: OFFInspect TR switch.
(See K2–80 TRANSAXLE RANGE (TR)
SWITCH INSPECTION.)1W
TSS
(Input/turbine
speed sensor)rpmIgnition switch ON: 0 rpm
Idle: 700—800 rpmInspect input/turbine speed sensor.
(See K2–85 INPUT/TURBINE SPEED
SENSOR INSPECTION.)1N, 2F
UP_SW
(Up switch)ON/OFFUp sift at M range: ON
Other: OFFInspect selector lever component.
2C
VPWR
(Battery
voltage)VIG ON: B+
Idle: 13—14 VInspect main relay.
1P
VSS
(Vehicle
speed)km/hVehicle speed 20 km/h {12.5 mph}: 20
km/h {12.5 mph}
Vehicle speed 40 km/h {25 mph}: 40 km/
h {25 mph}Inspect vehicle speedometer sensor.
(See K2–87 VEHICLE SPEEDOMETER
SENSOR (VSS) INSPECTION.)1V, 1M Monitor item
(Definition)Unit/
ConditionCondition/Specification ActionTCM
terminal
Page 597 of 909
K2–182
TROUBLESHOOTING
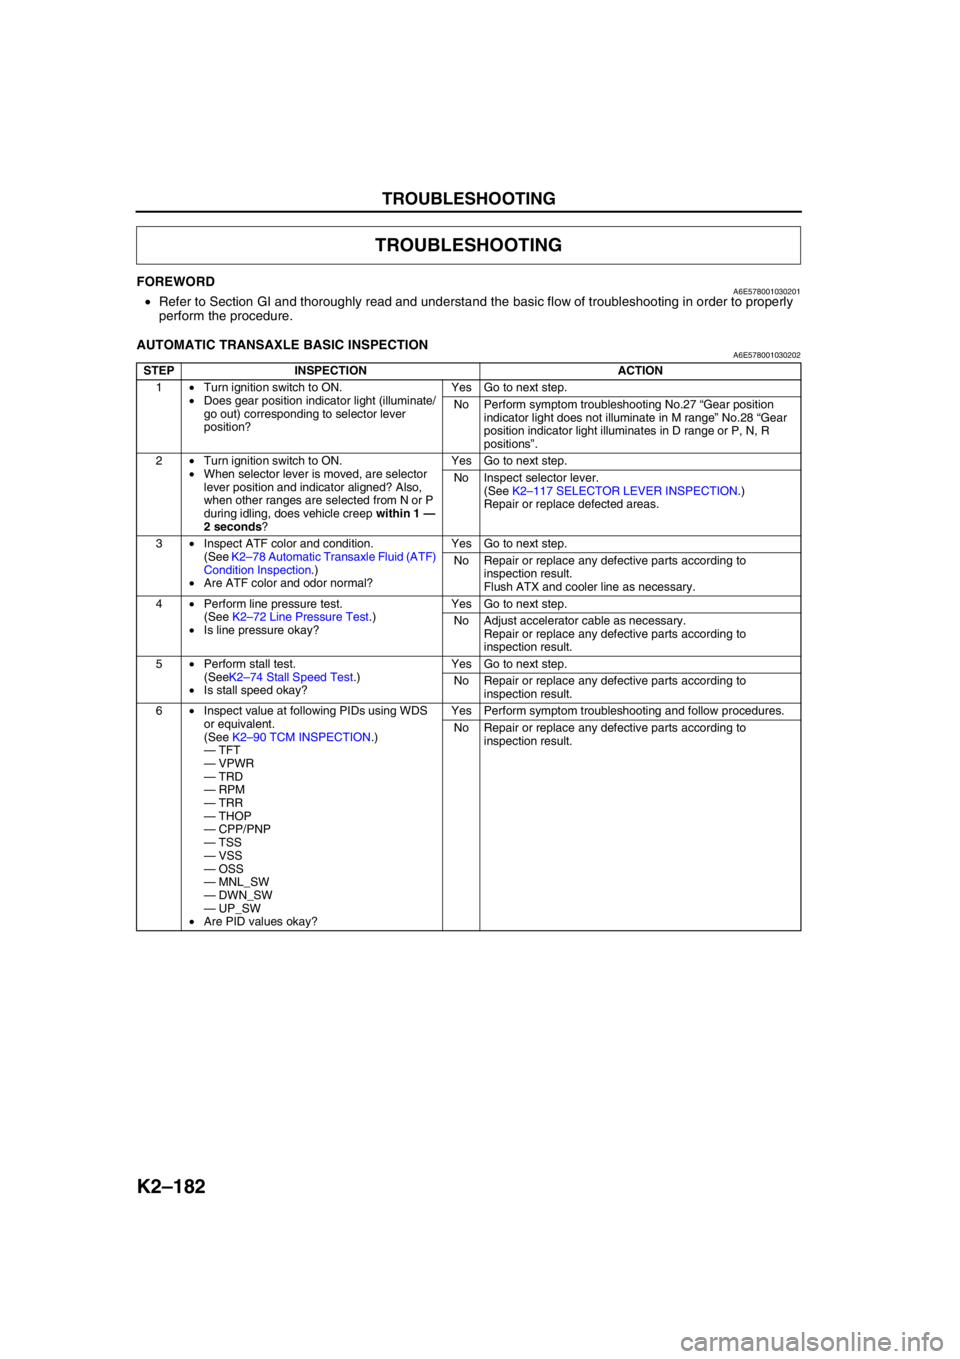
FOREWORDA6E578001030201•Refer to Section GI and thoroughly read and understand the basic flow of troubleshooting in order to properly
perform the procedure.
End Of Sie
AUTOMATIC TRANSAXLE BASIC INSPECTIONA6E578001030202
End Of Sie
TROUBLESHOOTING
STEP INSPECTION ACTION
1•Turn ignition switch to ON.
•Does gear position indicator light (illuminate/
go out) corresponding to selector lever
position?Yes Go to next step.
No Perform symptom troubleshooting No.27 “Gear position
indicator light does not illuminate in M range” No.28 “Gear
position indicator light illuminates in D range or P, N, R
positions”.
2•Turn ignition switch to ON.
•When selector lever is moved, are selector
lever position and indicator aligned? Also,
when other ranges are selected from N or P
during idling, does vehicle creep within 1 —
2 seconds?Yes Go to next step.
No Inspect selector lever.
(See K2–117 SELECTOR LEVER INSPECTION.)
Repair or replace defected areas.
3•Inspect ATF color and condition.
(See K2–78 Automatic Transaxle Fluid (ATF)
Condition Inspection.)
•Are ATF color and odor normal?Yes Go to next step.
No Repair or replace any defective parts according to
inspection result.
Flush ATX and cooler line as necessary.
4•Perform line pressure test.
(See K2–72 Line Pressure Test.)
•Is line pressure okay?Yes Go to next step.
No Adjust accelerator cable as necessary.
Repair or replace any defective parts according to
inspection result.
5•Perform stall test.
(SeeK2–74 Stall Speed Test.)
•Is stall speed okay?Yes Go to next step.
No Repair or replace any defective parts according to
inspection result.
6•Inspect value at following PIDs using WDS
or equivalent.
(See K2–90 TCM INSPECTION.)
—TFT
—VPWR
—TRD
—RPM
—TRR
—THOP
—CPP/PNP
—TSS
—VSS
—OSS
—MNL_SW
—DWN_SW
—UP_SW
•Are PID values okay?Yes Perform symptom troubleshooting and follow procedures.
No Repair or replace any defective parts according to
inspection result.
Page 598 of 909
TROUBLESHOOTING
K2–183
K2
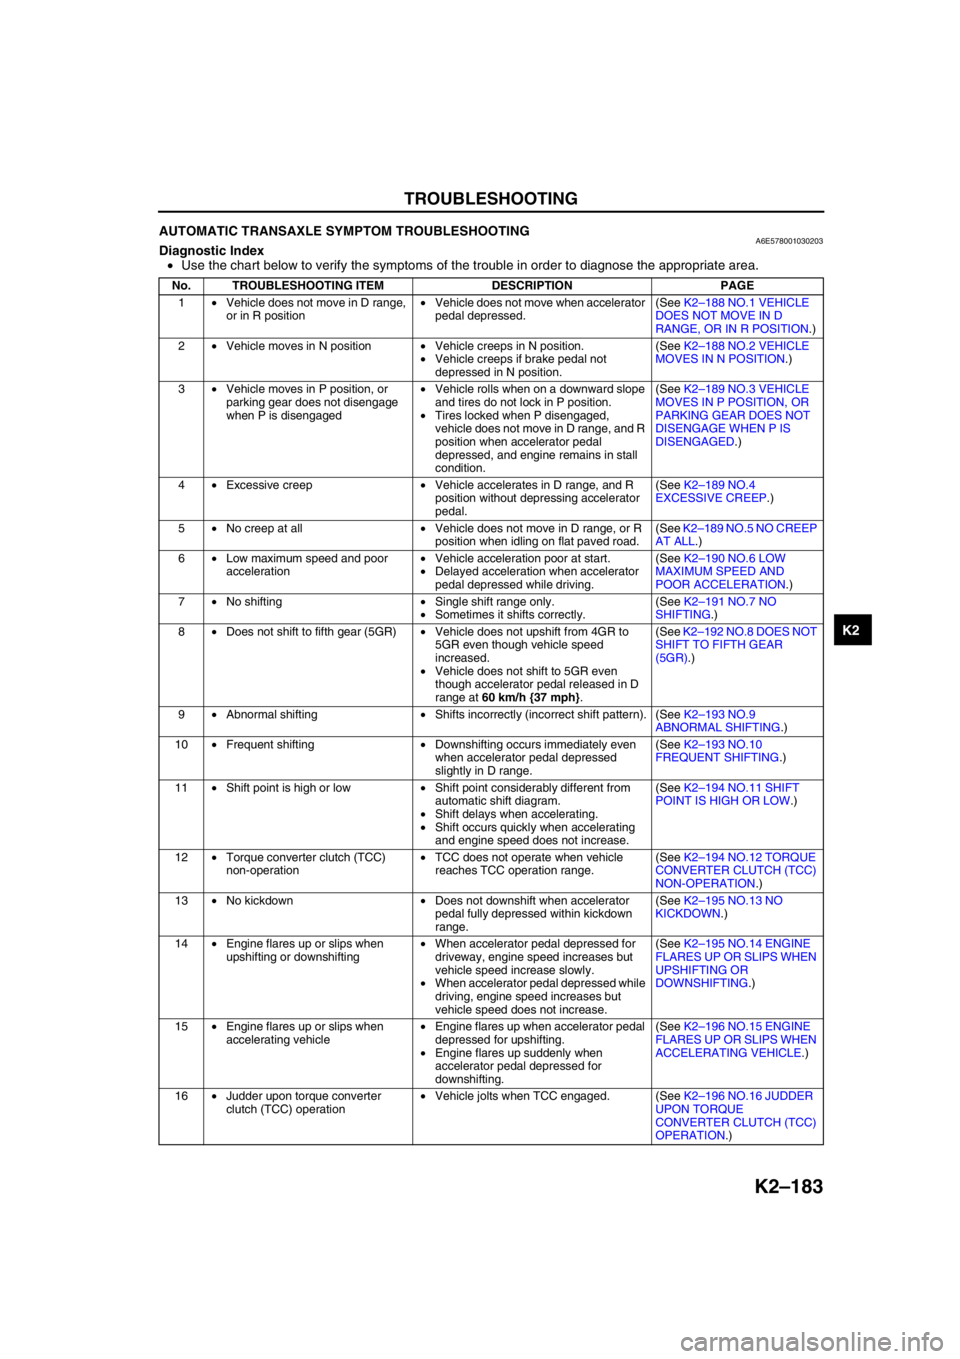
AUTOMATIC TRANSAXLE SYMPTOM TROUBLESHOOTINGA6E578001030203Diagnostic Index
•Use the chart below to verify the symptoms of the trouble in order to diagnose the appropriate area.
No. TROUBLESHOOTING ITEM DESCRIPTION PAGE
1•Vehicle does not move in D range,
or in R position•Vehicle does not move when accelerator
pedal depressed.(See K2–188 NO.1 VEHICLE
DOES NOT MOVE IN D
RANGE, OR IN R POSITION.)
2•Vehicle moves in N position•Vehicle creeps in N position.
•Vehicle creeps if brake pedal not
depressed in N position.(See K2–188 NO.2 VEHICLE
MOVES IN N POSITION.)
3•Vehicle moves in P position, or
parking gear does not disengage
when P is disengaged•Vehicle rolls when on a downward slope
and tires do not lock in P position.
•Tires locked when P disengaged,
vehicle does not move in D range, and R
position when accelerator pedal
depressed, and engine remains in stall
condition.(See K2–189 NO.3 VEHICLE
MOVES IN P POSITION, OR
PARKING GEAR DOES NOT
DISENGAGE WHEN P IS
DISENGAGED.)
4•Excessive creep•Vehicle accelerates in D range, and R
position without depressing accelerator
pedal.(See K2–189 NO.4
EXCESSIVE CREEP.)
5•No creep at all•Vehicle does not move in D range, or R
position when idling on flat paved road.(See K2–189 NO.5 NO CREEP
AT ALL.)
6•Low maximum speed and poor
acceleration•Vehicle acceleration poor at start.
•Delayed acceleration when accelerator
pedal depressed while driving.(See K2–190 NO.6 LOW
MAXIMUM SPEED AND
POOR ACCELERATION.)
7•No shifting•Single shift range only.
•Sometimes it shifts correctly.(See K2–191 NO.7 NO
SHIFTING.)
8•Does not shift to fifth gear (5GR)•Vehicle does not upshift from 4GR to
5GR even though vehicle speed
increased.
•Vehicle does not shift to 5GR even
though accelerator pedal released in D
range at 60 km/h {37 mph}.(See K2–192 NO.8 DOES NOT
SHIFT TO FIFTH GEAR
(5GR).)
9•Abnormal shifting•Shifts incorrectly (incorrect shift pattern). (See K2–193 NO.9
ABNORMAL SHIFTING.)
10•Frequent shifting•Downshifting occurs immediately even
when accelerator pedal depressed
slightly in D range.(See K2–193 NO.10
FREQUENT SHIFTING.)
11•Shift point is high or low•Shift point considerably different from
automatic shift diagram.
•Shift delays when accelerating.
•Shift occurs quickly when accelerating
and engine speed does not increase.(See K2–194 NO.11 SHIFT
POINT IS HIGH OR LOW.)
12•Torque converter clutch (TCC)
non-operation•TCC does not operate when vehicle
reaches TCC operation range.(See K2–194 NO.12 TORQUE
CONVERTER CLUTCH (TCC)
NON-OPERATION.)
13•No kickdown•Does not downshift when accelerator
pedal fully depressed within kickdown
range.(See K2–195 NO.13 NO
KICKDOWN.)
14•Engine flares up or slips when
upshifting or downshifting•When accelerator pedal depressed for
driveway, engine speed increases but
vehicle speed increase slowly.
•When accelerator pedal depressed while
driving, engine speed increases but
vehicle speed does not increase.(See K2–195 NO.14 ENGINE
FLARES UP OR SLIPS WHEN
UPSHIFTING OR
DOWNSHIFTING.)
15•Engine flares up or slips when
accelerating vehicle•Engine flares up when accelerator pedal
depressed for upshifting.
•Engine flares up suddenly when
accelerator pedal depressed for
downshifting.(See K2–196 NO.15 ENGINE
FLARES UP OR SLIPS WHEN
ACCELERATING VEHICLE.)
16•Judder upon torque converter
clutch (TCC) operation•Vehicle jolts when TCC engaged. (See K2–196 NO.16 JUDDER
UPON TORQUE
CONVERTER CLUTCH (TCC)
OPERATION.)
Page 599 of 909
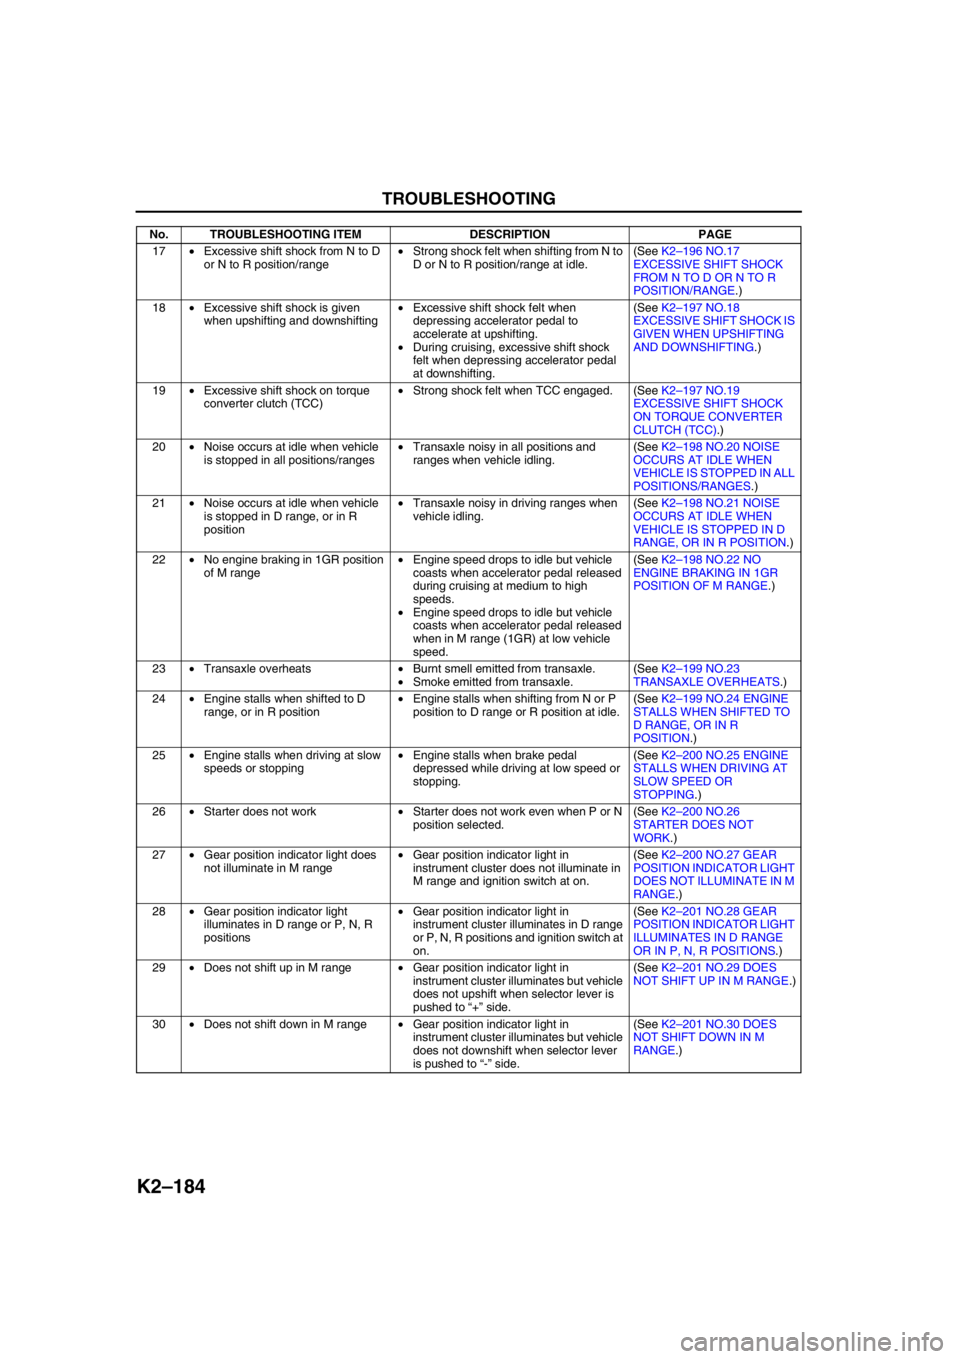
K2–184
TROUBLESHOOTING
17•Excessive shift shock from N to D
or N to R position/range•Strong shock felt when shifting from N to
D or N to R position/range at idle.(See K2–196 NO.17
EXCESSIVE SHIFT SHOCK
FROM N TO D OR N TO R
POSITION/RANGE.)
18•Excessive shift shock is given
when upshifting and downshifting•Excessive shift shock felt when
depressing accelerator pedal to
accelerate at upshifting.
•During cruising, excessive shift shock
felt when depressing accelerator pedal
at downshifting.(See K2–197 NO.18
EXCESSIVE SHIFT SHOCK IS
GIVEN WHEN UPSHIFTING
AND DOWNSHIFTING.)
19•Excessive shift shock on torque
converter clutch (TCC)•Strong shock felt when TCC engaged. (See K2–197 NO.19
EXCESSIVE SHIFT SHOCK
ON TORQUE CONVERTER
CLUTCH (TCC).)
20•Noise occurs at idle when vehicle
is stopped in all positions/ranges•Transaxle noisy in all positions and
ranges when vehicle idling.(See K2–198 NO.20 NOISE
OCCURS AT IDLE WHEN
VEHICLE IS STOPPED IN ALL
POSITIONS/RANGES.)
21•Noise occurs at idle when vehicle
is stopped in D range, or in R
position•Transaxle noisy in driving ranges when
vehicle idling.(See K2–198 NO.21 NOISE
OCCURS AT IDLE WHEN
VEHICLE IS STOPPED IN D
RANGE, OR IN R POSITION.)
22•No engine braking in 1GR position
of M range•Engine speed drops to idle but vehicle
coasts when accelerator pedal released
during cruising at medium to high
speeds.
•Engine speed drops to idle but vehicle
coasts when accelerator pedal released
when in M range (1GR) at low vehicle
speed.(See K2–198 NO.22 NO
ENGINE BRAKING IN 1GR
POSITION OF M RANGE.)
23•Transaxle overheats•Burnt smell emitted from transaxle.
•Smoke emitted from transaxle.(See K2–199 NO.23
TRANSAXLE OVERHEATS.)
24•Engine stalls when shifted to D
range, or in R position•Engine stalls when shifting from N or P
position to D range or R position at idle.(See K2–199 NO.24 ENGINE
STALLS WHEN SHIFTED TO
D RANGE, OR IN R
POSITION.)
25•Engine stalls when driving at slow
speeds or stopping•Engine stalls when brake pedal
depressed while driving at low speed or
stopping.(See K2–200 NO.25 ENGINE
STALLS WHEN DRIVING AT
SLOW SPEED OR
STOPPING.)
26•Starter does not work•Starter does not work even when P or N
position selected.(See K2–200 NO.26
STARTER DOES NOT
WORK.)
27•Gear position indicator light does
not illuminate in M range•Gear position indicator light in
instrument cluster does not illuminate in
M range and ignition switch at on.(See K2–200 NO.27 GEAR
POSITION INDICATOR LIGHT
DOES NOT ILLUMINATE IN M
RANGE.)
28•Gear position indicator light
illuminates in D range or P, N, R
positions•Gear position indicator light in
instrument cluster illuminates in D range
or P, N, R positions and ignition switch at
on.(See K2–201 NO.28 GEAR
POSITION INDICATOR LIGHT
ILLUMINATES IN D RANGE
OR IN P, N, R POSITIONS.)
29•Does not shift up in M range•Gear position indicator light in
instrument cluster illuminates but vehicle
does not upshift when selector lever is
pushed to “+” side.(See K2–201 NO.29 DOES
NOT SHIFT UP IN M RANGE.)
30•Does not shift down in M range•Gear position indicator light in
instrument cluster illuminates but vehicle
does not downshift when selector lever
is pushed to “-” side.(See K2–201 NO.30 DOES
NOT SHIFT DOWN IN M
RANGE.) No. TROUBLESHOOTING ITEM DESCRIPTION PAGE
Page 600 of 909

TROUBLESHOOTING
K2–185
K2
Quick Diagnosis Chart
Vehicle dose not move in D range, or in R position X X
X
X
X
X
X
X
X
X
XX X
XX
XX
XX
XX
X X X
X
XX X
XX
X XXXXX
XX X
XX
XX X X
X
X
X XX
X
XX
X
X
XX
X
XXX
X
XXX
X
X X XX
X
XXXX XX
X
XX
X
X X
XX XX
X
X
X 1
Excessive creep 4
No creep at all 5
Low maximum speed and poor acceleration 6
No shifting 7
Does not shift to fifth gear (5GR) 8
Abnormal shifting 9
Frequent shifting 10
Shift point is high or low 11
Torque converter clutch (TCC) non-operation 12
No kickdown 13
Engine flares up or slips when upshifting or downshifting 14
Engine flares up or slip when accelerating vehicle 15
Judder upon torque converter clutch (TCC) operation 16
Excessive shift shock from N to D or N to R position/range 17
Excessive shift shock on torque converter clutch (TCC) 19
No engine braking in 1GR position of M range 22
Transaxle overheats 23
Engine stalls when shifted to D range, or in R position 24
Engine stalls when driving at slow speeds or stopping 25
Starter does not work 26Excessive shift shock is given when upshifting and
downshifting 18
Noise occurs at idle when vehicle is stopped in all
positions/ranges 20
Noise occurs at idle when vehicle is stopped in D
range, or in R position 21
Gear position indicator light illuminates in D range or P, N,
R positions 28Gear position indicator light does not illuminate in M range
Electrical system components
ATX outer parts 27
Does not shift up in M range
29
Does not shift down in M range
Symptom item
Cause of trouble
Selector lever is misadjisted
Not within line pressure specification
Idle speed is misadjusted
IG timing is misadjusted
TR switch is misadjusted
Open/short
Abnormal signal is inputed
Abnormal signal is inputed Signal is not inputed
Signal is not inputed
Abnormal signal is inputed Signal is not inputed
Abnormal signal is inputed Signal is not inputed
Abnormal signal is inputed Signal is not inputed
Abnormal signal is inputed Signal is not inputed
Abnormal signal is inputed
Abnormal signal is inputed Signal is not inputedCAN signal
CAN signal Engine speed signal
Vehicle speedometer sensor
Input/turbine speed sensor
Intermediate sensor
D range switch
M range switch
Up switch
Down switch
Throttle opening
30Vehicle moves in N position 2
Vehicle moves in P position, or parking gear does not
disengage when P is disengaged 3
X X X
X X X
X
X
A6E5780W001