MAZDA 626 1987 Workshop Manual
Manufacturer: MAZDA, Model Year: 1987, Model line: 626, Model: MAZDA 626 1987Pages: 1865, PDF Size: 94.35 MB
Page 881 of 1865

TROUBLESHOOTING (G4A-EL) 7B
STEP 1 (WARNING CODE RETRIEVAL)
Self-diagnosis Function
The self-diagnosis system, which is integrated in the EC-AT control unit, diagnoses malfunction of the
main sensors (input) and solenoid valves (output), and the EC-AT control unit.
Malfunctions which have happened or are continuing are memorized in the EC-AT control unit as specific
codes.
The EC-AT Tester is used to retrieve these warning codes. Each malfunction is indicated by a code
number and buzzer as shown the table below.
Code Number
Code number Location of malfunction Buzzer
06 Vehicle speed sensor or circuit JliUli c
12 Throttle sensor or circuit rui r
55 Pulse genelator or circuit nnnnruiii r
60 1-2 shift solenoid valve or circuit jinnnnn r
61 2-3 shift solenoid valve or circuit nnnnnruL_[
62 3-4 shift solenoid valve or circuit nnnnnn nn r
63 Lock-up solenoid valve or circuit
_ 1 0,4 sec
rnnnnn ihi J r1.2sec J | _1.fi sec
76G07B-213
EC-AT Tester
Assembly of EC-AT tester
1. Set the plate (49 G019 912) onto the EC-AT tester
body (49 G019 901 A).
2. Connect the adapter harness (49 G019 911) to
the EC-AT tester body.
3. Select the code select switch to A position.
4. Select the select switch to NEW 626 position.
76G07B-603
7B—15
Page 882 of 1865

7B TROUBLESHOOTING (G4A-EL)
Components
EC-AT Tester (49 G019 9A2) Plate 49 G019 912
Tester body
49 G019 901A
Adapter harness
49 G019 911
86U07B-013
7B-16
Page 883 of 1865

TROUBLESHOOTING (G4A-EL) 7B
06 4 second period
55 4 second period
63
-*•
4 second period
Repeats above
General Note
1. If there is more than one malfunction, the code
numbers will be displayed on the tester one by one
in a numerical order. In the case of malfunctions,
55, 06, and 63, the code numbers are displayed
in an order of 06, 55, then 63. The display is as
shown.
86U07B-018
When the service connector
is not grounded
Malfunctions YES
NO
Hold indicator YES
flashing NQ
YES
NO
Memory in control unit
2. The hold indicator flashes to indicate the same pat-
tern as the buzzer of the EC-AT Tester when the
EC-AT service connector is grounded.
When the EC-AT service connector is not ground-
ed, the indicator flashes in a constant frequency
while a malfunction is occurring and goes out
if
the
malfunction recovers. However, the warning code
is memorized in the EC-AT control unit.
76G07B-015
Sensors-
Solenoid-valve
Fail-safe program Proces--\Out sing -v puts
The EC-AT control unit has a built-in fail-safe func-
tion for the throttle sensor, the pulse generator, and
the 1-2, 2-3, and 3-4 shift solenoid valves.
If a malfunction occurs, the EC-AT control unit will
control operation of the remaining components ac-
cording to a preset fail-safe program.
The vehicle may still be driven, although the driv-
ing performance will be slightly affected.
79G07C-062
4. The memory of warning codes is canceled by dis-
connecting the negative battery terminal for ap-
prox. five seconds.
79G07C-063
7B-17
Page 884 of 1865

7B TROUBLESHOOTING (G4A-EL)
Retrieval Procedure
1. Locate the service connector.
86U07B-019
76G07B-214
11 IDLFC
5» O | || KICK DOWNS* _ If, DEPRESS
|[BRAKE UORRSW
MNMWE STF *
° M CRUISE CONTROL SW
CDS®> *• PI ^ SPEED DROPS
Gf Aft
•
OO ou
I I
w
6019 HI NOW* XIKI
CO , LTQ
MUX
IN
JAP"
76G07B-016
2. Ground the ground connector of the EC-AT
Tester.
3. Connect the 6-pin connector of the EC-AT Tester
to the service connector.
Note
The service connector is blue-colored con-
nector.
4. Ground the 1 pin service connector.
Note
The service connector is blue-colored con-
nector.
5. Turn the ignition switch ON.
6. Check that "88" flashes on the digital display and
the buzzer sounds for three seconds after turning
the ignition switch ON.
7. If "88" does not flash, check the service connec-
tor wiring.
8. If "88" flashes and the buzzer sounds continuously
for more than 20 seconds, check wiring to 2M ter-
minal of the EC-AT control unit for short-circuit then
replace the EC-AT control unit and repeat steps
3 and 4.
9. Note the code numbers and check for the causes
by referring to the Inspection Procedure shown on
pages 7B—19 to 7B—21, repair as necessary.
Note
After repairs are made, recheck for code num-
bers by performing the "After-repair
procedure."
7B—18
Page 885 of 1865

TROUBLESHOOTING (G4A-EL) 7B
79G07C-068
Drive at 50
km/h
(31
mph)
Kick-down
Stop
the
vehicle
79G07C-069
After-repair Procedure
1. Cancel the memory of malfunctions by disconnect-
ing the negative battery terminal for at least five sec-
onds, then reconnect it.
2. Remove the EC-AT tester if it is connected.
3. Drive the vehicle at 50 km/h (31 mph), then de-
press the accelerator pedal fully to activate kick-
down. Stop the vehicle gradually.
KICK goimsv
BRAKE LIGHTS*
CRUISE CONTROL
C V,. DEPRESS FULL*
Ox
azsa
ORUti rpn
"J
i"
•
rm uu
£ZL ofF
4. Reconnect the EC-AT tester to the 6-pin service
connector.
5. Ground the 1 -pin service connector with a jumper
wire.
6. Turn the ignition switch ON.
7. Check that no code numbers are displayed.
79G07C-070
Inspection Procedure
No. 06 code display (Vehicle speed sensor)
76G07B-017
7B-19
Page 886 of 1865

7B TROUBLESHOOTING (G4A-EL)
No. 12 code display (Throttle sensor)
76G07B-018
No. 55 code display (Pulse generator)
Is there poor connection at connector? YES Repair or replace.
NO
Does EC-AT Tester display drum speed? (Refer to STEP 3-Signal Inspection)
YES Pulse generator OK.
Cancel memory of code number.
NO
NO Is there 200—400 12 between terminals of pulse generator connector? (Refer to page 7B—68)
NO Replace pulse generator. Is there 200—400 12 between terminals of pulse generator connector? (Refer to page 7B—68)
YES YES Check for open or short-circuit in wiring. Check for open or short-circuit in wiring.
76G07B-019
No. 60, 61, 62, or 64 code display (1-2 shift, 2-3 shift, or 3-4 shift solenoid valve)
7B-20
Page 887 of 1865

TROUBLESHOOTING (G4A-EL) 7B
76G07B-020
No. 63 code display (Lock-up solenoid valve)
76G07B-021
7B—21
Page 888 of 1865

7B TROUBLESHOOTING (G4A-EL)
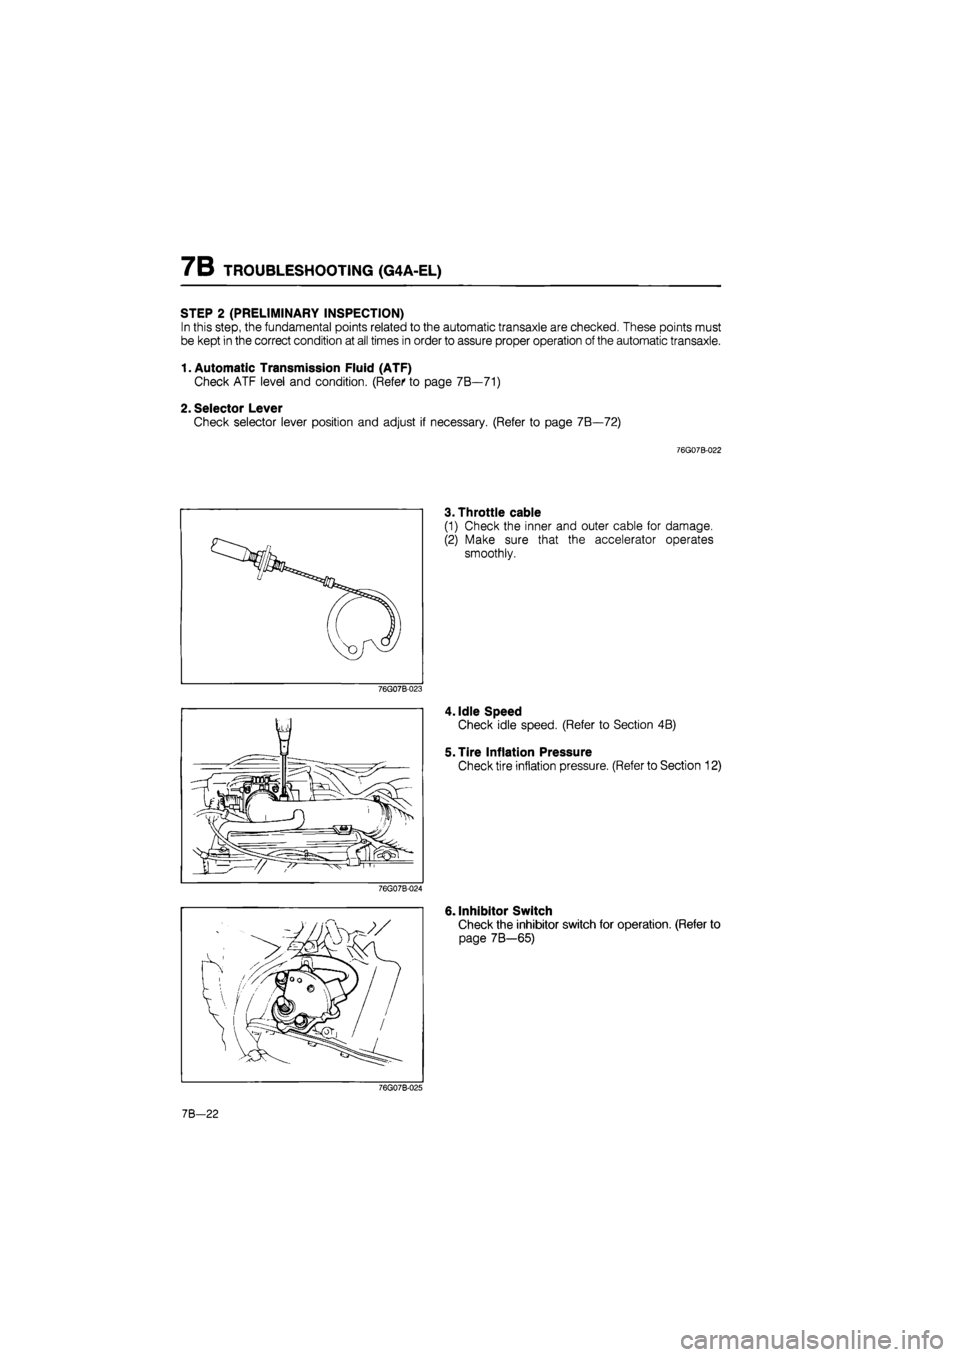
STEP 2 (PRELIMINARY INSPECTION)
In this step, the fundamental points related to the automatic transaxle are checked. These points must
be kept in the correct condition at all times in order to assure proper operation of the automatic transaxle.
1. Automatic Transmission Fluid (ATF)
Check ATF level and condition. (Refer to page 7B—71)
2. Selector Lever
Check selector lever position and adjust if necessary. (Refer to page 7B—72)
76G07B-022
3. Throttle cable
(1) Check the inner and outer cable for damage.
(2) Make sure that the accelerator operates
smoothly.
76G07B-023
4. Idle Speed
Check idle speed. (Refer to Section 4B)
5. Tire Inflation Pressure
Check tire inflation pressure. (Refer to Section 12)
76G07B-024
6. Inhibitor Switch
Check the inhibitor switch for operation. (Refer to
page 7B—65)
76G07B-025
7B-22
Page 889 of 1865

TROUBLESHOOTING (G4A-EL) 7B
7. Oil Leakage
Check for oil leakage.
(1) Warm up the ATF.
(2) Apply the parking brake and block the wheels
to prevent the vehicle from rolling.
(3) Shift the selector lever to R range.
(4) Check if oil leaks from the following oil seals
or gaskets.
(5) If oil leaks, replace the oil seal or gasket.
76G07B-026
Check for fluid leaks; the following figure shows the locations where fluid leakage may possibly occur.
1. Oil pan
2. Control valve body cover
3. Oil pump
4. Inhibitor switch
5. Speedometer driven gear
6. Pulse generator
7. Oil filler tube
8. Throttle cable
9. Bearing cover
10. Driveshaft
11. Square head plug
12. Transaxle case
13. Drain plug
14. Oil cooler return pipe
15. Oil cooler outlet pipe
16. Fluid temperature switch
17. Blind plugs
76G07B-027
7B—23
Page 890 of 1865

7B TROUBLESHOOTING (G4A-EL)
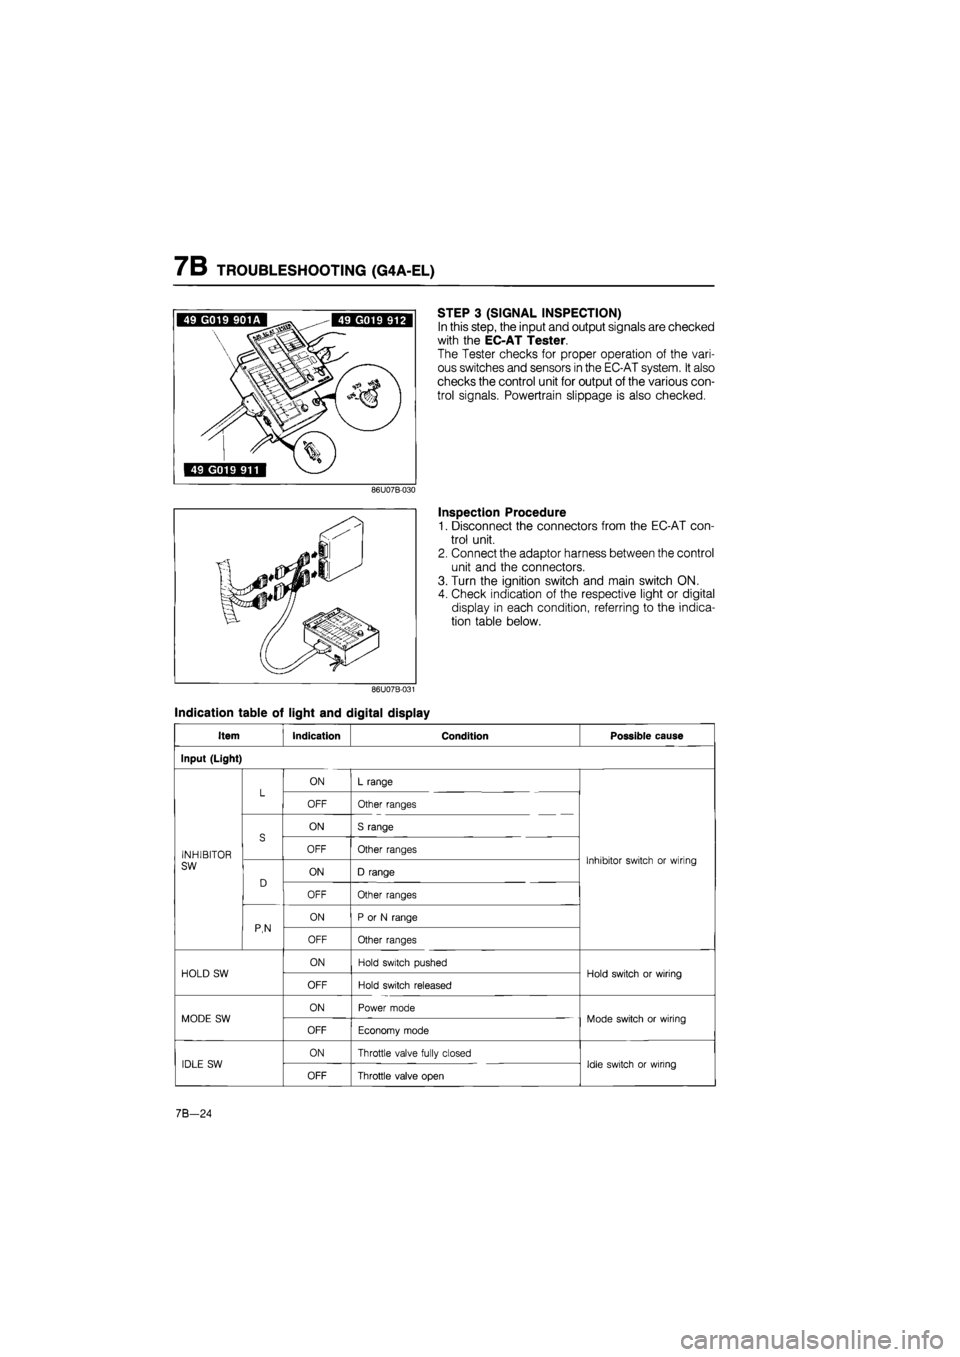
STEP 3 (SIGNAL INSPECTION)
In this step, the input and output signals are checked
with the EC-AT Tester.
The Tester checks for proper operation of the vari-
ous switches and sensors in the EC-AT system. It also
checks the control unit for output of the various con-
trol signals. Powertrain slippage is also checked.
Inspection Procedure
1. Disconnect the connectors from the EC-AT con-
trol unit.
2. Connect the adaptor harness between the control
unit and the connectors.
3. Turn the ignition switch and main switch ON.
4. Check indication of the respective light or digital
display in each condition, referring to the indica-
tion table below.
Indication table of light and digital display
Item Indication Condition Possible cause
Input (Light)
L ON L range L OFF Other ranges
S
ON S range
INHIBITOR
S OFF Other ranges Inhibitor switch or wiring SW
D ON D range
Inhibitor switch or wiring
D
OFF Other ranges
P,N
ON P or N range P,N OFF Other ranges
HOLD SW ON Hold switch pushed Hold switch or wiring HOLD SW
OFF Hold switch released
Hold switch or wiring
MODE SW ON Power mode Mode switch or wiring MODE SW
OFF Economy mode
Mode switch or wiring
IDLE SW ON Throttle valve fully closed Idle switch or wiring IDLE SW
OFF Throttle valve open
Idle switch or wiring
7B-24