MAZDA MX-5 1994 Workshop Manual
Manufacturer: MAZDA, Model Year: 1994, Model line: MX-5, Model: MAZDA MX-5 1994Pages: 1708, PDF Size: 82.34 MB
Page 511 of 1708

K TRANSMISSION On-vehicle Removal 1. Disconnect the negative battery cable. 2. On level ground, jack up the vehicle and support it evenly on safety stands. 3. Remove the exhaust pipe. (Refer to page K-46.) 4. Remove the propeller shaft. (Refer to section L.) 5. Disconnect the speedometer cable. 6. Support the transmission with a transmission jack. 7. Remove the power plant frame. (Refer to page K-46.) 8. Remove the extension housing and gasket, making sure to allow any ATF to drain into a container. On-vehicle Installation 1. lnstall a new gasket on the transmission case. 2. lnstall the extension housing. Tightening torque: 20-24 N-m (2.0-2.5kgf-m, 15--18 ft-lbf} i/ 3. Install the power plant frame. (Refer to page K-148.) 4. Connect the speedometer cable. 5. lnstall the propeller shaft. (Refer to section L.) 6. Install the exhaust pipe. (Refer to page K-148.) 7. Add ATF, and check the ATF level. (Refer to page K-35.) Gartner Banana
Page 512 of 1708
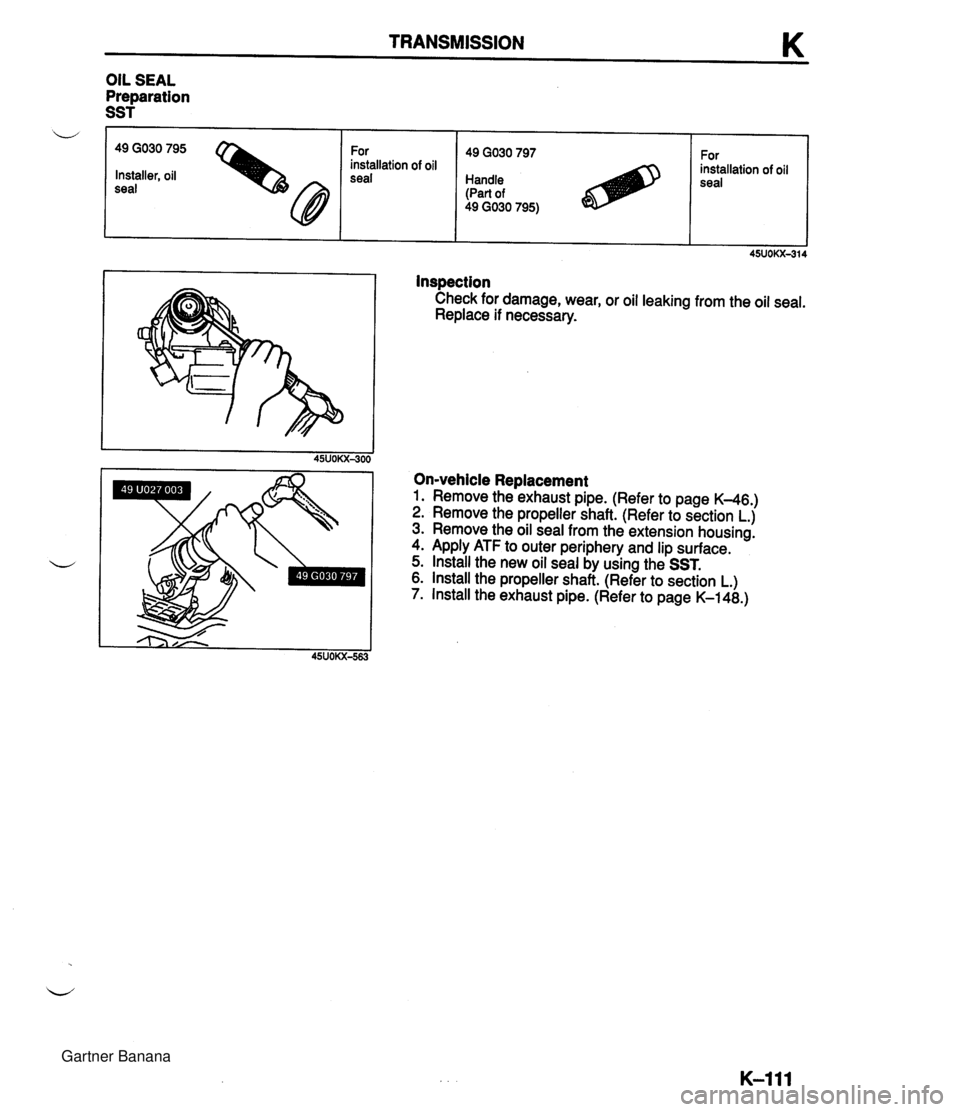
TRANSMISSION K Inspection Check for damage, wear, or oil leaking from the oil seal. Replace if necessary. OIL SEAL Preparation SST On-vehicle Replacement 1. Remove the exhaust pipe. (Refer to page K-46.) 2. Remove the propeller shaft. (Refer to section L.) 3. Remove the oil seal from the extension housing. 4. Apply ATF to outer periphery and lip surface. 5. Install the new oil seal by using the SST. 6. lnstall the propeller shaft. (Refer to section L.) 7. Install the exhaust pipe. (Refer to page K-148.) w 49 GO30 795 For installation of oil Installer, oil seal 49 GO30 797 Handle (Part of 49 GO30 795) For installation of oil seal Gartner Banana
Page 513 of 1708
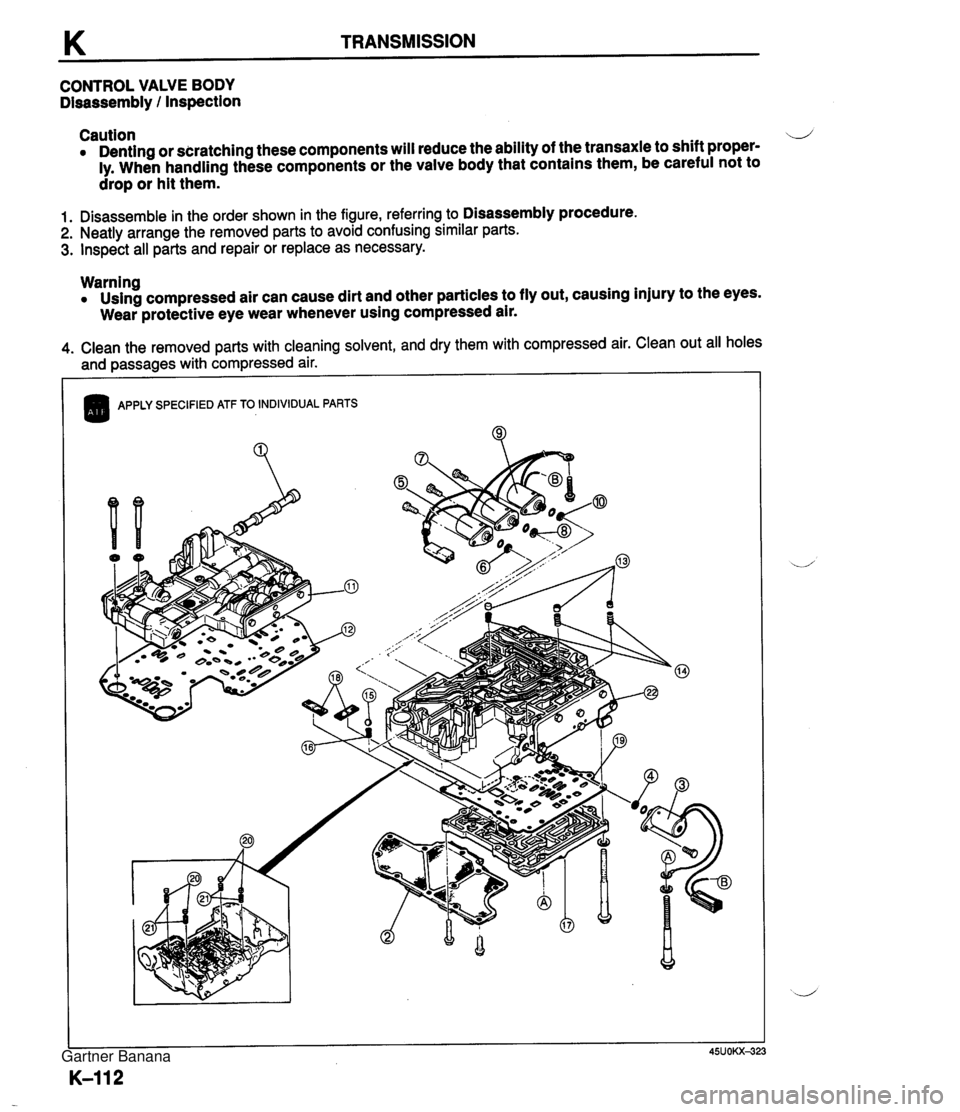
K TRANSMISSION CONTROL VALVE BODY Disassembly / Inspection Caution 4 Denting or scratching these components will reduce the ability of the transaxle to shift proper- ly. When handling these components or the valve body that contains them, be careful not to drop or hit them. 1. Disassemble in the order shown in the figure, referring to Disassembly procedure. 2. Neatly arrange the removed parts to avoid confusing similar parts. 3. Inspect all parts and repair or replace as necessary. Warning Using compressed air can cause dirt and other particles to fly out, causing injury to the eyes. Wear protective eye wear whenever using compressed air. 4. Clean the removed parts with cleaning solvent, and dry them with compressed air. Clean out all holes and passages with compressed air. I ( APPLY SPECIFIED ATF TO INDIVIDUAL PARTS Gartner Banana
Page 514 of 1708
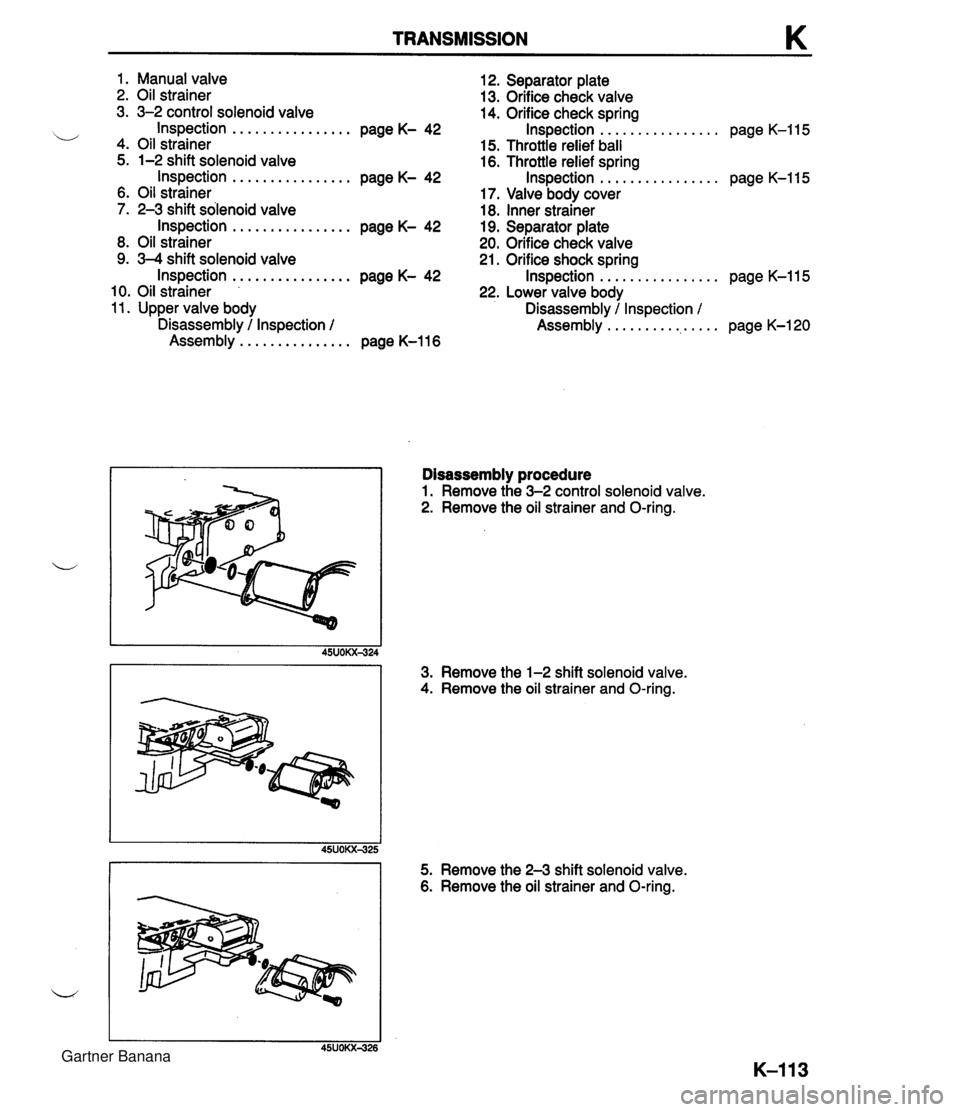
TRANSMISSION 1. Manual valve 12. Separator plate 2. Oil strainer 13. Orifice check valve 3. 3-2 control solenoid valve 14. Orifice check spring ................ ................ i/ Inspection page K- 42 Inspection page K-115 4. Oil strainer 15. Throttle relief ball 5. 1-2 shift solenoid valve 16. Throttle relief spring Inspection ................ page K- 42 Inspection ................ page K-115 6. Oil strainer 17. Valve body cover 7. 2-3 shift solenoid valve 18. Inner strainer Inspection ................ page K- 42 19. Separator plate 8. Oil strainer 20. Orifice check valve 9. 3-4 shift solenoid valve 21. Orifice shock spring ................ Inspection ................ page K- 42 Inspection page K-115 10. Oil strainer 22. Lower valve body 11. Upper valve body Disassembly / Inspection / ................ Disassembly / Inspection / Assembly page K-120 Assembly ............... page K-116 Disassembly procedure 1. Remove the 3-2 control solenoid valve. 2. Remove the oil strainer and O-ring. 3. Remove the 1-2 shift solenoid valve. 4. Remove the oil strainer and O-ring. I I 45UOKX425 5. Remove the 2-3 shift solenoid valve. 6. Remove the oil strainer and O-ring. i/ Gartner Banana
Page 515 of 1708
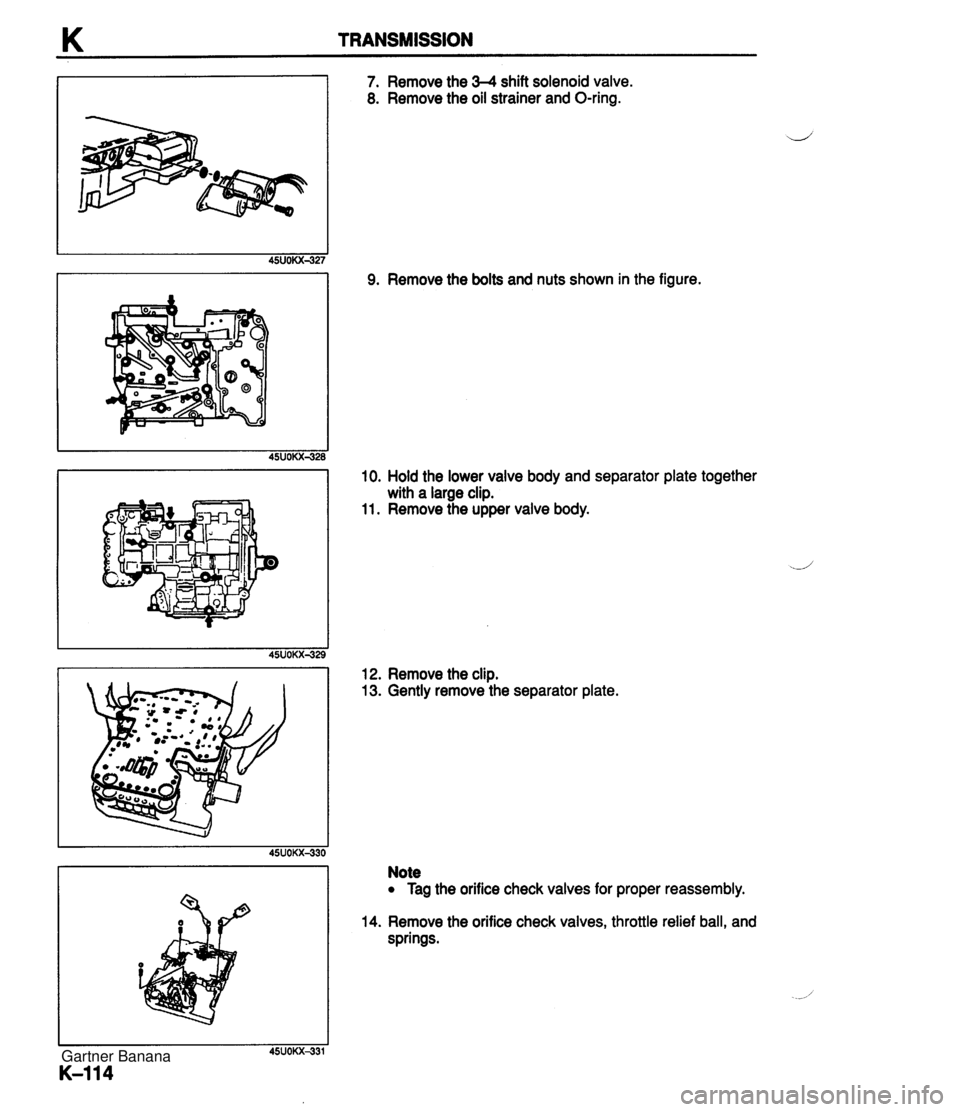
K TRANSMISSION 7. Remove the 34 shift solenoid valve. 8. Remove the oil strainer and O-ring. 9. Remove the bolts and nuts shown in the figure. 10. Hold the lower valve body and separator plate together with a large clip. 11. Remove the upper valve body. 12. Remove the clip. 13. Gently remove the separator plate. Note Tag the orifice check valves for proper reassembly. 14. Remove the orifice check valves, throttle relief ball, and springs. Gartner Banana
Page 516 of 1708

TRANSMISSION K r FREE LENGTH 1 -/i- WIRE DIAMETER 15. Gently remove the separator plate. Note Tag the orifice check valves for proper reassembly, 16. Remove the orifice check valves and springs. Inspection 1. Measure the spring specifications. 2. If not within specification, replace the spring(s). item Outer dia. Spring mm {in} Free length mm {in) 15.5 (0.61 0) 26.8 (1.055) Orifice check Throttle relief 5.0 (0.1 97) 6.5 I0.256) No. of coils 12.0 14.0 Wire dla. mm {in) 0.23 (0.009) 0.9 {0.035) Gartner Banana
Page 517 of 1708
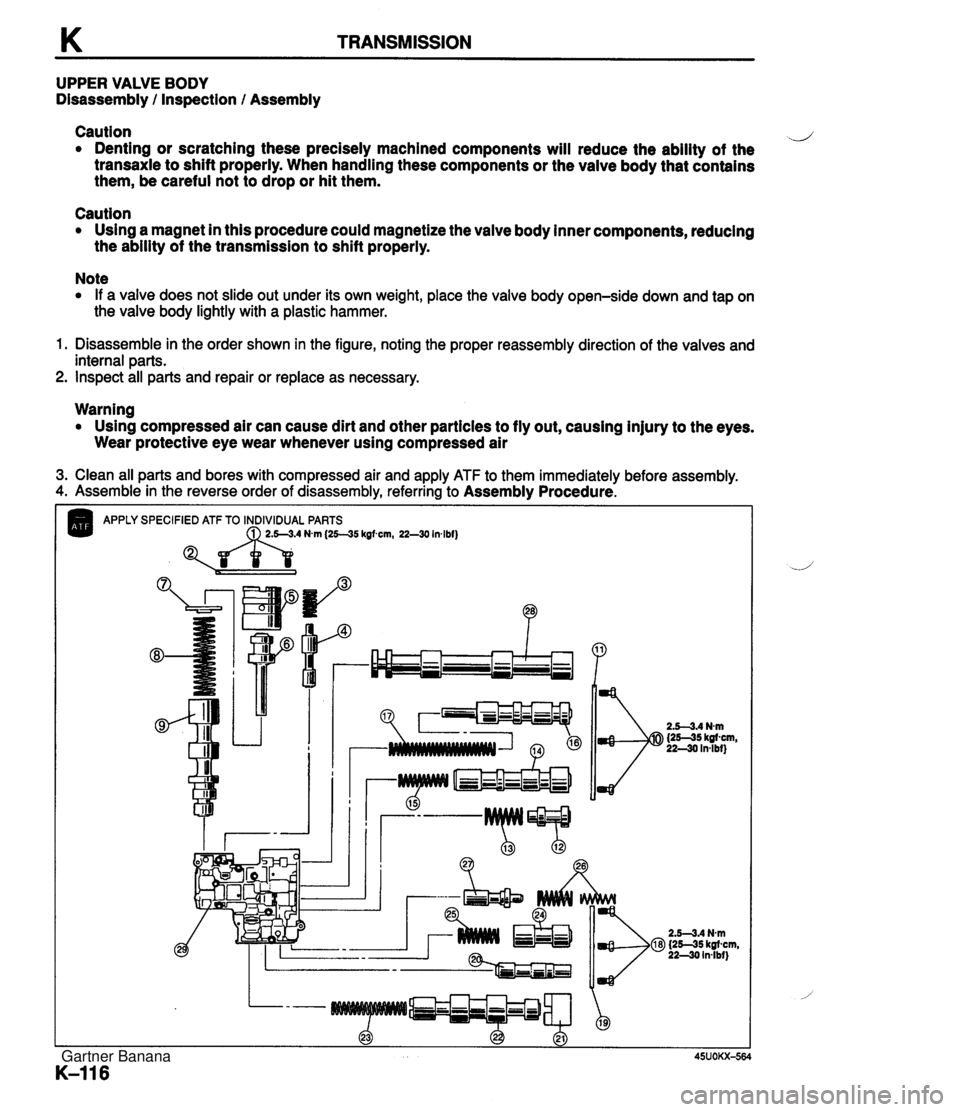
K TRANSMISSION UPPER VALVE BODY Disassembly / Inspection / Assembly Caution d Denting or scratching these precisely machined components will reduce the ability of the transaxle to shift properly. When handling these components or the valve body that contains them, be careful not to drop or hit them. Caution Using a magnet in this procedure could magnetize the valve body inner components, reducing the ability of the transmission to shift properly. Note If a valve does not slide out under its own weight, place the valve body open-side down and tap on the valve body lightly with a plastic hammer. 1. Disassemble in the order shown in the figure, noting the proper reassembly direction of the valves and internal parts. 2. Inspect all parts and repair or replace as necessary. Warning Using compressed air can cause dirt and other particles to fly out, causing injury to the eyes. Wear protective eye wear whenever using compressed air 3. Clean all parts and bores with compressed air and apply ATF to them immediately before assembly. 4. Assemble in the reverse order of disassembly, referring to Assembly Procedure. APPLY SPECIFIED ATF TO INDIVIDUAL PARTS Nvn (25--35 kgfwn, 22-30 Inlbf) Gartner Banana
Page 518 of 1708
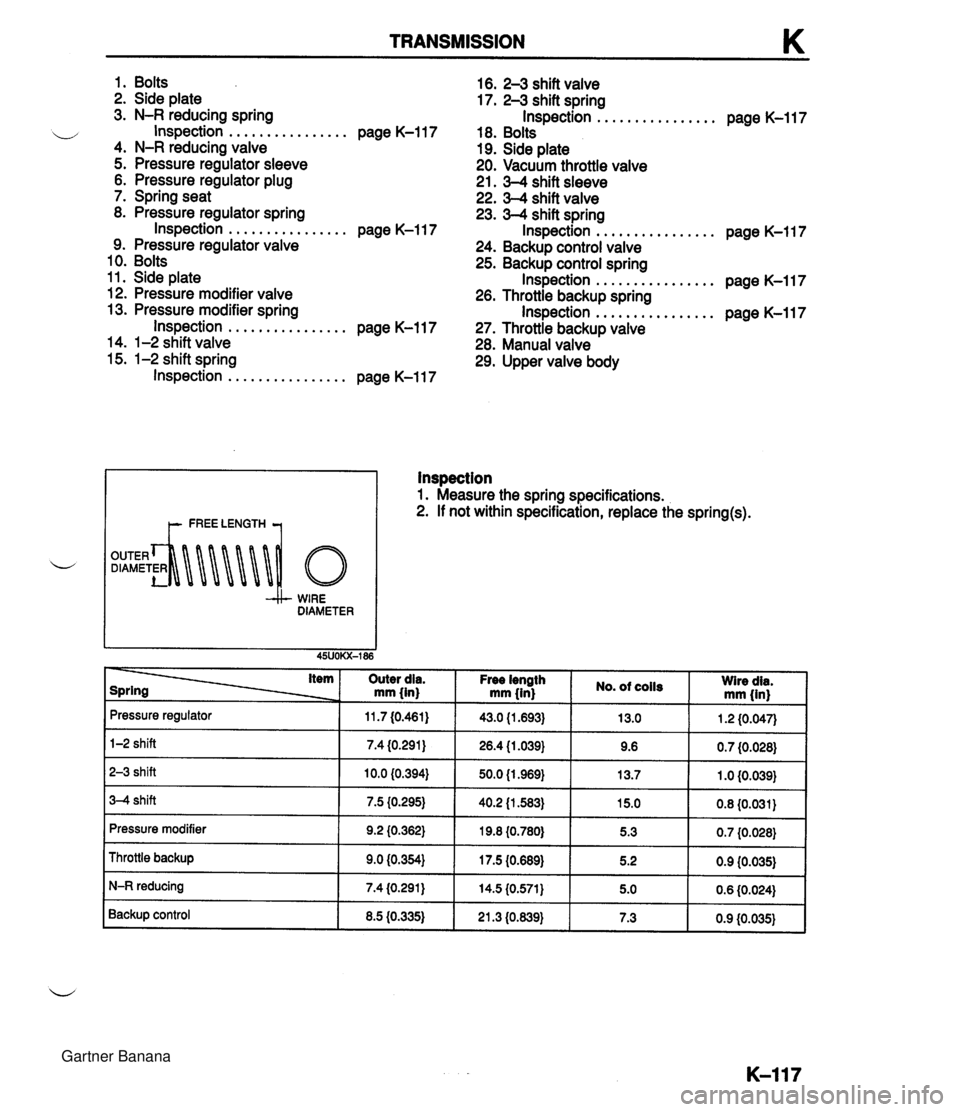
TRANSMISSION 1. Bolts 16. 2-3 shift valve 2. Side plate 17. 2-3 shift spring 3. N-R reducing spring Inspection ................ page K-117 ................ w Inspection page K-117 18. Bolts 4. N-R reducing valve 19. Side plate 5. Pressure regulator sleeve 20. Vacuum throttle valve 6. Pressure regulator plug 21. 3-4 shift sleeve 7. Spring seat 22. 3-4 shift valve 8. Pressure regulator spring 23. 3-4 shift spring Inspection ................ page K-117 Inspection ................ page K-117 9. Pressure regulator valve 24. Backup control valve 10. Bolts 25. Backup control spring 11. Side plate Inspection ................ page K-117 12. Pressure modifier valve 26. Throttle backup spring ................ 13. Pressure modifier spring Inspection page K-117 Inspection ................ page K-117 27. Throttle backup valve 14. 1-2 shift valve 28. Manual valve 15. 1-2 shift spring 29. Upper valve body Inspection ................ page K-117 I t- FREE LENGTH 7 WIRE DIAMETER lnspection 1. Measure the spring specifications. 2. If not within specification, replace the spring(s). item Outer dia. mm (in) Pressure regulator 1-2 shift Free iength mm (in} 2-3 shift 3-4 shift 11.7 (0.461) 7.4 (0.291) Pressure modifier Throttle backup No. of coils 10.0 (0.394) 7.5 (0.295) I I I I Wire dia. mm (in} 43.0 (1.693) 26.4 (1.039) 9.2 (0.362) 9.0 (0.354) N-R reducing Backup control 50.0 (1 .969) 40.2 (1 583) 13.0 9.6 19.8 {0.780} 17.5 {0.689) 8.5 (0.335) 1.2 (0.047) 0.7 (0.028) 13.7 15.0 0.6 (0.024) 7.4 (0.291) 1 .O (0.039) 0.8 (0.031) 5.3 5.2 21.3 (0.639) 0.7 (0.028) 0.9 (0.035) 14.5 (0.571) 5.0 7.3 0.9 (0.035) Gartner Banana
Page 519 of 1708
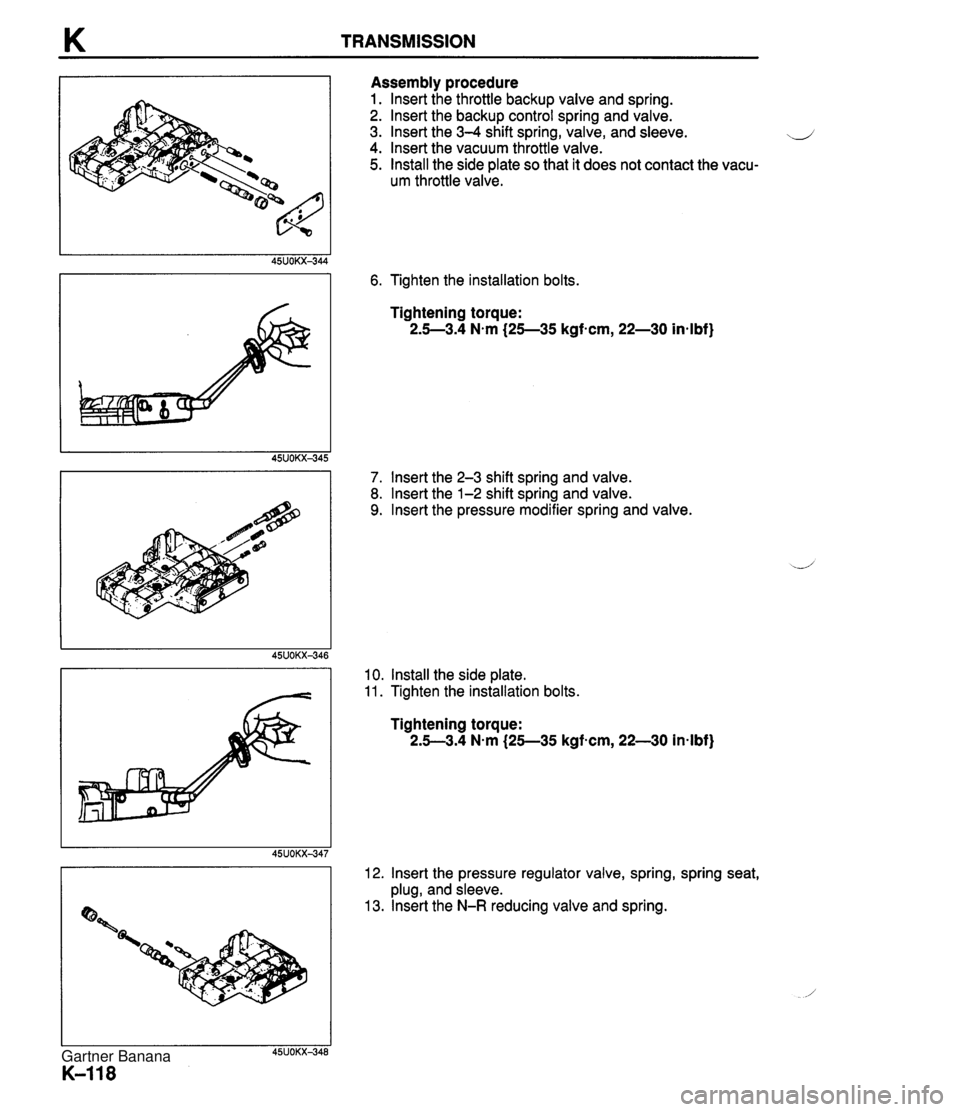
K TRANSMISSION Assembly procedure 1. lnsert the throttle backup valve and spring. 2. lnsert the backup control spring and valve. 3. Insert the 3-4 shift spring, valve, and sleeve. d 4. lnsert the vacuum throttle valve. 5. Install the side plate so that it does not contact the vacu- um throttle valve. 6. Tighten the installation bolts. Tightening torque: 2.5-3.4 N-m 125-35 kgf-cm, 22-30 inslbf) 7. lnsert the 2-3 shift spring and valve. 8. lnsert the 1-2 shift spring and valve. 9. lnsert the pressure modifier spring and valve. 10. Install the side plate. 11. Tighten the installation bolts. Tightening torque: 2.5--3.4 N-m (25--35 kgf-cm, 22-30 in-lbf) 12. lnsert the pressure regulator valve, spring, spring seat, plug, and sleeve. 13. lnsert the N-R reducing valve and spring. Gartner Banana
Page 520 of 1708
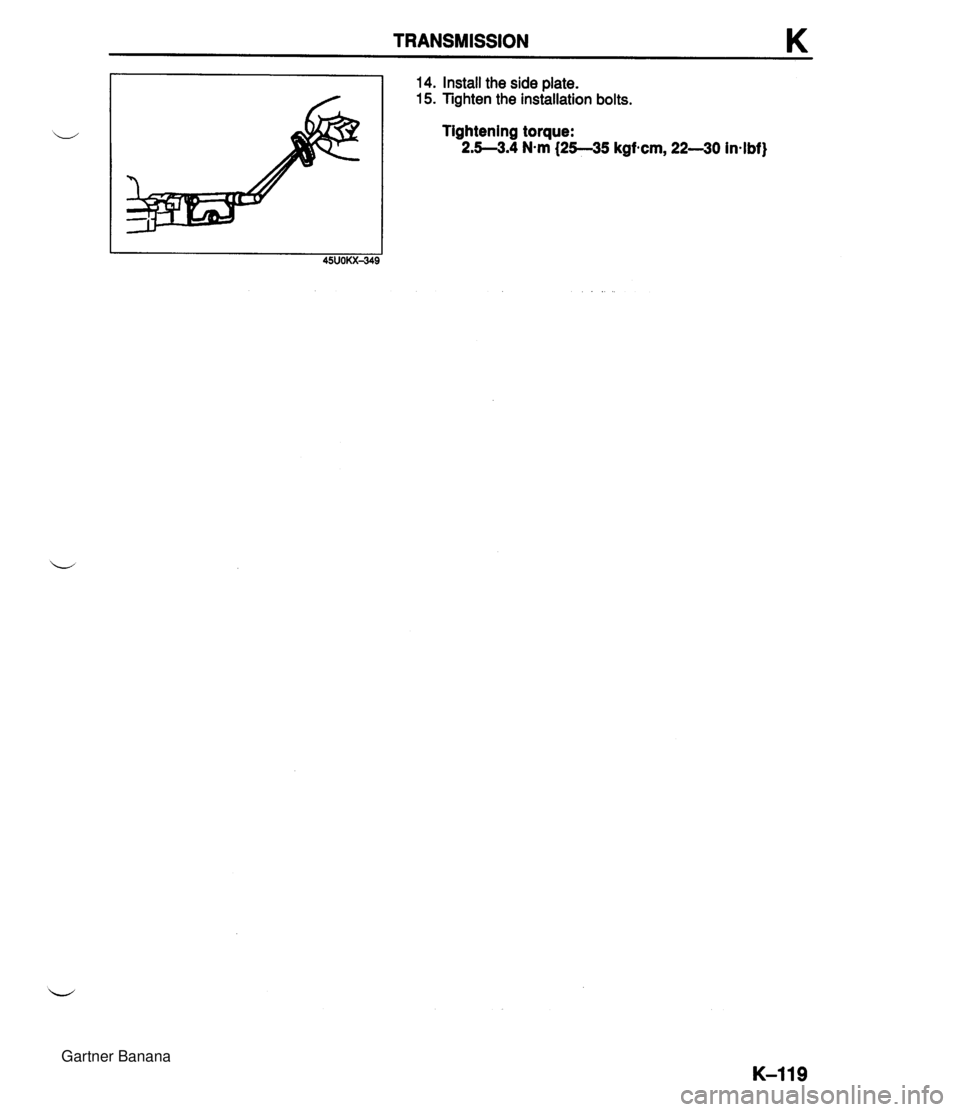
TRANSMISSION u 14. Install the side plate. 15. Tighten the installation bolts. Tightening torque: 2.5--3.4 N-m (25-35 kgfecm, 22-30 in-lbf) 45UOKX-349 Gartner Banana