engine MAZDA PROTEGE 1992 Workshop Manual
[x] Cancel search | Manufacturer: MAZDA, Model Year: 1992, Model line: PROTEGE, Model: MAZDA PROTEGE 1992Pages: 1164, PDF Size: 81.9 MB
Page 428 of 1164

F CONTROL SYSTEM
VB: Battery voltage
erminal Input Output Connection to
Test condition Correct voltage Remark
28 1 0 )
1 Airflow meter Ignition switch ON Approx. 3.8V
-
2c 0 Oxygen sensor
2D 0 Fan switch Idle Approx. 3.3V
Ignition switch ON ov
Idle (Cold engine)
ov
Idle (After warm-up) O-l .ov -
increasing engine speed (After warm-up) 0.5-I .ov
Deceleration o-0.4v
Fan operating (Engine coolant tempera- ov
ture over 97OC (207°F) or diagnosis con-
nector terminal TFA grounded) -
2E 0 Water thermo-
sensor Fan not operating (Idle) VS
Engine coolant temperature 20% (68OF)
After warm-up Approx. 2.5V f&ition switch
Below 05V
2F , 0 , , Throttle sensor , Accelerator pedal released
Accelerator pedal fully depressed
2G 0
2H 0 ATF thermosensor -30°C (-20°F) -150°C (302OF) Approx. 4.9%1.12V Ignition switch
ATF
Temp 20% (68OF) Approx. 4.6V ON
130% (266OF) Approx. 1.54V
Hold switch Switch debressed ov Ignition switch
i I I
Switch released Va ON
21 0 Throttle sensor Constant 4.5-5.5v Ignition switch
ON
I , I 2J 0 Distributor Ignition switch ON Approx. OV
(G-signal) [DOHC] or 5V _-
Idle Approx. 1.5V
2K 0 Intake air ther- Ambient air temperature 20% (68’F) Approx. 2.5V Built in airflow
mosensor meter
2L - - - -
- -
2M 0 Pulse generator Engine running at idle (N range) Above 0.6V
-
(IN)
Engine stopped (Ignition switch ON) ov
2N Pulse generator Constant ov
ground
20 0 Solenoid valve ignition switch ON Va
(Purge control) -
Idle Va
2P 0 Hold indicator Hold mode Below 2V Ignition switch
ON
Normal mode VB
23UOFX-1
1 Ul Iv
I u1
~~~~~~~~~~~~~~~~~~~~~~~~~~~~~~~~~~ 20)21Vi,2~]2112Gj2E)2Cj2~ iuI1s]l~lollMIlKI1IJ1~~t~l1Cj1~
32 j3X I3V 13T13R13P13N)3L13J(3H13F( 3D 13s 2P(2N\2L12J12H12F(2D126 1V IATIlRhPjlN(1 LjlJ Ilt-illFI 1 DI 16
4-
F-l 62
Page 430 of 1164

F CONTROL SYSTEM
srmina
3A
38
3c
3D
3E
3F
3G
3H
31
3J
3K
3L
3M
3N
30
3P
3Q
3R
3s
3T I input Output Connection to
Test condition Correct voltage Remark Battery voltage t
- -
Ground (Injector) Constant OU -
- -
Ground (Output) Constant OU -
- -
Ground (CPU) Constant OU -
- -
- Ground (Input) Constant ov
0 Inhibitor switch
D range VB Ignition switch
(D range) ON
Other ranges ov
0 DRL relay Parking brake pulled with ignition switch
l DRL: Daytime
(Canada) ON (DRL OFF) Va
Running Lights
Idle (DRL ON) Below 2.5V 0
Inhibitor switch
(L range) L range
Other ranges VB
ov Ignition switch
ON
0 Inhibitor switch
(S range) S range
Other ranges Va
ov Ignition switch
ON
_-__. - -. -
0 Solenoid valve Engine speed below 5,000 rpm Below 1.5V WCS: Variable In-
(VICS)
Engine speed above 5,000 rpm VB ertia Charging
System [DOHC]
- - -
- - -
- -
- - -
- - -
- - -
0 Solenoid valve 60 [DOHC]/120 [SOHC] seconds after Below 1.5v
(Pressure regula- engine started when engine coolant tem-
tor) [BP] perature above 90% (194*F) and intake
-
air temperature above 58% (136OF)
[DOHC]/50”C (122“F) [SOHC]
Other condition at idle Va
- - - - - -
- -
-
A- - -
- -
- I -
0 ISC valve Ignition switch ON VS
l Engine signal
Monitor: Green
I I Idle I
Approx. 1 OV and red lamps
flash
I
-
- - - -
-
- - - -
- - - - - -
23UOFX-1’
‘) )
U- r, )
IJ- l-1
I 1 r
3Y I3W I3U [3S13d3&M13K 31 13Gj3EI 3C
I3A 20/2M;2K( 21 12G(2E12C12A 1 U 11 Sll o]lOll MI1 K 1 I (1 G(1 E[ 1
C 11 A
32 13x [ 3V(3~(343~I3N[3~ 3~(3~(3~13~ 136 2P12N(2L[2J12H(2F(2D126 iv I~TI~RI~P(~NIIL i~(lii(l~I lo(le
.
F-l 64
Page 432 of 1164

F CONTROL SYSTEM
Ve: Battery voltage
erminal Input Output
Connection to Test condition Correct voltage Remark
3u 0 Injector (Nos. 1, 3) Ignition switch ON VB * Engine Signal
Idle Va Monitor: Green
and red lamps
Engine speed above 2,000 rpm on de- Va
flash
celeration (After warm-up)
3v 0 Injector (Nos. 2, 4) ignition switch at idle
VB
Idle VB
Engine speed above 2,000 rpm on de-
VB
celeration (After warm-up)
3W 0 1-2 shift solenoid Solenoid valve ON i&I AT running
valve
Solenoid valve OFF ov
3x 0 2-3 shift solenoid Solenoid valve ON
VB AT running
valve
Solenoid valve OFF ov
3Y 0
ZH;hift solenoid Solenoid valve ON VB AT running
Solenoid valve OFF ov
32 0 Lockup solenoid Solenoid valve ON
VB AT running
valve
Solenoid valve OFF ov
23UOFX-1~
1 I u- l-1 ,
III h-3
I r
3y 13W 13U (3Sl3Cj3+4]3K 31 13Gj3EI 3C 13A 2012h42Kl21 12Gl2E12Cj2A 1 U 11 SllC$O 1 MI1 K 1 I 11 G 1 El 1 C 11 A
32 )3X I3Vj3Tj3R]3Pj3N]3L 3Jj3Hj3F13D 138 2P)2N)2L~2J~2H~2F~2D~2B 1V IlTjlRjlP 1NjlL 1JjlH 1FI lD\lB
-*’
.J’ -
F-l 66
Page 434 of 1164

F CONTROL SYSTEM
23UOFX-l! 51
.
r---- - --------1
I
I
i I
I
:,
m7 I
- - -.-
Fc E, Vc Ez 23UOFX-158
WATER THER@OSENSOA
I
03UOFX-21
REPLACE WASHEF
f
OYJOFX-2’
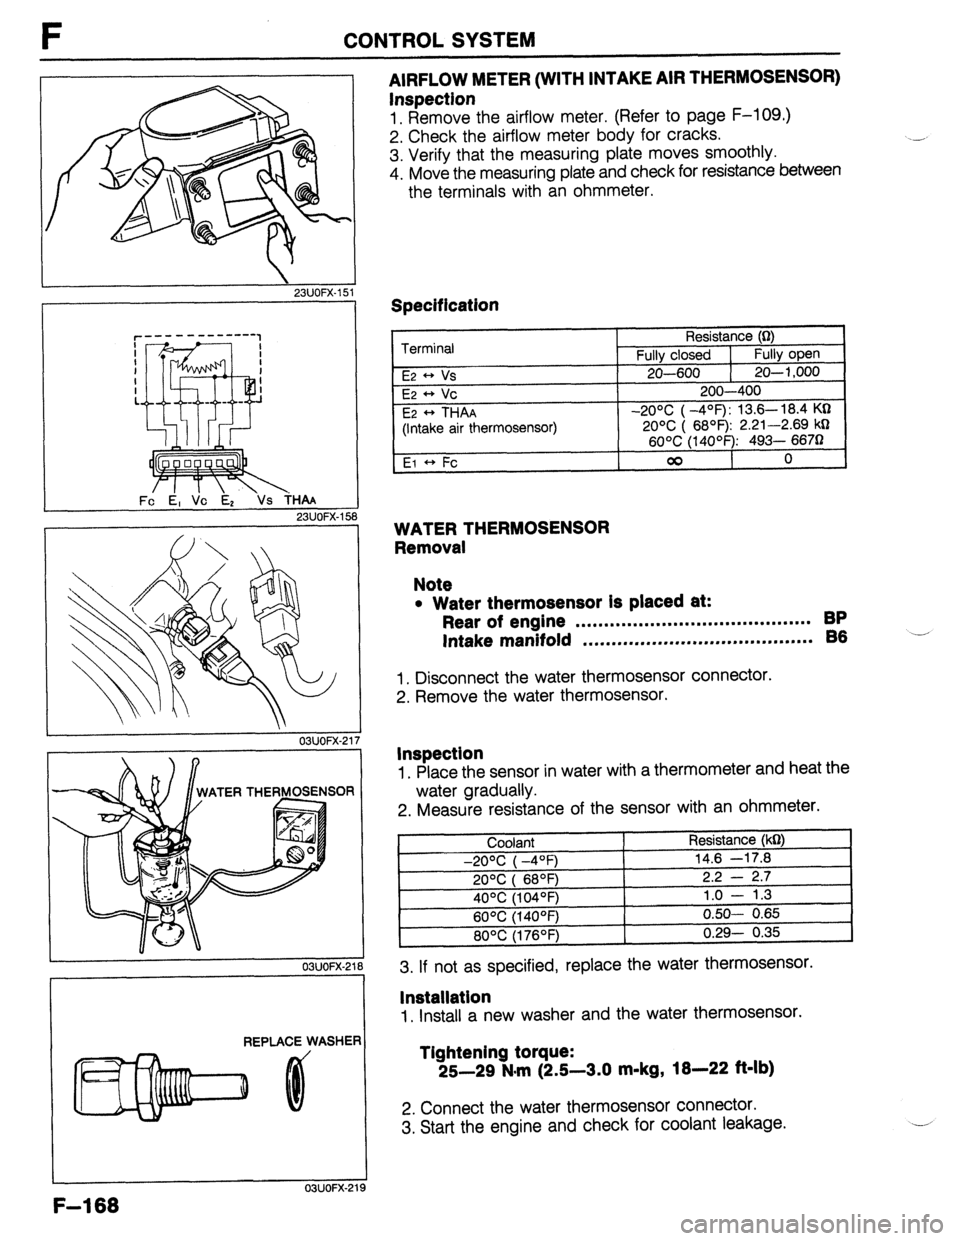
AIRFLOW METER (WITH INTAKE AIR THERMOSENSOR)
Inspection
1. Remove the airflow meter. (Refer to page F-109.)
2. Check the airflow meter body for cracks.
3. Verify that the measuring plate moves smoothly.
4. Move the measuring plate and check for resistance between
the terminals with an ohmmeter.
Specification
Terminal
E2 * Vs
E2 ++ Vc
E2
* THAA
(Intake air thermosensor)
El +, Fc Resistance (0)
Fully closed 1
Fully open
20-600 1 20-l ,000
200-400
-20% ( -4’=F): 13.6- 18.4 KQ
20% ( 6899 2.21-2.69 kD
60°C (14OOF): 493- 6670
00
0
WATER THERMOSENSOR
Removal
Note
l Water thermosensor Is placed at:
Rear of engine . . . . . . . . . . . . . . . . . . . . . . . . ..*.............. BP
Intake manifold ,.*......,..m...,..,.....*....*......... 86 -’
1. Disconnect the water thermosensor connector.
2. Remove the water thermosensor.
Inspection
1. Place the sensor in water with a thermometer and heat the
water gradually.
2. Measure resistance of the sensor with an ohmmeter.
3. If not as specified, replace the water thermosensor.
lnstallatlon
1. Install a new washer and the water thermosensor.
Tlghtening torque:
25-29 N.m (2.5-3.0 m-kg,
18-22 ft-lb)
2. Connect the water thermosensor connector.
3. Start the engine and check for coolant leakage.
F-l 68
Page 437 of 1164

CONTROL SYSTEM F
03UOFX-227
03UOFX-22:
03UOFX-22!
*
03UOFX-231
I
SELF-W CtECXER
WOFX-15
Replacement
1. Disconnect the throttle sensor connector.
2. Remove the throttle sensor mounting screws.
3. Remove the throttle sensor.
4. Install in the reverse order of removal.
Tightening torque:
1.6-2.4 N-m (16-24 cm-kg, 14-21 in-lb)
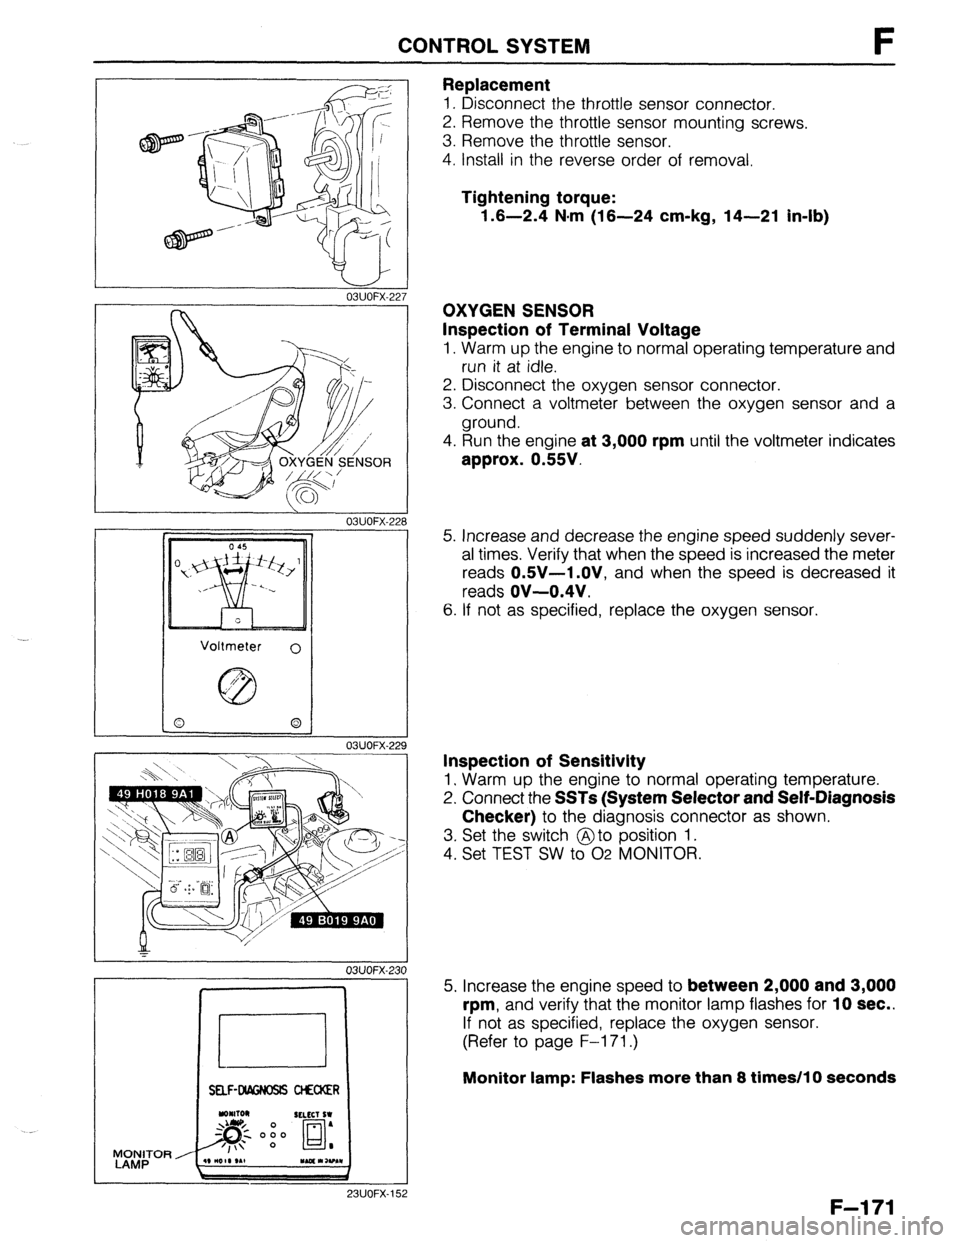
OXYGEN SENSOR
Inspection of Terminal Voltage
1. Warm up the engine to normal operating temperature and
run it at idle.
2. Disconnect the oxygen sensor connector.
3. Connect a voltmeter between the oxygen sensor and a
ground.
4. Run the engine
at 3,000 rpm until the voltmeter indicates
approx. 0.55V.
5. Increase and decrease the engine speed suddenly sever-
al times. Verify that when the speed is increased the meter
reads
OSV-1 .OV, and when the speed is decreased it
reads
OV-0.4V.
6. If not as specified, replace the oxygen sensor.
Inspection of Sensitivity
1. Warm up the engine to normal operating temperature.
2. Connect the
SSTs (System Selector and Self-Diagnosis
Checker)
to the diagnosis connector as shown.
3. Set the switch @to position 1.
4. Set TEST SW to 02 MONITOR.
5. Increase the engine speed to
between 2,000 and 3,000
rpm,
and verify that the monitor lamp flashes for 10 sec..
If not as specified, replace the oxygen sensor.
(Refer to page F-l 71.)
Monitor lamp: Flashes more than 8 times/l 0 seconds
F-l 71
Page 439 of 1164

CONTROL SYSTEM F
23UOFX-151
WASHER,
REPLACE
9MUOF2-24
05UOFX-25
9MUOF2-24
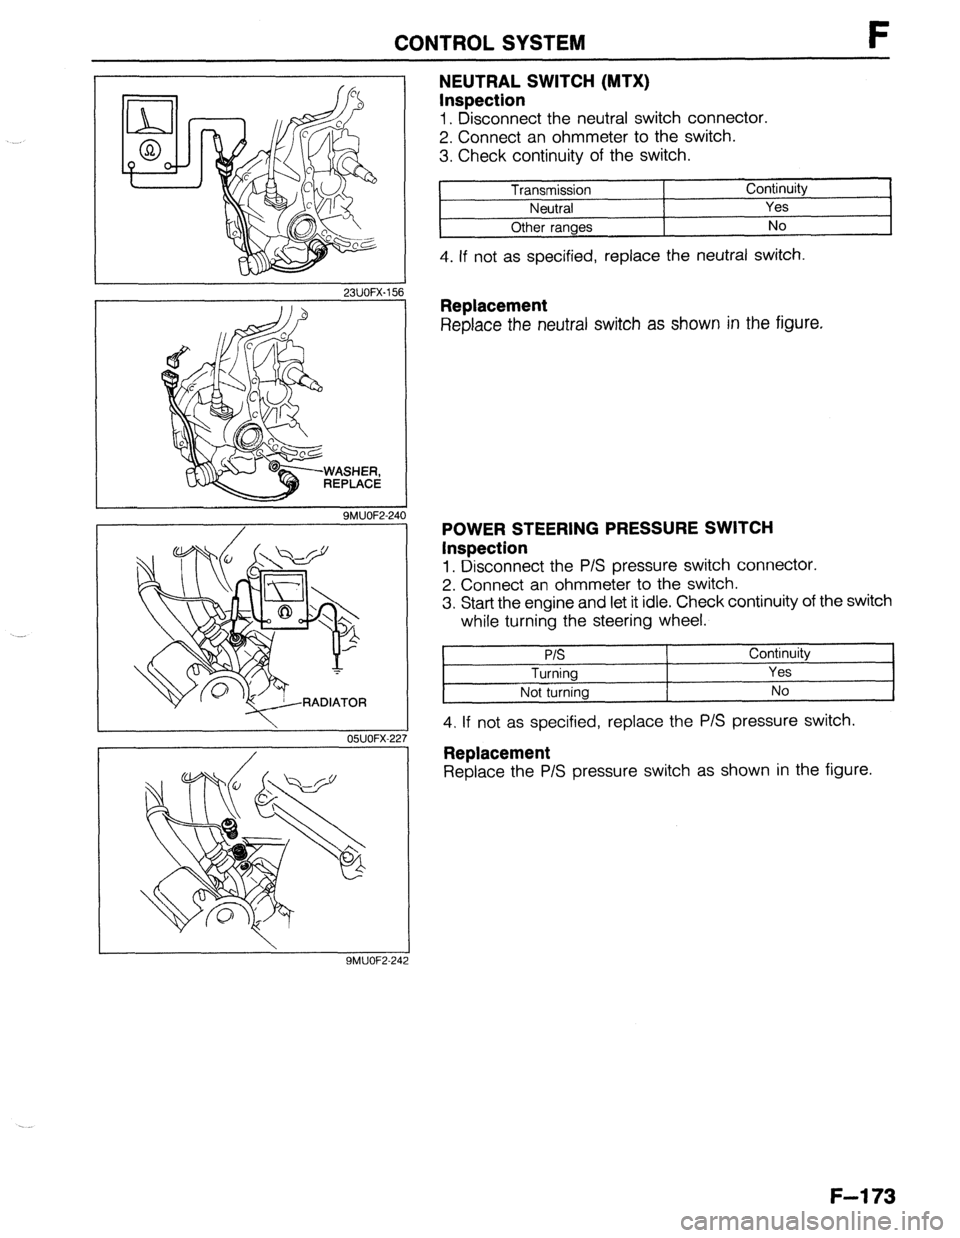
NEUTRAL SWITCH (MTX)
Inspection
1. Disconnect the neutral switch connector.
2. Connect an ohmmeter to the switch.
3. Check continuity of the switch.
Transmission Continuity
Neutral Yes
Other ranges No
4. If not as specified, replace the neutral switch.
Replacement
Replace the neutral switch as shown in the figure.
POWER STEERING PRESSURE SWITCH
Inspection
1. Disconnect the P/S pressure switch connector.
2. Connect an ohmmeter to the switch.
3. Start the engine and let it idle. Check continuity of the switch
while turning the steering wheel.
P/S
Turning
Not turning Continuity
Yes
No
4. If not as specified, replace the P/S pressure switch.
Replacement
Replace the P/S pressure switch as shown in the figure.
F-l 73
Page 441 of 1164

G
ENGINE ELECTRICAL SYSTEM
INDEX ......................................................
OUTLINE ..................................................
SPECIFICATIONS .................................... G- 3
TROUBLESHOOTING
GUIDE.. .................... G-
4
DIAGNOSTIC INDEX ................................
SYMPTOM TROUBLESHOOTING..
............. :- t
-
CHARGING SYSTEM ................................. G- 6
PREPARATION .......................................
CIRCUIT DIAGRAM ................................. :I ;
TROUBLESHOOTING .............................. G- 7
BATTERY ............................................... G- 6
ALTERNATOR ........................................ G-10
DRIVE BELT ........................................... G-14
IGNITION SYSTEM .................................... G-15
PREPARATION ....................................... G-15
CIRCUIT DIAGRAM ................................. G-15
TROUBLESHOOTING .............................. G-16
IGNITION TIMING ................................... G-17
HIGH-TENSION LEAD .............................. G-17
SPARK PLUGS ....................................... G-16
IGNITION COIL ....................................... G-19
DISTRIBUTOR ........................................ G-20
IGNITER ................................................ G-23
STARTING SYSTEM .................................. G-24
PREPARATION ....................................... G-24
CIRCUIT DIAGRAM ................................. G-24
STARTER ...............................................
G-25
STARTER INTERLOCK SWITCH (MTX)
........ G-31
03UOGX-001
Page 443 of 1164

OUTLINE G
OUTLINE
SPECIFICATIONS
Item EnginelTransaxle
‘-2, B6 SOHC BP SOHC BP DOHC
MTX 1 ATX MTX ( ATX
Voltage v 1 12
I
3attery
Dark current*’ Type and capacity
(20-hour rate)
mA 55D23L (60AH) 55D23L (60AH)
Max. 20.0
L\lternator
Starter
Type AC
output V-A 12-65
Regulator type Transistorized (built-in IC regulator)
Regulated voltage V 14.1-14.7
Brush length Standard 21.5 (0.846)
mm (in) Minimum 8.0 (0.315)
Drive belt deflection
New
98 N (10 kg, 22 lb)
mm (in) Used 8-Q (0.31-0.35)
Q-10 (0.35-0.39)
Type
I Direct Direct
I Coaxial
Direct Coaxial
reduction reduction I
output V-kW 12-0.95 12-0.95 12-1.4
12-0.95 12-1.4
Brush length Standard 17 (0.67) 17 (0.67) 17.5 (0.69) 17 (0.67)
17.5 (0.69)
mm (in) Minimum 11.5 (0.453) 11.5 (0.453) 10.0 (0.39) 11.5 (0.453) 10.0 (0.39)
Distributor
Ignition timing BTDC
(TEN terminal of diagnosis connector grounded) Electronic spark advance (photo diode)
6O--8O 4O-6O Q”-1 1 o
Ignition coil
Spark plug Resistance
(at 20% [68OF]) Primary
coil winding 0.81-O.QQg
Secondary
coil winding IO-16 kg
BKR5E-11 BKR5Ell BKR5Ell
NGK
BKR6E-11 BKRGEl 1 BKRGEli
BKR7Ell
Type NIPPON-
DENSON Kl GPR-Ul l
K20PRU 11 KIGPR-Ull
K20PR-Ul l KIGPR-Ull
K20PRUll
K22PR-Ul l
I Plua aao mm (in) I 1.0-l .l (0.039-0.043)
Firing order
’ Dark current is the constant flow of current while the ignition switch is OFF.
(i.e. engine control unit, audio, etc.) l-3-4-2
23lJOGX-00
G-3
Page 444 of 1164

TROUBLESHOOTING GUIDE
TROUBLESHOOTING GUIDE
DIAGNOSTIC INDEX
No. Troubleshooting items
Page
1
Will not crank-starter motor does not operate G-4
2
Will not crank-starter motor spins G-4
3
Cranks slowly G-5 4
Alternator warning lamp illuminates when engine running
G-5
5 Discharged battery G-5
6
Misfire
G-5
03UOGX-004
SYMPTOM TROUBLESHOOTING -
1
iTEl
1
2
3 Will not crank-Starter motor does not operate
INSPECTION
T
Check if engine cranks with fully charged battery
Check if battery voltage is applied at B terminal
TERMINAL
battery voltaae is aoolied at S terminal
when clutch pedal depressed (MTX) and ignition
switch in START position
S TERMINAL
Yes
No
Yes ACTION Check charging system CT- page G-7
Go to next step
Go to next step
No Check wire harness
Yes
l Check magnetic switch l Check field coil l Check armature
No
l Check starter interlock switch (MTX) ccp: page G-31 l Check inhibitor switch (ATX) c=p Section K l Check ignition switch CI Section T l Check wire harness
1 L-T page G-28
CT- page G-29
CT- page G-29
23UOGX.001
03UOGX-006
G-4
Page 445 of 1164

TROUBLESHOOTING GUIDE G
3 Cranks slowly
STEP INSPECTION ACTION
1 Check if engine cranks normally with fully Yes Check charging system CT page G-7
charged battery
No Go to next step
2 Check starter cable connection for looseness Yes Repair or replace connection
and corrosion
OBUOGX-OC
I 1 4
.
Alternator warning lamp illuminates when engine running
STEP INSPECTION ACTION
1 Check for correct battery voltage at idle Yes Check wire harness between alternator L terminal and aI*
Specification: 14.1--14.7V ternator warning lamp
No Check charging system w page G-7
03UOGX-008
5 I Discharged battery I 1TEP INSPECTION
f Check charging system w page G-7 -
6
TEF
1
r
--
Yes
03UOGX-009
ACTION
Turn ignition switch ON and check dark current as shown
Dark current: Below 20mA
No Repair or replace parts as necessary 1
Misfire
INSPECTION
-
Disconnect high-tension lead from each spark
plug and check for strong blue spark while
cranking
, i
Yes
No T-
I
ACTION
- Check spark plug w page G-f8
~3 If OK, engine electrical system normal
~3 If not OK, clean or replace spark plug
Check ignition system ci’ page G-16
1 03UOGX-010
G-5