MAZDA PROTEGE 1992 Workshop Manual
Manufacturer: MAZDA, Model Year: 1992, Model line: PROTEGE, Model: MAZDA PROTEGE 1992Pages: 1164, PDF Size: 81.9 MB
Page 711 of 1164

OUTLINE R
Coil Spring Applications
Model
PROTEGi
HATCHBACK Engine
Transaxle Sun roof ’ Front
I Rear
I
I
5MTX -
B 1 USA Canada USA Canada BP SOHC I I A I H
4EATX 1 -
C B H H
BP -
B6 DOHC
SOHC
BP SOHC 5MTX
4EATX
5MTX Manual transaxle @speed)
23UORX-006 .............
4EATX ............ Electronically controlled automatic transaxle (4-speed)
I- I c I- II I- I 0
E -
J I -
E -
I -
0 D -
J
I - -
A A G G
-
B B
G F
- -
B -
G
- -
B -
G
R-5
Page 712 of 1164
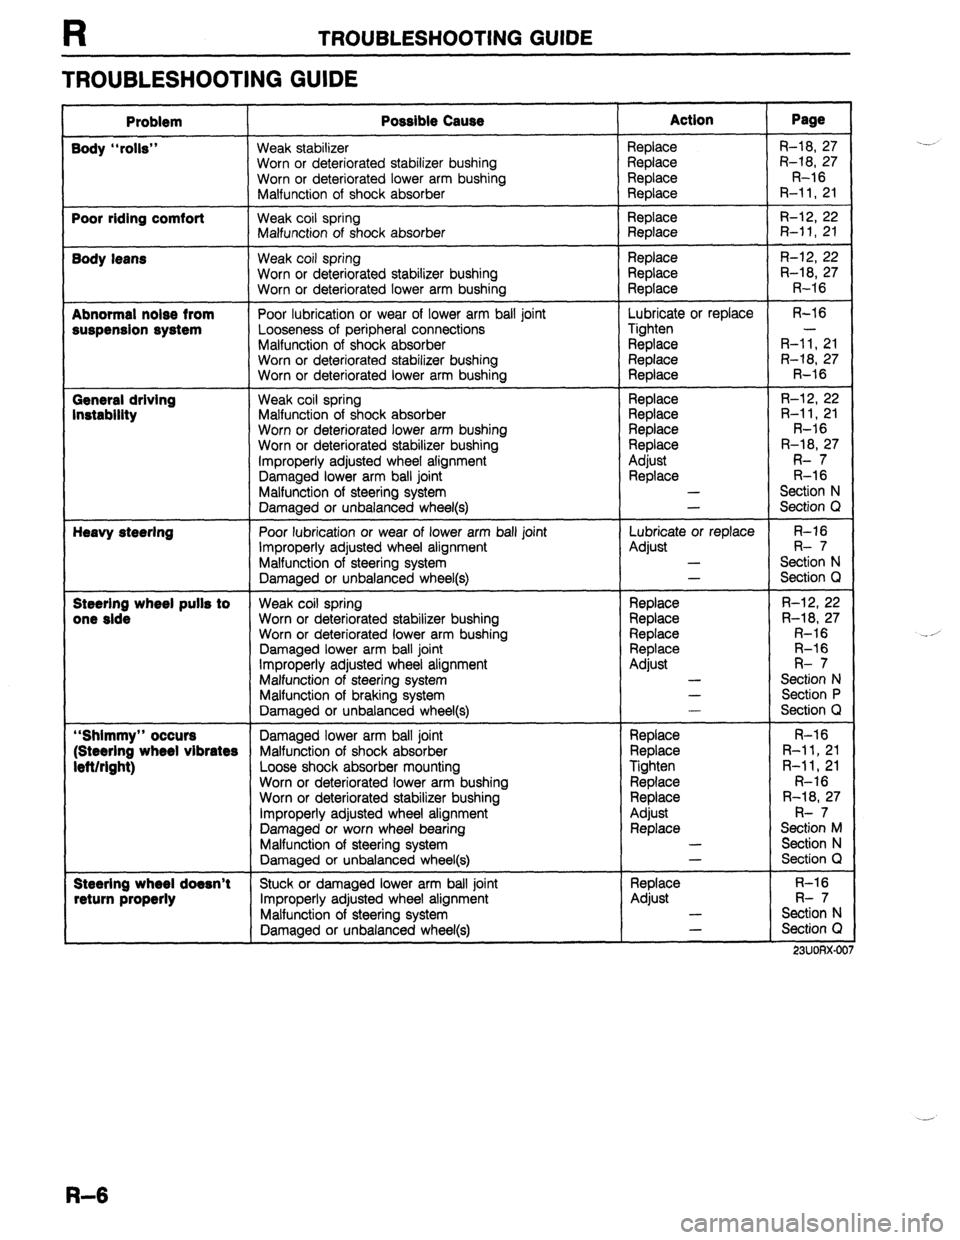
TROUBLESHOOTING GUIDE
TROUBLESHOOTING GUIDE
Problem Possible Cause Action Page
Body “rolls” Weak stabilizer Replace R-18, 27
Worn or deteriorated stabilizer bushing Replace R-18, 27
Worn or deteriorated lower arm bushing
Replace R-16
Malfunction of shock absorber
Replace R-11,21
Poor riding comfort Weak coil spring Replace R-12, 22
Malfunction of shock absorber Replace R-11,21
Body leans Weak coil spring Replace R-12, 22
Worn or deteriorated stabilizer bushing
Replace R-18, 27
Worn or deteriorated lower arm bushing Replace R-16
Abnormal noise from Poor lubrication or wear of lower arm ball joint Lubricate or replace R-16
suspension system Looseness of peripheral connections Tighten -
Malfunction of shock absorber Replace R-11, 21
Worn or deteriorated stabilizer bushing Replace R-18, 27
Worn or deteriorated lower arm bushing
Replace R-16
General driving Weak coil spring Replace R-12, 22
Instability Malfunction of shock absorber Replace R-11, 21
Worn or deteriorated lower arm bushing Replace R-16
Worn or deteriorated stabilizer bushing Replace R-18, 27
Improperly adjusted wheel alignment Adjust R- 7
Damaged lower arm ball joint
Replace R-l 6
Malfunction of steering system -
Section N
Damaged or unbalanced wheel(s) -
Section Q
Heavy steering
Poor lubrication or wear of lower arm ball joint Lubricate or replace R-16
Improperly adjusted wheel alignment
Adjust R- 7
Malfunction of steering system -
Section N
Damaged or unbalanced wheel(s) -
Section Q
Steerlng wheel pulls to Weak coil spring
Replace R-12, 22
one side
Worn or deteriorated stabilizer bushing Replace R-18, 27
Worn or deteriorated lower arm bushing Replace R-16
Damaged lower arm ball joint Replace R-16
Improperly adjusted wheel alignment Adjust R- 7
Malfunction of steering system -
Section N
Malfunction of braking system -
Section P
Damaged or unbalanced wheel(s) -
Section Q
“Shimmy” occurs Damaged lower arm ball joint Replace R-16
(Steering wheel vibrates Malfunction of shock absorber
Replace R-11, 21
left/right) Loose shock absorber mounting
Tighten R-11, 21
Worn or deteriorated lower arm bushing
Replace R-16
Worn or deteriorated stabilizer bushing Replace R-18, 27
Improperly adjusted wheel alignment
Adjust R- 7
Damaged or worn wheel bearing Replace Section M
Malfunction of steering system -
Section N
Damaged or unbalanced wheel(s) -
Section Q
Steering wheel doesn’t Stuck or damaged lower arm ball joint
Replace R-16
return properly Improperly adjusted wheel alignment Adjust R- 7
Malfunction of steering system -
Section N
Damaged or unbalanced wheel(s) -
Section Q
_-..--..__
23UUHXJJC
.-_,
.-
R-6
Page 713 of 1164
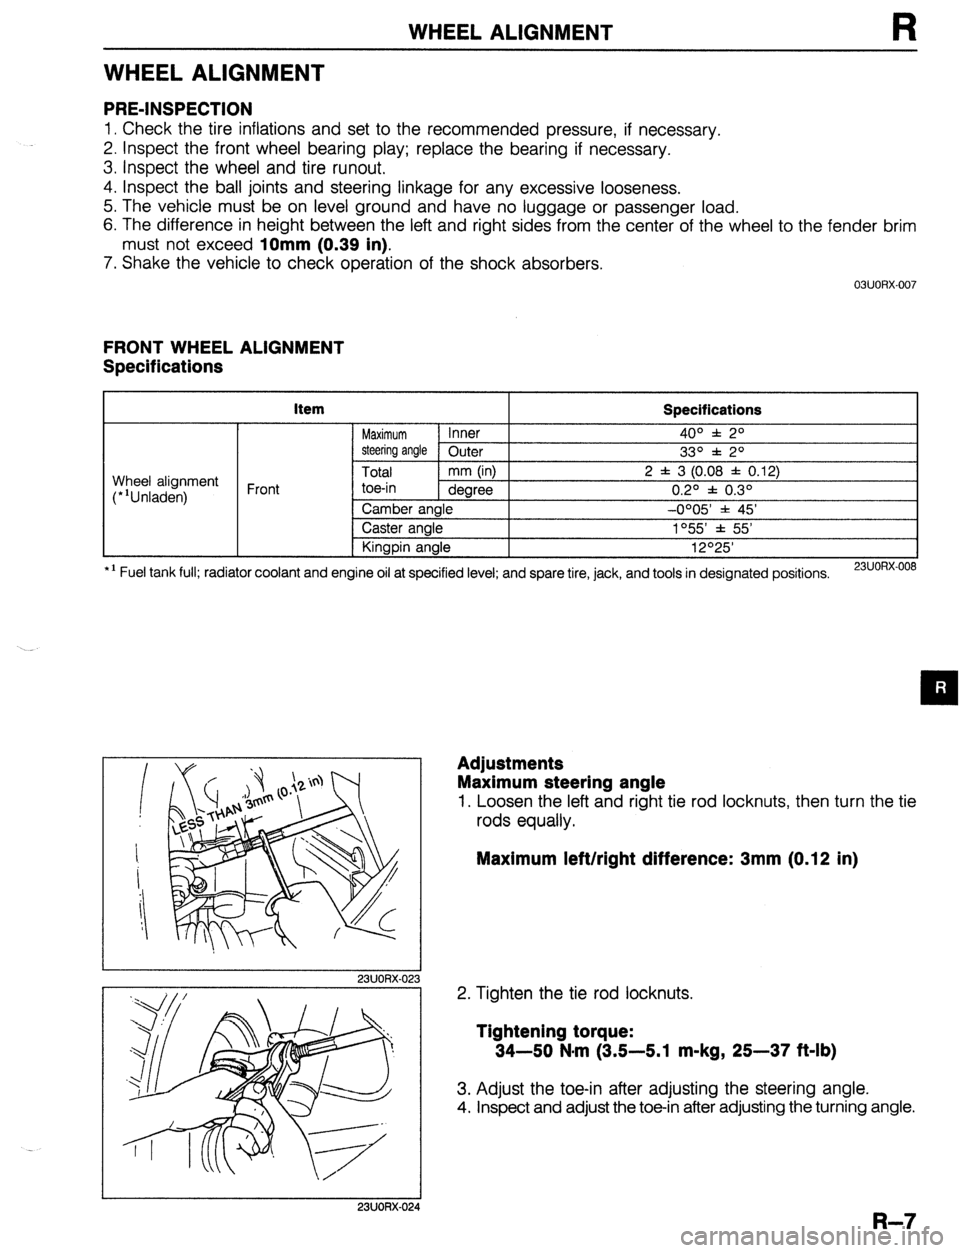
WHEEL ALIGNMENT
WHEEL ALIGNMENT
PRE-INSPECTION
1. Check the tire inflations and set to the recommended pressure, if necessary.
2. Inspect the front wheel bearing play; replace the bearing if necessary.
3. inspect the wheel and tire runout.
4. Inspect the ball joints and steering linkage for any excessive looseness.
5. The vehicle must be on level ground and have no luggage or passenger load.
6. The difference in height between the left and right sides from the center of the wheel to the fender brim
must not exceed
10mm (0.39 in).
7. Shake the vehicle to check operation of the shock absorbers.
03UORX.007
FRONT WHEEL ALIGNMENT
Specifications
item
Specifications
Maximum Inner 4o” f: 2O
steering angle Outer
33O f 2O
Total mm (in) 2 f 3 (0.08 f 0.12)
toe-in dearee 0.20 f 0.30 Wheel alignment
(*‘Unladen) Front
*I Fuel tank full; radiator coolant and Camber angle -0005 * 45’
Caster angle 1°55’ f 55’
Kingpin angle 12O25’
engine oil at specified level; and spare tire, jack, and tools in designated positions.
23UORX-008
I
I 23UORX-023
Adjustments
Maximum steering angle
1. Loosen the left and right tie rod locknuts, then turn the tie
rods equally.
Maximum left/right difference: 3mm (0.12 in)
2. Tighten the tie rod locknuts.
Tightening torque:
34-50 N-m (3.5-5.1 m-kg, 25-37 ft-lb)
3. Adjust the toe-in after adjusting the steering angle.
4. Inspect and adjust the toe-in after adjusting the turning angle.
I 23UORX-024
R-7
Page 714 of 1164

WHEEL ALIGNMENT
Camber and Caster
1, Jack up the front of the vehicle and support it with safety
stands.
2. Remove the mounting block nuts.
-
1 BUORX-01
23UORX-0;
3. Push the mounting block downward, and turn it to the
desired position.
Direction indicator
position
A
: Difference from standard position
Camber angle Caster angle
+14’ +14’
+29’ O0
+14’ -14’
4. Install and tighten the mounting nuts to the specified torque.
Tightening torque:
29-40 Nnrn (3.0-4.1 m-kg, 22-30 ft-lb)
Total toe-in
1. Loosen the left and right tie rod locknuts, then turn the tie
rods equally.
Caution
l The left and right tie rods are both right threaded,
so, to increase the toe-in, turn the right tie rod to-
ward the front of the vehicle and the left tie rod
equally toward the rear.
l One turn of the tie rod (both sides) changes the toe-
in by about 6mm (0.24 in).
2. Tighten the tie rod locknuts.
Tightening torque:
34-50 N-m (3.5-5.1 m-kg, 25-37 ft-lb)
Page 715 of 1164

WHEEL ALIGNMENT
REAR WHEEL ALIGNMENT
Specifications
kern Specifications
Total mm (in) 2 f 3 (0.08 f 0.12)
Wheel alignment
(*‘Unladen) Rear toe-in
degree 0.2O f 0.3O
Camber angle -0020’ f 45’
*I Fuel tank full; radiator coolant and engine oil at specified level; and spare tire, jack, and tools in designated positions.
13UORX-012
Adjustment
Total toe-in
1. Loosen the lateral link locknuts.
2. Turn the lateral link adjustment link to adjust.
Note
l One turn of the link changes 11.3mm (0.44 in).
3. Tighten the lateral link locknuts to the specified torque.
Tightening torque:
55-64 N,m (5.6-6.5 m-kg, 41-47 ft-lb)
R-9
Page 716 of 1164

FRONT SUSPENSION (STRUT)
FRONT SUSPENSION (STRUT)
PREPARATION
SST
19 GO17 5A0
support of engine
19 GO17
502
Part of
19 GO17 5AO)
19 GO34 1AO
Zompressor coil support of engine support of engine
49 GO34 102
49 GO34 1AO)
49 1243 785
Installer boot 49
0180 51oB installation of ball measurement of
R-l 0
Page 717 of 1164
R
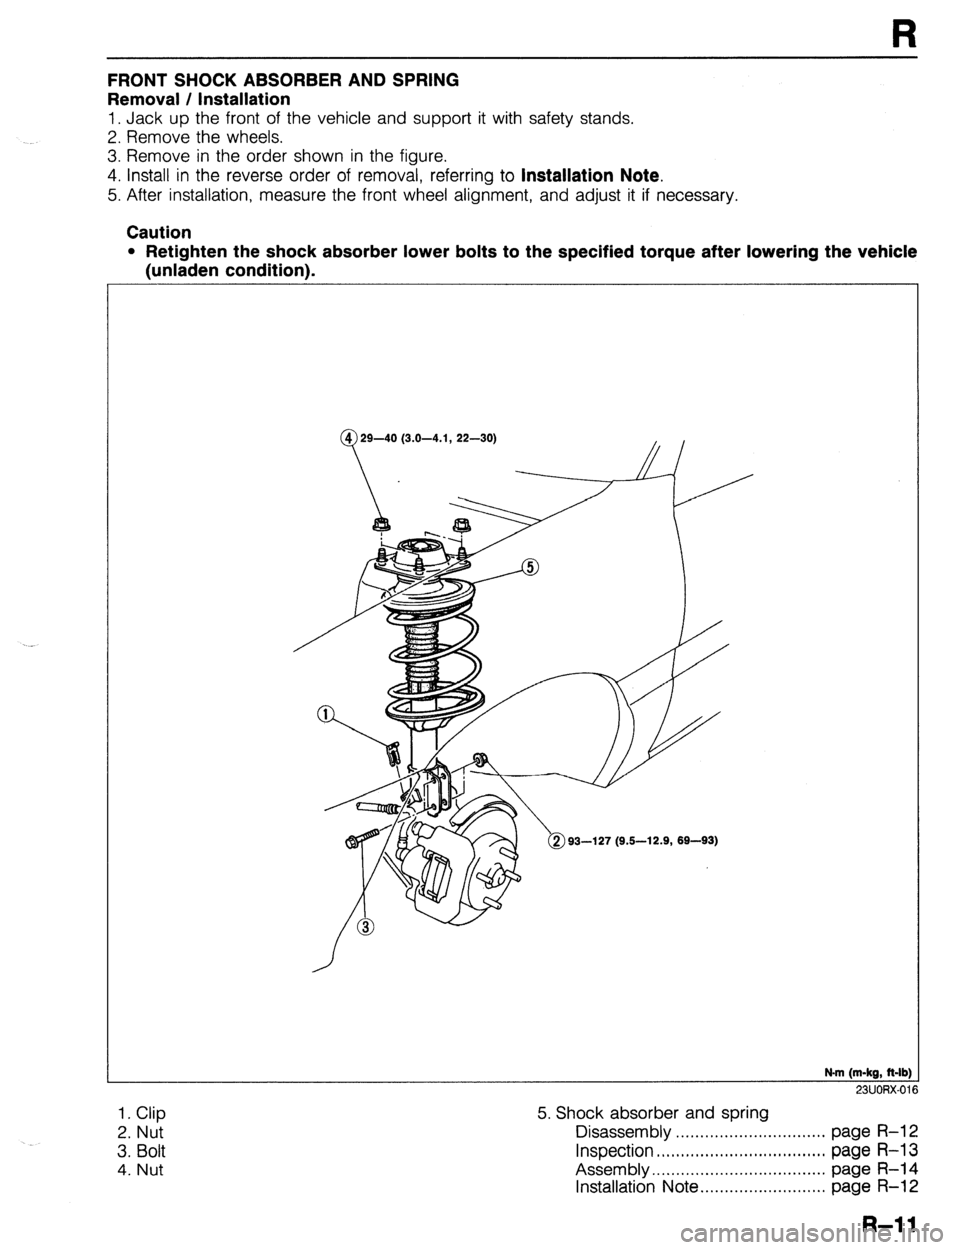
FRONTSHOCKABSORBERANDSPRING
Removal / Installation
1. Jack up the front of the vehicle and support it with safety stands.
2. Remove the wheels.
3. Remove in the order shown in the figure.
4. Install in the reverse order of removal, referring to Installation Note.
5. After installation, measure the front wheel alignment, and adjust it if necessary.
Caution
l Retighten the shock absorber lower bolts to the specified torque after lowering the vehicle
(unladen condition).
1. Clip
2. Nut
3. Bolt
4. Nut 5. Shock absorber and spring
N.m (m-kg, R-lb
23UORX-0‘
- .^
Disassembly ............................... page H-l Z
Inspection ................................... page R-l 3
Assembly.. .................................. page R-14
Installation Note.. ........................ page R-12
R-l 1
Page 718 of 1164
FRONT SUSPENSION (STRUT)
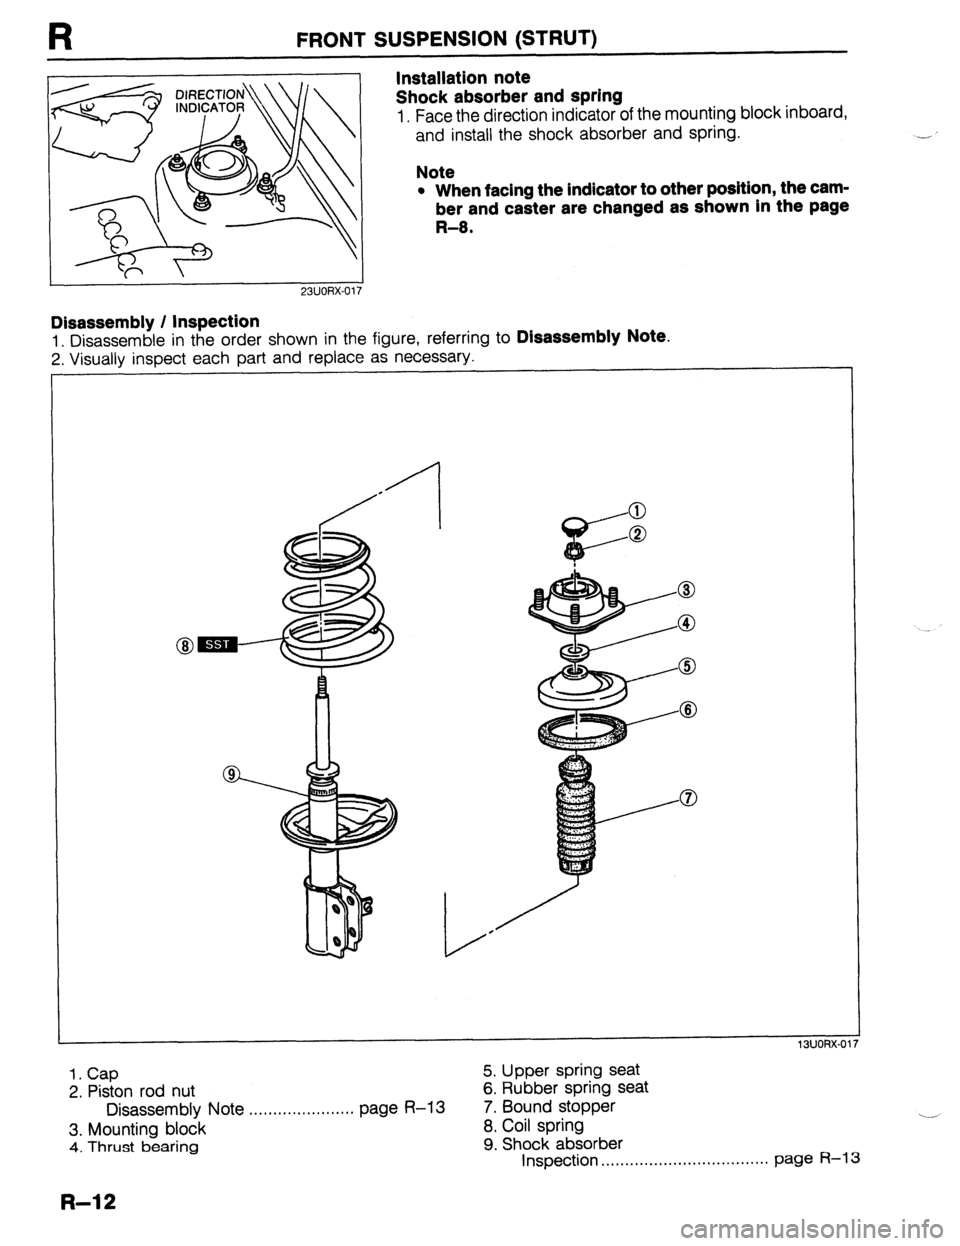
Installation note
Shock absorber and spring
1. Face the direction indicator of the mounting block inboard,
and install the shock absorber and spring.
Note
l When facing the indicator to other position, the cam-
ber and caster are changed as shown in the page
R-8. -’
23UORX-017
Disassembly / Inspection
1. Disassemble in the order shown in the figure, referring to Disassembly Note.
2. Visuallv inspect each part and replace as necessary.
1. Cap
2. Piston rod nut
Disassembly Note ,..........,.....,.... page R-13
3. Mounting block
4. Thrust bearing 5. Upper spring seat
6. Rubber spring seat
7. Bound stopper
8. Coil spring
9. Shock absorber
Inspection . . . . . . . . . , . . . . , . . . . . . . . . . . . . . . . . . . . page R-l 3
R-l 2
Page 719 of 1164
FRONT SUSPENSION (STRUT)
R
03UORX-022
.
.
H 03UOAX-02:
03UORX-02r
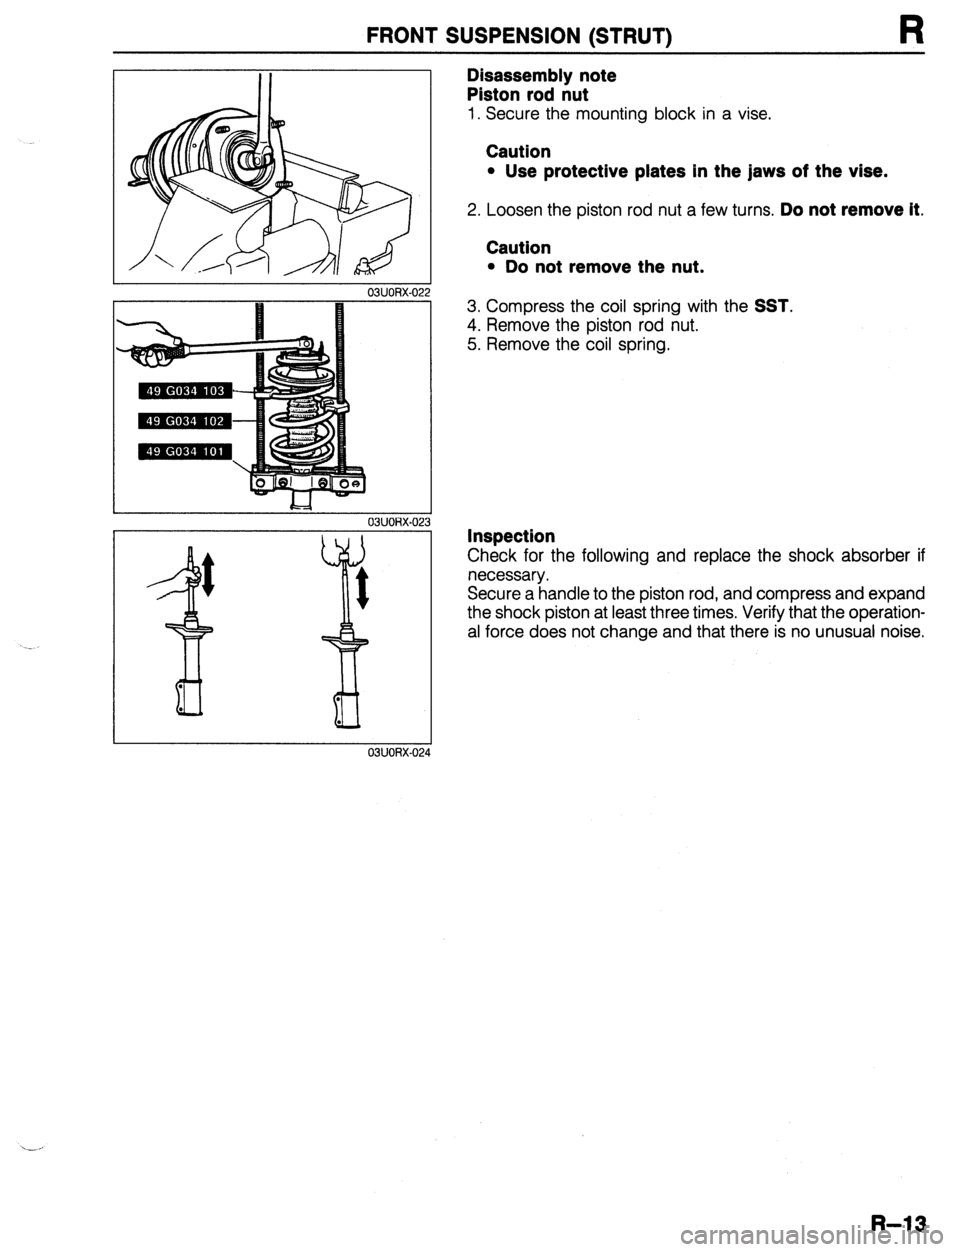
Disassembly note
Piston rod nut
1. Secure the mounting block in a vise.
Caution
l Use protective plates in the jaws of the vise.
2. Loosen the piston rod nut a few turns. Do not remove it.
Caution
l Do not remove the nut.
3. Compress the coil spring with the SST.
4. Remove the piston rod nut.
5. Remove the coil spring.
Inspection
Check for the following and replace the shock absorber if
necessary.
Secure a handle to the piston rod, and compress and expand
the shock piston at least three times. Verify that the operation-
al force does not change and that there is no unusual noise.
R-13
Page 720 of 1164
![MAZDA PROTEGE 1992 Workshop Manual R
Assembly FRONT SUSPENSION (STRUT)
N.m (m-kg, ft-lb]
03UORX-02
1. Shock absorber
2. Coil spring
3. Bound stopper
4. Rubber spring seat
5. Upper spring seat
R-14
--
6. Thrust bearing
7. Mo MAZDA PROTEGE 1992 Workshop Manual R
Assembly FRONT SUSPENSION (STRUT)
N.m (m-kg, ft-lb]
03UORX-02
1. Shock absorber
2. Coil spring
3. Bound stopper
4. Rubber spring seat
5. Upper spring seat
R-14
--
6. Thrust bearing
7. Mo](/img/28/57077/w960_57077-719.png)
R
Assembly FRONT SUSPENSION (STRUT)
N.m (m-kg, ft-lb]
03UORX-02
1. Shock absorber
2. Coil spring
3. Bound stopper
4. Rubber spring seat
5. Upper spring seat
R-14
--
6. Thrust bearing
7. Mounting block
8. Piston rod nut
9. Cap
1. Secure the shock absorber in a vise.
Caution
l Use protective plates in the jaws of the vise.
2. Compress the coil spring with the SST.
3. Install the coil spring, fitting the end of the coil into the step
of the lower seat.
4. Install the bound stopper. ..l