MAZDA PROTEGE 1992 Workshop Manual
PROTEGE 1992
MAZDA
MAZDA
https://www.carmanualsonline.info/img/28/57077/w960_57077-0.png
MAZDA PROTEGE 1992 Workshop Manual
Trending: distributor wiring, cruise control, gas type, fuse box location, engine coolant, differential, tires
Page 751 of 1164
REAR DOOR S
REAR DOOR
COMPONENTS
Removal / Installation
1. Disconnect the negative battery cable.
2. Remove in the order shown in the figure.
3. Install in the reverse order of removal.
Note
l Remove the rear door trim and door screen for removal of the checker. (Refer to naae S-17.
N-m (m-kg, ft-lb)
1. Harness connector 5. Door lock striker
2. Checker pin Adjustment Note ,..............,.....,.,. page S-16
3. Hinge 6. Checker
4. Rear door
Adjustment Note . . . . . . . . . . . . . . . . . . . . . . . . . page S-i 6
S-l 5
Page 752 of 1164
S REAR DOOR
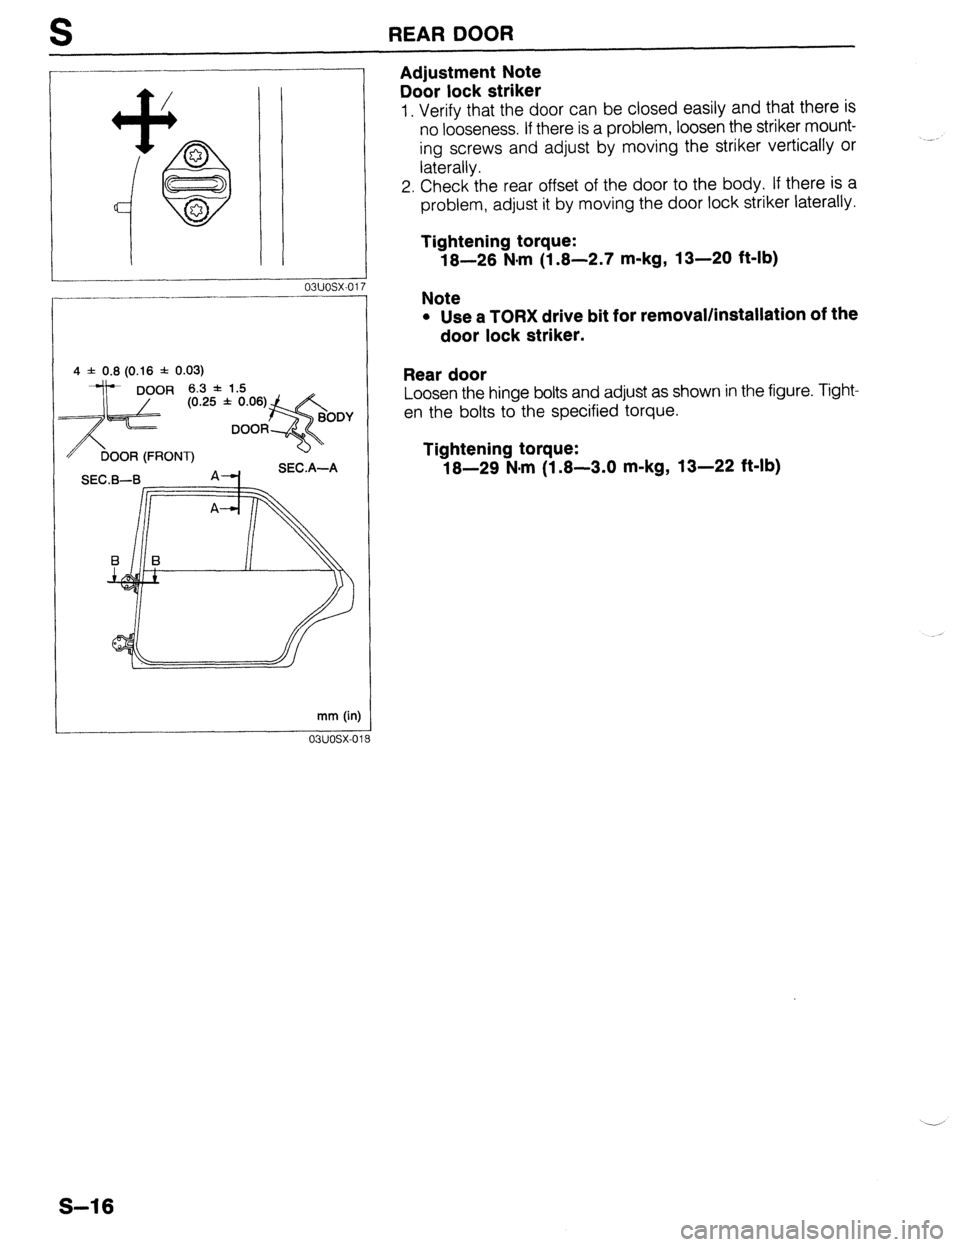
4 f 0.8 (0.16 f 0.03)
OR (FRONT)
-c1 A4 SEC.A-A
mm (in)
03uosx-0’
Adjustment Note
Door lock striker
1. Verify that the door can be closed easily and that there is
no looseness. If there is a problem, loosen the striker mount-
ing screws and adjust by moving the striker vertically or
laterally.
2. Check the rear offset of the door to the body. If there is a
problem, adjust it by moving the door lock striker laterally.
Tightening torque:
18-26 N.m (1.8-2.7 m-kg, 13-20 ft-lb)
Note
l Use a TORX drive bit for removal/installation of the
door lock striker.
Rear door
Loosen the hinge bolts and adjust as shown in the figure. Tight-
en the bolts to the specified torque.
Tightening torque:
18-29 N-m (1.8-3.0 m-kg, 13-22 ft-lb)
S-16
Page 753 of 1164

REAR SIDE WINDOW REGULATOR AND GLASS
REAR SIDE WINDOW REGULATOR AND GLASS
COMPONENTS
Removal / Installation
1. Open the rear door glass fully.
2. Disconnect the negative battery cable.
3. Remove in the order shown in the figure, referring to Removal Note.
4. Install in the reverse order of removal, referring to Installation Note.
Caution
l Remove the door screen carefullv so that it may be reused.
3-9 61-67 in-lb) ,
03uosx-019
1. Regulator handle (Manual window) 9. Center channel, channel protector
Removal Note . . . . . . . . . . . . . . . . . . . . . . . . . . . . . page S-l 2 10. Rear door glass
2. Rear door trim (Manual window) Removal Note ..,.....,..,................. page S-l 8
3. Rear door trim (Power window) Installation Note . . . . . . . . . . . . . . . . . . . . . . . . . . page S-18
4. Inner handle Il. Quarter window glass, weatherstrip
5. Pull handle bracket (Power window) 12. Manual window regulator
6. Rear power window switch 13. Power window regulator
7. Sealing pad 14. Glass run channel
8. Door screen
s-17
Page 754 of 1164
S REAR SIDE WINDOW REGULATOR AND GLASS
03UOSX-020
1
LIFT BRACKET
o3uosx-0:
Removal / Installation Note
Rear door glass
Manual window
1, Remove the window regulator roller from the large hole in
the lift bracket to remove the rear door glass.
2. Install in the reverse order of removal.
Power window
1. Remove the window regulator roller from the large hole in
the lift bracket to remove the rear door glass.
2. Install in the reverse order of removal.
s-1 8
Page 755 of 1164
REAR DOOR LOCK AND OPENER S
REAR DOOR LOCK AND OPENER
COMPONENTS
Removal / Installation
1. Raise the rear door glass fully to remove the door lock assembly.
2. Disconnect the negative battery cable.
3. Remove in the order shown in the figure, referring to Removal Note.
4. install in the reverse order of removal.
Caution
l Remove the door screen carefully so that it may be reused.
4.2-6.2 N-m
1, Regulator handle (Manual regulator) 7. Sealing pad
Removal Note . . . . . . . . . . . . . . . . . . . . . . . . . . . . . page S-l 2 8. Door screen
2. Rear door trim (Power window) 9. Lock knob assembly
3. Rear door trim (Manual window) 10. Lock control (Power door lock)
4. inner handle 11, Rear door lock assembly
5. Pull handle bracket (power window) 12. Outer handle
6. Rear power window switch
s-19
Page 756 of 1164

S REAR HATCH
REAR HATCH
COMPONENTS
Removal / Installation
1. Disconnect the negative battery cable.
2. Remove in the order shown in the figure.
3. Install in the reverse order of removal.
Note
l Remove the trunk end trim, trunk side cover, trunk side trim, rear header trim, rear seat belt
upper anchor, and C-pillar trim for removal of rear harness No.2. (Refer to pages S-98, 101.)
l Remove the rear portion of the headliner for removal of the rear hatch hinge and washer pipe.
(Refer to page S-91.)
I
I
\/ 8.8-13 N.m f60-130 cm-ka. 78-l 13 In-lb)
18-23 (1.8-2.3, 12-17)
7.8-12 N-m (80-120 cm-kg, 89-104 In-lb)
=?.3, 12-17)
7.8-12 Nin
(80-120 cm-kg,
89-l 04 in-lb)
Rear hatch
Rear hatch striker
1. Rear harness No.2
6. Trunk end trim
2. Washer pipe
Removal I Installation . . . . . . . . . . . . . . . . . . page S-98
3. Stay damper 7. Rear hatch striker
4. Rear hatch Adjustment Note . . . . . . . . . . . . . . . . . . . . . . . . . page S-21
Adjustment Note . . . . . . . . . . . . . . . . . . . . . . . . . page S-21 8. Rear hatch opener cable
5. Rear hatch hinge
s-20
Page 757 of 1164
REAR HATCH S
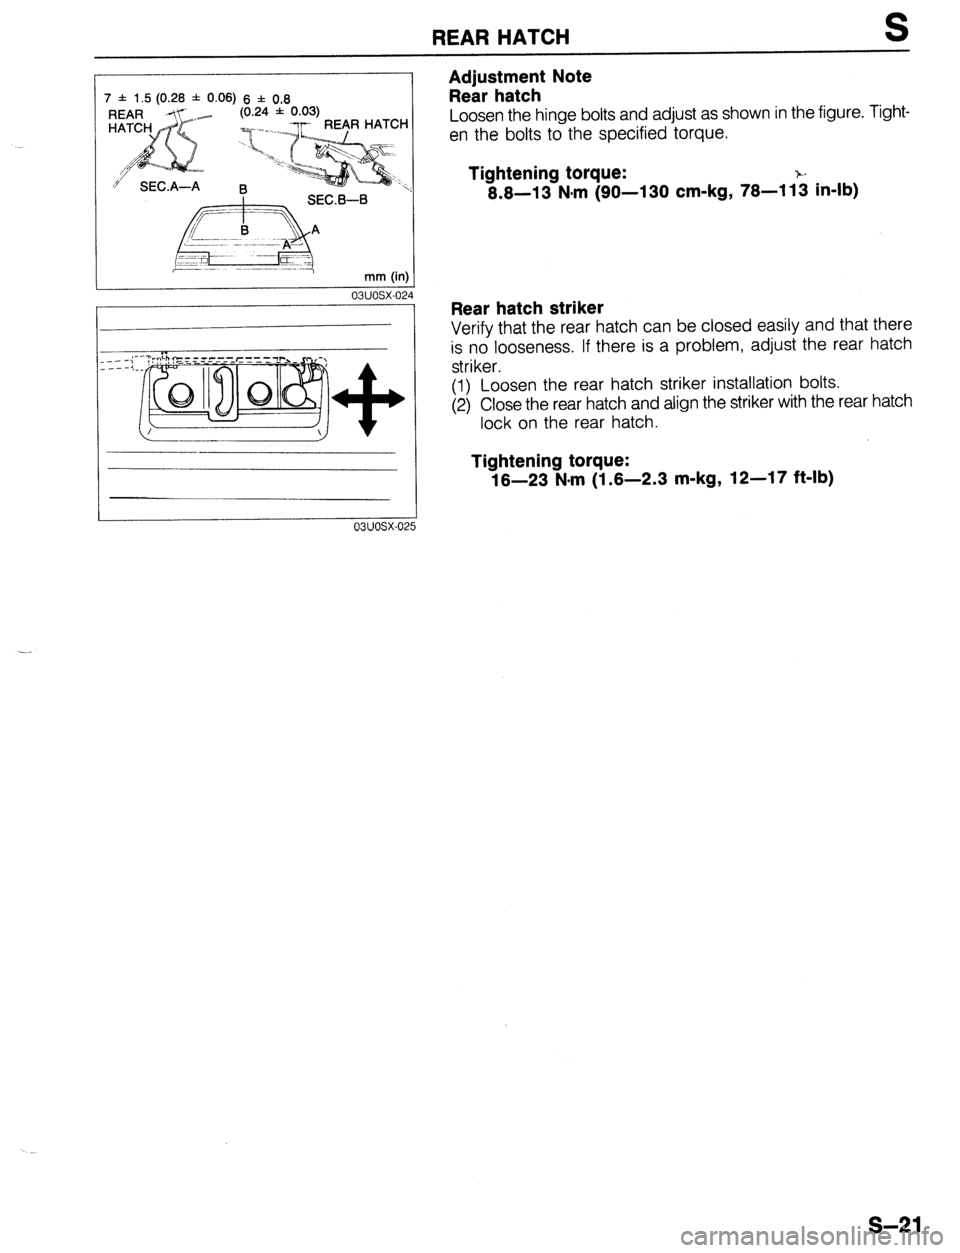
7 f 1.5 (0.28 f 0.06) 6 f 0.8
(0.24 * 0.03)
9 SECA-A R
mm (i..,
03UOSX-02
---i-
----:.
03uosx-oi
Adjustment Note
Rear hatch
Loosen the hinge bolts and adjust as shown in the figure. Tight-
en the bolts to the specified torque.
Tightening torque:
8.8-13 N*m (90-l 30 cm-kg, 78-l 1: in-lb)
Rear hatch striker
Verify that the rear hatch can be closed easily and that there
is no looseness. If there is a problem, adjust the rear hatch
striker.
(1) Loosen the rear hatch striker installation bolts.
(2) Close the rear hatch and align the striker with the rear hatch
lock on the rear hatch.
Tightening torque:
18-23 N*m (1.6-2.3 m-kg, 12-17 ft-lb)
s-21
Page 758 of 1164
S REARHATCH LOCKANDOPENER
REARHATCH LOCKANDOPENER
COMPONENTS
Removal / Installation
1. Disconnect the negative battery cable.
2. Remove in the order shown in the figure.
2 lnctall in the rpvprs~! order of rwnoval.
2.3, 12-17)
N.m (m-kg, ft-lb
_____-
0.1UOSX-C’
Rear hatch lock Rear hatch opener, opener cable
1. Rear hatch lower trim 5. Trunk end trim
Removal / Installation .,......,,...... page S- 98 Removal / Installation .,,......,,._... page S- 98
2. Lock cylinder retainer 6. Rear hatch striker
3. Lock cylinder assembly Adjustment Note ,.,,,,,,,......,,,,,... page S- 21
4. Rear hatch lock assembly 7. Scuff plate, Trunk side cover, Trunk side trim,
Quarter trim (R.H. side)
Removal / Installation ,.........,..... page S- 98
8. Opener lever
9. Rear seat cushion
Removal / Installation . . . . . . . . . . . . . . . . page S-l 12
10. Rear hatch opener cable
s-22
Page 759 of 1164
POWER DOOR LOCK SYSTEM
POWER DOOR LOCK SYSTEM
STRUCTURAL VIEW
121 rnsx-on
1, Door lock timer and relay
Inspection ................................... page S-26
2. Door lock switch (In door lock assembly)
Inspection ................................... page S-26
Removal / Installation
Hatchback ................................ page S-13
PROTEGC .................................
page S-14 - -- 3. Front door lock control
inspection ................................... page S-26
Removal / Installation
Hatchback ................................ page S-13
PROTEGE ................................. page S-14
4. Rear door lock control
Inspection ...................................
page S-26
Removal / installation ..................
page S-l 9
S-23
Page 760 of 1164
POWER DOOR LOCK SYSTEM
TROUBLESHOOTING GUIDE
Circuit Diagram
l POWER DOOR LOCK K-2
MAIN
c-09 POWER DOOR LOCK SWITCH(OR1) K--IO POWER DOOR LOCK K-II POWER DOOR LOCK MOT(X?FP
RELAY (F)
(3HB) (PROTEGE)
(3HB) (PROTEGE)
C-12 POWER DOOR LOCK K-13 POWER OOOR LOCK
MOTOR RL (OR31 MOTOR RR (OR41
S-24
Trending: technical data, radio, run flat, fuel filter, odometer, wheel torque, parking brake


