MAZDA PROTEGE 1992 Workshop Manual
PROTEGE 1992
MAZDA
MAZDA
https://www.carmanualsonline.info/img/28/57077/w960_57077-0.png
MAZDA PROTEGE 1992 Workshop Manual
Trending: fuse box, parking brake, heating, interior lights, washer fluid, low beam, warning
Page 781 of 1164
MOLDING, PROTECTOR, GARNISH
installation
Install in the order shown in the figure.
____------.-
- _-.-
S
03UOSX-06(
1. Lower rear window molding
2. R.H. rear window molding
(with upper and lower joints)
3. L.H. rear window molding
(with upper and lower joints) 4. Upper rear window molding
5. Lower rear window molding installation nuts
6. Rear hatch lower trim
Installation . . . . . . . . . . . . . . . . . . . . . . . . . . . . . . . . . . .
page
S-98
s-45
Page 782 of 1164
MOLDING, PROTECTOR, GARNISH
ROOF MOLDING
Removal / Installation
1. Remove in the order shown in the figure.
2. Install in the reverse order of removal, referring to
Installation Note.
Caution
l Remove the roof molding carefully to prevent damage to the painted surface.
03UOSX-OE
1. Roof molding
Installation Note . . . . . . . . . . . . . . . . . . . . . . . . . . page S-47 --,
S-46
Page 783 of 1164
MOLDING, PROTECTOR, GARNISH S
ADHESIVE
-------
03UOSX-06
--.-
03UOSX-OE
ADHESIVE
Installation Note
Roof molding
1. Remove the adhesive remaining on the body.
Note
l Remove as much adhesive as possible without
damaging the painted surface.
l If the adhesive is difficult to remove, soften it with
a hot air blower.
2. Remove any grease or dirt from the molding and molding
adhesion surface of the body.
3. Apply primer to the molding as shown.
4. Apply the adhesive (polyurethane) to the molding as shown.
Caution
l Do not apply too much adhesive because it will ooze
out when installed.
5. Peel away the molding adhesive tape protector.
6. Install the’front molding clip to the body stud.
7. Align the molding on the body and attach it securely.
8. Install the rear molding clip to the body stud.
I
03UOSX-065
S-47
Page 784 of 1164
S MOLDING, PROTECTOR, GARNISH
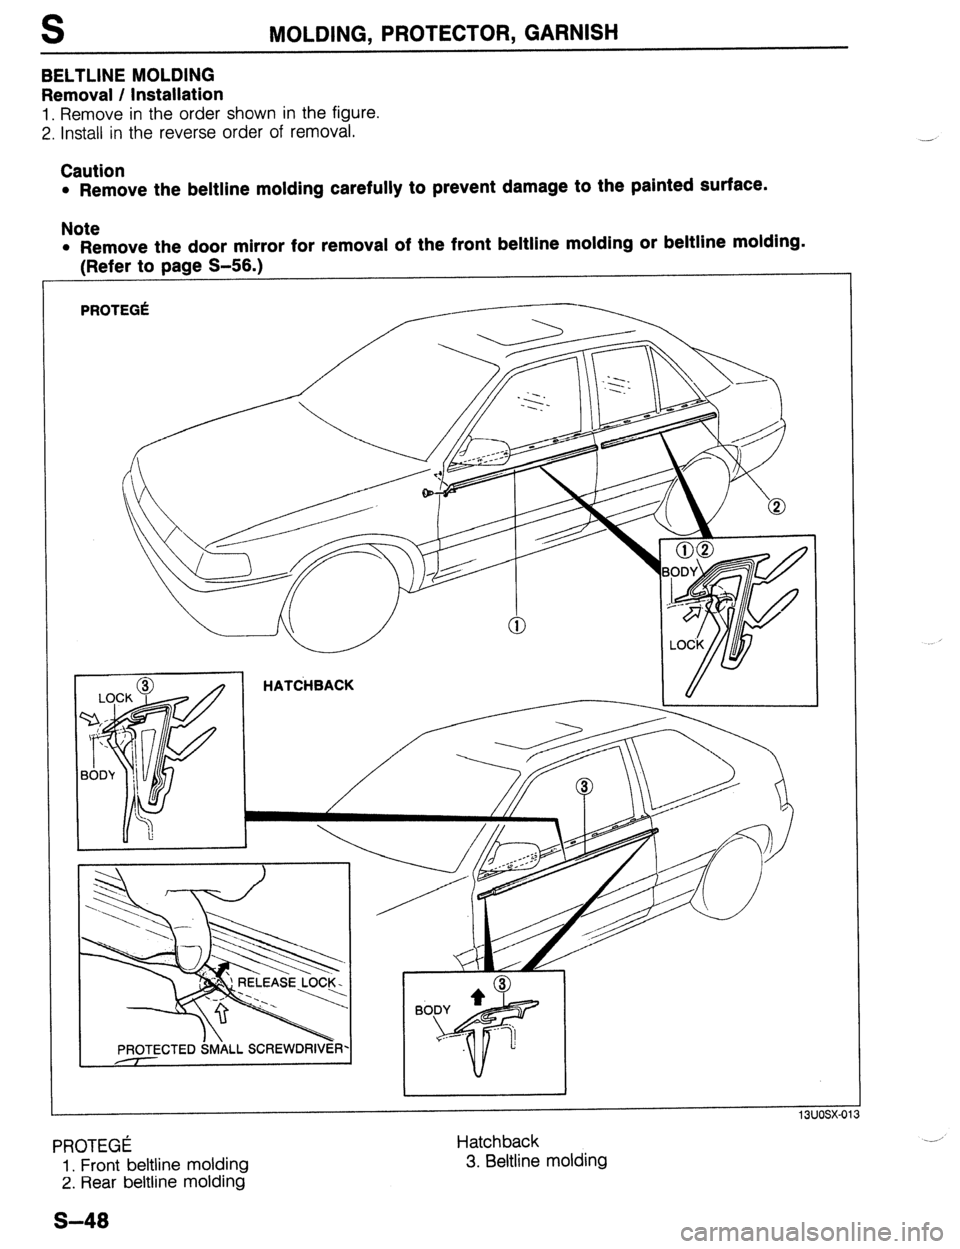
BELTLINE MOLDING
Removal / Installation
1. Remove in the order shown in the figure.
2. Install in the reverse order of removal.
Caution
l Remove the beltline molding carefully to prevent damage to the painted surface.
Note
l Remove the door mirror for removal of the front beltline molding or beltline molding. IRnfnr tn twanp S-!ifL \, ,“.“. .w r-a- - --‘,
PROTEGk
PROTEGE
1. Front beltline molding
2. Rear beltline molding Hatchback
3. Beltline molding
.-’
S-40
Page 785 of 1164
MOLDING. PROTECTOR, GARNISH S
SIDE PROTECTOR
Removal / Installation
1. Remove in the order shown in the figure, referring to Removal Note.
2. Install in the reverse order of removal, referring to Installation Note.
Caution
l Remove the side protector carefully to prevent damage to the painted surface.
PROTEGk
HATCHBACK
1. Protector No.1 2. Protector No.2 3. Protector No.3
Removal Note . . page S-49 Removal Note . . page S-49 Removal Note ,. page S-49
Installation Note page S-50 Installation Note page S-50 Installation Note page S-50
03UOSX-068
Removal Note
Protector
1. Using a screwdriver or knife, twist the protector end, being
careful not to damage the painted surface, and separate
the adhesive for
20-30mm (0.79-1.18 in).
2. Pull the separated portion to remove it.
s-49
Page 786 of 1164
S MOLDING, PROTECTOR, GARNISH
I 03UOSX-06
PRIMER 9
I
I 03uosx-070
BONDING AGENT
DOUBLE-SIDED ADHESIVE TAPE
03uosx-071
Installation Note
Protector
1. Use a knife to remove the adhesive remaining on the body
and protector.
Note
l Remove as much adhesive as possible without
damaging the painted surface.
l If the adhesive is difficult to remove, soften it with
a hot air blower.
2. Remove any grease or dirt from the protector and body
adhesion surface.
3. Apply primer to the protector as shown.
4. Attach double-sided adhesive tape to the protector (when
reused).
5. Apply adhesive (polyurethane) to the protector as shown.
6. Mark the installation position on the body with masking tape.
7. Align the protector on the body and attach it securely.
Note
l Adhesion conditions deteriorate if air temperature
is below 20°C (66OF); heating of the body is recom-
mended.
I 03UOSX-072
s-50
Page 787 of 1164
RADIATOR GRILLE, LOWER GRILLE MOLDING S
RADIATOR GRILLE, LOWER GRILLE MOLDING
COMPONENTS
Removal / Installation
1. Remove in the order shown in the figure.
2. Install in the reverse order of removal, referring to Installation Note.
1. Radiator grille 3. Lower grille molding
Installation Note. . . . . . . . . . . . . . . . . . . . .
page S-51 4. Clip
2. Front combination light
Removal I Installation ..,.,,...,..,........ Section T
Installation Note
Radiator grille
1. Insert the clips into the grille, and align them with the instal-
lation holes in the body.
2. Press the grille into the body.
s-51
Page 788 of 1164
S REAR FINISHER
REAR FINISHER
COMPONENTS
Removal / Installation
1. Remove in the order shown in the figure.
2. Install in the reverse order of removal.
HATCHBACK
Hatchback PROTEGE
1. Rear hatch lower trim 4. License plate light
Removal / Installation . . . . . . . . . . . . . . . . . . page S-98 5. Rear finisher 2. Rear finisher 6. Packing
3. Packing
S-52
Page 789 of 1164
COWL GRILLE, EXTRACTOR CHAMBER
COWL GRILLE
COMPONENTS
Removal / Installation
1. Remove in the order shown in the figure.
2. Install in the reverse order of removal.
r-
-140 cm-kg, 87-122 i
kg, 87-122 in-lb)
1. Wiper arm cover 3. Cowl cap
2. Wiper arm and blade
4. Cowl grille
Adjustment Note . . . . . . . . . . . . . . . . . . . . . . . . . page S-73
EXTRACTOR CHAMBER
COMPONENTS
Removal / Installation
1. Remove in the order shown in the figure.
2. Install in the reverse order of removal.
1. Rear bumper
Removal I Installation . . . . . . . . . . . . . . . . . . page S-40
2. Extractor chamber
s-53
Page 790 of 1164
S
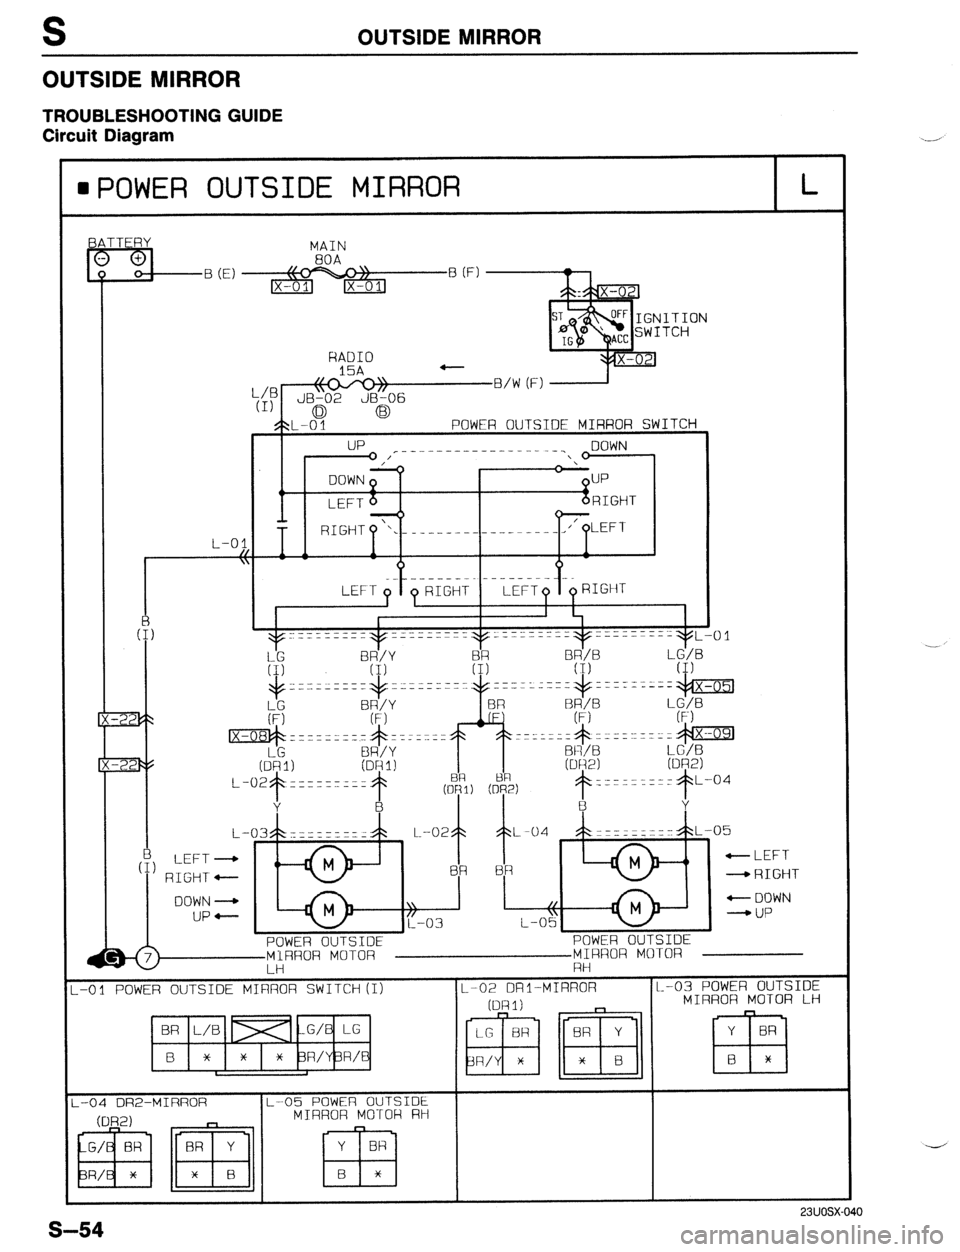
OUTSIDE MIRROR
TROUBLESHOOTING GUIDE
Circuit Diagram
OUTSIDE MIRROR
IPOWER OUTSIDE MIRROR L
BATTERY
MAIN
80A
B (E) B (F)
ITION
TCH
HAD10
15A -
::P \\o-rol/
JB-02 JB-06
0 G3
$?L-0 1 POWER OUTSIDE MIRROR SWITCH
up r---~~~---------_--_ DOWN
I’ ‘
DOWN p UP
,c
LEFT 6 RIGHT
---o -
‘\.------ ------- -___-l/’
L-01
-RIGHT
MIRROR MOTOR
-01 POWER OUTSIDE MIRROR SWITCH(I) L.-O2 DRI-MIRROR
.-
Trending: octane, change time, clutch, reset, jump start, power steering, child seat


