MITSUBISHI 3000GT 1991 Service Manual
Manufacturer: MITSUBISHI, Model Year: 1991, Model line: 3000GT, Model: MITSUBISHI 3000GT 1991Pages: 1146, PDF Size: 76.68 MB
Page 571 of 1146
PROPELLER SHAFT - Propeller Shaft25-7Mating marks
1ONOOOL
1 ON0003Mating marks
(commercially available)
\lOS520 'lOY507
SERVICE POINTS OF DISASSEMBLYM25GFAO
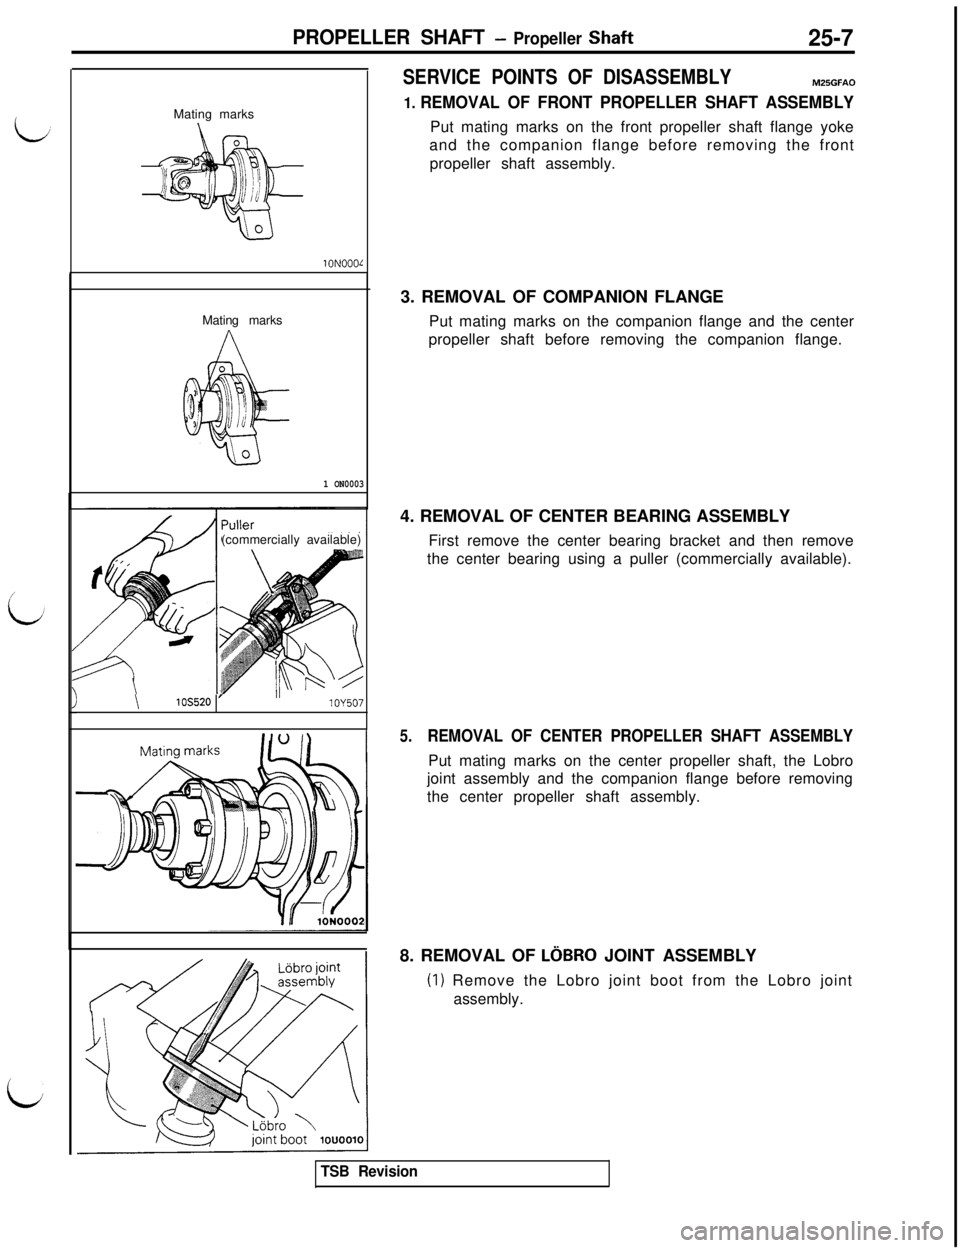
1. REMOVAL OF FRONT PROPELLER SHAFT ASSEMBLYPut mating marks on the front propeller shaft flange yoke
and the companion flange before removing the front
propeller shaft assembly.
3. REMOVAL OF COMPANION FLANGE
Put mating marks on the companion flange and the center
propeller shaft before removing the companion flange.
4. REMOVAL OF CENTER BEARING ASSEMBLY
First remove the center bearing bracket and then remove
the center bearing using a puller (commercially available).
5.REMOVAL OF CENTER PROPELLER SHAFT ASSEMBLYPut mating marks on the center propeller shaft, the Lobro
joint assembly and the companion flange before removing
the center propeller shaft assembly.
8. REMOVAL OF
LOBRO JOINT ASSEMBLY
(1) Remove the Lobro joint boot from the Lobro joint
assembly.
TSB Revision
Page 572 of 1146
25-8PROPELLER SHAFT - Propeller Shaft1 Mating marks
I,A ^.IOuter raceICageInner race
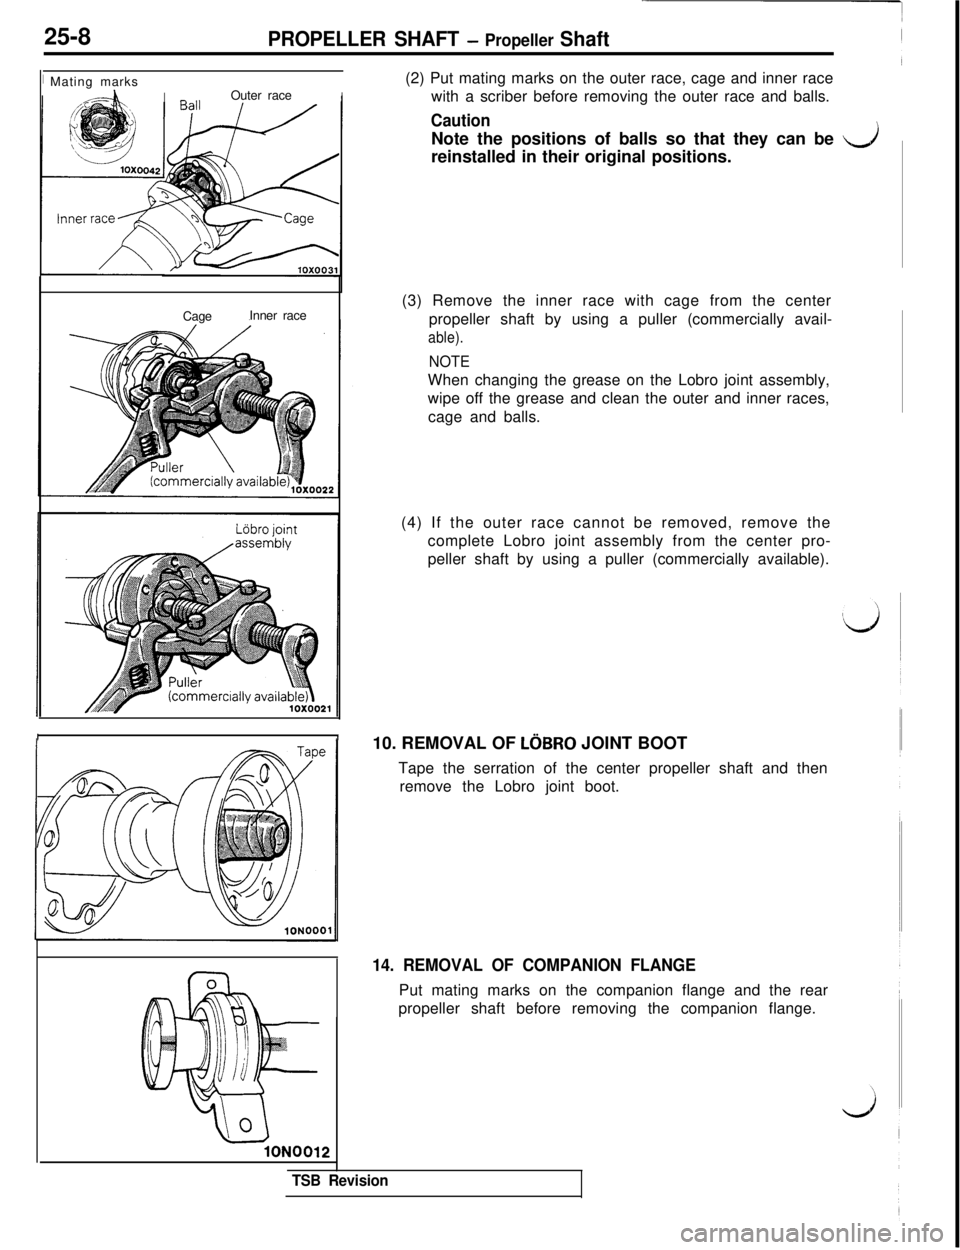
IIlON0012(2) Put mating marks on the outer race, cage and inner race
with a scriber before removing the outer race and balls.
CautionNote the positions of balls so that they can be
dreinstalled in their original positions.
(3) Remove the inner race with cage from the center
propeller shaft by using a puller (commercially avail-
able).
NOTEWhen changing the grease on the Lobro joint assembly,
wipe off the grease and clean the outer and inner races,
cage and balls.
(4) If the outer race cannot be removed, remove the
complete Lobro joint assembly from the center pro-
peller shaft by using a puller (commercially available).
10. REMOVAL OF
LOBRO JOINT BOOT
Tape the serration of the center propeller shaft and then
remove the Lobro joint boot.
14. REMOVAL OF COMPANION FLANGEPut mating marks on the companion flange and the rear
propeller shaft before removing the companion flange.
TSB Revision
Page 573 of 1146
PROPELLER SHAFT - Propeller Shaft25-9
L;Puller
[commercially available)
Companion flange
Rubber mountSelfnut-lockir
lON0007
e
lONO10X0018
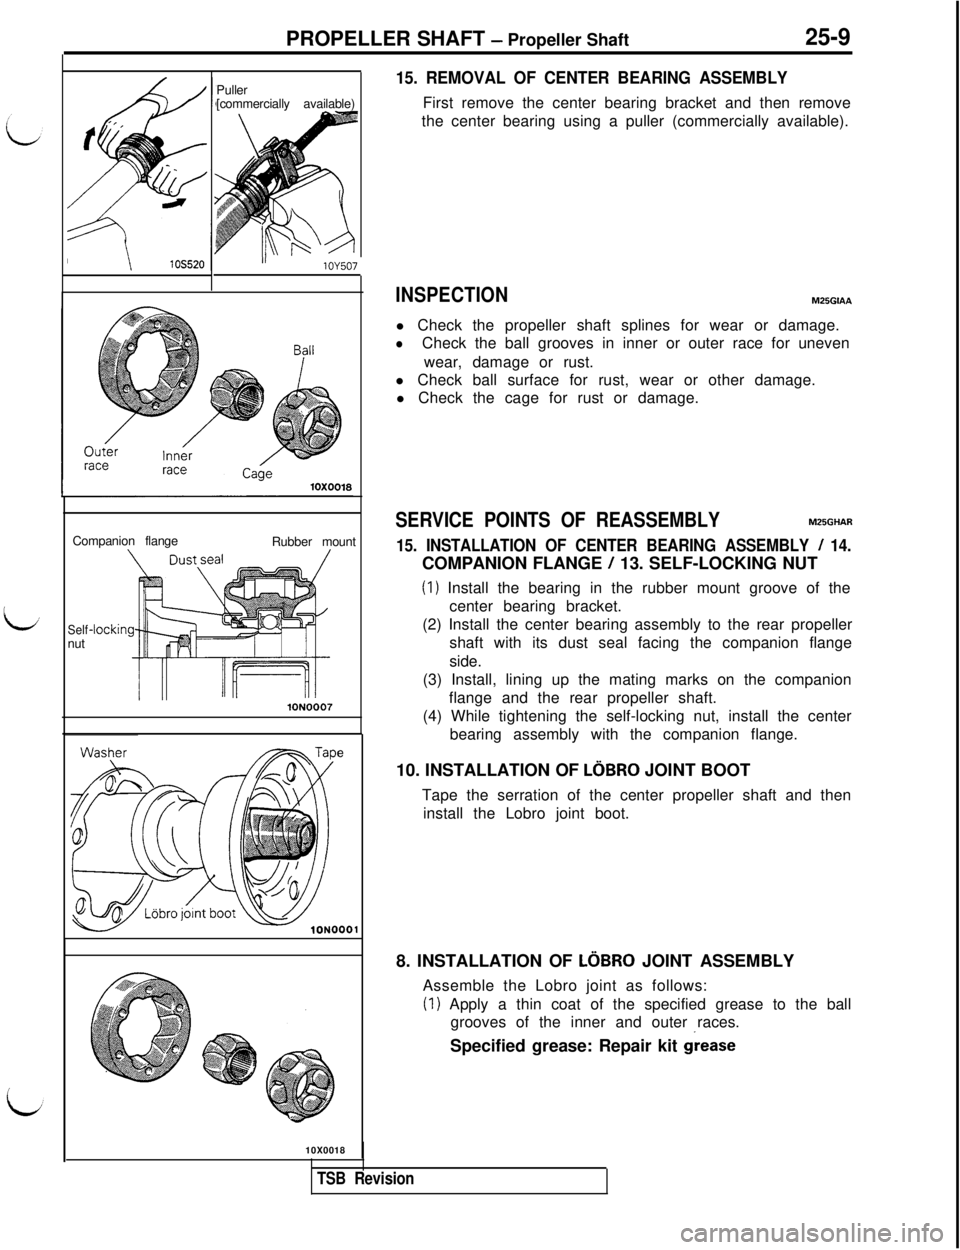
15. REMOVAL OF CENTER BEARING ASSEMBLYFirst remove the center bearing bracket and then remove
the center bearing using a puller (commercially available).
INSPECTIONM25GIAAl Check the propeller shaft splines for wear or damage.
lCheck the ball grooves in inner or outer race for uneven
wear, damage or rust.
l Check ball surface for rust, wear or other damage.
l Check the cage for rust or damage.
SERVICE POINTS OF REASSEMBLYM25GHA.R
15. INSTALLATION OF CENTER BEARING ASSEMBLY
/ 14.COMPANION FLANGE
/ 13. SELF-LOCKING NUT
(1) Install the bearing in the rubber mount groove of the
center bearing bracket.
(2) Install the center bearing assembly to the rear propeller
shaft with its dust seal facing the companion flange
side.
(3) Install, lining up the mating marks on the companion
flange and the rear propeller shaft.
(4) While tightening the self-locking nut, install the center
bearing assembly with the companion flange.
10. INSTALLATION OF
LOBRO JOINT BOOT
Tape the serration of the center propeller shaft and then
install the Lobro joint boot.
8. INSTALLATION OF
LOBRO JOINT ASSEMBLY
Assemble the Lobro joint as follows:
(I) Apply a thin coat of the specified grease to the ball
grooves of the inner and outer races.
Specified grease: Repair kit
giease
TSB Revision
Page 574 of 1146
25-10
PROPELLER SkIAFT - ProDeller Shaft
Iinner race
Recessed end
of inner race
Chamfered end
of cage
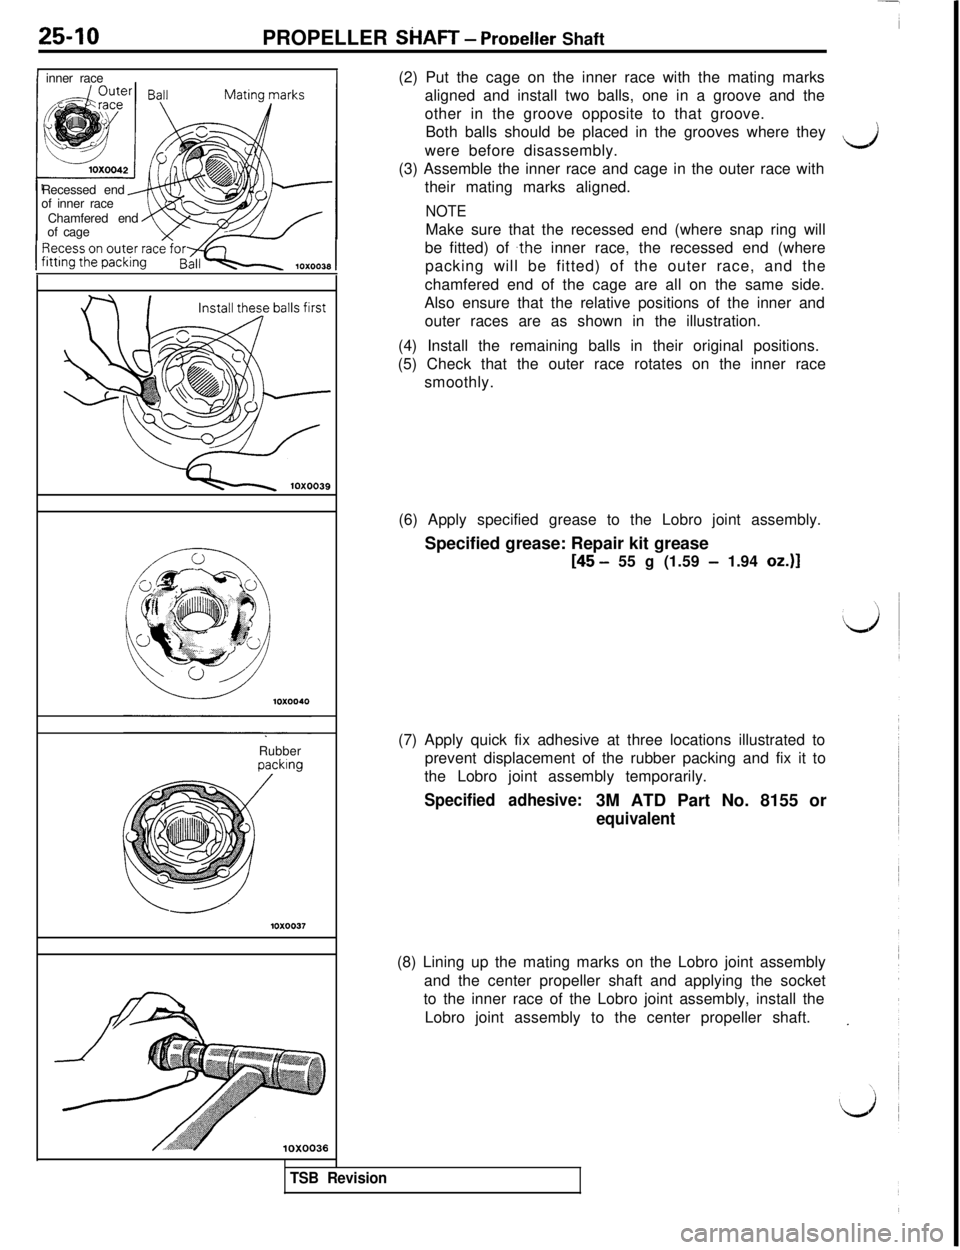
Rubberking(2) Put the cage on the inner race with the mating marks
aligned and install two balls, one in a groove and the
other in the groove opposite to that groove.
Both balls should be placed in the grooves where they
were before disassembly.
d(3) Assemble the inner race and cage in the outer race with
their mating marks aligned.
NOTEMake sure that the recessed end (where snap ring will
be fitted) of
,the inner race, the recessed end (where
packing will be fitted) of the outer race, and the
chamfered end of the cage are all on the same side.
Also ensure that the relative positions of the inner and
outer races are as shown in the illustration.
(4) Install the remaining balls in their original positions.
(5) Check that the outer race rotates on the inner race
smoothly.
(6) Apply specified grease to the Lobro joint assembly.
Specified grease: Repair kit grease
[45 - 55 g (1.59 - 1.94 oz.)]
(7) Apply quick fix adhesive at three locations illustrated to
prevent displacement of the rubber packing and fix it to
the Lobro joint assembly temporarily.
Specified adhesive:3M ATD Part No. 8155 or
equivalent(8) Lining up the mating marks on the Lobro joint assembly
and the center propeller shaft and applying the socket
to the inner race of the Lobro joint assembly, install the
Lobro joint assembly to the center propeller shaft.
TSB Revision
Page 575 of 1146
PROPELLER SHAFT - Propeller Shaft25-11
LMounting boltsL6bro
ioht boot1ouooll
/1ouoo17
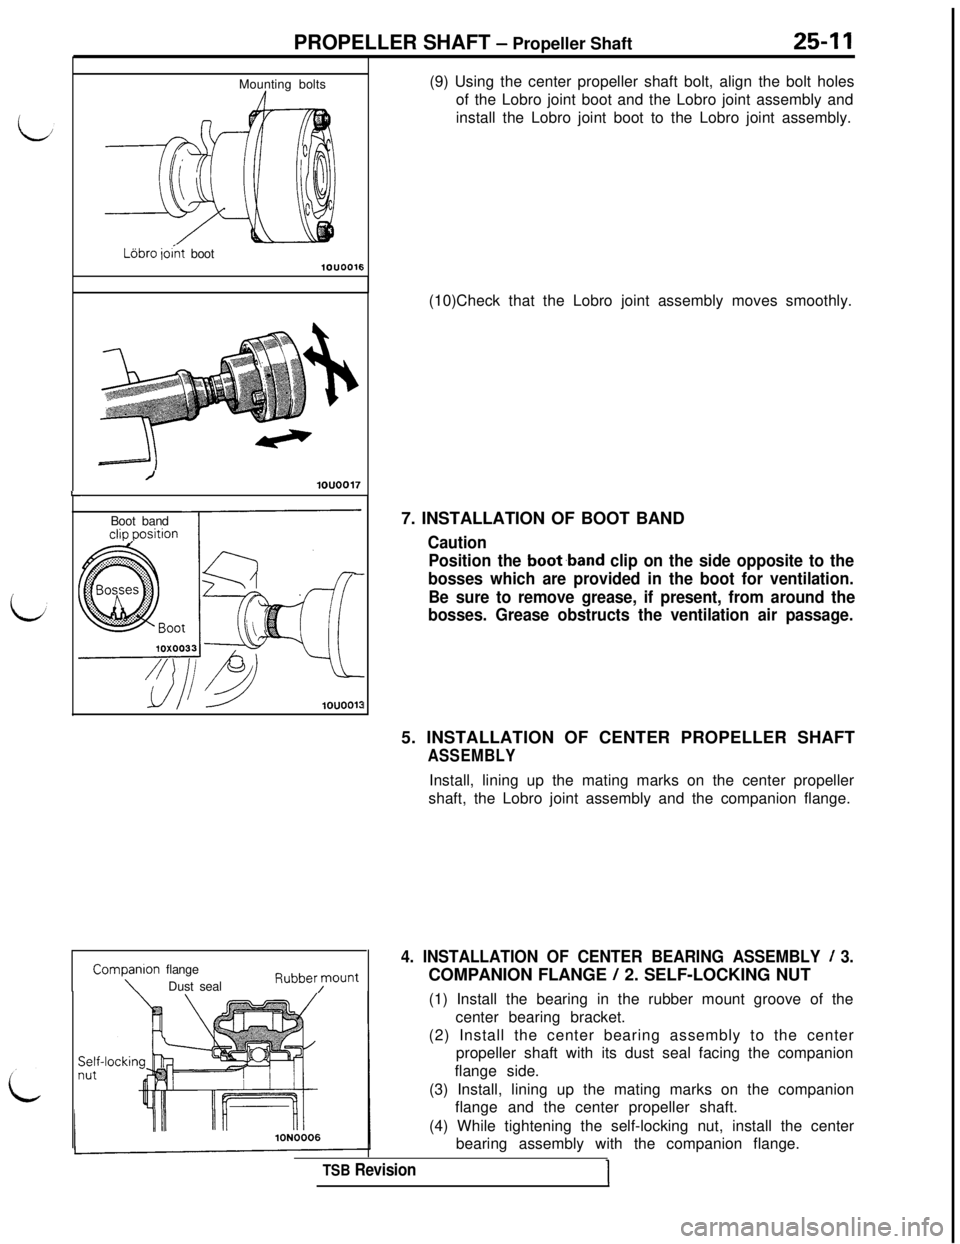
5(9) Using the center propeller shaft bolt, align the bolt holes
of the Lobro joint boot and the Lobro joint assembly and
install the Lobro joint boot to the Lobro joint assembly.
(10)Check that the Lobro joint assembly moves smoothly.clio Dosition
7Boot band
1ouoo13
Companion flange
\Dust sealRubber/mount
I7. INSTALLATION OF BOOT BAND
Caution
Position the
boot,band clip on the side opposite to the
bosses which are provided in the boot for ventilation.
Be sure to remove grease, if present, from around the
bosses. Grease obstructs the ventilation air passage.5. INSTALLATION OF CENTER PROPELLER SHAFT
ASSEMBLYInstall, lining up the mating marks on the center propeller
shaft, the Lobro joint assembly and the companion flange.
4. INSTALLATION OF CENTER BEARING ASSEMBLY / 3.COMPANION FLANGE
/ 2. SELF-LOCKING NUT
(1) Install the bearing in the rubber mount groove of the
center bearing bracket.
(2) Install the center bearing assembly to the center
propeller shaft with its dust seal facing the companion
flange side.
(3) Install, lining up the mating marks on the companion
flange and the center propeller shaft.
(4) While tightening the self-locking nut, install the center
bearing assembly with the companion flange.
TSB Revision
Page 576 of 1146
Page 577 of 1146
26-1
FRONT AXLE
CONTENTSM26AA- -i
DRIVE SHAFT. . . . . . . . . . . . . . . . . . . . . . . . . . . . . . . . . . . . . . . . . . .._...........11SPECIFICATIONS _..._........................................... 2
HUB AND KNUCKLEGeneral Specifications....................................2............................................6Lubricants............................................................2i
SERVICE ADJUSTMENT PROCEDURES........5Service Specifications....................................2Hub End Play Inspection
................................5TROUBLESHOOTING........................................5
SPECIAL TOOLS . . . . . . . . . . . . . . .._.................. .: . . . . . . . . . . . .3I
iJI
Page 578 of 1146
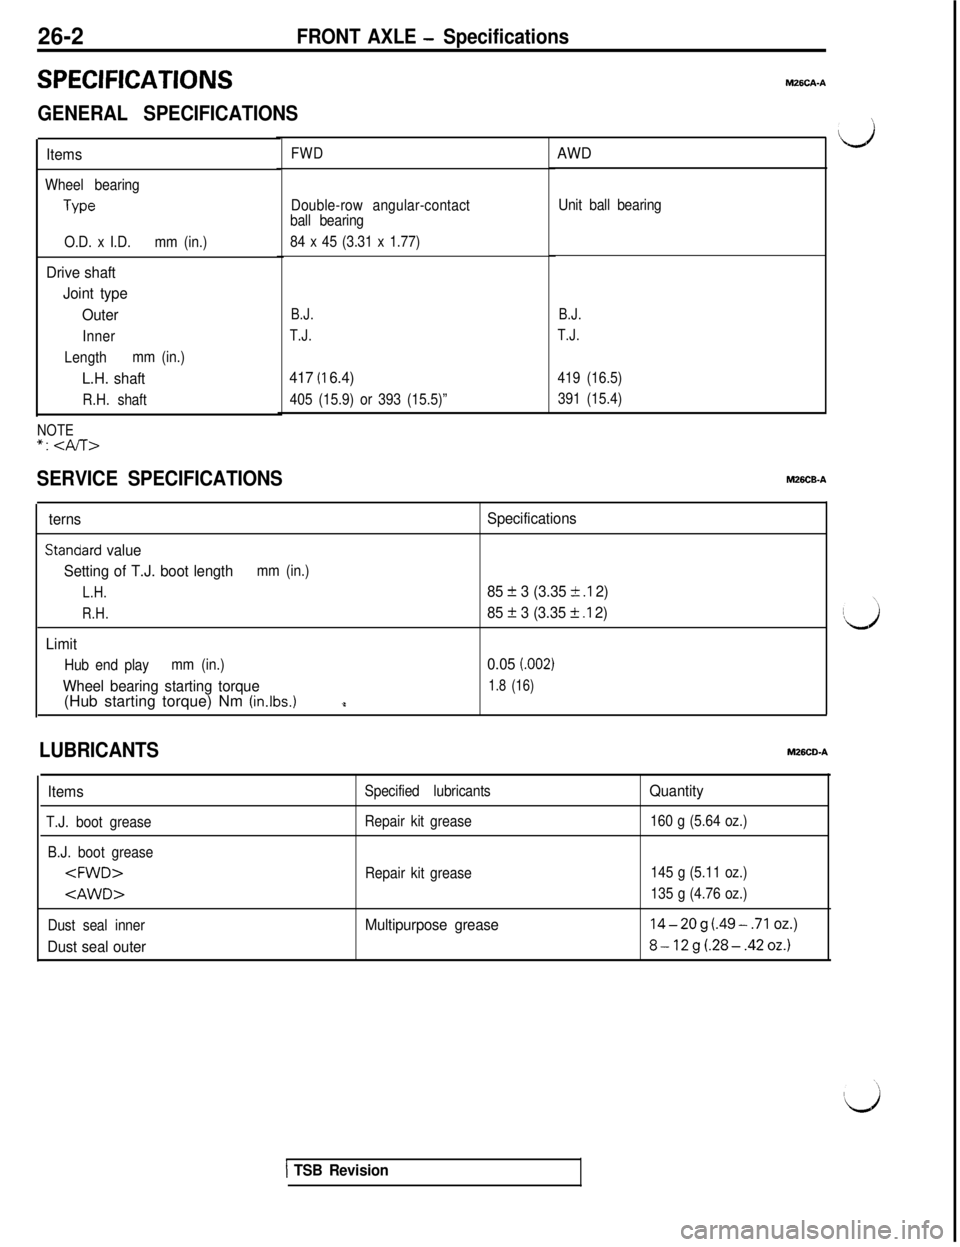
26-2FRONT AXLE - Specifications
SERVICE SPECIFICATIONS
FWD
SPECIFICATIONS
GENERAL SPECIFICATIONS
Items
Wheel bearing
TypeDouble-row angular-contact
ball bearing
O.D. x I.D.mm (in.)
Drive shaft
Joint type
Outer
Inner
Lengthmm (in.)
L.H. shaft
R.H. shaft84 x 45 (3.31 x 1.77)
B.J.
T.J.
417 (I 6.4)
405 (15.9) or 393 (15.5)”
NOTE“1
AWD
Unit ball bearing
B.J.
T.J.
419 (16.5)
391 (15.4)
M26CB-A
terns
standard value
Setting of T.J. boot length
mm (in.)
L.H.
R.H.
Limit
Hub end playmm (in.)
Wheel bearing starting torque(Hub starting torque) Nm (in.lbs.)
Specifications
85
f 3 (3.35 k .I 2)
85
+ 3 (3.35 +- .I 2)
0.05
(.002)
1.8 (16)
LUBRICANTSM26CO-A
Items
T.J. boot grease
B.J. boot grease
Dust seal inner
Dust seal outer
Specified lubricants
Repair kit grease
Repair kit grease
Multipurpose greaseQuantity
160 g (5.64 oz.)
145 g (5.11 oz.)
135 g (4.76 oz.)
14-2og (.49-.71 oz.)
8-12g(.28-.42oz.)
1 TSB Revision
Page 579 of 1146
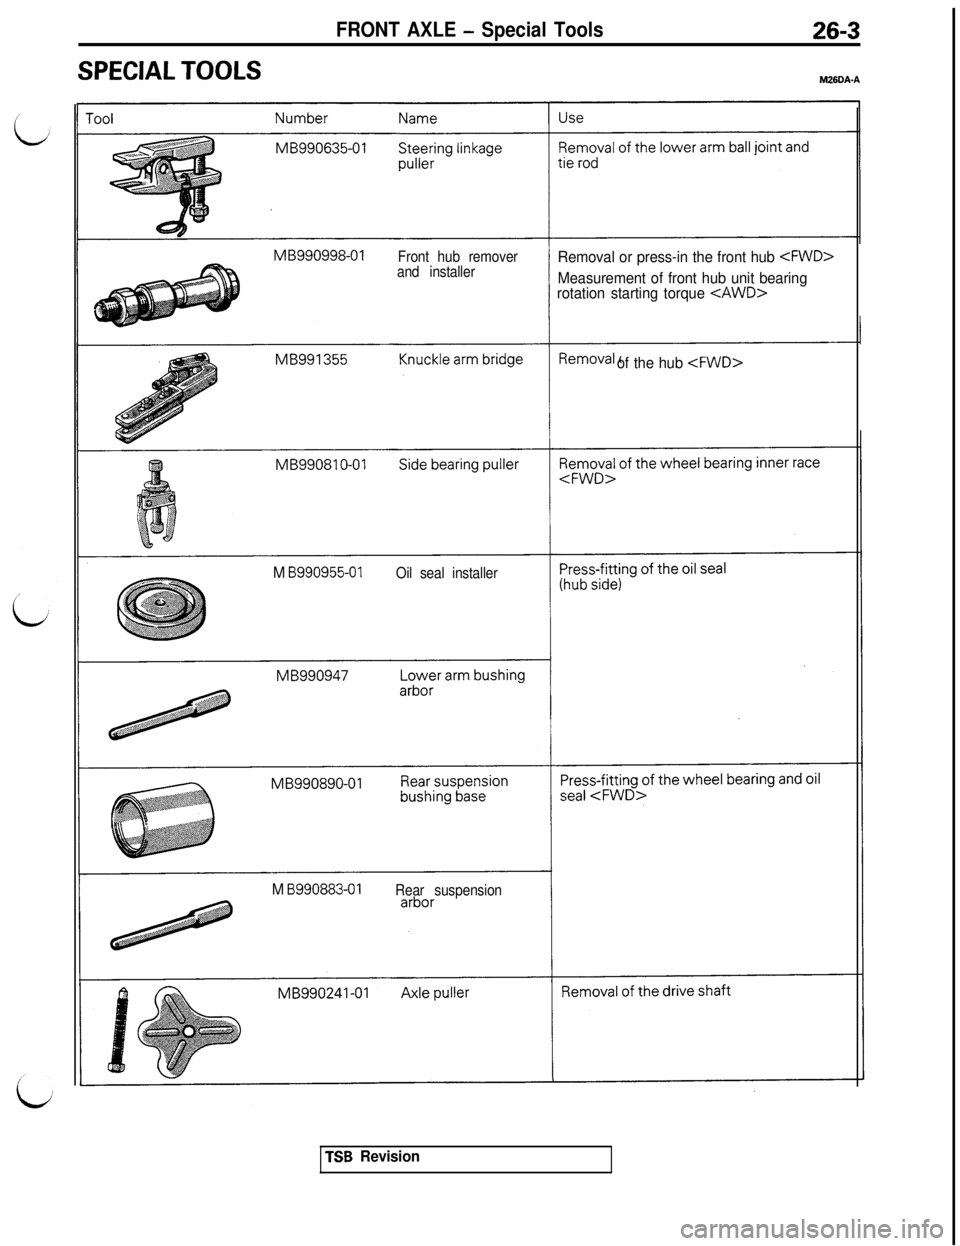
SPECIAL TOOLS
FRONT AXLE - Special Tools26-3M26DA-A
MB990998-01
Front hub remover
and installerRemoval or press-in the front hub
Measurement of front hub unit bearing
rotation starting torque
of the hub
M B990955-01Oil seal installer
MB990890-01
M B990883-01Rear suspension
TSB Revision
Page 580 of 1146
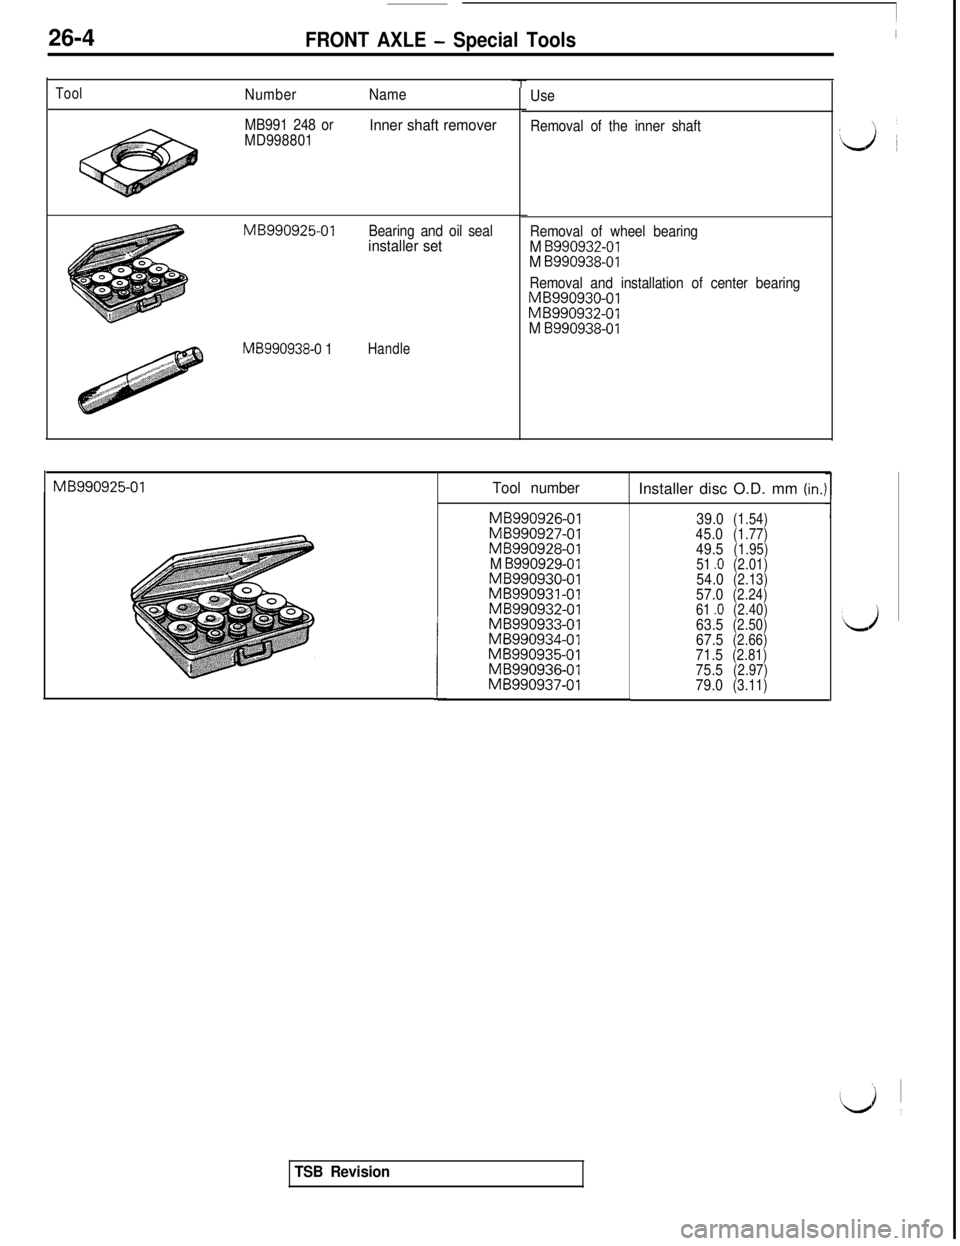
26-4FRONT AXLE - Special Tools
ToolNumberName
MB991 248 or
MD998801
Inner shaft remover
MB990925-01
Bearing and oil sealinstaller set
MB990938-0 1Handle
7Use
Removal of the inner shaft
Removal of wheel bearing
M 8990932-01M B990938-01
Removal and installation of center bearingMB990930-01MB990932-01M 8990938-01
MB990925-01Tool numberInstaller disc O.D. mm (in.:
I
MB990926-01MB990927-01MB990928-01M B990929-01MB990930-01MB990931-01MB990932-01MB990933-01MB990934-01MB990935-01MB990936-01MB990937-0139.0
(1.54)45.0(1.77)49.5(1.95)
51 .o(2.01)54.0(2.13)57.0(2.24)
61 .O(2.40)63.5(2.50)67.5(2.66)71.5(2.81)75.5(2.97)79.0(3.11)
TSB Revision