MITSUBISHI GALANT 1989 Service Repair Manual
Manufacturer: MITSUBISHI, Model Year: 1989, Model line: GALANT, Model: MITSUBISHI GALANT 1989Pages: 1273, PDF Size: 37.62 MB
Page 1131 of 1273
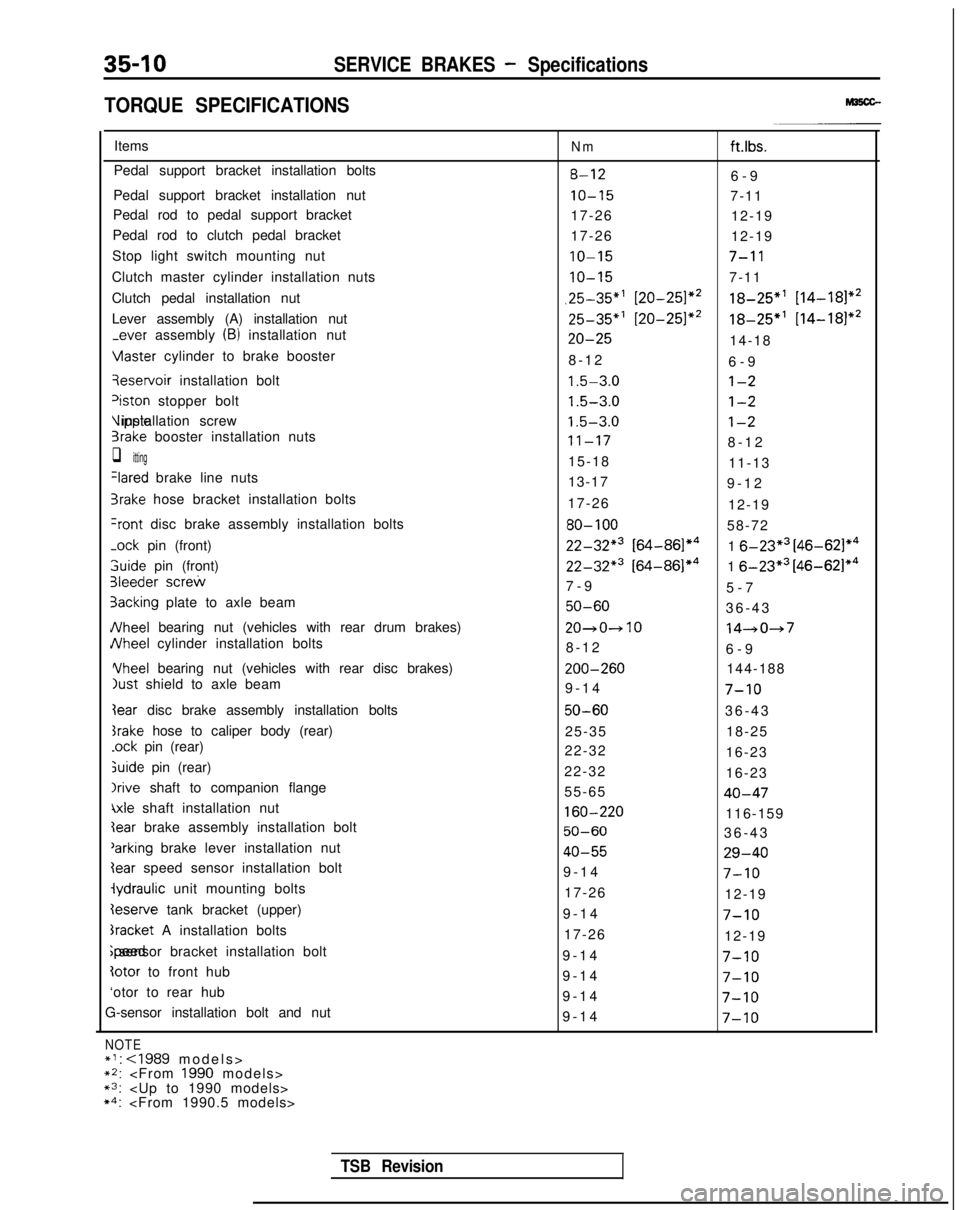
35-10SERVICE BRAKES - Specifications
TORQUE SPECIFICATIONS
Items
Pedal support bracket installation bolts
Pedal support bracket installation nut
Pedal rod to pedal support bracket
Pedal rod to clutch pedal bracket
Stop light switch mounting nut
Clutch master cylinder installation nuts
Clutch pedal installation nut
Lever assembly (A) installation nut
-ever assembly (B) installation nut Vlaster
cylinder to brake booster qeservoir
installation bolt
‘iston stopper bolt Vipple installation screw
3rake booster installation nuts
q itting
Ilared brake line nuts
3rake hose bracket installation bolts
+ont disc brake assembly installation bolts
-ock
pin (front) 3uide
pin (front)
31eeder screw
3acking plate to axle beam
JVheel bearing nut (vehicles with rear drum brakes)
JVheel cylinder installation bolts Yheel
bearing nut (vehicles with rear disc brakes)
just shield to axle beam
Iear disc brake assembly installation bolts
srake hose to caliper body (rear)
.ock pin (rear)
&ride pin (rear)
Irive shaft to companion flange
\xle shaft installation nut
Ieserve tank bracket (upper)
bracket A installation bolts ;peed sensor bracket installation bolt
totor to front hub
‘otor to rear hub
G-sensor installation bolt and nut
NOTE*I:
~2:
Nmft.lbs.
8-126-
9
IO-157-11
17-26 12-19
17-26 12-19
IO-157-l 1
IO-157-11
,25-35”’ [20-251*218-25”’ [14-181*2
25-35*’ [20-251*218-25*’
[14-181*2
20-2514-18
8-1
2
6-9
1.5-3.0l-2
1.5-3.0l-2
1.5-3.0l-2
11-178-1
2
15-18 11-13
13-17 9-12
17-26 12-19
80-10058-72
22-32*3 [64-86]*41 6-23*3 [46-621*4
22-32*3 [64-86]*41 6-23*3 [46-62]*4
7-
9
5-7
50-6036-4
3
20~0~1014-047
8-1
2
6-9 ZOO-260
144-188
9-14
7-10
50-6036-4
3
25-35 18-25
22-32 16-23
22-32 16-23
55-65
40-47
160-220116-159
50-6036-4
3
40-5529-40
9-1
4
7-10
17-26
12-19
9-1
4
7-10
17-26
12-19
9-1
4
7-10
9-1
4
7-10
9-1
4
7-10
9-1
4
7-10
TSB Revision
Page 1132 of 1273
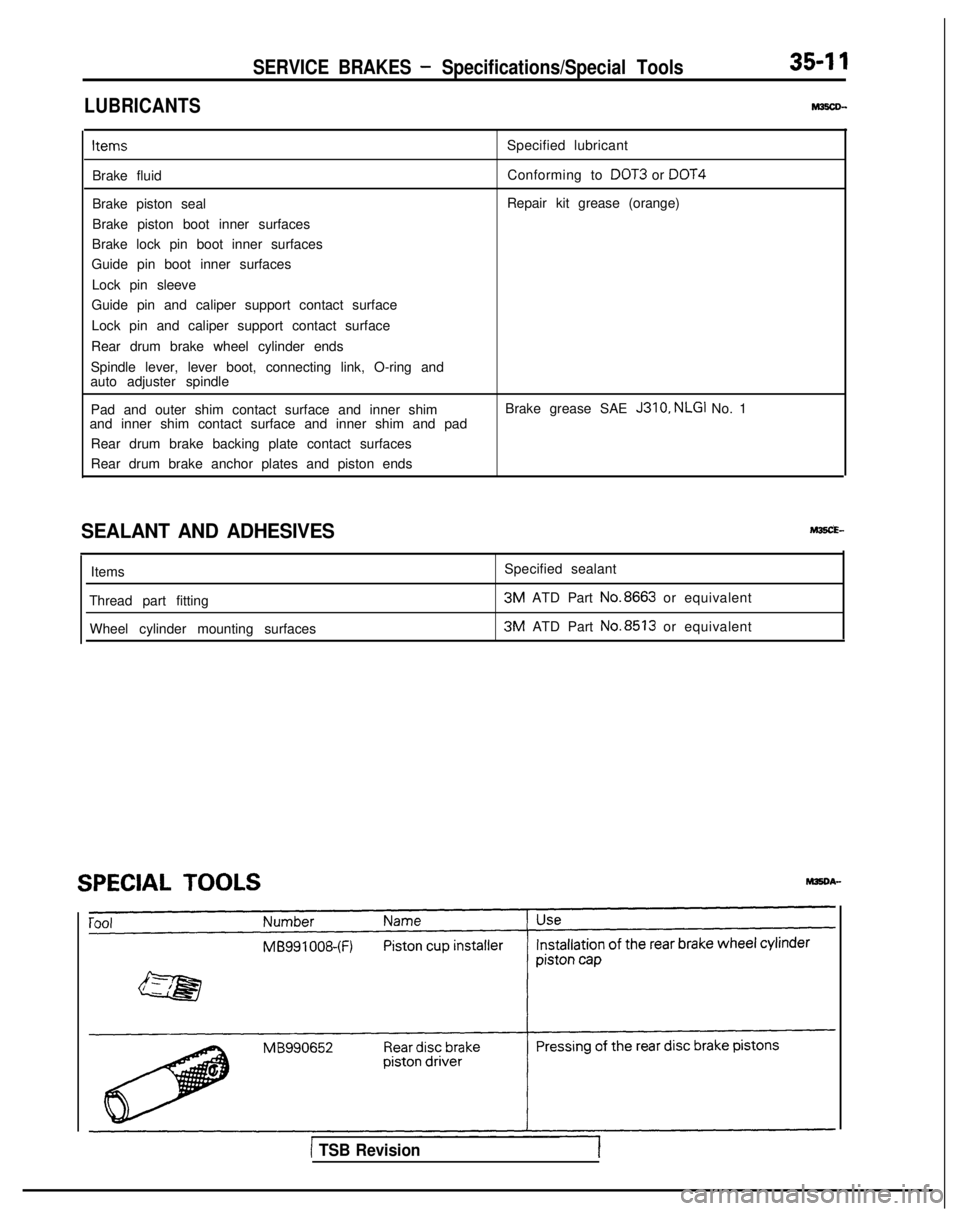
SERVICE BRAKES - Specifications/Special Tools35-l 1
LUBRICANTS
Items
Brake fluid
Brake piston seal
Brake piston boot inner surfaces
Brake lock pin boot inner surfaces
Guide pin boot inner surfaces
Lock pin sleeve
Guide pin and caliper support contact surface
Lock pin and caliper support contact surface
Rear drum brake wheel cylinder ends
Spindle lever, lever boot, connecting link, O-ring and
auto adjuster spindle Specified lubricant
Conforming to
DOT3 or DOT4
Repair kit grease (orange)
Pad and outer shim contact surface and inner shim
and inner shim contact surface and inner shim and pad
Rear drum brake backing plate contact surfaces
Rear drum brake anchor plates and piston ends Brake grease SAE J310,
NLGI No. 1
SEALANT AND ADHESIVES
,
Items
Specified sealant
Thread part fitting 3M
ATD Part No.8663
or equivalent
Wheel cylinder mounting surfaces 3M
ATD Part No.8513
or equivalent
SPECIAL TOOLS
[ TSB Revision
Page 1133 of 1273
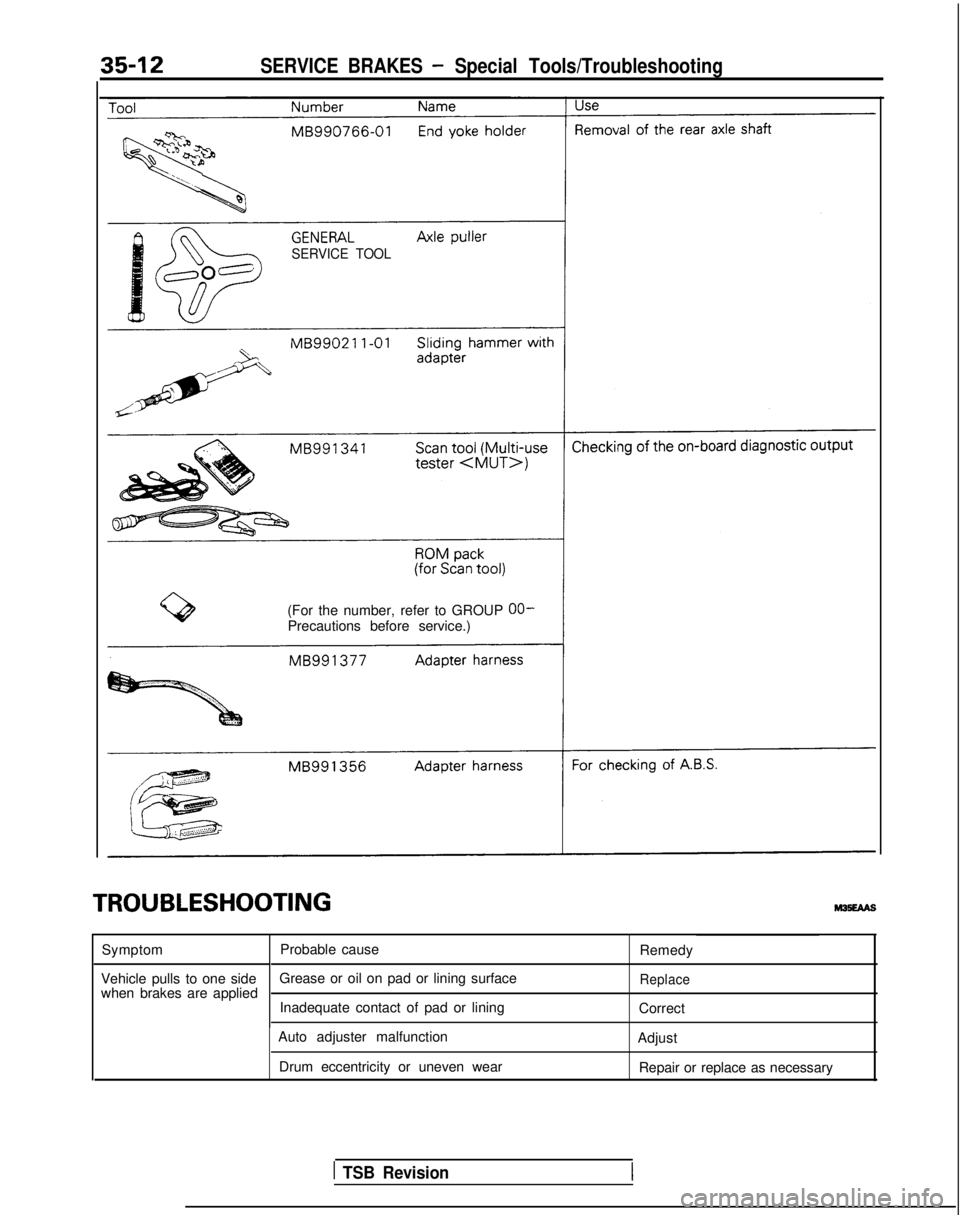
SERVICE BRAKES - Special Tools/Troubleshooting
SERVICE TOOL
(For the number, refer to GROUP OO-Precautions before service.)
TROUBLESHOOTING
Symptom
Vehicle pulls to one side
when brakes are applied Probable cause
Grease or oil on pad or lining surface
Inadequate contact of pad or lining
Auto adjuster malfunction
Drum eccentricity or uneven wear Remedy
Replace
Correct
Adjust Repair or replace as necessary
1 TSB Revision
Page 1134 of 1273

SERVICE BRAKES - Troubleshooting35-13
SymptomInsufficient braking
power Probable cause
Low or deteriorated brake fluid
Air in brake system Overheated brake rotor due to dragging of pad or
lining Remedy
Refill or change
Bleed air
Correct
Inadequate contact of pad or lining
Brake booster malfunction
Clogged brake line
Grease or oil on pad or lining surface
Replace
Proportioning valve malfunction
Auto adjuster malfunction Adjust
Increased pedal stroke Air in brake system Bleed air’
(Reduced pedal to floor-
board clearance) Worn lining or pad
Replace
Broken vacuum hose
Faulty master cylinder
Brake fluid leaks Correct
Auto adjuster malfunction Adjust
Excessive push rod to master cylinder clearance
Brake dragIncomplete release of parking brake Correct
Clogged master cylinder return port Incorrect parking brake adjustment Adjust
Improper push rod to master cylinder clearance
Faulty master cylinder piston return spring
Replace
Worn brake pedal return spring Broken rear drum brake shoe return spring
Lack of lubrication in sliding parts Lubricate
Insufficient parking Worn brake lining or pad
Replace
Drake function
Grease or oil on lining or pad surface
Parking brake cable sticking
Stuck wheel cylinder or caliper piston
Excessive parking brake lever stroke Adjust the parking brake lever
stroke or check the parking brake
cable routing
Auto adjuster malfunction Adjust
TSB Revision
-..
Page 1135 of 1273
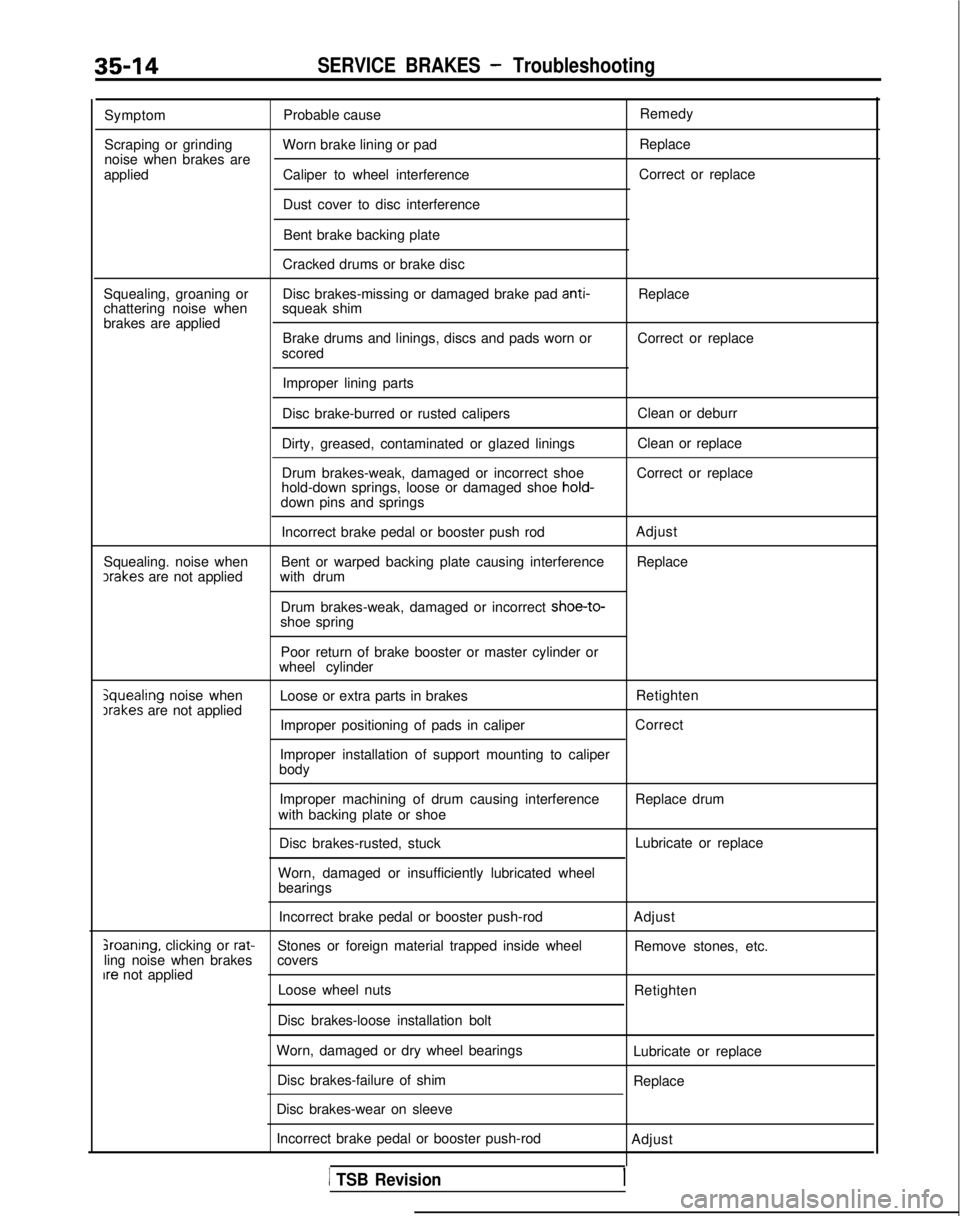
35-14SERVICE BRAKES - Troubleshooting
Symptom
Scraping or grinding
noise when brakes are
applied Probable cause
Worn brake lining or pad
Caliper to wheel interference
Dust cover to disc interference Remedy
Replace
Correct or replace
Bent brake backing plate
Cracked drums or brake disc
Squealing, groaning or
chattering noise when
brakes are applied Disc brakes-missing or damaged brake pad anti-
squeak shim Replace
Brake drums and linings, discs and pads worn or
scored Correct or replace
Improper lining parts
Disc brake-burred or rusted calipers
Dirty, greased, contaminated or glazed linings
Drum brakes-weak, damaged or incorrect shoe
hold-down springs, loose or damaged shoe hold-
down pins and springs Clean or deburr
Clean or replace
Correct or replace
Squealing. noise when ,rakes
are not applied Incorrect brake pedal or booster push rod
Bent or warped backing plate causing interference
with drum
Drum brakes-weak, damaged or incorrect shoe-to-
shoe spring Adjust
Replace
jquealing noise when Irakes
are not applied Poor return of brake booster or master cylinder or
wheel cylinder
Loose or extra parts in brakes Retighten
Improper positioning of pads in caliper
Improper installation of support mounting to caliper
body Correct
Improper machining of drum causing interference
with backing plate or shoe
Disc brakes-rusted, stuck
Worn, damaged or insufficiently lubricated wheel bearings Replace drum
Lubricate or replace
Incorrect brake pedal or booster push-rod Adjust
sroaning. clicking or rat-Stones or foreign material trapped inside wheel
Remove stones, etc.
ling noise when brakes covers
Ire not applied
Loose wheel nuts Retighten
Disc brakes-loose installation bolt
Worn, damaged or dry wheel bearings Disc brakes-failure of shim
Disc brakes-wear on sleeve Lubricate or replace
Replace
Incorrect brake pedal or booster push-rod Adjust
1 TSB Revision
Page 1136 of 1273

SERVICE BRAKES - Anti-lock Braking System Troubleshooting35-15
ANTI-LOCK BRAKING SYSTEM
TROUBLESHOOTINGM35EElAE
PARTICULAR CHARACTERISTICS OF
THE ANTI-LOCK BRAKING SYSTEM
Models equipped with the anti-lock braking system
(A.B.S.) may exhibit one or more of the following
characteristics from time to time, but none of these
is abnormal.
(1)
(2)
A pulsing feeling in the brake pedal, or vibration
of the body or the steering wheel, when the
anti-lock braking system is activated by sudden
braking or by braking on a slippery road surface.
Actually, this phenomenon is an indication that
the anti-lock braking system is functioning nor-
mally.
When the vehicle speed reaches approximately
6 km/h (4 mph) after the engine is started and
the vehicle starts off (for the first time), awhining motor noise may be heard from the
engine compartment if the vehicle is traveling in
a quiet place. This noise is simply the result of a
self-check being made of the anti-lock braking
system operation.
TROUBLESHOOTING METHODS
Problems related to the anti-lock braking system
(A.B.S.) can be classified into two general categor-
ies: problems in the electrical system and those in
the hydraulic system. For problems in the electrical system, the on-board
diagnostic is built into the electronic control unit
(E.C.U.) causing the A.B.S. warning light to illuminate
as a warning to the driver. In this instance, checks
can be made by using the scan tool and oscillo-
scope.
Problems in the hydraulic system (poor braking,
etc.) can be located in the same way as for ordinary
brakes. There is, however, the necessity to check to
determine whether the problem is related to ordi-
nary brake components or to the components re-
lated to the A.B.S. To make this check, use the scan
tool.
HOW TO USE THE TROUBLESHOOTING
FLOW CHART
(1) Using the flow chart, check the ABS warning
light light-up sequence. Read the diagnostic
trouble codes and check the condition of bra-
king operation.
(2) Following the check chart listed in the remedy
column, perform the checks. There are [Expla- nation] and [Hint] in each check chart. Refer to
them when troubleshooting.
NOTE
ECU: Electronic control unit
HU:Hydraulic unit
TSB Revision
Page 1137 of 1273
35-16SERVICE BRAKES - Anti-lock Braking System Troubleshooting
TROUBLESHOOTING (ABS-FWD)
Confirm condition in the following way and diagnose accordingly.
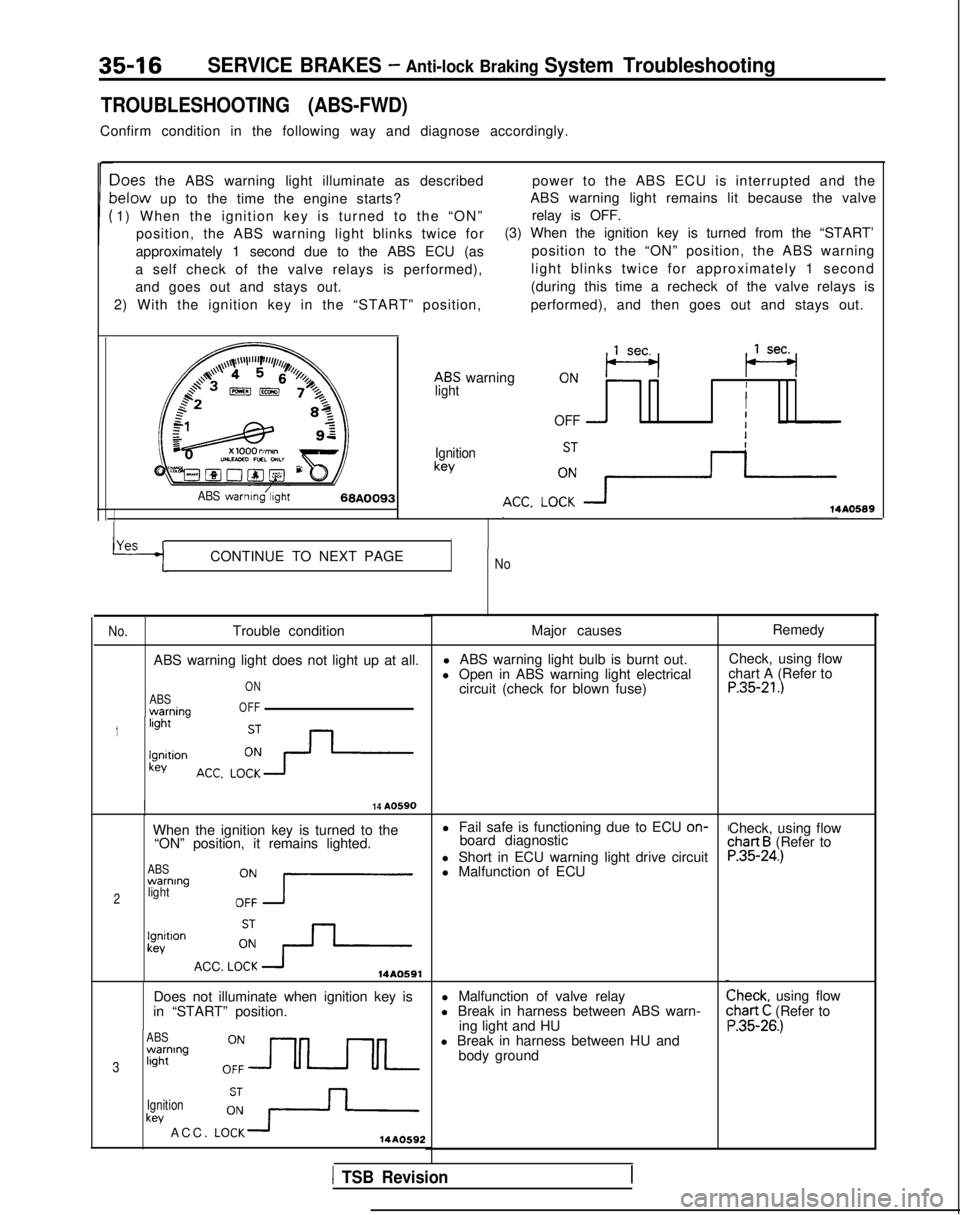
Ioes the ABS warning light illuminate as describedpower to the ABS ECU is interrupted and the
lelow up to the time the engine starts?ABS warning light remains lit because the valve
1) When the ignition key is turned to the “ON” relay is OFF.
position, the ABS warning light blinks twice for (3) When the ignition key is turned from the “START’
approximately 1 second due to the ABS ECU (as position to the “ON” position, the ABS warning
a self check of the valve relays is performed), light blinks twice for approximately 1 second
and goes out and stays out. (during this time a recheck of the valve relays is
2) With the ignition key in the “START” position, performed), and then goes out and stays out.
ABS warning
,,lseq (se+
lightII
OFF -I
Ignitionkey
ABS warnmg/;,ght68A009314A0589
YAS rICONTINUE TO NEXT PAGENo
No.
Trouble condition
ABS warning light does not light up at all.
ABSwarnina
ON
OFF
1light -
lgnltionkey
I14 A0590
When the ignition key is turned to the l Fail safe is functioning due to ECU on-
“ON” position, it remains lighted. board diagnostic
ABSwarning
2lightOZ7
l Short in ECU warning light drive circuit
l Malfunction of ECU
lgnitlonkev
ACC. LOi+14A0591
Does not illuminate when ignition key is
in “START” position.
ABSwarning
3light
Ignition
key ACC. LO:+14AO592
Major causes
l ABS warning light bulb is burnt out.
l Open in ABS warning light electrical circuit (check for blown fuse)
l Malfunction of valve relay
l Break in harness between ABS warn- ing light and HU
l Break in harness between HU and body ground Remedy
Check, using flow
chart A (Refer to
P.35-21.)
Check, using flowchart B (Refer toP.35-24.)
Check, using flow:hart C (Refer to ‘.35-26.)
1 TSB Revision
Page 1138 of 1273
SERVICE BRAKES - Anti-lock Braking System Troubleshooting35-I 7
No.
4
Trouble condition
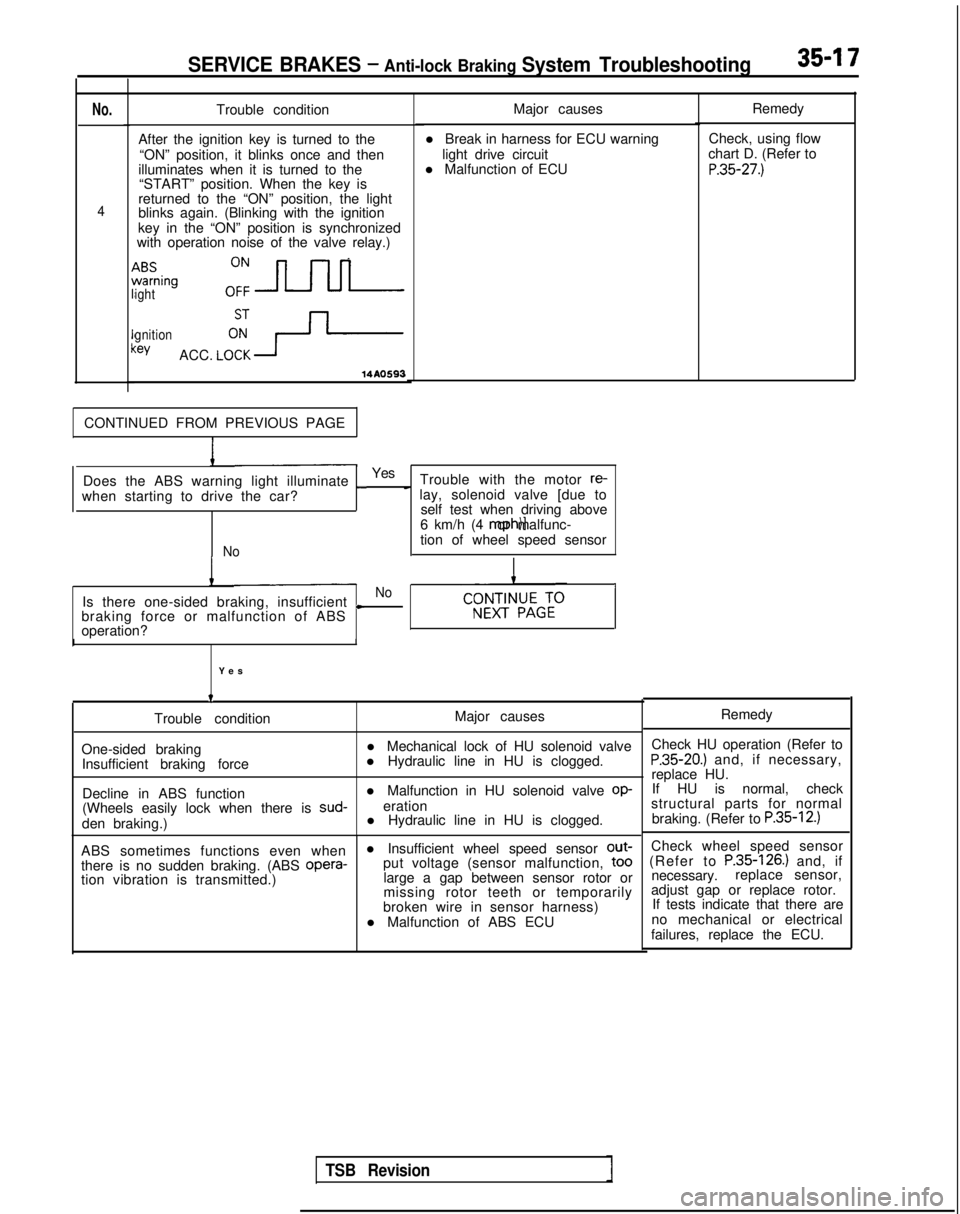
After the ignition key is turned to the “ON” position, it blinks once and then
illuminates when it is turned to the “START” position. When the key is
returned to the “ON” position, the light
blinks again. (Blinking with the ignition
key in the “ON” position is synchronized
with operation noise of the valve relay.)
ABSwarning
ighto:=
gnition:eyACC. LCFY-
14AO593
Major causes
l Break in harness for ECU warning light drive circuit
l Malfunction of ECU
CONTINUED FROM PREVIOUS PAGE
Does the ABS warning light illuminate
_Yes Trouble with the motor re-
when starting to drive the car?
c lay, solenoid valve [due to self test when driving above
6 km/h (4 mph)] or malfunc-
Notion of wheel speed sensor
I
Is there one-sided braking, insufficientNo
L
braking force or malfunction of ABS
operation?
I
Yes
t
Trouble condition
One-sided braking Insufficient braking force
Decline in ABS function
I
Major causes
l Mechanical lock of HU solenoid valve
l Hydraulic line in HU is clogged.
l Malfunction in HU solenoid valve
op-
(Wheels easily lock when there is sud-
eration
den braking.) l Hydraulic line in HU is clogged.
ABS sometimes functions even when l Insufficient wheel speed sensor out-
there is no sudden braking. (ABS opera-
put voltage (sensor malfunction,
to0
tion vibration is transmitted.)
large a gap between sensor rotor or
missing rotor teeth or temporarily
broken wire in sensor harness)
l Malfunction of ABS ECU Remedy
Check, using flow
chart D. (Refer to
P.35-27.)
Remedy
Check HU operation (Refer to
P.35-20.) and, if necessary,
replace HU. If HU is normal, check
structural parts for normal
braking. (Refer to
P.35-12.)
Check wheel speed sensor
(Refer to P.35-126.) and, if
necessary. replace sensor,
adjust gap or replace rotor. If tests indicate that there are
no mechanical or electrical
failures, replace the ECU.
TSB Revision
Page 1139 of 1273
35-18SERVICE BRAKES - Anti-lock Braking System Troubleshooting
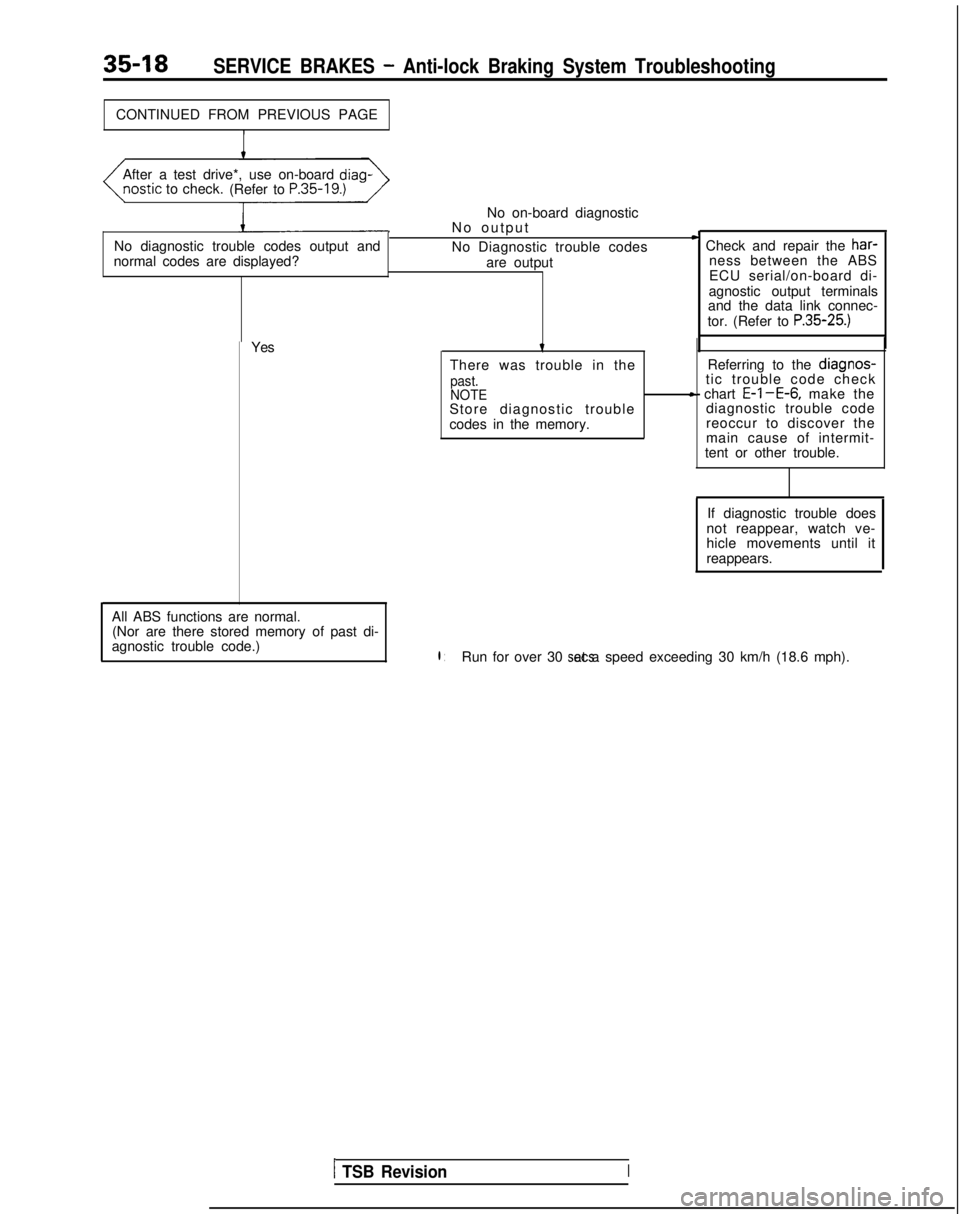
CONTINUED FROM PREVIOUS PAGEAfter a test drive*, use on-board diag-
ostic
to check.
(Refer to
P.35-19.)
No diagnostic trouble codes output and
normal codes are displayed? No on-board diagnostic
No outpu
t
No Diagnostic trouble codes are output
D Check and repair the har-
ness between the ABS
ECU serial/on-board di-
agnostic output terminals
and the data link connec-
tor. (Refer to
P.35-25.)
Yes
All ABS functions are normal. (Nor are there stored memory of past di-
agnostic trouble code.)t
There was trouble in the
past.
NOTE
Store diagnostic trouble
codes in the memory. Referring to the
diagnos-tic trouble code checkc chart E-l-E-6, make the
diagnostic trouble code
reoccur to discover the
main cause of intermit-
tent or other trouble.
If diagnostic trouble does
not reappear, watch ve-
hicle movements until it
reappears.
l :Run for over 30 sets. at a speed exceeding 30 km/h (18.6 mph).
1 TSB RevisionI
Page 1140 of 1273
SERVICE BRAKES - Anti-lock Braking System Troubleshooting35-19
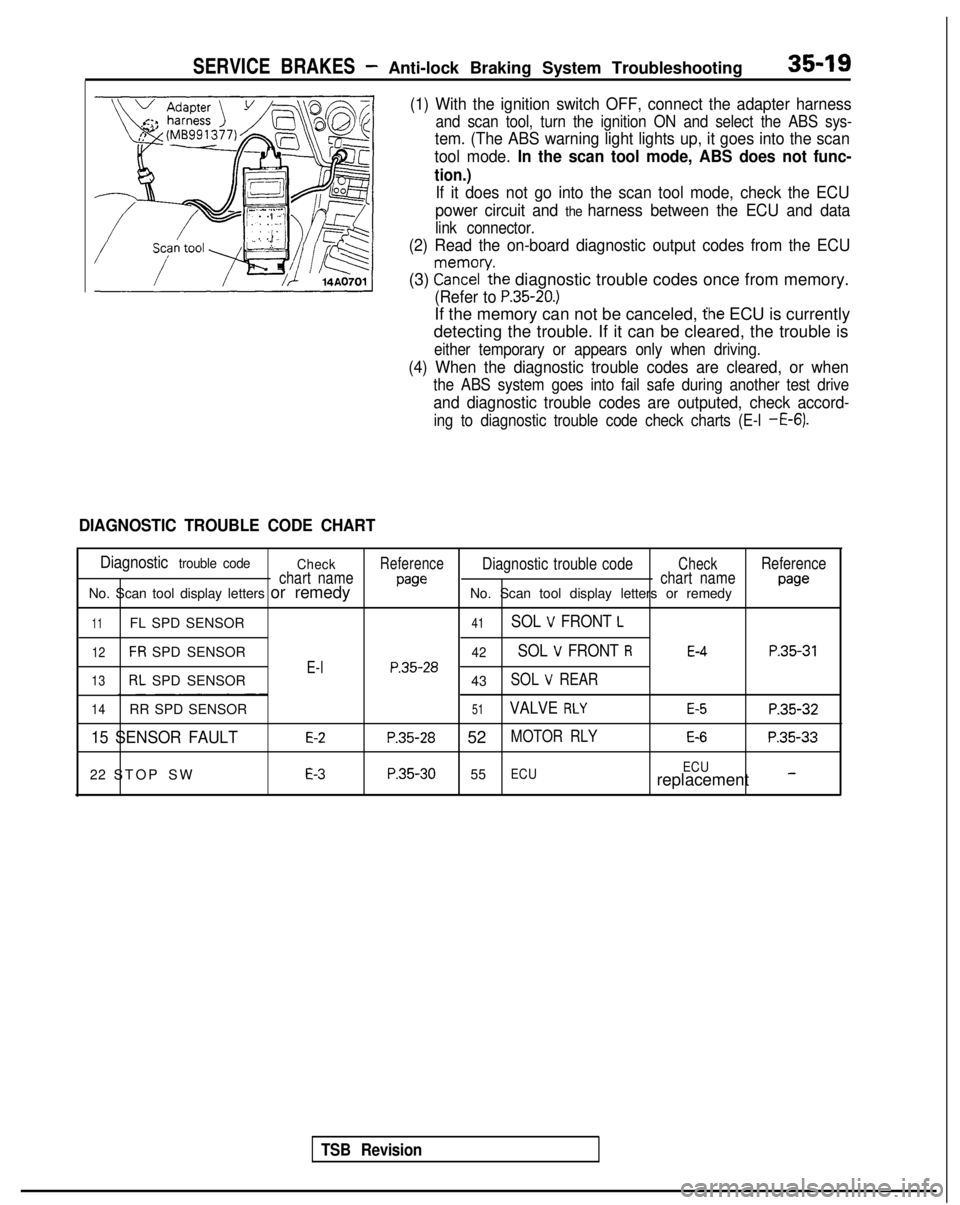
(1) With the ignition switch OFF, connect the adapter harness
and scan tool, turn the ignition ON and select the ABS sys-
tem. (The ABS warning light lights up, it goes into the scan
tool mode.
In the scan tool mode, ABS does not func-
tion.)
If it does not go into the scan tool mode, check the ECU
power circuit and
the harness between the ECU and data
link connector.
(2) Read the on-board diagnostic output codes from the ECU
(3) ?a\?zl’ythe diagnostic trouble codes once from memory.
(Refer to P.35-20.)
If the memory can not be canceled, the ECU is currently
detecting the trouble. If it can be cleared, the trouble is
either temporary or appears only when driving.
(4) When the diagnostic trouble codes are cleared, or when
the ABS system goes into fail safe during another test drive
and diagnostic trouble codes are outputed, check accord-
ing to diagnostic trouble code check charts (E-l -E-6).
DIAGNOSTIC TROUBLE CODE CHART
Diagnostic trouble code CheckReferenceDiagnostic trouble codeCheckReference
chart name
pawchart namepawNo. Scan tool display letters or remedy No. Scan tool display letters or remedy
11FL SPD SENSOR41SOL V FRONT L
12FR SPD SENSOR42SOL V FRONT RE-4P.35-31
E-lP.35-2813RL SPD SENSOR
43SOL V REAR
14RR SPD SENSOR51VALVE RLYE-5P.35-32
15 SENSOR FAULTE-2P.35-28 52MOTOR RLYE-6P.35-33
22 STOP SWE-3P.35-30 55ECU ECUreplacement -
TSB Revision