MITSUBISHI LANCER EVOLUTION X 2008 Workshop Manual
Manufacturer: MITSUBISHI, Model Year: 2008, Model line: LANCER EVOLUTION X, Model: MITSUBISHI LANCER EVOLUTION X 2008Pages: 241, PDF Size: 8.26 MB
Page 161 of 241
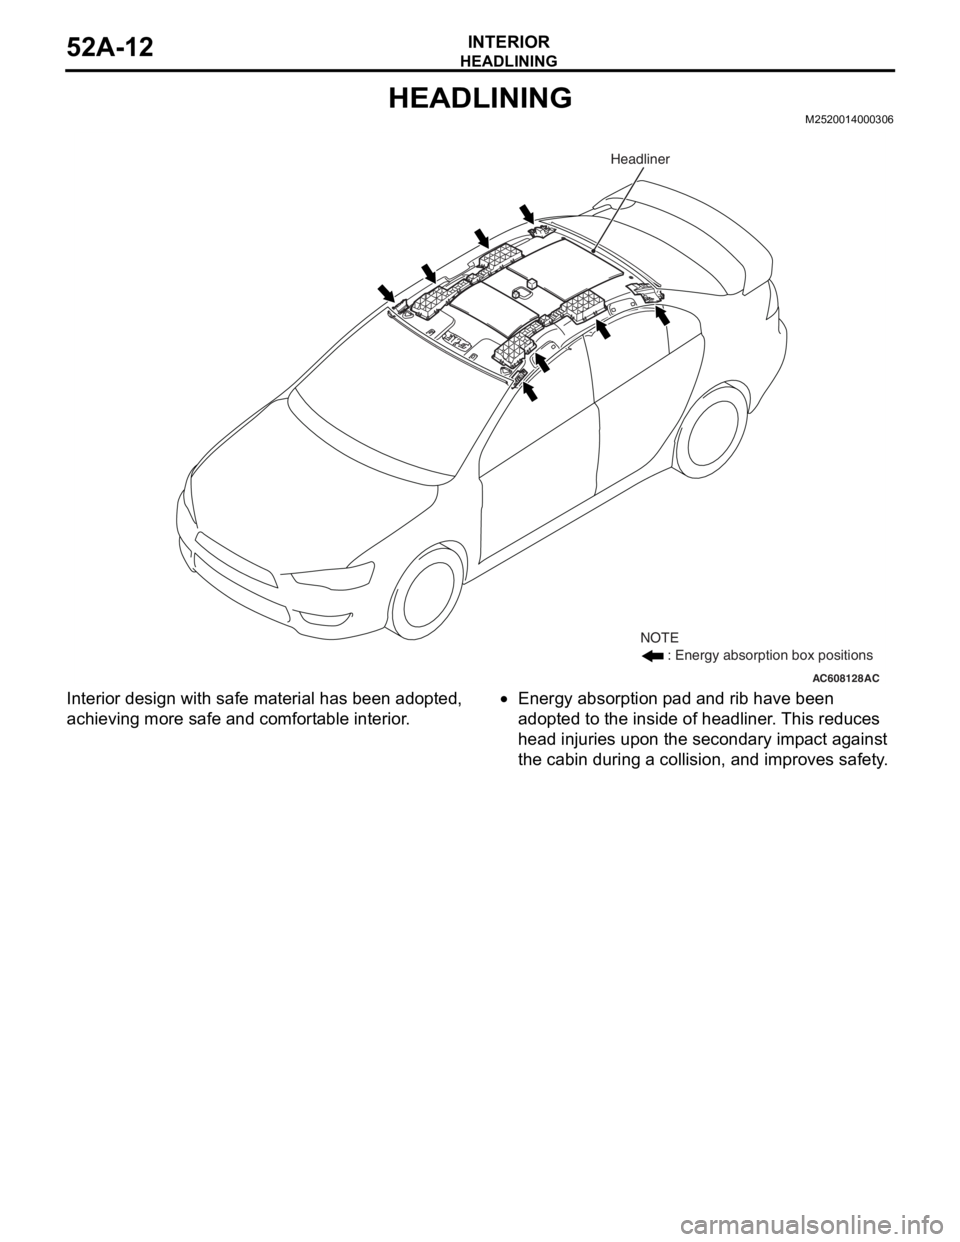
HEADLINING
INTERIOR52A-12
HEADLININGM2520014000306
Interior design with safe material has been adopted,
achieving more safe and comfortable interior.•Energy absorption pad and rib have been
adopted to the inside of headliner. This reduces
head injuries upon the secondary impact against
the cabin during a collision, and improves safety.
AC608128AC
NOTE
: Energy absorption box positions
Headliner
Page 162 of 241
52A-1
GROUP 52A
INTERIOR
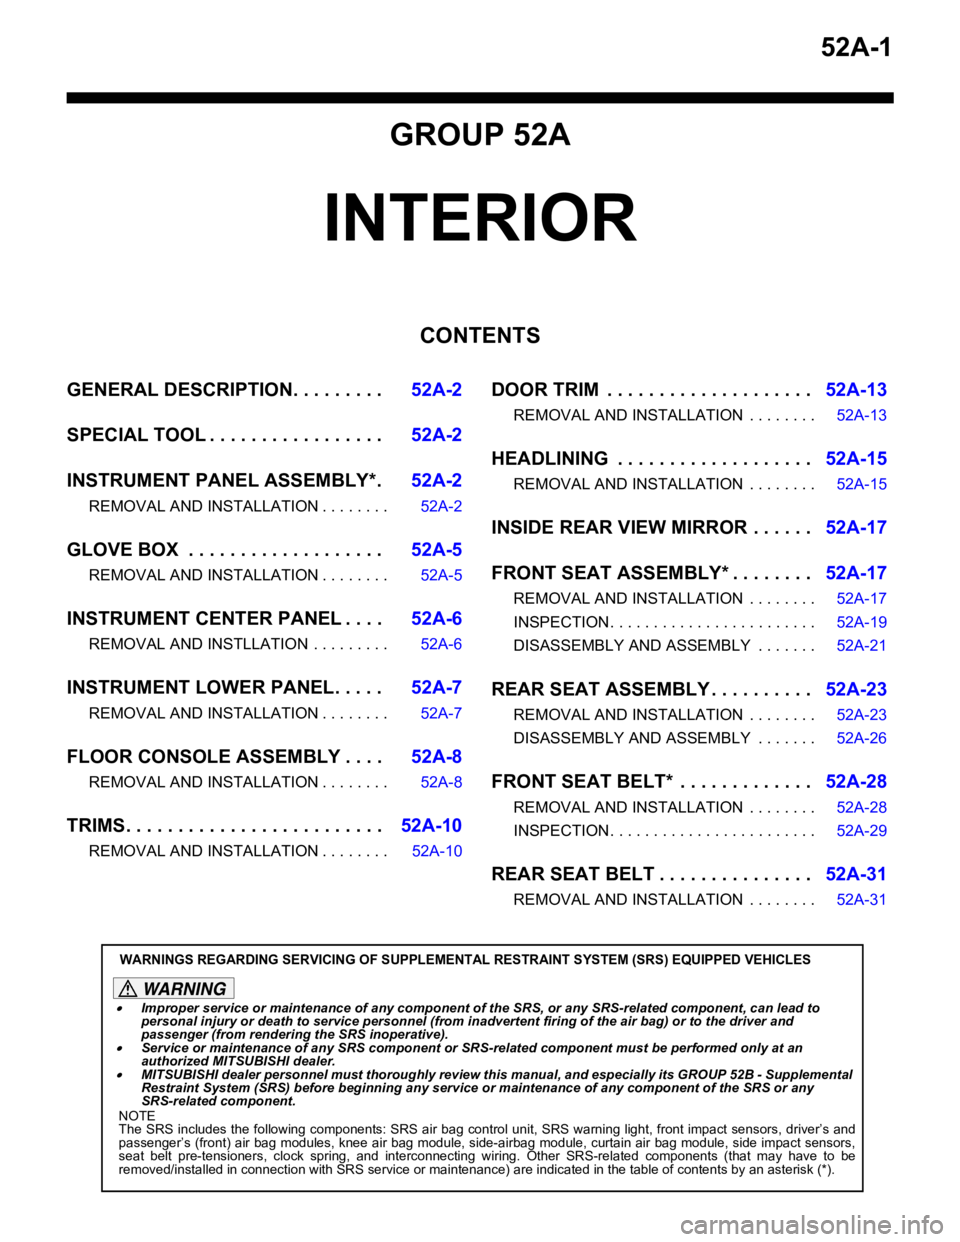
CONTENTS
GENERAL DESCRIPTION. . . . . . . . .52A-2
SPECIAL TOOL . . . . . . . . . . . . . . . . .52A-2
INSTRUMENT PANEL ASSEMBLY*.52A-2
REMOVAL AND INSTALLATION . . . . . . . . 52A-2
GLOVE BOX . . . . . . . . . . . . . . . . . . .52A-5
REMOVAL AND INSTALLATION . . . . . . . . 52A-5
INSTRUMENT CENTER PANEL . . . .52A-6
REMOVAL AND INSTLLATION . . . . . . . . . 52A-6
INSTRUMENT LOWER PANEL. . . . .52A-7
REMOVAL AND INSTALLATION . . . . . . . . 52A-7
FLOOR CONSOLE ASSEMBLY . . . .52A-8
REMOVAL AND INSTALLATION . . . . . . . . 52A-8
TRIMS. . . . . . . . . . . . . . . . . . . . . . . . .52A-10
REMOVAL AND INSTALLATION . . . . . . . . 52A-10
DOOR TRIM . . . . . . . . . . . . . . . . . . . .52A-13
REMOVAL AND INSTALLATION . . . . . . . . 52A-13
HEADLINING . . . . . . . . . . . . . . . . . . .52A-15
REMOVAL AND INSTALLATION . . . . . . . . 52A-15
INSIDE REAR VIEW MIRROR . . . . . .52A-17
FRONT SEAT ASSEMBLY* . . . . . . . .52A-17
REMOVAL AND INSTALLATION . . . . . . . . 52A-17
INSPECTION. . . . . . . . . . . . . . . . . . . . . . . . 52A-19
DISASSEMBLY AND ASSEMBLY . . . . . . . 52A-21
REAR SEAT ASSEMBLY . . . . . . . . . .52A-23
REMOVAL AND INSTALLATION . . . . . . . . 52A-23
DISASSEMBLY AND ASSEMBLY . . . . . . . 52A-26
FRONT SEAT BELT* . . . . . . . . . . . . .52A-28
REMOVAL AND INSTALLATION . . . . . . . . 52A-28
INSPECTION. . . . . . . . . . . . . . . . . . . . . . . . 52A-29
REAR SEAT BELT . . . . . . . . . . . . . . .52A-31
REMOVAL AND INSTALLATION . . . . . . . . 52A-31
WARNINGS REGARDING SERVICING OF SUPPLEMENTAL RESTRAINT SYSTEM (SRS) EQUIPPED VEHICLES
WARNING
•Improper service or maintenance of an y component of the SRS, or any SRS-related component, can lead to
personal injury or death to service personnel (from inadvertent firing of the air bag) or to the driver and
passenger (from renderin g the SRS inoperative).
•Service or maintenance of any SRS component or SRS-related component must be performed only at an
authorized MITSUBISHI dealer.
•MITSUBISHI dealer personnel must thoroughly review this manual, and especially its GROUP 52B - Supplemental
Restraint System (SRS) before beginning any service or maintenance of any component of the SRS or any
SRS-related component.
NOTE
The SRS includes the following components: SRS air bag control unit, SRS warning light, front impact sensors, driver’s and
passenger’s (front) air bag modules, knee air bag module, side-airbag module, curtain air bag module, side impact sensors,
seat belt pre-tensioners, clock spring, and interconnecting wiring. Other SRS-related components (that may have to be
removed/installed in connection with SRS service or maintenance) are indicated in the table of contents by an asterisk (*).
Page 163 of 241
GENERAL DESCRIPTION
TSB Revision
INTERIOR52A-2
GENERAL DESCRIPTIONM1521000100429
OPERATION
.
SEAT BELT WARNING SYSTEM
If the driver turns the ignition switch to the "ON" posi-
tion without fastening the seat belt, the seat belt
warning light illuminates.
SPECIAL TOOLM1521000600576
INSTRUMENT PANEL ASSEMBLY
REMOVAL AND INSTALLATIONM1521001701591
WARNING
For removal and installation of the passenger's side air bag module, always observe the ser-
vice procedures described in GROUP 52B, Air Bag Module and Clock Spring P.52B-367.
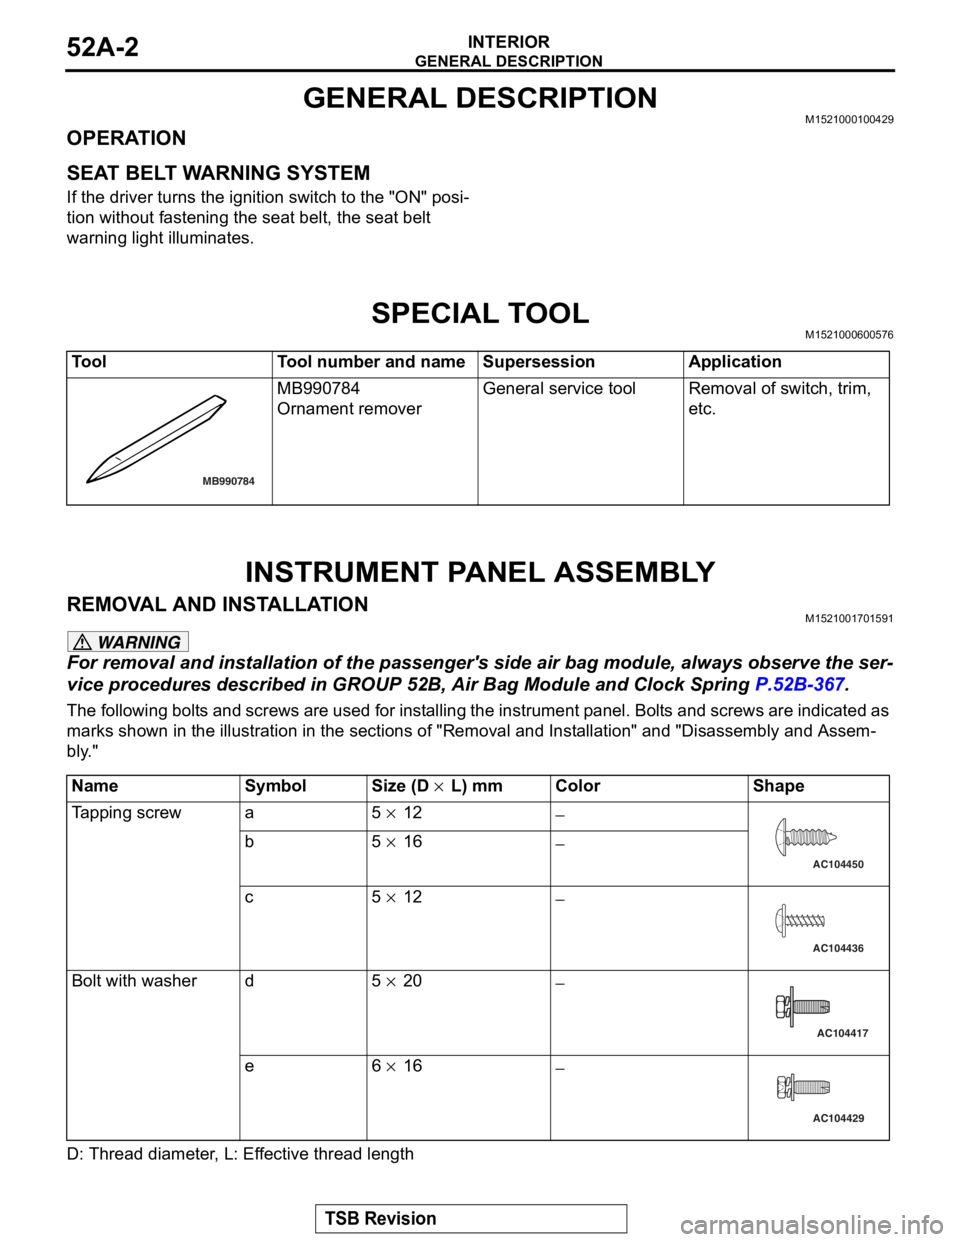
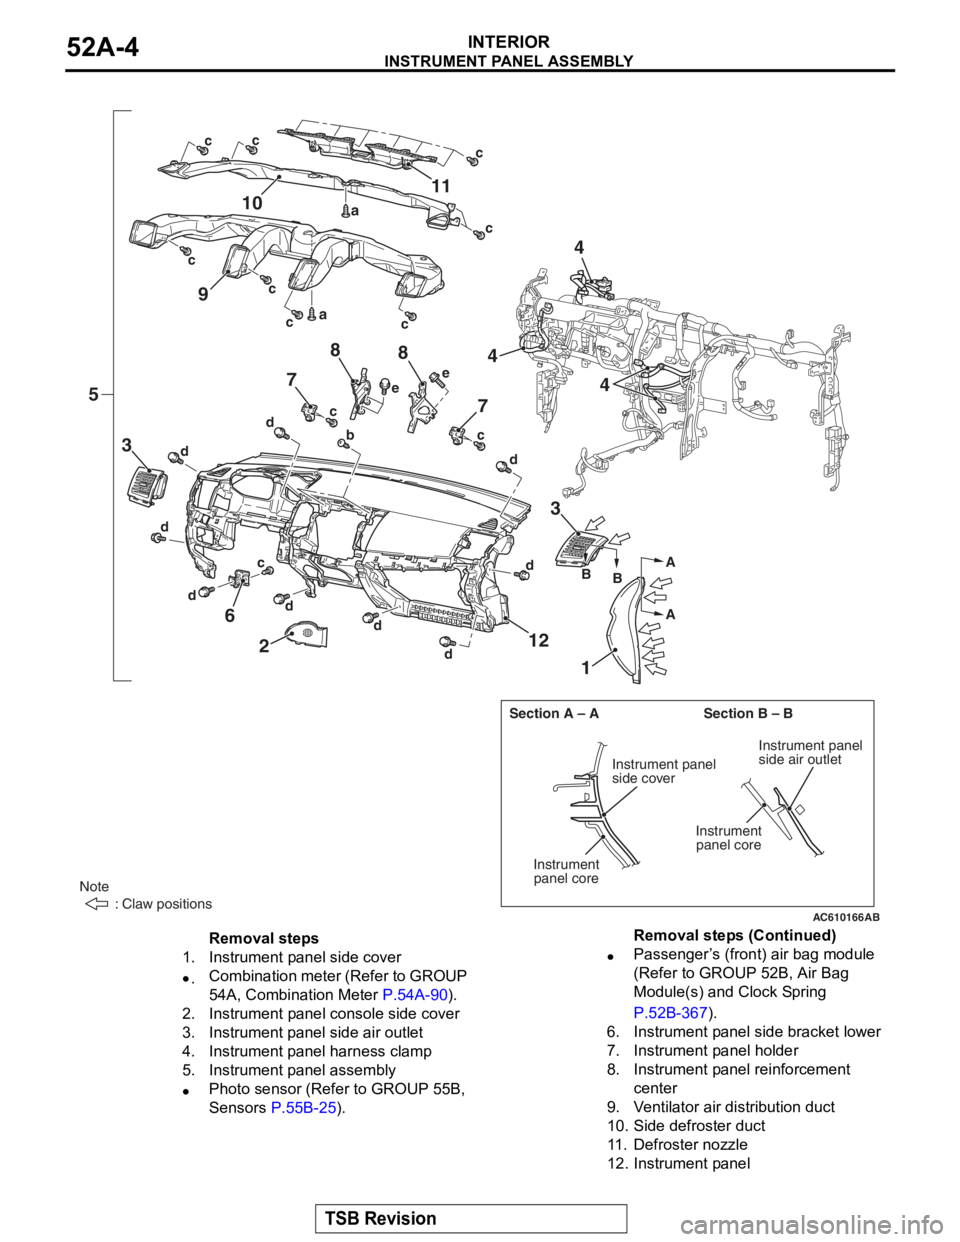
The following bolts and screws are used for installing the in strument panel. Bolts and screws are indicated as
marks shown in the illustration in the sections of "R emoval and Installation" and "Disassembly and Assem
-
bly."
D: Thread diameter, L: Effective thread length
ToolTool number and nameSupersessionApplication
MB990784
Ornament remover
General service toolRemoval of switch, trim,
etc.
MB990784
NameSymbolSize (D × L) mmColorShape
Tapping screwa5 × 12−
b5 × 16−
c5 × 12−
Bolt with washerd5 × 20−
e6 × 16−
AC104450
AC104436
AC104417
AC104429
Page 164 of 241
INSTRUMENT PANEL ASSEMBLY
TSB Revision
INTERIOR52A-3
CAUTION
•Refer to GROUP 52B-SRS Service Precautions P.52B-24 and Air bag Module and Clock Spring
P.52B-367 before removing the passenger side air bag module.
•Do not subject the SRS-ECU to any shocks when removing or installing the instrument panel.
Pre-removal and Post-installation Operation
•Removal and Installation of Front Pillar Trim (Refer to P.52A-10).
•Removal and Installation of Instrument Under Cover
(Refer to P.52A-10).
•Removal and Installation of Glove Box (Refer to P.52A-10).
•Removal and Installation of Instrument Cover Lower, Air
Outlet Garnish (Refer to P.52A-10).
•Removal and Installation of Audio Unit (Refer to GROUP
54A, Radio with CD Player P.54A-307).
•Removal and Installation of Audio Visual Navigation Unit,
GPS antenna (Refer to GROUP 54A, MMCS P.54A-391).
•Removal and Installation of Steering shaft (Refer to
GROUP 37, Steering Column Shaft P.37-25).
•Removal and Installation of Hands-free Cellular Phone
System (Refer to GROUP 54A, Hands-free Module
P.54A-435).
•Removal and Installation of Sensors (Refer to GROUP
55B, Interior Temperature Sensor
P.55B-25).
Page 165 of 241
INSTRUMENT PANEL ASSEMBLY
TSB Revision
INTERIOR52A-4
AC608286
AC610166
Note
: Claw positions
Section A – A Section B – BA
A
B
B
1
2
3
3
12
5
67
9
10
11
8
8
AB
7
Instrument panel
side cover
Instrument panel
side air outlet
Instrument panel core
Instrumentpanel core
4
4
4
d d
d d
d
d
d d
be
e
c
c
a ac
c
c
c
c
c c
c
c
d
Removal steps
1.Instrument panel side cover
•.Combination meter (Refer to GROUP
54A, Combination Meter
P.54A-90).
2.Instrument panel console side cover
3.Instrument panel side air outlet
4.Instrument panel harness clamp
5.Instrument panel assembly
•Photo sensor (Refer to GROUP 55B,
Sensors
P.55B-25).
•Passenger’s (front) air bag module
(Refer to GROUP 52B, Air Bag
Module(s) and Clock Spring
P.52B-367).
6.Instrument panel side bracket lower
7.Instrument panel holder
8.Instrument panel reinforcement
center
9.Ventilator air distribution duct
10.Side defroster duct
11 .Defroster nozzle
12.Instrument panel
Removal steps (Continued)
Page 166 of 241
GLOVE BOX
TSB Revision
INTERIOR52A-5
GLOVE BOX
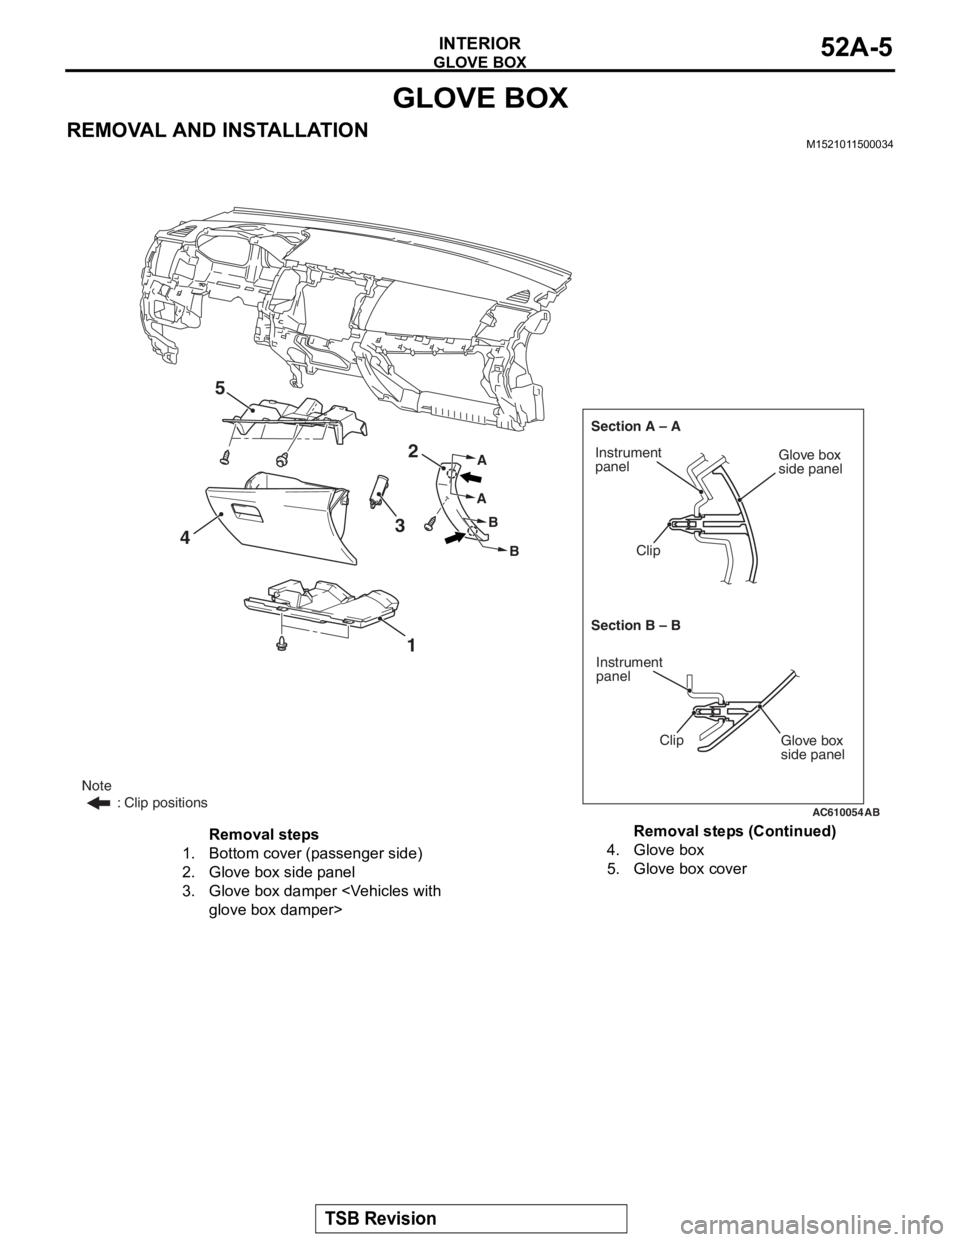
REMOVAL AND INSTALLATIONM1521011500034
AC610054
Note
: Clip positions
Section B – B Section A – A
A
A B
B
AB
2
5
3
4
1Instrument
panel
Instrument
panel
Clip
Glove box
side panel
Glove box
side panel
Clip
Removal steps
1.Bottom cover (passenger side)
2.Glove box side panel
3.Glove box damper
4.Glove box
5.Glove box cover
Removal steps (Continued)
Page 167 of 241
INSTRUMENT CENTER PANEL
TSB Revision
INTERIOR52A-6
INSTRUMENT CENTER PANEL
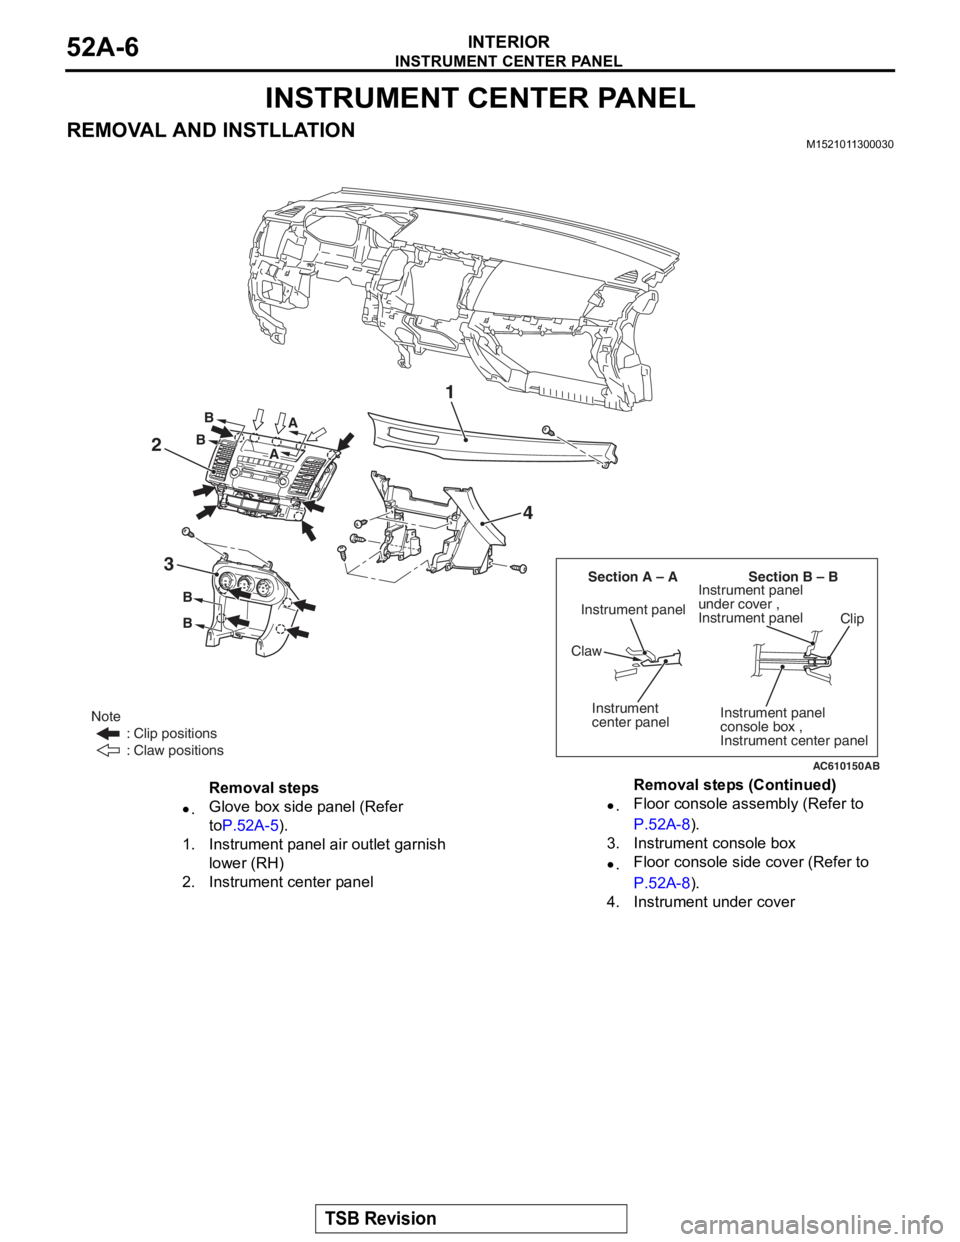
REMOVAL AND INSTLLATIONM1521011300030
AC610150
Section B – B
Section A – A
B
B
AB
3 4
2
Instrument panel
under cover ,
Instrument panel
Claw
Instrument panel
console box ,
Instrument center panel
Instrument panel
Clip
Note
: Clip positions
: Claw positions
B
B A
A
Instrument
center panel
1
Removal steps
•.Glove box side panel (Refer
to
P.52A-5).
1.Instrument panel air outlet garnish
lower (RH)
2.Instrument center panel
•.Floor console assembly (Refer to
P.52A-8).
3.Instrument console box
•.Floor console side cover (Refer to
P.52A-8).
4.Instrument under cover
Removal steps (Continued)
Page 168 of 241
INSTRUMENT LOWER PANEL
TSB Revision
INTERIOR52A-7
INSTRUMENT LOWER PANEL
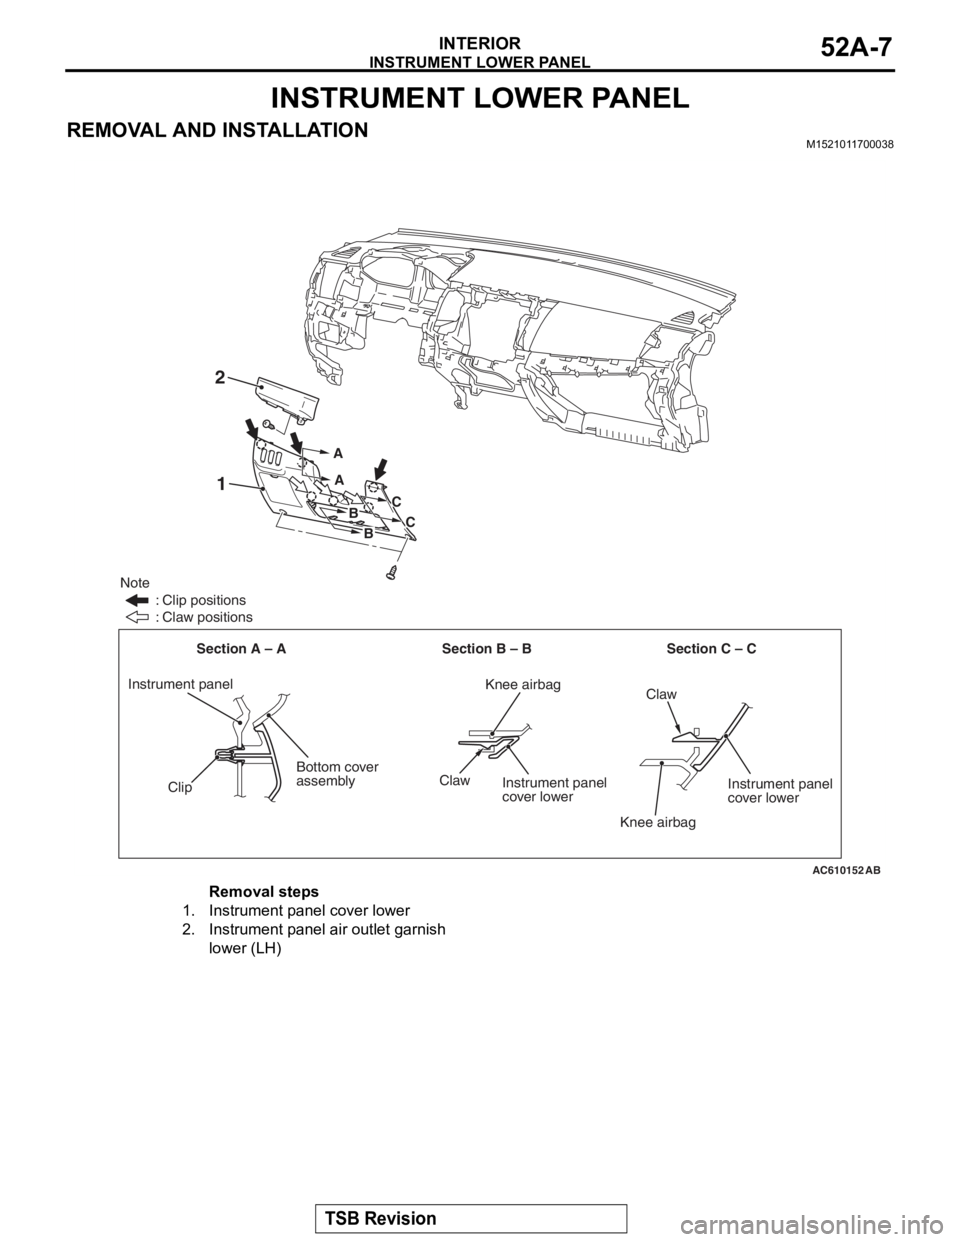
REMOVAL AND INSTALLATIONM1521011700038
AC610152
Section B – B Section C – C
Section A – A A
A
1
Knee airbag
Instrument panel
Bottom cover
assembly
B
B
C
C
Note
: Clip positions
: Claw positions
Clip
Knee airbagInstrument panel
cover lower
Claw
Claw
2
AB
Instrument panel
cover lower
Removal steps
1.Instrument panel cover lower
2.Instrument panel air outlet garnish
lower (LH)
Page 169 of 241
FLOOR CONSOLE ASSEMBLY
TSB Revision
INTERIOR52A-8
FLOOR CONSOLE ASSEMBLY
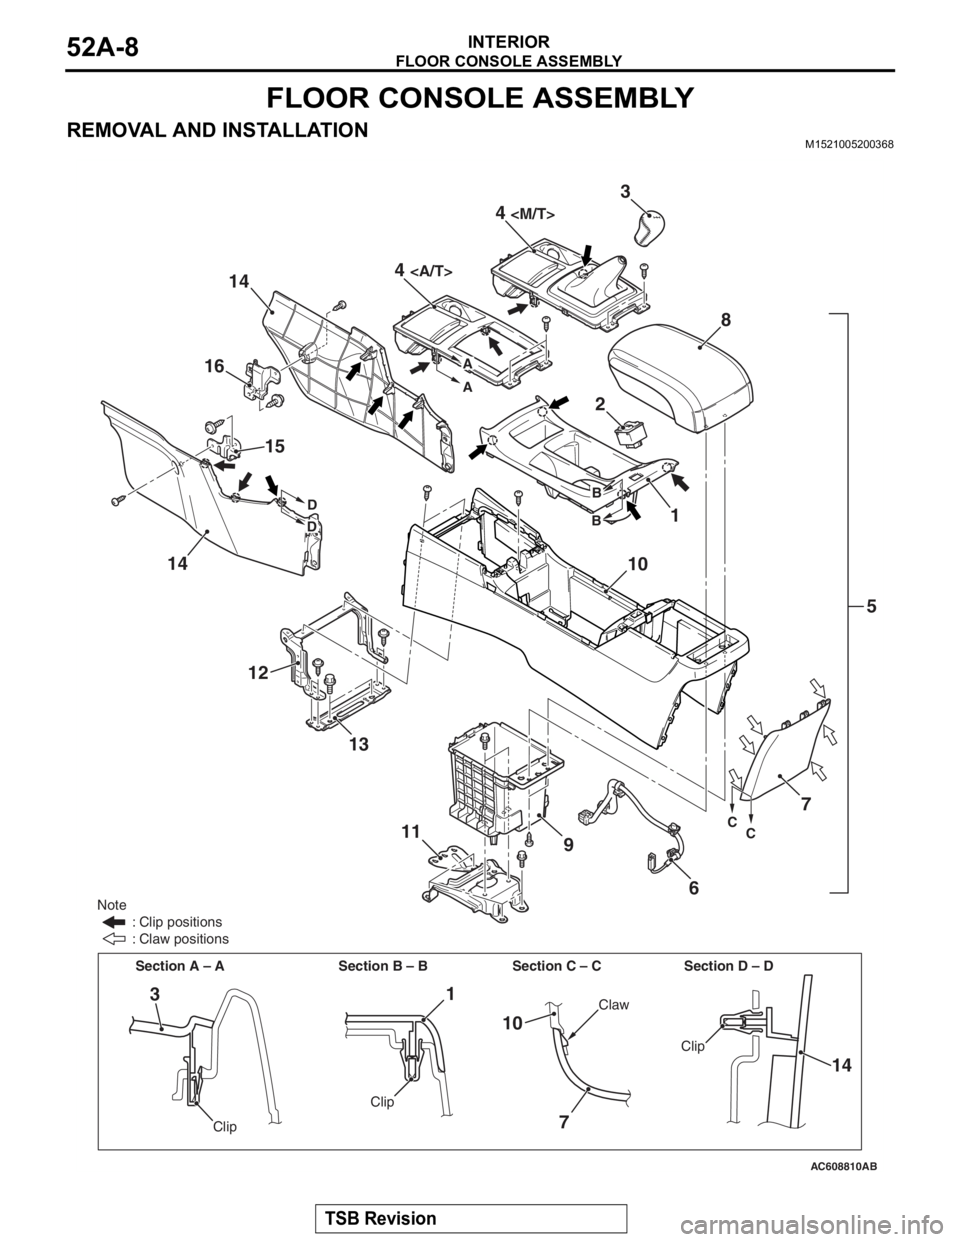
REMOVAL AND INSTALLATIONM1521005200368
AC608810AB
135
6
11 4
4
12
8
1
3
2
9
14
14
15
16
10
Section D – D
A
A
Note
: Clip positions
: Claw positions
Clip
Claw
14
Section A – A Section B – B Section C – C
Clip
Clip
13
10
7
B
B
D
D
7
CC
Page 170 of 241
FLOOR CONSOLE ASSEMBLY
TSB Revision
INTERIOR52A-9
REASSEMBLY SERVICE POINT
.
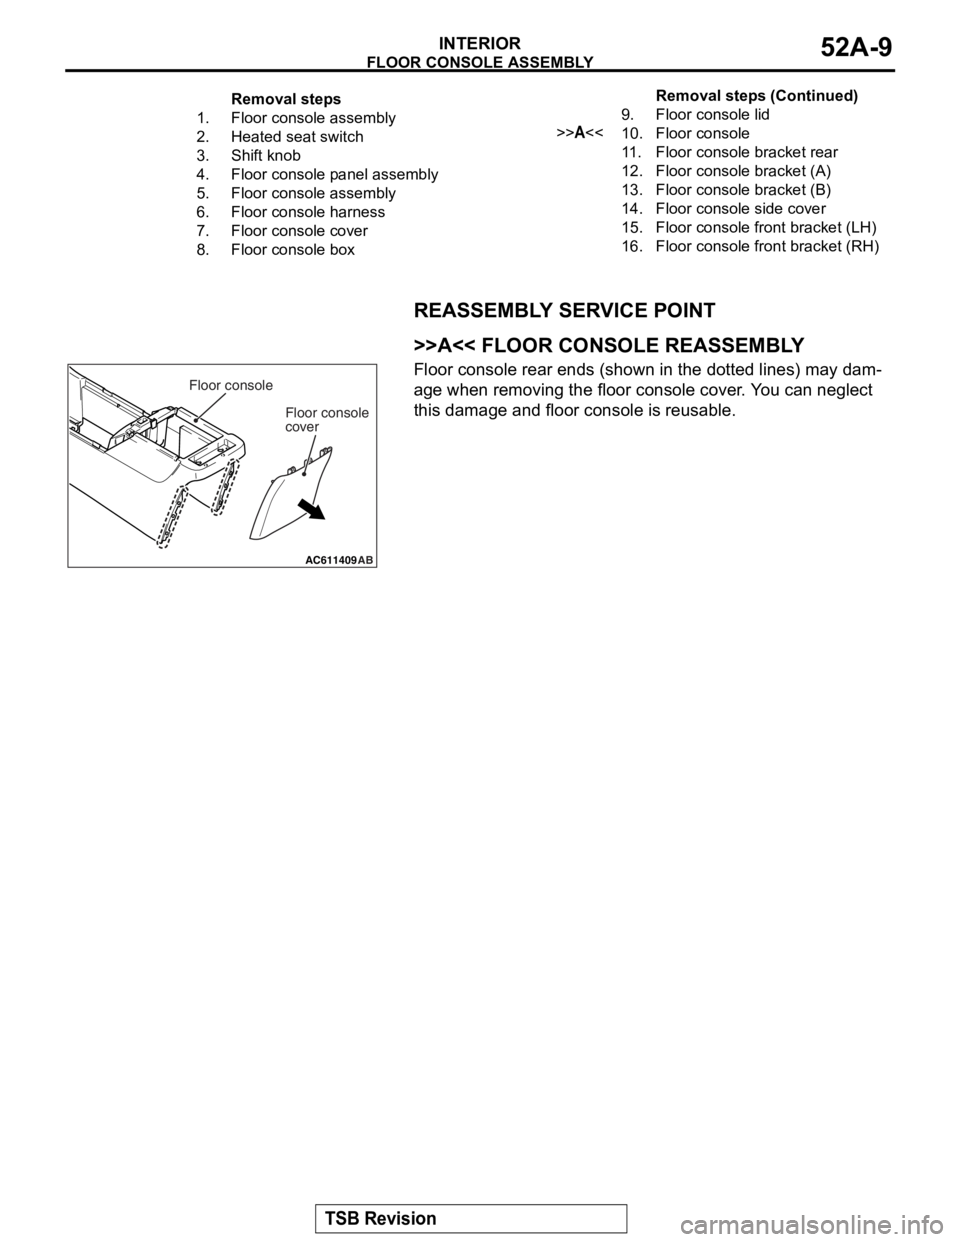
>>A<< FLOOR CONSOLE REASSEMBLY
Floor console rear ends (shown in the dotted lines) may dam-
age when removing the floor console cover. You can neglect
this damage and floor console is reusable.
Removal steps
1.Floor console assembly
2.Heated seat switch
3.Shift knob
4.Floor console panel assembly
5.Floor console assembly
6.Floor console harness
7.Floor console cover
8.Floor console box
9.Floor console lid
>>A<<10.Floor console
11 .Floor console bracket rear
12.Floor console bracket (A)
13.Floor console bracket (B)
14.Floor console side cover
15.Floor console front bracket (LH)
16.Floor console front bracket (RH)
Removal steps (Continued)
AC611409
Floor consoleFloor console
cover
AB