NISSAN NAVARA 2005 Repair Workshop Manual
Manufacturer: NISSAN, Model Year: 2005, Model line: NAVARA, Model: NISSAN NAVARA 2005Pages: 3171, PDF Size: 49.59 MB
Page 2451 of 3171
MTC-64
TROUBLE DIAGNOSIS
SYSTEM DESCRIPTION
Component Parts
Air mix door control system components are:
lFront air control
lAir mix door motors (Front and rear)
lPBR (built-into air mix motors)
System Operation
The front air control receives data from the temperature selected by the driver and rear passenger. The front
air control then applies a voltage to one circuit of the appropriate air mix door motor, while ground is applied to
the other circuit, causing the appropriate air mix door motor to rotate. The direction of rotation is determined by
which circuit has voltage applied to it, and which one has ground applied to it. The front air control monitors the
air mix door positions by measuring the voltage signal on the PBR circuits of each door.
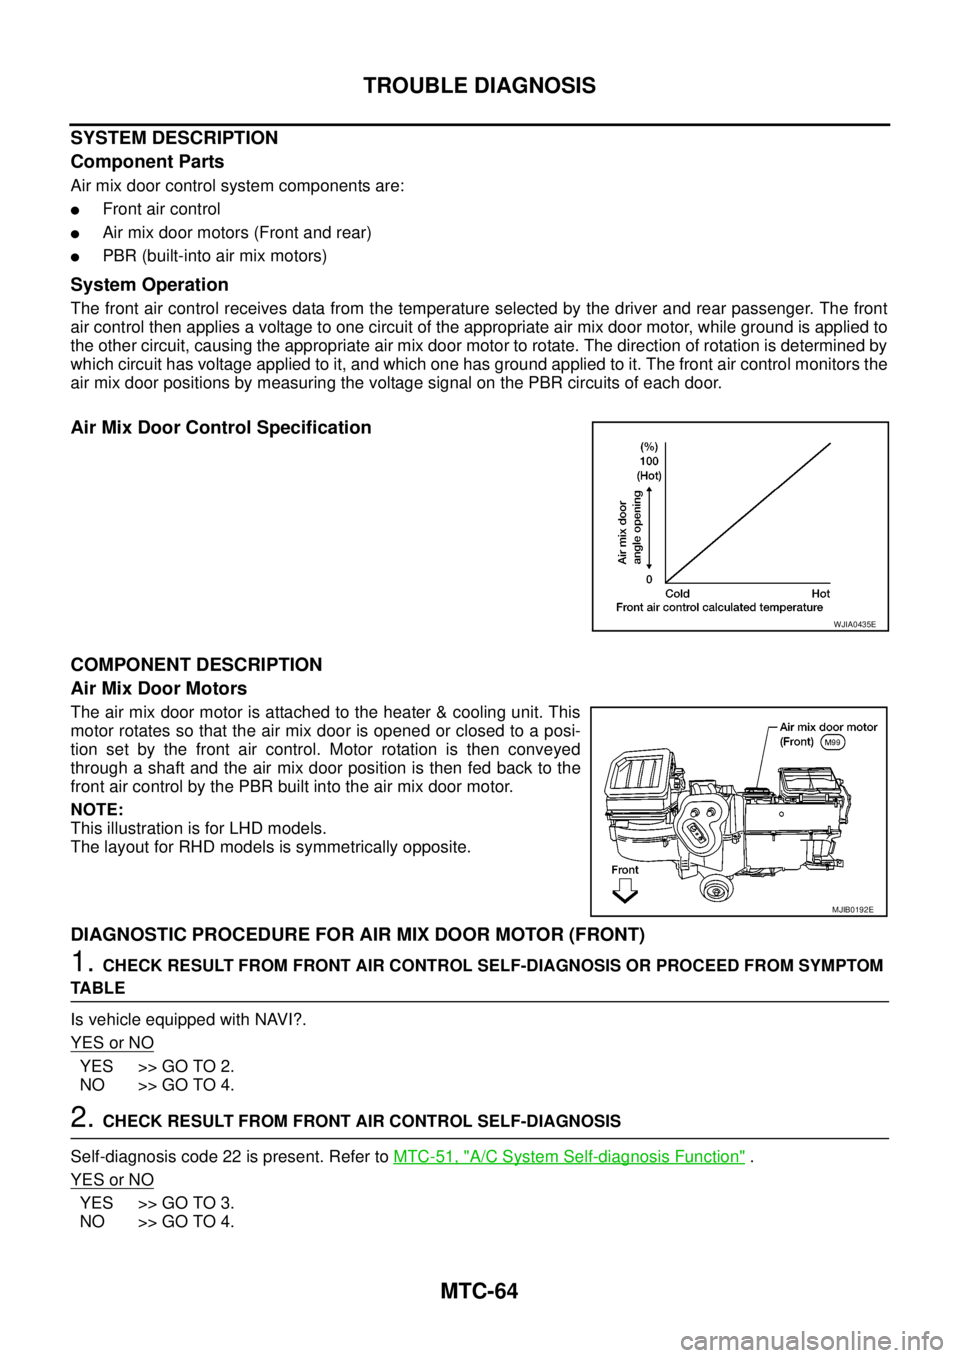
Air Mix Door Control Specification
COMPONENT DESCRIPTION
Air Mix Door Motors
The air mix door motor is attached to the heater & cooling unit. This
motor rotates so that the air mix door is opened or closed to a posi-
tion set by the front air control. Motor rotation is then conveyed
through a shaft and the air mix door position is then fed back to the
front air control by the PBR built into the air mix door motor.
NOTE:
This illustration is for LHD models.
The layout for RHD models is symmetrically opposite.
DIAGNOSTIC PROCEDURE FOR AIR MIX DOOR MOTOR (FRONT)
1.CHECK RESULT FROM FRONT AIR CONTROL SELF-DIAGNOSIS OR PROCEED FROM SYMPTOM
TABLE
Is vehicle equipped with NAVI?.
YESorNO
YES >> GO TO 2.
NO >> GO TO 4.
2.CHECK RESULT FROM FRONT AIR CONTROL SELF-DIAGNOSIS
Self-diagnosis code 22 is present. Refer toMTC-51, "
A/C System Self-diagnosis Function".
YESorNO
YES >> GO TO 3.
NO >> GO TO 4.
WJIA0435E
MJIB0192E
Page 2452 of 3171
TROUBLE DIAGNOSIS
MTC-65
C
D
E
F
G
H
I
K
L
MA
B
MTC
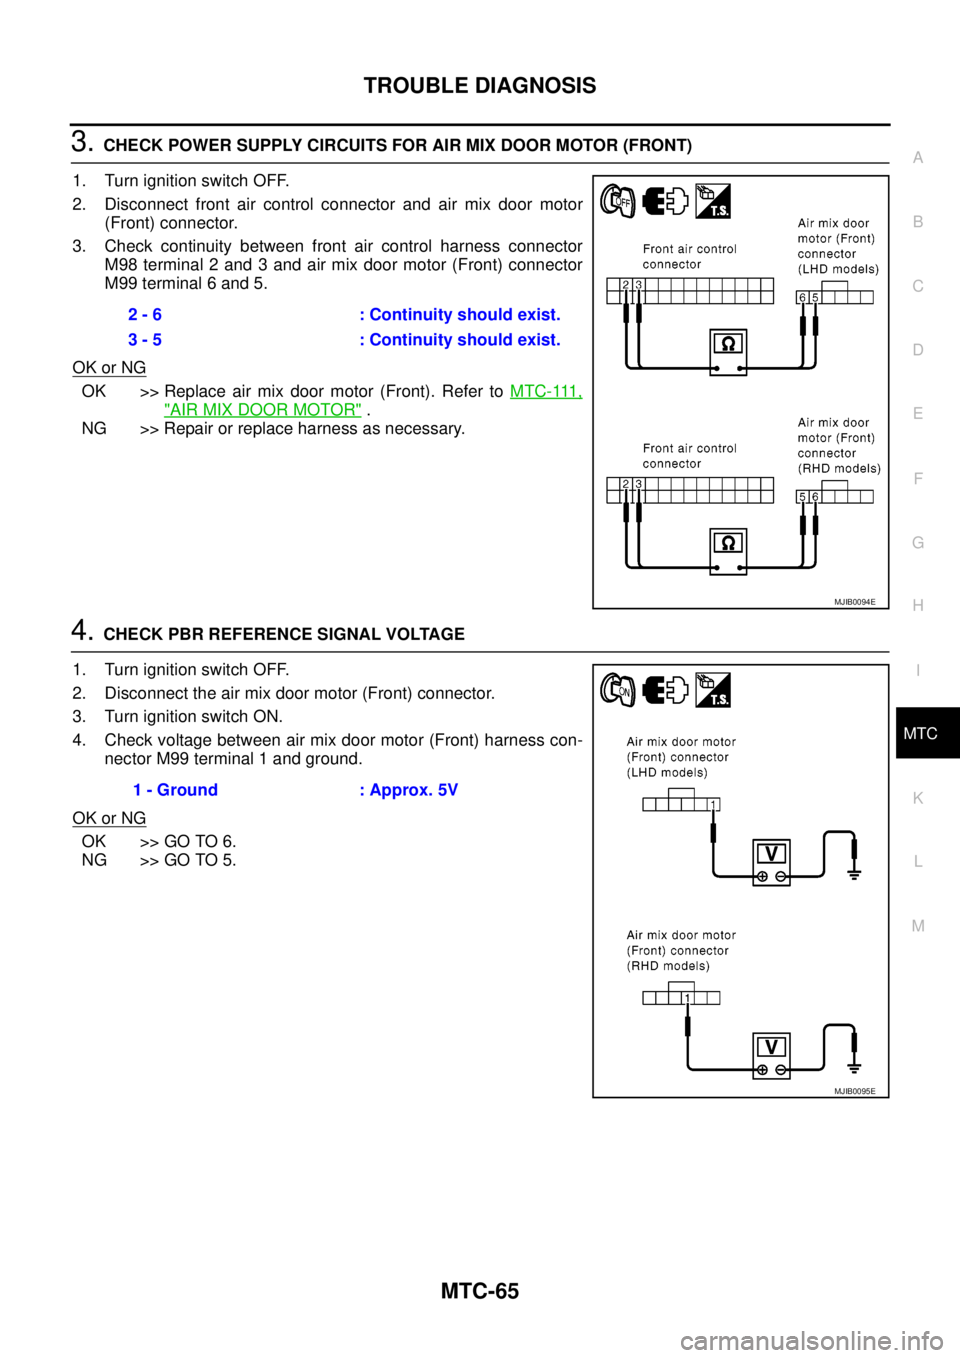
3.CHECK POWER SUPPLY CIRCUITS FOR AIR MIX DOOR MOTOR (FRONT)
1. Turn ignition switch OFF.
2. Disconnect front air control connector and air mix door motor
(Front) connector.
3. Check continuity between front air control harness connector
M98 terminal 2 and 3 and air mix door motor (Front) connector
M99 terminal 6 and 5.
OK or NG
OK >> Replace air mix door motor (Front). Refer toM T C - 111 ,
"AIR MIX DOOR MOTOR".
NG >> Repair or replace harness as necessary.
4.CHECK PBR REFERENCE SIGNAL VOLTAGE
1. Turn ignition switch OFF.
2. Disconnect the air mix door motor (Front) connector.
3. Turn ignition switch ON.
4. Check voltage between air mix door motor (Front) harness con-
nector M99 terminal 1 and ground.
OK or NG
OK >> GO TO 6.
NG >> GO TO 5.2 - 6 : Continuity should exist.
3 - 5 : Continuity should exist.
MJIB0094E
1 - Ground : Approx. 5V
MJIB0095E
Page 2453 of 3171
MTC-66
TROUBLE DIAGNOSIS
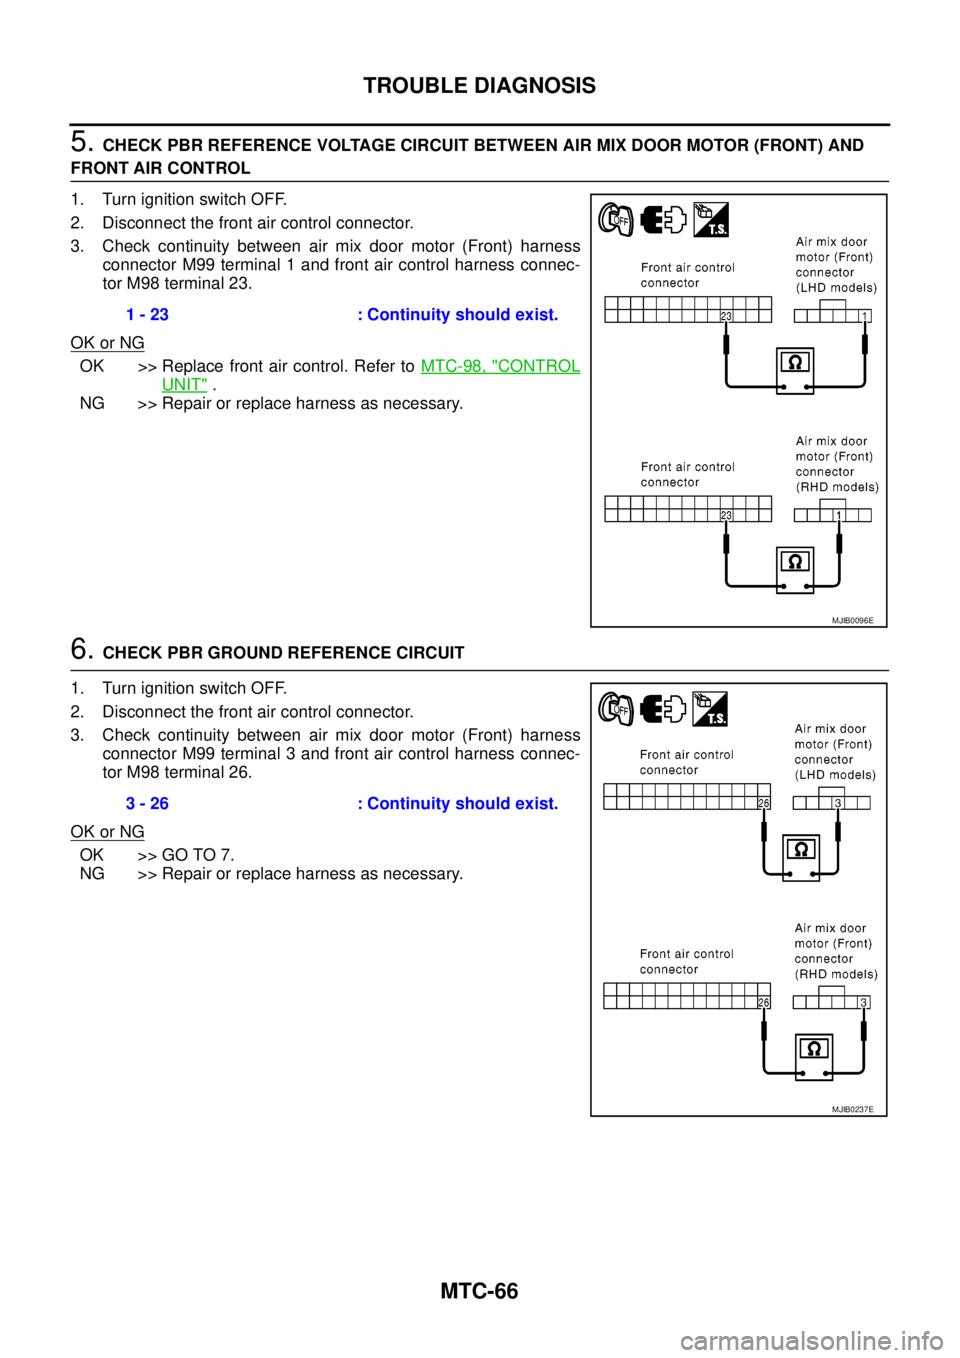
5.CHECK PBR REFERENCE VOLTAGE CIRCUIT BETWEEN AIR MIX DOOR MOTOR (FRONT) AND
FRONT AIR CONTROL
1. Turn ignition switch OFF.
2. Disconnect the front air control connector.
3. Check continuity between air mix door motor (Front) harness
connector M99 terminal 1 and front air control harness connec-
tor M98 terminal 23.
OK or NG
OK >> Replace front air control. Refer toMTC-98, "CONTROL
UNIT".
NG >> Repair or replace harness as necessary.
6.CHECK PBR GROUND REFERENCE CIRCUIT
1. Turn ignition switch OFF.
2. Disconnect the front air control connector.
3. Check continuity between air mix door motor (Front) harness
connector M99 terminal 3 and front air control harness connec-
tor M98 terminal 26.
OK or NG
OK >> GO TO 7.
NG >> Repair or replace harness as necessary.1 - 23 : Continuity should exist.
MJIB0096E
3 - 26 : Continuity should exist.
MJIB0237E
Page 2454 of 3171
TROUBLE DIAGNOSIS
MTC-67
C
D
E
F
G
H
I
K
L
MA
B
MTC
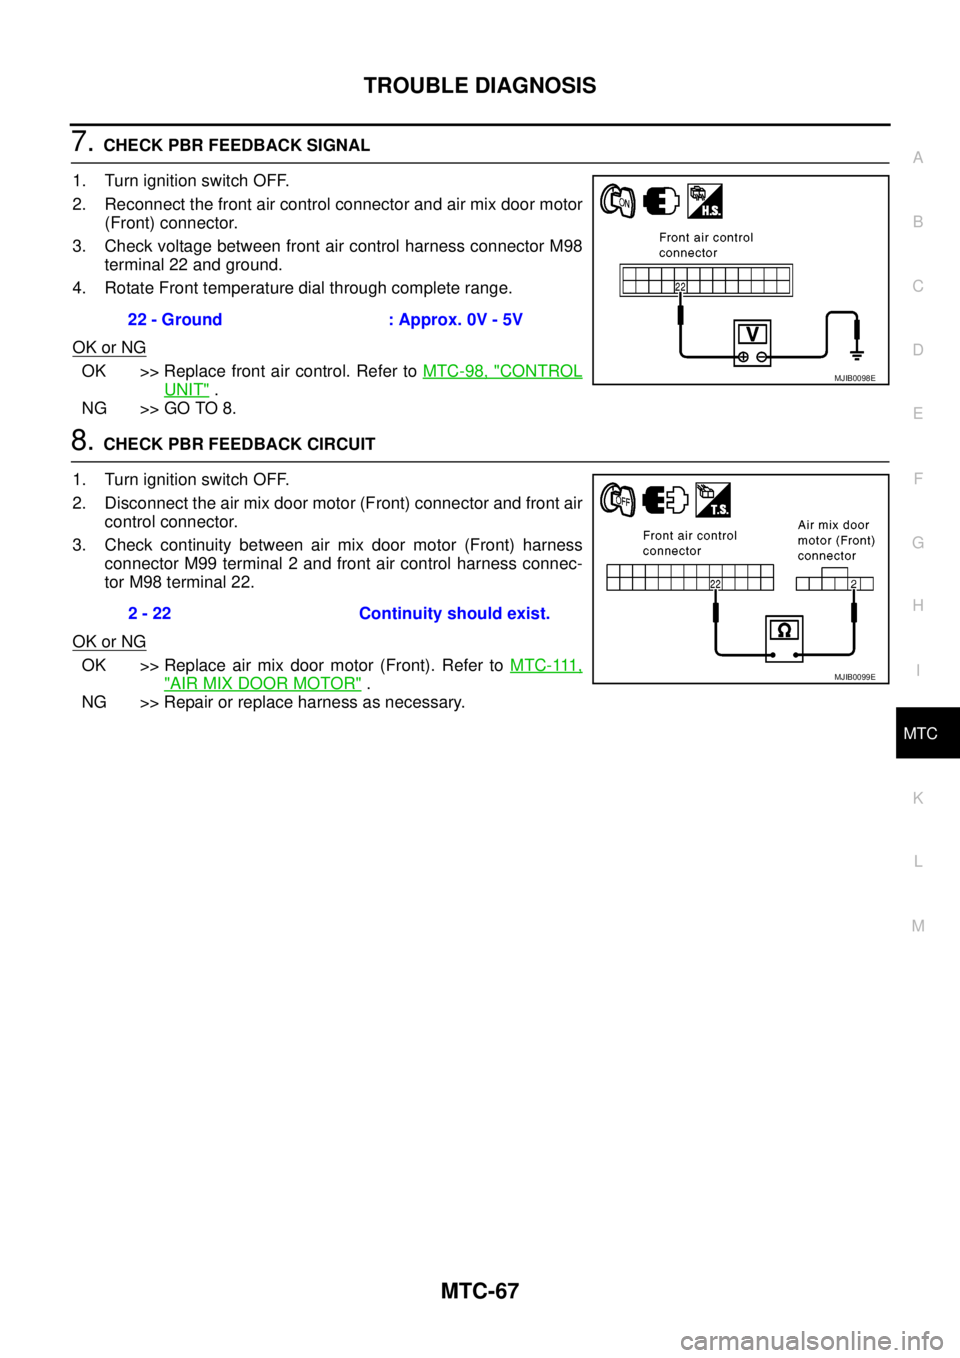
7.CHECK PBR FEEDBACK SIGNAL
1. Turn ignition switch OFF.
2. Reconnect the front air control connector and air mix door motor
(Front) connector.
3. Check voltage between front air control harness connector M98
terminal 22 and ground.
4. Rotate Front temperature dial through complete range.
OK or NG
OK >> Replace front air control. Refer toMTC-98, "CONTROL
UNIT".
NG >> GO TO 8.
8.CHECK PBR FEEDBACK CIRCUIT
1. Turn ignition switch OFF.
2. Disconnect the air mix door motor (Front) connector and front air
control connector.
3. Check continuity between air mix door motor (Front) harness
connector M99 terminal 2 and front air control harness connec-
tor M98 terminal 22.
OK or NG
OK >> Replace air mix door motor (Front). Refer toM T C - 111 ,
"AIR MIX DOOR MOTOR".
NG >> Repair or replace harness as necessary.22 - Ground : Approx. 0V - 5V
MJIB0098E
2 - 22 Continuity should exist.
MJIB0099E
Page 2455 of 3171
MTC-68
TROUBLE DIAGNOSIS
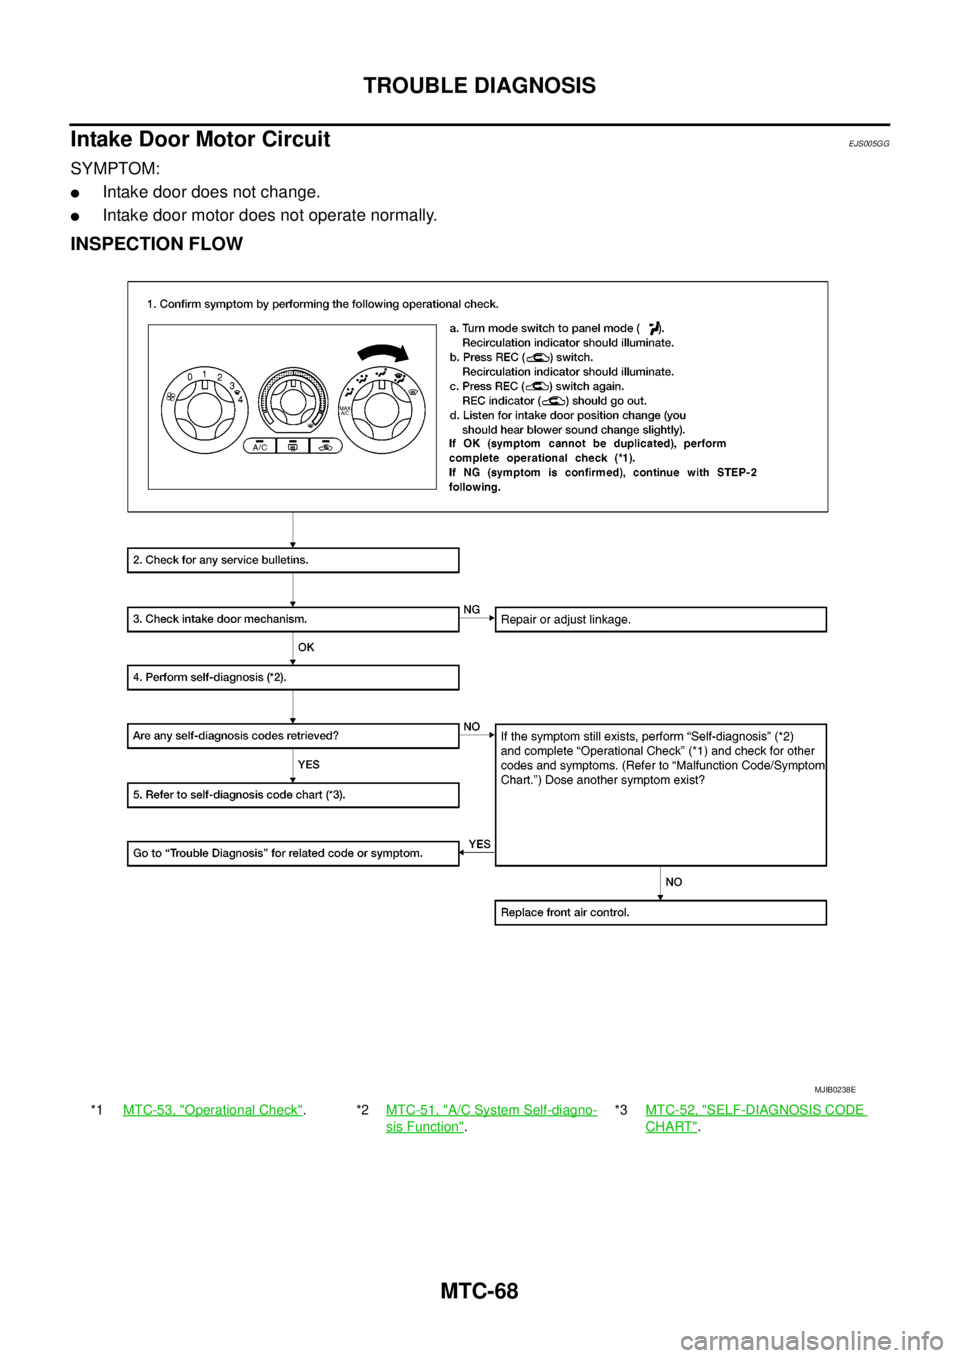
Intake Door Motor Circuit
EJS005GG
SYMPTOM:
lIntake door does not change.
lIntake door motor does not operate normally.
INSPECTION FLOW
*1MTC-53, "Operational Check".*2MTC-51, "A/C System Self-diagno-
sis Function".*3MTC-52, "
SELF-DIAGNOSIS CODE
CHART".
MJIB0238E
Page 2456 of 3171
TROUBLE DIAGNOSIS
MTC-69
C
D
E
F
G
H
I
K
L
MA
B
MTC
SYSTEM DESCRIPTION
Component Parts
Intake door control system components are:
lFront air control
lIntake door motor
System Operation
The intake door control determines the intake door position based on the position of the recirculation switch.
When the recirculation switch is depressed the intake door motor rotate closing off the fresh air inlet and recir-
culating the cabin air. If the recirculation switch is depressed again, the intake door motor rotate in the oppo-
site direction, again allowing fresh air into the cabin.
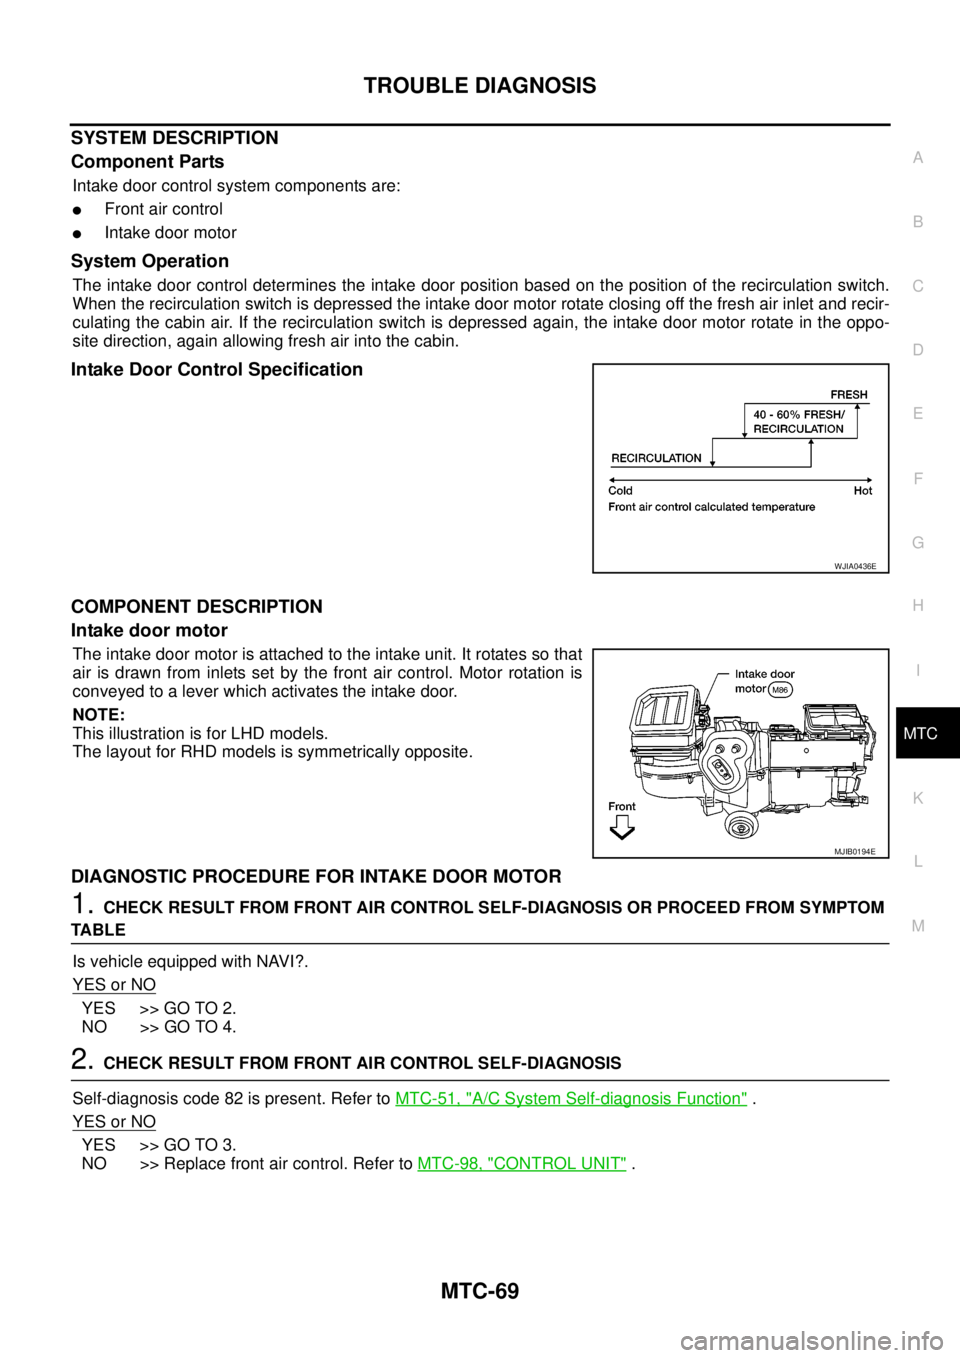
Intake Door Control Specification
COMPONENT DESCRIPTION
Intake door motor
The intake door motor is attached to the intake unit. It rotates so that
air is drawn from inlets set by the front air control. Motor rotation is
conveyed to a lever which activates the intake door.
NOTE:
This illustration is for LHD models.
The layout for RHD models is symmetrically opposite.
DIAGNOSTIC PROCEDURE FOR INTAKE DOOR MOTOR
1.CHECK RESULT FROM FRONT AIR CONTROL SELF-DIAGNOSIS OR PROCEED FROM SYMPTOM
TABLE
Is vehicle equipped with NAVI?.
YES or NO
YES >> GO TO 2.
NO >> GO TO 4.
2.CHECK RESULT FROM FRONT AIR CONTROL SELF-DIAGNOSIS
Self-diagnosis code 82 is present. Refer toMTC-51, "
A/C System Self-diagnosis Function".
YES or NO
YES >> GO TO 3.
NO >> Replace front air control. Refer toMTC-98, "
CONTROL UNIT".
WJIA0436E
MJIB0194E
Page 2457 of 3171
MTC-70
TROUBLE DIAGNOSIS
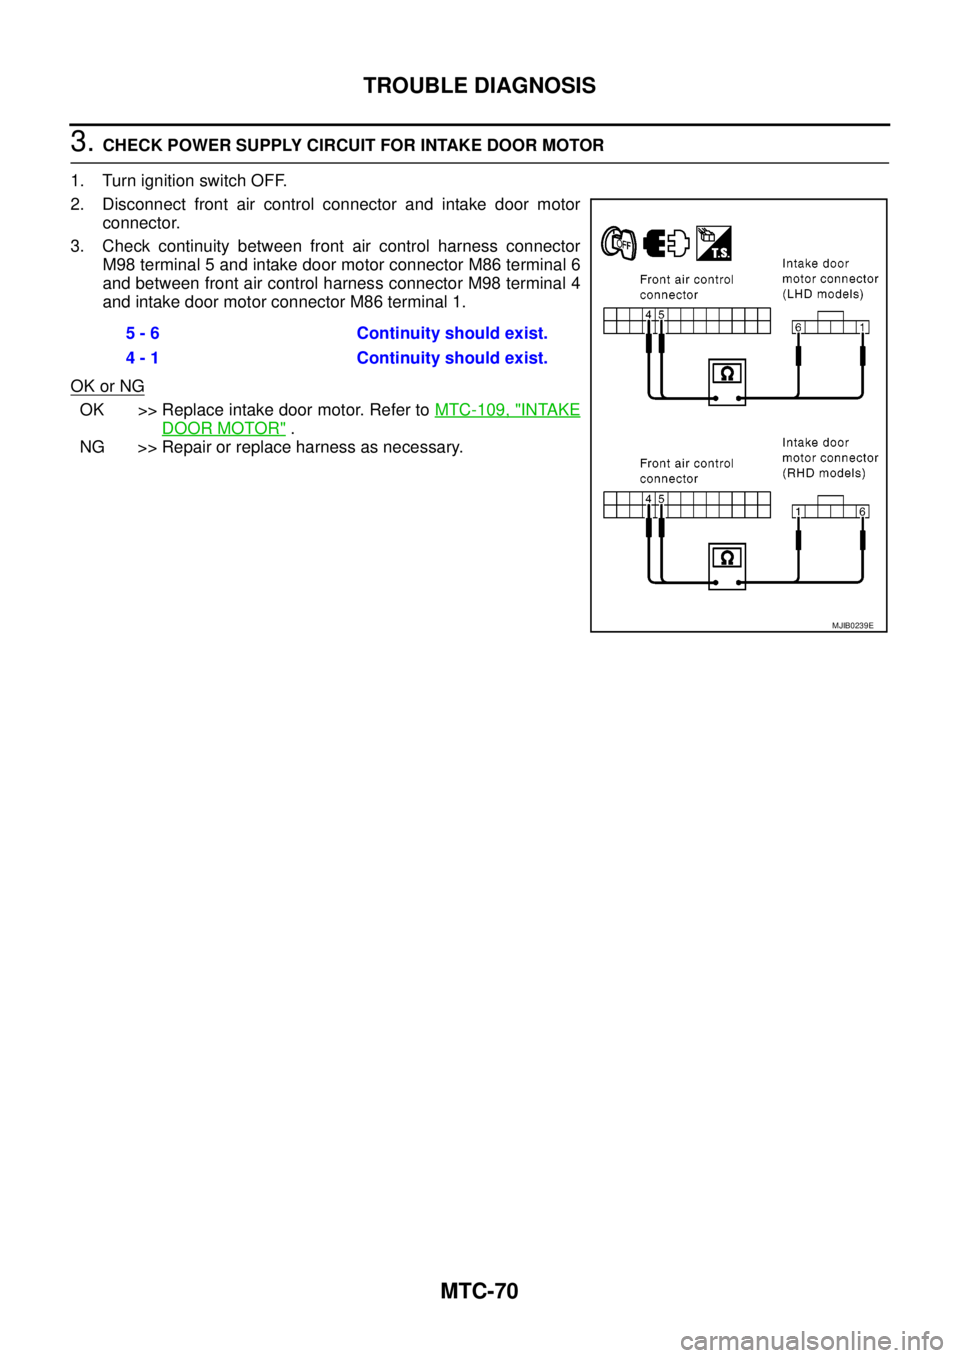
3.CHECK POWER SUPPLY CIRCUIT FOR INTAKE DOOR MOTOR
1. Turn ignition switch OFF.
2. Disconnect front air control connector and intake door motor
connector.
3. Check continuity between front air control harness connector
M98 terminal 5 and intake door motor connector M86 terminal 6
and between front air control harness connector M98 terminal 4
and intake door motor connector M86 terminal 1.
OK or NG
OK >> Replace intake door motor. Refer toMTC-109, "INTAKE
DOOR MOTOR".
NG >> Repair or replace harness as necessary.5 - 6 Continuity should exist.
4 - 1 Continuity should exist.
MJIB0239E
Page 2458 of 3171
TROUBLE DIAGNOSIS
MTC-71
C
D
E
F
G
H
I
K
L
MA
B
MTC
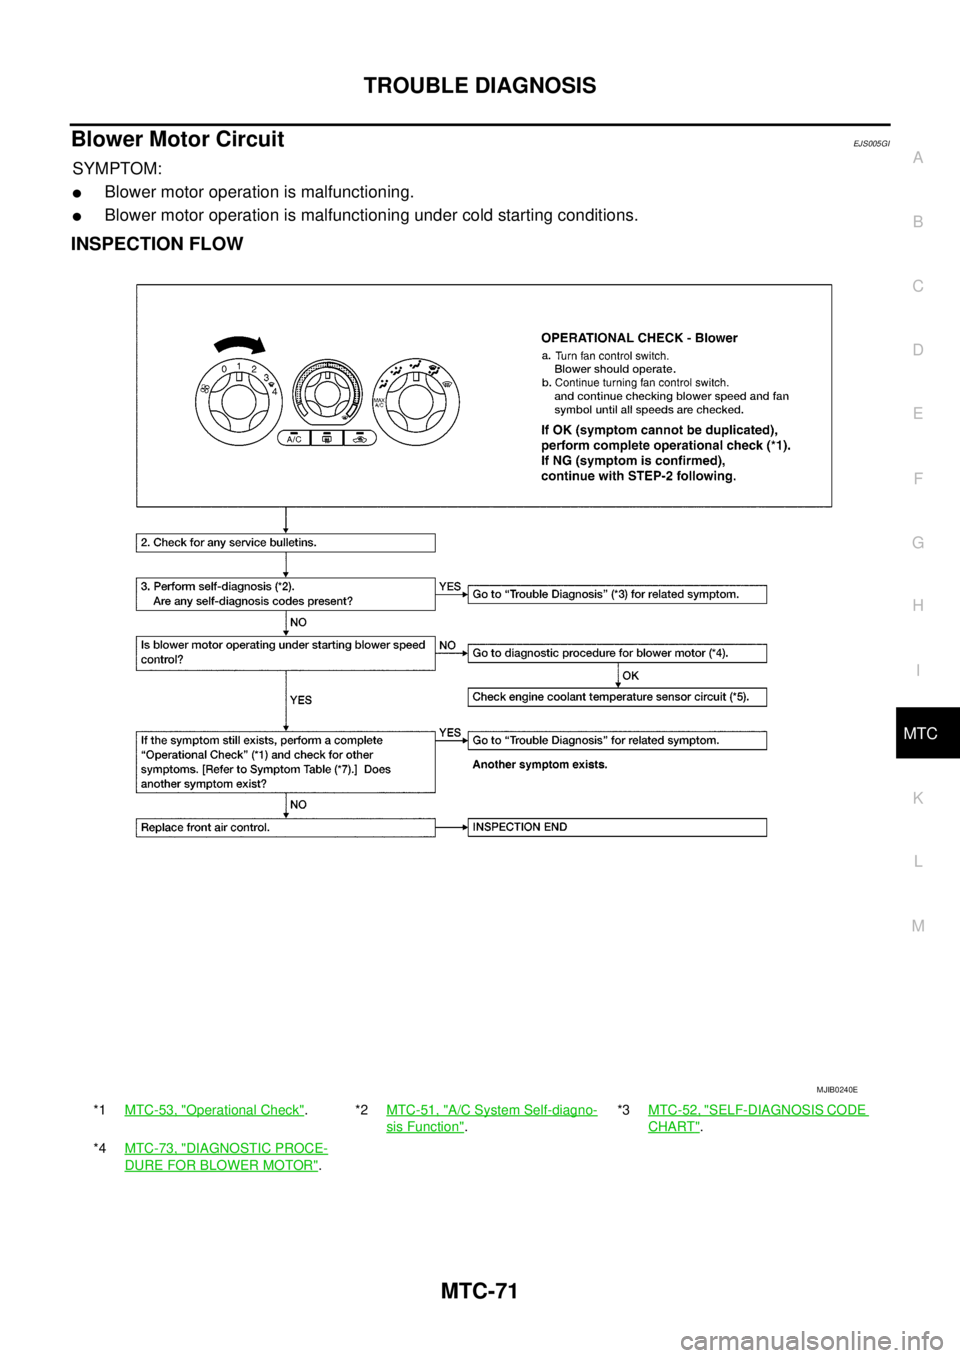
Blower Motor CircuitEJS005GI
SYMPTOM:
lBlower motor operation is malfunctioning.
lBlower motor operation is malfunctioning under cold starting conditions.
INSPECTION FLOW
*1MTC-53, "Operational Check".*2MTC-51, "A/C System Self-diagno-
sis Function".*3MTC-52, "
SELF-DIAGNOSIS CODE
CHART".
*4MTC-73, "
DIAGNOSTIC PROCE-
DURE FOR BLOWER MOTOR".
MJIB0240E
Page 2459 of 3171
MTC-72
TROUBLE DIAGNOSIS
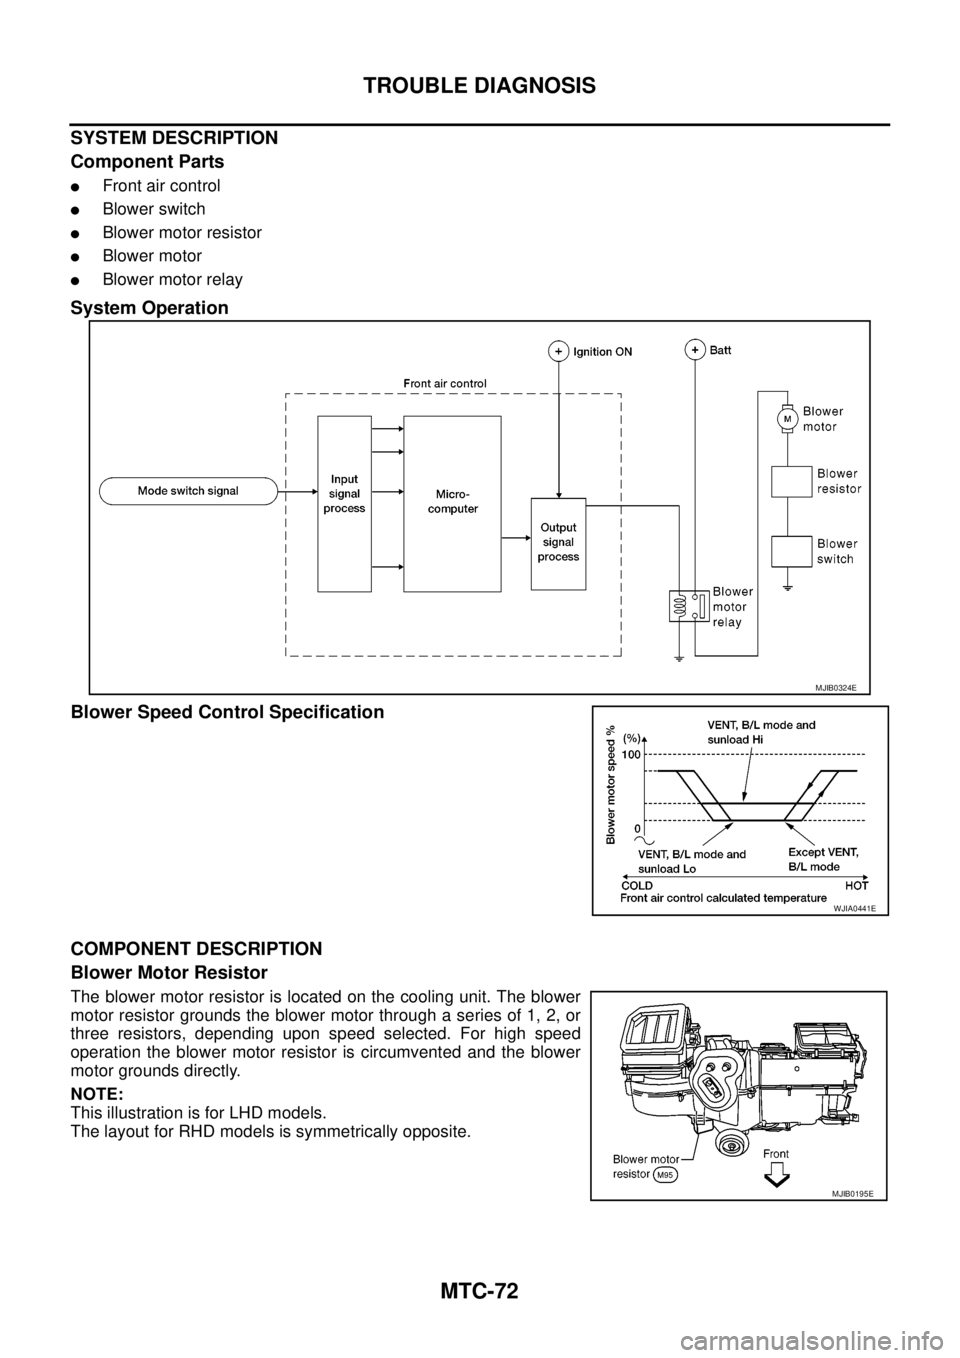
SYSTEM DESCRIPTION
Component Parts
lFront air control
lBlower switch
lBlower motor resistor
lBlower motor
lBlower motor relay
System Operation
Blower Speed Control Specification
COMPONENT DESCRIPTION
Blower Motor Resistor
The blower motor resistor is located on the cooling unit. The blower
motor resistor grounds the blower motor through a series of 1, 2, or
three resistors, depending upon speed selected. For high speed
operation the blower motor resistor is circumvented and the blower
motor grounds directly.
NOTE:
This illustration is for LHD models.
The layout for RHD models is symmetrically opposite.
MJIB0324E
WJIA0441E
MJIB0195E
Page 2460 of 3171
TROUBLE DIAGNOSIS
MTC-73
C
D
E
F
G
H
I
K
L
MA
B
MTC
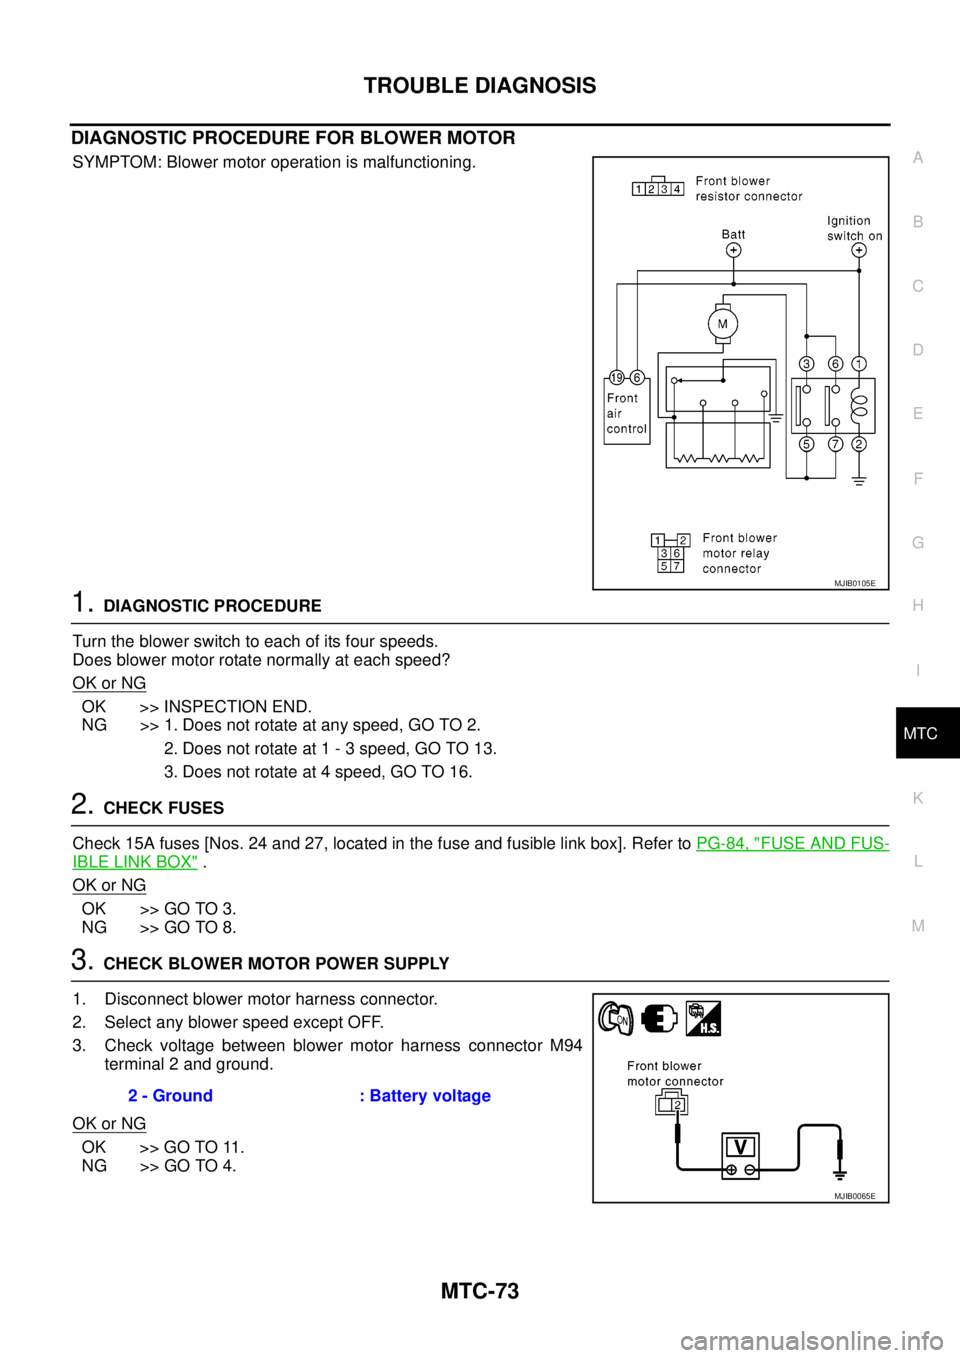
DIAGNOSTIC PROCEDURE FOR BLOWER MOTOR
SYMPTOM: Blower motor operation is malfunctioning.
1.DIAGNOSTIC PROCEDURE
Turntheblowerswitchtoeachofitsfourspeeds.
Does blower motor rotate normally at each speed?
OK or NG
OK >> INSPECTION END.
NG >> 1. Does not rotate at any speed, GO TO 2.
2. Does not rotate at 1 - 3 speed, GO TO 13.
3. Does not rotate at 4 speed, GO TO 16.
2.CHECK FUSES
Check 15A fuses [Nos. 24 and 27, located in the fuse and fusible link box]. Refer toPG-84, "
FUSE AND FUS-
IBLE LINK BOX".
OK or NG
OK >> GO TO 3.
NG >> GO TO 8.
3.CHECK BLOWER MOTOR POWER SUPPLY
1. Disconnect blower motor harness connector.
2. Select any blower speed except OFF.
3. Check voltage between blower motor harness connector M94
terminal 2 and ground.
OK or NG
OK >> GO TO 11.
NG >> GO TO 4.
MJIB0105E
2 - Ground : Battery voltage
MJIB0065E