NISSAN NAVARA 2005 Repair Workshop Manual
Manufacturer: NISSAN, Model Year: 2005, Model line: NAVARA, Model: NISSAN NAVARA 2005Pages: 3171, PDF Size: 49.59 MB
Page 2461 of 3171
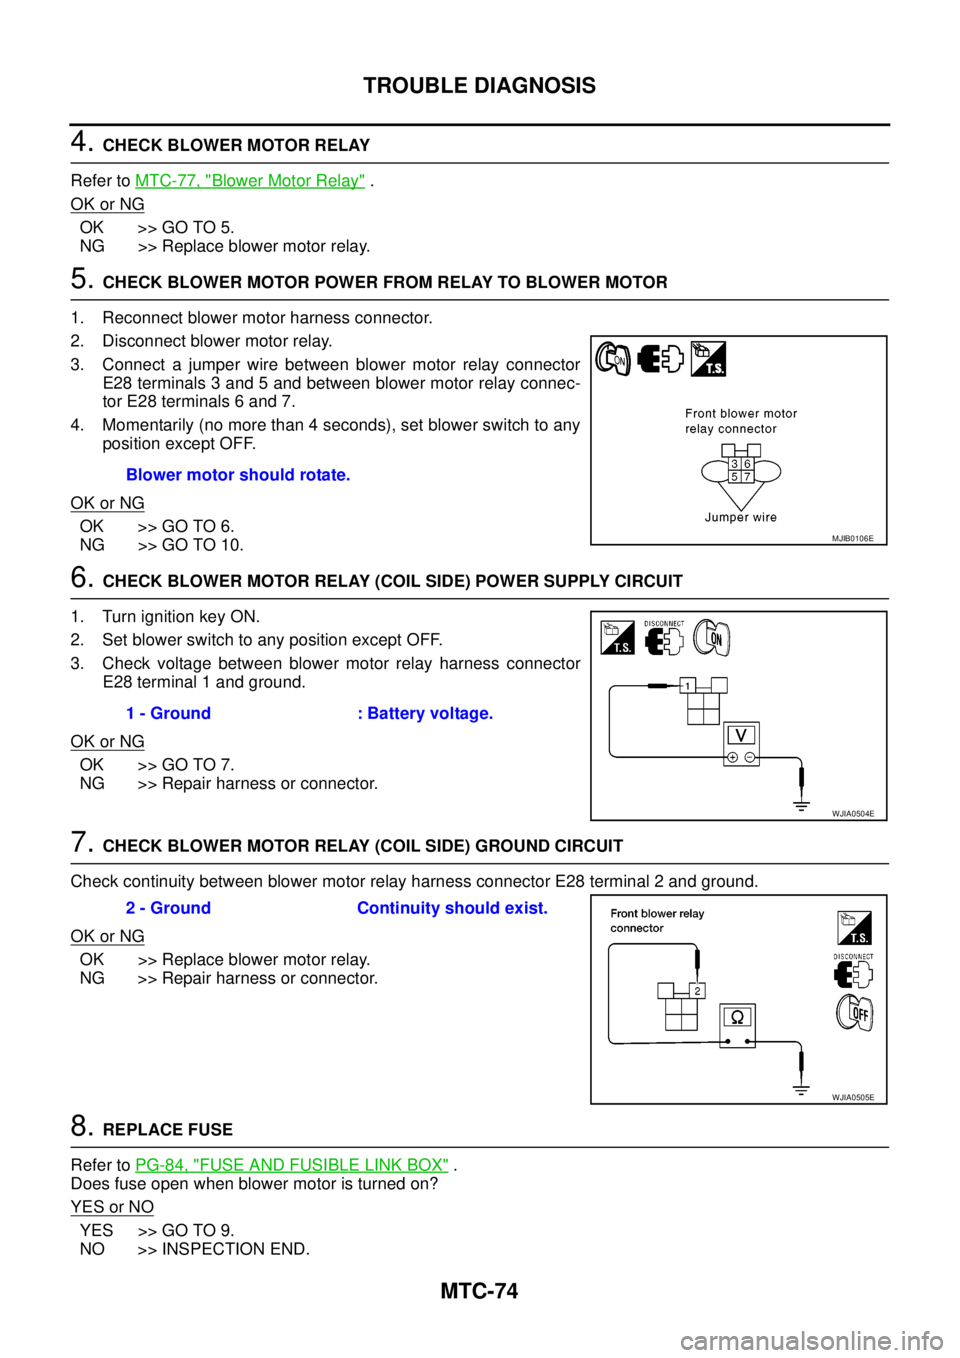
MTC-74
TROUBLE DIAGNOSIS
4.CHECK BLOWER MOTOR RELAY
Refer toMTC-77, "
Blower Motor Relay".
OK or NG
OK >> GO TO 5.
NG >> Replace blower motor relay.
5.CHECK BLOWER MOTOR POWER FROM RELAY TO BLOWER MOTOR
1. Reconnect blower motor harness connector.
2. Disconnect blower motor relay.
3. Connect a jumper wire between blower motor relay connector
E28 terminals 3 and 5 and between blower motor relay connec-
tor E28 terminals 6 and 7.
4. Momentarily (no more than 4 seconds), set blower switch to any
position except OFF.
OK or NG
OK >> GO TO 6.
NG >> GO TO 10.
6.CHECK BLOWER MOTOR RELAY (COIL SIDE) POWER SUPPLY CIRCUIT
1. Turn ignition key ON.
2. Set blower switch to any position except OFF.
3. Check voltage between blower motor relay harness connector
E28 terminal 1 and ground.
OK or NG
OK >> GO TO 7.
NG >> Repair harness or connector.
7.CHECK BLOWER MOTOR RELAY (COIL SIDE) GROUND CIRCUIT
Check continuity between blower motor relay harness connector E28 terminal 2 and ground.
OK or NG
OK >> Replace blower motor relay.
NG >> Repair harness or connector.
8.REPLACE FUSE
Refer toPG-84, "
FUSE AND FUSIBLE LINK BOX".
Does fuse open when blower motor is turned on?
YESorNO
YES >> GO TO 9.
NO >> INSPECTION END.Blower motor should rotate.
MJIB0106E
1 - Ground : Battery voltage.
WJIA0504E
2 - Ground Continuity should exist.
WJIA0505E
Page 2462 of 3171
TROUBLE DIAGNOSIS
MTC-75
C
D
E
F
G
H
I
K
L
MA
B
MTC
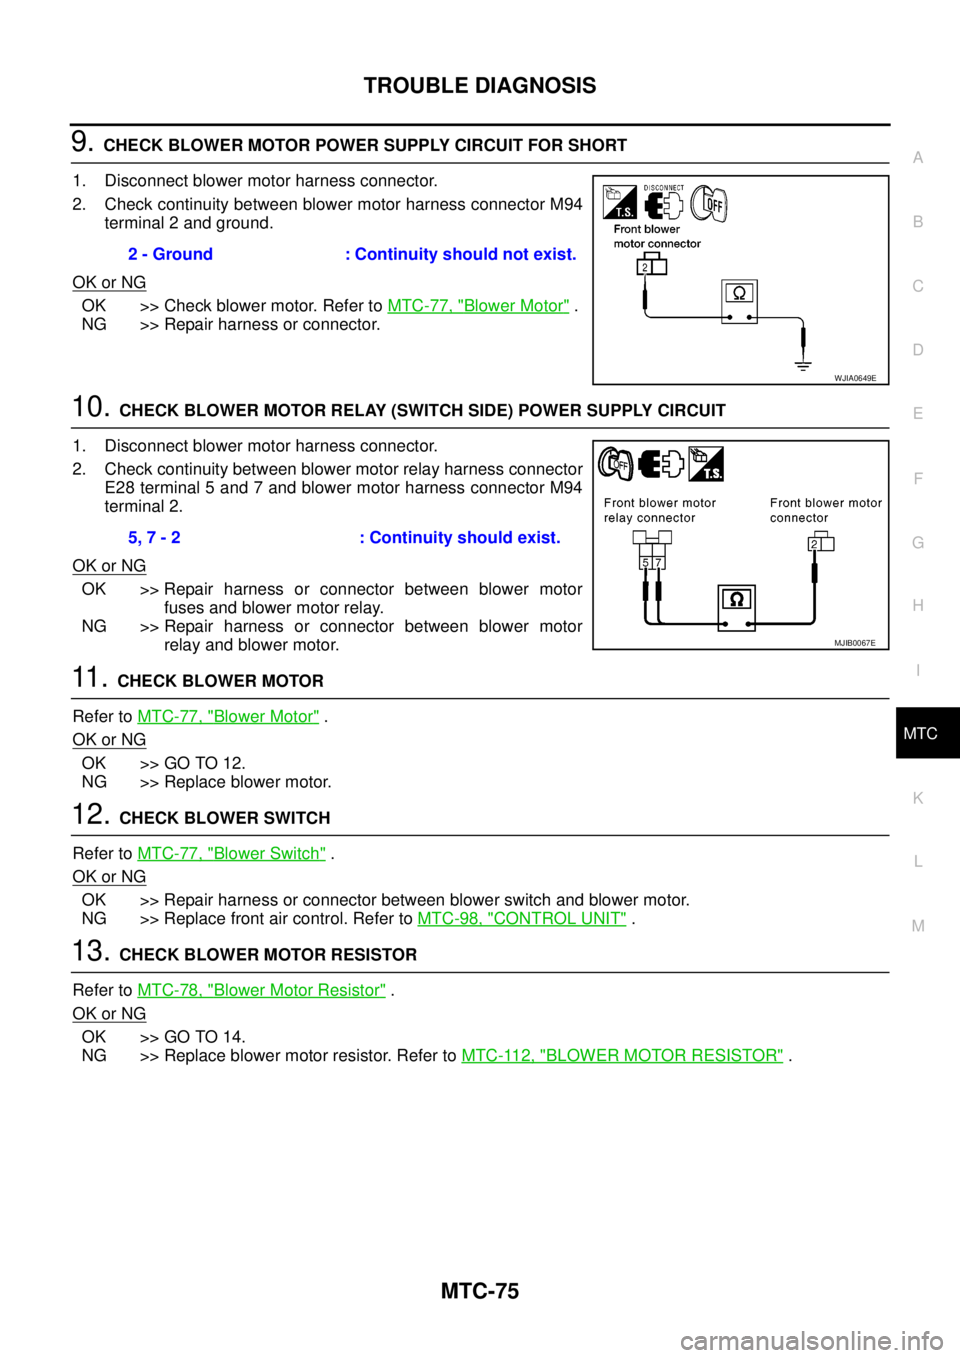
9.CHECK BLOWER MOTOR POWER SUPPLY CIRCUIT FOR SHORT
1. Disconnect blower motor harness connector.
2. Check continuity between blower motor harness connector M94
terminal 2 and ground.
OK or NG
OK >> Check blower motor. Refer toMTC-77, "Blower Motor".
NG >> Repair harness or connector.
10.CHECK BLOWER MOTOR RELAY (SWITCH SIDE) POWER SUPPLY CIRCUIT
1. Disconnect blower motor harness connector.
2. Check continuity between blower motor relay harness connector
E28 terminal 5 and 7 and blower motor harness connector M94
terminal 2.
OK or NG
OK >> Repair harness or connector between blower motor
fuses and blower motor relay.
NG >> Repair harness or connector between blower motor
relay and blower motor.
11 .CHECK BLOWER MOTOR
Refer toMTC-77, "
Blower Motor".
OK or NG
OK >> GO TO 12.
NG >> Replace blower motor.
12.CHECK BLOWER SWITCH
Refer toMTC-77, "
Blower Switch".
OK or NG
OK >> Repair harness or connector between blower switch and blower motor.
NG >> Replace front air control. Refer toMTC-98, "
CONTROL UNIT".
13.CHECK BLOWER MOTOR RESISTOR
Refer toMTC-78, "
Blower Motor Resistor".
OK or NG
OK >> GO TO 14.
NG >> Replace blower motor resistor. Refer toMTC-112, "
BLOWER MOTOR RESISTOR". 2 - Ground : Continuity should not exist.
WJIA0649E
5, 7 - 2 : Continuity should exist.
MJIB0067E
Page 2463 of 3171
MTC-76
TROUBLE DIAGNOSIS
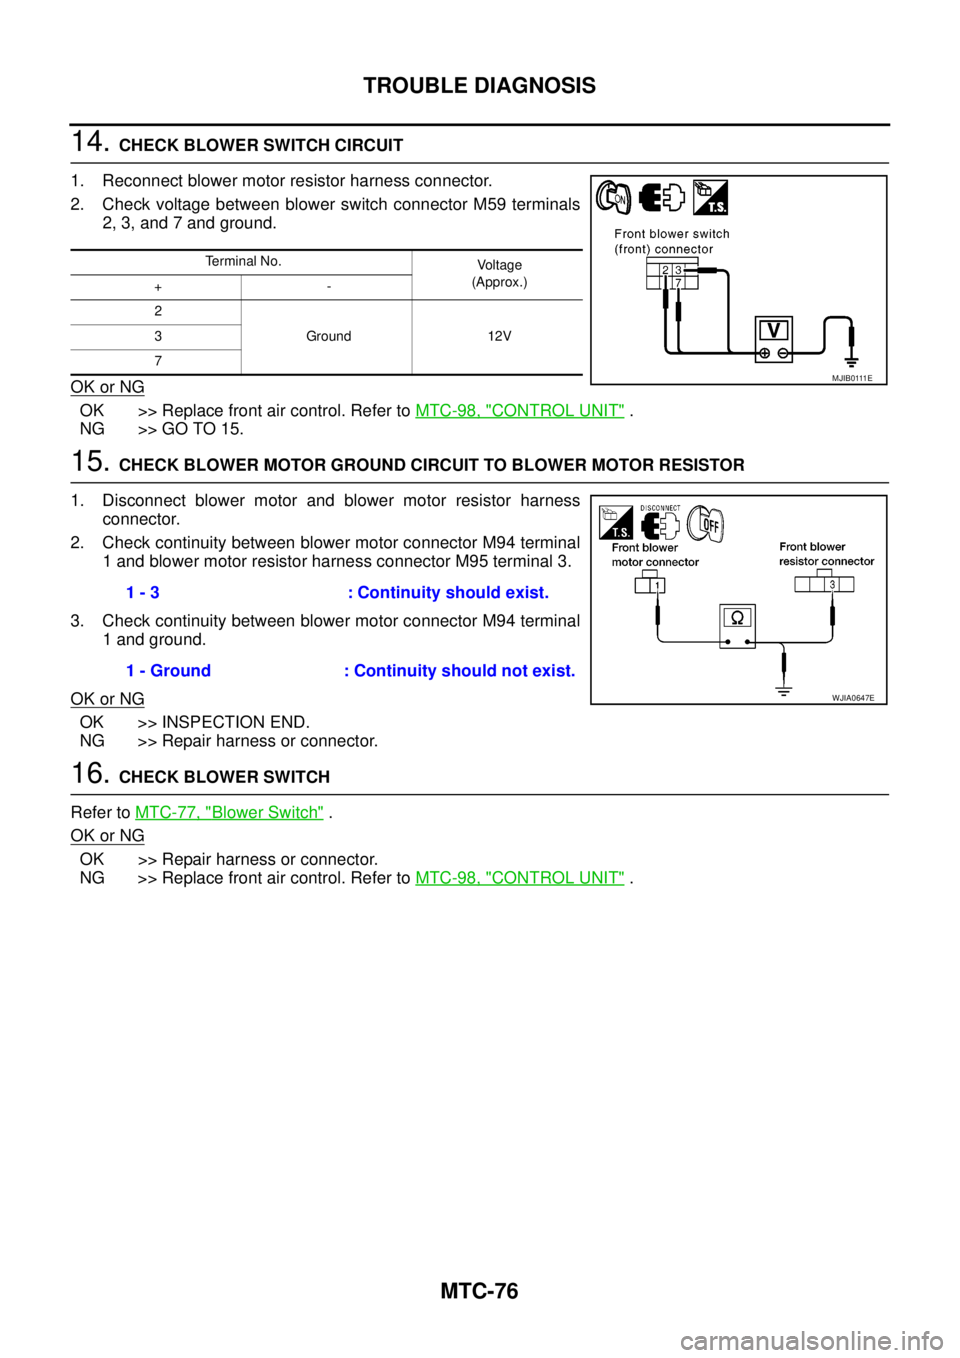
14.CHECK BLOWER SWITCH CIRCUIT
1. Reconnect blower motor resistor harness connector.
2. Check voltage between blower switch connector M59 terminals
2, 3, and 7 and ground.
OK or NG
OK >> Replace front air control. Refer toMTC-98, "CONTROL UNIT".
NG >> GO TO 15.
15.CHECK BLOWER MOTOR GROUND CIRCUIT TO BLOWER MOTOR RESISTOR
1. Disconnect blower motor and blower motor resistor harness
connector.
2. Check continuity between blower motor connector M94 terminal
1 and blower motor resistor harness connector M95 terminal 3.
3. Check continuity between blower motor connector M94 terminal
1 and ground.
OK or NG
OK >> INSPECTION END.
NG >> Repair harness or connector.
16.CHECK BLOWER SWITCH
Refer toMTC-77, "
Blower Switch".
OK or NG
OK >> Repair harness or connector.
NG >> Replace front air control. Refer toMTC-98, "
CONTROL UNIT".
Terminal No.
Voltage
(Approx.)
+-
2
Ground 12V 3
7
M J I B 0 111 E
1 - 3 : Continuity should exist.
1 - Ground : Continuity should not exist.
WJIA0647E
Page 2464 of 3171
TROUBLE DIAGNOSIS
MTC-77
C
D
E
F
G
H
I
K
L
MA
B
MTC
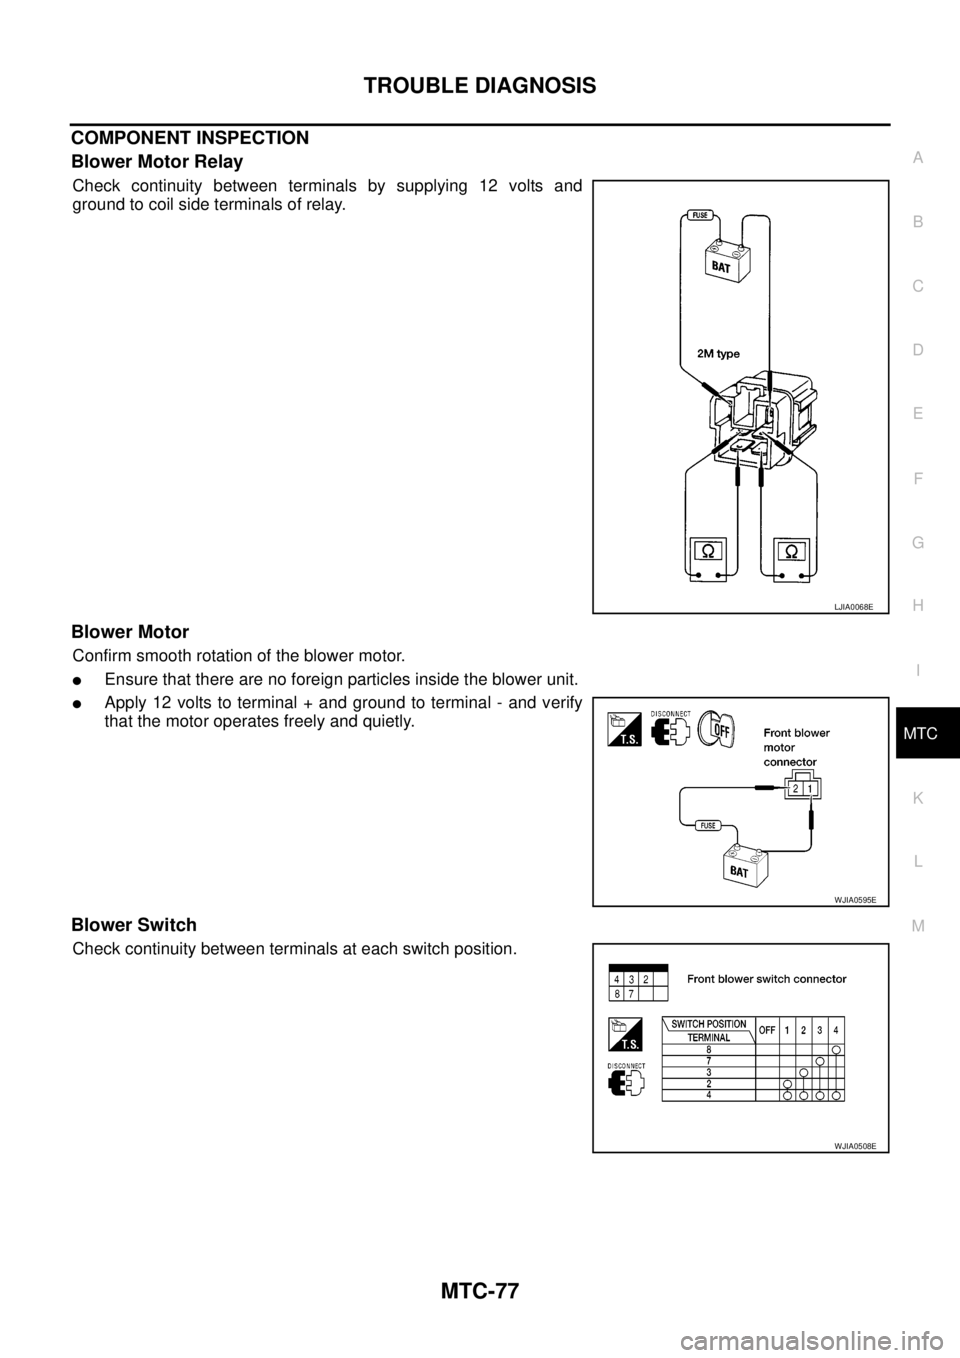
COMPONENT INSPECTION
Blower Motor Relay
Check continuity between terminals by supplying 12 volts and
ground to coil side terminals of relay.
Blower Motor
Confirm smooth rotation of the blower motor.
lEnsure that there are no foreign particles inside the blower unit.
lApply 12 volts to terminal + and ground to terminal - and verify
that the motor operates freely and quietly.
Blower Switch
Check continuity between terminals at each switch position.
LJIA0068E
WJIA0595E
WJIA0508E
Page 2465 of 3171
MTC-78
TROUBLE DIAGNOSIS
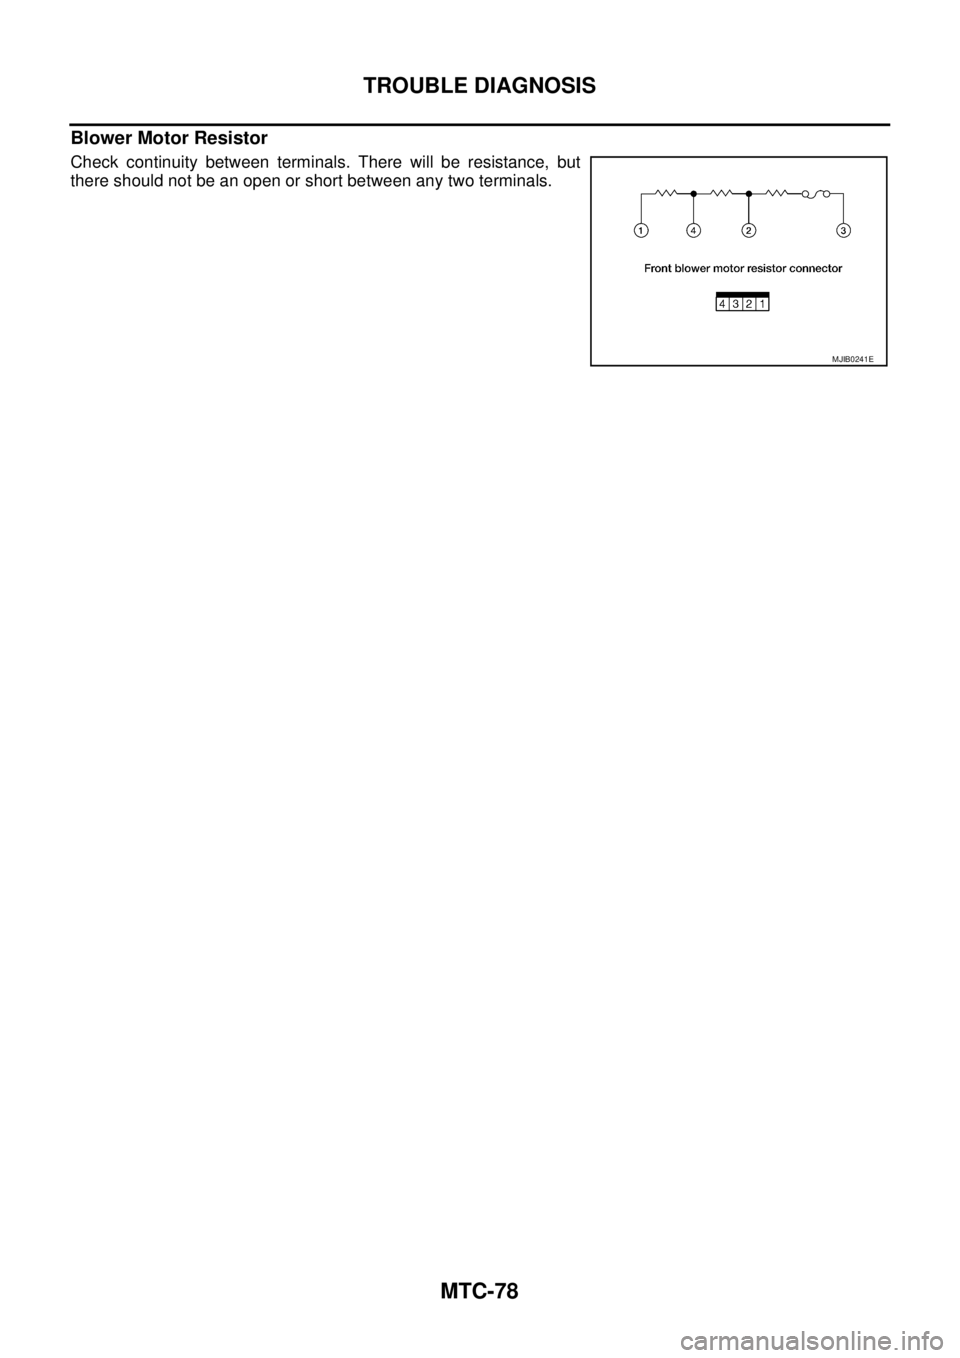
Blower Motor Resistor
Check continuity between terminals. There will be resistance, but
there should not be an open or short between any two terminals.
MJIB0241E
Page 2466 of 3171
TROUBLE DIAGNOSIS
MTC-79
C
D
E
F
G
H
I
K
L
MA
B
MTC
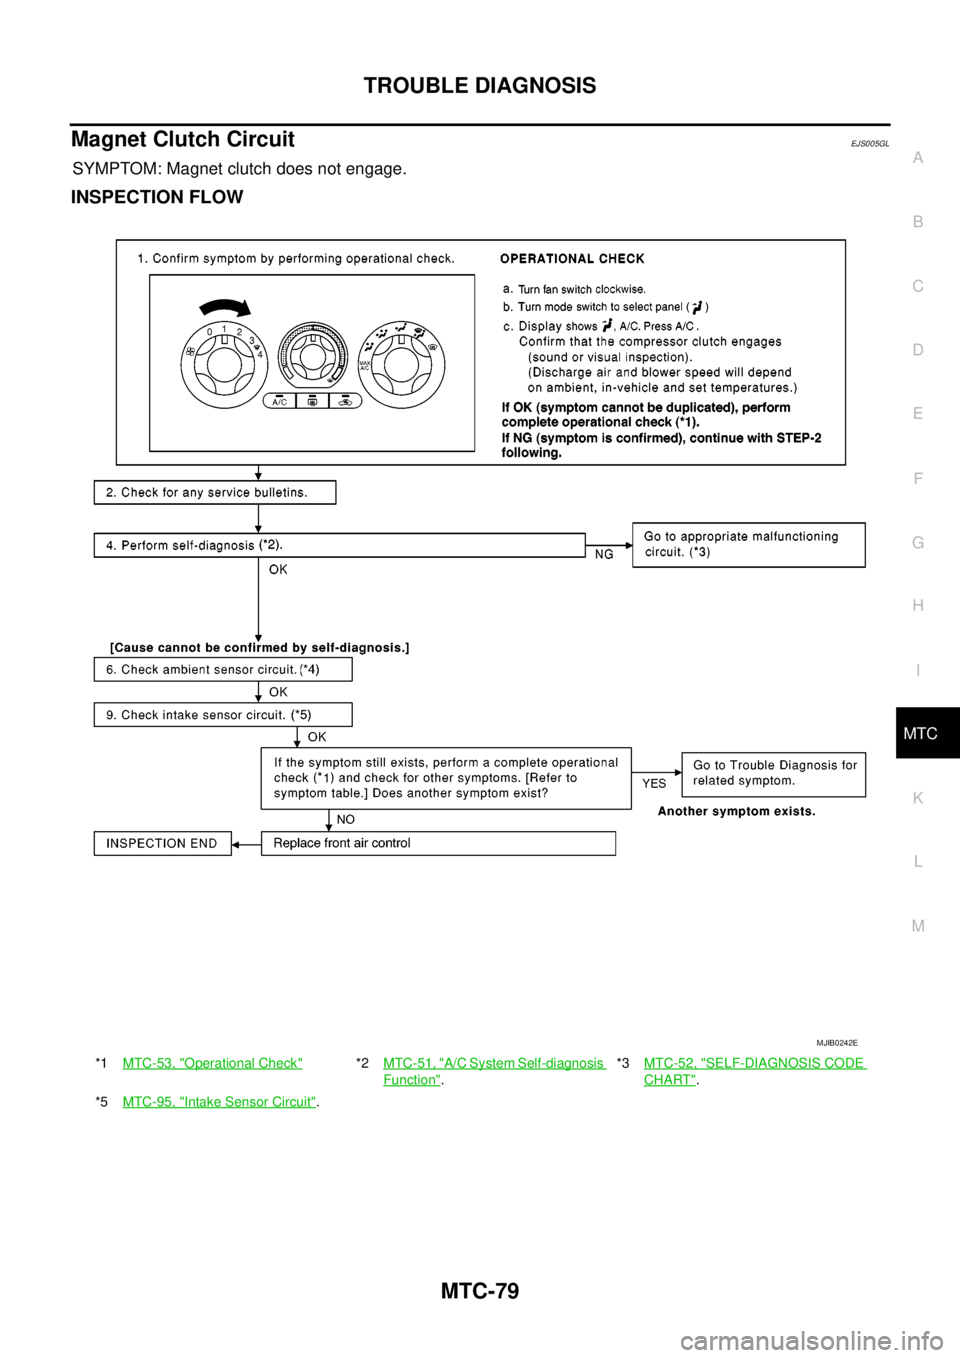
Magnet Clutch CircuitEJS005GL
SYMPTOM: Magnet clutch does not engage.
INSPECTION FLOW
*1MTC-53, "Operational Check"*2MTC-51, "A/C System Self-diagnosis
Function".*3MTC-52, "
SELF-DIAGNOSIS CODE
CHART".
*5MTC-95, "
Intake Sensor Circuit".
MJIB0242E
Page 2467 of 3171
MTC-80
TROUBLE DIAGNOSIS
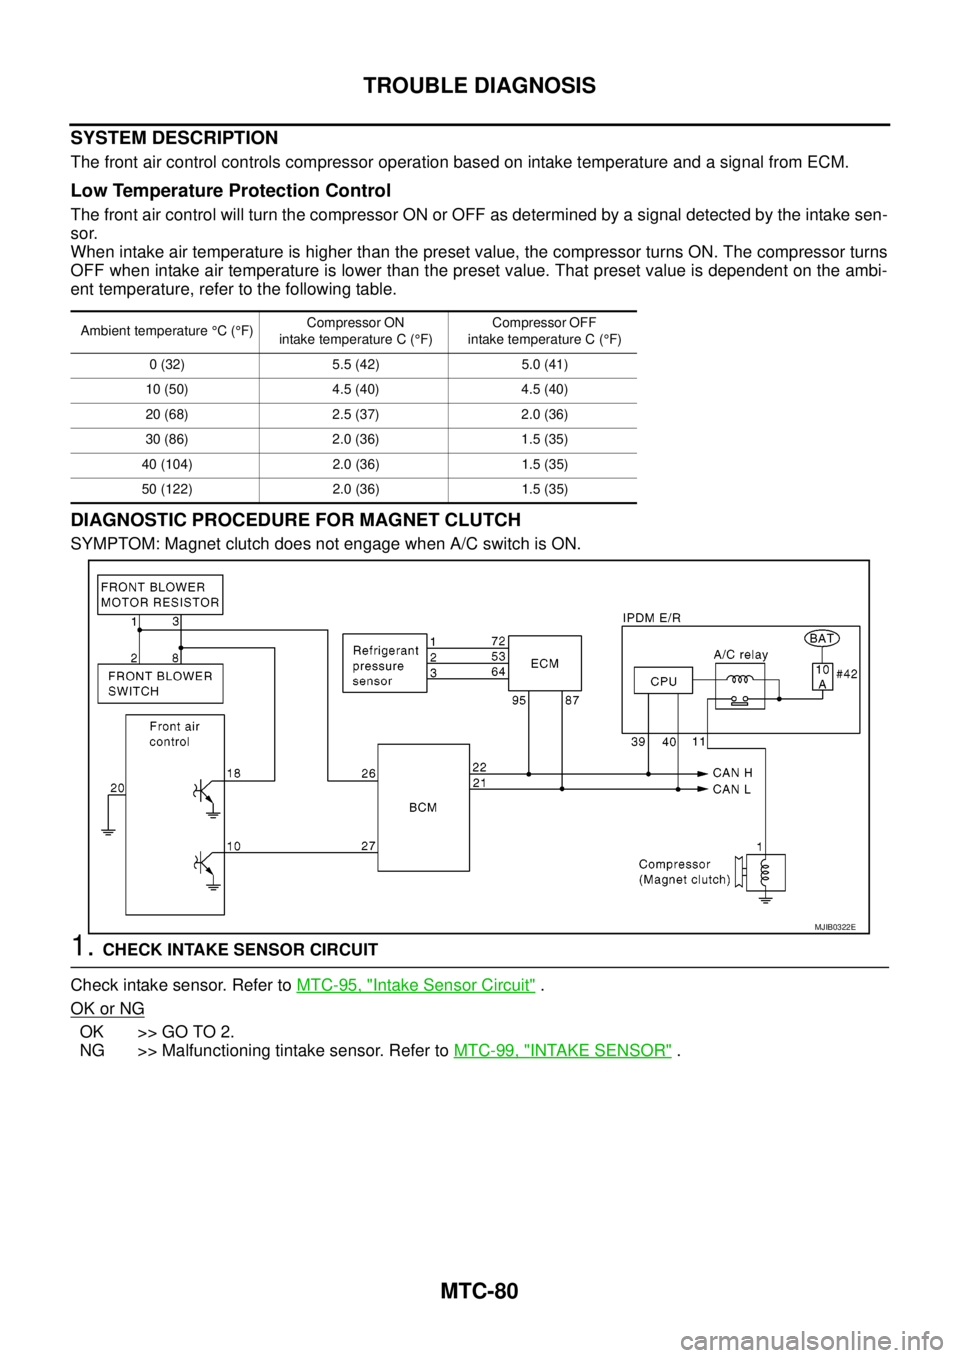
SYSTEM DESCRIPTION
The front air control controls compressor operation based on intake temperature and a signal from ECM.
Low Temperature Protection Control
The front air control will turn the compressor ON or OFF as determined by a signal detected by the intake sen-
sor.
When intake air temperature is higher than the preset value, the compressor turns ON. The compressor turns
OFF when intake air temperature is lower than the preset value. That preset value is dependent on the ambi-
ent temperature, refer to the following table.
DIAGNOSTIC PROCEDURE FOR MAGNET CLUTCH
SYMPTOM: Magnet clutch does not engage when A/C switch is ON.
1.CHECK INTAKE SENSOR CIRCUIT
Check intake sensor. Refer toMTC-95, "
Intake Sensor Circuit".
OK or NG
OK >> GO TO 2.
NG >> Malfunctioning tintake sensor. Refer toMTC-99, "
INTAKE SENSOR".
Ambient temperature°C(°F)Compressor ON
intake temperature C (°F)Compressor OFF
intake temperature C (°F)
0 (32) 5.5 (42) 5.0 (41)
10 (50) 4.5 (40) 4.5 (40)
20 (68) 2.5 (37) 2.0 (36)
30 (86) 2.0 (36) 1.5 (35)
40 (104) 2.0 (36) 1.5 (35)
50 (122) 2.0 (36) 1.5 (35)
MJIB0322E
Page 2468 of 3171
TROUBLE DIAGNOSIS
MTC-81
C
D
E
F
G
H
I
K
L
MA
B
MTC
2.PERFORM AUTO ACTIVE TEST
Refer toPG-19, "
Auto Active Test".
Does magnet clutch operate?
YES or NO
YES >>lWITH CONSULT-II
GO TO 5.
lWITHOUT CONSULT-II
GO TO 6.
NO >> Check 10A fuse (No. 42, located in IPDM E/R), and GO TO 3.
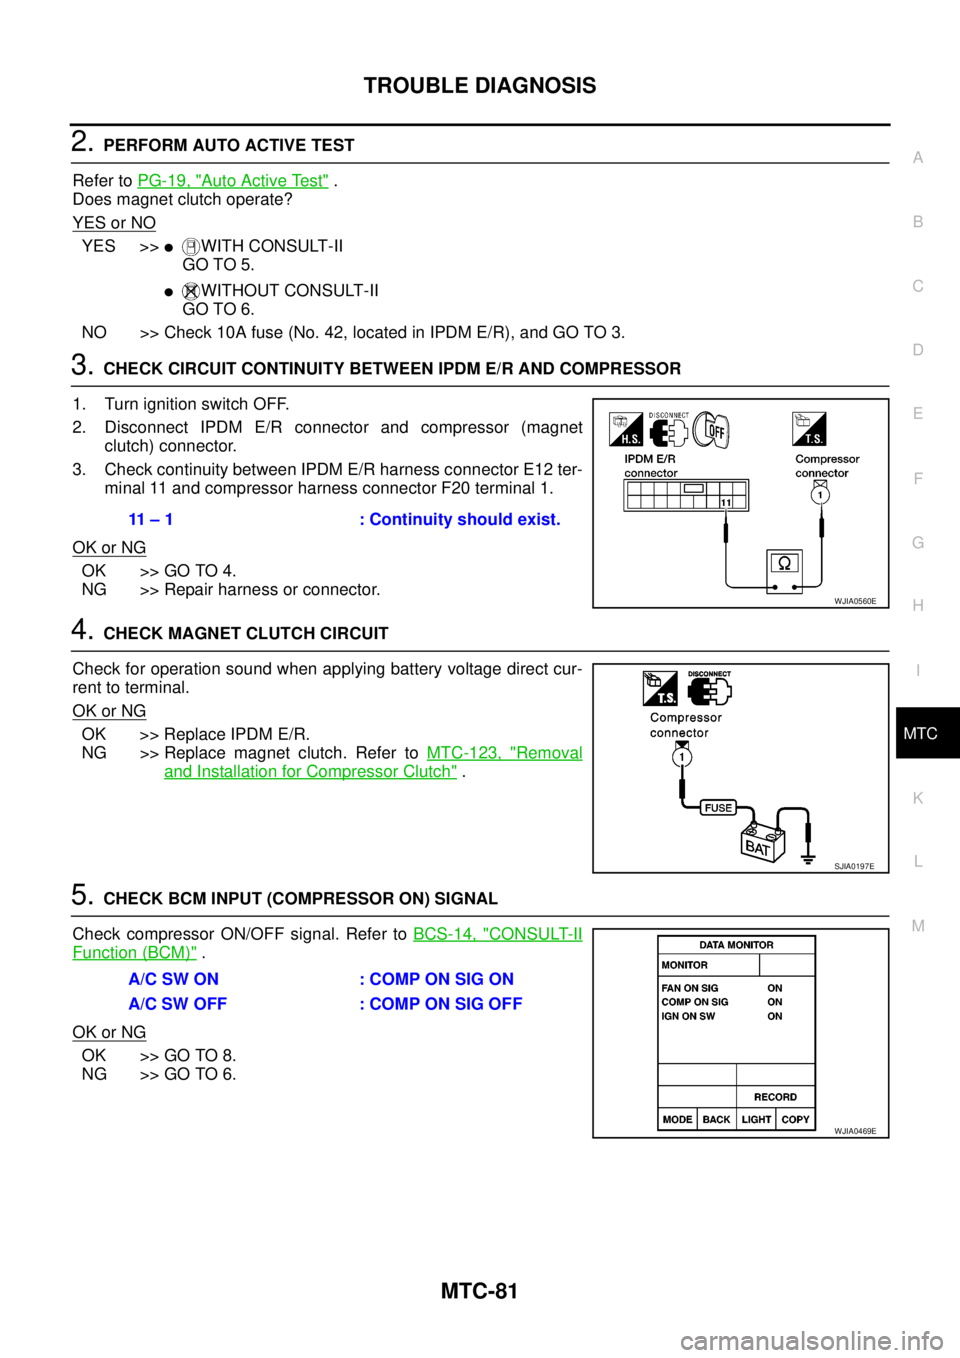
3.CHECK CIRCUIT CONTINUITY BETWEEN IPDM E/R AND COMPRESSOR
1. Turn ignition switch OFF.
2. Disconnect IPDM E/R connector and compressor (magnet
clutch) connector.
3. Check continuity between IPDM E/R harness connector E12 ter-
minal 11 and compressor harness connector F20 terminal 1.
OK or NG
OK >> GO TO 4.
NG >> Repair harness or connector.
4.CHECK MAGNET CLUTCH CIRCUIT
Check for operation sound when applying battery voltage direct cur-
rent to terminal.
OK or NG
OK >> Replace IPDM E/R.
NG >> Replace magnet clutch. Refer toMTC-123, "
Removal
and Installation for Compressor Clutch".
5.CHECK BCM INPUT (COMPRESSOR ON) SIGNAL
Check compressor ON/OFF signal. Refer toBCS-14, "
CONSULT-II
Function (BCM)".
OK or NG
OK >> GO TO 8.
NG >> GO TO 6.
11 – 1 : Continuity should exist.
WJIA0560E
SJIA0197E
A/C SW ON : COMP ON SIG ON
A/CSWOFF :COMPONSIGOFF
WJIA0469E
Page 2469 of 3171
MTC-82
TROUBLE DIAGNOSIS
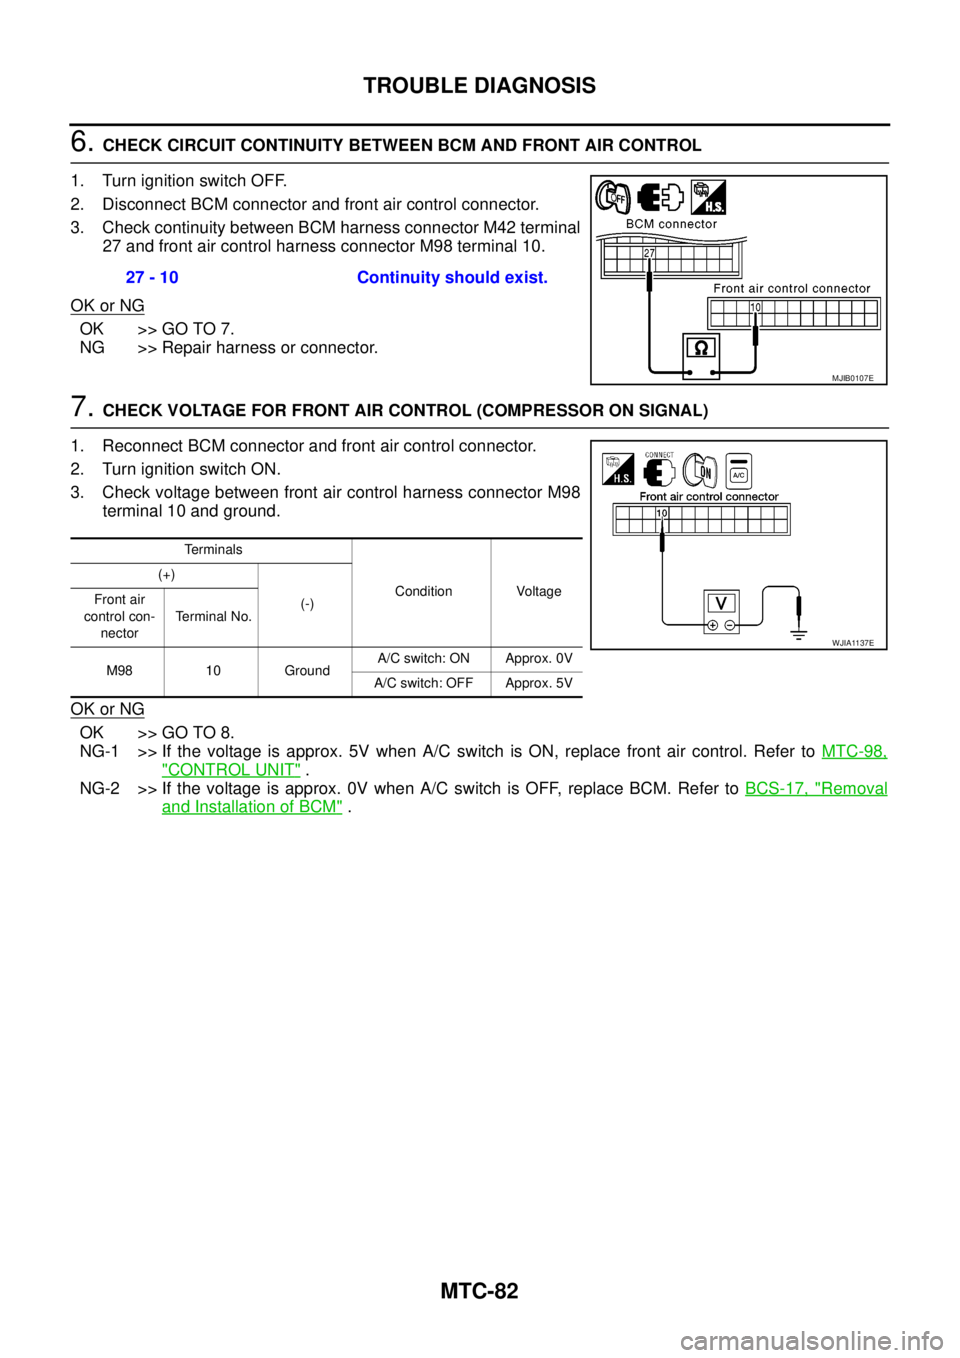
6.CHECK CIRCUIT CONTINUITY BETWEEN BCM AND FRONT AIR CONTROL
1. Turn ignition switch OFF.
2. Disconnect BCM connector and front air control connector.
3. Check continuity between BCM harness connector M42 terminal
27 and front air control harness connector M98 terminal 10.
OK or NG
OK >> GO TO 7.
NG >> Repair harness or connector.
7.CHECK VOLTAGE FOR FRONT AIR CONTROL (COMPRESSOR ON SIGNAL)
1. Reconnect BCM connector and front air control connector.
2. Turn ignition switch ON.
3. Check voltage between front air control harness connector M98
terminal 10 and ground.
OK or NG
OK >> GO TO 8.
NG-1 >> If the voltage is approx. 5V when A/C switch is ON, replace front air control. Refer toMTC-98,
"CONTROL UNIT".
NG-2 >> If the voltage is approx. 0V when A/C switch is OFF, replace BCM. Refer toBCS-17, "
Removal
and Installation of BCM". 27 - 10 Continuity should exist.
MJIB0107E
Terminals
Condition Voltage (+)
(-) Front air
control con-
nectorTerminal No.
M98 10 GroundA/C switch: ON Approx. 0V
A/C switch: OFF Approx. 5V
WJIA1137E
Page 2470 of 3171
TROUBLE DIAGNOSIS
MTC-83
C
D
E
F
G
H
I
K
L
MA
B
MTC
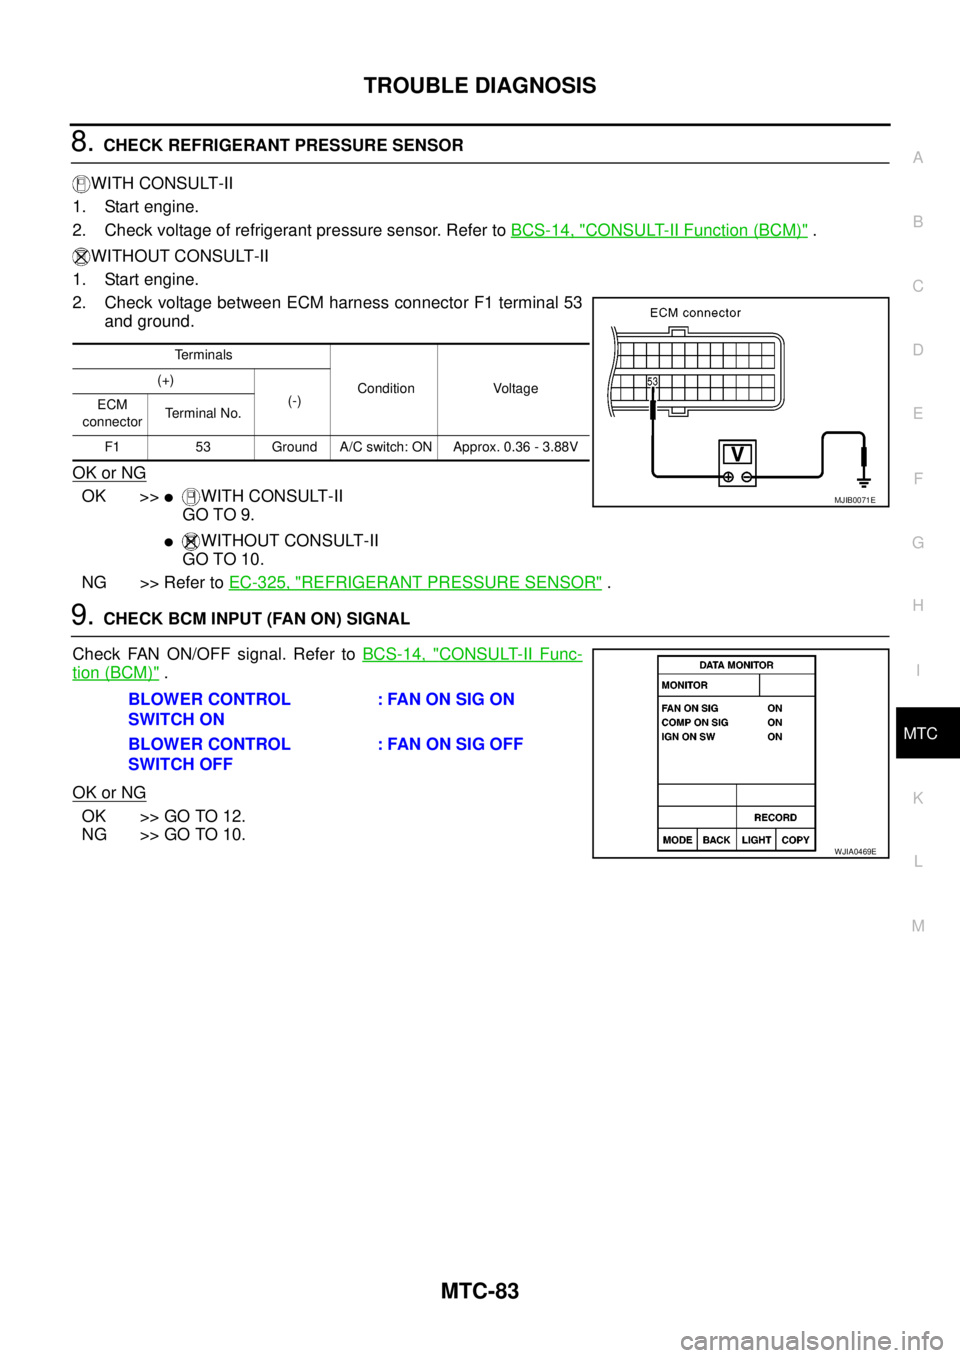
8.CHECK REFRIGERANT PRESSURE SENSOR
WITH CONSULT-II
1. Start engine.
2. Check voltage of refrigerant pressure sensor. Refer toBCS-14, "
CONSULT-II Function (BCM)".
WITHOUT CONSULT-II
1. Start engine.
2. Check voltage between ECM harness connector F1 terminal 53
and ground.
OK or NG
OK >>lWITH CONSULT-II
GO TO 9.
lWITHOUT CONSULT-II
GO TO 10.
NG >> Refer toEC-325, "
REFRIGERANT PRESSURE SENSOR".
9.CHECK BCM INPUT (FAN ON) SIGNAL
Check FAN ON/OFF signal. Refer toBCS-14, "
CONSULT-II Func-
tion (BCM)".
OK or NG
OK >> GO TO 12.
NG >> GO TO 10.
Terminals
Condition Voltage (+)
(-)
ECM
connectorTerminal No.
F1 53 Ground A/C switch: ON Approx. 0.36 - 3.88V
MJIB0071E
BLOWER CONTROL
SWITCH ON: FAN ON SIG ON
BLOWER CONTROL
SWITCH OFF:FANONSIGOFF
WJIA0469E