NISSAN NAVARA 2005 Repair Workshop Manual
NAVARA 2005
NISSAN
NISSAN
https://www.carmanualsonline.info/img/5/57362/w960_57362-0.png
NISSAN NAVARA 2005 Repair Workshop Manual
Trending: body, child restraint, adding oil, interior lights, power steering belt, buttons, driver seat adjustment
Page 2491 of 3171
MTC-104
HEATER & COOLING UNIT ASSEMBLY
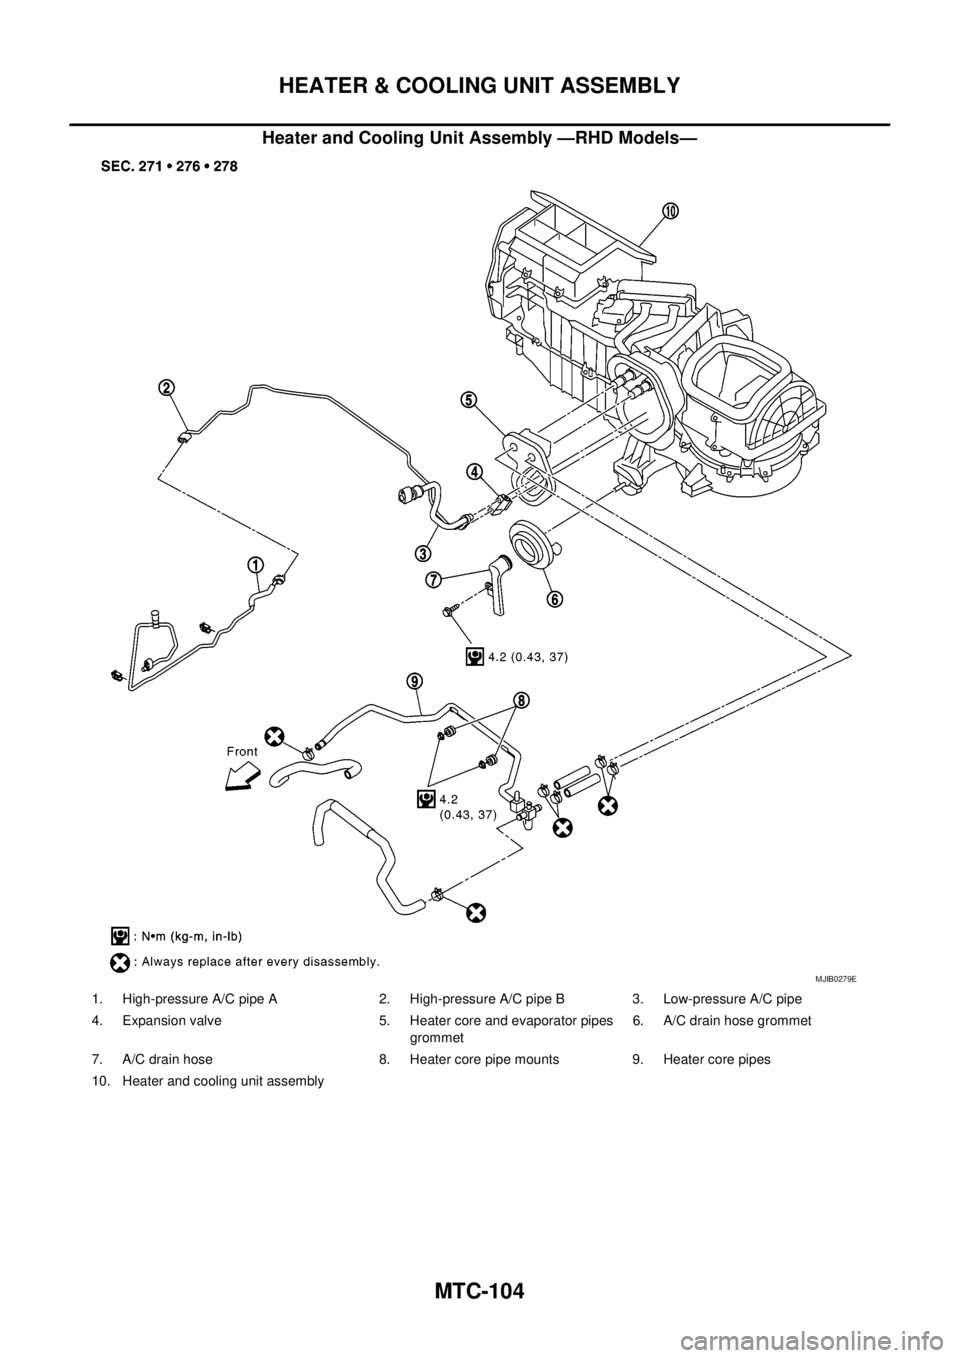
Heater and Cooling Unit Assembly —RHD Models—
MJIB0279E
1. High-pressure A/C pipe A 2. High-pressure A/C pipe B 3. Low-pressure A/C pipe
4. Expansion valve 5. Heater core and evaporator pipes
grommet6. A/C drain hose grommet
7. A/C drain hose 8. Heater core pipe mounts 9. Heater core pipes
10. Heater and cooling unit assembly
Page 2492 of 3171
HEATER & COOLING UNIT ASSEMBLY
MTC-105
C
D
E
F
G
H
I
K
L
MA
B
MTC
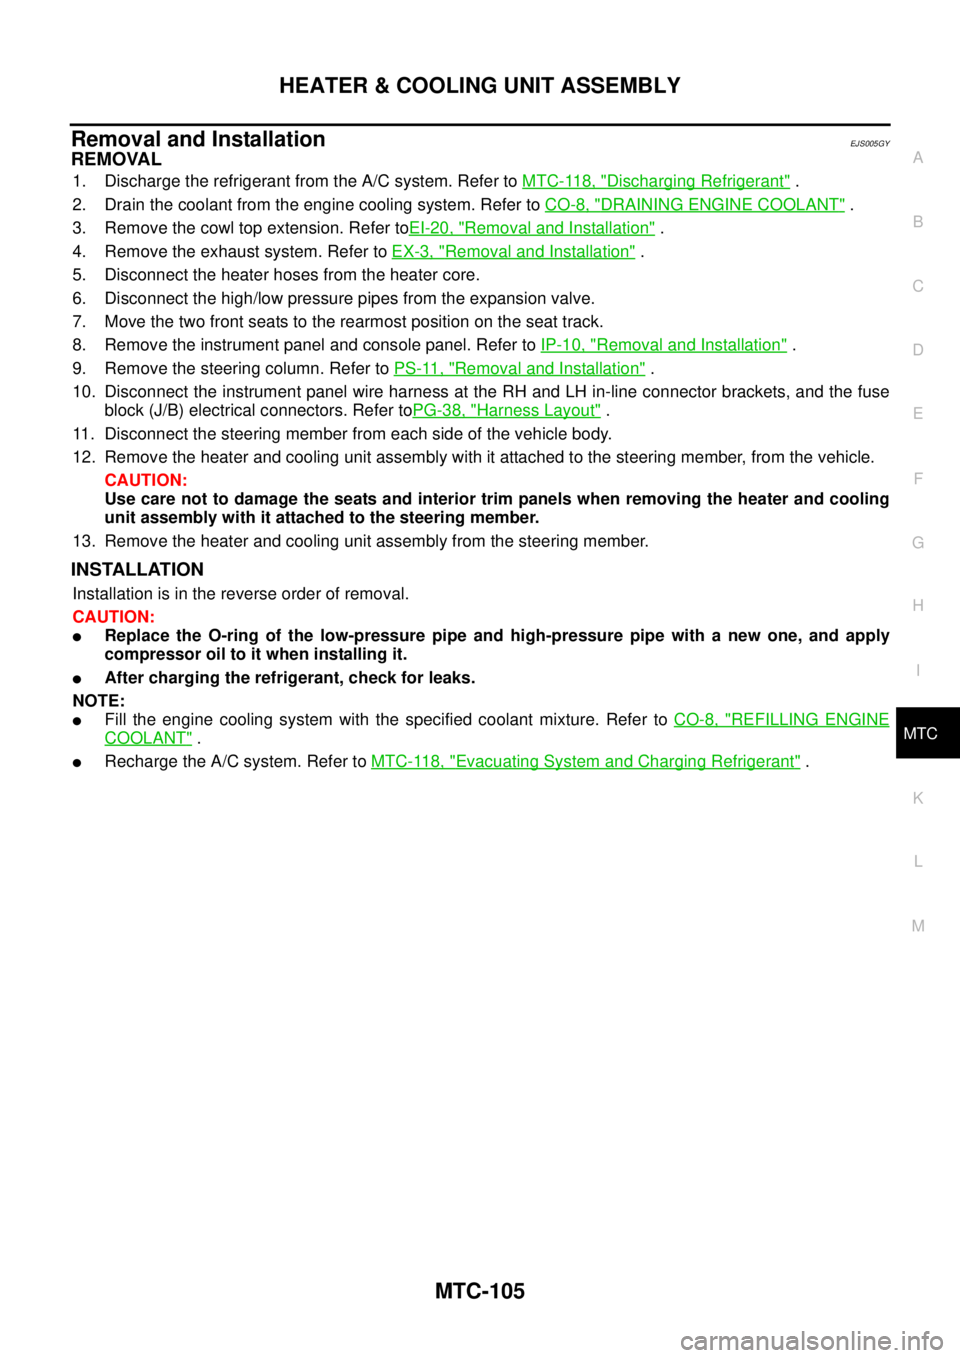
Removal and InstallationEJS005GY
REMOVAL
1. Discharge the refrigerant from the A/C system. Refer toMTC-118, "Discharging Refrigerant".
2. Drain the coolant from the engine cooling system. Refer toCO-8, "
DRAINING ENGINE COOLANT".
3. Remove the cowl top extension. Refer toEI-20, "
Removal and Installation".
4. Remove the exhaust system. Refer toEX-3, "
Removal and Installation".
5. Disconnect the heater hoses from the heater core.
6. Disconnect the high/low pressure pipes from the expansion valve.
7. Move the two front seats to the rearmost position on the seat track.
8. Remove the instrument panel and console panel. Refer toIP-10, "
Removal and Installation".
9. Remove the steering column. Refer toPS-11, "
Removal and Installation".
10. Disconnect the instrument panel wire harness at the RH and LH in-line connector brackets, and the fuse
block (J/B) electrical connectors. Refer toPG-38, "
Harness Layout".
11. Disconnect the steering member from each side of the vehicle body.
12. Remove the heater and cooling unit assembly with it attached to the steering member, from the vehicle.
CAUTION:
Use care not to damage the seats and interior trim panels when removing the heater and cooling
unit assembly with it attached to the steering member.
13. Remove the heater and cooling unit assembly from the steering member.
INSTALLATION
Installation is in the reverse order of removal.
CAUTION:
lReplace the O-ring of the low-pressure pipe and high-pressure pipe with a new one, and apply
compressor oil to it when installing it.
lAfter charging the refrigerant, check for leaks.
NOTE:
lFill the engine cooling system with the specified coolant mixture. Refer toCO-8, "REFILLING ENGINE
COOLANT".
lRecharge the A/C system. Refer toMTC-118, "Evacuating System and Charging Refrigerant".
Page 2493 of 3171
MTC-106
HEATER CORE
HEATER CORE
PFP:27140
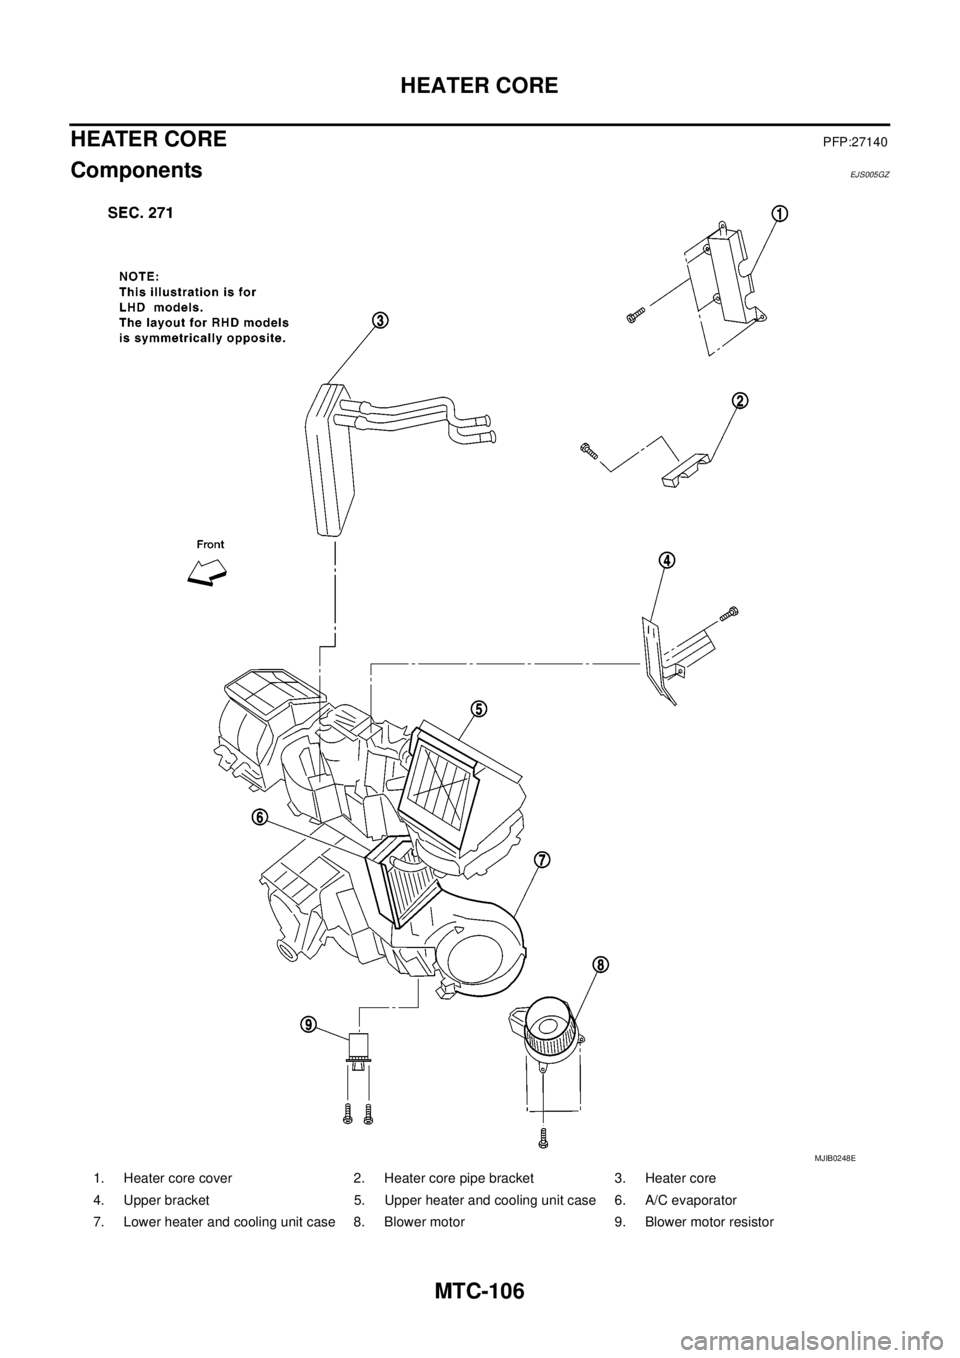
ComponentsEJS005GZ
1. Heater core cover 2. Heater core pipe bracket 3. Heater core
4. Upper bracket 5. Upper heater and cooling unit case 6. A/C evaporator
7. Lower heater and cooling unit case 8. Blower motor 9. Blower motor resistor
MJIB0248E
Page 2494 of 3171
HEATER CORE
MTC-107
C
D
E
F
G
H
I
K
L
MA
B
MTC
Removal and InstallationEJS005H0
REMOVAL
1. Remove the heater and cooling unit assembly. Refer toMTC-103, "HEATER&COOLING UNIT ASSEM-
BLY".
2. Remove the four screws and remove the upper bracket.
3. Remove the four screws and remove the heater core cover.
4. Remove the heater core pipe bracket.
5. Remove the heater core.
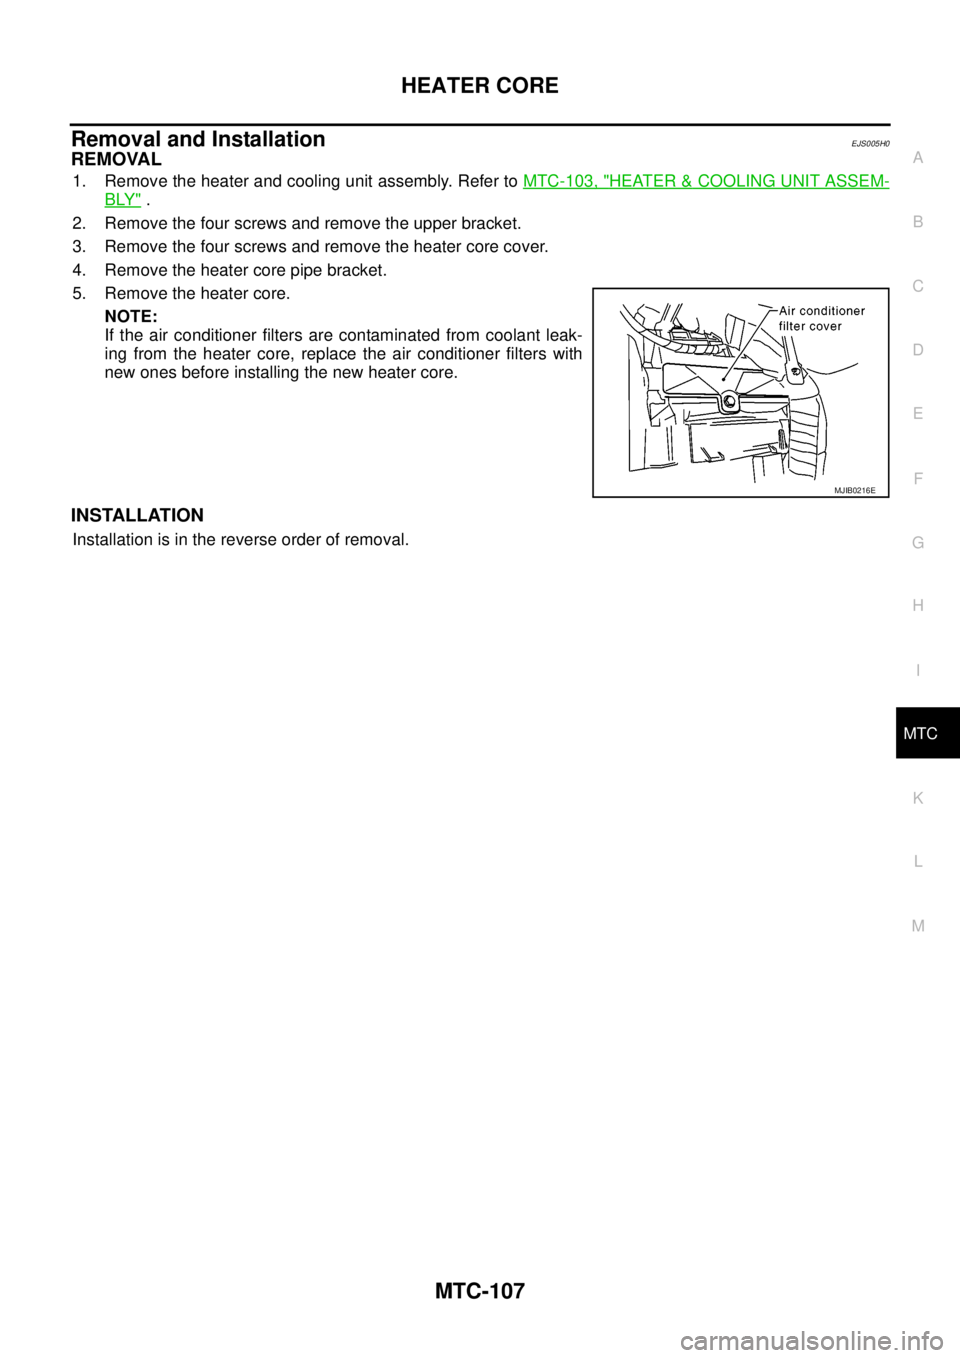
NOTE:
If the air conditioner filters are contaminated from coolant leak-
ing from the heater core, replace the air conditioner filters with
new ones before installing the new heater core.
INSTALLATION
Installation is in the reverse order of removal.
MJIB0216E
Page 2495 of 3171
MTC-108
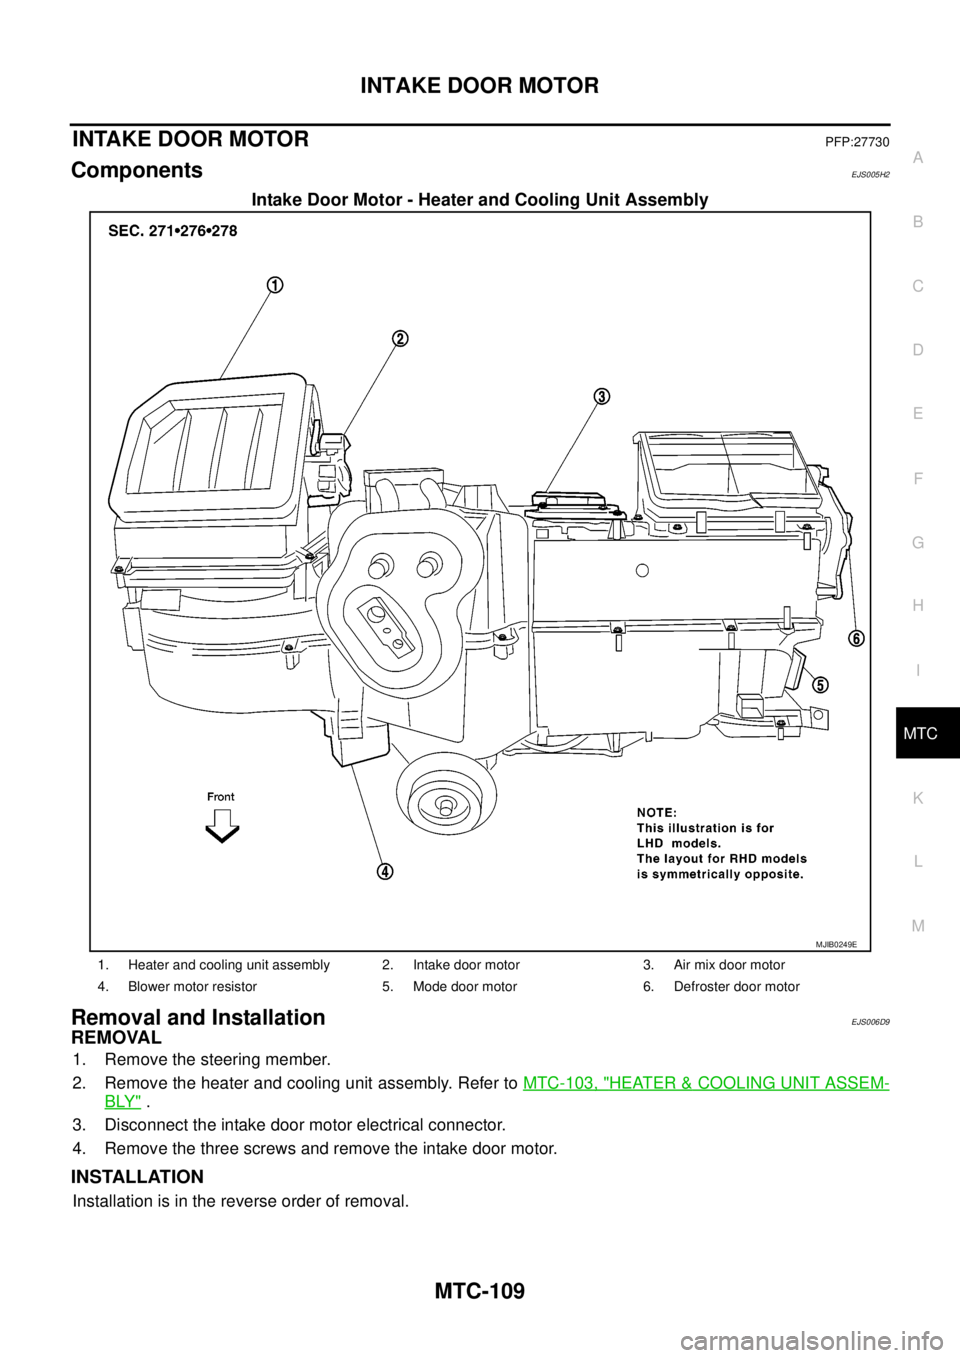
DEFROSTERDOORMOTOR
DEFROSTER DOOR MOTOR
PFP:27733
ComponentsEJS005H1
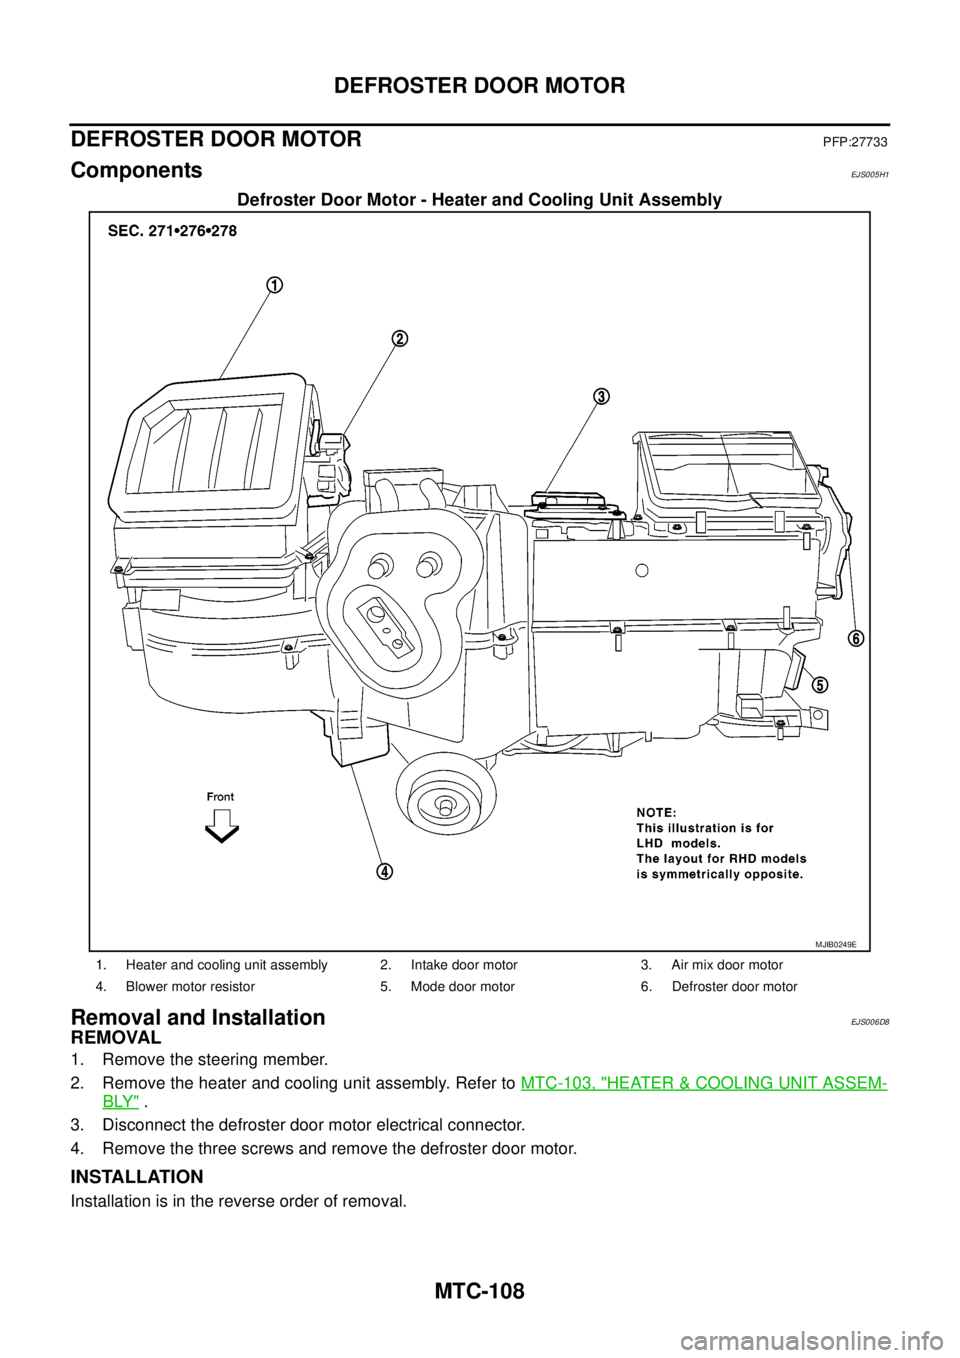
Defroster Door Motor - Heater and Cooling Unit Assembly
Removal and InstallationEJS006D8
REMOVAL
1. Remove the steering member.
2. Remove the heater and cooling unit assembly. Refer toMTC-103, "
HEATER&COOLING UNIT ASSEM-
BLY".
3. Disconnect the defroster door motor electrical connector.
4. Remove the three screws and remove the defroster door motor.
INSTALLATION
Installation is in the reverse order of removal.
MJIB0249E
1. Heater and cooling unit assembly 2. Intake door motor 3. Air mix door motor
4. Blower motor resistor 5. Mode door motor 6. Defroster door motor
Page 2496 of 3171
INTAKE DOOR MOTOR
MTC-109
C
D
E
F
G
H
I
K
L
MA
B
MTC
INTAKE DOOR MOTORPFP:27730
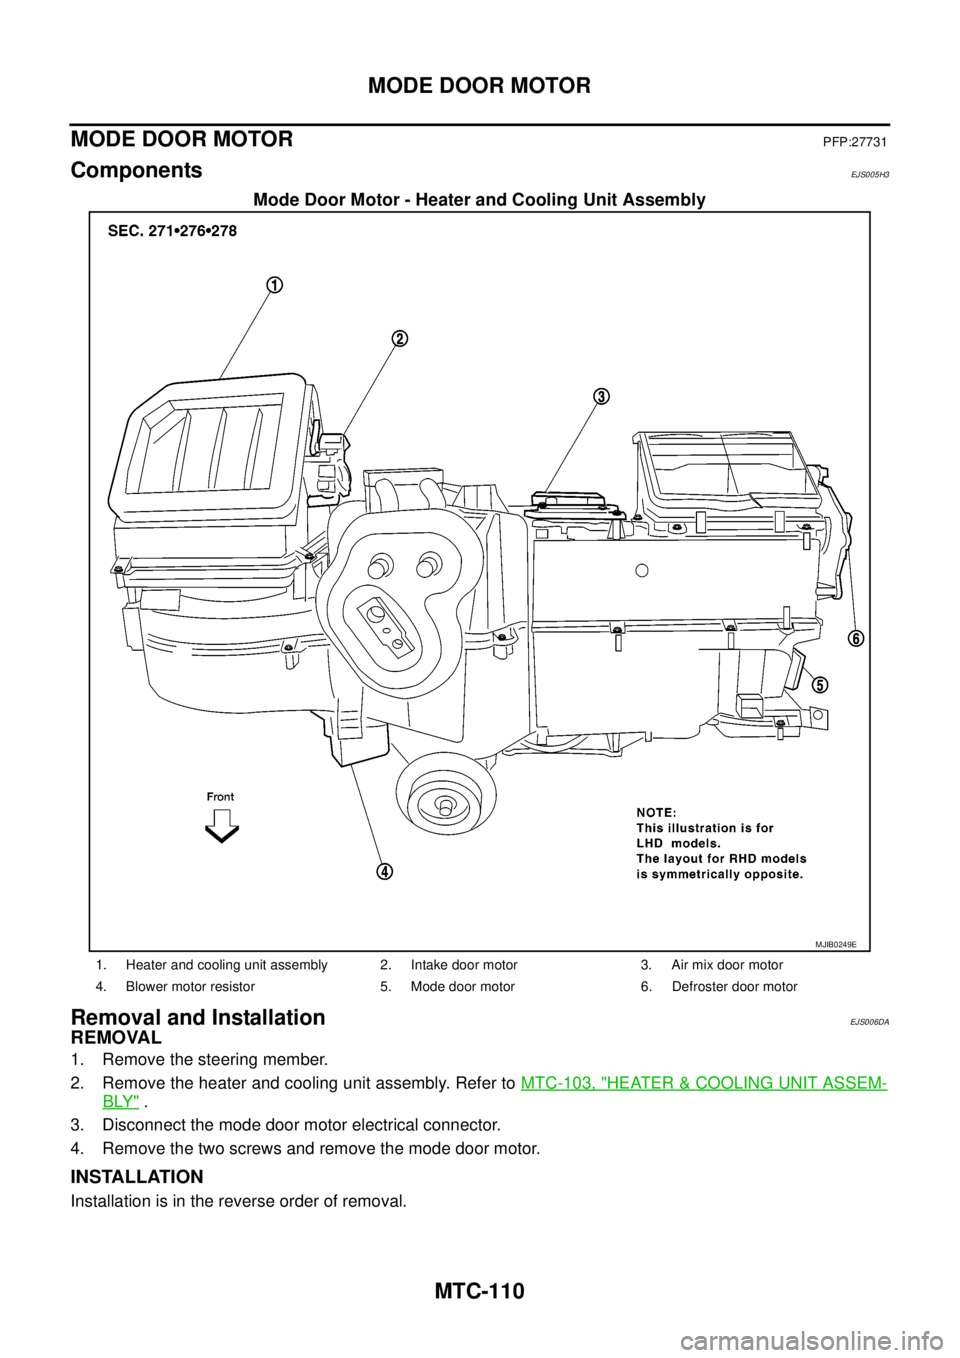
ComponentsEJS005H2
Intake Door Motor - Heater and Cooling Unit Assembly
Removal and InstallationEJS006D9
REMOVAL
1. Remove the steering member.
2. Remove the heater and cooling unit assembly. Refer toMTC-103, "
HEATER&COOLING UNIT ASSEM-
BLY".
3. Disconnect the intake door motor electrical connector.
4. Remove the three screws and remove the intake door motor.
INSTALLATION
Installation is in the reverse order of removal.
MJIB0249E
1. Heater and cooling unit assembly 2. Intake door motor 3. Air mix door motor
4. Blower motor resistor 5. Mode door motor 6. Defroster door motor
Page 2497 of 3171
MTC-110
MODE DOOR MOTOR
MODE DOOR MOTOR
PFP:27731
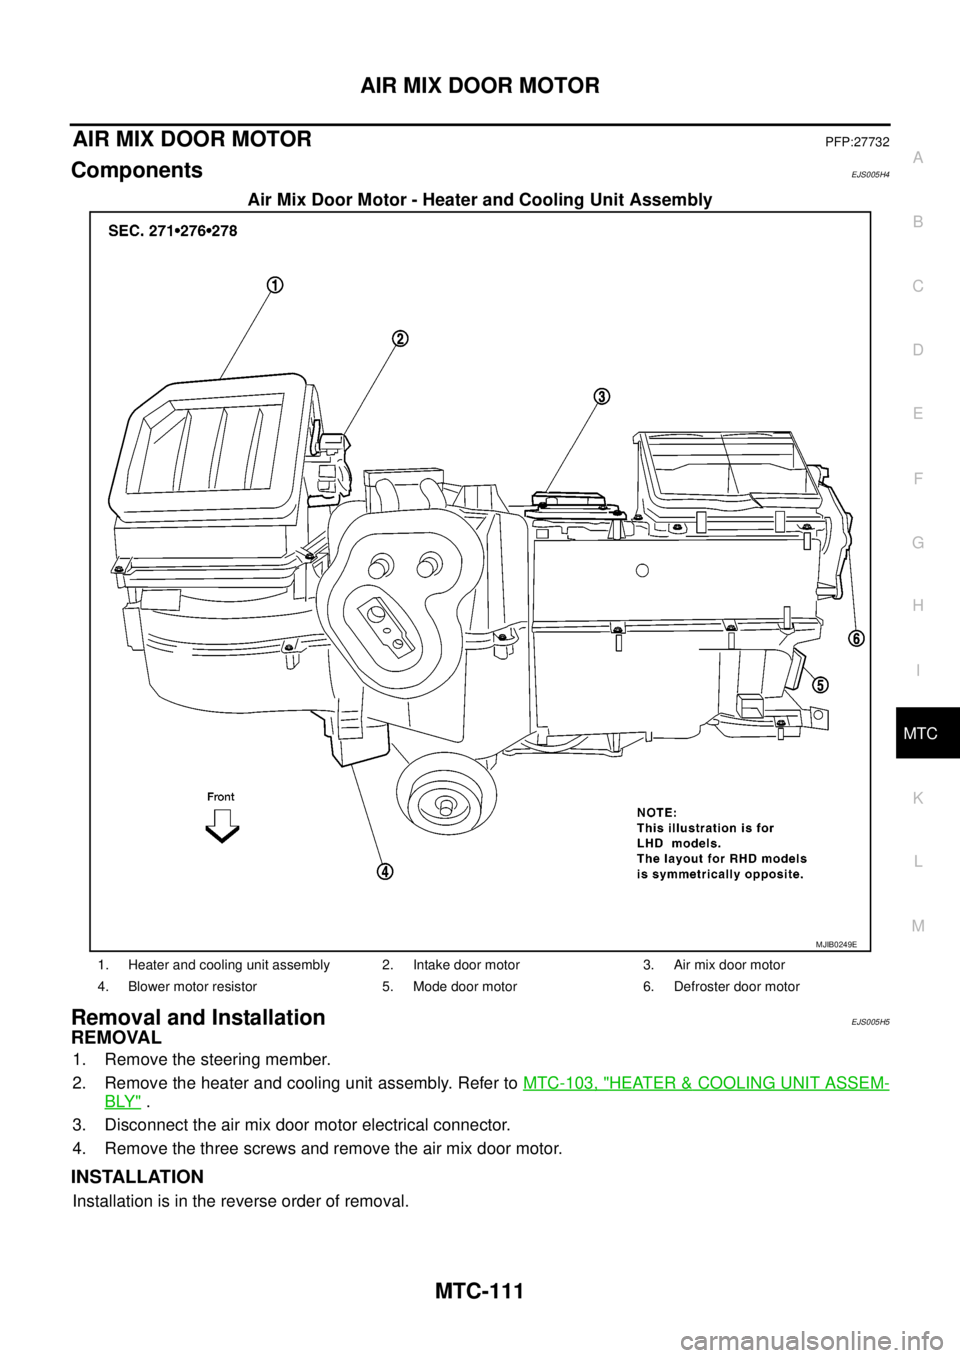
ComponentsEJS005H3
Mode Door Motor - Heater and Cooling Unit Assembly
Removal and InstallationEJS006DA
REMOVAL
1. Remove the steering member.
2. Remove the heater and cooling unit assembly. Refer toMTC-103, "
HEATER&COOLING UNIT ASSEM-
BLY".
3. Disconnect the mode door motor electrical connector.
4. Remove the two screws and remove the mode door motor.
INSTALLATION
Installation is in the reverse order of removal.
MJIB0249E
1. Heater and cooling unit assembly 2. Intake door motor 3. Air mix door motor
4. Blower motor resistor 5. Mode door motor 6. Defroster door motor
Page 2498 of 3171
AIR MIX DOOR MOTOR
MTC-111
C
D
E
F
G
H
I
K
L
MA
B
MTC
AIR MIX DOOR MOTORPFP:27732
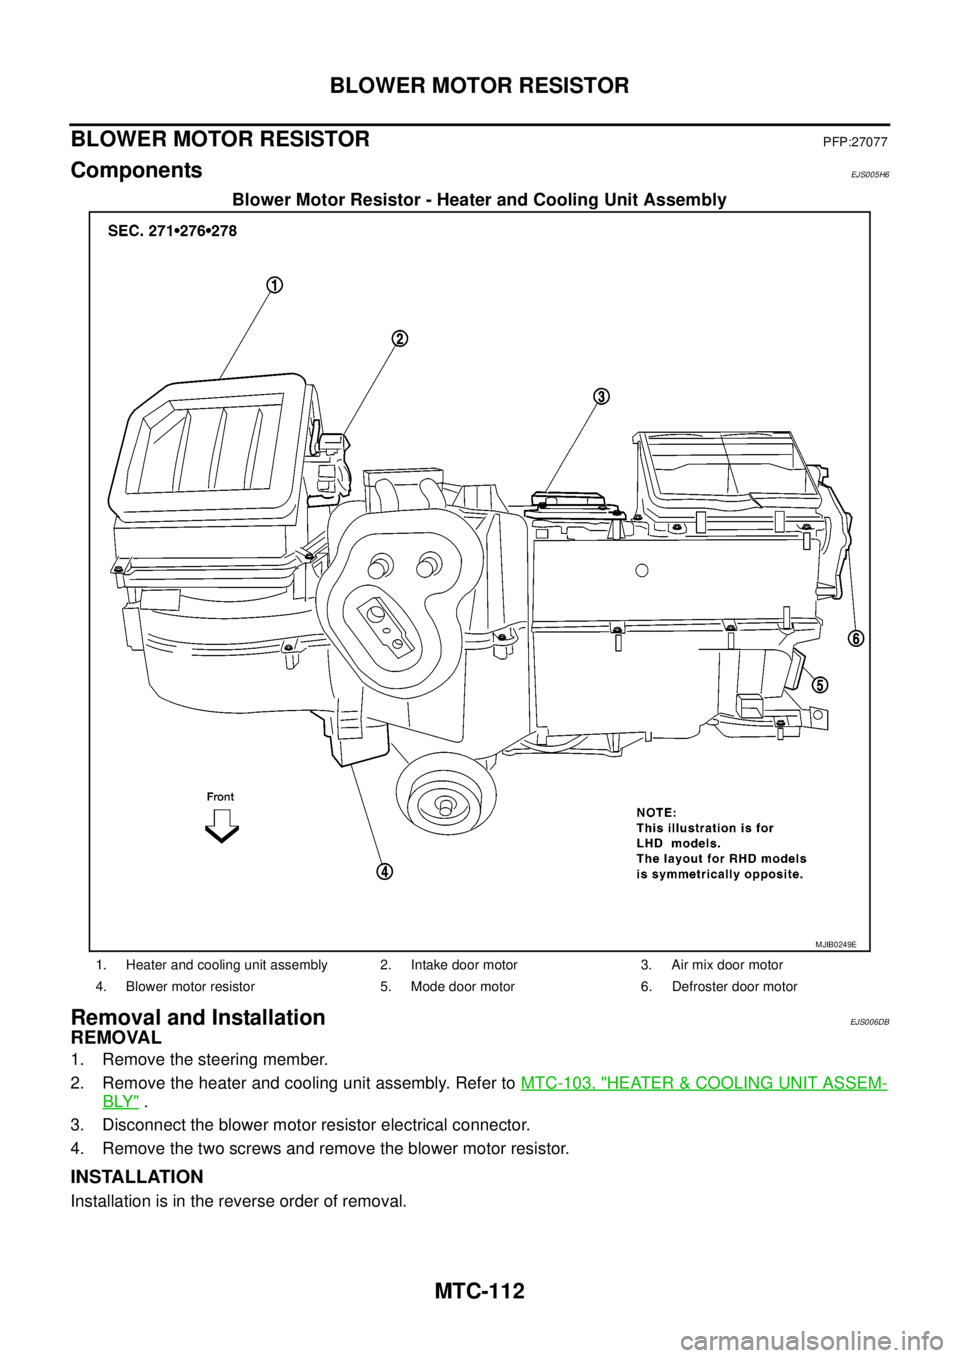
ComponentsEJS005H4
Air Mix Door Motor - Heater and Cooling Unit Assembly
Removal and InstallationEJS005H5
REMOVAL
1. Remove the steering member.
2. Remove the heater and cooling unit assembly. Refer toMTC-103, "
HEATER&COOLING UNIT ASSEM-
BLY".
3. Disconnect the air mix door motor electrical connector.
4. Remove the three screws and remove the air mix door motor.
INSTALLATION
Installation is in the reverse order of removal.
MJIB0249E
1. Heater and cooling unit assembly 2. Intake door motor 3. Air mix door motor
4. Blower motor resistor 5. Mode door motor 6. Defroster door motor
Page 2499 of 3171
MTC-112
BLOWER MOTOR RESISTOR
BLOWER MOTOR RESISTOR
PFP:27077
ComponentsEJS005H6
Blower Motor Resistor - Heater and Cooling Unit Assembly
Removal and InstallationEJS006DB
REMOVAL
1. Remove the steering member.
2. Remove the heater and cooling unit assembly. Refer toMTC-103, "
HEATER&COOLING UNIT ASSEM-
BLY".
3. Disconnect the blower motor resistor electrical connector.
4. Remove the two screws and remove the blower motor resistor.
INSTALLATION
Installation is in the reverse order of removal.
MJIB0249E
1. Heater and cooling unit assembly 2. Intake door motor 3. Air mix door motor
4. Blower motor resistor 5. Mode door motor 6. Defroster door motor
Page 2500 of 3171
DUCTS AND GRILLES
MTC-113
C
D
E
F
G
H
I
K
L
MA
B
MTC
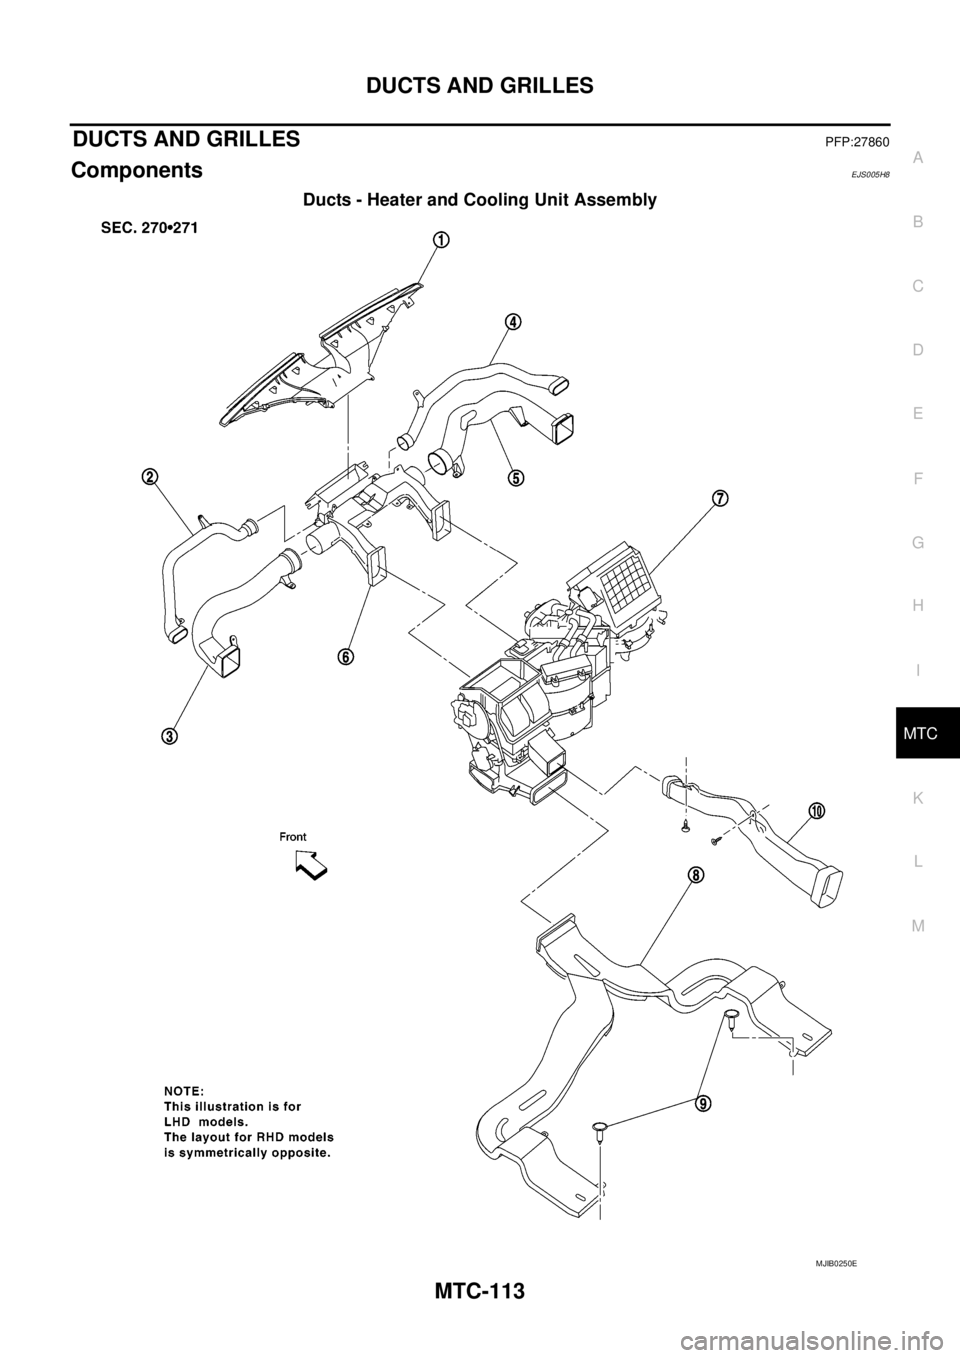
DUCTS AND GRILLESPFP:27860
ComponentsEJS005H8
Ducts - Heater and Cooling Unit Assembly
MJIB0250E
Trending: fold seats, service schedule, oil level, battery capacity, fuel type, Timing marks, U1000
