NISSAN NAVARA 2005 Repair Workshop Manual
Manufacturer: NISSAN, Model Year: 2005, Model line: NAVARA, Model: NISSAN NAVARA 2005Pages: 3171, PDF Size: 49.59 MB
Page 911 of 3171
DI-1
DRIVER INFORMATION SYSTEM
K ELECTRICAL
CONTENTS
C
D
E
F
G
H
I
J
L
M
SECTIONDI
A
B
DI
DRIVER INFORMATION SYSTEM
PRECAUTION ............................................................ 3
Precautions for Supplemental Restraint System
(SRS)“AIRBAG”and“SEATBELTPRE-TEN-
SIONER” .................................................................. 3
Wiring Diagrams and Trouble Diagnosis .................. 3
COMBINATION METERS ........................................... 4
System Description .................................................. 4
UNIFIED METER CONTROL UNIT ...................... 4
POWER SUPPLY AND GROUND CIRCUIT ........ 4
SPEEDOMETER ................................................... 4
TACHOMETER ..................................................... 4
WATER TEMPERATURE GAUGE ........................ 4
FUEL GAUGE ....................................................... 5
ODO/TRIP METER ............................................... 5
TRIP COMPUTER ................................................ 5
ENGINE OIL MAINTENANCE INFORMATION..... 6
METER ILLUMINATION CONTROL ..................... 6
CLOCK .................................................................. 6
AMBIENT AIR TEMPERATURE INDICATION ...... 6
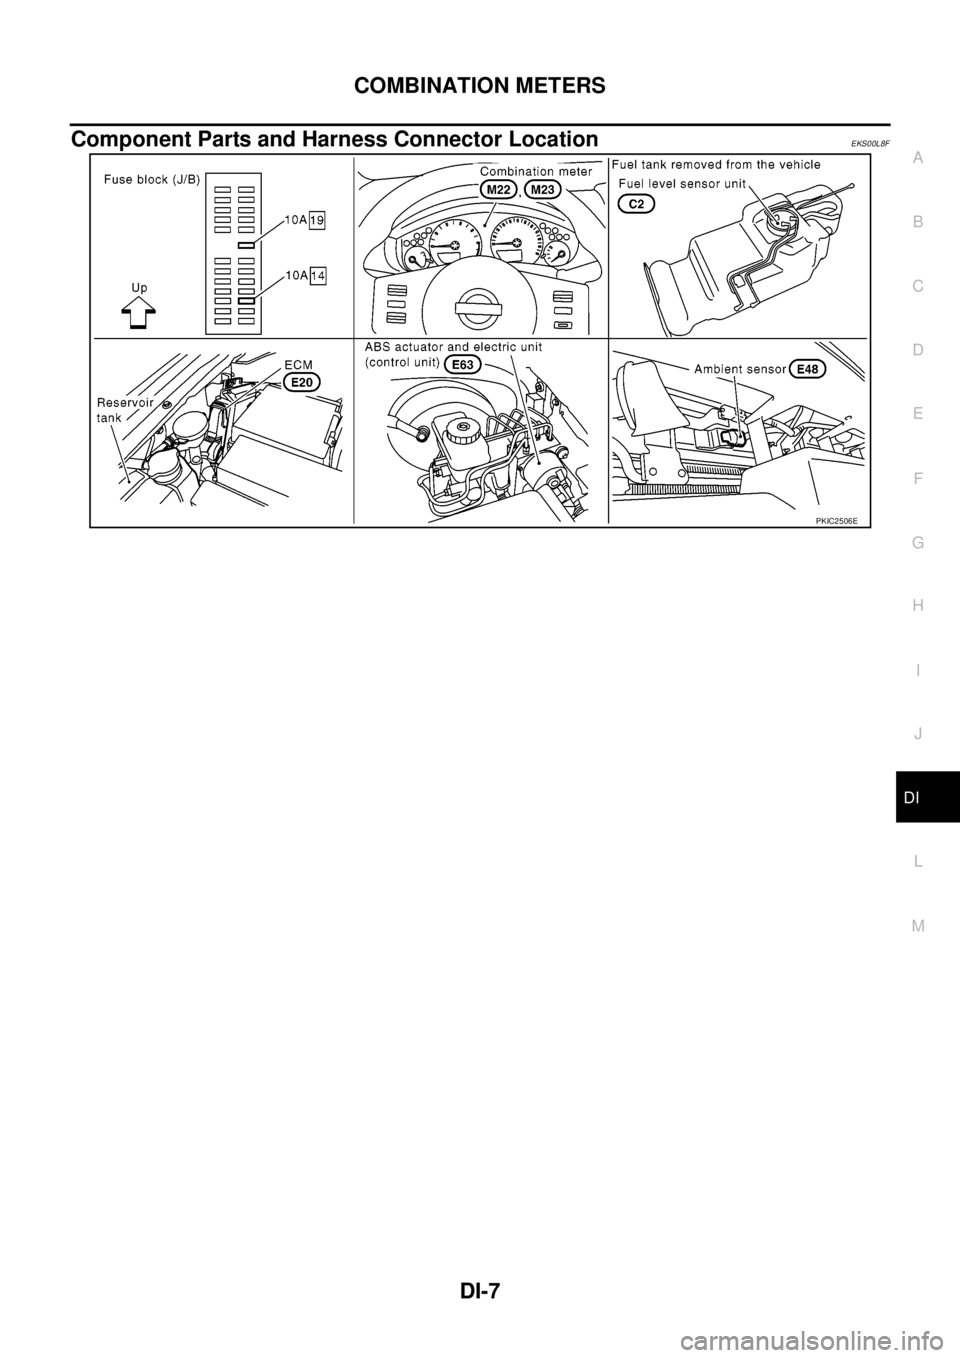
Component Parts and Harness Connector Location..... 7
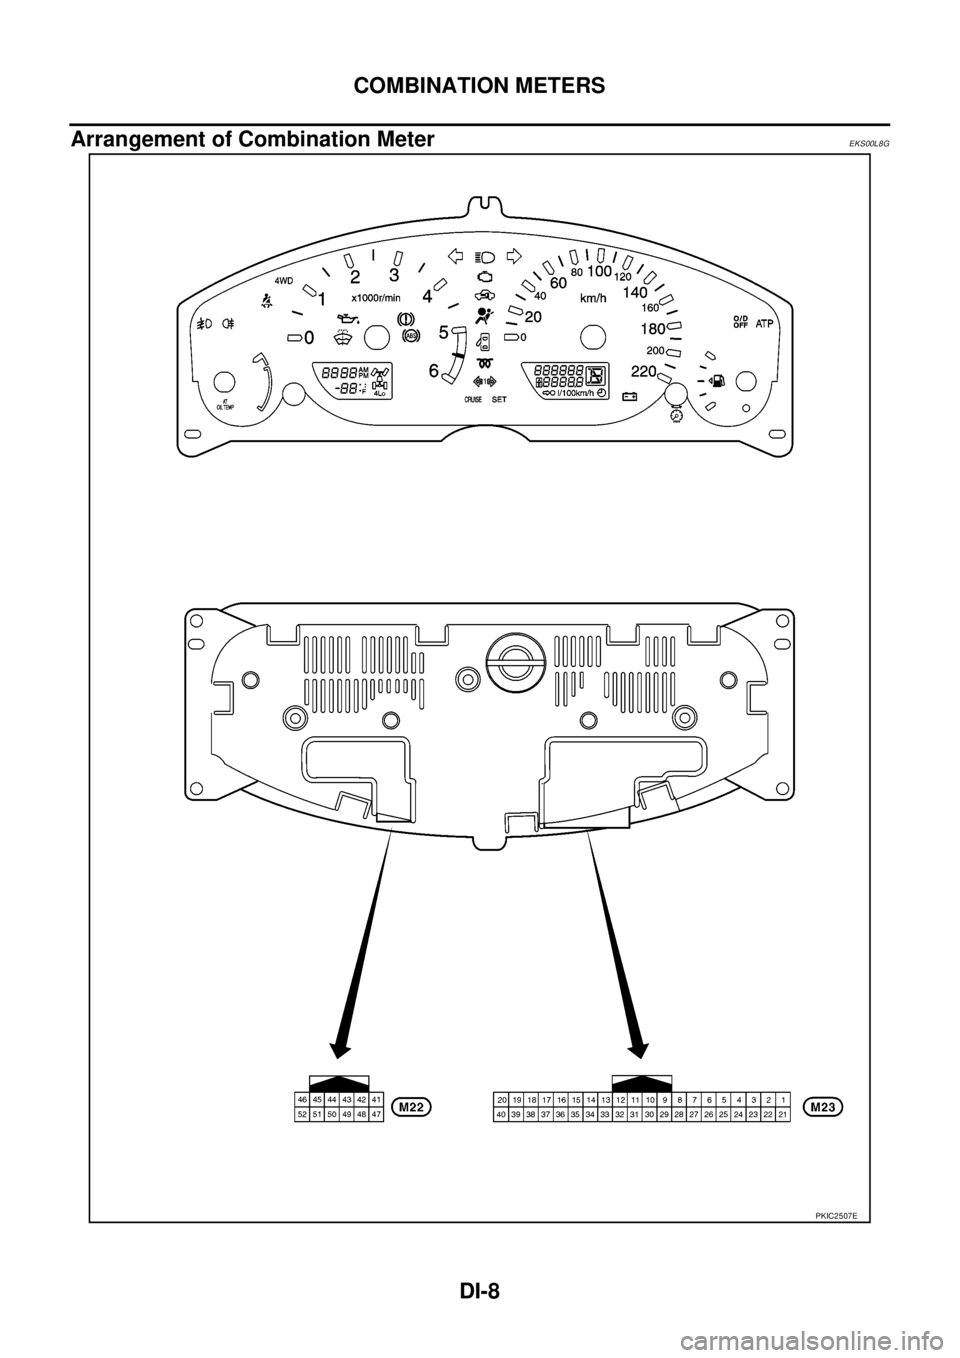
Arrangement of Combination Meter ......................... 8
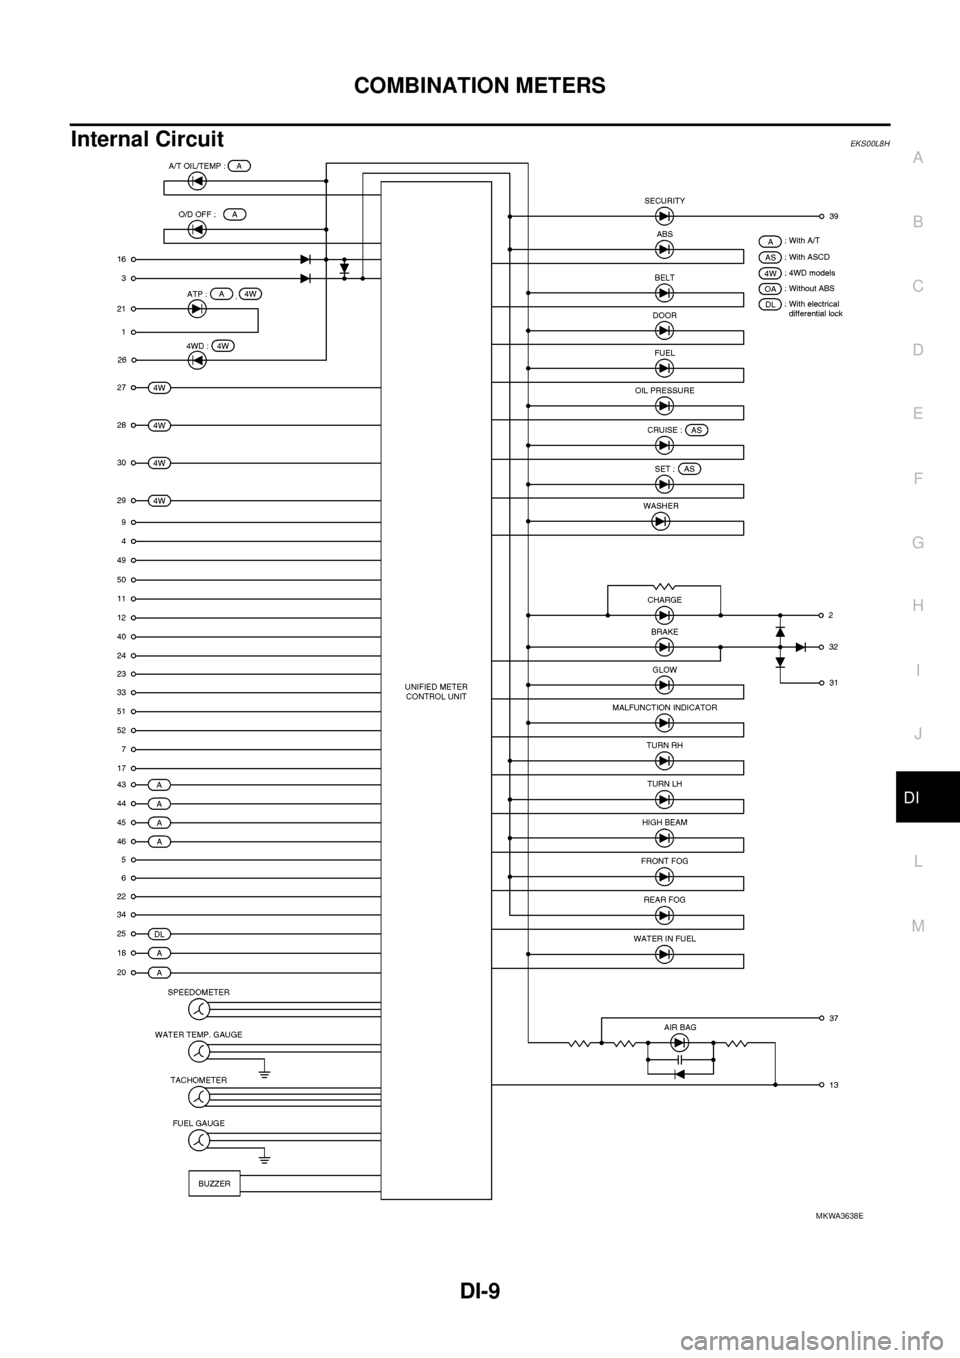
Internal Circuit .......................................................... 9
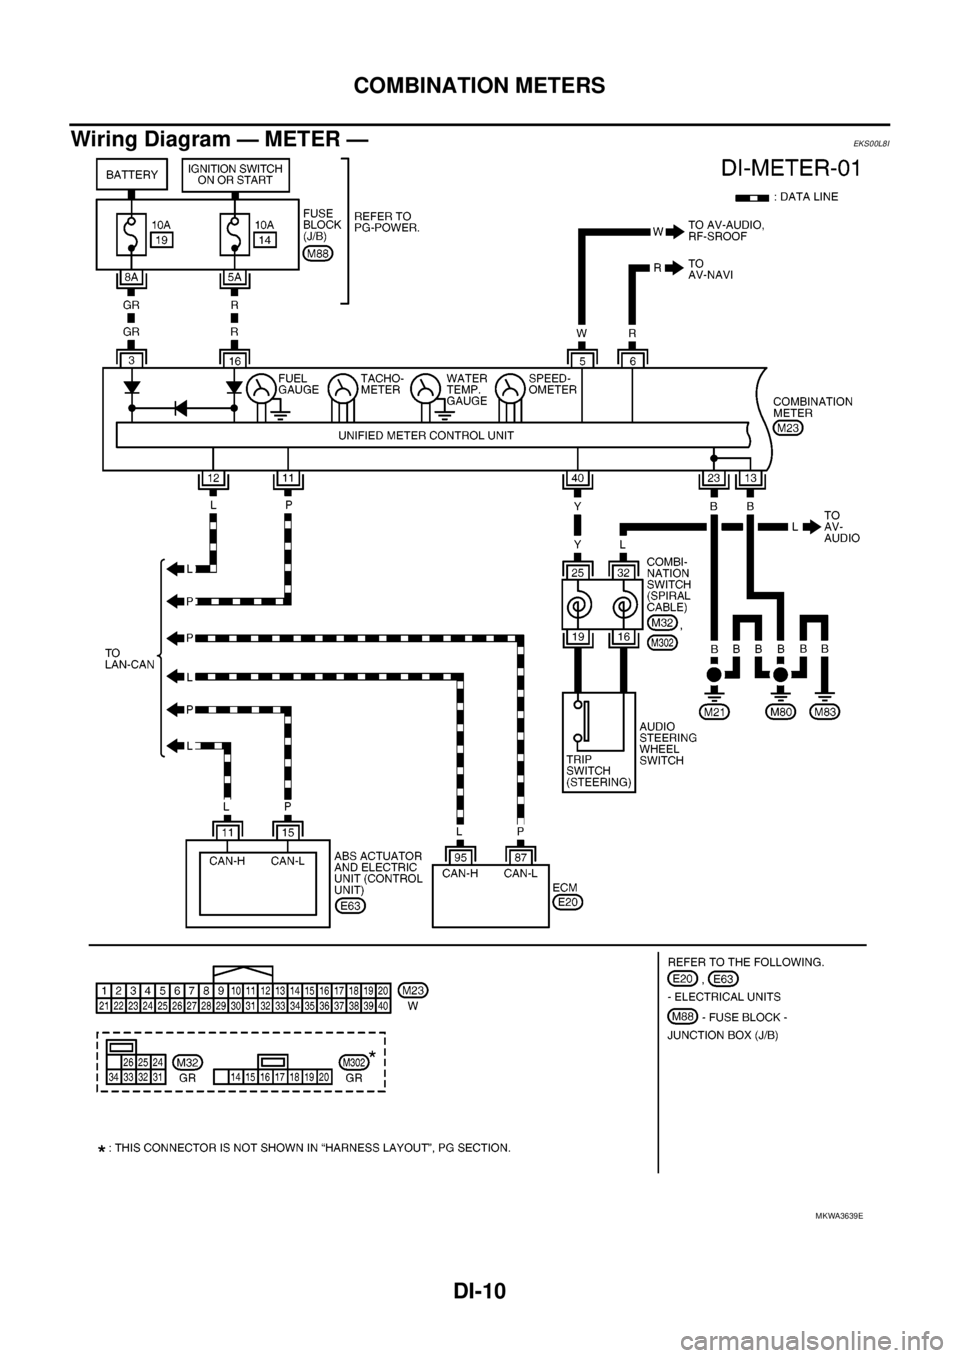
Wiring Diagram — METER — ................................ 10
Terminals and Reference Value for Combination
Meter ...................................................................... 12
Self-Diagnosis Mode of Combination Meter ........... 13
FUNCTION .......................................................... 13
OPERATION PROCEDURE ............................... 13
TEST ITEM ......................................................... 13
CONSULT-II Function (METER) ............................. 15
CONSULT-II BASIC OPERATION ....................... 15
SELF-DIAG RESULTS ........................................ 16
DATA MONITOR ................................................. 17
Trouble Diagnosis .................................................. 18
HOW TO PERFORM TROUBLE DIAGNOSIS ... 18
PRELIMINARY CHECK ...................................... 19
Symptom Chart ...................................................... 19
Power Supply and Ground Circuit Inspection ........ 19
Vehicle Speed Signal Inspection ............................ 20
Engine Speed Signal Inspection ............................ 21Engine Coolant Temperature Signal Inspection ..... 21
Fuel Level Sensor Signal Inspection ...................... 22
Ambient Sensor Signal Inspection .......................... 24
Fuel Gauge Fluctuates, Indicates Wrong Value, or
Varies ...................................................................... 25
Fuel Gauge Does Not Move to Full position ........... 25
DTC [U1000] CAN Communication Circuit ............. 26
DTC [B2205] Vehicle Speed Circuit ........................ 26
Electrical Components Inspection .......................... 27
FUEL LEVEL SENSOR UNIT CHECK ................ 27
AMBIENT SENSOR CHECK ............................... 27
Removal and Installation of Combination Meter ..... 27
WARNING LAMPS .................................................... 28
System Description ................................................. 28
OIL PRESSURE WARNING LAMP ..................... 28
Component Parts and Harness Connector Location... 28
Schematic ............................................................... 29
Wiring Diagram — WARN — .................................. 30
A/T MODELS ....................................................... 30
M/T MODELS ...................................................... 37
Oil Pressure Warning Lamp Stays Off (Ignition
Switch ON) ............................................................. 44
Oil Pressure Warning Lamp Does Not Turn Off (Oil
Pressure Is Normal) ................................................ 45
Oil Pressure Warning Lamp Keeps Blinking (Oil
Level Is Normal) ..................................................... 46
Component Inspection ............................................ 47
OIL PRESSURE SWITCH ................................... 47
OIL LEVEL SENSOR .......................................... 47
A/T INDICATOR ........................................................ 48
System Description ................................................. 48
Wiring Diagram — AT/IND — ................................. 49
A/T Indicator Does Not Illuminate ........................... 50
WARNING CHIME ..................................................... 51
System Description ................................................. 51
POWER SUPPLY AND GROUND CIRCUIT ....... 51
LIGHT WARNING CHIME ................................... 51
KEY REMINDER WARNING CHIME .................. 51
LOW-FUEL WARNING CHIME ........................... 51
SEAT BELT WARNING CHIME ........................... 52
Page 912 of 3171

DI-2
Component Parts and Harness Connector Location... 52
Wiring Diagram — CHIME — ................................. 53
LHD MODELS ..................................................... 53
RHD MODELS ..................................................... 55
Terminals and Reference Value for BCM ................ 57
Terminals and Reference Value for Combination
Meter ...................................................................... 57
CONSULT-II Function (BCM) .................................. 58
DIAGNOSTIC ITEMS DESCRIPTION ................. 58
CONSULT-II BASIC OPERATION PROCEDURE
... 58
DATA MONITOR .................................................. 59
ACTIVE TEST ..................................................... 59
SELF-DIAG RESULTS ........................................ 60
Trouble Diagnosis ................................................... 60
HOW TO PERFORM TROUBLE DIAGNOSIS .... 60
PRELIMINARY INSPECTION ............................. 60
SYMPTOM CHART ............................................. 61
Meter Buzzer Circuit Inspection .............................. 61Lighting Switch Signal Inspection ........................... 62
Front Door Switch (Driver Side) Signal Inspection... 62
Seat Belt Buckle Switch Signal Inspection (Driver
Side) ........................................................................ 63
Electrical Component Inspection ............................ 64
FRONT DOOR SWITCH (DRIVER SIDE) ........... 64
SEAT BELT BUCKLE SWITCH (DRIVER SIDE)... 64
CAN COMMUNICATION ........................................... 65
System Description ................................................. 65
CAN Communication Unit ....................................... 65
COMPASS ................................................................. 66
System Description ................................................. 66
DIRECTION DISPLAY ......................................... 66
Zone Variation Change Procedure .......................... 66
Correction Functions of the Compass Display ........ 67
AUTOMATIC CORRECTION ............................... 67
MANUAL CORRECTION PROCEDURE ............. 67
Wiring Diagram — COMPAS — .............................. 68
Removal and Installation of Compass ..................... 69
Page 913 of 3171
PRECAUTION
DI-3
C
D
E
F
G
H
I
J
L
MA
B
DI
PRECAUTIONPFP:00011
Precautions for Supplemental Restraint System (SRS) “AIR BAG” and “SEAT
BELT PRE-TENSIONER”
EKS00N1V
The Supplemental Restraint System such as “AIR BAG” and “SEAT BELT PRE-TENSIONER”, used along
with a front seat belt, helps to reduce the risk or severity of injury to the driver and front passenger for certain
types of collision. Information necessary to service the system safely is included in the SRS and SB section of
this Service Manual.
WARNING:
lTo avoid rendering the SRS inoperative, which could increase the risk of personal injury or death
in the event of a collision which would result in air bag inflation, all maintenance must be per-
formed by an authorized NISSAN/INFINITI dealer.
lImproper maintenance, including incorrect removal and installation of the SRS, can lead to per-
sonal injury caused by unintentional activation of the system. For removal of Spiral Cable and Air
Bag Module, see the SRS section.
lDo not use electrical test equipment on any circuit related to the SRS unless instructed to in this
Service Manual. SRS wiring harnesses can be identified by yellow and/or orange harnesses or
harness connectors.
Wiring Diagrams and Trouble DiagnosisEKS00L8C
When reading wiring diagrams, refer to the following:
lGI-15, "How to Read Wiring Diagrams"
lPG-4, "POWER SUPPLY ROUTING CIRCUIT"for power distribution circuit
When performing trouble diagnosis, refer to the following:
lGI-11, "HOW TO FOLLOW TEST GROUPS IN TROUBLE DIAGNOSES"
lGI-24, "How to Perform Efficient Diagnosis for an Electrical Incident"
Page 914 of 3171

DI-4
COMBINATION METERS
COMBINATION METERS
PFP:24814
System DescriptionEKS00L8E
UNIFIED METER CONTROL UNIT
lSpeedometer, odo/trip meter, tachometer, fuel gauge and water temperature gauge are controlled by the
unified meter control unit, which is built into the combination meter.
lWarning lamp and indicator lamp are controlled by signals drawn from each unit with CAN communication
and components connected directly to the combination meter.
lOdo/trip meter display is included in the combination meter, which displays odometer, trip-meter, vehicle
information (trip computer, engine oil maintenance information)
*and A/T position*.
*: Vehicles with each system only.
lClock display is included in the combination meter, which displays current time, ambient air temperature*
and 4WD indicator*.
*: Vehicles with each system only.
lUnified meter control unit corresponds a CONSULT-II function (self-diagnosis results and data monitor).
lThe following items can be checked during self-diagnosis mode.
–Sweep of gauges pointer
–Present gauge values
–Odo/trip meter display and clock display segments
–Condition of warning lamps/indicator lamps controlled by unified meter control unit
–Battery voltage
–Driver's seat belt buckle switch status
–CPU status of unified meter control unit
POWER SUPPLY AND GROUND CIRCUIT
Power is supplied at all times
lthrough 10A fuse [No.19, located in the fuse block (J/B)]
lto combination meter terminal 3.
With the ignition switch in the ON or START position, power is supplied
lthrough 10A fuse [No.14, located in the fuse block (J/B)]
lto combination meter terminal 16.
Ground is supplied
lto combination meter terminals 13 and 23
lthrough grounds M21, M80 and M83.
SPEEDOMETER
The speedometer indicates the vehicle speed.
lABS actuator and electric unit (control unit) converses a pulse signal from wheel sensor to vehicle speed
signal, and transmits vehicle speed signal to combination meter with CAN communication.
lCombination meter converses the vehicle speed signal to angle signal, and commands to speedometer.
TACHOMETER
The tachometer indicates engine speed in revolutions per minute (rpm).
lECM converses a signal from crank position sensor to engine speed signal, and transmits to combination
meter with CAN communication.
lCombination meter converses the engine speed signal to angle signal, and commands to tachometer.
WATER TEMPERATURE GAUGE
The water temperature gauge indicates the engine coolant temperature.
lECM converses a signal from water temperature sensor to engine coolant temperature signal, and trans-
mits to combination meter with CAN communication.
lCombination meter converses the engine coolant temperature signal to angle signal, and commands to
water temperature gauge.
Page 915 of 3171
COMBINATION METERS
DI-5
C
D
E
F
G
H
I
J
L
MA
B
DI
FUEL GAUGE
The fuel gauge indicates the approximate fuel level in the fuel tank.
Combination meter reads a resistor signal from fuel level sensor unit.
Signal is supplied
lto combination meter terminal 9
lthrough fuel level sensor unit terminal 1 and 2
lfrom combination meter terminal 4.
ODO/TRIP METER
lABS actuator and electric unit (control unit) converses a pulse signal from wheel sensor to vehicle speed
signal, and transmits vehicle speed signal to combination meter with CAN communication.
lCombination meter uses the vehicle speed signal to calculate the mileage, and it displays.
How to Change/ Reset Indication
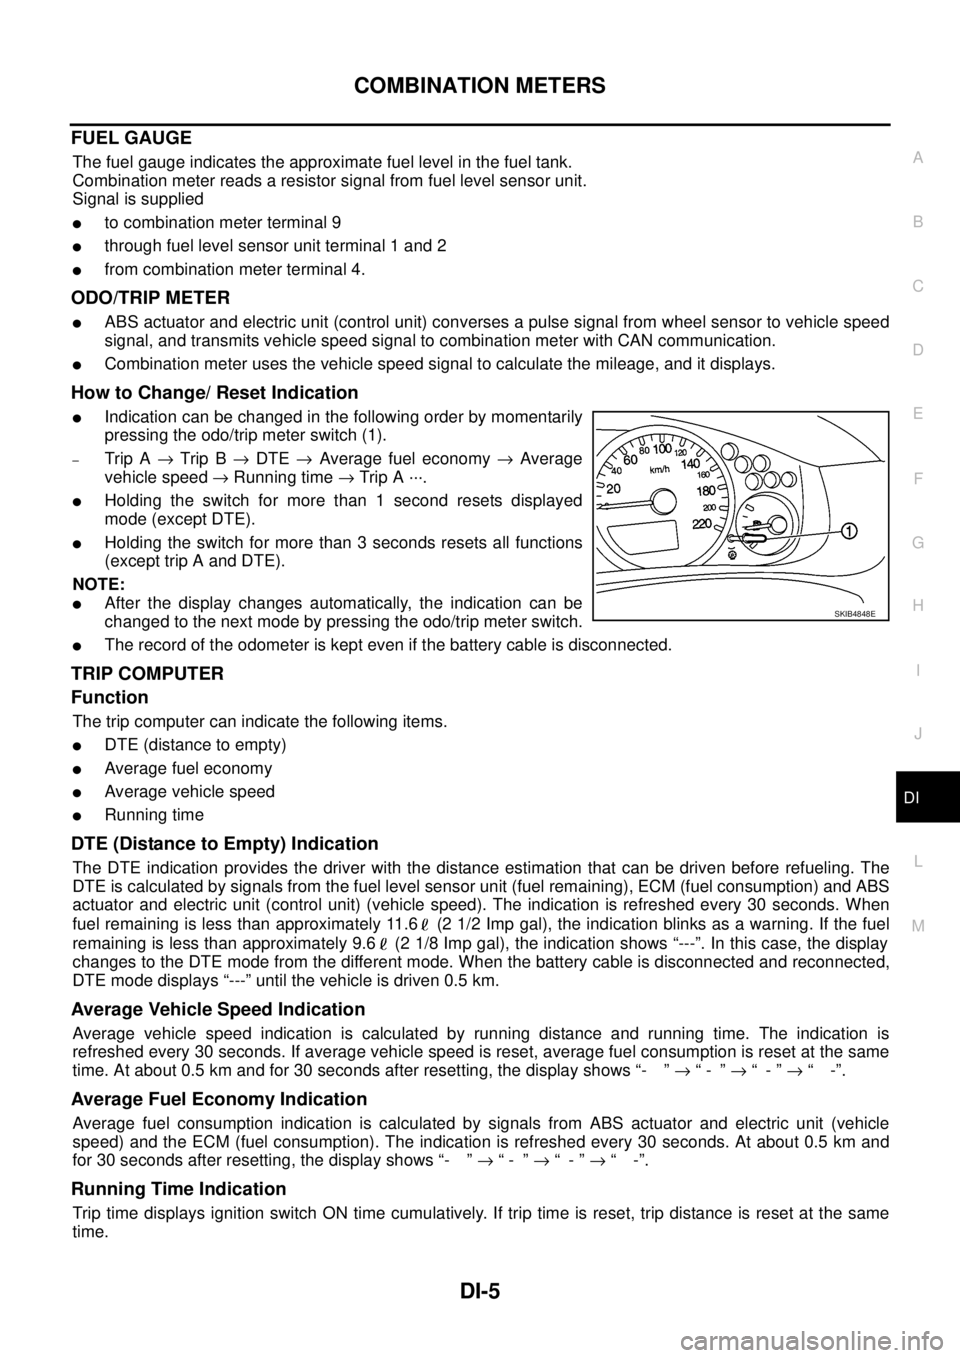
lIndication can be changed in the following order by momentarily
pressing the odo/trip meter switch (1).
–Trip A®Trip B®DTE®Average fuel economy®Average
vehicle speed®Running time®Trip A ···.
lHolding the switch for more than 1 second resets displayed
mode (except DTE).
lHolding the switch for more than 3 seconds resets all functions
(except trip A and DTE).
NOTE:
lAfter the display changes automatically, the indication can be
changed to the next mode by pressing the odo/trip meter switch.
lThe record of the odometer is kept even if the battery cable is disconnected.
TRIP COMPUTER
Function
The trip computer can indicate the following items.
lDTE (distance to empty)
lAverage fuel economy
lAverage vehicle speed
lRunning time
DTE (Distance to Empty) Indication
The DTE indication provides the driver with the distance estimation that can be driven before refueling. The
DTE is calculated by signals from the fuel level sensor unit (fuel remaining), ECM (fuel consumption) and ABS
actuator and electric unit (control unit) (vehicle speed). The indication is refreshed every 30 seconds. When
fuel remaining is less than approximately 11.6 (2 1/2 Imp gal), the indication blinks as a warning. If the fuel
remaining is less than approximately 9.6 (2 1/8 Imp gal), the indication shows “---”. In this case, the display
changes to the DTE mode from the different mode. When the battery cable is disconnected and reconnected,
DTE mode displays “---” until the vehicle is driven 0.5 km.
Average Vehicle Speed Indication
Average vehicle speed indication is calculated by running distance and running time. The indication is
refreshed every 30 seconds. If average vehicle speed is reset, average fuel consumption is reset at the same
time. At about 0.5 km and for 30 seconds after resetting, the display shows “- ”®“- ”®“-”®“ -”.
Average Fuel Economy Indication
Average fuel consumption indication is calculated by signals from ABS actuator and electric unit (vehicle
speed) and the ECM (fuel consumption). The indication is refreshed every 30 seconds. At about 0.5 km and
for 30 seconds after resetting, the display shows “- ”®“- ”®“-”®“ -”.
Running Time Indication
Trip time displays ignition switch ON time cumulatively. If trip time is reset, trip distance is reset at the same
time.
SKIB4848E
Page 916 of 3171
DI-6
COMBINATION METERS
ENGINE OIL MAINTENANCE INFORMATION
lEngine oil maintenance information displays maintenance intervals of engine oil.
lWith ignition switch ON position, engine oil maintenance information is displayed on odo/trip meter display
for 5 seconds.
NOTE:
Refer to Owner's Manual for setting.
METER ILLUMINATION CONTROL
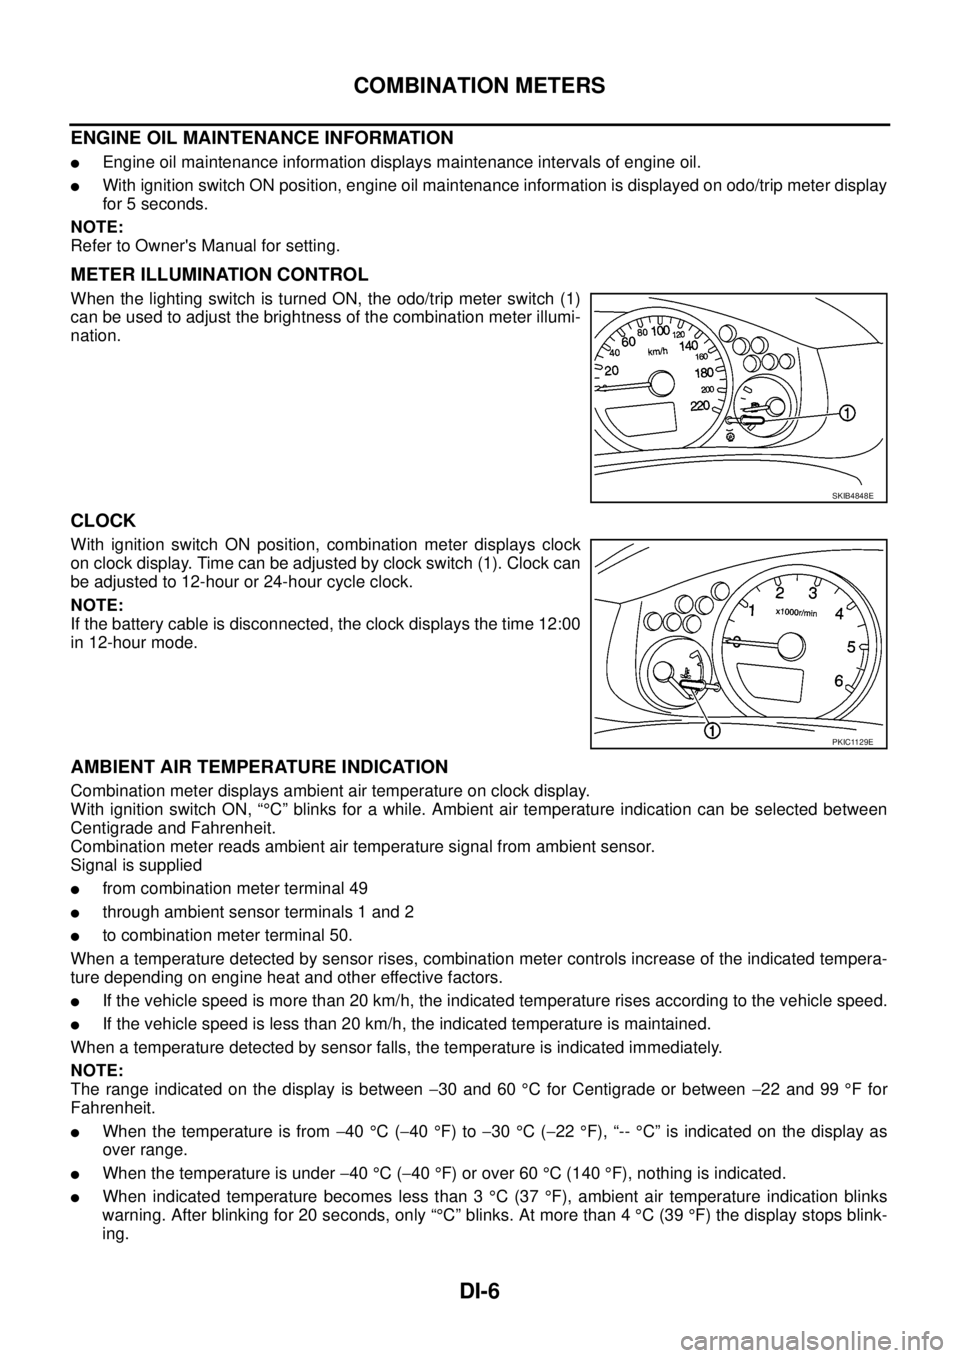
When the lighting switch is turned ON, the odo/trip meter switch (1)
can be used to adjust the brightness of the combination meter illumi-
nation.
CLOCK
With ignition switch ON position, combination meter displays clock
on clock display. Time can be adjusted by clock switch (1). Clock can
be adjusted to 12-hour or 24-hour cycle clock.
NOTE:
If the battery cable is disconnected, the clock displays the time 12:00
in 12-hour mode.
AMBIENT AIR TEMPERATURE INDICATION
Combination meter displays ambient air temperature on clock display.
With ignition switch ON, “°C” blinks for a while. Ambient air temperature indication can be selected between
Centigrade and Fahrenheit.
Combination meter reads ambient air temperature signal from ambient sensor.
Signal is supplied
lfrom combination meter terminal 49
lthrough ambient sensor terminals 1 and 2
lto combination meter terminal 50.
When a temperature detected by sensor rises, combination meter controls increase of the indicated tempera-
ture depending on engine heat and other effective factors.
lIf the vehicle speed is more than 20 km/h, the indicated temperature rises according to the vehicle speed.
lIf the vehicle speed is less than 20 km/h, the indicated temperature is maintained.
When a temperature detected by sensor falls, the temperature is indicated immediately.
NOTE:
The range indicated on the display is between-30 and 60°C for Centigrade or between-22 and 99°Ffor
Fahrenheit.
lWhen the temperature is from-40°C(-40°F) to-30°C(-22°F), “--°C” is indicated on the display as
over range.
lWhen the temperature is under-40°C(-40°F) or over 60°C(140°F), nothing is indicated.
lWhen indicated temperature becomes less than 3°C(37°F), ambient air temperature indication blinks
warning. After blinking for 20 seconds, only “°C” blinks. At more than 4°C(39°F) the display stops blink-
ing.
SKIB4848E
PKIC1129E
Page 917 of 3171
COMBINATION METERS
DI-7
C
D
E
F
G
H
I
J
L
MA
B
DI
Component Parts and Harness Connector LocationEKS00L8F
PKIC2506E
Page 918 of 3171
DI-8
COMBINATION METERS
Arrangement of Combination Meter
EKS00L8G
PKIC2507E
Page 919 of 3171
COMBINATION METERS
DI-9
C
D
E
F
G
H
I
J
L
MA
B
DI
Internal CircuitEKS00L8H
MKWA3638E
Page 920 of 3171
DI-10
COMBINATION METERS
Wiring Diagram — METER —
EKS00L8I
MKWA3639E